> ## Documentation Index
> Fetch the complete documentation index at: https://buttercms.com/docs/llms.txt
> Use this file to discover all available pages before exploring further.
# Single sign-on (SSO)
> Learn how to set up and manage Single Sign-On (SSO) for your ButterCMS organization using your identity provider.
**Single sign-on (SSO)** is an authentication scheme that allows a user to log in with a single ID to any of several related, yet independent, software systems.
SSO is available on ButterCMS Enterprise plans only. If your team is interested in enabling this feature for your account, please reach out via in-app chat or contact our [Sales Team](https://buttercms.com/sales/).
## SSO benefits for enterprise
| Benefit | Description |
| ---------------------------- | -------------------------------------------------- |
| **Centralized access** | Manage all user access from your identity provider |
| **Enhanced security** | Leverage your existing security policies |
| **Simplified onboarding** | Users authenticate with existing credentials |
| **Automatic deprovisioning** | Disable access instantly when employees leave |
| **Compliance** | Meet enterprise security requirements |
## Supported identity providers
ButterCMS also supports Heroku login via the [Heroku add-on](./heroku-add-on), which lets you access the ButterCMS dashboard directly from Heroku using SSO — no separate login required.
ButterCMS can integrate with almost any SSO identity provider, such as:
| Provider | Description |
| ---------- | --------------------------------------- |
| Azure AD | Microsoft's enterprise identity service |
| Okta | Universal identity platform |
| OneLogin | Unified access management |
| Salesforce | CRM and identity services |
## Setting up SSO
### Process for setting up single sign-on
1. **Share your SSO Identity provider with us** - Contact our team and let us know which identity provider you use
2. **Provide your IdP metadata** - Share your SSO URL, Entity ID, and X.509 certificate with the ButterCMS team
3. **We'll handle the configuration** - Our team configures SAML and shares service provider metadata back to you
4. **Your IT team completes configuration** - Finish IdP configuration and assign users on your end
5. **Schedule the enablement** - Set a date and time when our team can enable SSO for your organization; test before go-live
To get started with SSO setup, you can send an inquiry directly to our Sales team [here](https://buttercms.com/sales/).
### Required information
When requesting SSO setup, have the following IdP metadata ready:
| Field | Example |
| ----------------- | ------------------------------------------------- |
| **SSO URL** | `https://company.okta.com/sso` |
| **Entity ID** | `https://www.okta.com/saml2/service-provider/...` |
| **Certificate** | PEM-encoded X.509 certificate |
| **Admin contact** | `it-admin@company.com` |
## Important information about SSO
### What changes when SSO is enabled
Once SSO is enabled for an organization, it automatically applies to **all users** within that organization. It's not possible for a select number of users to have SSO while others use password authentication.
When your organization enables SSO:
* **No password login** - Your users are no longer able to log in using their ButterCMS email and password. Instead, they must click the "Login with SSO" button.
* **Password resets through SSO** - Your users will now reset passwords through your SSO identity provider's password flow, not through ButterCMS.
* **Invitations still work** - You can still invite users through the ButterCMS interface. When a user accepts the invite, there's no password field for them to fill in, as their login will be routed through the SSO provider.
{/* SOURCE: file_path="knowledge-base/faqs/understanding-sso-single-sign-on-sso.md" section="Security notes" */}
### Security note on user provisioning
We do not support user auto-provisioning for security reasons. Any users who need access to ButterCMS will need to be added/invited explicitly through the ButterCMS dashboard.
## Logging in with SSO
### How to log in when SSO is enabled
**Step 1:** Go to [buttercms.com](https://buttercms.com) and click on the **Log In** button:

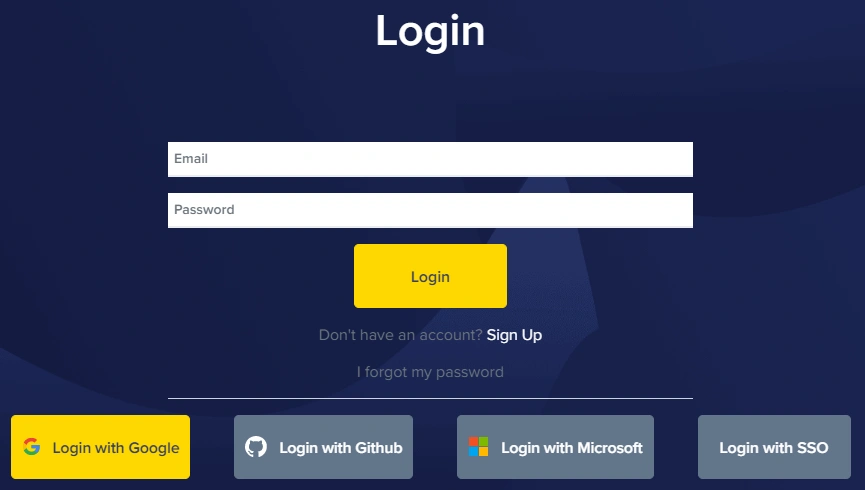
**Step 2:** Click on the **Login with SSO** button:
**Step 3:** Enter your work email address:
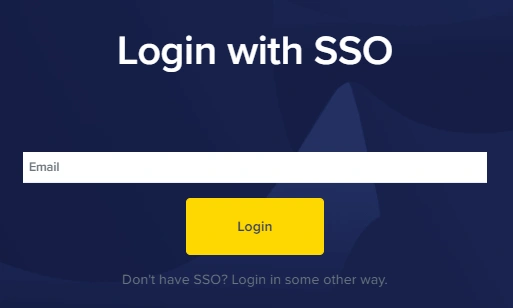
**Step 4:** Click on the **Login** button and you will be taken to the SSO provider your company is using.
**Step 5:** Complete the login process with your SSO provider and you will be taken to your ButterCMS dashboard.
If your company has SSO enabled, you will **not** be able to log in to your ButterCMS dashboard using an email address and password. You must use the **Login with SSO** option.
## Managing SSO users
### Inviting users when SSO is enabled
Adding users when SSO is enabled is the same as the [normal process to add users](../collaborating-with-teams/team-management#adding-team-members), with two important caveats:
1. the user must be added to your SSO identity provider before adding to ButterCMS (as they will be unable to login otherwise); we do not support auto provisioning for security reasons.
2. the email address for the new user must match the corporate email address tied to that person in your SSO Identity Provider
## Deleting SSO users
### What happens when a user is deleted from your identity provider
Deleting an employee from your SSO Identity Provider platform will **not** automatically delete that user from ButterCMS. However, it does prevent that user from logging in to their ButterCMS dashboard.
You can still view the user's profile and [delete the user](../collaborating-with-teams/team-management) from your Butter account if desired.
**Best practice:** When an employee leaves your organization, we recommend:
1. First, remove them from your SSO identity provider (this immediately prevents login)
2. Then, remove them from ButterCMS to keep your user list clean and accurate
## Frequently asked questions
No. Once SSO is enabled for an organization, it applies to all users within that organization. All users must use the SSO login method.
Existing users will no longer be able to log in with their email and password. They will need to use the "Login with SSO" option and authenticate through your identity provider.
No. For security reasons, ButterCMS does not support user auto-provisioning. All users must be explicitly invited through the ButterCMS dashboard.
Password resets are handled through your SSO identity provider, not through ButterCMS. Contact your IT administrator or use your identity provider's password reset process.
No. SSO is an Enterprise-level feature. Contact our [sales team](https://buttercms.com/sales/) to learn more about Enterprise plans.