> ## Documentation Index
> Fetch the complete documentation index at: https://buttercms.com/docs/llms.txt
> Use this file to discover all available pages before exploring further.
# Creating Collection items
> Collections store reusable data that can be referenced across your website. This guide shows you how to add Collections and manage their items.
## Quick references
Check out our core concepts article on Pages, Collections, and the Blog Engine to understand the differences
between these content types and when to use each one.
Take a deep dive into the Collections content type, including features, supported fields, and more.
## Create a Collection
Before you can add items to a Collection, you need to create it.
You must have adequate permissions to create a new Collection.
If you like to learn by doing, check out our [tutorial on building a Collections-based navigation menu](../../../build-your-app/how-to-recipes/add-a-feature/navigation-menus-collections) for an example of how to set up a Collection with multiple nested levels.
There are two ways to create a new Collection.
You can either click ***Content Types*** in the left sidebar, then ***New Content Type***, then ***Collection***, or you can click on the ***Collections*** icon in the left sidebar, then ***New item***, then ***Create new collection***.
Click on a field type in the menu pane that appears to add it to your Collection schema. Give the field a name, slug, and add any necessary configuration options.
For more information on the various field types and the configuration options they offer, such as default values, help text, validation, and more, check out our [core concepts article on fields](../../../core-concepts/field-types/field-basics).
Click the ***Create Collection*** button in the upper-right corner to save the fields to the Collection schema.
Fill in the Collection name. Then, click ***Save as a Collection***. You'll immediately be given the opportunity to add your first item to the Collection.
## Adding items to a Collection
To add items to an existing collection, either:
* Roll over the ***Collections*** button in the left sidebar, and click the grey plus sign next to the Collection you want to add an item to; or
* Click on ***Collections*** in the left sidebar, then click ***New Item*** and select the Collection you want to add an item to.
Fill in the applicable fields on your Collection item, and click ***Publish*** or ***Save Draft*** to save your changes.
## Editing existing items
1. Navigate to the Collection.
2. Click on the item you want to edit.
3. Make your changes.
4. Click **Save** or **Publish.**
Changes to Collection items may affect all Pages or Collection items that reference them. For example, updating a testimonial's quote updates it everywhere the testimonial is displayed.
## Deleting Collection items
1. Navigate to the Collection.
2. Find the item you want to delete.
3. Click the delete icon or select the item and use bulk delete.
4. Confirm the deletion.
**Caution**: Deleting a Collection item will remove it from all Pages that reference it. Make sure you no longer need the item before you delete it.
## Collection label
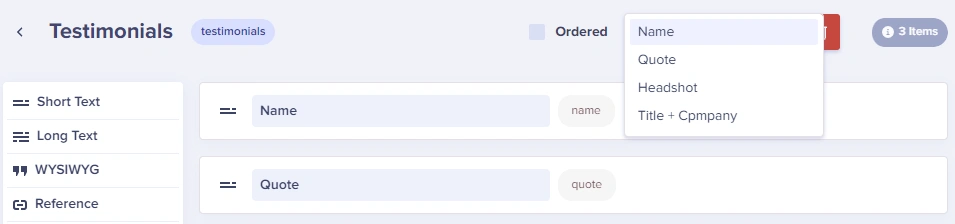
The Collection Label determines which field is displayed in the list view. Your developer can configure this when setting up the Collection. Common choices include:
* **Name**: For categories, authors, and team members
* **Title**: For FAQ questions and testimonials
* **Date**: For events and time-sensitive content
{/* IMAGE_SOURCE: file_path="knowledge-base/content-modeling-basics/use-cases-for-buttercms-collections.md" */}
## Next steps for managing content
Learn about content statuses, such as published and draft, how to schedule content, how to preview changes in the
dashboard, how versioning works, and more.