A knowledge base is a core part of many products and support teams. It reduces support load by offering users a way to find answers on their own. In this post, we will focus on how to build a knowledge base in Angular without overcomplicating things.
Knowledge bases provide numerous advantages. A few include:
Increased customer retention: Customers have a do-it-yourself (DIY) mentality and would thus prefer to resolve any issues with your product before contacting customer service. A knowledge base acts as a source of truth which eventually helps them and gives them positive assurances about the product or the business.
Assistance to customer support officials: It is a point of reference for customers and staff to get the necessary information about a business or product.
Increased engagement: A knowledge base makes it easier for users to find and get the answers they need by consolidating information in a central location. In doing so, it increases the engagement of users to the company or its product as its knowledge base becomes an alternative or a go-to choice in getting answers to their questions.
Before we see how to build a knowledge base in Angular, it helps to understand why Angular is a solid choice here. Angular is a modern framework built on TypeScript, which makes apps more secure and easier to maintain. Its component-based structure allows you to reuse code, speeding up development.
It’s reliable, developer-friendly, backed by Google, and has a large community for support. Angular also comes with built-in features like routing, security, AOT compilation, and forms, so you often don’t need extra libraries. These qualities make it ideal for building a knowledge base that’s fast and scalable.
ButterCMS is a headless CMS with an intuitive dashboard and a powerful content API. By serving as your backend content repository, ButterCMS gives complete control over the front end.
Components, collections, and page types are just a few of the features in ButterCMS that make it relatively simple to create and manage content in the dashboard and ultimately serve that content to your customers wherever they may be.
In this tutorial, we will be heavily using Page types. A core feature of Butter, enabling users to configure pages once and effectively use them over and over again, ultimately, saving you a lot of time and headache.
The knowledge base will be divided into three types (that we will create using the Page Type feature):
The Home page type: This page type displays the content associated with the home page of the knowledge base. It also shows links to sections of the knowledge base that users can access.
The Section page type: This page type shows all the sections of the knowledge base. It displays links to the article or information that users can access
The Article page type: This page type displays the article's content.
In this article, we will build a clone of the ButterCMS knowledge base. The knowledge base will have all its data stored within ButterCMS.
To follow through with this article, you need the following:
Basic knowledge of JavaScript
Node JS runtime installed on your local machine
Angular CLI installed globally on your local machine (using NPM or Yarn)
An active ButterCMS account
Package managers like Yarn or NPM
A code editor (VS Code is preferred)
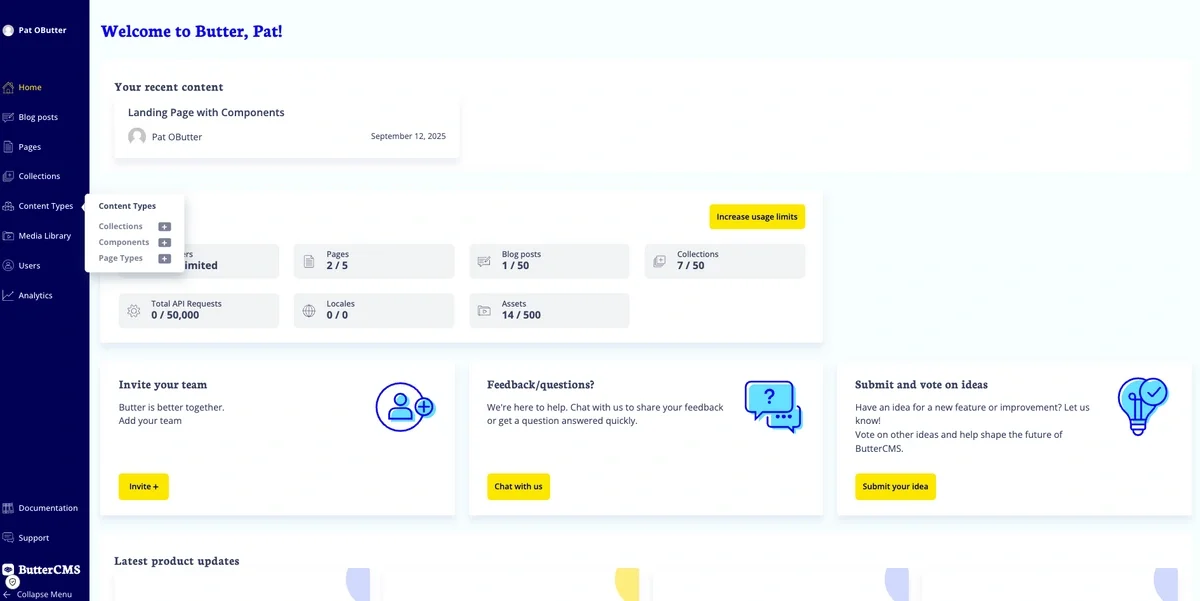
First, sign up for ButterCMS. You can do so via email, Google sign-in, or GitHub sign-in.
As stated previously, we will model our content into three page types: the Home page type, the Section page type, and the Article page type.
Create the Article page type by clicking the + icon next to the Page Types option on the Content Types tab on the sidebar menu.
Creating a new page type
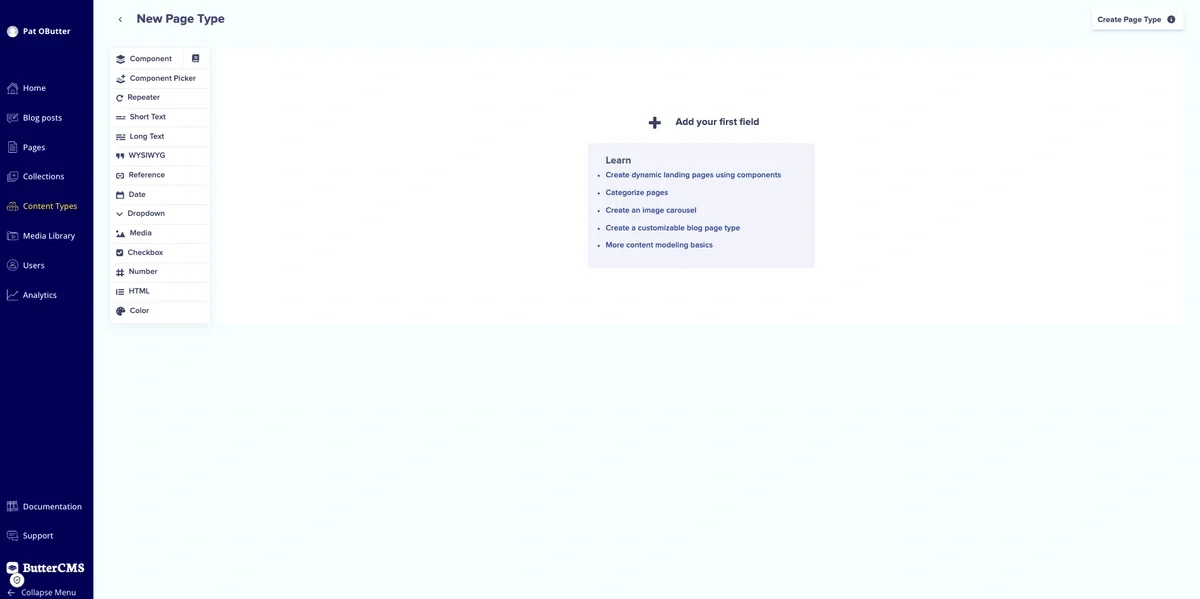
From there, click the New Content Type button on the top right and click Page Type. You'll see the Page Configuration page.
New page type configuration page
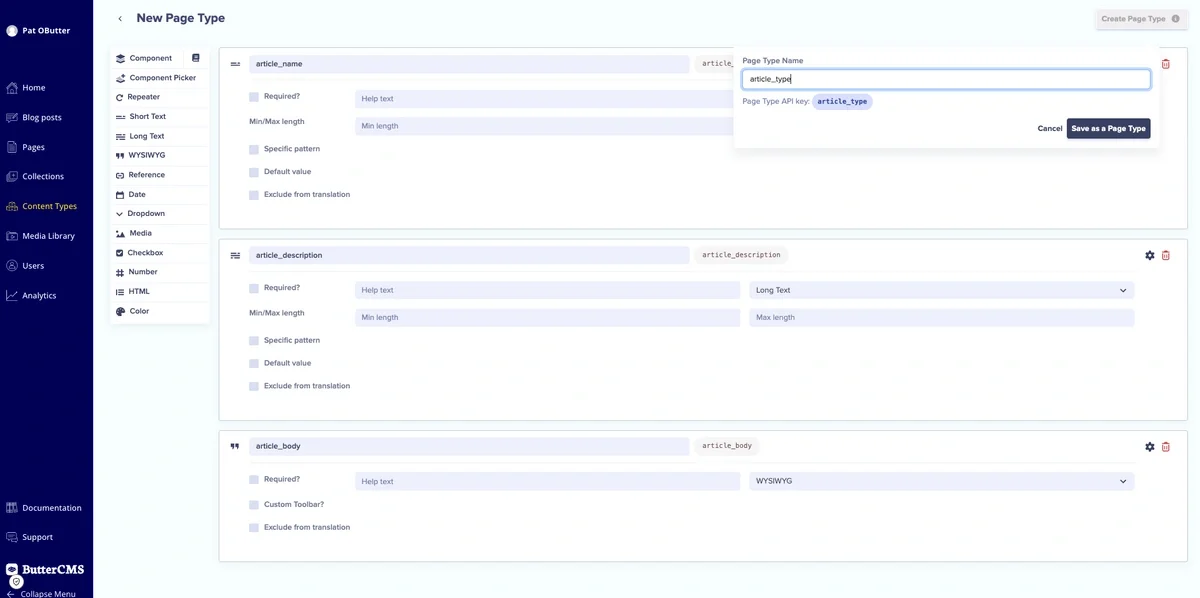
For the Article page type, add the following fields:
article_name: This is a short text field that will bear the article name.
article_description: This is a long text field that will bear the article description.
article_body: This is a WYSIWYG editor that will bear the article's content.
Article_type page configuration
Next, we’re going to save this page type as article_type.
Saving the article_type page type
After creating the article_type page type, we will create the section_type page. If you're creating another page type, you'll click the + icon next to the Page Types icon in the Content Types drop-down menu.
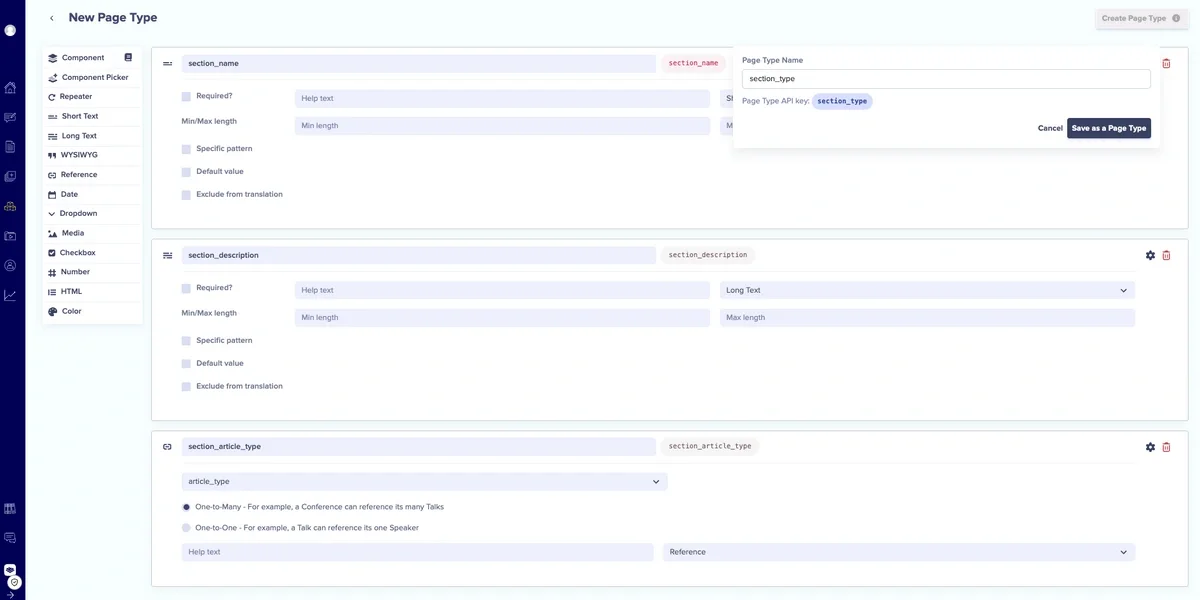
For the Section page type, we will add the following fields:
section_name: This is a short text field that will bear the section name.
section_description: This is a long text field that will bear the article description.
section_article_type: This is a reference field. Click the What will this reference drop-down menu and click article_type. Make sure One-to-Many is toggled on (this field can reference many Article page types).
Next, we’re going to save the page as our section_type page type.
Saving the section_type page type
After creating the section_type page type, we will create the section_type page. If you're creating another page type you'll click the + icon next to the Page Types icon in the Content Types drop-down menu.
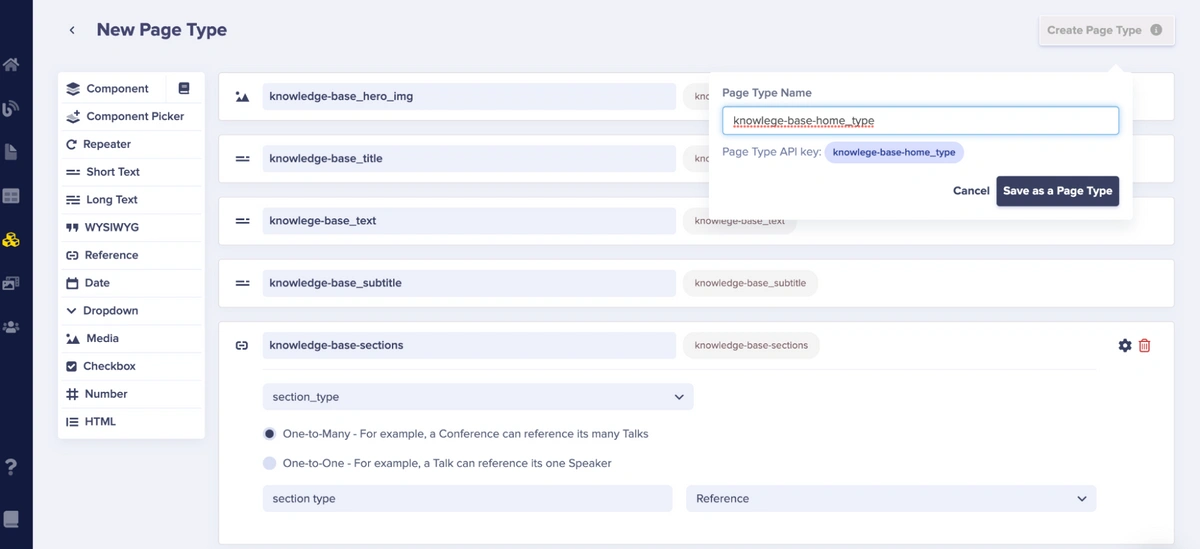
For the Home page type, we will add the following fields:
Knowledge-base_hero_img: This is a media field that will bear the home page image.
Knowledge-base_title: This is a short text field that will bear the title text of the knowledge base home page.
Knowlege-base_text: This is a short text field that will bear the corresponding text of the knowledge base home page.
Knowledge-base_subtitle: This is a short text field that will bear the subtitle text of the knowledge base home page.
Knowledge-base-sections: This is a reference field to a section-type page (a one-to-many reference—that is, this field can reference many section page types).
Saving the knowledge-base_home_type page type
With the page types modeled in the previous section, we will now create pages using them. Let's begin by creating an article.
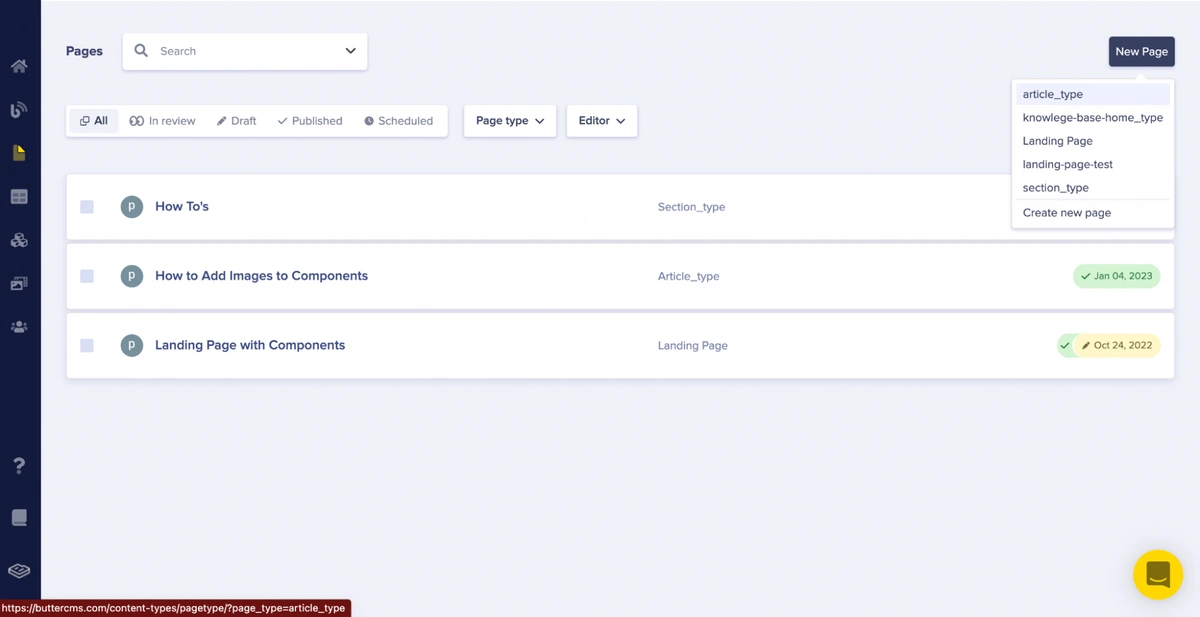
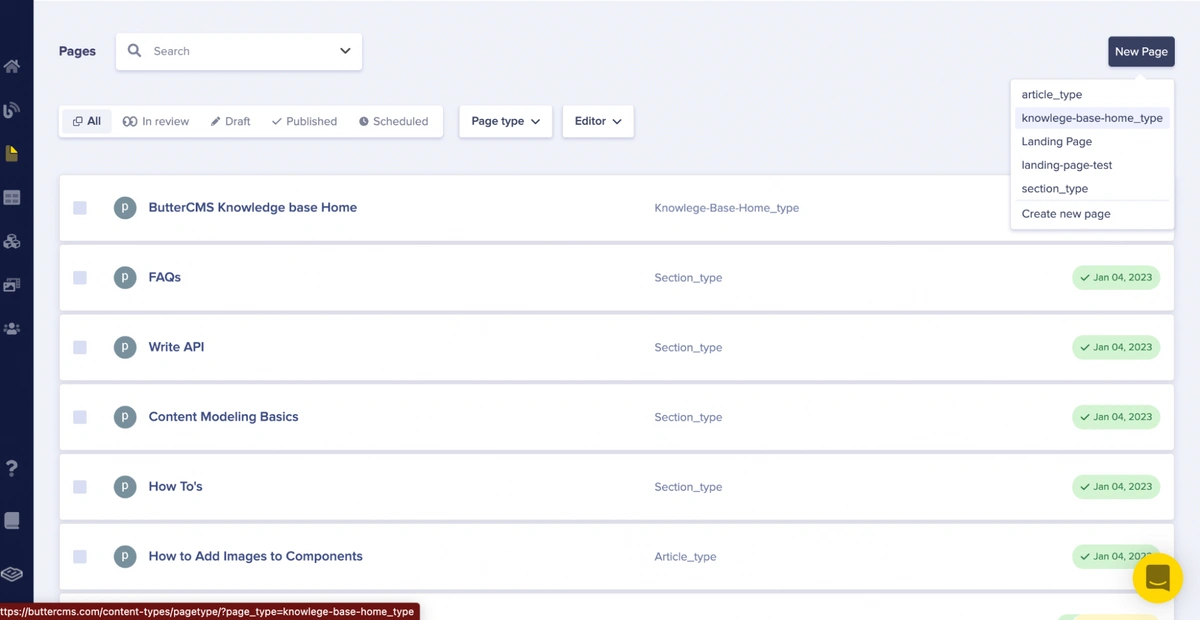
Click the New Page button in the ButterCMS Pages section on the dashboard, and select the article_type page from the dropdown.
Creating an article_type page from an article_type page type
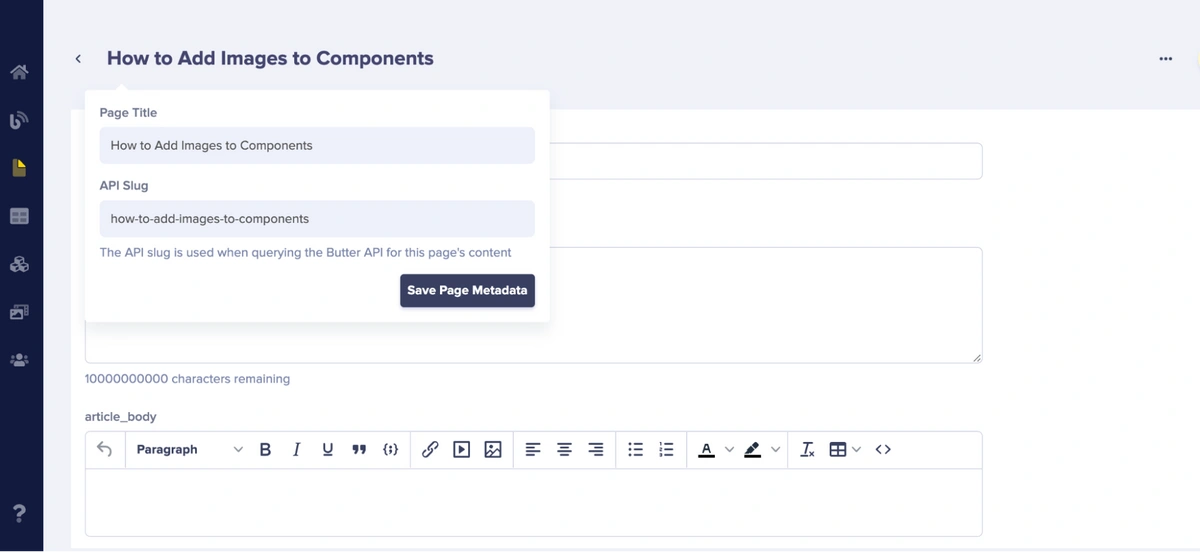
On the created page, we will add the page title and API slug as page metadata information. Click the Save Page Metadata button to create a draft and proceed to the text editor.
Adding metadata information
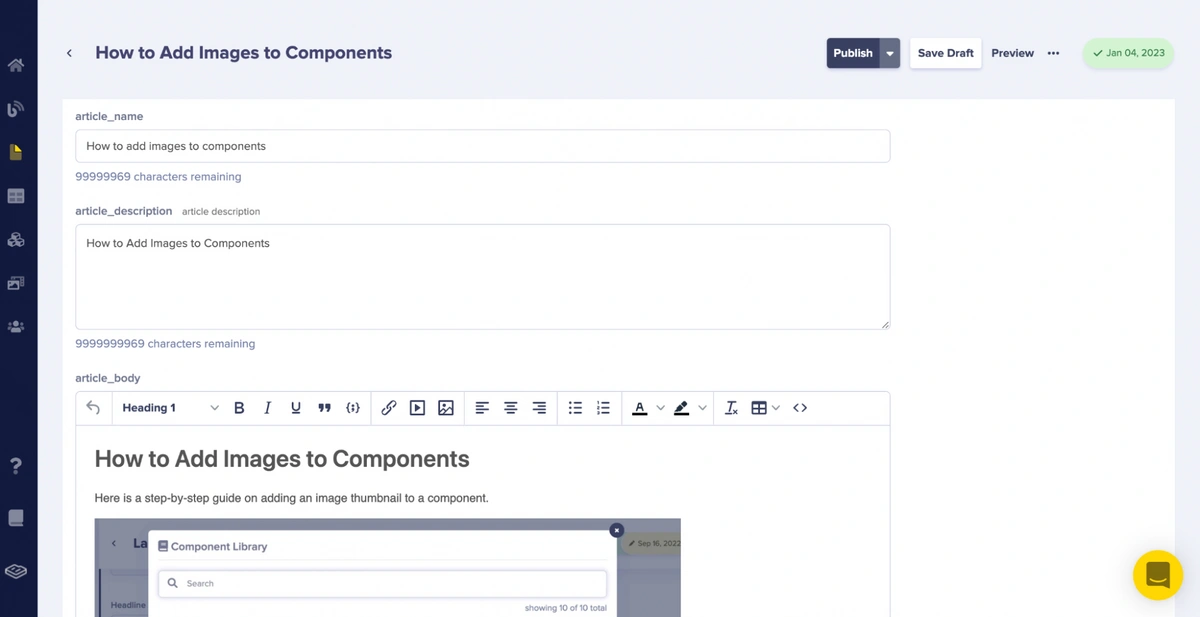
Next, we will add the content of the How to Add Images to Components article to the ButterCMS knowledge base as our first demo article.
Adding the Article contents to the page
Click the Publish button to save and publish all the changes made.
Repeat the article_page creation process several times to have different articles within the section.
Next, we will create a section page that will use the article page we created as a reference.
Click the New Page button in the ButterCMS Pages section on the dashboard, and select the section_type page from the dropdown.
Creating a section_type page
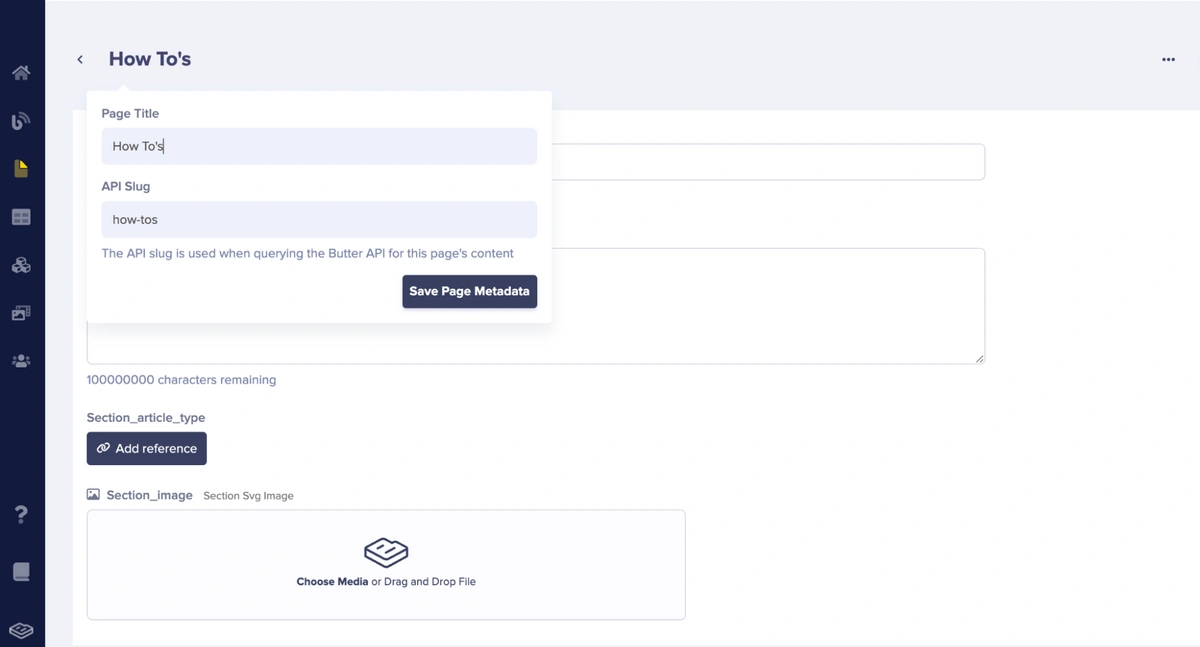
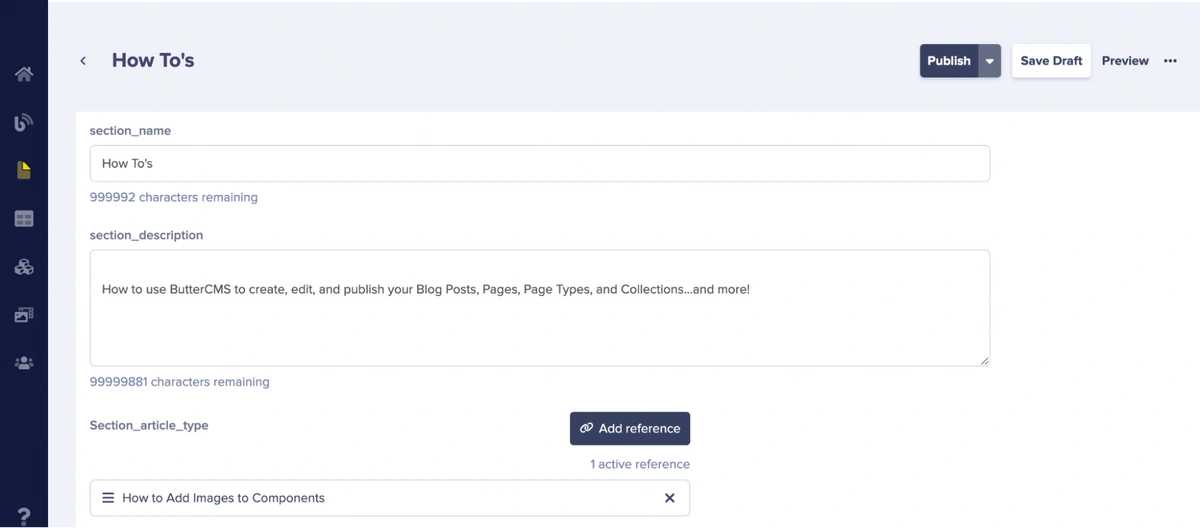
On the created page, we will add “How To’s” as the page title and “how-tos” as the API slug for metadata information. After adding them, click the Save Page Metadata button to create a draft and proceed to the text editor.
Adding the section page’s metadata information
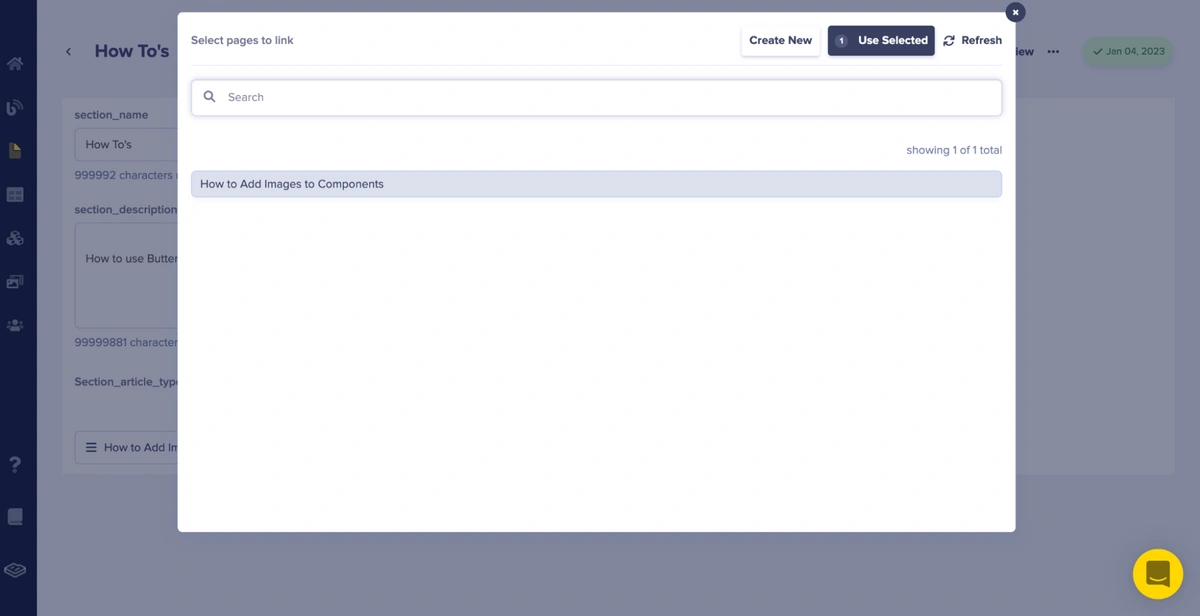
Adding section_article_type reference Information
In the picture above, upon clicking the Add Reference button, it brings up a popup that shows us reference article page(s) we can link to our section_article_type page type.
Added section_article_type reference
In the picture above, we show the added reference article (How to Add Images to Components) to our section_article_type page type.
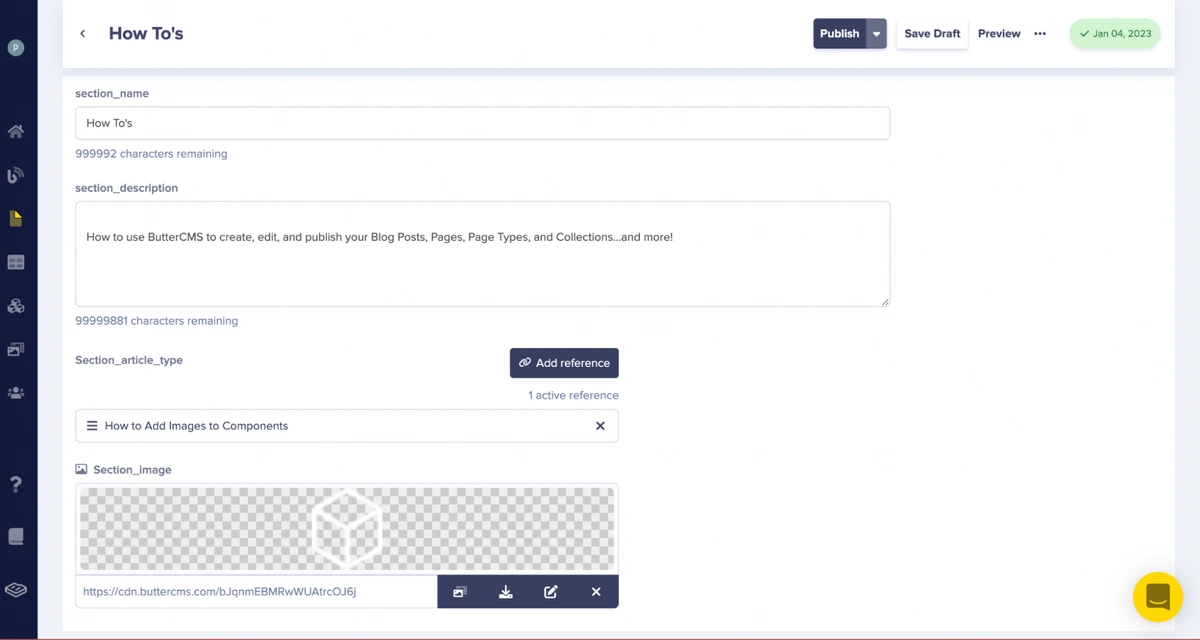
Adding section_image
Click the Publish button to save and publish all the changes made.
Repeat the section_page creation process several times to have different sections available.
Next, we will create a home page that will house the section pages we created as a reference.
Click the New Page button in the ButterCMS Pages section on the dashboard, and select the article_type page from the dropdown.
Creating a knowledge-base-home_type page from the knowledge-base-home_type page type
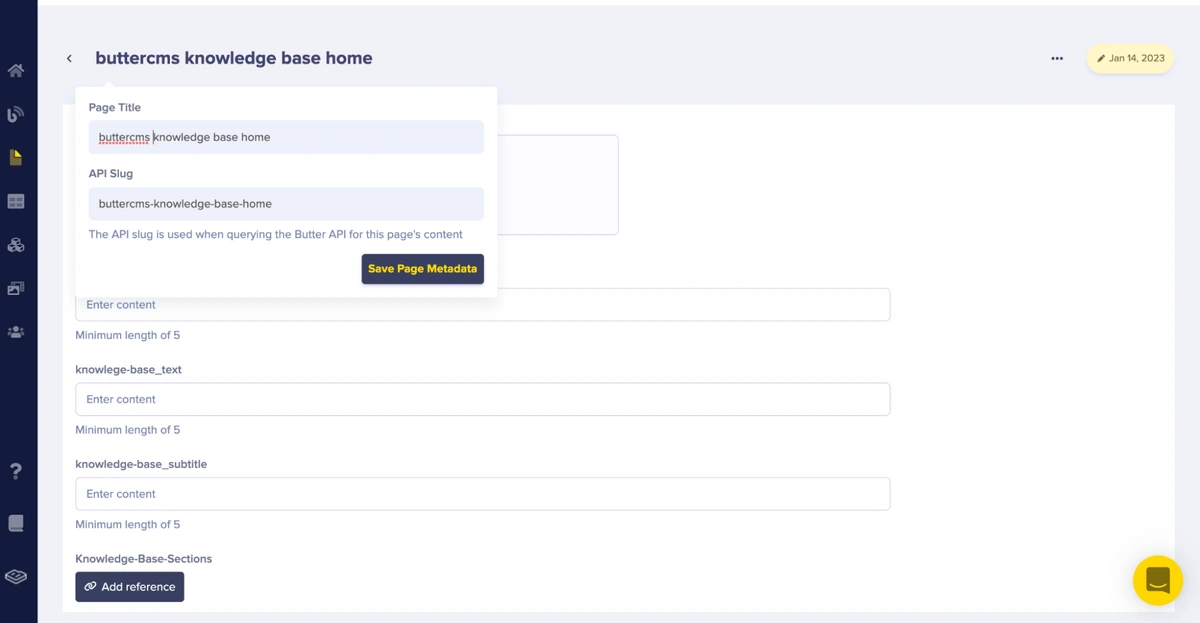
On the created page, we will add “buttercms knowledge base home” as the page title and “buttercms-knowledge-base-home” as the API slug as page metadata information. After adding them, click the Save Page Metadata button to create a draft and proceed to the text editor.
Adding knowledge-base-home_type Metadata Information
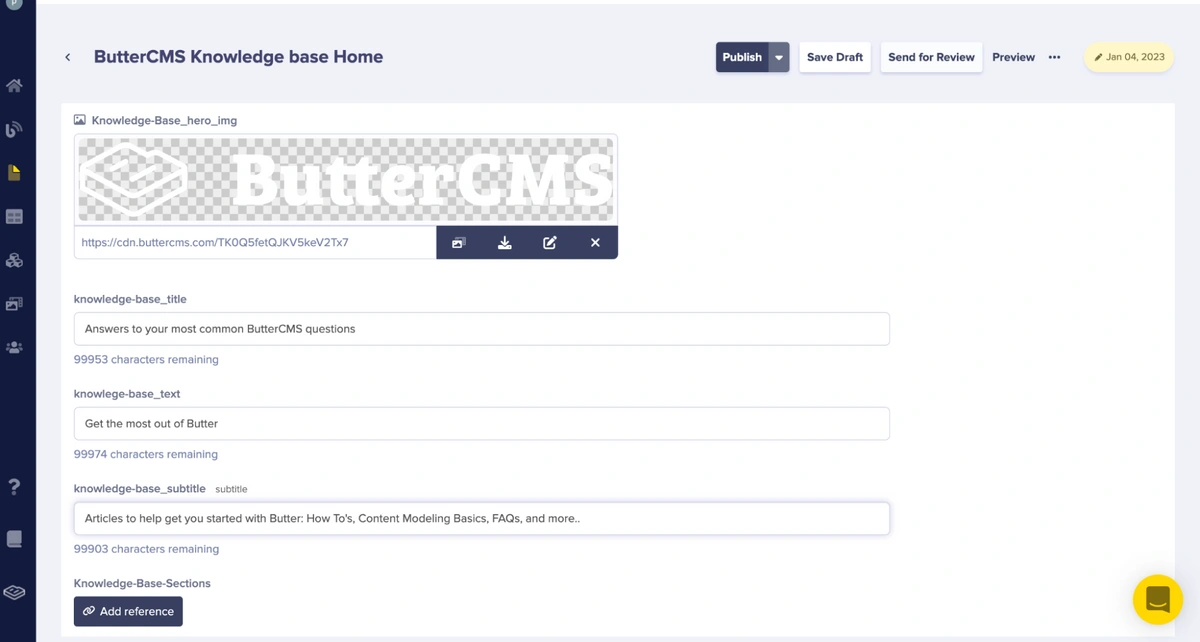
Next, we will add content from the ButterCMS knowledge base page to our created page.
Adding content to knowledge-base-home_type
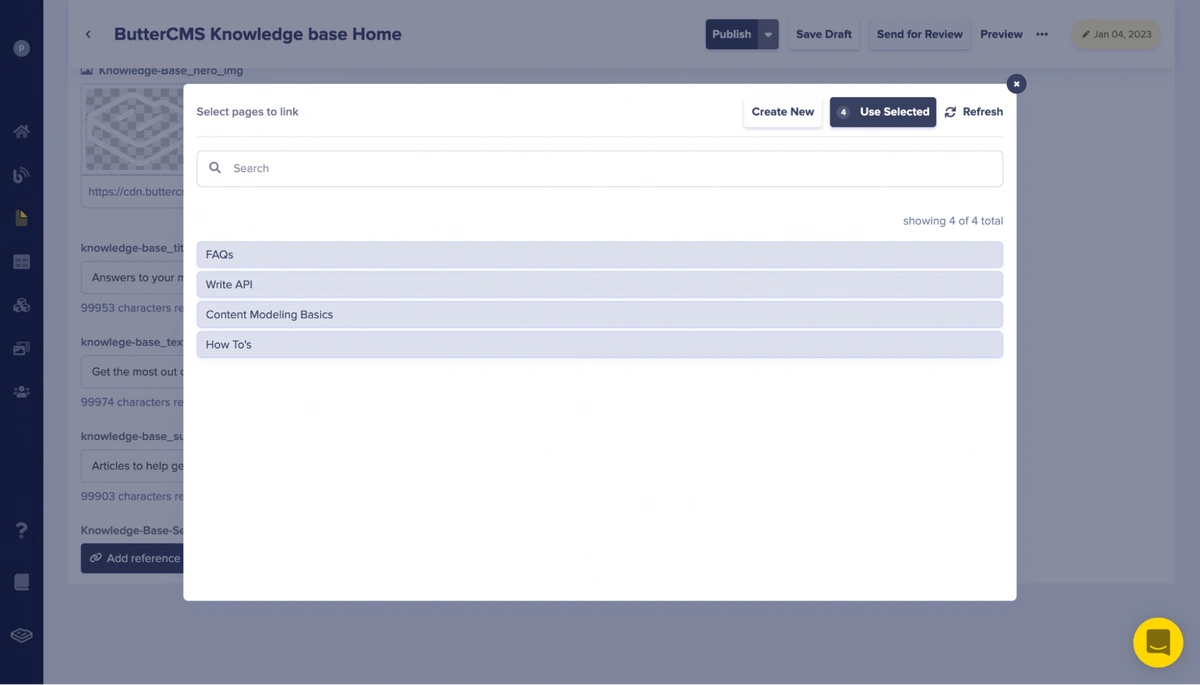
Upon clicking the button Add Reference, a modal pops up. This modal displays the available section_type pages that can be referenced in the knowledge-base-sections field.
Adding knowledge-base-sections reference
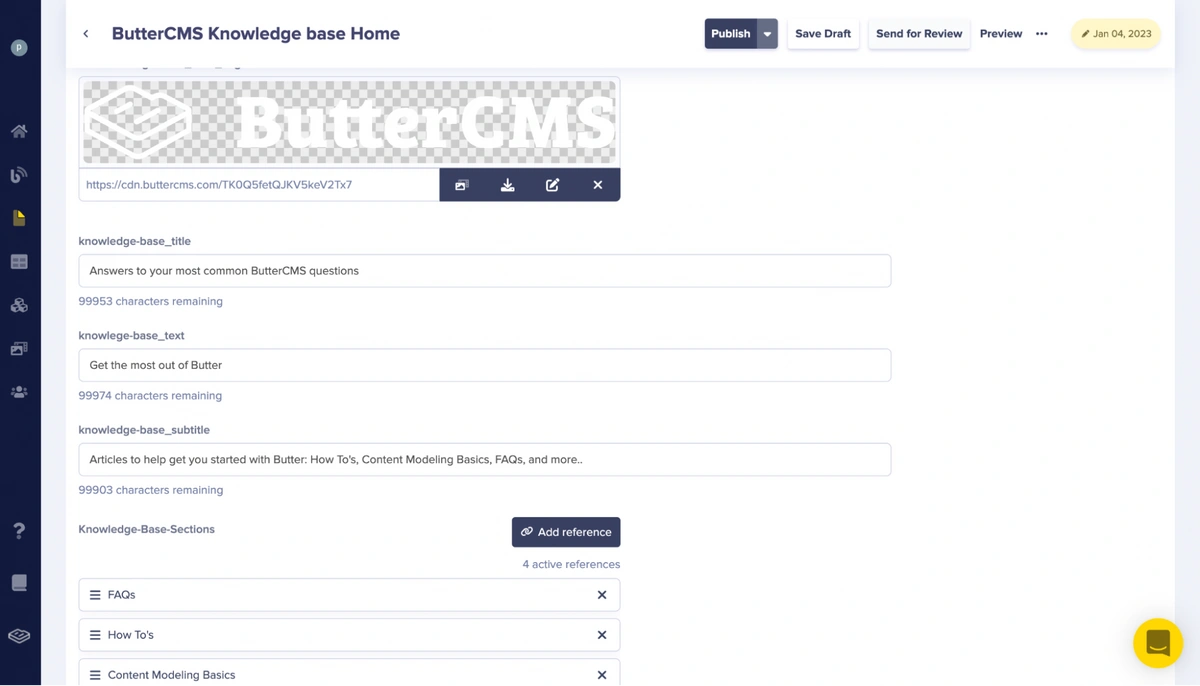
Added knowledge-base-sections reference
After adding this content, click the Publish button to save and publish all the changes made.
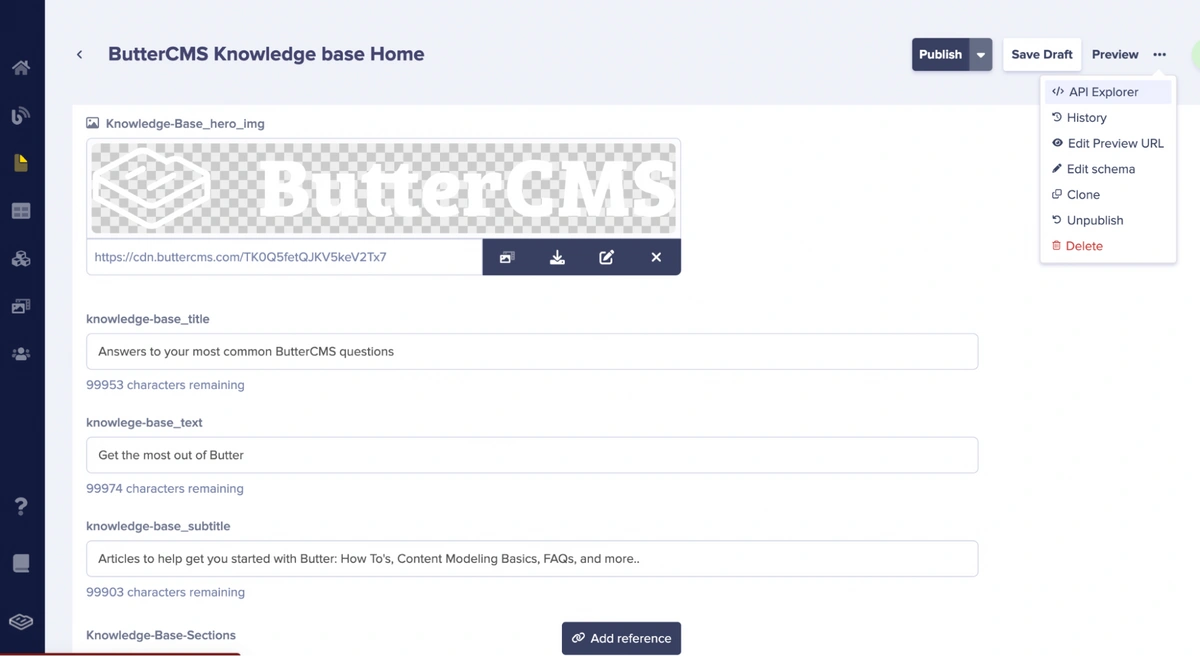
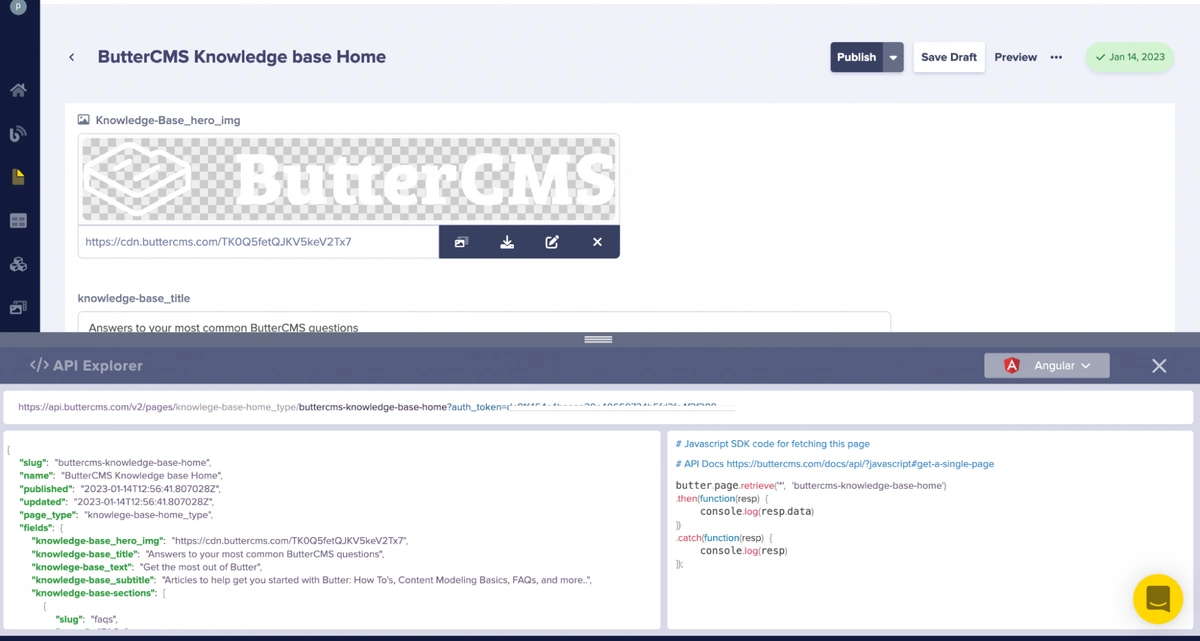
After adding the content, we will access the API Explorer to look at a sample of the response data from our knowledge-base-home_type page on the ButterCMS Content API. To access the API Explorer, select the API Explorer option on the menu beside the preview link.
Accessing API explorer on the home page
Upon clicking on the API Explorer menu, the API Explorer pane pops up. The explorer shows us a sample of the response data from our knowledge-base-home_type page on the ButterCMS Content API.
API Explorer on the home page
We have now created the data for the ButterCMS knowledge base. We will now create an Angular application that will retrieve and display the knowledge base content via the ButterCMS Content API.
We will install a new Angular project with the Angular CLI. If you haven’t installed the CLI before, simply type the command below to do so:
npm install -g @angular/cli
To install our Angular application, type the commands below:
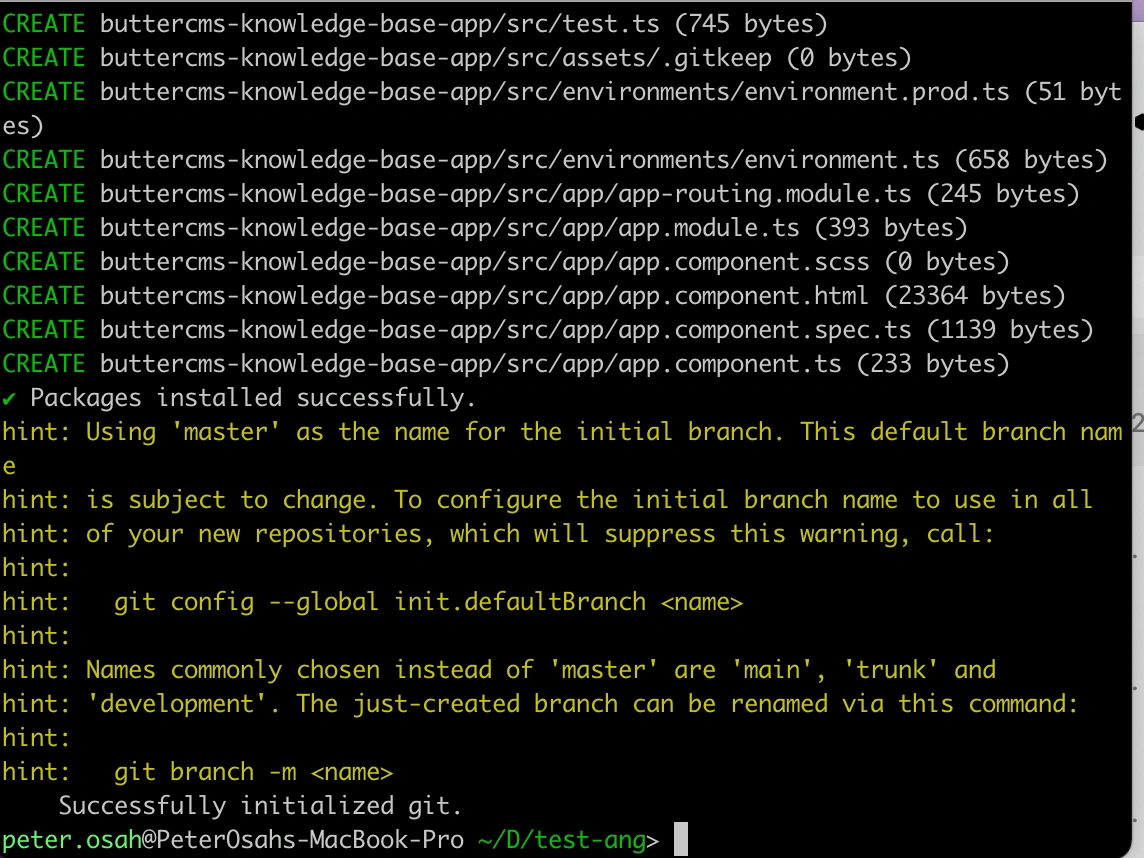
ng new buttercms-knowledge-base-app
Installing the Angular project
Successful installation of the angular project
After installing the Angular application, we will configure Tailwind CSS for our Angular application. This is to expedite styling. To configure Tailwind for an angular project, follow the steps here.
Next, we will install the ButterCMS JavaScript client. This client enables us to make API calls to the ButterCMS Content API to retrieve the data created on our dashboard.
To install the client, enter the command below:
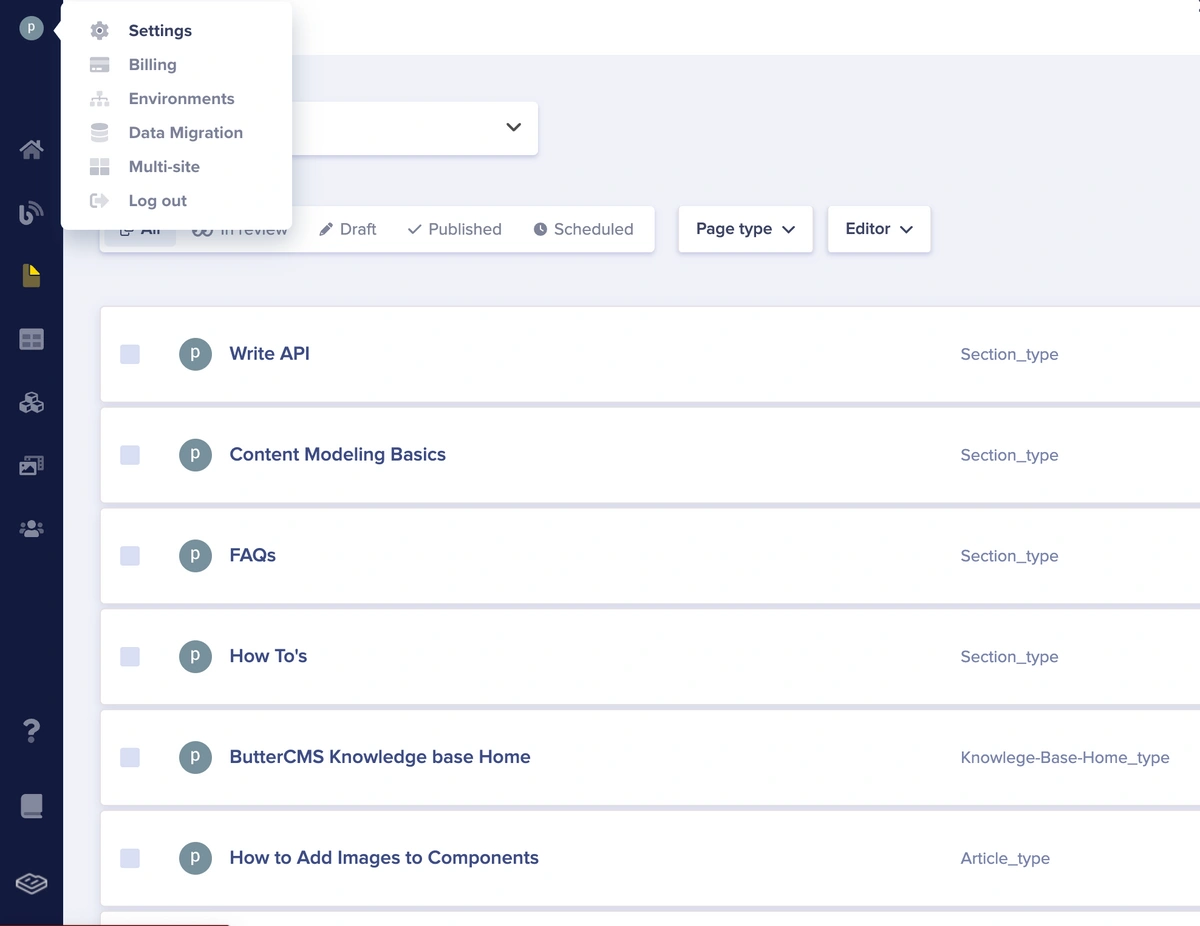
npm install buttercms —-saveNext, we will add the API read token credential to the environment.ts file in our Angular project, just as we will be adding that to the ButterCMS JavaScript client. You can always get your API read token from the settings menu in the ButterCMS dashboard.
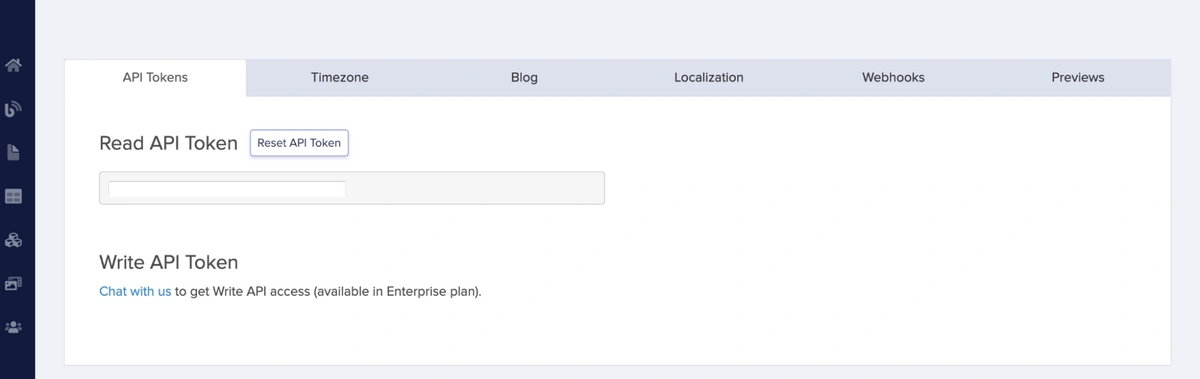
Accessing the settings menu
The Read API Token
Next, we will add the Read API Token obtained from the Butter dashboard into the environment files that Angular provides. This is to enable us to inject the token into the service. Copy the token and store it in the src/environments/environment.ts file in our app, which should look like this:
export const environment = {
   production: false,
   title: 'ButterCMS dev',
   apiToken: 'type token'
};
After installing and adding the token, we will create the core, pages, and components folders inside the src folder. These folders will house the services applications we will use as well as the pages and components. Upon adding these folders, the application structure should look as follows:
BUTTERCMS-KNOWLEDGE-BASE-APP    (Root Directory)
├─ src
├─ app
├─ components
├─ core
├─ pages
├─ assets
├─ environments
├─ favicon.ico
├─ index.html
├─ main.ts
├─ polyfill.ts
├─ styles.scss
├─ test.ts
├─ package.json
├─ package-lock.json
├─ angular.json
└─ yarn.lock
….
Project structure upon adding the pages, components, and core folders to the app folder of the project.
We will add our global styles to the src/styles.css file:
/* You can add global styles to this file, and also import other style files */
@tailwind base;
@tailwind components;
@tailwind utilities;


* {
   box-sizing: border-box;
}


body {
   margin: 0;
   font-family: "Proxima Nova", sans-serif;
   font-size: 1rem;
   font-weight: 400;
   line-height: 1.5;
   color: #384062;
   text-align: left;
   background-color: #fff;
   -webkit-font-smoothing: antialiased;
   font-smoothing: antialiased;
   text-size-adjust: none;
   font-size: 16px;
   line-height: 1.3;
   width: 100%;
}


/* typography */


h1, h2, h3, h4, .section-legal .section-legal__body dt, .section-legal .section-legal-security__body dt, h5, h6 {
   font-weight: 600;
}


h1:last-child, h2:last-child, h3:last-child, h4:last-child,
.section-legal .section-legal__body dt:last-child,
.section-legal .section-legal-security__body dt:last-child,
h5:last-child, h6:last-child, p:last-child {
   margin-bottom: 0;
}


h2 {
   font-size: 35px;
   line-height: 1.2;
   display: block;
}


h5 {
   font-size: 28px;
   line-height: 1.2;
}


h6 {
   font-size: 18px;
   font-weight: 400;
   line-height: 1.44;
}


article, aside, details, figcaption, figure, footer, header, hgroup, menu, nav, section, summary, main {
   display: block;
}


ol, ul, dl {
   margin-top: 0;
   margin-bottom: 1rem;
}


svg {
   overflow: hidden;
   vertical-align: middle;
}


input[type=text], input[type=password], input[type=date], input[type=datetime], input[type=datetime-local], input[type=month], input[type=week], input[type=email], input[type=number], input[type=search], input[type=tel], input[type=time], input[type=url], input[type=color], textarea, a[href^=tel] {
   appearance: none;
}


[type=search] {
   outline-offset: -2px;
   -webkit-appearance: none;
}


button, input, optgroup, select, textarea {
   font-family: inherit;
   font-size: inherit;
   color: inherit;
   -moz-osx-font-smoothing: grayscale;
   -webkit-font-smoothing: antialiased;
   font-smoothing: antialiased;
}


button, input {
   overflow: visible;
}


input, button, select, optgroup, textarea {
   margin: 0;
   font-family: inherit;
   font-size: inherit;
   line-height: inherit;
}


/* container */
.container {
   width: 100%;
   padding-right: 15px;
   padding-left: 15px;
   margin-right: auto;
   margin-left: auto;
}


@media (min-width: 576px){
   .container {
       max-width: 1200px;
   }
}
Adding styles in the /src/styles.scss file
Now, use the ng serve command to launch the development server.
The knowledge base will have a home page that displays an overview of the base along with links to sections within the base that a user can click on to navigate around. Let's start by creating the home components that will house this content.
We will first create a component. To do this, open the terminal and enter the following commands in sequence in the src/app/pages folder:
ng generate component Home

ng generate component view-knowledge-base-section

ng generate component view-knowledge-base-article

ng generate component search-knowledge-base
After entering the command, the folder structure will be as follows:
BUTTERCMS-KNOWLEDGE-BASE-APP    (Root Directory)
├─ src
├─ app
├─ components
├─ core
├─ pages
       ├─ home
       ├─ search-knowledge-base
       ├─ view-knowledge-base-article
       ├─ view-knowledge-base-section
├─ assets
├─ environments
├─ favicon.ico
├─ index.html
├─ main.ts
├─ polyfill.ts
├─ styles.scss
├─ test.ts
├─ package.json
├─ package-lock.json
├─ angular.json
└─ yarn.lock
….
Project structure upon adding the home, search-knowledge-base, view-knowledge-base-article, and view-knowledge-base-section components to the pages folder.
From the structure, we created the pages:
home, which will hold the knowledge base home page
search-knowledge-base, which is the page that enables us to search through the knowledge base
view-knowledge-base-article, which shows us a single article of the knowledge base
view-knowledge-base-section, which shows us a single section of the knowledge base
Next, let’s create the routes for these pages. Head over to app/app-routing.module.ts and modify the file with the snippet of code below:
import { NgModule } from '@angular/core';
import { RouterModule, Routes } from '@angular/router';
import { HomeComponent } from './pages/home/home.component';
import { SearchKnowledgeBaseComponent } from './pages/search-knowledge-base/search-knowledge-base.component';
import { ViewKnowledgeBaseArticleComponent } from './pages/view-knowledge-base-article/view-knowledge-base-article.component';
import { ViewKnowledgeBaseSectionComponent } from './pages/view-knowledge-base-section/view-knowledge-base-section.component';


const routes: Routes = [
 { path: 'knowledge-base', component: HomeComponent },
 { path: 'knowledge-base/section/:id', component: ViewKnowledgeBaseSectionComponent },
 { path: 'knowledge-base/section/:sectionId/article/:articleId', component: ViewKnowledgeBaseArticleComponent },
 { path: 'knowledge-base/search', component: SearchKnowledgeBaseComponent },
 { path: '', redirectTo: 'knowledge-base', pathMatch: 'full' },
];


@NgModule({
 imports: [RouterModule.forRoot(routes)],
 exports: [RouterModule]
})
export class AppRoutingModule { }
Updating the contents of the /app/app-routing.module.ts file.
Next, head over to app/app.component.html and modify it to the following:
<div>
  <router-outlet></router-outlet>
</div>
We will create a service. A service in Angular is an object that is instantiated only once during the lifetime of an application. It includes methods for keeping data available throughout the life of an application. We can use a service to integrate into an API and the service can be used in any component of choice by dependency injection, which Angular provides out of the box.
To do this, open the terminal and enter the following commands in sequence in the src/app/core folder.
ng generate service butter-cms
After entering the command, the folder structure will be as follows:
BUTTERCMS-KNOWLEDGE-BASE-APP    (Root Directory)
├─ src
├─ app
├─ components
├─ core
       ├─ butter-cms.service.ts
       ├─ butter-cms.service.spec.ts
├─ pages
       ├─ home
       ├─ search-knowledge-base
       ├─ view-knowledge-base-article
       ├─ view-knowledge-base-section
├─ assets
├─ environments
├─ favicon.ico
├─ index.html
├─ main.ts
├─ polyfill.ts
├─ styles.scss
├─ test.ts
├─ package.json
├─ package-lock.json
├─ angular.json
└─ yarn.lock
….
Project structure upon adding the butter-cms.service.ts service file.
Next, we will add the snippet of code to the core/butter-cms.service.ts file:
import { Injectable } from '@angular/core';
import Butter from 'buttercms';
import { environment } from 'src/environments/environment';


@Injectable({
 providedIn: 'root'
})
export class ButterCMSService {
 butter: any;
  constructor() {
   this.butter = Butter(environment.apiToken);
 }


 getKnowledgeBaseHomeType() {
   return this.butter.page.retrieve('*', 'buttercms-knowledge-base-home');
 }


 SearchKnowledgeBaseSection(page_type: string, page:number = 1, page_size: number = 10) {
   return this.butter.page.search(page_type, {
     page_type: 'article_type'
   });
 }


 getKnowledgeBaseSectionType(section: string) {
   return this.butter.page.retrieve('*', section);
 }


 getKnowledgeBaseArticleType(article: string) {
   return this.butter.page.retrieve('*', article);
 }


}
Adding methods butter-cms.service.ts service file to the core folder in the app folder of the project.
From the code above, we integrated the ButterCMS client we installed earlier and added the read token obtained from the environment file to the client. We also created methods that connect to the ButterCMS Content API to retrieve home page contents (method getKnowledgeBaseHomeType()), section page contents (method getKnowledgeBaseSectionType()), article contents (method getKnowledgeBaseArticleType()), and contents from making a search query to the content API (searchKnowledgeBaseSection()).
We will start by displaying the knowledge base home page. Head over to the app/pages/home/home.component.ts file and add the snippet of code below:
import { Component, OnInit } from '@angular/core';
import { ActivatedRoute, Router } from '@angular/router';
import { ButterCMSService } from 'src/app/core/services/butter-cms.service';


@Component({
 selector: 'app-home',
 templateUrl: './home.component.html',
 styleUrls: ['./home.component.scss']
})
export class HomeComponent implements OnInit {


 homePageData: any;
 searchText: string = '';


 constructor(
   private butterCMSService: ButterCMSService,
   private router: Router,
   private activatedRoute: ActivatedRoute
 ) { }


 ngOnInit(): void {
   this.butterCMSService.getKnowledgeBaseHomeType()
   .then((resp: any) => {
     this.homePageData = resp?.data?.data;
     console.log('data', resp?.data?.data)
   })
   .catch(function(error: any) {
     console.log('error', error)
   });
 }
}
Code in the app/pages/home/home.component.ts file
In the code above, we simply import the service we created earlier and call the method getKnowledgeBaseHome(), which sends an HTTP request to the Content API to fetch the contents for the home page.
We will go to the app/pages/home/home.component.html file and paste the snippet of code below:
<div>
   <app-header [butterImg]="homePageData?.fields['knowledge-base_hero_img']"></app-header>


   <div class="intro intro--small"
       style="background-image: url(https://buttercms.com/static/v2/images/intro-bg-2.4af98db9356f.jpg);">
       <div class="container">
           <div class="intro__inner">
               <div class="intro__head">
                   <h1>
                       {{ homePageData?.fields['knowledge-base_title'] }}
                   </h1>
               </div>


               <div class="intro__content">
                   <div class="search">
                       <form>
                           <i class="ico-search">
                               <svg>
                                   <use
                                       xlink:href="https://buttercms.com/static/v2/images/sprite.1229afca4c5f.svg#ico-search">
                                   </use>
                               </svg>
                           </i>


                           <input [(ngModel)]="searchText" type="search" name="query" id="query" value="" placeholder="Search here" class="search__field"/>


                           <button (click)="handleSearch()" type="submit" class="search__btn btn btn--solid-yellow">
                               <i class="ico-arrow-send-white">
                                   <svg xmlns="http://www.w3.org/2000/svg" viewBox="0 0 448 512"><path d="M438.6 278.6c12.5-12.5 12.5-32.8 0-45.3l-160-160c-12.5-12.5-32.8-12.5-45.3 0s-12.5 32.8 0 45.3L338.8 224 32 224c-17.7 0-32 14.3-32 32s14.3 32 32 32l306.7 0L233.4 393.4c-12.5 12.5-12.5 32.8 0 45.3s32.8 12.5 45.3 0l160-160z"/></svg>
                               </i>
                           </button>
                       </form>
                   </div>
               </div>
           </div>
       </div>
   </div>


   <main class="main">
       <section class="container section-services-alt">
           <div class="section-services__head">
               <h2>
                   {{ homePageData?.fields['knowlege-base_text'] }}
               </h2>


               <p>
                   {{ homePageData?.fields['knowledge-base_subtitle'] }}
               </p>
           </div>


           <div class="section-services__body">
               <div class="services-alt">
                   <div class="flex flex-wrap">


                       <div *ngFor="let data of homePageData?.fields['knowledge-base-sections']" class="w-full md:w-4/12">
                           <div class="service-alt">
                               <div class="service__head">
                                   <div class="service__image">
                                       <img [src]="data?.fields?.section_image" alt="How To's">
                                   </div>


                                   <div class="service__content">
                                       <h5>
                                           {{ data?.fields?.section_name }}
                                       </h5>
                                   </div>
                               </div>


                               <div class="service__body">
                                   <p>
                                       {{ data?.fields?.section_description }}
                                   </p>
                               </div>
                               <a [routerLink]="['/knowledge-base/section',  data?.slug]"></a>
                           </div>
                       </div>
                   </div>
               </div>
           </div>
       </section>
   </main>
</div>
Code in app/pages/home/home.component.html file
In the code above, we simply render the home page data obtained from calling the method getKnowledgeBaseHome() on the ButterCMS service.
Next, we will add styling to the component. We will go to the app/pages/home/home.component.scss file and paste the snippet of code below:
.intro {
   position: relative;
   padding: 176px 0 87px;
   background-repeat: no-repeat;
   background-size: cover;
   background-position: center center;
   color: #fff;
   text-align: center;
   width: 100%;

   &.intro--small {
       position: relative;
       padding: 193px 0 36px;
       margin: 0 0 40px;
       width: 100%;

       & .intro__inner {
           & .intro__head {
               margin: 0 0 74px;

               @media (max-width: 767px){
                   & {
                       margin-bottom: 48px;
                   }
               }

               h1 {
                   font-size: 45px;
                   line-height: 1.09;
               }
           }
       }
   }

   @media (max-width: 767px){
       .intro {
           padding: 106px 0 40px;
       }
   }

   @media (max-width: 767px){
       .intro--small {
           margin: 0 0 25px;
       }
   }

   & .intro__inner {
       max-width: 1110px;
       margin: 0 auto;
   }
}

.search {
   width: 573px;
   position: absolute;
   bottom: -35px;
   left: 50%;
   transform: translateX(-50%);
   box-shadow: 0px 22px 76px 0px rgb(0 0 0 / 16%);

   @media (max-width: 767px){
       & {
           width: 95%;
           bottom: -20px;
       }
   }

   & .btn {
       position: relative;
       left: -1px;
       flex: 0 0 73px;
       max-width: 73px;
       height: 70px;
       padding: 0;
       min-width: unset;
       line-height: 70px;
       border-radius: 0;
       border-bottom-right-radius: 2px;
       border-top-right-radius: 2px;
       transition: opacity 0.3s ease;

       @media (max-width: 767px){
           & {
               flex: 0 0 40px;
               max-width: 40px;
               height: 40px;
               line-height: 38px;
           }
       }
   }

   & form {
       display: flex;
   }

   & .search__field {
       flex: 0 0 500px;
       max-width: 500px;
       height: 70px;
       padding: 0 50px;
       border-bottom-right-radius: 2px;
       border-top-right-radius: 2px;
       border: 0;
       color: #19234F;
       outline: none;

       &::placeholder {
           color: #19234F;
       }

       @media (max-width: 767px){
           & {
               flex: 1;
               padding: 0 20px 0 50px;
               max-width: unset;
               height: 40px;
           }
       }
   }

   & .ico-search {
       position: absolute;
       pointer-events: none;
       left: 27px;
       top: 50%;
       transform: translateY(-50%);
   }

   .ico-search {
       width: 14px;
       height: 14px;
       line-height: 0;
   }

   [class*=ico-] {
       display: inline-block;
       vertical-align: middle;
   }

   .ico-arrow-send-white, .ico-arrow-send {
       width: 20px;
       height: 13px;
       line-height: 0;

       & svg {
           width: 100%;
           height: 100%;
       }
   }

   [class*=ico-] {
       display: inline-block;
       vertical-align: middle;
       & svg {
           width: 100%;
           height: 100%;
           fill: inherit;
       }
   }

   svg:not(:root) {
       overflow: hidden;
   }
}

.btn--solid-yellow {
   background: #FED700;
   border-color: #FED700;
}

.section-services-alt {
   padding: 85px 0 14px;

   & .section-services__head {
       margin: 0 0 93px;
       text-align: center;
   }

   & h2 {
       margin: 0 0 32px;
   }

   @media (max-width: 1650px){
       .section-services-alt {
           padding: 85px 20px 14px;
       }
   }

   & .service-alt {
       height: 100%;
       position: relative;
       display: flex;
       flex-direction: column;
       margin: 0 0 30px;
       padding: 33px 21px 35px 38px;
       border-radius: 4px;
       transition: box-shadow 0.3s ease;

       &:hover {
           box-shadow: 0px 13px 26px 0px rgb(0 0 0 / 16%);
       }

       & .service__head {
           display: flex;
           align-items: center;
           margin: 0 0 24px;

           & .service__image {
               position: relative;
               flex: 0 0 70px;
               height: 70px;
               margin: 0 10px 0 0;
               border-radius: 50%;
               background-color: #19234F;
               display: flex;
               justify-content: center;
               align-items: center;
           }

           & .service__content {
               & h5 {
                   font-size: 25px;
                   letter-spacing: 0.02em;
               }
           }
       }

       & .service__body {
           flex: 1 1 auto;
       }

       & h5 {
           font-size: 25px;
           letter-spacing: 0.02em;
       }

       & p {
           line-height: 1.88;
       }

       & > a {
           position: absolute;
           top: 0;
           left: 0;
           right: 0;
           bottom: 0;
           color: inherit;
           text-decoration: none;
           transition: opacity 0.4s ease-in-out;

           &:hover, &[href^=tel] {
               text-decoration: none;
           }

           &:hover {
               color: inherit;
               opacity: 0.8;
           }


           &:hover {
               color: #0056b3;
               text-decoration: underline;
           }
       }

   }
}
styling in the app/pages/home/home.component.scss file
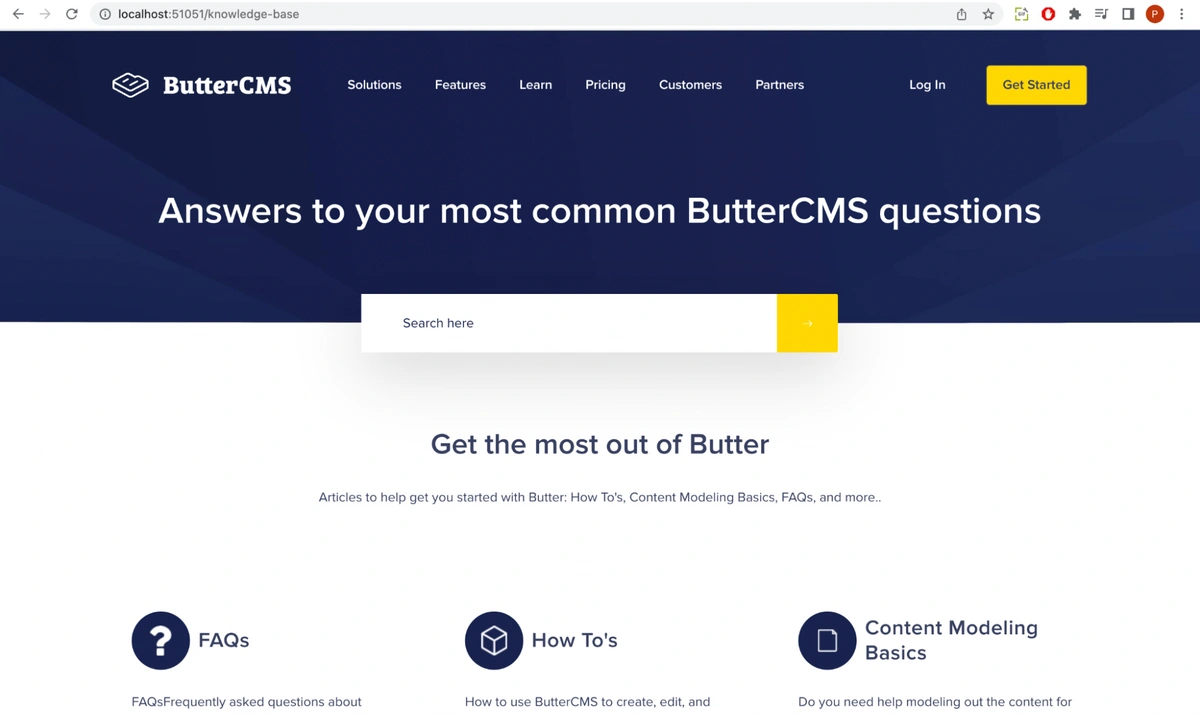
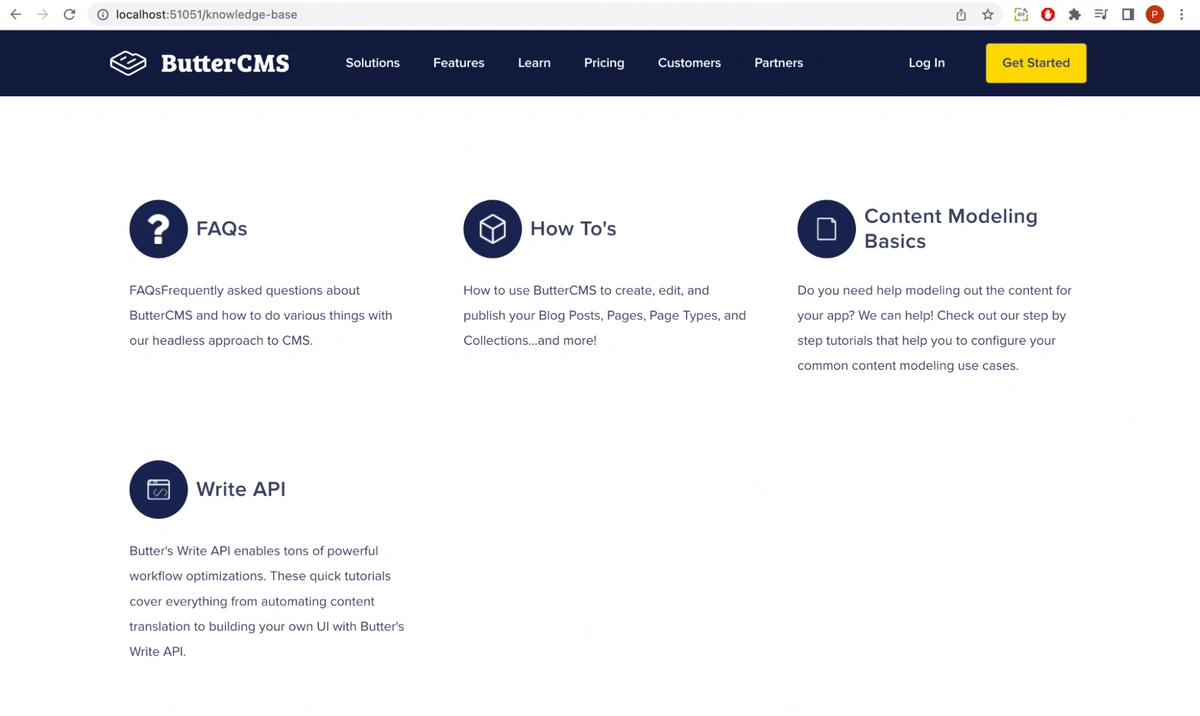
After adding the styling, when we open our app in the browser, we will see the following:
Preview of the knowledge base Homepage
From the preview, we can see the home page contents we created in the ButterCMS dashboard.
We will link content on the home page to a section so that, upon clicking them, we will be able to navigate to that section. Head over to the app/pages/view-knowledge-base-section/view-knowledge-base-section.component.ts file and paste the snippet of code below:
import { Component, OnInit } from '@angular/core';
import { ActivatedRoute, ParamMap } from '@angular/router';
import { ButterCMSService } from 'src/app/core/services/butter-cms.service';

@Component({
 selector: 'app-view-knowledge-base-section',
 templateUrl: './view-knowledge-base-section.component.html',
 styleUrls: ['./view-knowledge-base-section.component.scss'],
})
export class ViewKnowledgeBaseSectionComponent implements OnInit {

 id: string | any ;
 sectionData: any;

 constructor(
   private route: ActivatedRoute,
   private butterCMSService: ButterCMSService
 ) {}

 ngOnInit(): void {
   this.id = this.route.snapshot.paramMap.get('id')
   console.log('id', this.id);

   this.butterCMSService.getKnowledgeBaseSectionType(this.id)
   .then((resp: any) => {
     this.sectionData = resp?.data?.data;
     console.log('section data', resp?.data?.data)
   })
   .catch(function(error: any) {
     console.log('section error', error)
   });
 }
}
Code in the app/pages/view-knowledge-base-section/view-knowledge-base-section.component.ts file
In the code above, we simply import the service we created earlier and call the method getKnowledgeBaseSectionType() which sends an HTTP request to the Content API to fetch the content for a section using the slug (ID) of that section.
We will go to the app/pages/view-knowledge-base-section/view-knowledge-base-section.component.html file and paste the snippet of code below:
<app-header-for-sections></app-header-for-sections>


<main class="main background-gray">
   <div class="breadcrumbs container">
       <nav aria-label="breadcrumb" class="breadcrumbs-search-navbar">
           <ol class="breadcrumb">
               <li class="breadcrumb-item">
                   <a [routerLink]="'/knowledge-base/'">
                       All Categories
                   </a>
               </li>
               <li class="breadcrumb-item active" aria-current="page">
                   {{ sectionData?.fields?.section_name}}
               </li>
           </ol>

           <div class="search search--inline">
               <form>
                   <i class="ico-search">
                       <svg>
                           <use xlink:href="https://buttercms.com/static/v2/images/sprite.1229afca4c5f.svg#ico-search"></use>
                       </svg>
                   </i>

                   <input type="search" name="query" id="query" value="" placeholder="Search here"
                       class="search__field">

                   <button type="submit" class="search__btn btn btn--solid-dark-blue btn--icon">
                       <i class="ico-arrow-send-white">
                           <svg style="color: white" xmlns="http://www.w3.org/2000/svg" width="16" height="16" fill="currentColor" class="bi bi-arrow-right" viewBox="0 0 16 16"> <path fill-rule="evenodd" d="M1 8a.5.5 0 0 1 .5-.5h11.793l-3.147-3.146a.5.5 0 0 1 .708-.708l4 4a.5.5 0 0 1 0 .708l-4 4a.5.5 0 0 1-.708-.708L13.293 8.5H1.5A.5.5 0 0 1 1 8z" fill="white"></path> </svg>
                       </i>
                   </button>
               </form>
           </div>
       </nav>
   </div>

   <section class="section-category">
       <div class="container">
           <div class="section-category__head">
               <div class="d-inline-block">
                   <div class="category-icon">
                       <img src="https://cdn.buttercms.com/JsA9TWYQ5upTxBFMiNr9" alt="How To's">
                   </div>
               </div>
               <h1 class="d-inline-block">
                   {{ sectionData?.fields?.section_name}}
               </h1>
               <p class="mt-5">
                   {{ sectionData?.fields?.section_description }}
               </p>
           </div>

           <div class="section-category__body">
               <div class="row">
                   <div class="col">
                       <ul *ngIf="sectionData && sectionData?.fields?.section_article_type?.length > 0" class="list-group">
                           <li *ngFor="let data of sectionData?.fields?.section_article_type" class="list-group-item list-group-item-action">
                               <h5 class="d-flex justify-content-between">
                                   {{ data?.fields?.article_name }}
                               </h5>
                               <p>
                                   {{ data?.fields?.article_description }}
                               </p>
                               <a [routerLink]="['/knowledge-base/section/' + id + '/article',  data?.slug]"></a>
                           </li>
                       </ul>

                       <ul *ngIf="(!sectionData) || ( sectionData && sectionData?.fields?.section_article_type?.length === 0)" class="list-group">
                           <li class="list-group-item list-group-item-action">
                               <h5 class="d-flex justify-content-between">
                                   No Article available
                               </h5>
                           </li>
                       </ul>
                   </div>
               </div>
           </div>
       </div>
   </section>
</main>
Code in the app/pages/view-knowledge-base-section/view-knowledge-base-section.component.html file
In the code above, we simply render the section data obtained from calling the method getKnowledgeBaseSectionType() on the ButterCMS service.
Next, we will add styling to the component. We will go to the app/pages/view-knowledge-base-section/view-knowledge-base-section.component.scss file and paste the snippet of code below:
/* breadcrumbs */
.breadcrumbs {
   .breadcrumbs-search-navbar {
       background-color: #e9ecef;
       display: flex;
       align-items: center;

       .breadcrumb {
           display: flex;
           flex-wrap: wrap;
           padding: 0.75rem 1rem;
           margin-bottom: 1rem;
           list-style: none;
           background-color: #e9ecef;
           border-radius: 0.25rem;

           .breadcrumb-item {
               a {
                   color: inherit;
                   text-decoration: none;
                   transition: opacity 0.4s ease-in-out;
                   cursor: pointer;
                   background-color: transparent;
               }

               &.active {
                   color: #6c757d;
               }

               & + .breadcrumb-item {
                   padding-left: 0.5rem;
               }
           }

           .breadcrumb-item + .breadcrumb-item::before {
               display: inline-block;
               padding-right: 0.5rem;
               color: #6c757d;
               content: "/";
           }
       }


       & .search {
           padding: 10px;
           margin: 0 0 0 auto;

           &.search--inline {
               position: static;
               transform: translateX(0);
               max-width: 422px;
               width: 100%;
               box-shadow: none;

               & .ico-search {
                   left: 18px;
               }

               & .search__field {
                   flex: 1;
                   max-width: 349px;
                   width: 100%;
                   height: 42px;
                   padding: 0 42px;
                   appearance: none !important;

                   &::placeholder {
                       outline: none !important;
                       box-shadow: none !important;
                   }
               }

               & .btn {
                   left: -1px;
                   flex: 0 0 73px;
                   max-width: 73px;
                   min-width: 0;
                   height: 42px;
                   padding: 0;
                   line-height: 42px;
               }
           }


           & .btn {
               position: relative;
               left: -1px;
               flex: 0 0 73px;
               max-width: 73px;
               height: 70px;
               padding: 0;
               min-width: unset;
               line-height: 70px;
               border-radius: 0;
               border-bottom-right-radius: 2px;
               border-top-right-radius: 2px;
               transition: opacity 0.3s ease;


               border: 1px solid #384062;
               font-family: "Proxima Nova", sans-serif;
               font-size: 16px;
               font-weight: 600;
               vertical-align: middle;
               text-align: center;
               text-decoration: none;
               appearance: none;
               user-select: none;

               &.btn--solid-dark-blue {
                   background: #151E46;
                   border-color: #151E46;
                   color: #fff;

                   &.btn--icon svg {
                       fill: #fff;
                   }
               }

               &.btn--icon {
                   display: flex;
                   align-items: center;
                   justify-content: center;
                   letter-spacing: -0.01em;

                   & svg {
                       transition: fill 0.3s ease-in-out;
                   }
               }


               .ico-arrow-send-white svg, .ico-arrow-send svg {
                   width: 100%;
                   height: 100%;
               }
           }


           & .search__field {
               flex: 0 0 500px;
               max-width: 500px;
               height: 70px;
               padding: 0 50px;
               border-bottom-right-radius: 2px;
               border-top-right-radius: 2px;
               border: 0;
               color: #19234F;
               appearance: none !important;

               &::placeholder {
                   outline: none !important;
                   box-shadow: none !important;
               }
           }


           & form {
               display: flex;
           }

           & .ico-search {
               position: absolute;
               pointer-events: none;
               left: 27px;
               top: 50%;
               transform: translateY(-50%);
               width: 14px;
               height: 14px;
               line-height: 0;
           }

           [class*=ico-] {
               display: inline-block;
               vertical-align: middle;
           }


           [class*=ico-] svg {
               width: 100%;
               height: 100%;
               fill: inherit;
           }


           svg:not(:root) {
               overflow: hidden;
           }


           svg {
               overflow: hidden;
               vertical-align: middle;
           }
       }
   }


   & ol.breadcrumb {
       margin-bottom: 0;
   }
}


.background-gray {
   background-color: #f8f9fa !important;
}


/* layout */


.row {
   display: flex;
   flex-wrap: wrap;
   margin-right: -15px;
   margin-left: -15px;
}


.col {
   max-width: 100%;
   flex: 1;
}


.d-inline-block {
   display: inline-block !important;
}


.justify-content-between {
   justify-content: space-between !important;
}


.d-flex {
   display: flex !important;
}


/* section-category */
.section-category {
   padding: 20px 0 40px;
   background-color: #f8f9fa;


   & .container {
       background-color: #fff;
       padding: 3rem 2rem;
   }


   .section-category__head {
       margin-bottom: 60px;


       h1 {
           font-size: 45px;
           line-height: 1.09;
       }


       & p:last-child {
           margin-bottom: 0;
       }


       & .category-icon {
           position: relative;
           flex: 0 0 70px;
           height: 70px;
           width: 70px;
           margin: 0 10px 0 0;
           border-radius: 50%;
           background-color: #19234F;
           display: flex;
           justify-content: center;
           align-items: center;


           img {
               display: inline-block;
               max-width: 100%;
               height: auto;
               vertical-align: middle;
           }
       }
   }


   & .section-category__body {
       .row {
           display: flex;
           flex-wrap: wrap;
           margin-right: -15px;
           margin-left: -15px;


           .col {
               max-width: 100%;
               flex: 1;
           }
       }


       & .list-group-item {
           padding: 2rem 1.25rem !important;


           &:first-child {
               border-top-left-radius: 0.25rem;
               border-top-right-radius: 0.25rem;
           }


           & {
               position: relative;
               display: block;
               padding: 0.75rem 1.25rem;
               margin-bottom: -1px;
               background-color: #fff;
               border: 1px solid rgba(0, 0, 0, 0.125);
           }


           &.list-group-item-action {
               width: 100%;
               color: #495057;
               text-align: inherit;


               &:hover, &:focus {
                   z-index: 1;
                   color: #495057;
                   text-decoration: none;
                   background-color: #f8f9fa;
               }
           }


           [class^=list-] {
               list-style: none outside none;
           }


           & p {
               margin-top: 0;
               margin-bottom: 1rem;
           }


           & a {
               position: absolute;
               top: 0;
               left: 0;
               right: 0;
               bottom: 0;
               color: inherit;
               text-decoration: none;
               transition: opacity 0.4s ease-in-out;
           }


           h5 {
               font-weight: 600;
               font-size: 28px;
               line-height: 1.2;
               margin-bottom: 0.5rem;
           }
       }
   }
}


/* Articles */
.section-articles {
   padding: 120px 0 0px;

   @media (max-width: 1650px){
       .section-articles {
           padding: 40px 20px 0px;
       }
   }


   &.section-articles--alt {
       padding: 40px 0 127px;
   }


   & .section-articles__head {
       margin: 0 0 76px;
       text-align: center;
   }

   & .section-articles__foot {
       padding: 5px 0 0;

       & .articles-small {
           & .articles-small__title {
               margin: 0 0 40px;
               font-size: 20px;
               font-weight: 600;
           }

           & h5 {
               display: block;
               font-size: 0.83em;
               margin-block-start: 1.67em;
               margin-block-end: 1.67em;
               margin-inline-start: 0px;
               margin-inline-end: 0px;
               font-weight: bold;
           }

           & .articles-small__title {
               margin: 0 0 40px;
               font-size: 20px;
               font-weight: 600;
           }
       }
   }


   [class^=list-] {
       list-style: none outside none;
   }


   .list-group {
       display: flex;
       flex-direction: column;
       padding-left: 0;
       margin-bottom: 0;

       &:first-child {
           border-top-left-radius: 0.25rem;
           border-top-right-radius: 0.25rem;
       }

       & .list-group-item {
           position: relative;
           display: block;
           padding: 0.75rem 1.25rem;
           margin-bottom: -1px;
           background-color: #fff;
           border: 1px solid rgba(0, 0, 0, 0.125);

           & a {
               color: inherit;
               text-decoration: none;
               transition: opacity 0.4s ease-in-out;

               h6 {
                   font-size: 18px;
                   line-height: 1.44;
                   margin-bottom: 0.5rem;
                   font-weight: 600;
               }
           }

           &.list-group-item-action {
               width: 100%;
               color: #495057;
               text-align: inherit;

               &:hover, &:focus {
                   z-index: 1;
                   color: #495057;
                   text-decoration: none;
                   background-color: #f8f9fa;
               }
           }


           &:first-child {
               border-top-left-radius: 0.25rem;
               border-top-right-radius: 0.25rem;
           }
       }
   }
Styling in the app/pages/view-knowledge-base-section/view-knowledge-base-section.component.scss file
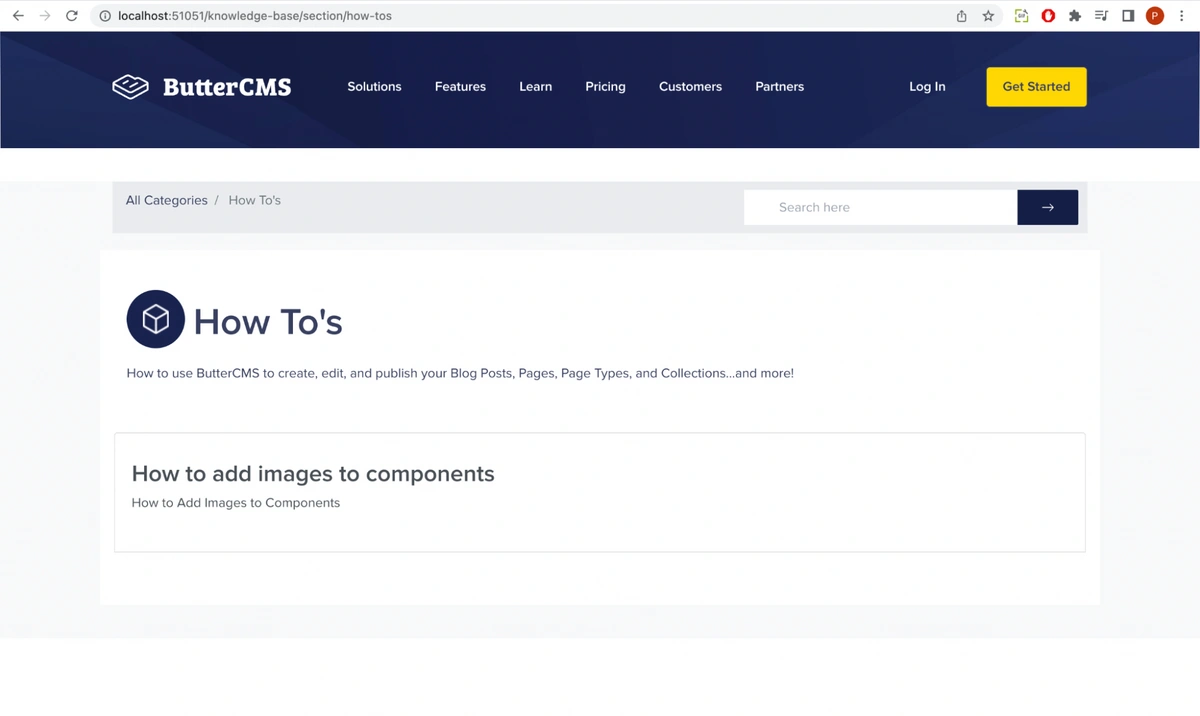
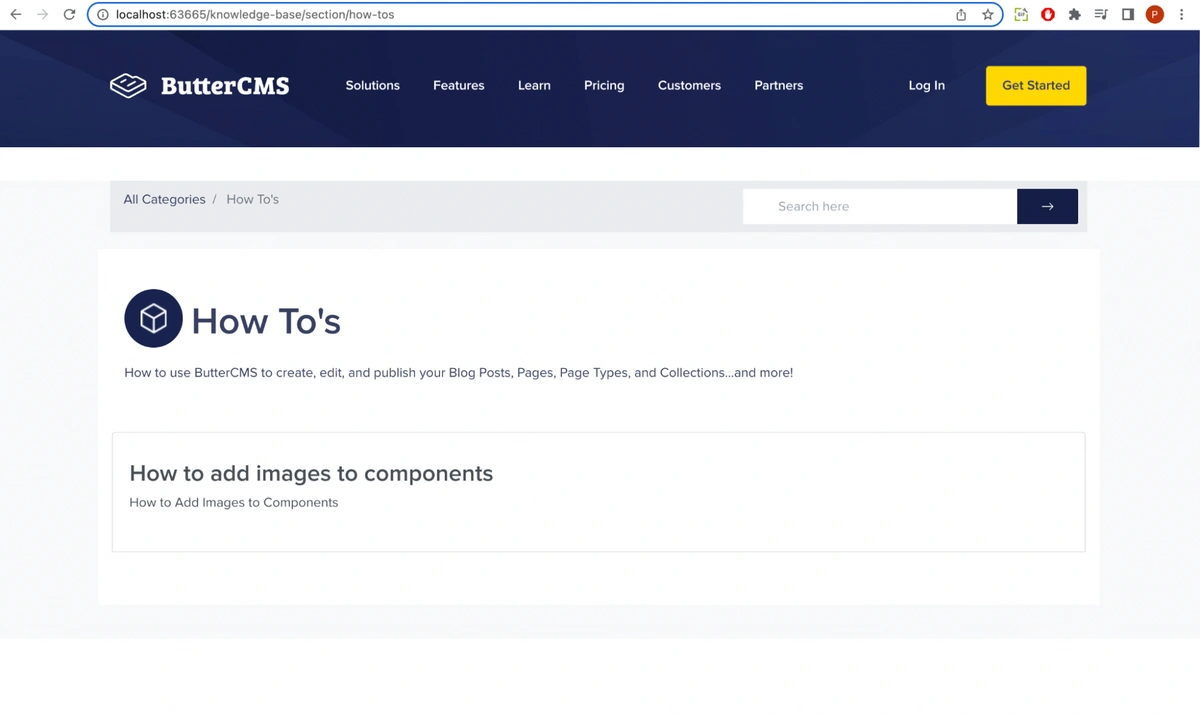
After adding the styling, when we open our app in the browser, we will see the following:
Preview of a knowledge base section
From the preview, we can see the section content we created in the ButterCMS dashboard and the link to the article page.
We will link the content of the section to an article so that upon clicking the link, we will be able to view the article. Head over to the app/pages/view-knowledge-article-section/view-knowledge-base-article.component.scss file and paste the snippet of code below:
import { Component, OnInit, ViewEncapsulation } from '@angular/core';
import { ActivatedRoute } from '@angular/router';
import { ButterCMSService } from 'src/app/core/services/butter-cms.service';

@Component({
 selector: 'app-view-knowledge-base-article',
 templateUrl: './view-knowledge-base-article.component.html',
 styleUrls: ['./view-knowledge-base-article.component.scss'],
 encapsulation: ViewEncapsulation.None,
})
export class ViewKnowledgeBaseArticleComponent implements OnInit {

 id: string | any ;
 articleData: any;
 sectionId: string | any;

 constructor(
   private route: ActivatedRoute,
   private butterCMSService: ButterCMSService
 ) {}

 ngOnInit(): void {
   this.sectionId = this.route.snapshot.paramMap.get('sectionId');
   this.id = this.route.snapshot.paramMap.get('articleId');
   console.log('id', this.id);

   this.butterCMSService.getKnowledgeBaseArticleType(this.id)
   .then((resp: any) => {
     this.articleData = resp?.data?.data;
     console.log('article data', resp?.data?.data)
   })
   .catch(function(error: any) {
     console.log('article error', error)
   });
 }
}

}
Code in the app/pages/view-knowledge-base-article/view-knowledge-base-article.component.ts file
In the code above, we simply import the service we created earlier and call the method getKnowledgeBaseArticleType() which sends an HTTP request to the Content API to fetch the contents of an article using the article slug (ID) of that section.
We will go to the app/pages/view-knowledge-base-article/view-knowledge-base-article.component.html file and paste the snippet of code below:
<app-header-for-sections></app-header-for-sections>


<main class="main background-gray">
   <div class="breadcrumbs container">
       <nav aria-label="breadcrumb" class="breadcrumbs-search-navbar">
           <ol class="breadcrumb">
               <li class="breadcrumb-item">
                   <a [routerLink]="'/knowledge-base/'">
                       All Categories
                   </a>
               </li>
               <li class="breadcrumb-item">
                   <a [routerLink]="'/knowledge-base/section/' + sectionId">
                       {{ sectionId }}
                   </a>
               </li>


               <li class="breadcrumb-item active" aria-current="page">
                   {{ articleData?.slug }}
               </li>
           </ol>


           <div class="search search--inline">
               <form>
                   <i class="ico-search">
                       <svg>
                           <use xlink:href="https://buttercms.com/static/v2/images/sprite.1229afca4c5f.svg#ico-search">
                           </use>
                       </svg>
                   </i>


                   <input type="search" name="query" id="query" value="" placeholder="Search here"
                       class="search__field">


                   <button type="submit" class="search__btn btn btn--solid-dark-blue btn--icon">
                       <i class="ico-arrow-send-white">
                           <svg style="color: white" xmlns="http://www.w3.org/2000/svg" width="16" height="16" fill="currentColor" class="bi bi-arrow-right" viewBox="0 0 16 16"> <path fill-rule="evenodd" d="M1 8a.5.5 0 0 1 .5-.5h11.793l-3.147-3.146a.5.5 0 0 1 .708-.708l4 4a.5.5 0 0 1 0 .708l-4 4a.5.5 0 0 1-.708-.708L13.293 8.5H1.5A.5.5 0 0 1 1 8z" fill="white"></path> </svg>
                       </i>
                   </button>
               </form>
           </div>
       </nav>
   </div>


   <section class="section-category">
       <div class="container">
           <div class="section-category__body">
               <section class="section-article">
                   <div class="container" [innerHTML]="articleData?.fields?.article_body"></div>
               </section>
           </div>
       </div>
   </section>
</main>
Code in the app/pages/view-knowledge-base-article/view-knowledge-base-article.component.html file
In the code above, we simply render the article data obtained from calling the method getKnowledgeBaseArticleType() on the ButterCMS service.
Next, we will add styling to the component. We will go to the app/pages/view-knowledge-base-article/view-knowledge-base-article.component.scss file and paste the snippet of code below:
/* breadcrumbs */
.breadcrumbs {
   .breadcrumbs-search-navbar {
       background-color: #e9ecef;
       display: flex;
       align-items: center;


       .breadcrumb {
           display: flex;
           flex-wrap: wrap;
           padding: 0.75rem 1rem;
           margin-bottom: 1rem;
           list-style: none;
           background-color: #e9ecef;
           border-radius: 0.25rem;


           .breadcrumb-item {
               a {
                   color: inherit;
                   text-decoration: none;
                   transition: opacity 0.4s ease-in-out;
                   cursor: pointer;
                   background-color: transparent;
               }


               &.active {
                   color: #6c757d;
               }


               & + .breadcrumb-item {
                   padding-left: 0.5rem;
               }
           }


           .breadcrumb-item + .breadcrumb-item::before {
               display: inline-block;
               padding-right: 0.5rem;
               color: #6c757d;
               content: "/";
           }
       }


       & .search {
           padding: 10px;
           margin: 0 0 0 auto;


           &.search--inline {
               position: static;
               transform: translateX(0);
               max-width: 422px;
               width: 100%;
               box-shadow: none;


               & .ico-search {
                   left: 18px;
               }


               & .search__field {
                   flex: 1;
                   max-width: 349px;
                   width: 100%;
                   height: 42px;
                   padding: 0 42px;
                   appearance: none !important;


                   &::placeholder {
                       outline: none !important;
                       box-shadow: none !important;
                   }
               }


               & .btn {
                   left: -1px;
                   flex: 0 0 73px;
                   max-width: 73px;
                   min-width: 0;
                   height: 42px;
                   padding: 0;
                   line-height: 42px;
               }
           }


           & .btn {
               position: relative;
               left: -1px;
               flex: 0 0 73px;
               max-width: 73px;
               height: 70px;
               padding: 0;
               min-width: unset;
               line-height: 70px;
               border-radius: 0;
               border-bottom-right-radius: 2px;
               border-top-right-radius: 2px;
               transition: opacity 0.3s ease;


               border: 1px solid #384062;
               font-family: "Proxima Nova", sans-serif;
               font-size: 16px;
               font-weight: 600;
               vertical-align: middle;
               text-align: center;
               text-decoration: none;
               appearance: none;
               user-select: none;


               &.btn--solid-dark-blue {
                   background: #151E46;
                   border-color: #151E46;
                   color: #fff;


                   &.btn--icon svg {
                       fill: #fff;
                   }
               }

               &.btn--icon {
                   display: flex;
                   align-items: center;
                   justify-content: center;
                   letter-spacing: -0.01em;


                   & svg {
                       transition: fill 0.3s ease-in-out;
                   }
               }


               .ico-arrow-send-white svg, .ico-arrow-send svg {
                   width: 100%;
                   height: 100%;
               }
           }


           & .search__field {
               flex: 0 0 500px;
               max-width: 500px;
               height: 70px;
               padding: 0 50px;
               border-bottom-right-radius: 2px;
               border-top-right-radius: 2px;
               border: 0;
               color: #19234F;
               appearance: none !important;


               &::placeholder {
                   outline: none !important;
                   box-shadow: none !important;
               }
           }


           & form {
               display: flex;
           }

           & .ico-search {
               position: absolute;
               pointer-events: none;
               left: 27px;
               top: 50%;
               transform: translateY(-50%);
               width: 14px;
               height: 14px;
               line-height: 0;
           }

           [class*=ico-] {
               display: inline-block;
               vertical-align: middle;
           }


           [class*=ico-] svg {
               width: 100%;
               height: 100%;
               fill: inherit;
           }


           svg:not(:root) {
               overflow: hidden;
           }


           svg {
               overflow: hidden;
               vertical-align: middle;
           }
       }
   }


   & ol.breadcrumb {
       margin-bottom: 0;
   }
}


.background-gray {
   background-color: #f8f9fa !important;
}


/* layout */


.row {
   display: flex;
   flex-wrap: wrap;
   margin-right: -15px;
   margin-left: -15px;
}


.col {
   max-width: 100%;
   flex: 1;
}


.d-inline-block {
   display: inline-block !important;
}


.justify-content-between {
   justify-content: space-between !important;
}


.d-flex {
   display: flex !important;
}


/* section-category */
.section-category {
   padding: 20px 0 40px;
   background-color: #f8f9fa;


   & .container {
       background-color: #fff;
       padding: 3rem 2rem;
   }


   .section-category__head {
       margin-bottom: 60px;


       h1 {
           font-size: 45px;
           line-height: 1.09;
       }


       & p:last-child {
           margin-bottom: 0;
       }


       & .category-icon {
           position: relative;
           flex: 0 0 70px;
           height: 70px;
           width: 70px;
           margin: 0 10px 0 0;
           border-radius: 50%;
           background-color: #19234F;
           display: flex;
           justify-content: center;
           align-items: center;


           img {
               display: inline-block;
               max-width: 100%;
               height: auto;
               vertical-align: middle;
           }
       }
   }


   & .section-category__body {


       h1 {
           font-weight: 600 !important;
           font-size: 45px !important;
           line-height: 1.09 !important;


           &:last-child {
               margin-bottom: 0;
           }
       }


       p {
           padding-bottom:  1rem;
       }


       .row {
           display: flex;
           flex-wrap: wrap;
           margin-right: -15px;
           margin-left: -15px;


           .col {
               max-width: 100%;
               flex: 1;
           }
       }


       & .list-group-item {
           padding: 2rem 1.25rem !important;


           &:first-child {
               border-top-left-radius: 0.25rem;
               border-top-right-radius: 0.25rem;
           }


           & {
               position: relative;
               display: block;
               padding: 0.75rem 1.25rem;
               margin-bottom: -1px;
               background-color: #fff;
               border: 1px solid rgba(0, 0, 0, 0.125);
           }


           &.list-group-item-action {
               width: 100%;
               color: #495057;
               text-align: inherit;


               &:hover, &:focus {
                   z-index: 1;
                   color: #495057;
                   text-decoration: none;
                   background-color: #f8f9fa;
               }
           }


           [class^=list-] {
               list-style: none outside none;
           }


           & p {
               margin-top: 0;
               margin-bottom: 1rem;
           }


           & a {
               position: absolute;
               top: 0;
               left: 0;
               right: 0;
               bottom: 0;
               color: inherit;
               text-decoration: none;
               transition: opacity 0.4s ease-in-out;
           }


           h5 {
               font-weight: 600;
               font-size: 28px;
               line-height: 1.2;
               margin-bottom: 0.5rem;
           }
       }


       /* article */
       .section-article {
           background-color: #f8f9fa;


           & > .container > h1 {
               font-weight: 600 !important;
               font-size: 45px !important;
               line-height: 1.09 !important;


               &:last-child {
                   margin-bottom: 0;
               }
           }


           p {
               padding-bottom:  1rem;
           }


           & .container {
               padding: 3rem 2rem;
               background-color: #fff;
           }
           .section-article__body {}
       }
   }
}
Styling in the app/pages/view-knowledge-base-section/view-knowledge-base-section.component.scss file
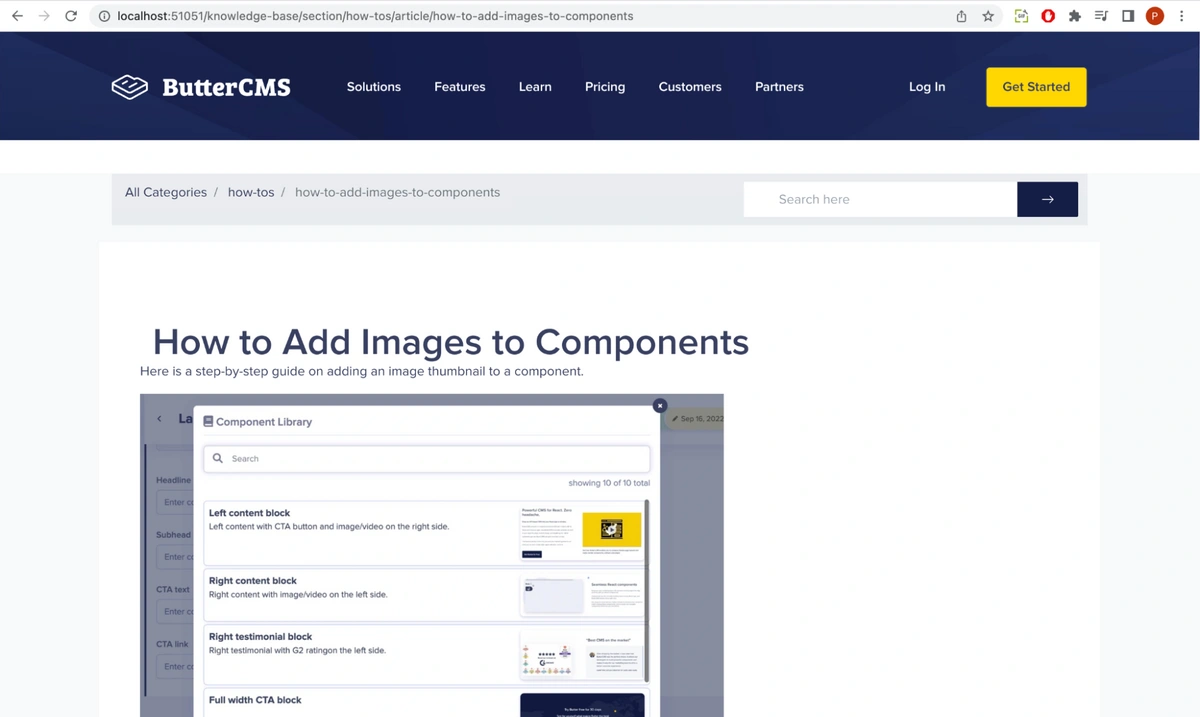
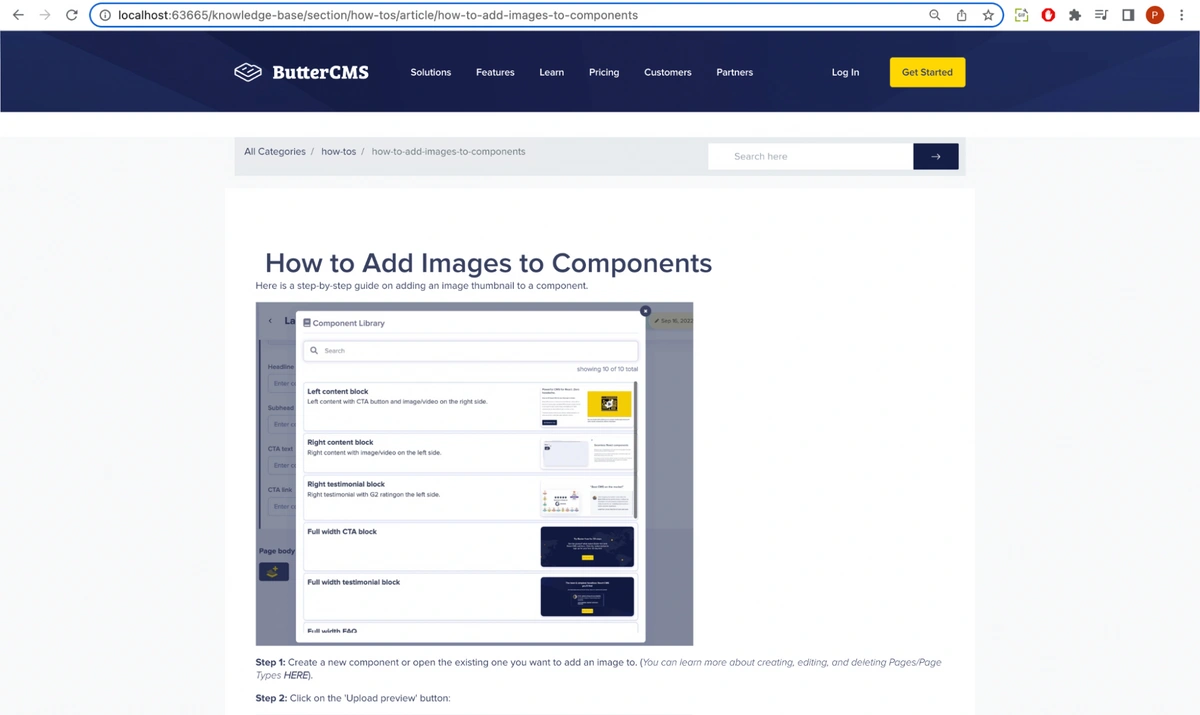
After adding the styling, when we open our app in the browser, we will see the following:
Preview of a knowledge base article
From the preview, we can see the article content we created in the ButterCMS dashboard.
For the home page, we will be using the ngModel directive for two-way binding for the search input. So, we will need to import the forms module to our application. To do this, head over to src/app/app.module.ts and add the following imports:
import { NgModule } from '@angular/core';
Then, modify imports to look like the following:
imports: [
   ….
   FormsModule
 ],
Next, head over to the app/pages/home/home.component.ts file and define the following property which will hold the value entered in the search bar:
searchText: string = '';Next, let’s update the search bar in the app/pages/home/home.component.html file by adding an onclick event function handleSearch() and an ngModel to the already existing search input.
<div class="intro intro--small"
       style="background-image: url(https://buttercms.com/static/v2/images/intro-bg-2.4af98db9356f.jpg);">
       <div class="container">
           <div class="intro__inner">
               <div class="intro__head">
                   <h1>
                       {{ homePageData?.fields['knowledge-base_title'] }}
                   </h1>
               </div>

               <div class="intro__content">
                   <div class="search">
                       <form>
                           <i class="ico-search">
                               <svg>
                                   <use
                                       xlink:href="https://buttercms.com/static/v2/images/sprite.1229afca4c5f.svg#ico-search">
                                   </use>
                               </svg>
                           </i>

                           <input [(ngModel)]="searchText" type="search" name="query" id="query" value="" placeholder="Search here" class="search__field"/>

                           <button (click)="handleSearch()" type="submit" class="search__btn btn btn--solid-yellow">
                               <i class="ico-arrow-send-white">
                                   <svg style="color: white" xmlns="http://www.w3.org/2000/svg" width="16" height="16" fill="currentColor" class="bi bi-arrow-right" viewBox="0 0 16 16"> <path fill-rule="evenodd" d="M1 8a.5.5 0 0 1 .5-.5h11.793l-3.147-3.146a.5.5 0 0 1 .708-.708l4 4a.5.5 0 0 1 0 .708l-4 4a.5.5 0 0 1-.708-.708L13.293 8.5H1.5A.5.5 0 0 1 1 8z" fill="white"></path> </svg>
                               </i>
                           </button>
                       </form>
                   </div>
               </div>
           </div>
       </div>
   </div>
A section of code in the app/pages/home/home.component.ts file
After adding the HTML code, head over to the app/pages/home/home.component.ts file and update the component with the snippet of code below:
import { Component, OnInit } from '@angular/core';
import { ActivatedRoute, Router } from '@angular/router';
import { ButterCMSService } from 'src/app/core/services/butter-cms.service';


@Component({
 selector: 'app-home',
 templateUrl: './home.component.html',
 styleUrls: ['./home.component.scss']
})
export class HomeComponent implements OnInit {


 homePageData: any;
 searchText: string = '';


 constructor(
   private butterCMSService: ButterCMSService,
   private router: Router,
   private activatedRoute: ActivatedRoute
 ) { }


 ngOnInit(): void {
   this.butterCMSService.getKnowledgeBaseHomeType()
   .then((resp: any) => {
     this.homePageData = resp?.data?.data;
     console.log('data', resp?.data?.data)
   })
   .catch(function(error: any) {
     console.log('error', error)
   });
 }


 handleSearch() {
   this.router.navigate(['search'], {
     relativeTo: this.activatedRoute,
     queryParams: {
       query: this.searchText
     },
     queryParamsHandling: 'merge',
     skipLocationChange: true
   });
 }
}
In the code above, the ngModel stores the search text added to the search input and the handleSearch() function handles sending the search query to the search results page.
Next, we will fill the search results page with code. Head over to app/pages/search-knowledge-base/search-knowledge-base.component.ts file and add the snippet of code below:
import { Component, OnInit } from '@angular/core';
import { ActivatedRoute } from '@angular/router';
import { ButterCMSService } from 'src/app/core/services/butter-cms.service';


@Component({
 selector: 'app-search-knowledge-base',
 templateUrl: './search-knowledge-base.component.html',
 styleUrls: ['./search-knowledge-base.component.scss']
})
export class SearchKnowledgeBaseComponent implements OnInit {
 id: string | any ;
 knowledgeBaseData: any;


 constructor(
   private route: ActivatedRoute,
   private butterCMSService: ButterCMSService
 ) {}


 ngOnInit(): void {
   this.route.queryParams
     .subscribe(params => {
       this.id = params['query'];
       console.log(params);
     }
   );


   this.butterCMSService.SearchKnowledgeBaseSection(this.id)
   .then((resp: any) => {
     this.knowledgeBaseData = resp?.data?.data;
     console.log('section data', resp?.data?.data)
   })
   .catch(function(error: any) {
     console.log('section error', error)
   });
 }
}
Code in the app/pages/search-knowledge-base/search-knowledge-base.component.ts file
In the code above, we simply import the service we created earlier and call the method searchKnowledgeBase() which sends an HTTP request to the Content API to search for articles using a search keyword.
Next, we will go to the app/pages/search-knowledge-base/search-knowledge-base.component.html file and paste the snippet of code below:
<app-header-for-sections></app-header-for-sections>


<main class="main background-gray">
   <div class="breadcrumbs container">
       <nav aria-label="breadcrumb" class="breadcrumbs-search-navbar">
           <ol class="breadcrumb">
               <li class="breadcrumb-item">
                   <a [routerLink]="'/knowledge-base/'">
                      Search
                   </a>
               </li>
               <li class="breadcrumb-item active" aria-current="page">
                   {{ id }}
               </li>
           </ol>


           <div class="search search--inline">
               <form>
                   <i class="ico-search">
                       <svg>
                           <use xlink:href="https://buttercms.com/static/v2/images/sprite.1229afca4c5f.svg#ico-search"></use>
                       </svg>
                   </i>


                   <input type="search" name="query" id="query" value="" placeholder="Search here"
                       class="search__field">


                   <button type="submit" class="search__btn btn btn--solid-dark-blue btn--icon">
                       <i class="ico-arrow-send-white">
                           <svg>
                               <use xlink:href="https://buttercms.com/static/v2/images/sprite.1229afca4c5f.svg#ico-arrow-send-white"></use>
                           </svg>
                       </i>
                   </button>
               </form>
           </div>
       </nav>
   </div>


   <section class="section-category">
       <div class="container">
           <div class="section-category__head">
               <div class="d-inline-block">
                   <div class="category-icon">
                       <img src="https://cdn.buttercms.com/JsA9TWYQ5upTxBFMiNr9" alt="How To's">
                   </div>
               </div>
               <h1 class="d-inline-block">
                   Search for {{ id }}
               </h1>
               <p class="mt-5">
                   {{ knowledgeBaseData?.fields?.section_description }}
               </p>
           </div>


           <div *ngIf="knowledgeBaseData && knowledgeBaseData?.length > 0" class="section-category__body">
               <div class="row">
                   <div class="col">
                       <ul  class="list-group">
                           <li *ngFor="let data of knowledgeBaseData" class="list-group-item list-group-item-action">
                               <h5 class="d-flex justify-content-between">
                                   {{ data?.fields?.article_name }}
                               </h5>
                               <p>
                                   {{ data?.fields?.article_description }}
                               </p>
                               <a [routerLink]="['/knowledge-base/section/' + id + '/article',  data?.slug]"></a>
                           </li>
                       </ul>
                   </div>
               </div>
           </div>


           <div *ngIf="(!knowledgeBaseData) || ( knowledgeBaseData && knowledgeBaseData?.length === 0)" class="section-category__body">
               <div class="row">
                 <div class="col">
                   <p>
                     No results found. Try a different search query.
                   </p>
                 </div>
               </div>
           </div>
       </div>
   </section>
</main>
Code in the app/pages/search-knowledge-base/search-knowledge-base.component.html file
In the code above, we simply render the search results obtained from calling the method searchKnowledgeBase() on the ButterCMS service.
Next, we will add styling to the component. We will go to the app/pages/search-knowledge-base/search-knowledge-base.component.scss file and paste the snippet of code below:
/* breadcrumbs */
.breadcrumbs {
   .breadcrumbs-search-navbar {
       background-color: #e9ecef;
       display: flex;
       align-items: center;

       .breadcrumb {
           display: flex;
           flex-wrap: wrap;
           padding: 0.75rem 1rem;
           margin-bottom: 1rem;
           list-style: none;
           background-color: #e9ecef;
           border-radius: 0.25rem;

           .breadcrumb-item {
               a {
                   color: inherit;
                   text-decoration: none;
                   transition: opacity 0.4s ease-in-out;
                   cursor: pointer;
                   background-color: transparent;
               }

               &.active {
                   color: #6c757d;
               }

               & + .breadcrumb-item {
                   padding-left: 0.5rem;
               }
           }

           .breadcrumb-item + .breadcrumb-item::before {
               display: inline-block;
               padding-right: 0.5rem;
               color: #6c757d;
               content: "/";
           }
       }

       & .search {
           padding: 10px;
           margin: 0 0 0 auto;

           &.search--inline {
               position: static;
               transform: translateX(0);
               max-width: 422px;
               width: 100%;
               box-shadow: none;

               & .ico-search {
                   left: 18px;
               }

               & .search__field {
                   flex: 1;
                   max-width: 349px;
                   width: 100%;
                   height: 42px;
                   padding: 0 42px;
                   appearance: none !important;

                   &::placeholder {
                       outline: none !important;
                       box-shadow: none !important;
                   }
               }

               & .btn {
                   left: -1px;
                   flex: 0 0 73px;
                   max-width: 73px;
                   min-width: 0;
                   height: 42px;
                   padding: 0;
                   line-height: 42px;
               }
           }

           & .btn {
               position: relative;
               left: -1px;
               flex: 0 0 73px;
               max-width: 73px;
               height: 70px;
               padding: 0;
               min-width: unset;
               line-height: 70px;
               border-radius: 0;
               border-bottom-right-radius: 2px;
               border-top-right-radius: 2px;
               transition: opacity 0.3s ease;

               border: 1px solid #384062;
               font-family: "Proxima Nova", sans-serif;
               font-size: 16px;
               font-weight: 600;
               vertical-align: middle;
               text-align: center;
               text-decoration: none;
               appearance: none;
               user-select: none;

               &.btn--solid-dark-blue {
                   background: #151E46;
                   border-color: #151E46;
                   color: #fff;

                   &.btn--icon svg {
                       fill: #fff;
                   }
               }

               &.btn--icon {
                   display: flex;
                   align-items: center;
                   justify-content: center;
                   letter-spacing: -0.01em;

                   & svg {
                       transition: fill 0.3s ease-in-out;
                   }
               }

               .ico-arrow-send-white svg, .ico-arrow-send svg {
                   width: 100%;
                   height: 100%;
               }
           }

           & .search__field {
               flex: 0 0 500px;
               max-width: 500px;
               height: 70px;
               padding: 0 50px;
               border-bottom-right-radius: 2px;
               border-top-right-radius: 2px;
               border: 0;
               color: #19234F;
               appearance: none !important;

               &::placeholder {
                   outline: none !important;
                   box-shadow: none !important;
               }
           }

           & form {
               display: flex;
           }

           & .ico-search {
               position: absolute;
               pointer-events: none;
               left: 27px;
               top: 50%;
               transform: translateY(-50%);
               width: 14px;
               height: 14px;
               line-height: 0;
           }

           [class*=ico-] {
               display: inline-block;
               vertical-align: middle;
           }

           [class*=ico-] svg {
               width: 100%;
               height: 100%;
               fill: inherit;
           }

           svg:not(:root) {
               overflow: hidden;
           }

           svg {
               overflow: hidden;
               vertical-align: middle;
           }
       }
   }

   & ol.breadcrumb {
       margin-bottom: 0;
   }
}

.background-gray {
   background-color: #f8f9fa !important;
}

/* layout */

.row {
   display: flex;
   flex-wrap: wrap;
   margin-right: -15px;
   margin-left: -15px;
}

.col {
   max-width: 100%;
   flex: 1;
   flex-basis: 0;
   flex-grow: 1;
   position: relative;
   width: 100%;
   padding-right: 15px;
   padding-left: 15px;
}

.d-inline-block {
   display: inline-block !important;
}

.justify-content-between {
   justify-content: space-between !important;
}

.d-flex {
   display: flex !important;
}


/* section-category */
.section-category {
   padding: 20px 0 40px;
   background-color: #f8f9fa;

   & .container {
       background-color: #fff;
       padding: 3rem 2rem;
   }

   .section-category__head {
       margin-bottom: 60px;

       h1 {
           font-size: 45px;
           line-height: 1.09;
       }

       & p:last-child {
           margin-bottom: 0;
       }

       & .category-icon {
           position: relative;
           flex: 0 0 70px;
           height: 70px;
           width: 70px;
           margin: 0 10px 0 0;
           border-radius: 50%;
           background-color: #19234F;
           display: flex;
           justify-content: center;
           align-items: center;

           img {
               display: inline-block;
               max-width: 100%;
               height: auto;
               vertical-align: middle;
           }
       }
   }

   & .section-category__body {
       .row {
           display: flex;
           flex-wrap: wrap;
           margin-right: -15px;
           margin-left: -15px;

           .col {
               max-width: 100%;
               flex: 1;
           }
       }

       & .list-group-item {
           padding: 2rem 1.25rem !important;

           &:first-child {
               border-top-left-radius: 0.25rem;
               border-top-right-radius: 0.25rem;
           }

           & {
               position: relative;
               display: block;
               padding: 0.75rem 1.25rem;
               margin-bottom: -1px;
               background-color: #fff;
               border: 1px solid rgba(0, 0, 0, 0.125);
           }

           &.list-group-item-action {
               width: 100%;
               color: #495057;
               text-align: inherit;

               &:hover, &:focus {
                   z-index: 1;
                   color: #495057;
                   text-decoration: none;
                   background-color: #f8f9fa;
               }
           }

           [class^=list-] {
               list-style: none outside none;
           }

           & p {
               margin-top: 0;
               margin-bottom: 1rem;
           }

           & a {
               position: absolute;
               top: 0;
               left: 0;
               right: 0;
               bottom: 0;
               color: inherit;
               text-decoration: none;
               transition: opacity 0.4s ease-in-out;
           }

           h5 {
               font-weight: 600;
               font-size: 28px;
               line-height: 1.2;
               margin-bottom: 0.5rem;
           }
       }
   }
}

/* Articles */
.section-articles {
   padding: 120px 0 0px;

   @media (max-width: 1650px){
       .section-articles {
           padding: 40px 20px 0px;
       }
   }


   &.section-articles--alt {
       padding: 40px 0 127px;
   }


   & .section-articles__head {
       margin: 0 0 76px;
       text-align: center;
   }

   & .section-articles__foot {
       padding: 5px 0 0;

       & .articles-small {
           & .articles-small__title {
               margin: 0 0 40px;
               font-size: 20px;
               font-weight: 600;
           }

           & h5 {
               display: block;
               font-size: 0.83em;
               margin-block-start: 1.67em;
               margin-block-end: 1.67em;
               margin-inline-start: 0px;
               margin-inline-end: 0px;
               font-weight: bold;
           }

           & .articles-small__title {
               margin: 0 0 40px;
               font-size: 20px;
               font-weight: 600;
           }
       }
   }

   [class^=list-] {
       list-style: none outside none;
   }

   .list-group {
       display: flex;
       flex-direction: column;
       padding-left: 0;
       margin-bottom: 0;

       &:first-child {
           border-top-left-radius: 0.25rem;
           border-top-right-radius: 0.25rem;
       }

       & .list-group-item {
           position: relative;
           display: block;
           padding: 0.75rem 1.25rem;
           margin-bottom: -1px;
           background-color: #fff;
           border: 1px solid rgba(0, 0, 0, 0.125);

           & a {
               color: inherit;
               text-decoration: none;
               transition: opacity 0.4s ease-in-out;

               h6 {
                   font-size: 18px;
                   line-height: 1.44;
                   margin-bottom: 0.5rem;
                   font-weight: 600;
               }
           }

           &.list-group-item-action {
               width: 100%;
               color: #495057;
               text-align: inherit;

               &:hover, &:focus {
                   z-index: 1;
                   color: #495057;
                   text-decoration: none;
                   background-color: #f8f9fa;
               }
           }

           &:first-child {
               border-top-left-radius: 0.25rem;
               border-top-right-radius: 0.25rem;
           }
       }
   }
}
Styling in the app/pages/search-knowledge-base/search-knowledge-base.component.scss file
With this, when we open our app in the browser, we will see the following:
A preview of the search feature
When we combine all of the components we've created, we get a well-designed knowledge base, as shown below.
A preview of the home page of the knowledge base
A preview of the sections on the home page of the knowledge base
A preview of the link to an article page in a section of the knowledge base
A preview of an article in the knowledge base
A preview of a part of the article page in the knowledge base
In this tutorial, we walked through how to build a knowledge base in Angular using ButterCMS—from modeling page types and creating content in the dashboard to fetching and displaying it via the Content API. With this foundation, you can extend your knowledge base or apply the same page type approach to other content-driven features in your app. Want to try building it yourself? Start a free trial to explore on your own, or request a demo and we'll walk you through it.