New Starter App
ButterCMS is designed to be easy to integrate into your existing Next.js project.
If you're starting from scratch, or you want to hit the ground with a fast-implementing, easy tutorial, check out this Next.js + ButterCMS Starter. Our starter fully integrates with dynamic sample content from your ButterCMS account and includes a beautiful, custom theme and already-implemented search functionality.
All of the included sample content is automatically created in your account dashboard when you sign up for a free trial of ButterCMS.
This project can be deployed to Heroku and Vercel with the click of a button, so that you can instantly launch a new Next.js site that's fully integrated with ButterCMS. Just pick your provider and click the corresponding button below!

Source Code: https://github.com/ButterCMS/nextjs-starter-buttercms
Add Butter to An Existing App
Adding Butter to an existing Next.js app is lightning fast. All you need is your free API token and a few commands in terminal!
1. Get your Butter API token
Your API token is generated when you create a free trial account with ButterCMS. Once logged in, you can grab it from the settings page.
2. Install our SDK
$ npm install buttercms --save3. Fetch content from Butter
Let's fetch some content from Butter. Start a shell session and copy and paste in the below lines, substituting your actual Butter API token from Step 1. This will initialize the Butter Next.js SDK and fetch a sample "simple-page" from your Butter account.
$ nodevar butter = require('buttercms')('your_api_token');
butter.page.retrieve('*', 'simple-page').then(response => console.log(response.data))And you should see the following:
Promise {  }
> {
  data: {
    slug: 'simple-page',
    name: 'Simple Page',
    published: '2021-11-08T13:34:24.754675Z',
    updated: '2021-11-08T13:34:24.803661Z',
    page_type: null,
    fields: {
      seo_title: 'Anvils and Dynamite | Acme Co',
      headline: 'Acme Co provides supplies to your favorite cartoon heroes.',
      hero_image: 'https://cdn.buttercms.com/c8oSTGcwQDC5I58km5WV',
      call_to_action: 'Buy Now',
      customer_logos: [Array]
    }
  }
}
Awesome! You've just fetched your first page with the Butter API!
4. Expand your app by integrating blogs and pages
From here, the sky's the limit! We've provided step-by-step instructions for some of the most common tasks below, including:
- Creating and integrating Single Pages into your app,
- Creating and integrating reusable template pages with Page Types,
- Integrating Butter's feature-rich, easy-to-use Blog Engine,
- And using Collections to manage related, reusable components like tags and categories.
5. Final installation and integration notes
In Step 3, you pasted in your Butter API token into code. Now, as you integrate Butter into your app, you'll want to store your token as an environment variable.
In ES6 syntax, you can set your token with the following:
import Butter from 'buttercms';
const butter = Butter('your_api_token');
If yarn is your preferred package manager, you can also install
the Butter SDK with $ yarn add buttercms.
Butter can also be loaded using a CDN:
<script src="https://cdn.jsdelivr.net/npm/buttercms@3.0.3/dist/butter.min.js"></script>
The source code for the Butter Next.js SDK is available on Github.
Table of Contents
- Introduction
- Create a single page
- Integrate single page into your application
- Create multiple pages using Page Types
- Dynamic landing pages using Components
- Previewing pages
Introduction
Quickly launch a new marketing site or add CMS-powered pages to your existing site using our Pages. To create dynamic landing pages be sure to check out Components.
Create a Single Page
GET https://api.buttercms.com/v2/pages/*/?auth_token=your_token
Adding a CMS-powered page to your app involves three easy steps:
If you need help after reading this, contact us via email or livechat.
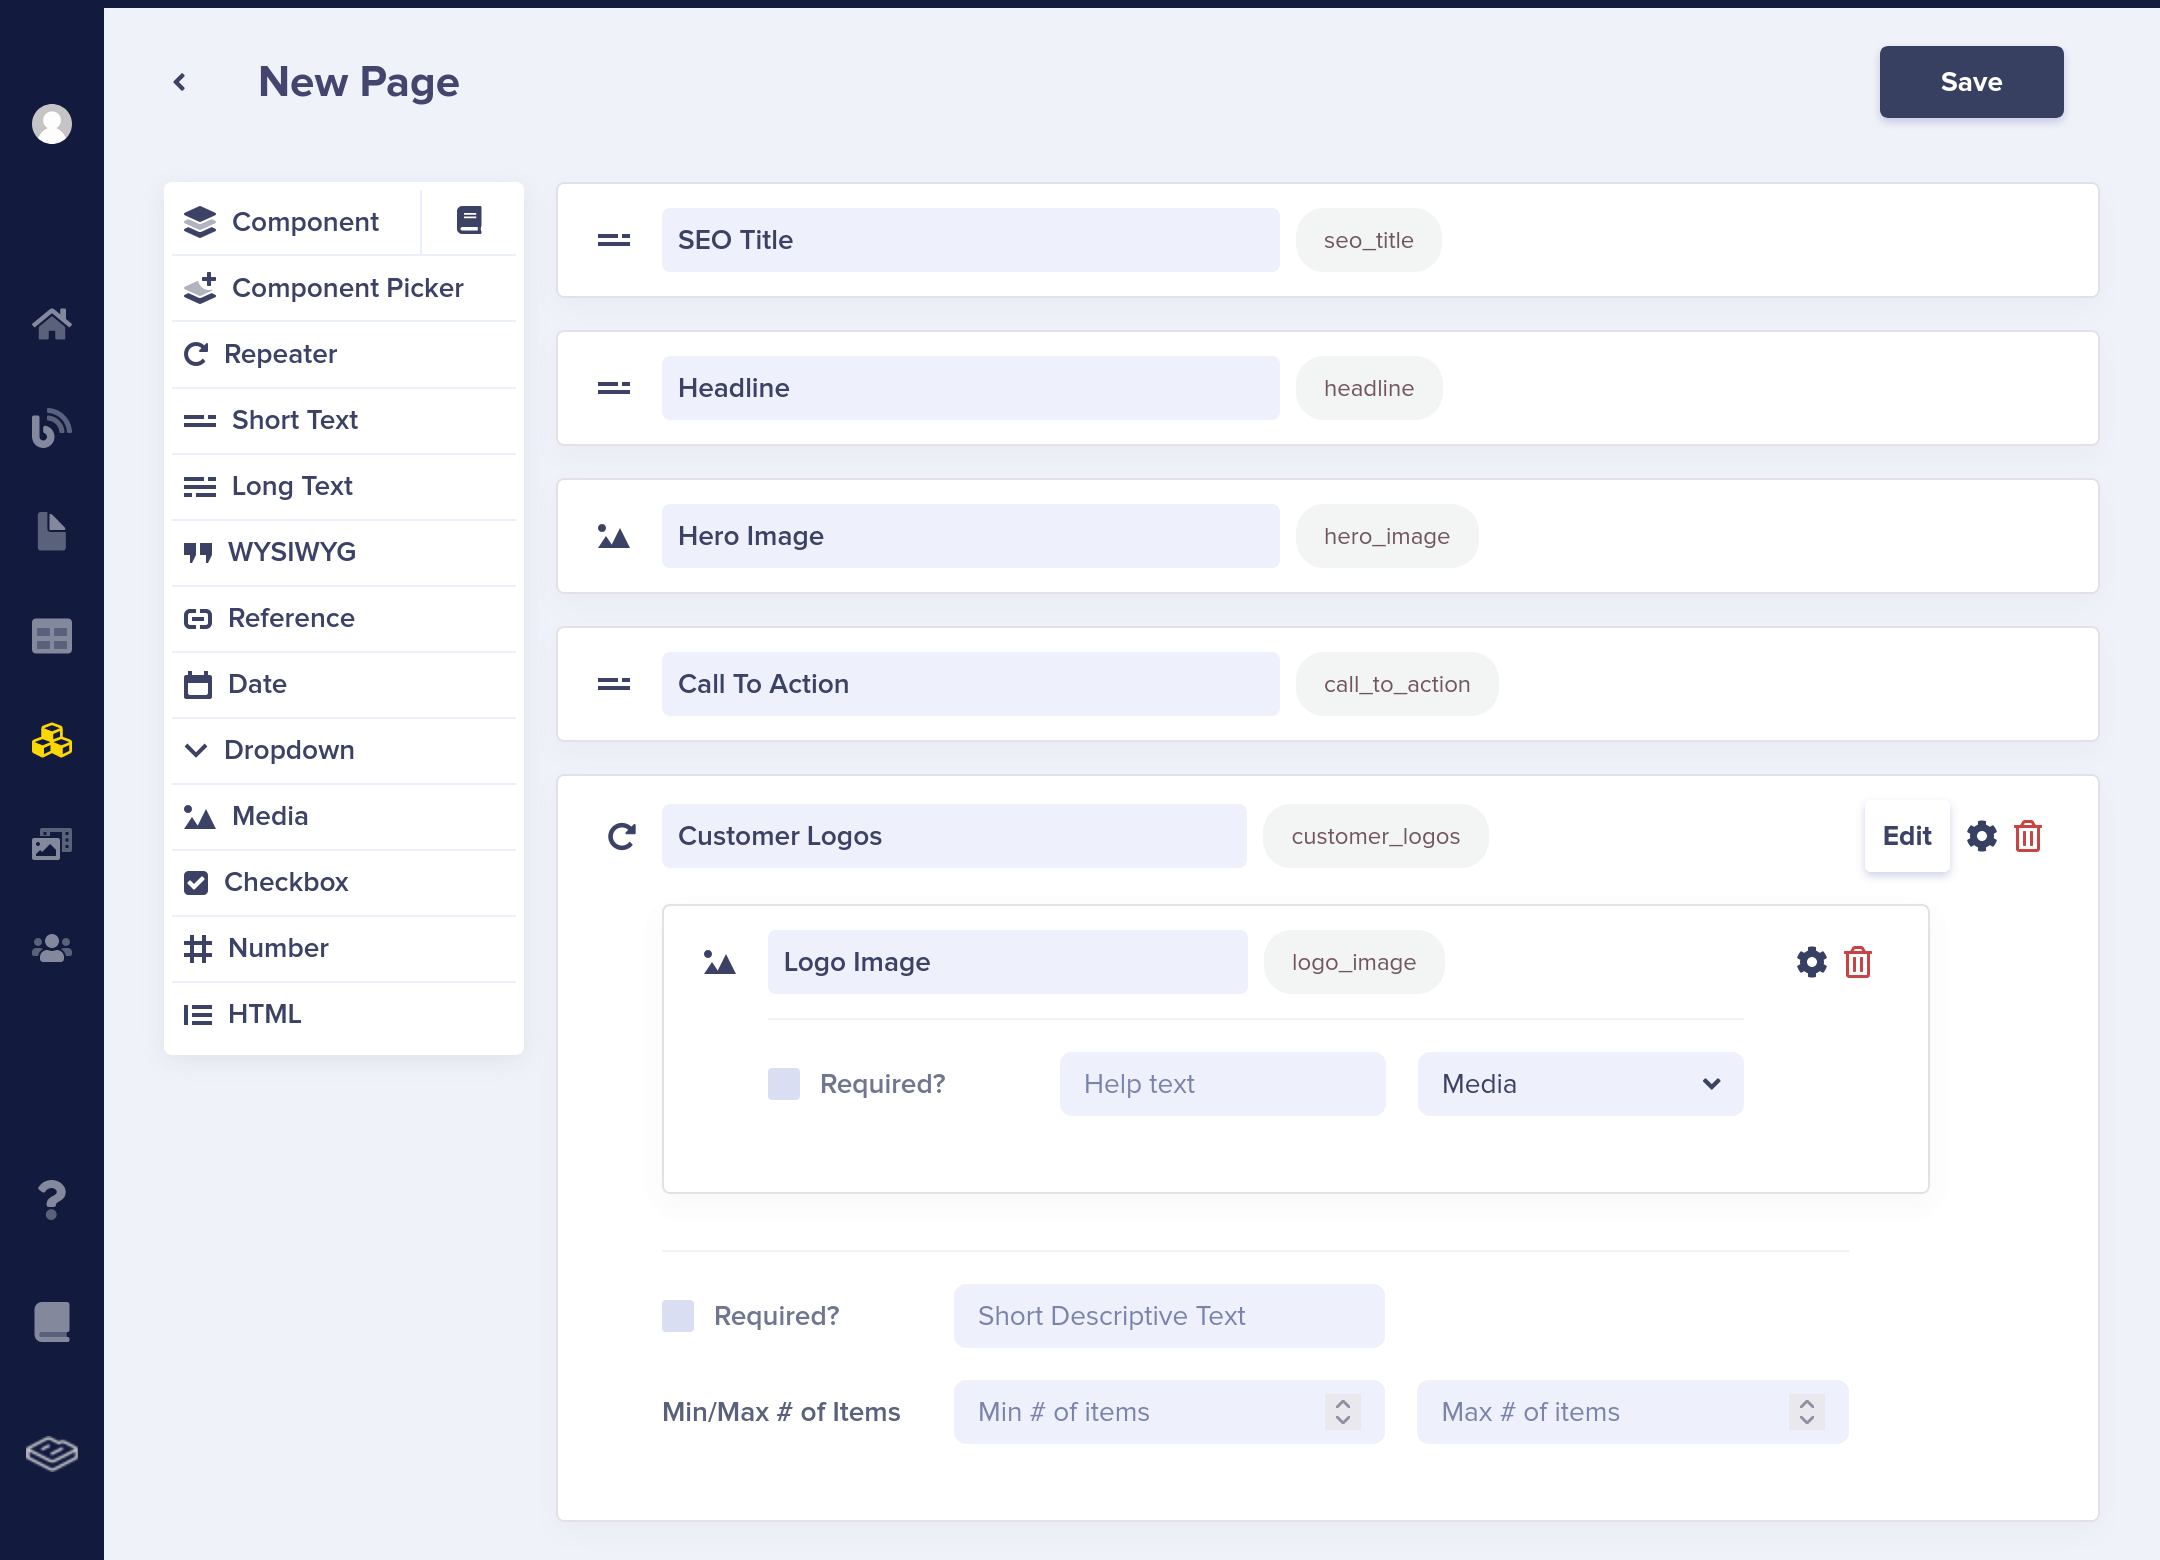
Create the Page Structure
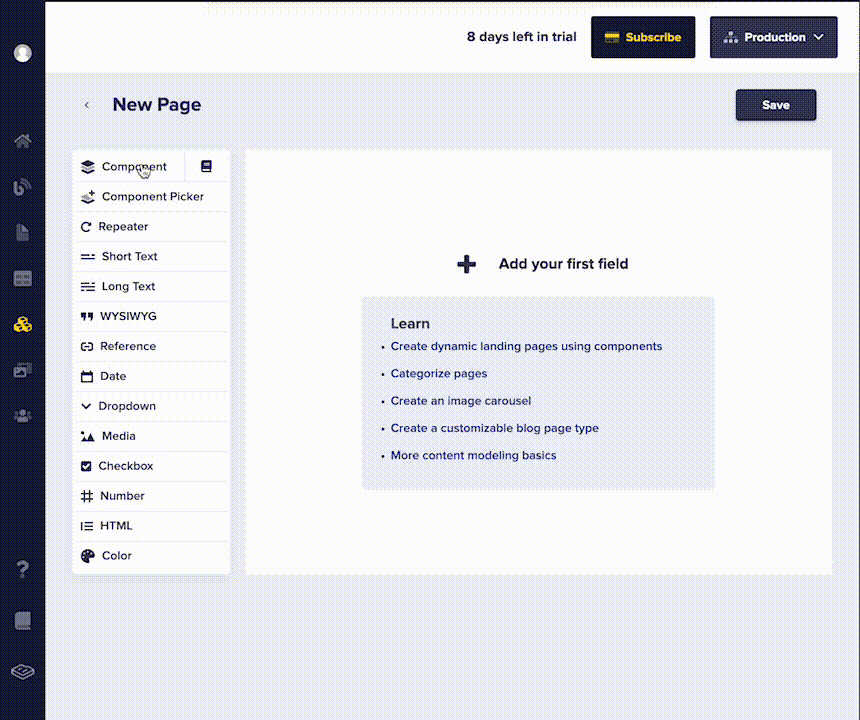
The first step is to create a new Page and define its structure using our Page Builder.
Let's create an example homepage. For the "Customer Logos" field, we'll use a repeater, which will later make it easy to loop through this field in our template.
Populate the Content
Choose a title and API slug.
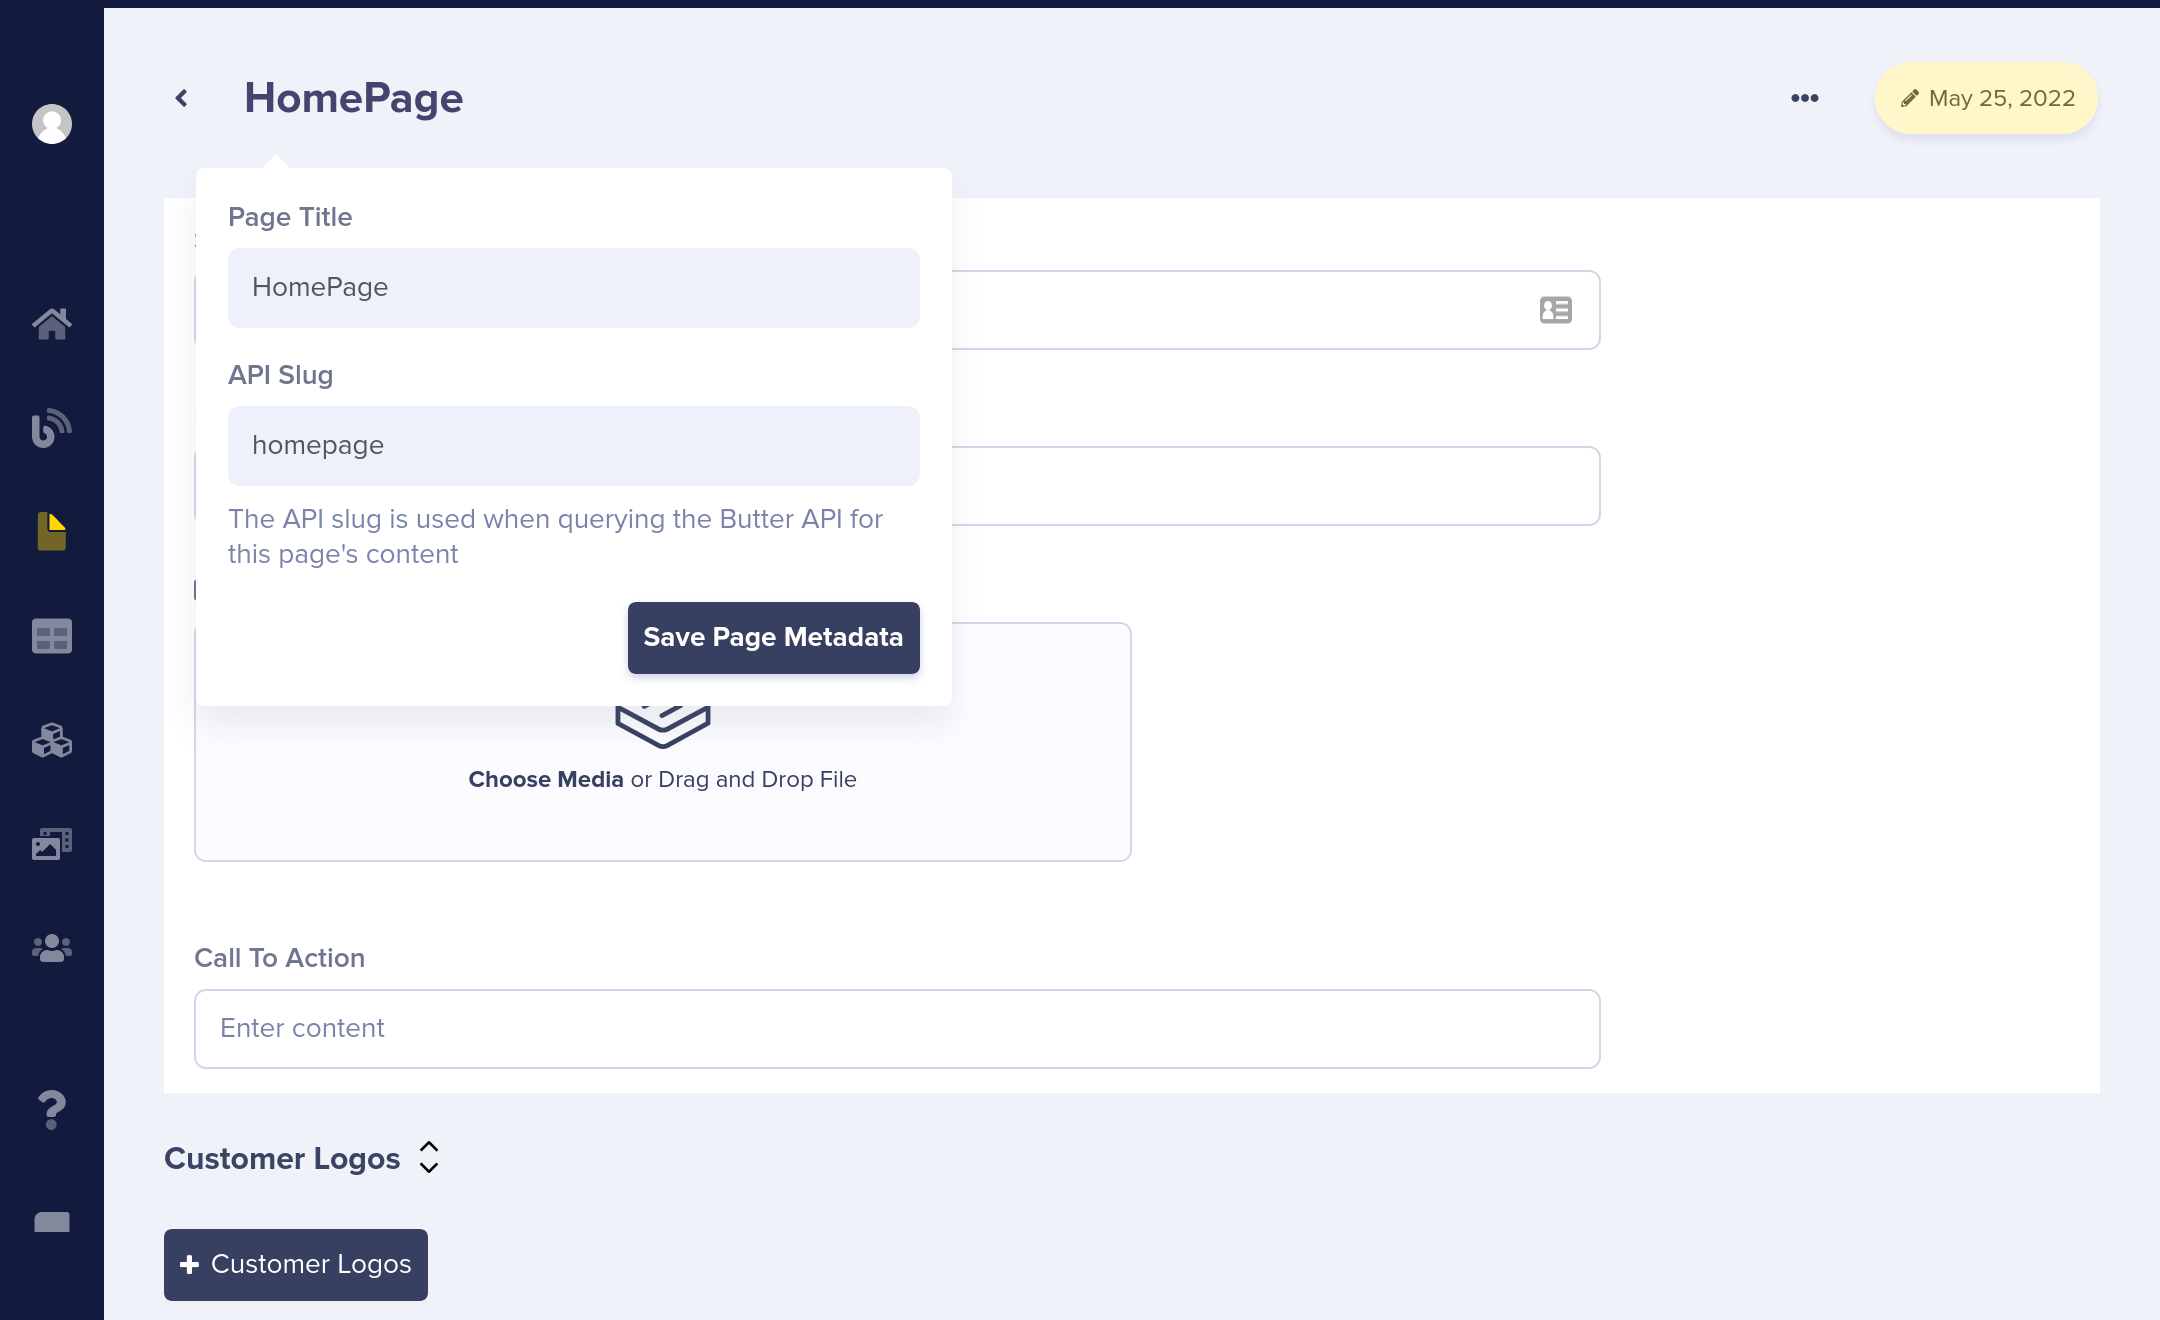
Now, let's populate our new page with content. In the next step, we'll call the ButterCMS API to retrieve this content from our app.
Integrate into your application
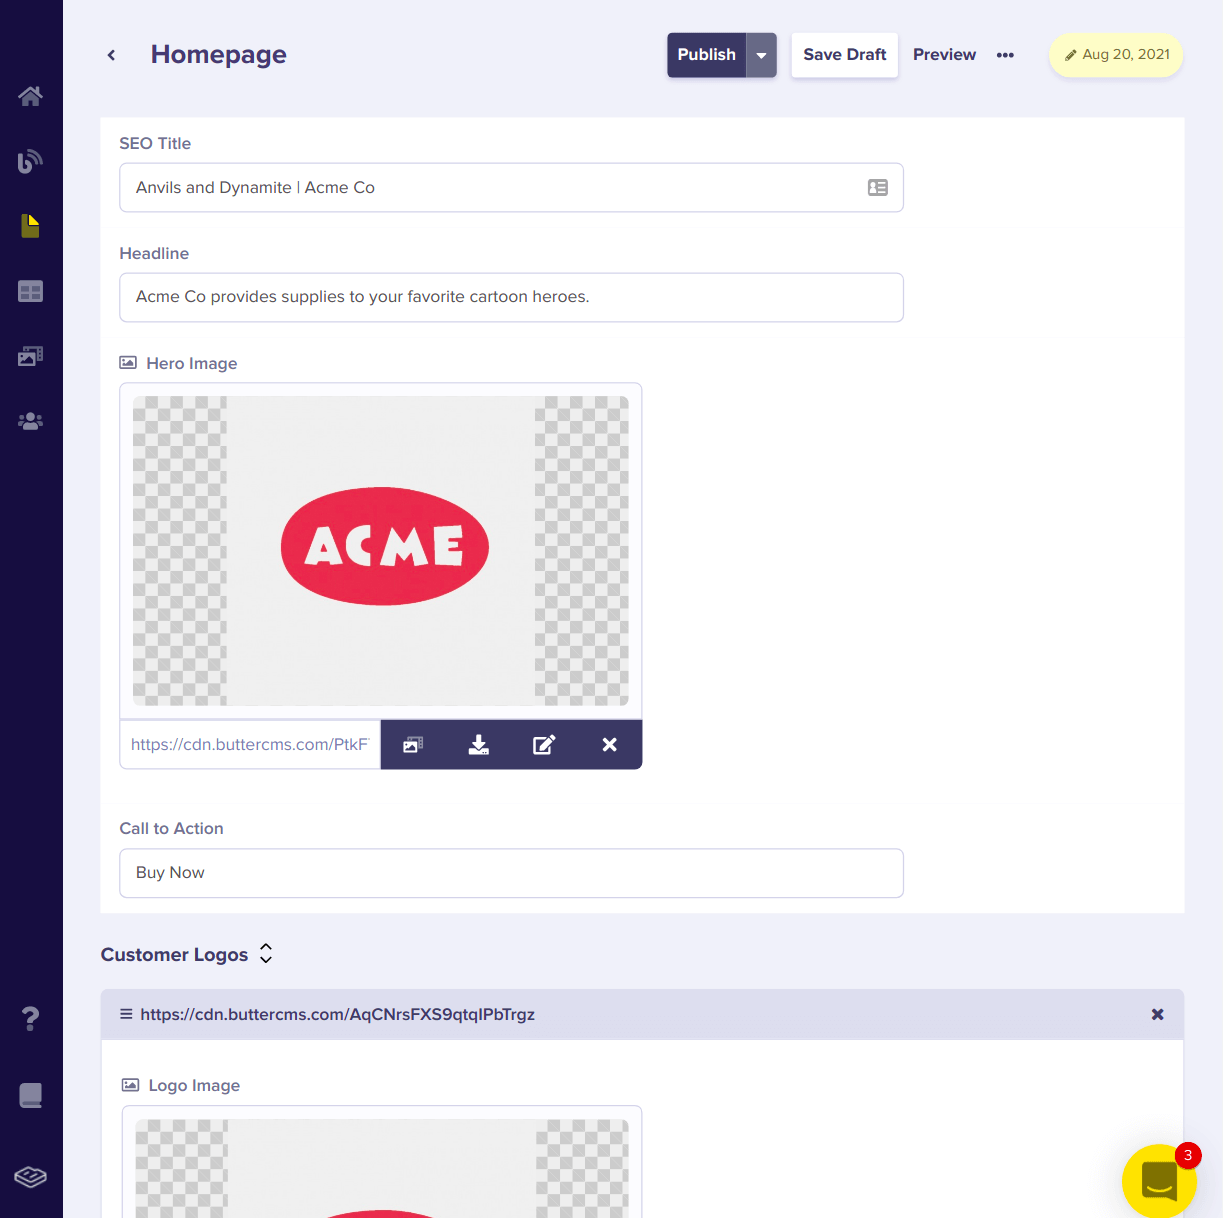
With your homepage defined, the ButterCMS Pages API will return it in JSON format like this:
{
  "data": {
    "slug": "homepage",
    "name": "HomePage",
    "published":"2021-08-20T15:06:58.237911Z",
    "updated":"2021-08-20T15:06:58.237911Z",
    "page_type": null,
    "fields": {
      "seo_title": "Anvils and Dynamite | Acme Co",
      "headline": "Acme Co provides supplies to your favorite cartoon heroes.",
      "hero_image": "https://cdn.buttercms.com/c8oSTGcwQDC5I58km5WV",
      "call_to_action": "Buy Now",
      "customer_logos": [
        {
          "logo_image": "https://cdn.buttercms.com/c8oSTGcwQDC5I58km5WV"
        },
        {
          "logo_image": "https://cdn.buttercms.com/c8oSTGcwQDC5I58km5WV"
        }
      ]
    }
  }
}
To integrate this into your app, create lib/api.js file with a new function to retrive the home page data:
import Butter from "buttercms";
const butter = Butter('your_api_token');

export async function getHomePage() {
    const homePage = await butter.page.retrieve('*', 'homepage')
    return homePage.data.data
}
Update pages/index.js to diplay home page data:
import Head from "next/head";
import { getHomePage } from "../lib/api";

export default function Index({
    seoTitle,
    heroImage,
    callToAction,
    customerLogos,
    headline,
}) {
    return (
        <div>
            <Head>
                <title>{seoTitle}</title>
            </Head>
            <img src={heroImage}/>
            <h1>{headline}</h1>
            <button>{callToAction}</button>
            {/* Loop through customer_logos */}
        </div>
    );
}

export async function getStaticProps() {
    const homePageData = await getHomePage();
    const {
        seo_title: seoTitle,
        hero_image: heroImage,
        call_to_action: callToAction,
        customer_logos: customerLogos,
        headline,
    } = homePageData.fields;

    return {
        props: {
            seoTitle,
            heroImage,
            callToAction,
            customerLogos,
            headline,
        },
    };
}
That's it! If you browse to your homepage you'll see your homepage populated with the content you created in Butter.
Create multiple pages using Page Types
Overview Video
Step By Step Tutorial
Let's say you want to add a set of Customer Case Studies to your marketing site. Each should have the same structure, but different content. Page Types are a perfect tool for this scenario.
You can create a Page Type from scratch in four easy steps:
- Create A Single Page
- Populate Your Page Content
- Create a Page Type From Your Page
- Integrate into your application
Any Single Page that you've created can be used to create a Page Type by starting with Step #3: Create a Page Type From Your Page.
If you need help after reading this, contact us via email or livechat.
Create A Single Page
You'll start with creating a new Single Page, which will eventually be your first Customer Case Study. You'll later use the structure, or schema, of this first page to form the basis of the Customer Case Study Page Type. Once you've finished setting up your schema, click "Save to edit the page content."
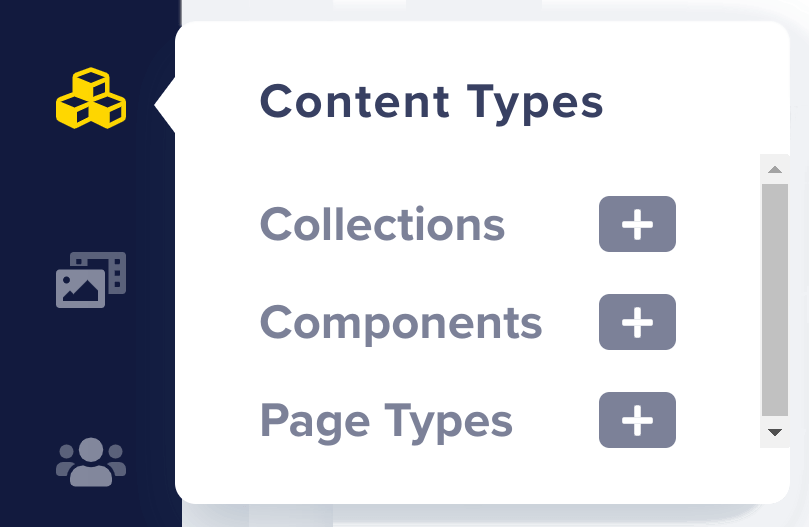
Note: You can also add create, edit, and delete Page Types via the new Content Types Pane. Adding Page Types this way doesn't require the creation of a Single Page first, as you will directly create and access the Page Type schema. Once you've created your new Page Type, you can hover over the Pages menu in the Butter sidebar and click the plus sign next to your new Page Type to create a Page of that Type!
Populate the Content
After saving, you'll be asked to assign a title for the page. For this first Customer Case Study, we'll use "Acme Co." Assigning a title automatically generates a slug for this page that we'll later use to retrieve it from our app via the ButterCMS API:
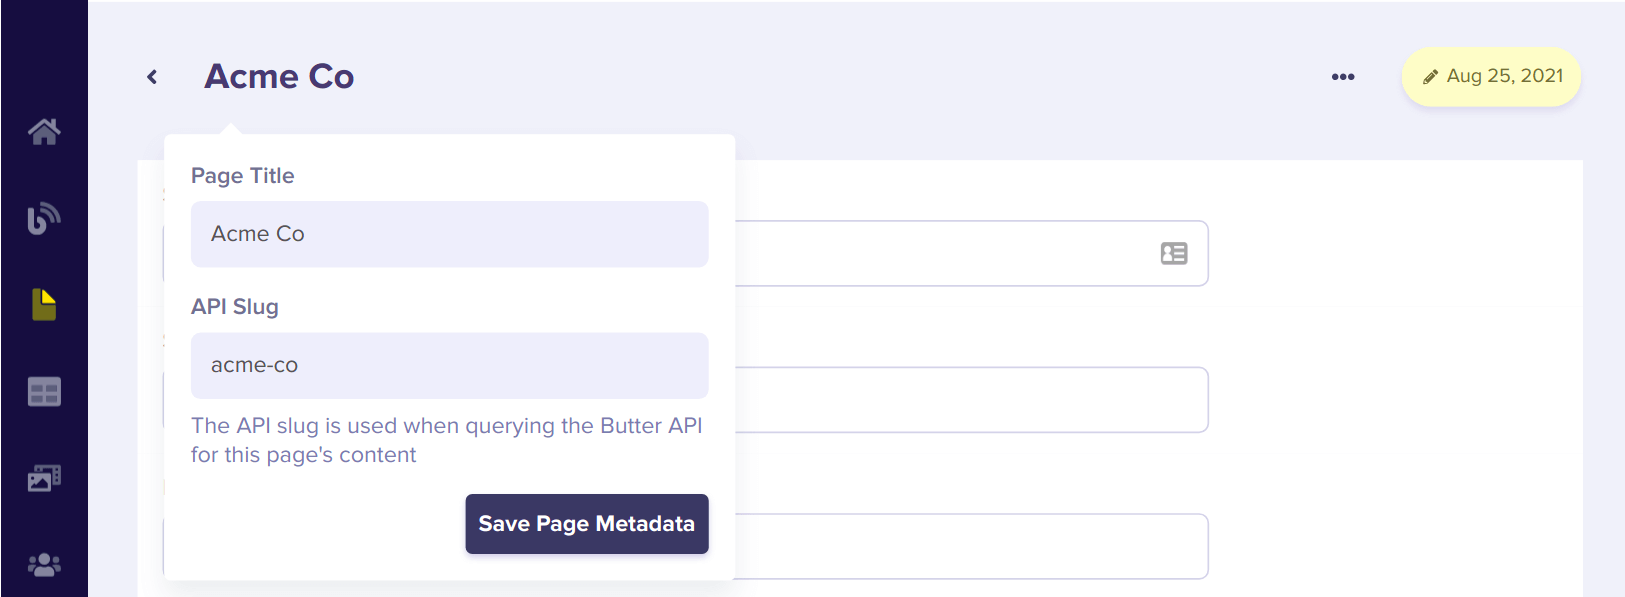
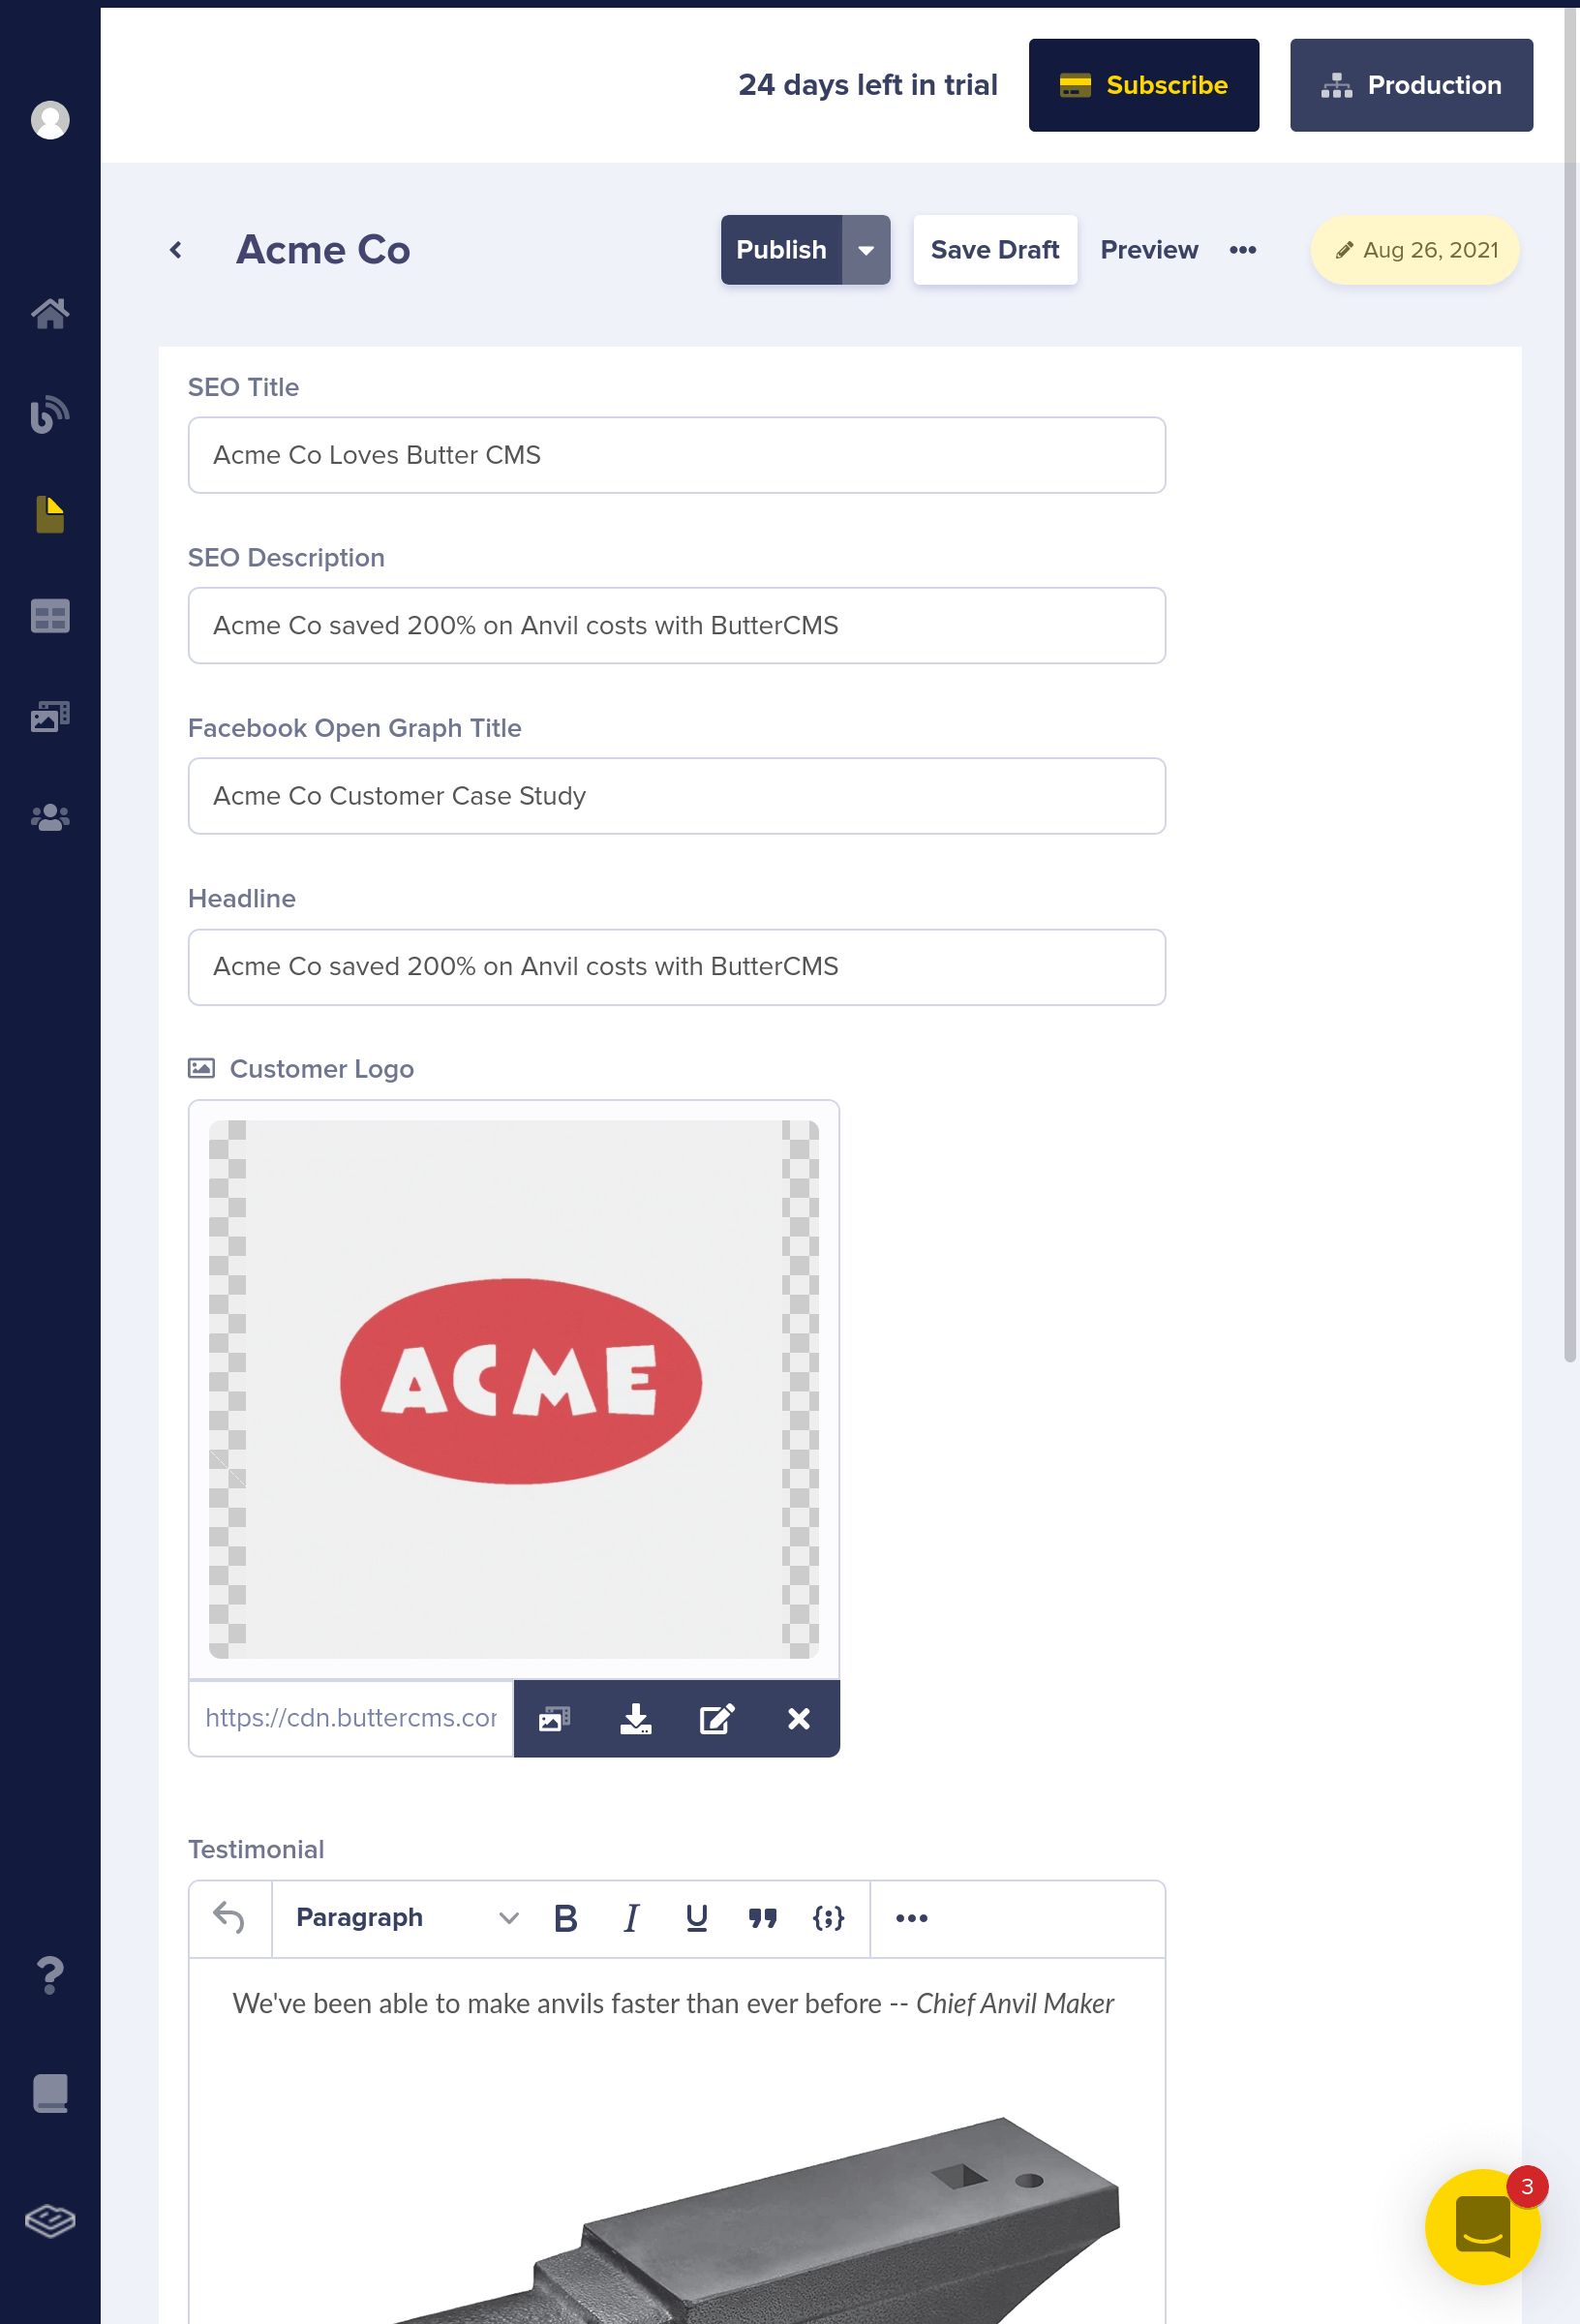
Now, click on "Save Page Metadata" and populate content for "Acme Co", your first Customer Case Study.
Create a Page Type From Your Page
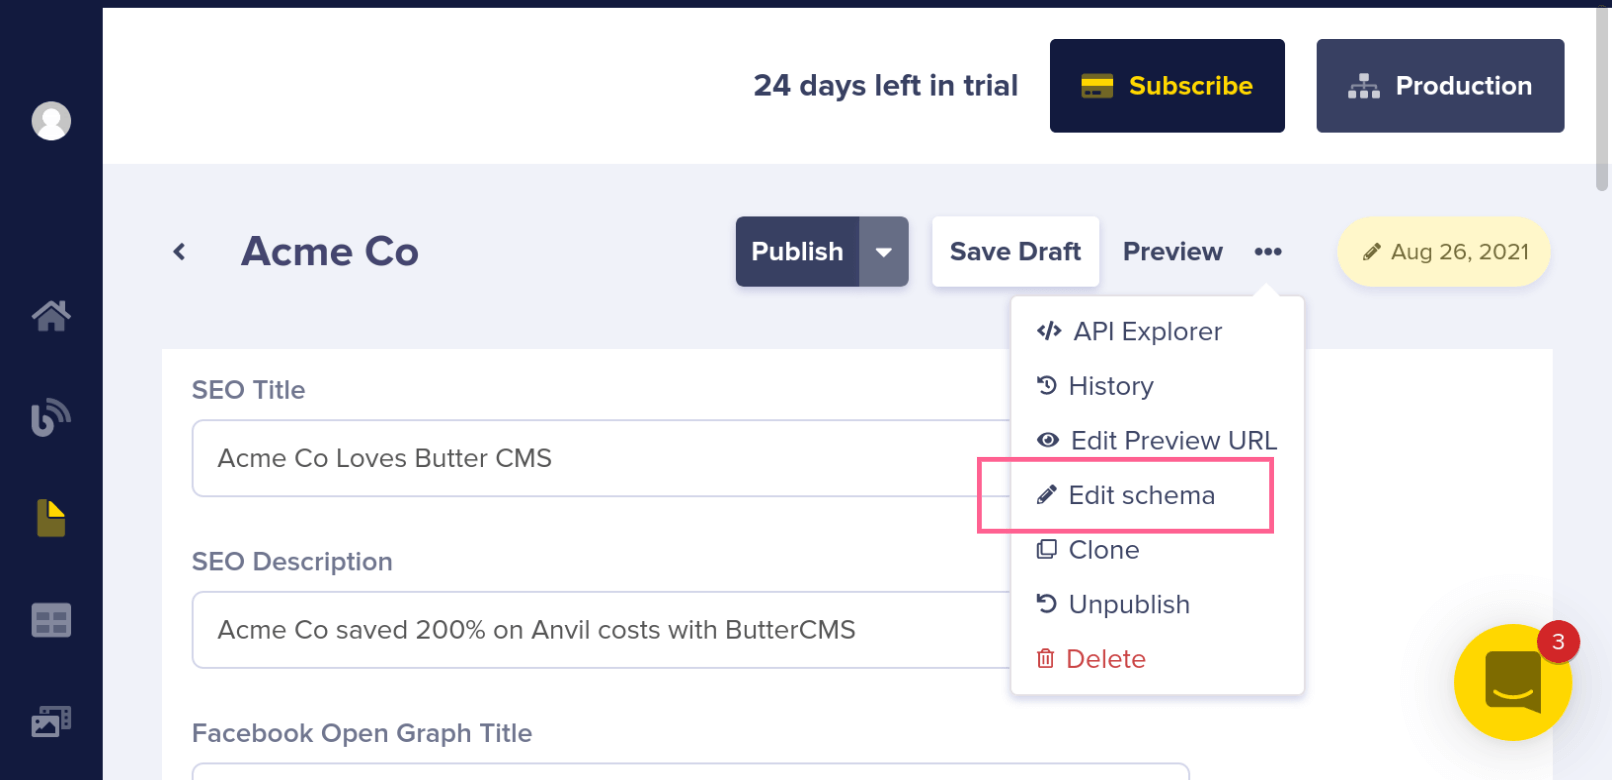
Now, we're going to create a Customer Case Study Page Type from our Acme Co case study, which will allow us to reuse this page structure across multiple Customer Case Study pages.
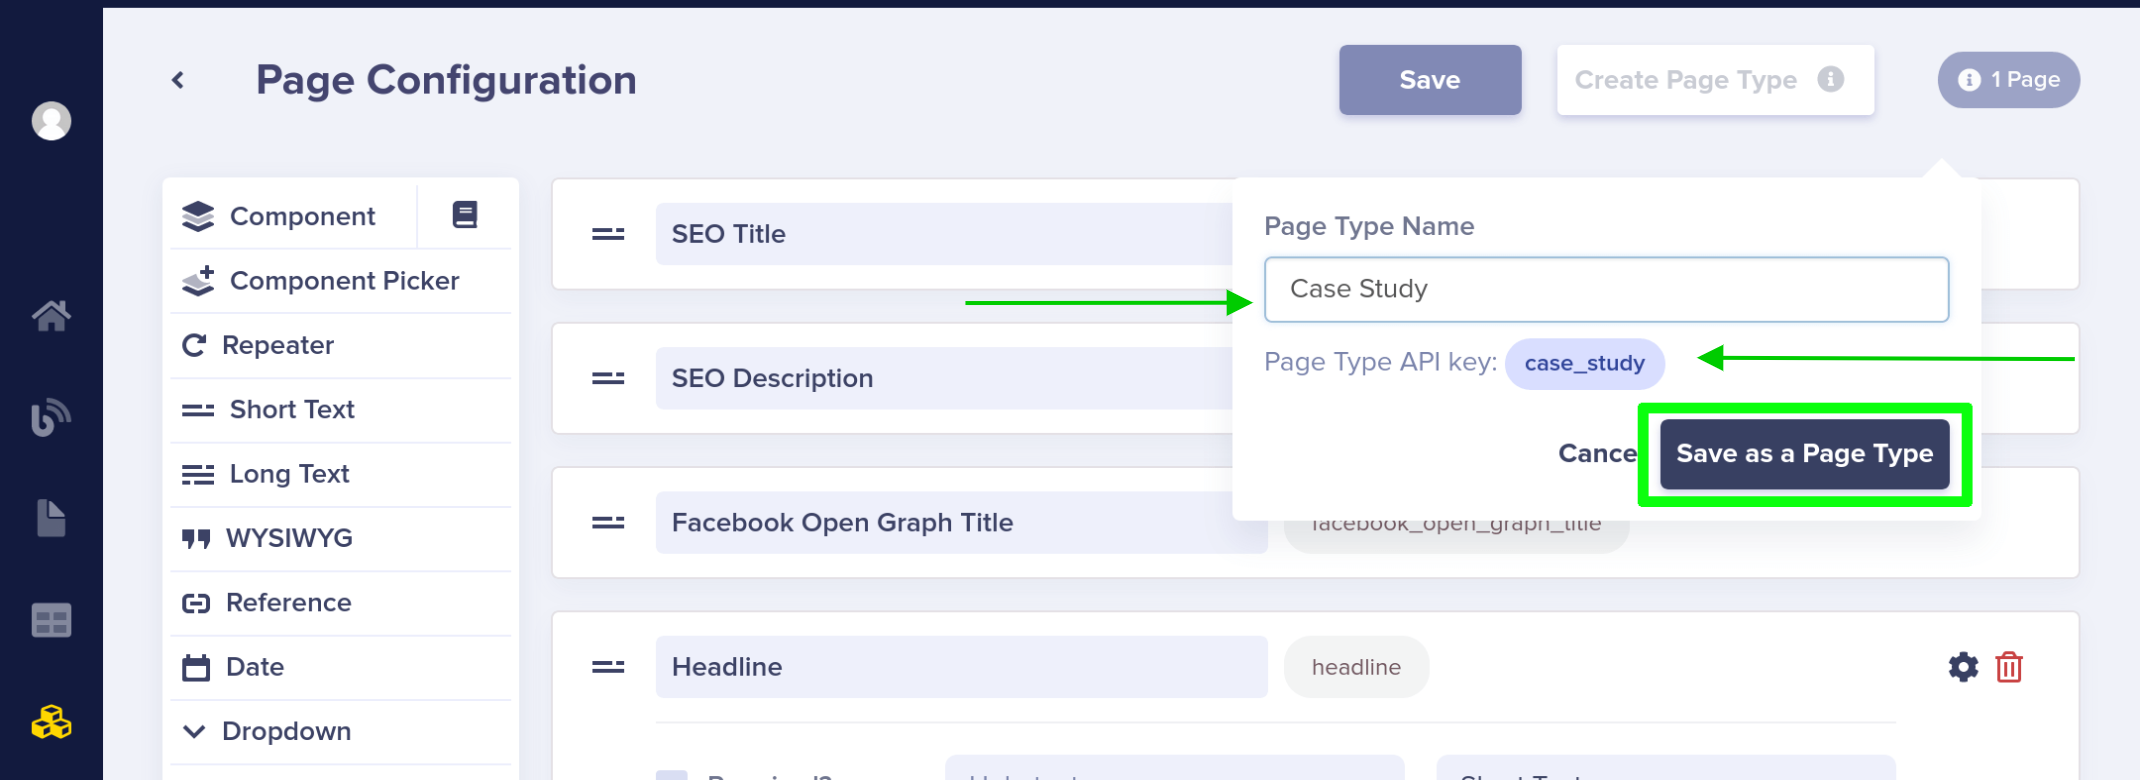
First, publish or save the Acme Co page. Then, click the three dots in the upper right-hand corner of the page and click on "edit schema."
This brings you back to the initial Page Configuration view. Click on the button in the top right that says Create Page Type.
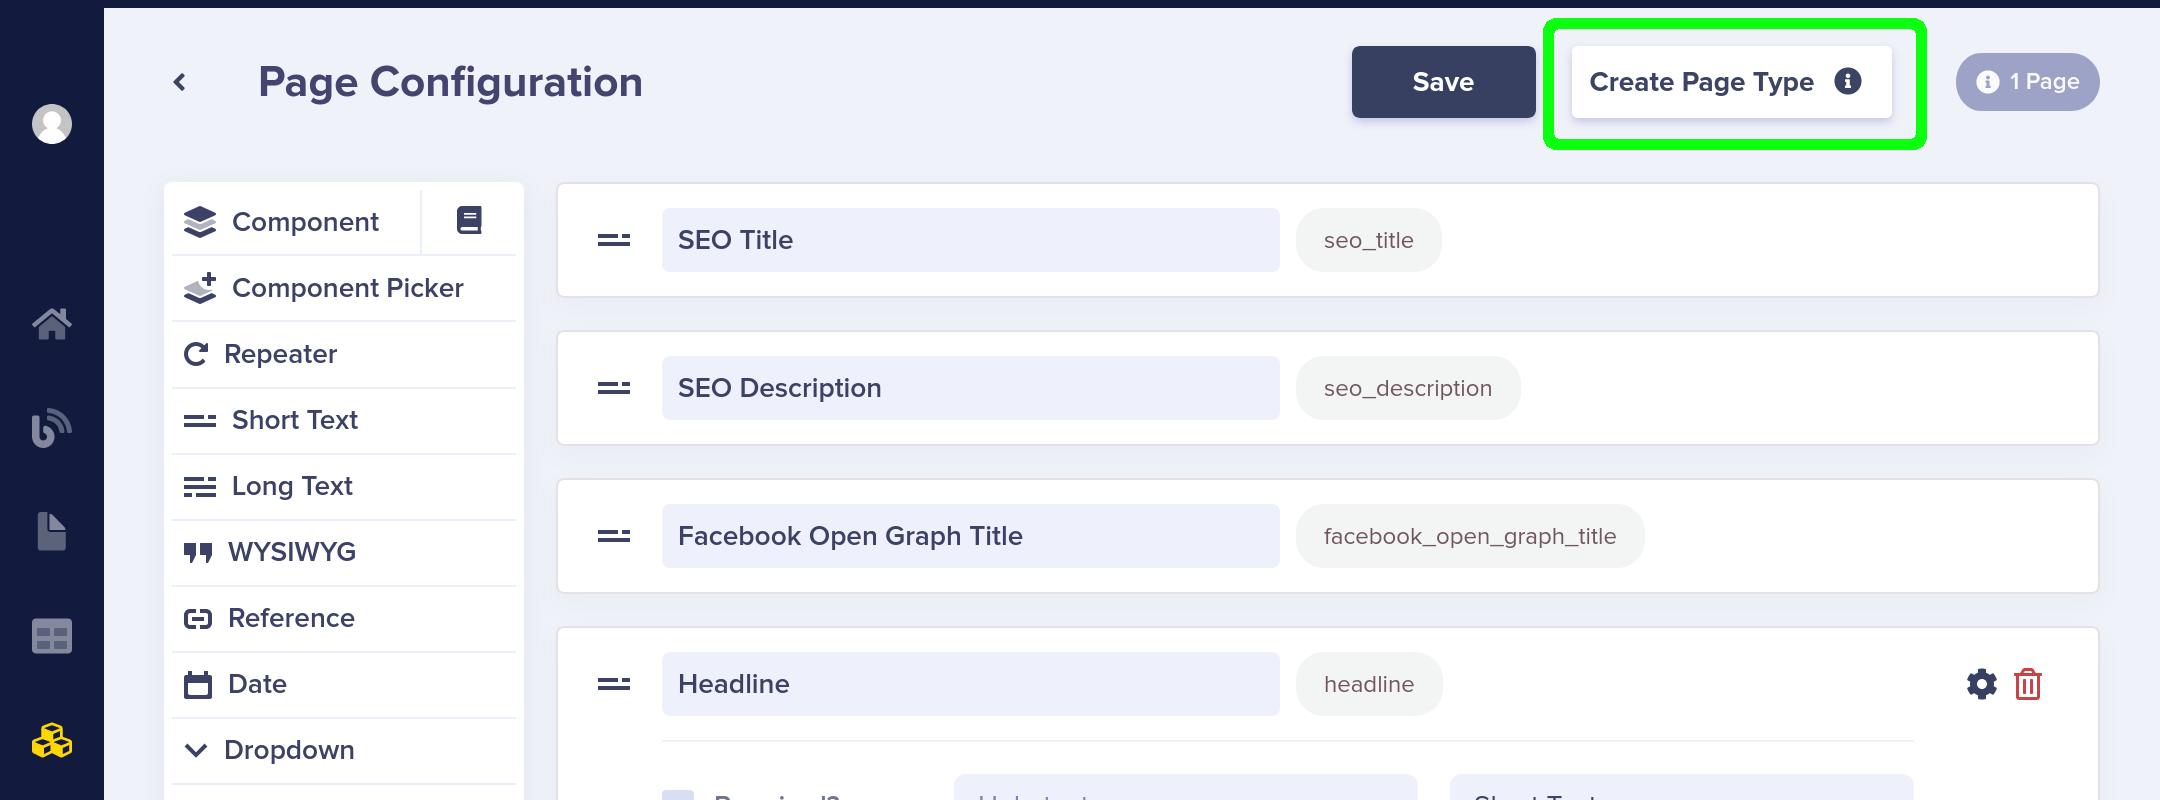
Give your new page type a name. This auto-generates the API slug needed to call this Page Type from the ButterCMS API.
Integrate into your application
With a case study defined, the ButterCMS Pages API will return it in JSON format like this:
{
  "data": {
    "slug": "acme-co",
    "name": "Acme Co",
    "published": "2021-08-23T14:28:21.077112Z",
    "updated": "2021-08-23T14:28:21.077112Z",
    "page_type": "case_study",
    "fields": {
      "seo_title": "Acme Co Loves Butter CMS",
      "seo_description": "Acme Co saved 200% on Anvil costs with ButterCMS",
      "headline": "Acme Co saved 200% on Anvil costs with ButterCMS",
      "facebook_open_graph_title": "Acme Co Customer Case Study",
      "customer_logo": "https://cdn.buttercms.com/66oMGYOuSP2V0bsK6gKd",
      "testimonial": "<p>We've been able to make anvils faster than ever before!<em>--Chief Anvil Maker Anvil</em></p>
      <p><img src="https://cdn.buttercms.com/queOG6fITpiJAUc7GV30\" alt="" /></p>"""
    }
  }
}
To integrate this into your app, create getCustomerCaseStudy and getCustomerCaseStudies functions in lib/api.js:
export async function getCustomerCaseStudy(slug) {
    const response = await butter.page.retrieve("customer_case_study", slug);
    return response.data.data;
}

export async function getCustomerCaseStudies() {
    const pages = await butter.page.list("customer_case_study");
    return pages.data.data;
}
Create a new file pages/case-studies/[slug].js to create a dynamic route for viewing each case study. In this file, we should:
- Inside the getStaticProps function get the case study slug in the url and fetch this page from Butter
- Inside the getStaticPaths function get all possible routes for case studies pages by fetching all pages from Butter
Paste this into the file:
import Head from "next/head";
import { useRouter } from "next/router";
import ErrorPage from "next/error";

import { getCustomerCaseStudies, getCustomerCaseStudy } from "../../lib/api";

export default function CustomerCaseStudy({
    slug,
    seoTitle,
    customerLogo,
    headline,
    testimonial,
}) {
    const router = useRouter();
    if (!router.isFallback && !slug) {
        return <ErrorPage statusCode={404} />;
    }

    return router.isFallback ? (
        <div>Loading…</div>
    ) : (
        <div>
            <Head>
                <title>{seoTitle}</title>
            </Head>

            <div>
                <img src={customerLogo} />
            </div>
            <h1>{headline}</h1>
            <div dangerouslySetInnerHTML={{__html: testimonial }} />
        </div>
    );
}

export async function getStaticProps({ params }) {
    const slug = params.slug;
    const pageData = await getCustomerCaseStudy(slug);

    const {
        seo_title: seoTitle,
        customer_logo: customerLogo,
        headline,
        testimonial,
    } = pageData.fields;
    return { props: { slug, seoTitle, customerLogo, headline, testimonial } };
}

export async function getStaticPaths() {
    const caseStudiesPages = await getCustomerCaseStudies();

    return {
        paths: (caseStudiesPages || []).map(
            (page) => `/case-studies/${page.slug}`
        ),
        fallback: true,
    };
}
Setup the Customers Page to list all our customers
Create a new file pages/case-studies.js:
import { getCustomerCaseStudies } from "../lib/api";

export default function CaseStudies({ caseStudies }) {
    return (
        <div>
            {caseStudies.map(
                (
                    { fields: { customer_logo: customerLogo, headline }, slug },
                    key
                ) => (
                    <div key={key}>
                        <img src={customerLogo} />
                        <a href={`/case-studies/${slug}`}>{headline}</a>
                    </div>
                )
            )}
        </div>
    );
}

export async function getStaticProps() {
    const caseStudies = await getCustomerCaseStudies();

    return { props: {caseStudies} };
}
That's it! The page your created in Butter dashboard will immediately show in your app.
If you need help after reading this, contact us via email or livechat.
Dynamic landing pages using Components
Modeling Complicated Content
The Pages in the above examples use fairly simple content models. Simple can be great, like when you need to create a number of basic pages with the exact same structure and layout. But what about when your marketing team wants to create a wide array of landing pages with differing layouts?
That's where Butter Components come in. Components are user-defined partial schemas and come in two main varieties: Local Components, which are defined inside of the Page or Page Type schema, and Global Components, which can be saved/accessed via the global Component Library in the Content Types Pane for maximum reusability.
In addition to normal component fields, users can also create Component Pickers. When added to a Page, component pickers allow content creators to choose from a palette of pre-defined local or global components.
For more details, including how to set up dynamic pages in Butter with flexible, tailored layouts, check out our detailed documentation on Components, including Local Components, Global Components, and Component Pickers.
Collaborate with marketing when defining your Component Library
When using Components, collaborate with your marketing team to define a library of Components (i.e. SEO, Call to Action, Hero, Key Benefits, etc) that your team will use to compose pages. Once you've defined this Component library, your marketing team will have a good understanding of what Components are available to them as they launch new campaigns.
Previewing Pages
To give your marketers the ability to preview pages you will want to first configure the preview URL of your Page Type.
When your marketer clicks "Preview", they will get taken to that preview URL such as https://yoursite.com/the-page/?preview=1 with a preview=1 parameter appended.
Your application will then look for that preview=1 parameter and when detected, call the ButterCMS API with the same preview parameter. You can see this defined in our API docs when querying Pages.
Passing preview=1 to ButterCMS will cause the draft version of the Page content to be returned and thus displayed within your application, allowing your marketing team to see a full in-context preview of their draft changes.
For frameworks that don't allow dynamic real-time routing, like Astro, Hugo, and static-site generators, you can set the preview value as an environment variable and pass that in a parameters array when making your call to Butter. See our Astro starter for an example.
Introduction
The
Features Of The Content Types Pane
The Content Types Pane offers convenient access to a number of features. To see them in action, check out the animation below.
- Create new Page Types, Global Components, and Collections with a single click.
- Integrated Search: Can't remember if your SEO block is a Page Type, a Global Component, or Collection? The Content Types Pane allows you search through all three at once, or filter by a specific Content Type.
- Easy Schema Updates: Clicking on any named Content Type from within the Content Types Pane takes you directly to the schema for that object, allowing for lightning-quick updates!
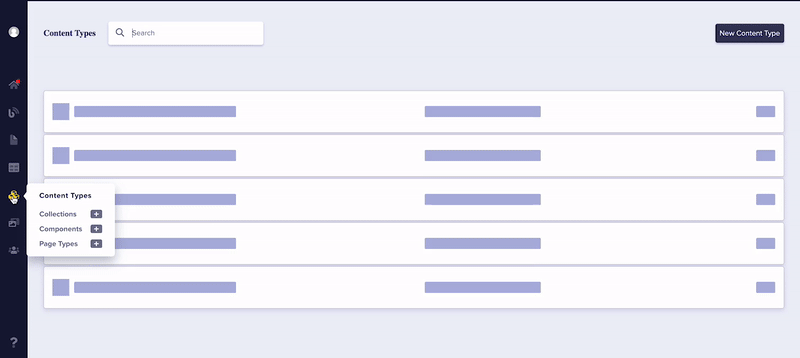
As you can see, the Content Types Pane is a powerful tool to make creating, editing, and deleting your custom user content a breeze! If you need help after reading this, contact us via email or livechat.
Introduction to Components
Butter Components are user-defined partial schemas and come in two main varieties: Local Components, which are defined inside of the Page or Page Type schema, and Global Components, which can be saved/accessed via the global Component Library in the Content Types Pane for maximum reusability.
In addition to normal component fields, users can also create Component Pickers. When added to a Page, component pickers allow content creators to choose from a palette of pre-defined local or global components.
Components allow you to:
- Group data by function: For example, all of the data relating to the SEO of your Page might be lumped together into a single SEO component, making it much easier for marketers to find.
- Group data by structure: You could create a component in Butter for a Hero Banner that includes all of the relevant fields, such as a title, a call to action button, a featured image, links, and even design elements like hex values for color. You could then save this component as a Global Component, which could then be imported from your Component Library and included in the schemas for other Page Types.
- Create flexible, dynamic layouts for pages via the usage of a Component Picker that chooses from pre-defined components. This makes piping the data into templates and apps easy, as the data will match the structure you and your development team have defined.
- And, in the case of a Global Component, easily make changes that automatically update multiple Pages and Page Types.
For more details, including how to use Local Components, Global Components, and Component Pickers, refer to the examples below!
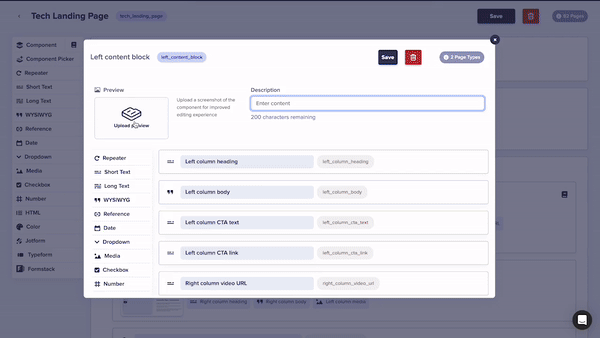
Local Components

A Component Field, like the one above, represents a single Local Component. When setting up either a Local or Global Component, you can mix-and-match from the following Content Field Types:
- Short Text
- Long Text
- WYSIWYG
- Date
- Dropdown: (Tip: Hit [enter] to add new values)
- Media: Utilizes the filestack API to serve and transform images, video, and more via our lightning-fast CDN. For more information, see Image Transformation.
- Checkbox
- Number
- HTML: Useful to add additional code snippets, etc.
- Repeater: A content field that allows you to group any combination of the above fields. Useful for creating testimonial slides, image slides for a carousel, etc.
- Reference: A powerful field type that allows to link to your other content, such as Pages and Collections. See this blog entry for more information.
Each Content Field has a number of additional configuration options that can be accessed via the settings gear in the top right corner of each Field instance, such as marking fields mandatory, setting minimum and maximum character counts, or adding rollover help text to assist your marketing team.
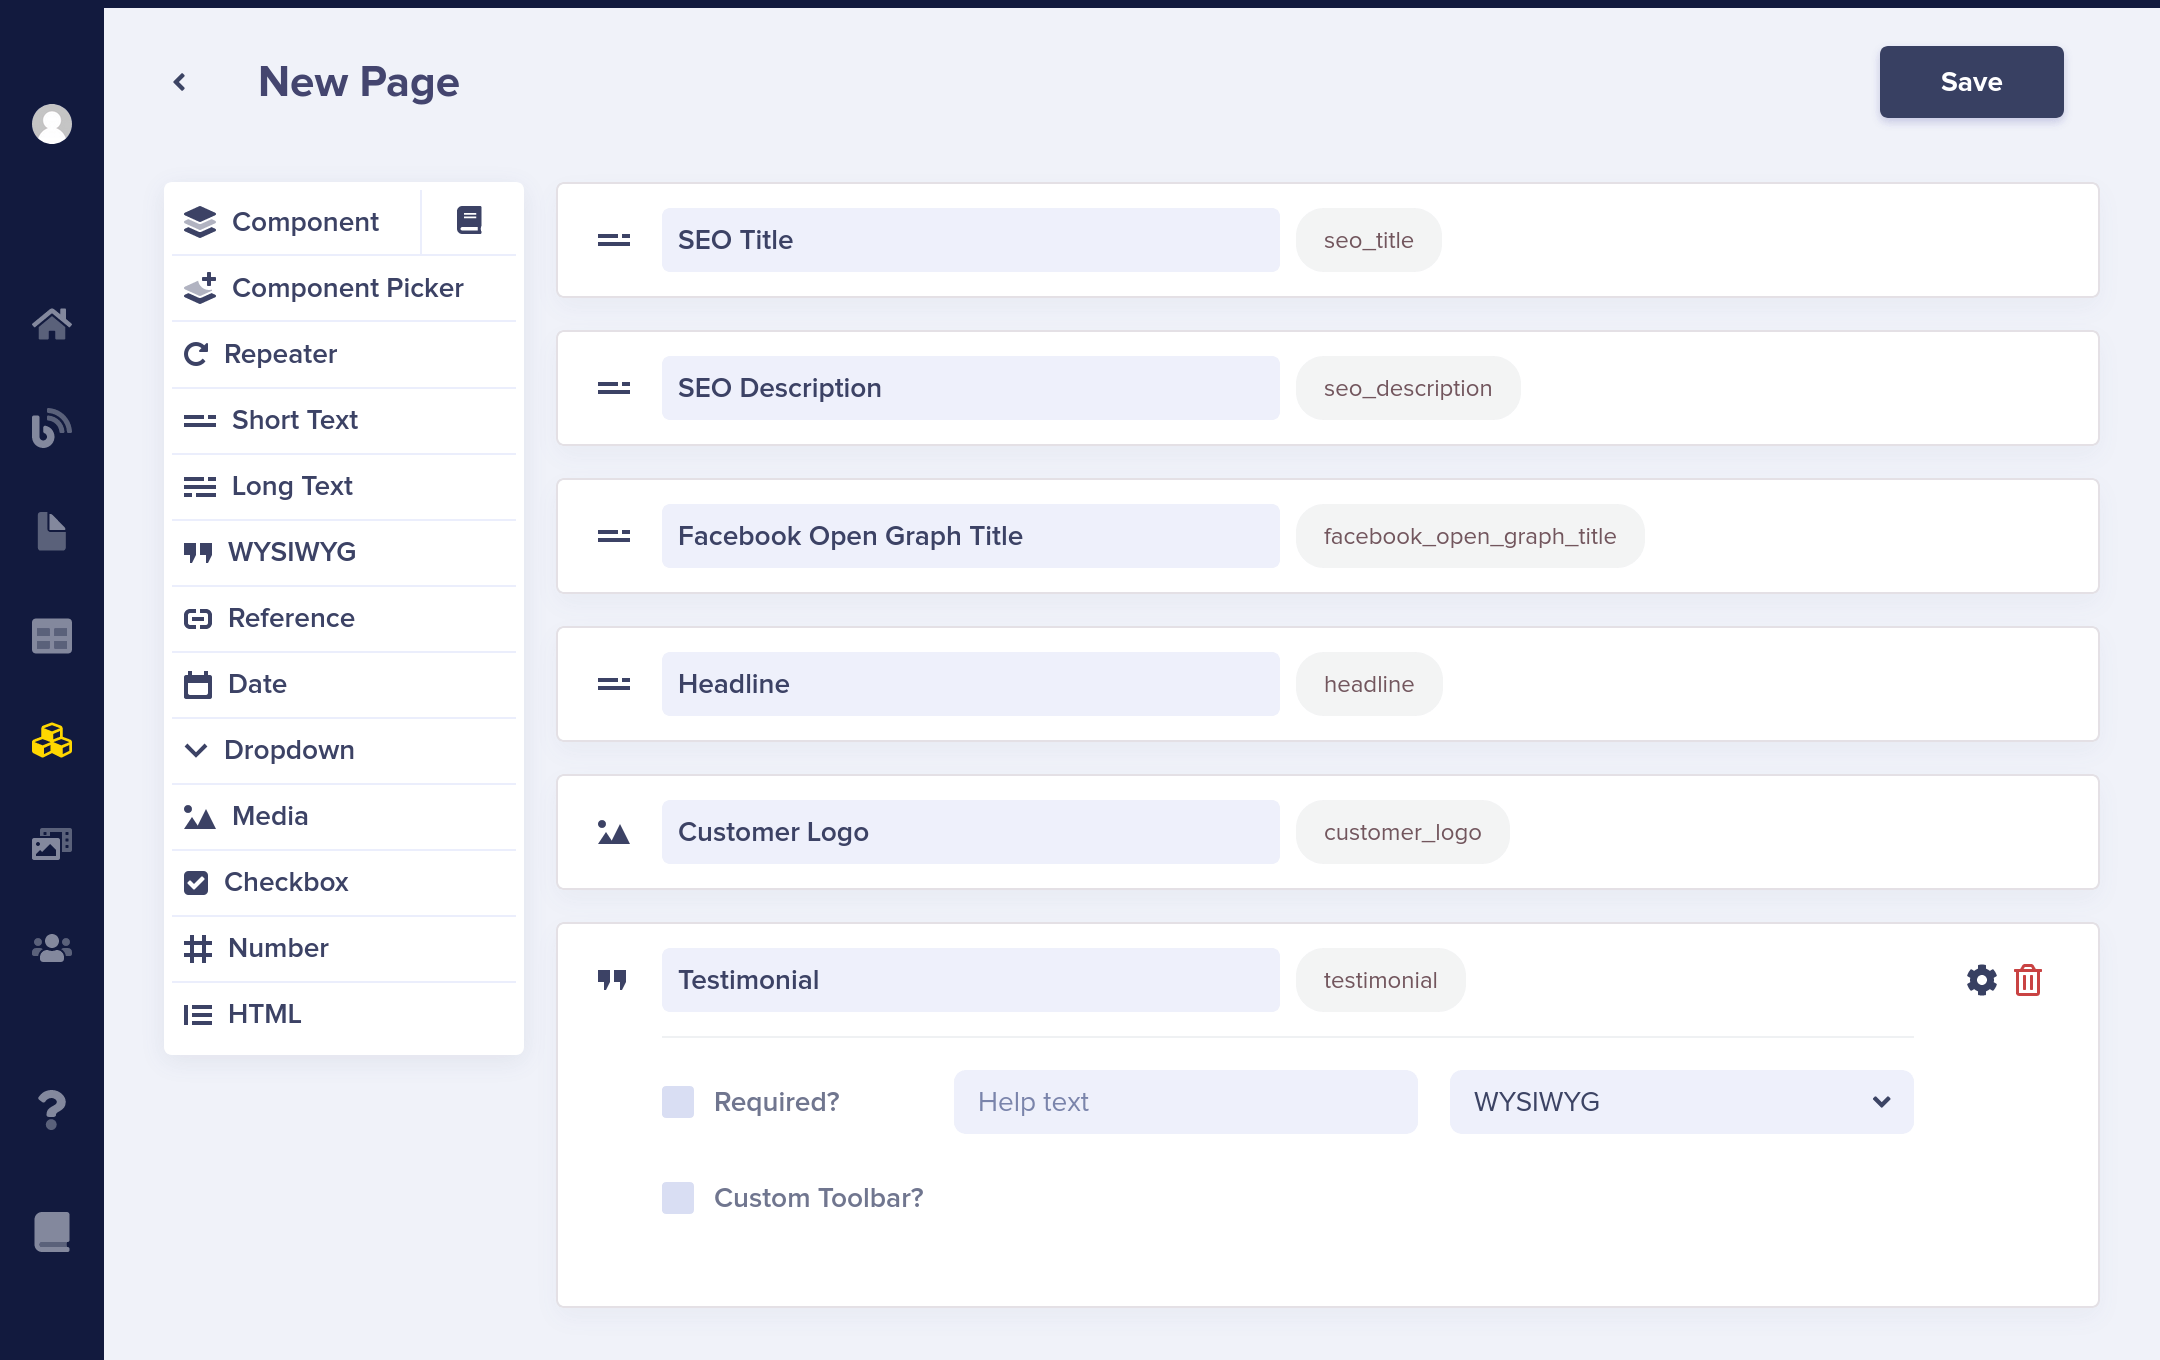
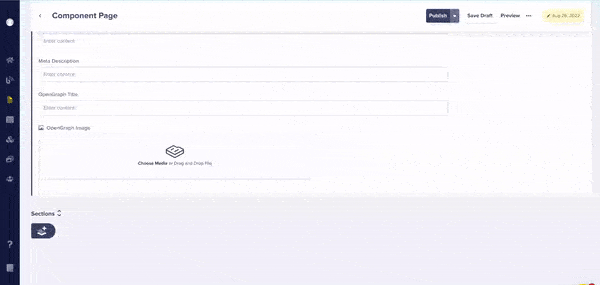
As mentioned in the introduction, a Component can be used to group related fields of a Page together. For example, configuring an SEO Component on your Page is a great idea to give your marketers the control they need over SEO and social sharing meta tags.
Here is how to create a local SEO component inside a new Page schema:
Once the schema is set, marketing is ready to add content to the Page. This is what the finished component looks like when the Page is accessed.
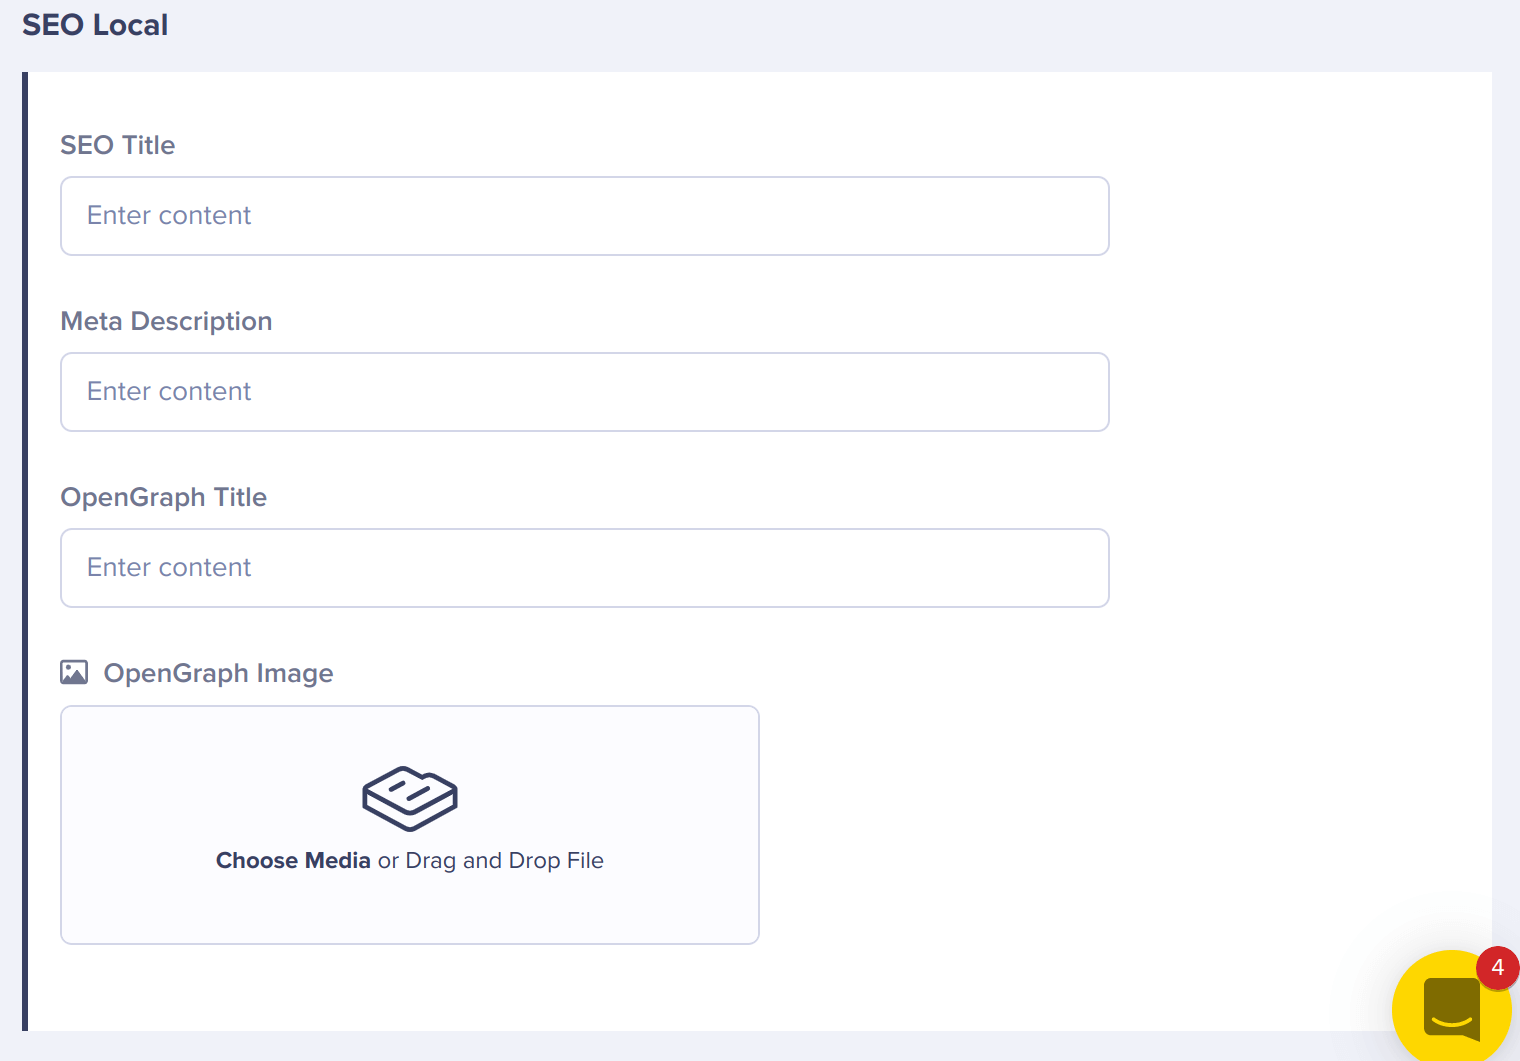
The content for a Component is serialized as you would expect, an object
within the larger Page fields object.
{
    "data": {
        "slug": "homepage",
        "fields": {
            "seo": {
                "seo_title": "...",
                "meta_description": "...",
                "opengraph_title": "...",
                "opengraph_image": "https://cdn.buttercms.com/..."
            }
        }
    }
}
Global Components
You can save any Local Component to your Content Library, where it can then be accessed via your Content Types Pane:
We can tell that this component is now a Global Component by the book icon in the top right corner of the Page Schema:

In addition to converting local components via the "Save to Library" button, Global Components can also be created directly by clicking the plus sign icon next to "Components" in the Content Types Page. Components created this way will also be available in the Component Library.

New Feature: Component Thumbnails
You can now upload thumbnails and add descriptions to your global components!
Thumbnails make it easier for your marketing team to find the component they need in your Component Library or in Component Pickers like the ones in the next section.
Component Pickers
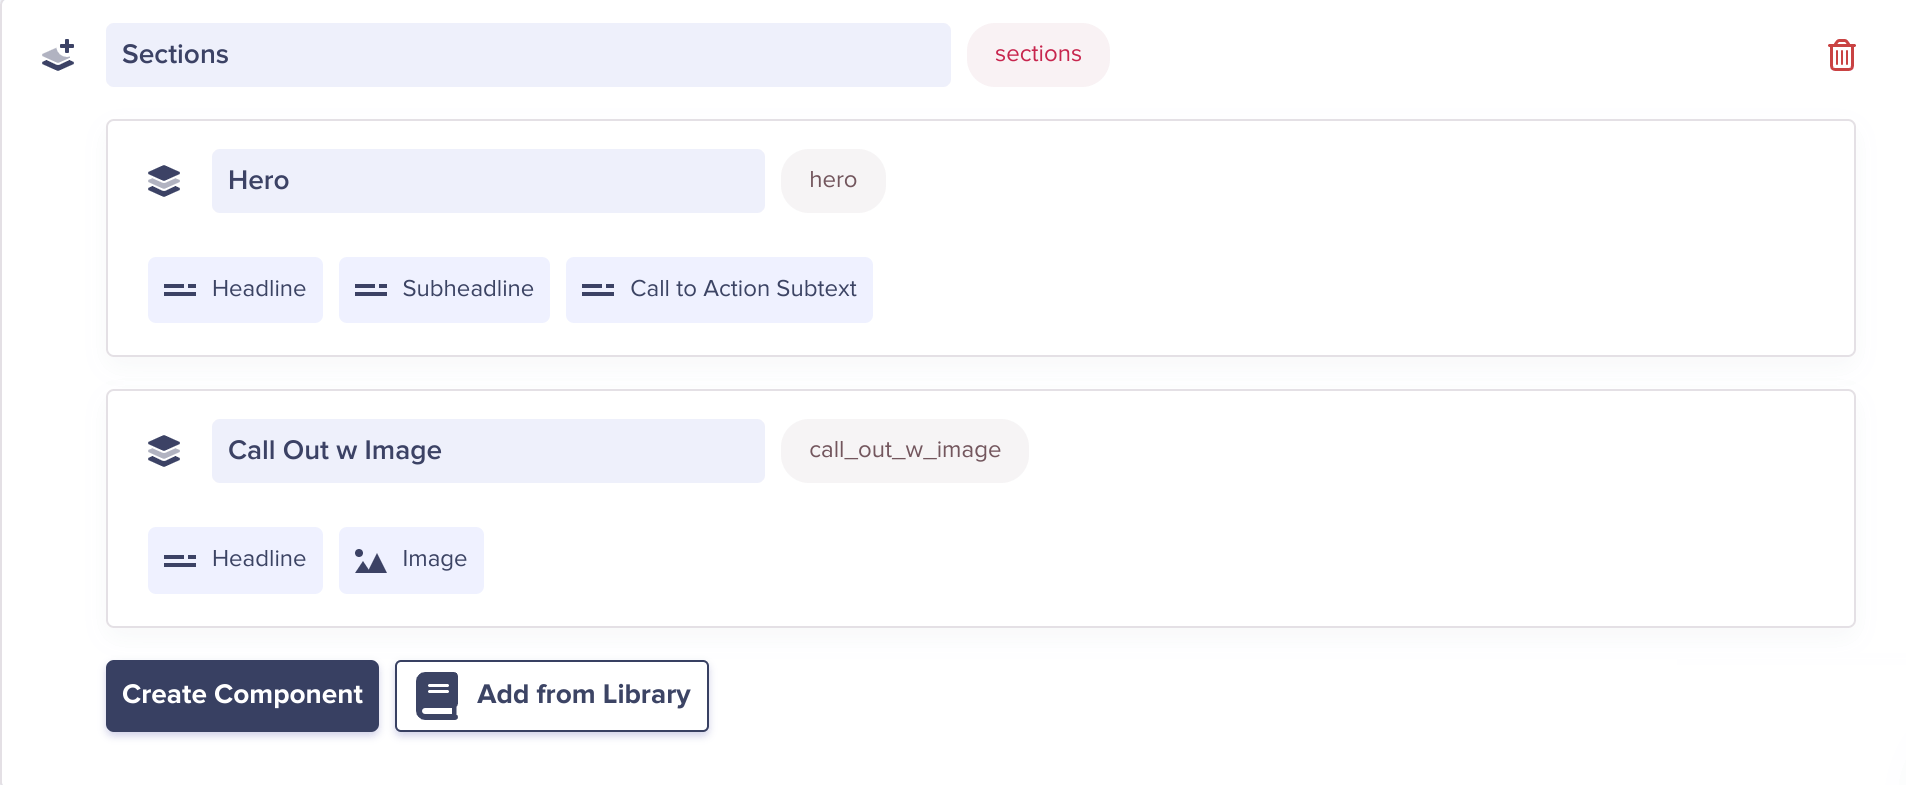
A Component Picker defines a palette of Components your marketing team can use when composing a page. Pickers can be local (defined in a Page or Page Type schema) or global (added to the Component Library.) Above is a Component Picker named "Sections" (to represent horizontal sections of a page) that contains two Components inside of its schema. Below, you can see the Component Picker in action!
Our component pickers now feature drag-and-drop reordering for fast updates.
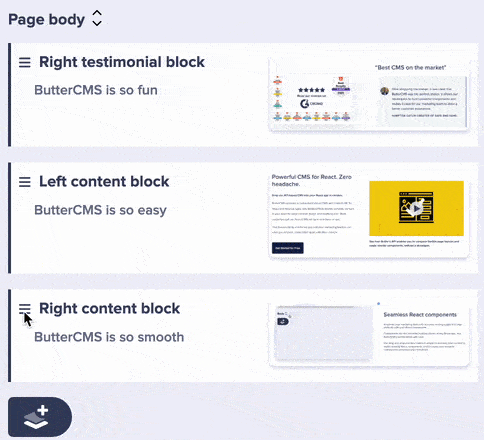
Component Pickers allow your marketing team to compose a new page by mix-and-matching the Components defined in the schema in any order they choose. For example...
Your Homepage could be composed of these Components...
- Hero
- Call to Action
- Key Benefit
While your Solutions page uses these Components:
- Hero
- Call to Action
- Solution Details
- Call to Action
By using Component Pickers, marketers can create limitless combinations of landing pages, all without needing to involve your dev team.
Component Pickers are serialized arrays of Components within the larger Page
fields object. Each item in the array has fields and type
properties. So a Component Picker named sections would look like this:
{
  "data": {
    "slug": "homepage",
    "fields": {
      "sections": [
        {
          "fields": {
            "headline": "...",
            "subheadline": "...",
            "call_to_action": "..."
          },
          "type": "hero"
        },
        {
          "fields": {
            "video_headline": "...",
            "video_link": "..."
          },
          "type": "product_video"
        }
      ]
    }
  }
}
Here's the logic to render a page template in your application using a Component Picker.
  //Pseudocode
  For each component in sections:
  if type is 'hero':
    render hero.html template with template data/context set to component.fields
  if type is 'product_video':
    render product_video.html template with template data/context set to component.fields

  // Code
  for component in page.fields.sections:
    if component.type == 'hero':
      render('components/hero.html', { data: component.fields })
    if component.type == 'product_video':
      render('components/product_video.html', { data: component.fields })
Introduction
GET https://api.buttercms.com/v2/content/your_collection_key/?auth_token=your_token
Collections are tables of data to be referenced by Pages, extending the use cases that you can achieve with ButterCMS. They can be accessed in a variety of ways:
- Directly via the Collections Menu (see below), where you can create, edit, and delete both Collection schemas and individual Collection Items.
- Collection schemas can also be accessed via the Content Types Pane.
- Collection Items for existing Collections can also be created, edited, and queried directly from the Butter API. (For code examples of making API calls to query a Collection directly, check out our Collections API Reference.)
See the Collections Use Cases below. Several of these use cases utilize References. References are a powerful field type you can add to Pages and Collections that allow you to create links between your content.
Use Cases
Tables of Related Content
There are many use cases for Collections. One is using Collections as tables of related data which you can query directly. For example, let's say you want to create a music site for musicians, and you want to store data like Albums and Artists.
Here's how you'd model that out using Collections in Butter and then query your content.
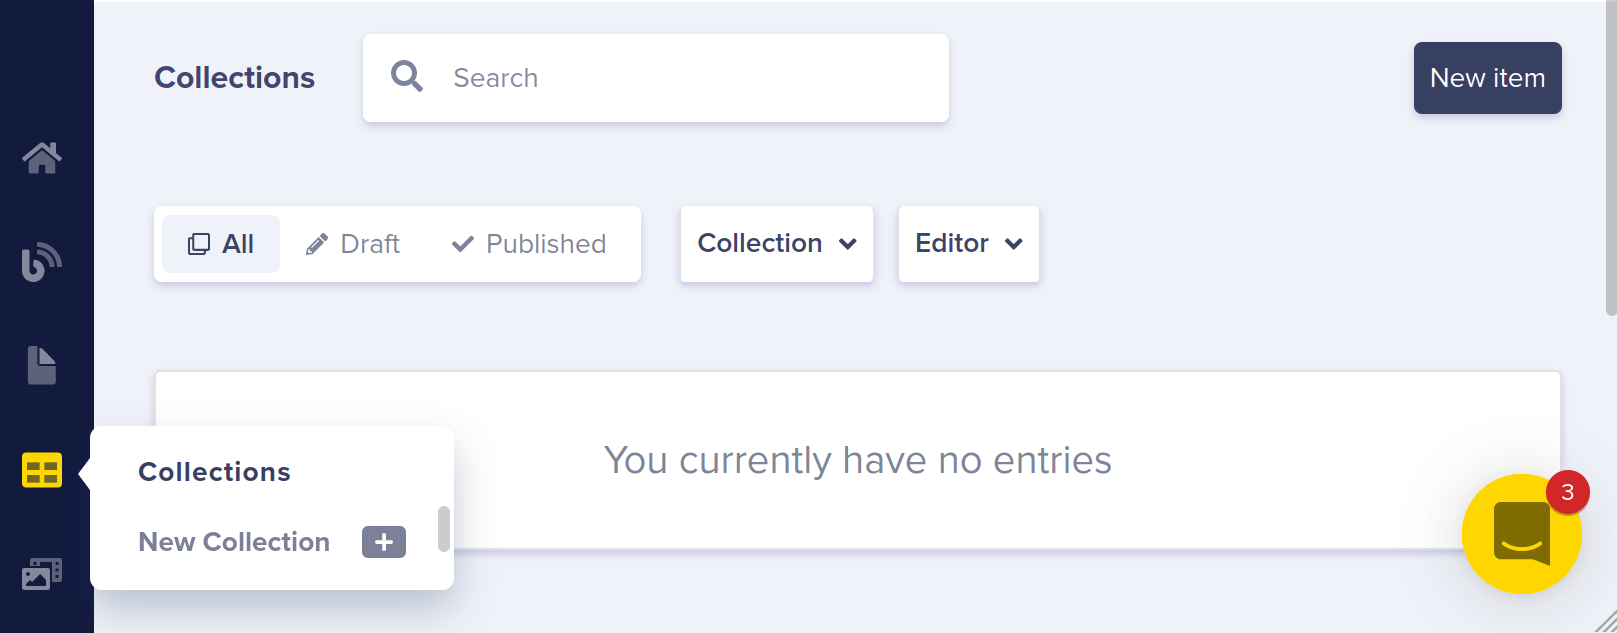
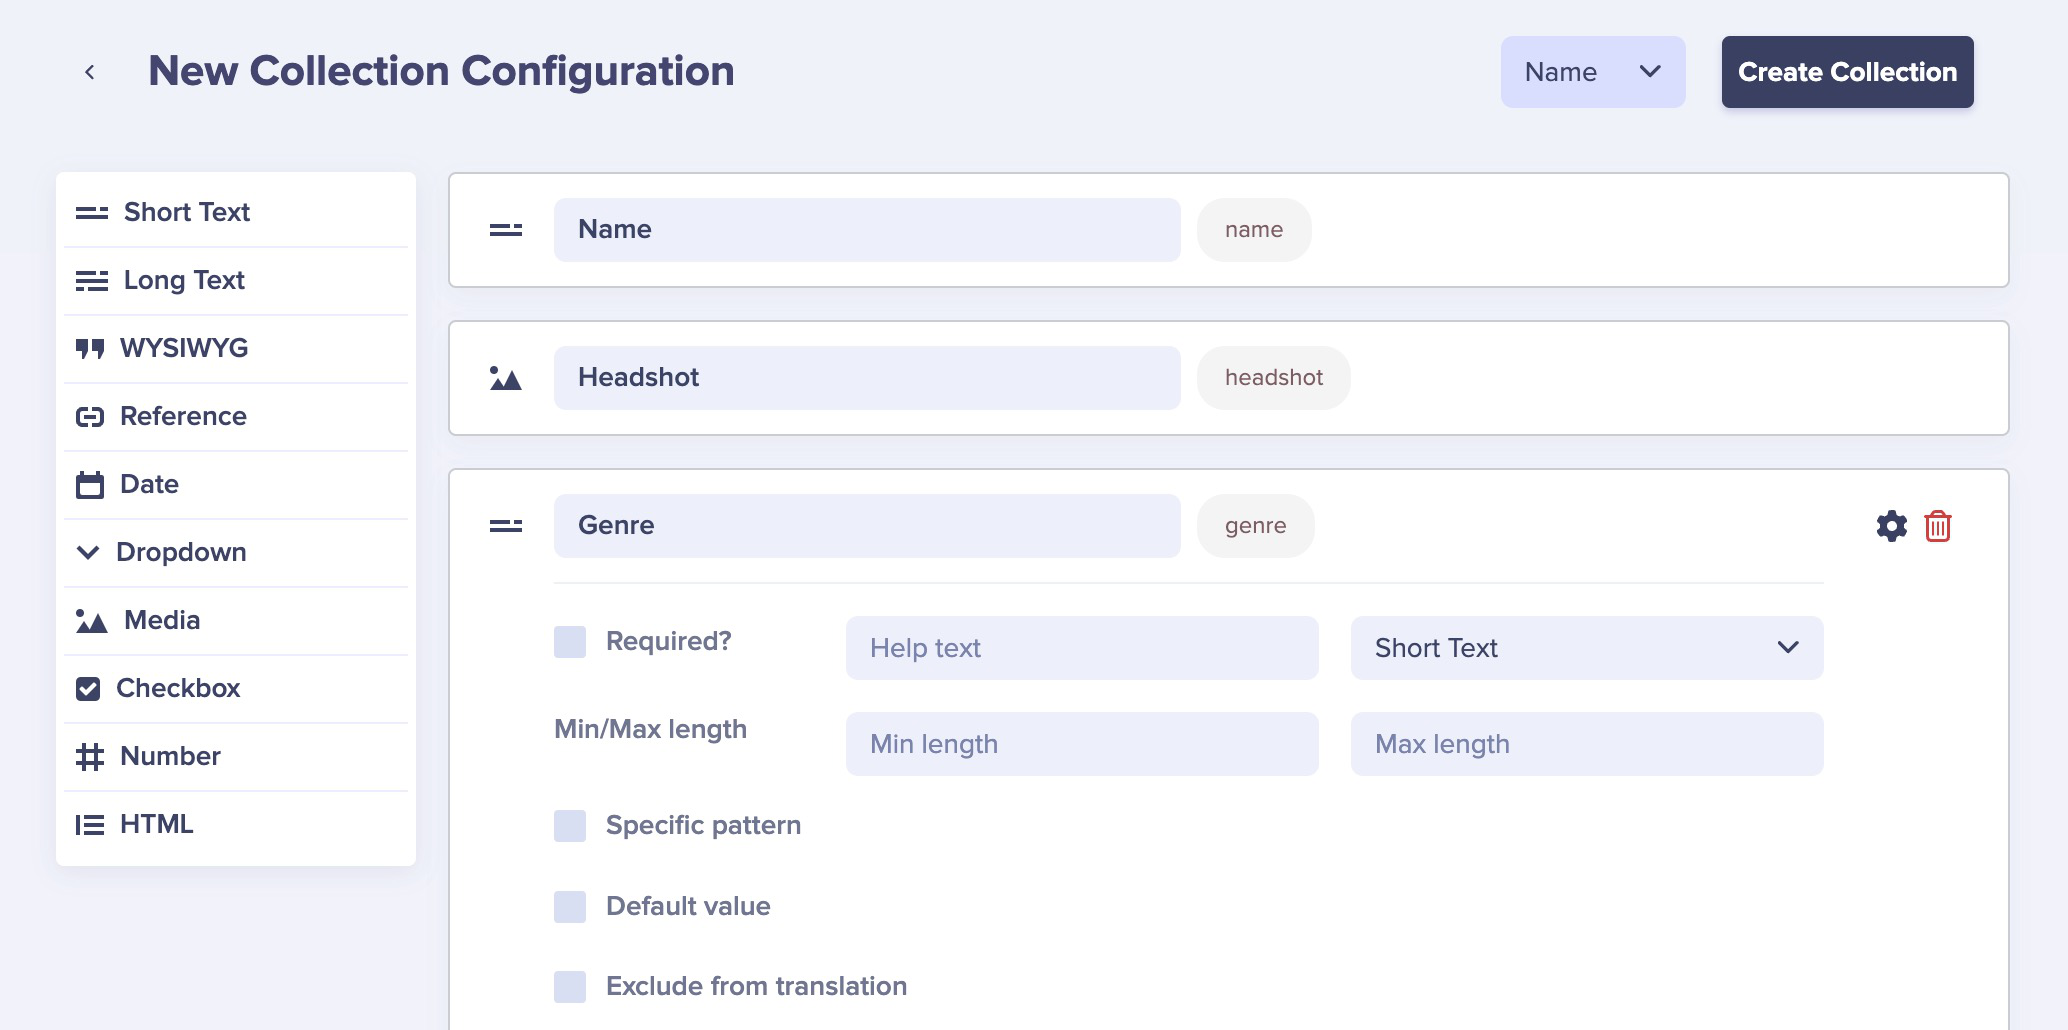
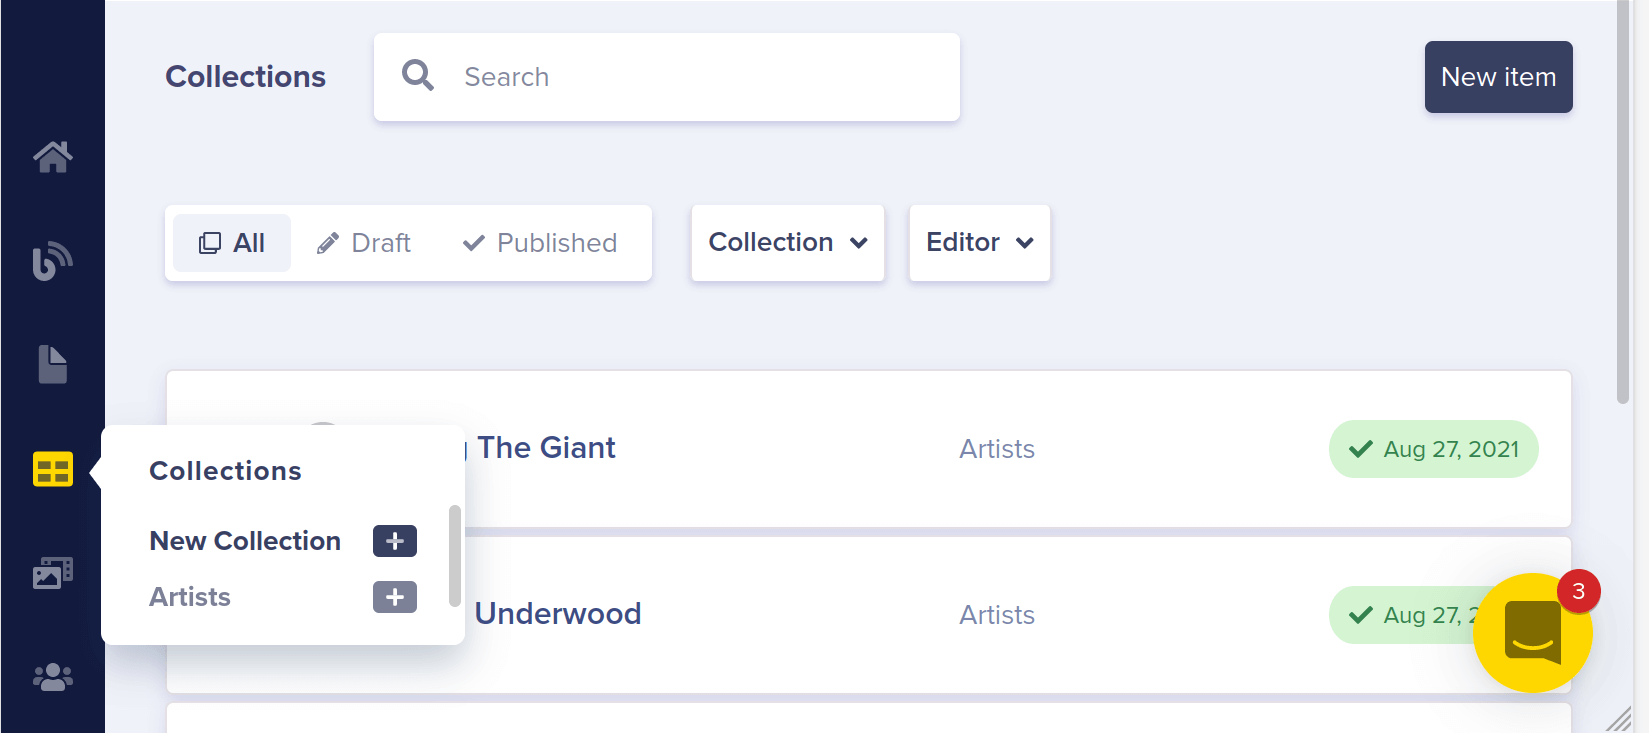
First, go to your collections dashboard. Click New Collection. (Alternatively, you could hover over the button for Content Types and click the plus sign next to "Collection.")
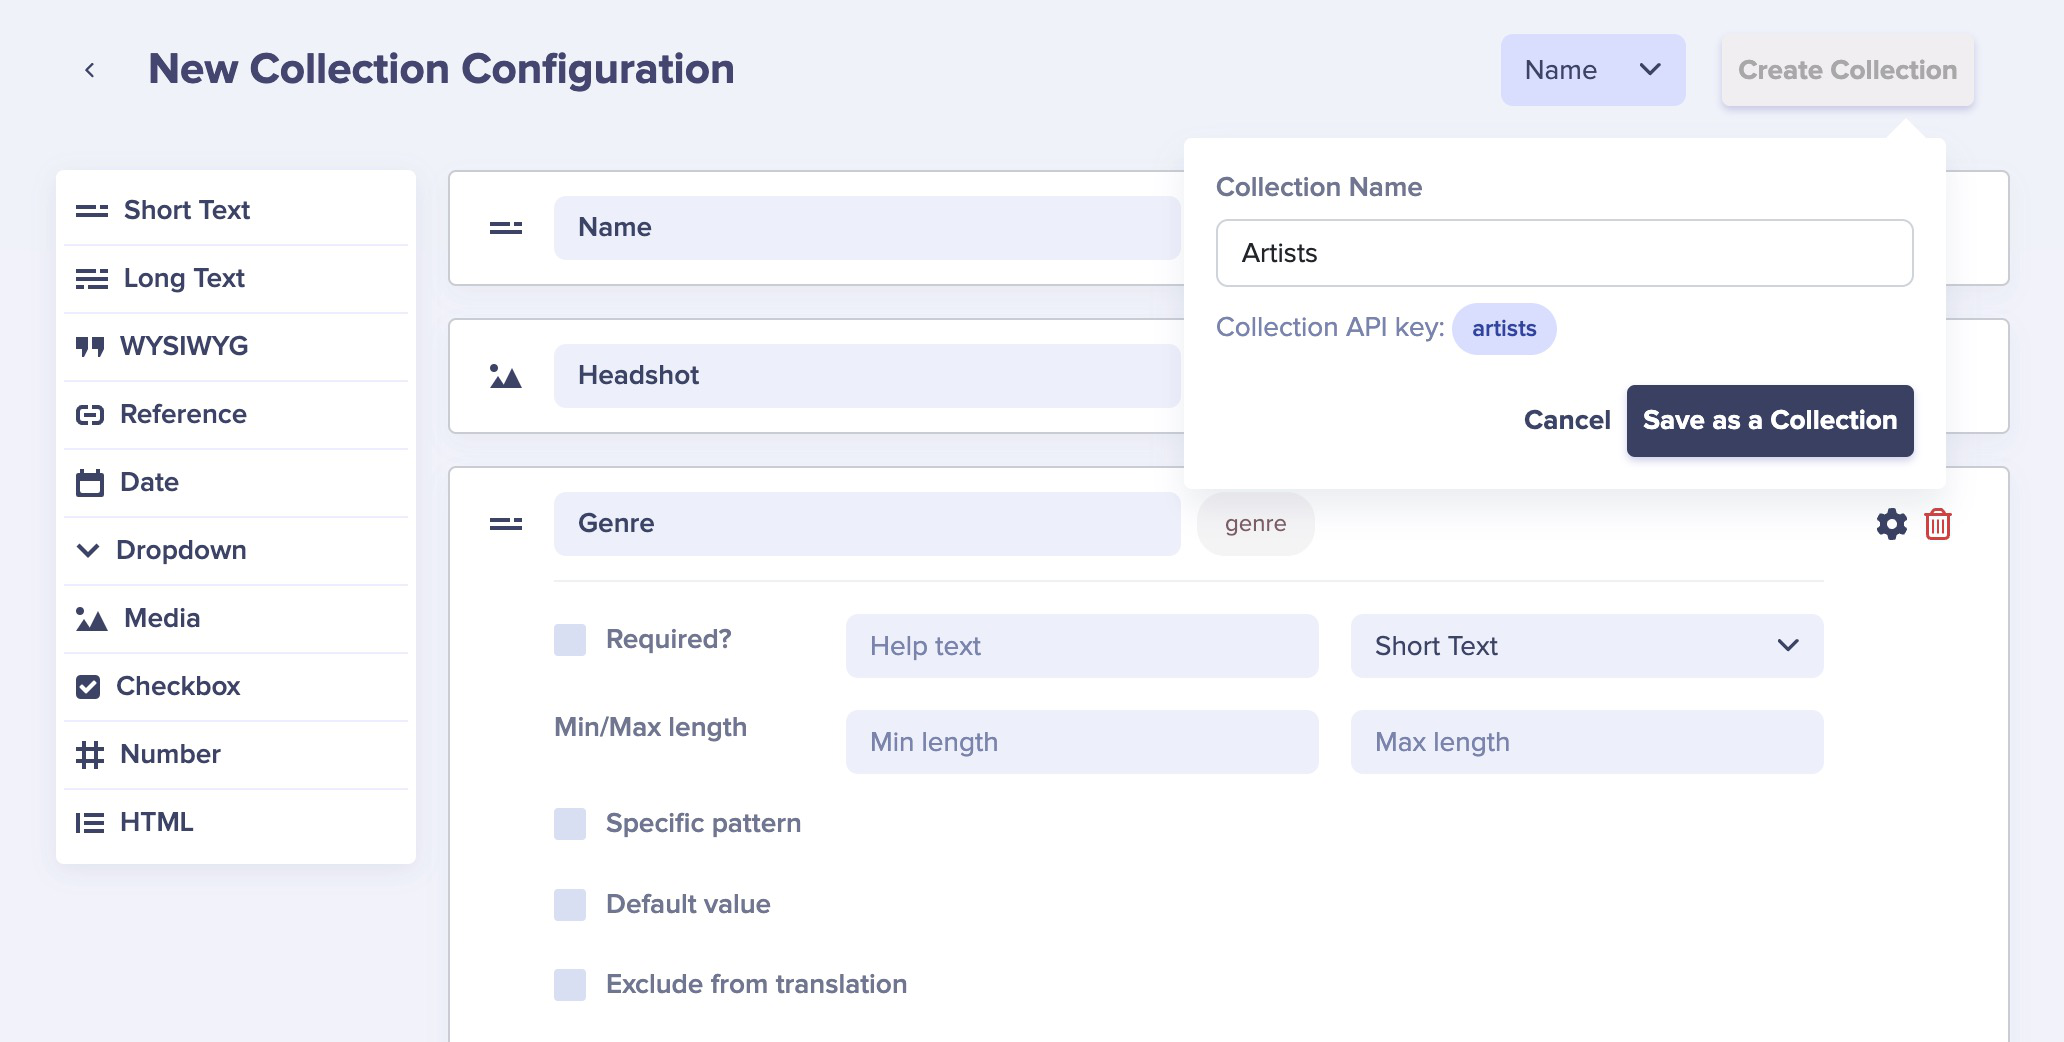
Configure this collection's properties to be "Name," "Headshot," and "Genre."
Give the collection the name "Artists" and save.
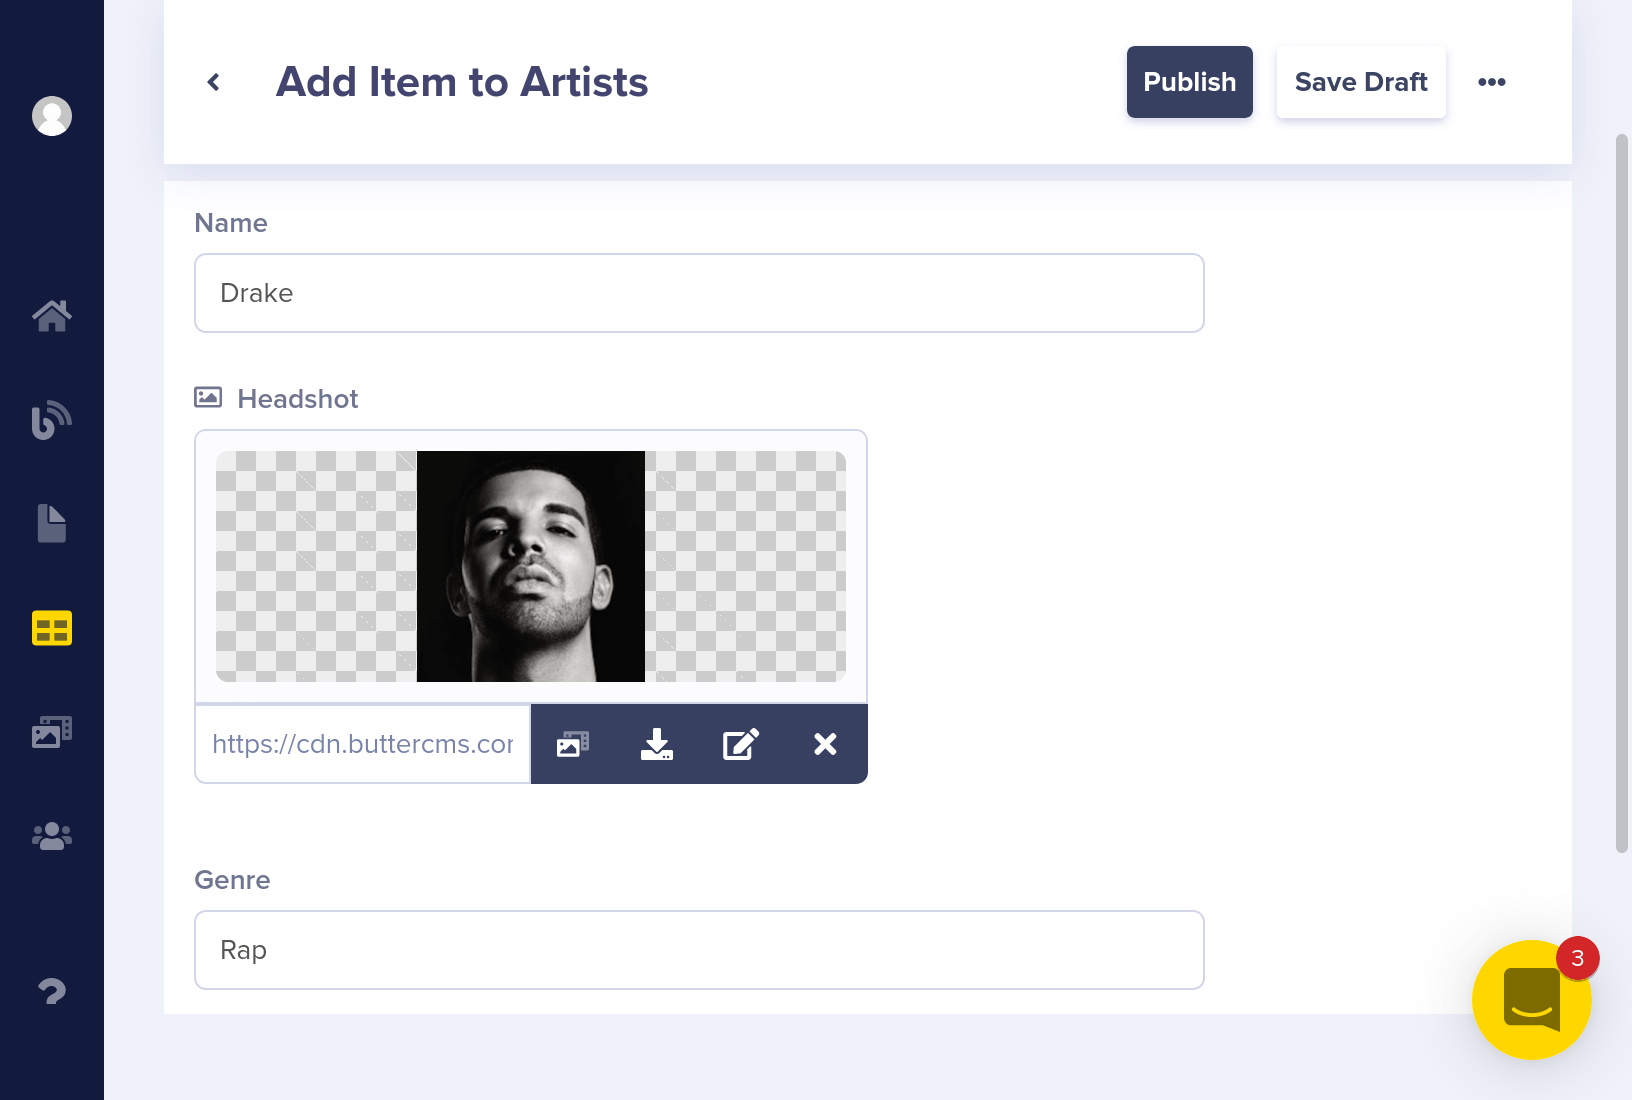
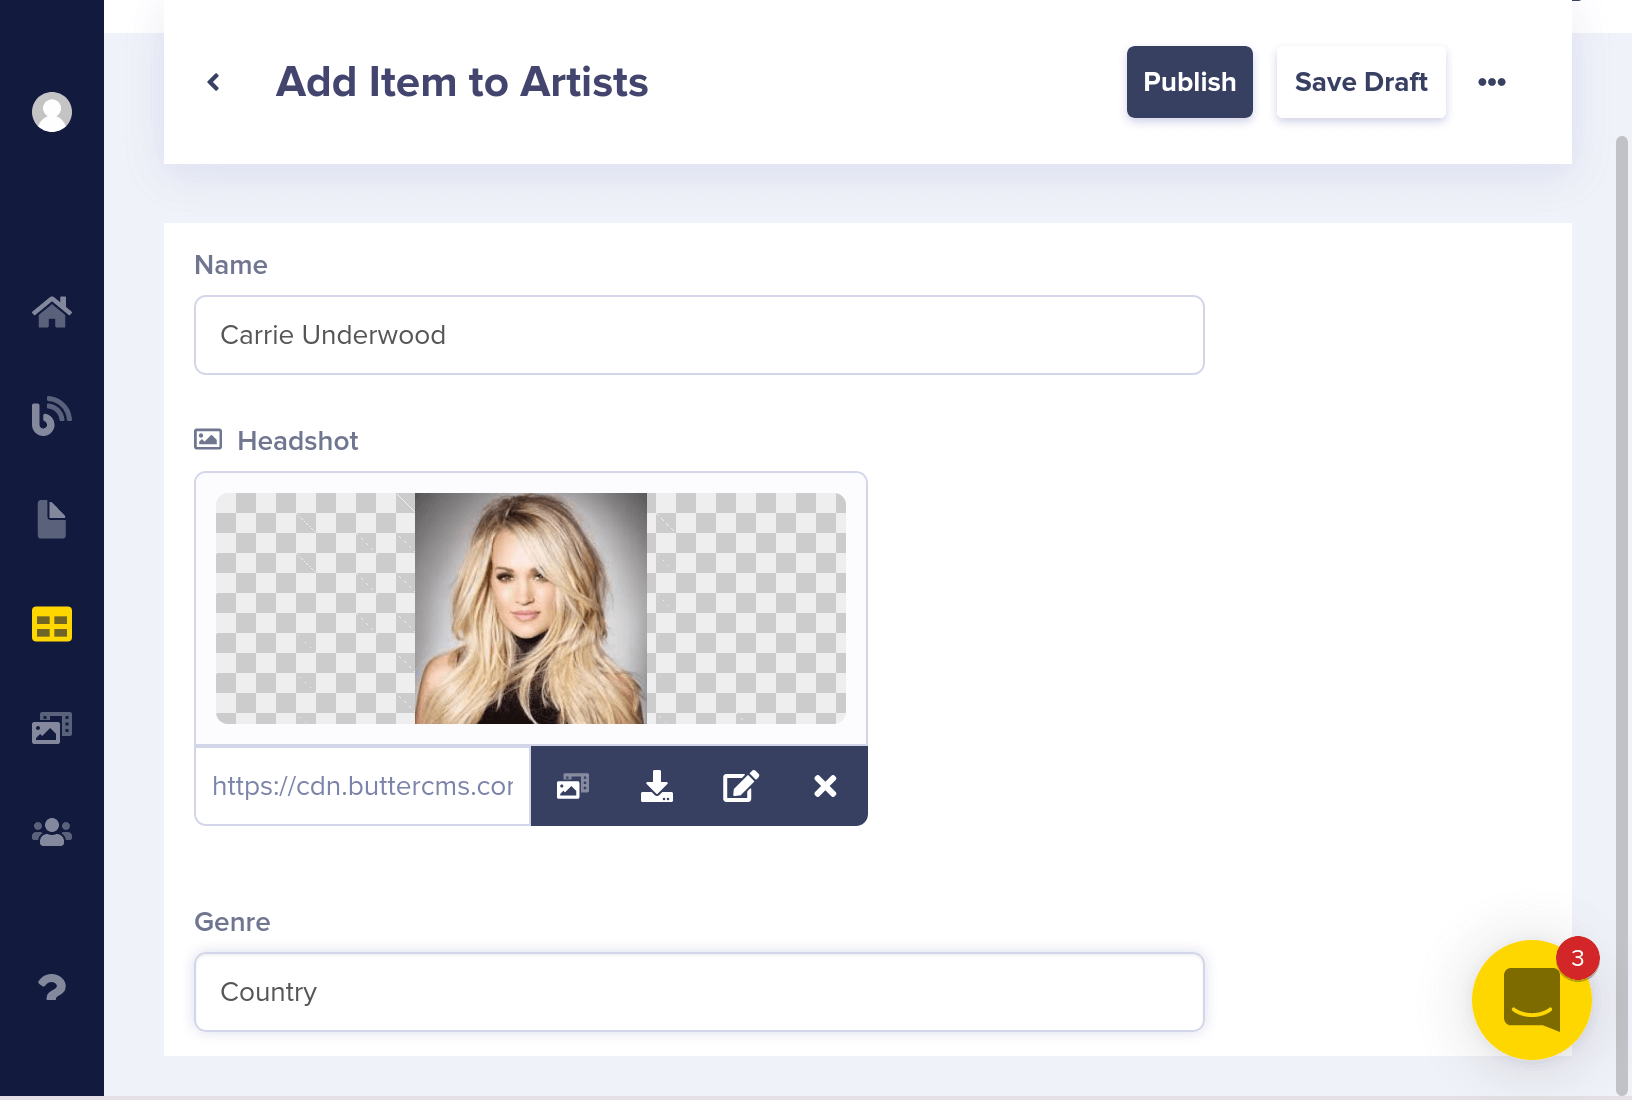
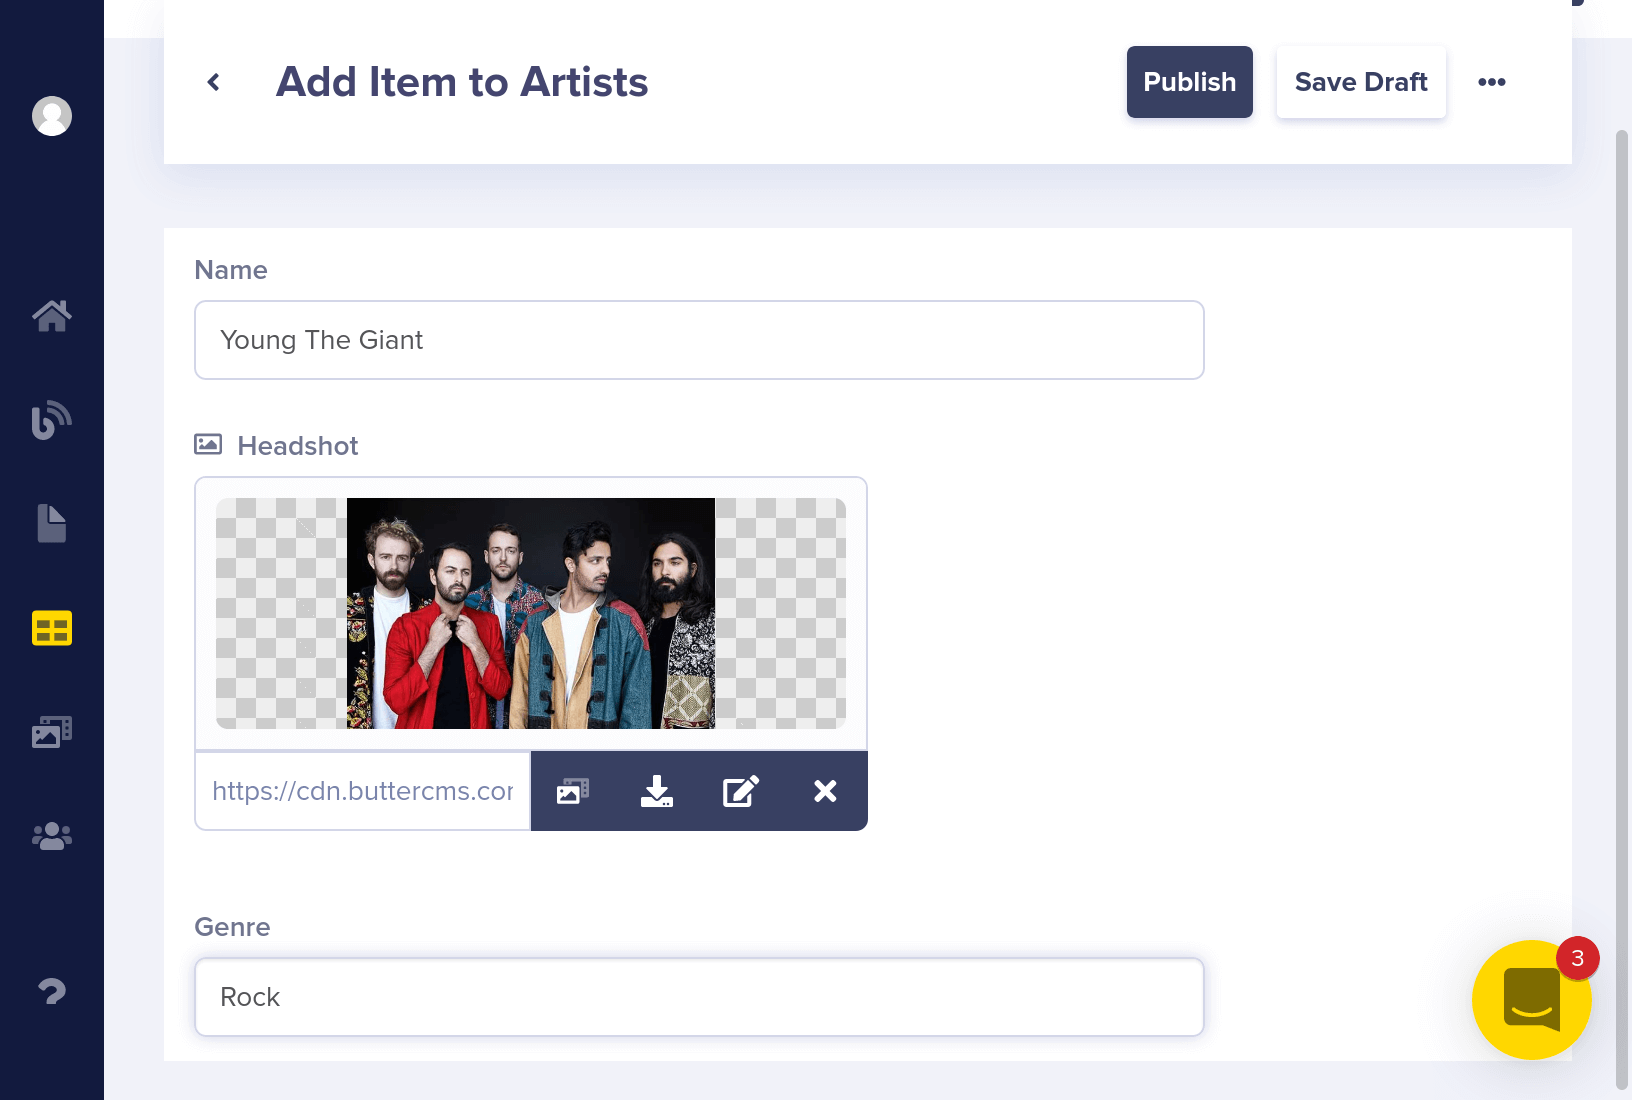
Let's add some Arists to the Collection.
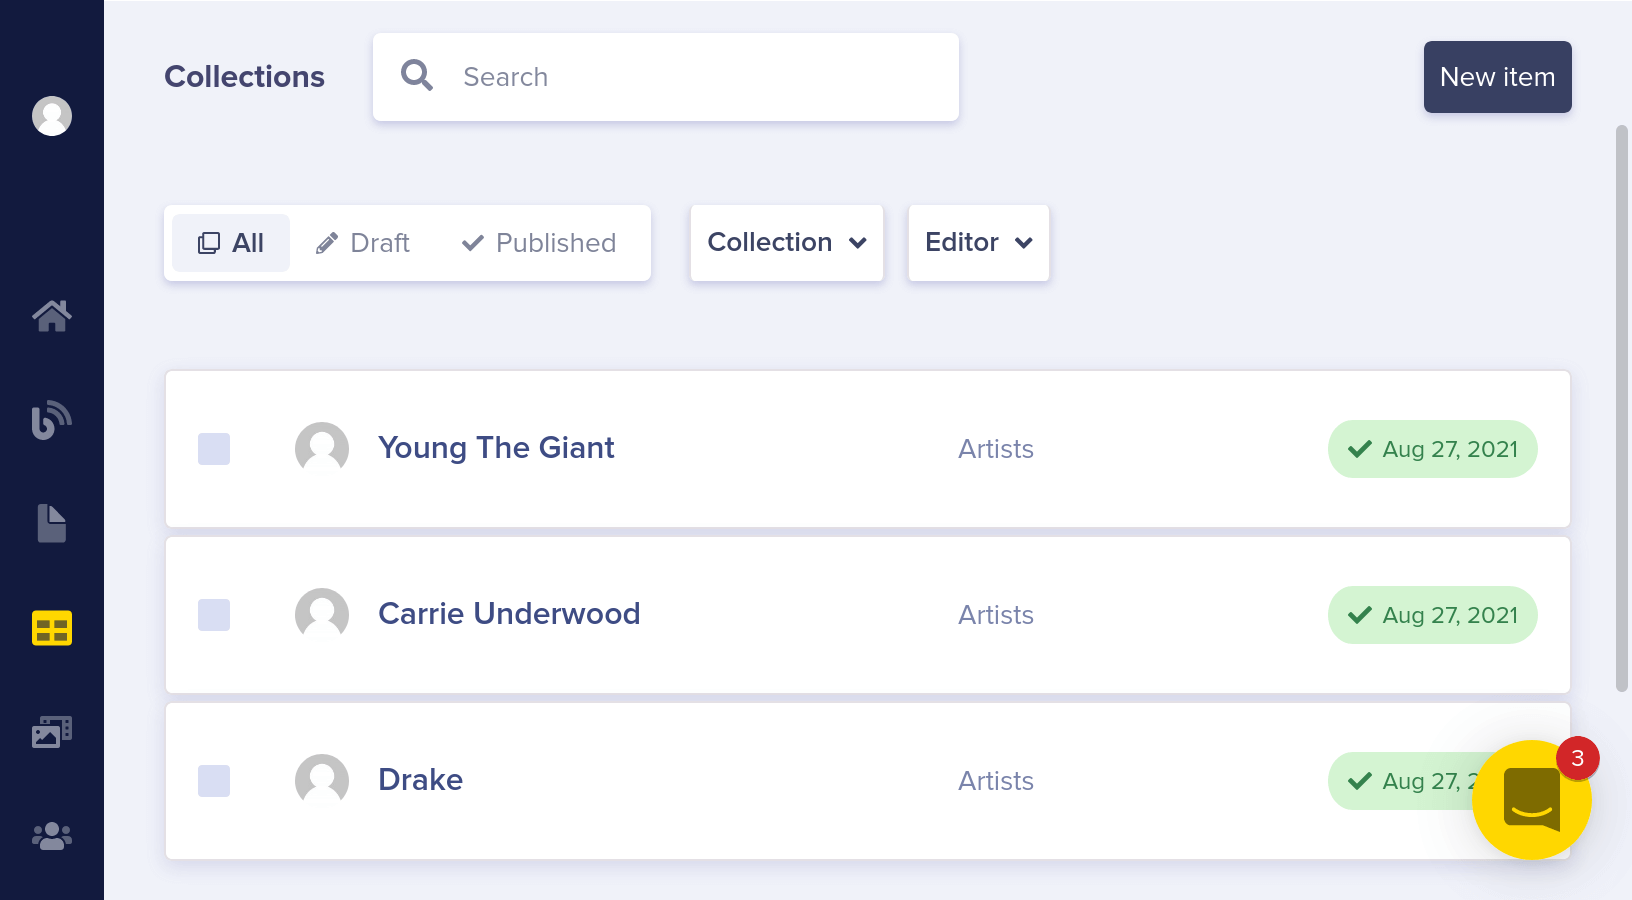
Your collections dashboard should now look like this:
You can query Collections directly via our API. Here's what the API JSON response looks like for your Artists Collection.
GET https://api.buttercms.com/v2/content/artists/
{
    "data": {
        "artists": [
            {
                "genre": "Rap",
                "name": "Drake",
                "headshot": "https://cdn.buttercms.com/V0mLWb47TaI9qmrRkzAC"
            },
            {
                "genre": "Country",
                "name": "Carrie Underwood",
                "headshot": "https://cdn.buttercms.com/FRToQffDSK2IE1O3fUuq"
            },
            {
                "genre": "Rock",
                "name": "Young the Giant",
                "headshot": "https://cdn.buttercms.com/jqVWtHf6T6acW8APrh3g"
            }
        ]
    }
}
With your Artists Collection created, you can now create a Collection for Albums, which will include a Reference to our Artists Collection (as every Album belongs to an Artist). Start by creating a new collection.
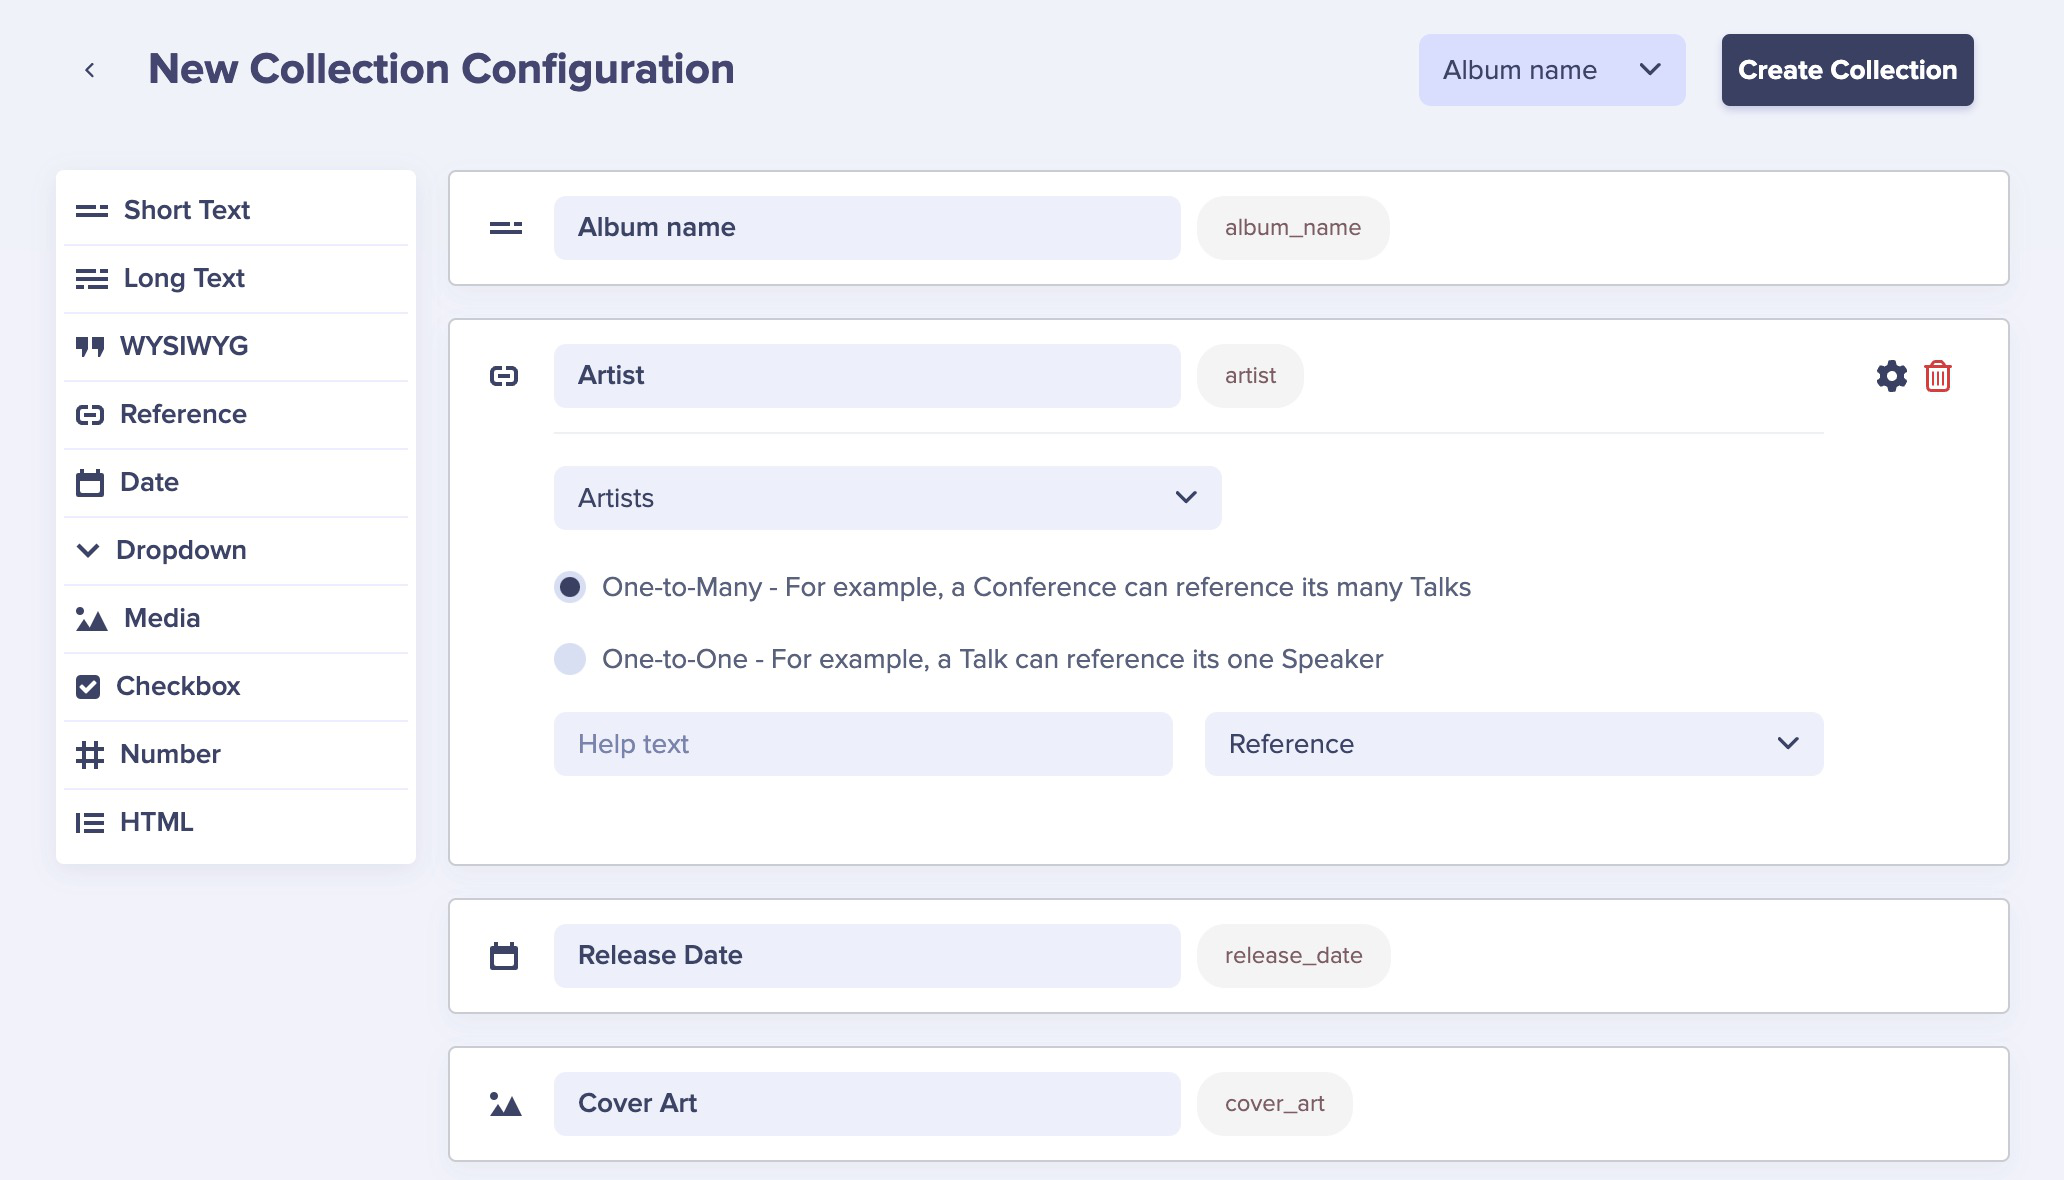
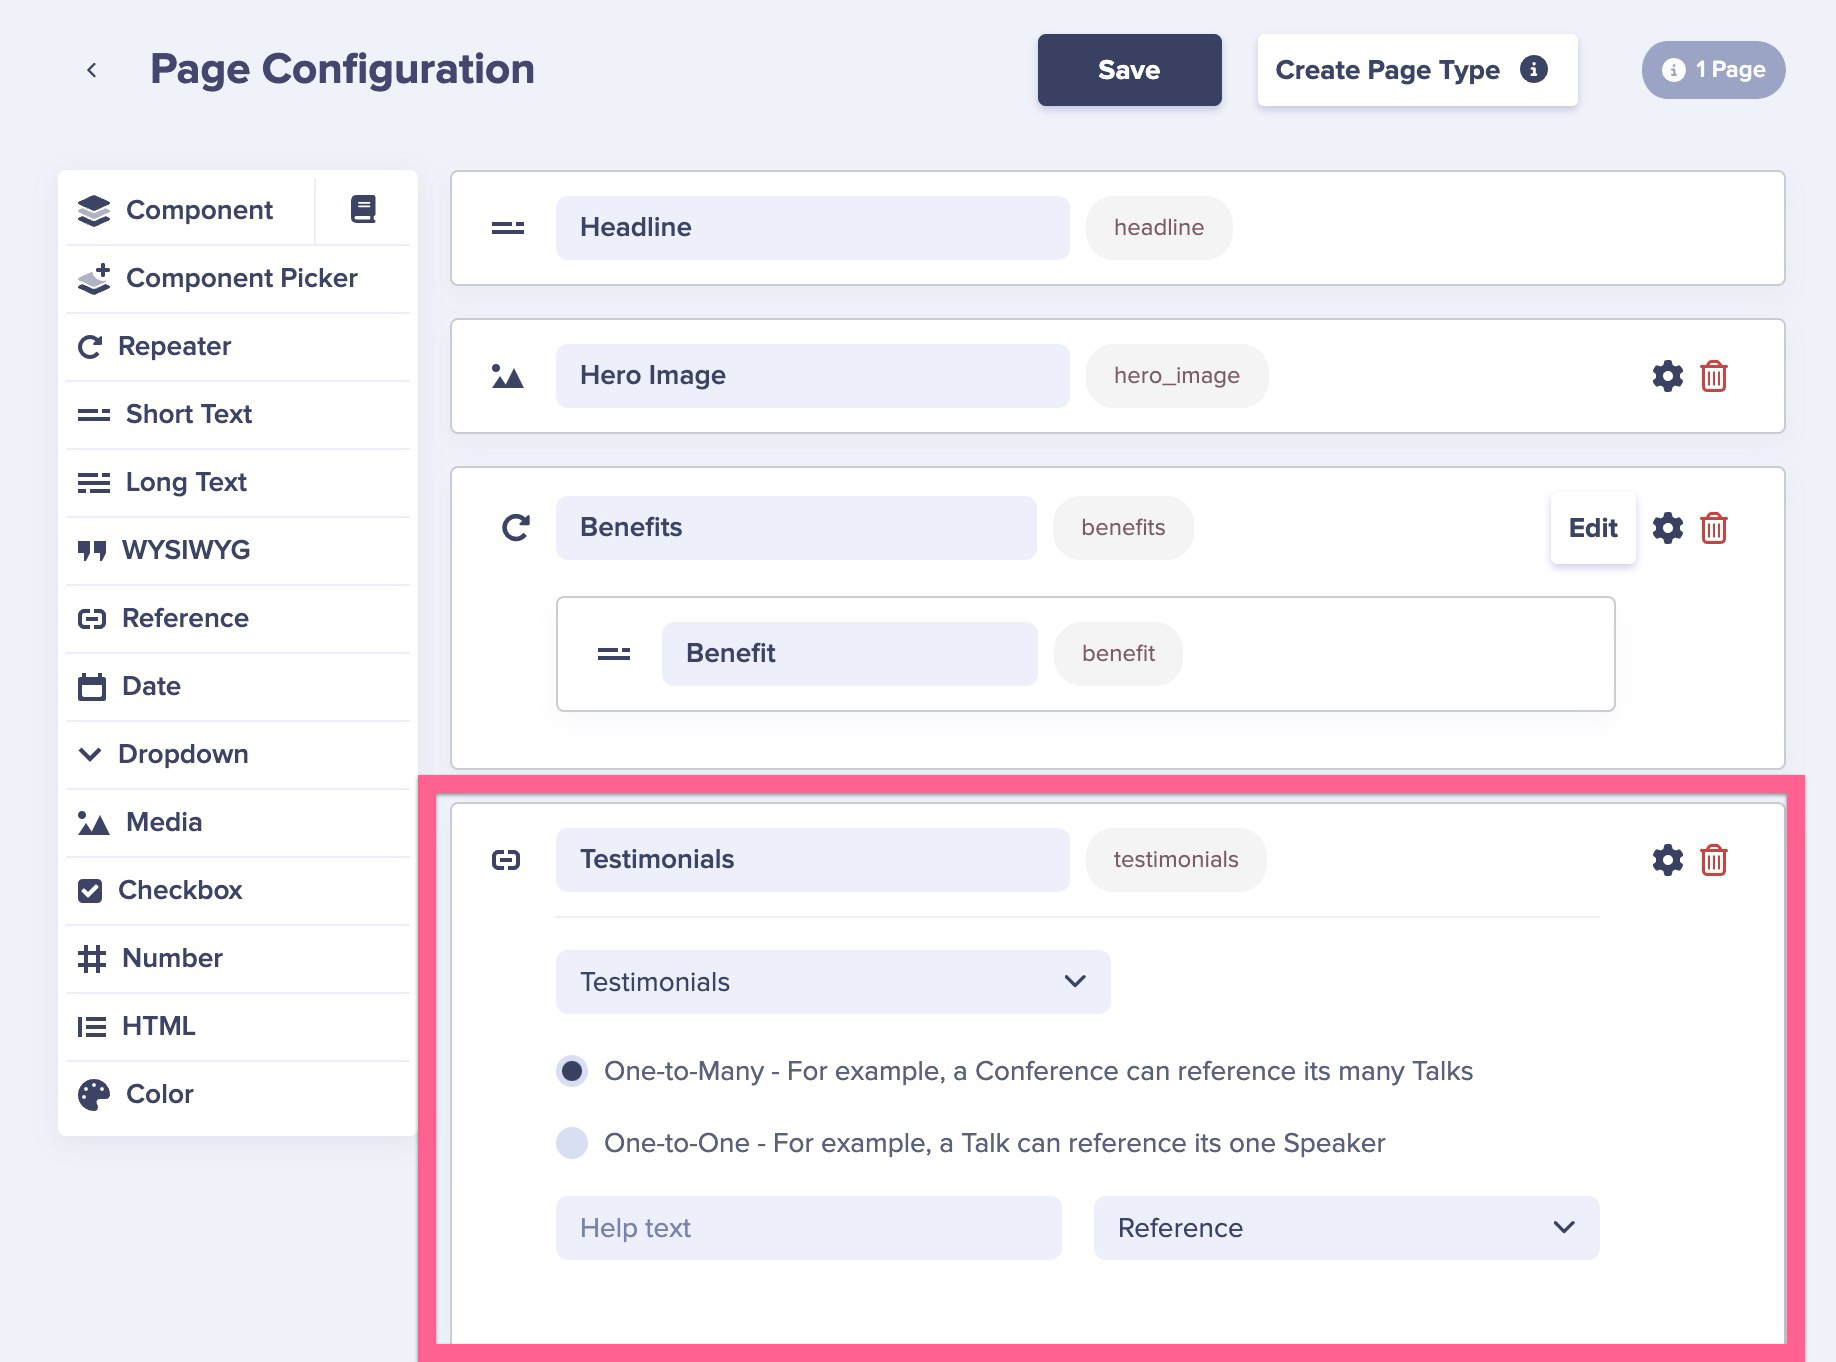
Set up your configuration, with fields for "Album Name," "Artist," "Release Date," and "Cover Art." For "Artist," make sure to use a "Reference" field, link it to "Artists," and set the radio button to "One-to-Many."
Name your collection "Albums" and publish it.

Now, let's add some albums.
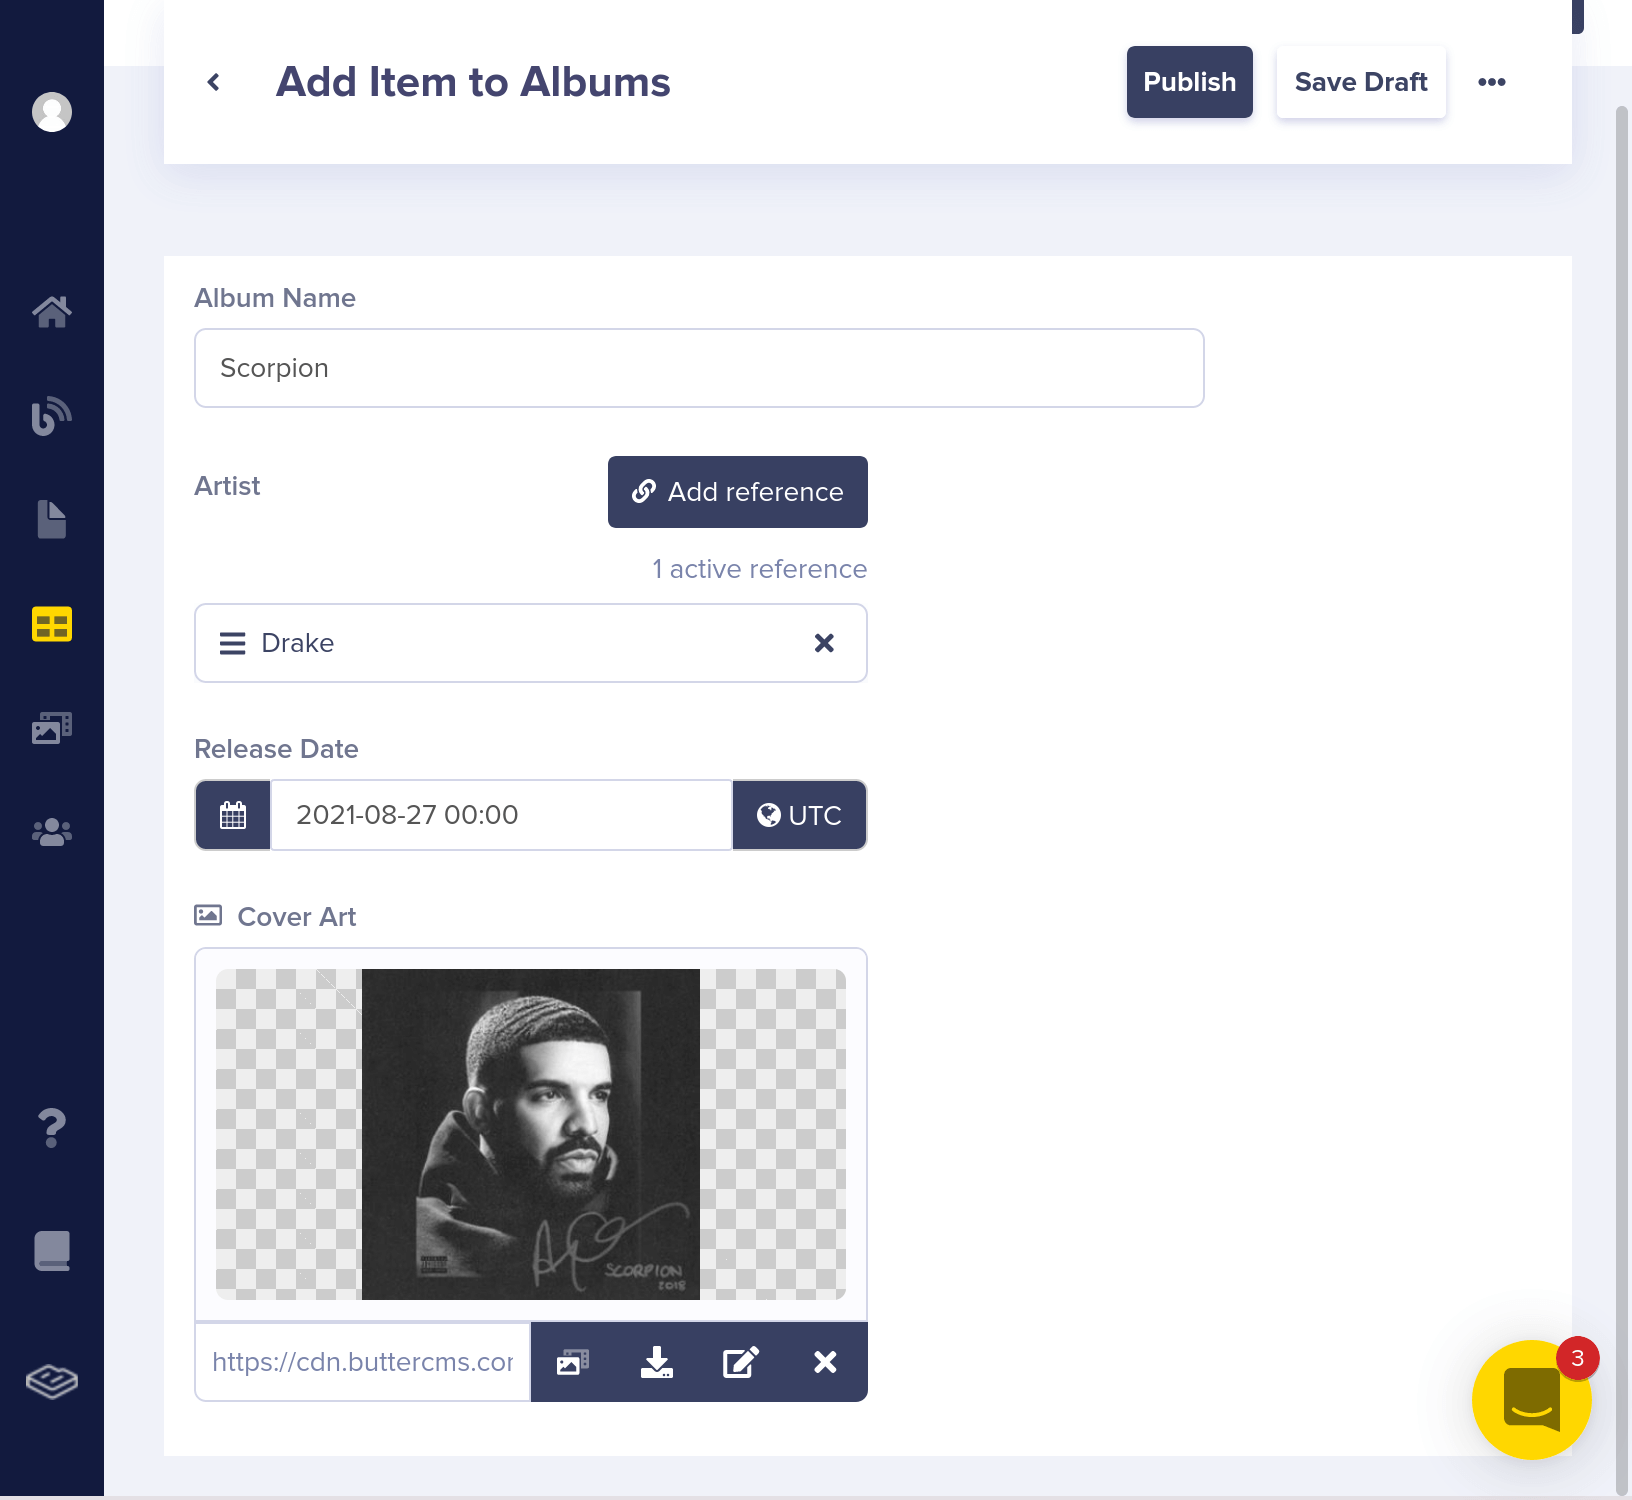

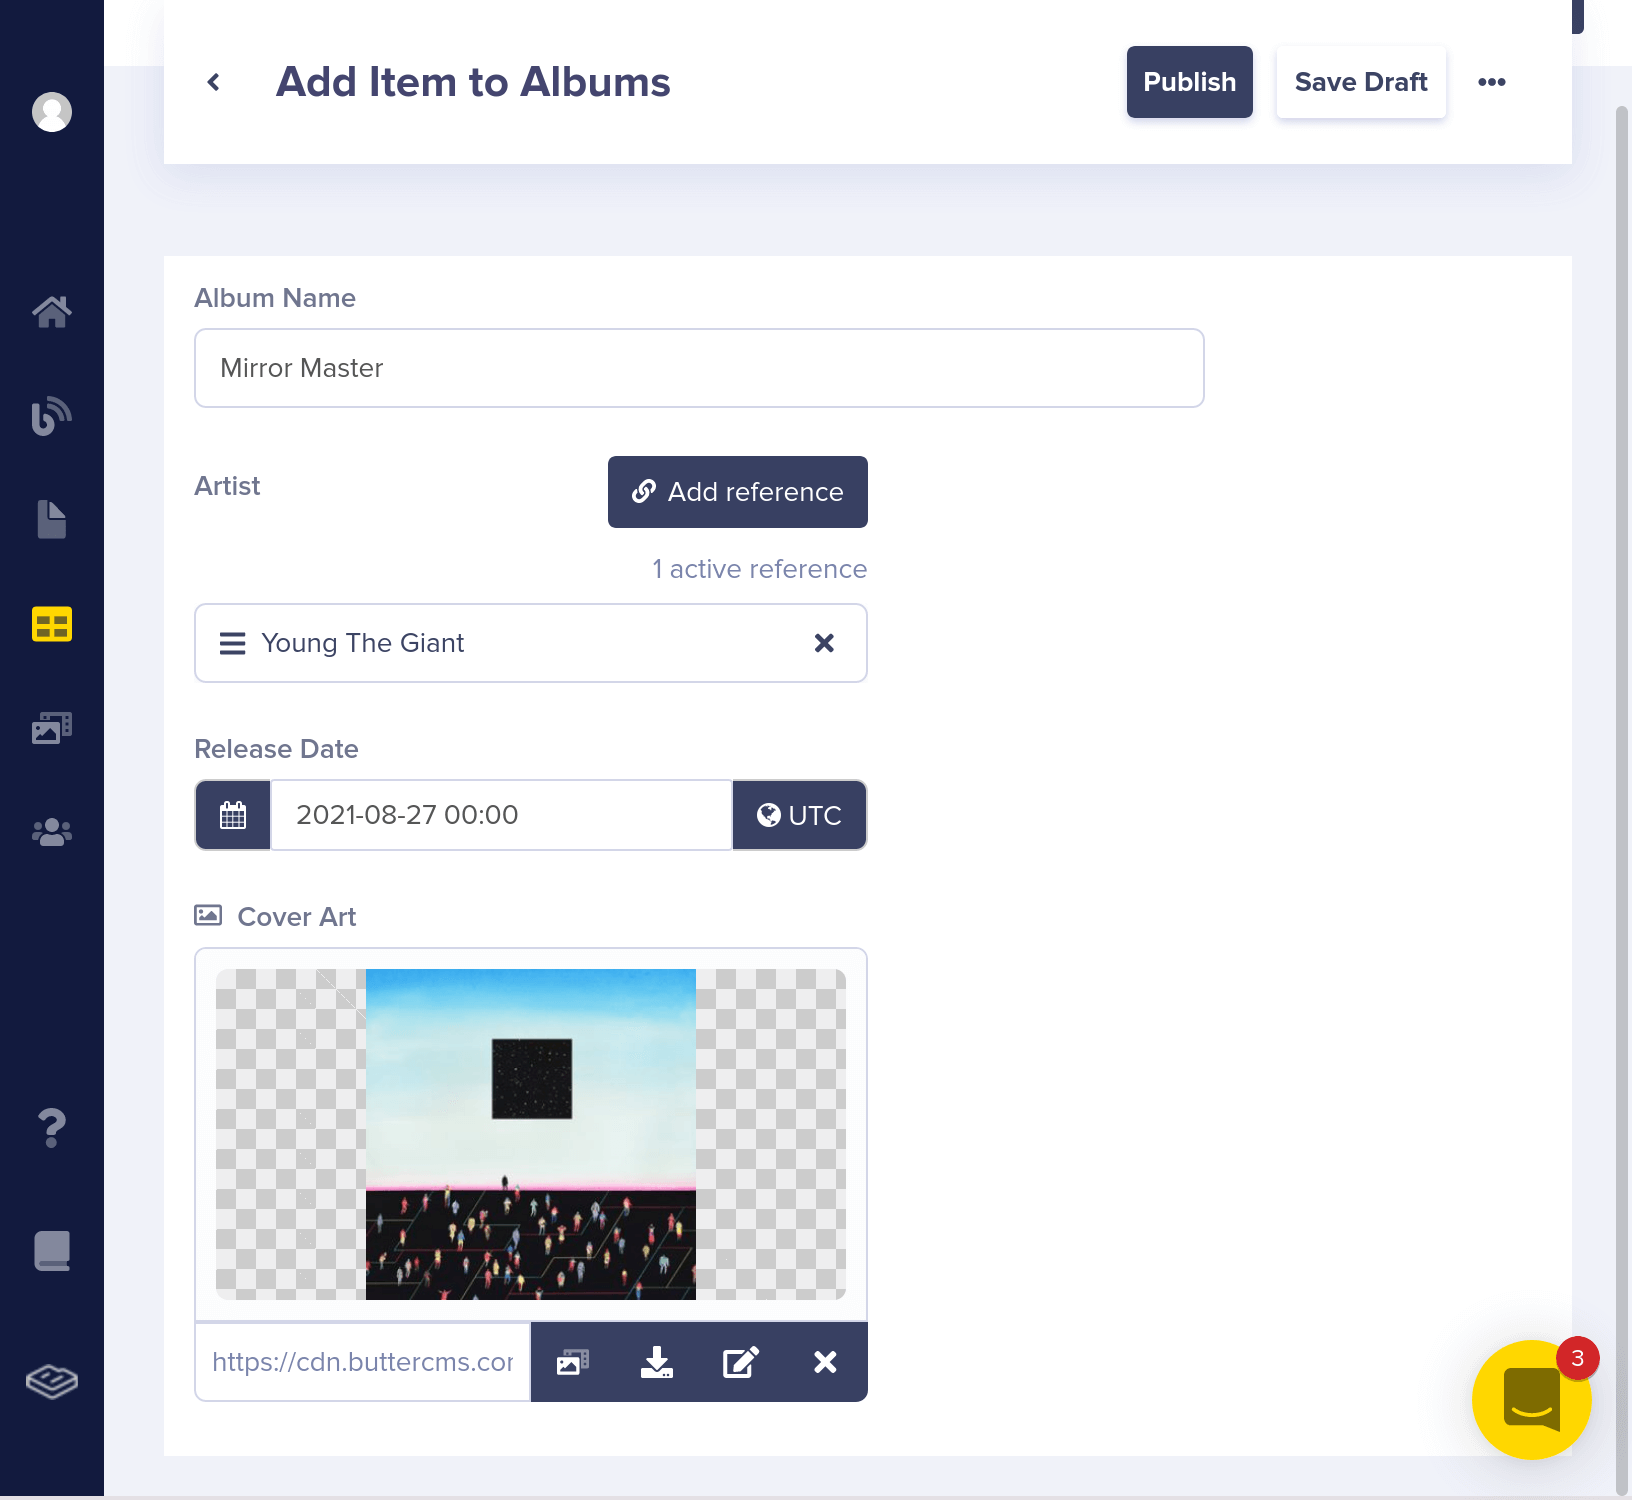
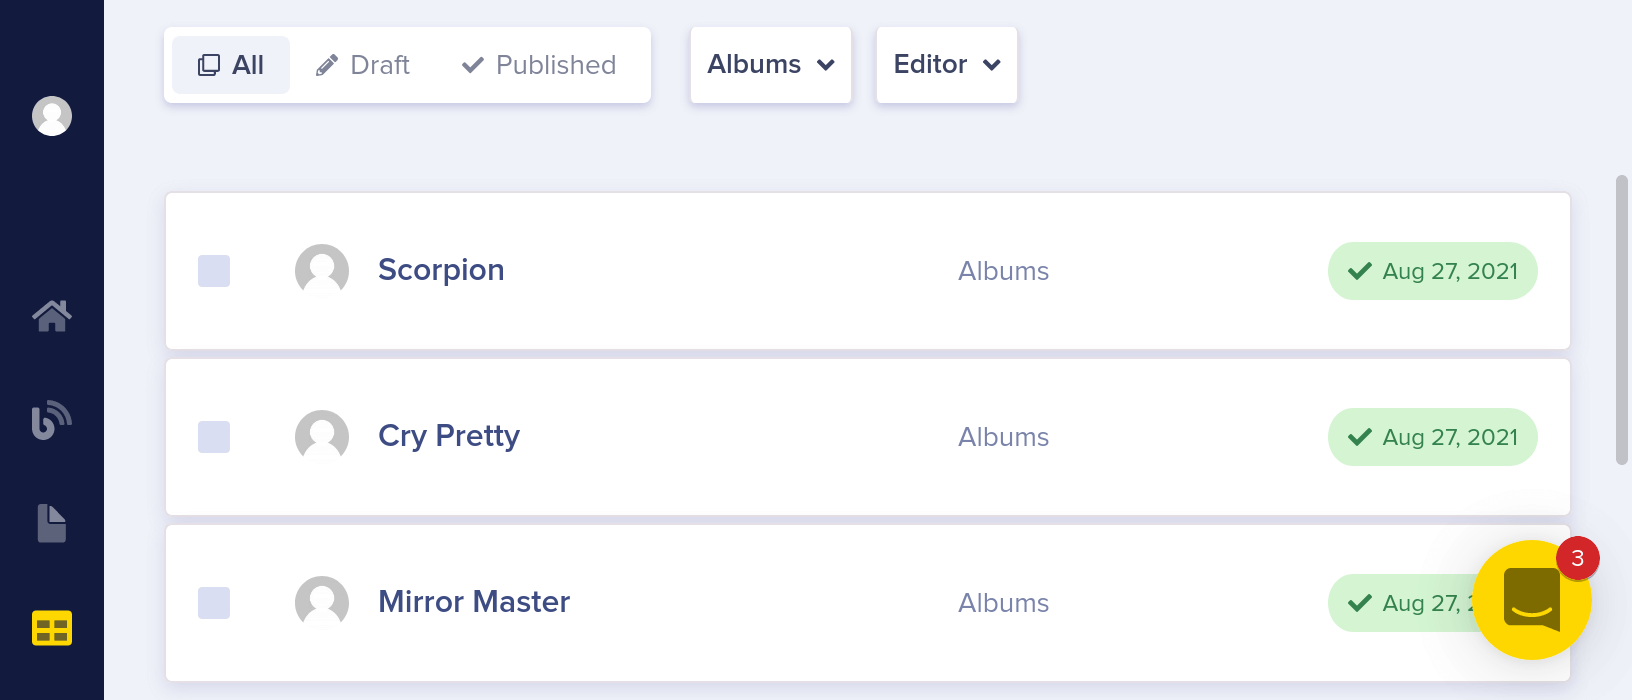
Here's what your Albums Collection should look like now:
Here's what the API JSON response looks like for your Albums Collection. Note artist is a Reference the Artists Collection above.
GET https://api.buttercms.com/v2/content/albums/
{
    "data": {
        "albums": [
            {
                "release_date": "2018-06-29T00:00:00",
                "artist": {
                    "genre": "Rap",
                    "name": "Drake",
                    "headshot": "https://cdn.buttercms.com/V0mLWb47TaI9qmrRkzAC"
                },
                "cover_art": "https://cdn.buttercms.com/uorkxsTQfit8N8uW6Im4",
                "album_name": "Scorpion"
            },
            {
                "release_date": "2018-09-14T00:00:00",
                "artist": {
                    "genre": "Country",
                    "name": "Carrie Underwood",
                    "headshot": "https://cdn.buttercms.com/FRToQffDSK2IE1O3fUuq"
                },
                "cover_art": "https://cdn.buttercms.com/3m0oGGyXQNCUnQke4Ps5",
                "album_name": "Cry Pretty"
            },
            {
                "release_date": "2018-10-12T00:00:00",
                "artist": {
                    "genre": "Rock",
                    "name": "Young the Giant",
                    "headshot": "https://cdn.buttercms.com/jqVWtHf6T6acW8APrh3g"
                },
                "cover_art": "https://cdn.buttercms.com/ThLT87lBSzyCkhivr64l",
                "album_name": "Mirror Master"
            }
        ]
    }
}
This use case demonstrates is how you can use Collections to create tables of data that Reference each other for complex content structures.
Page Facets to Group/Filter By
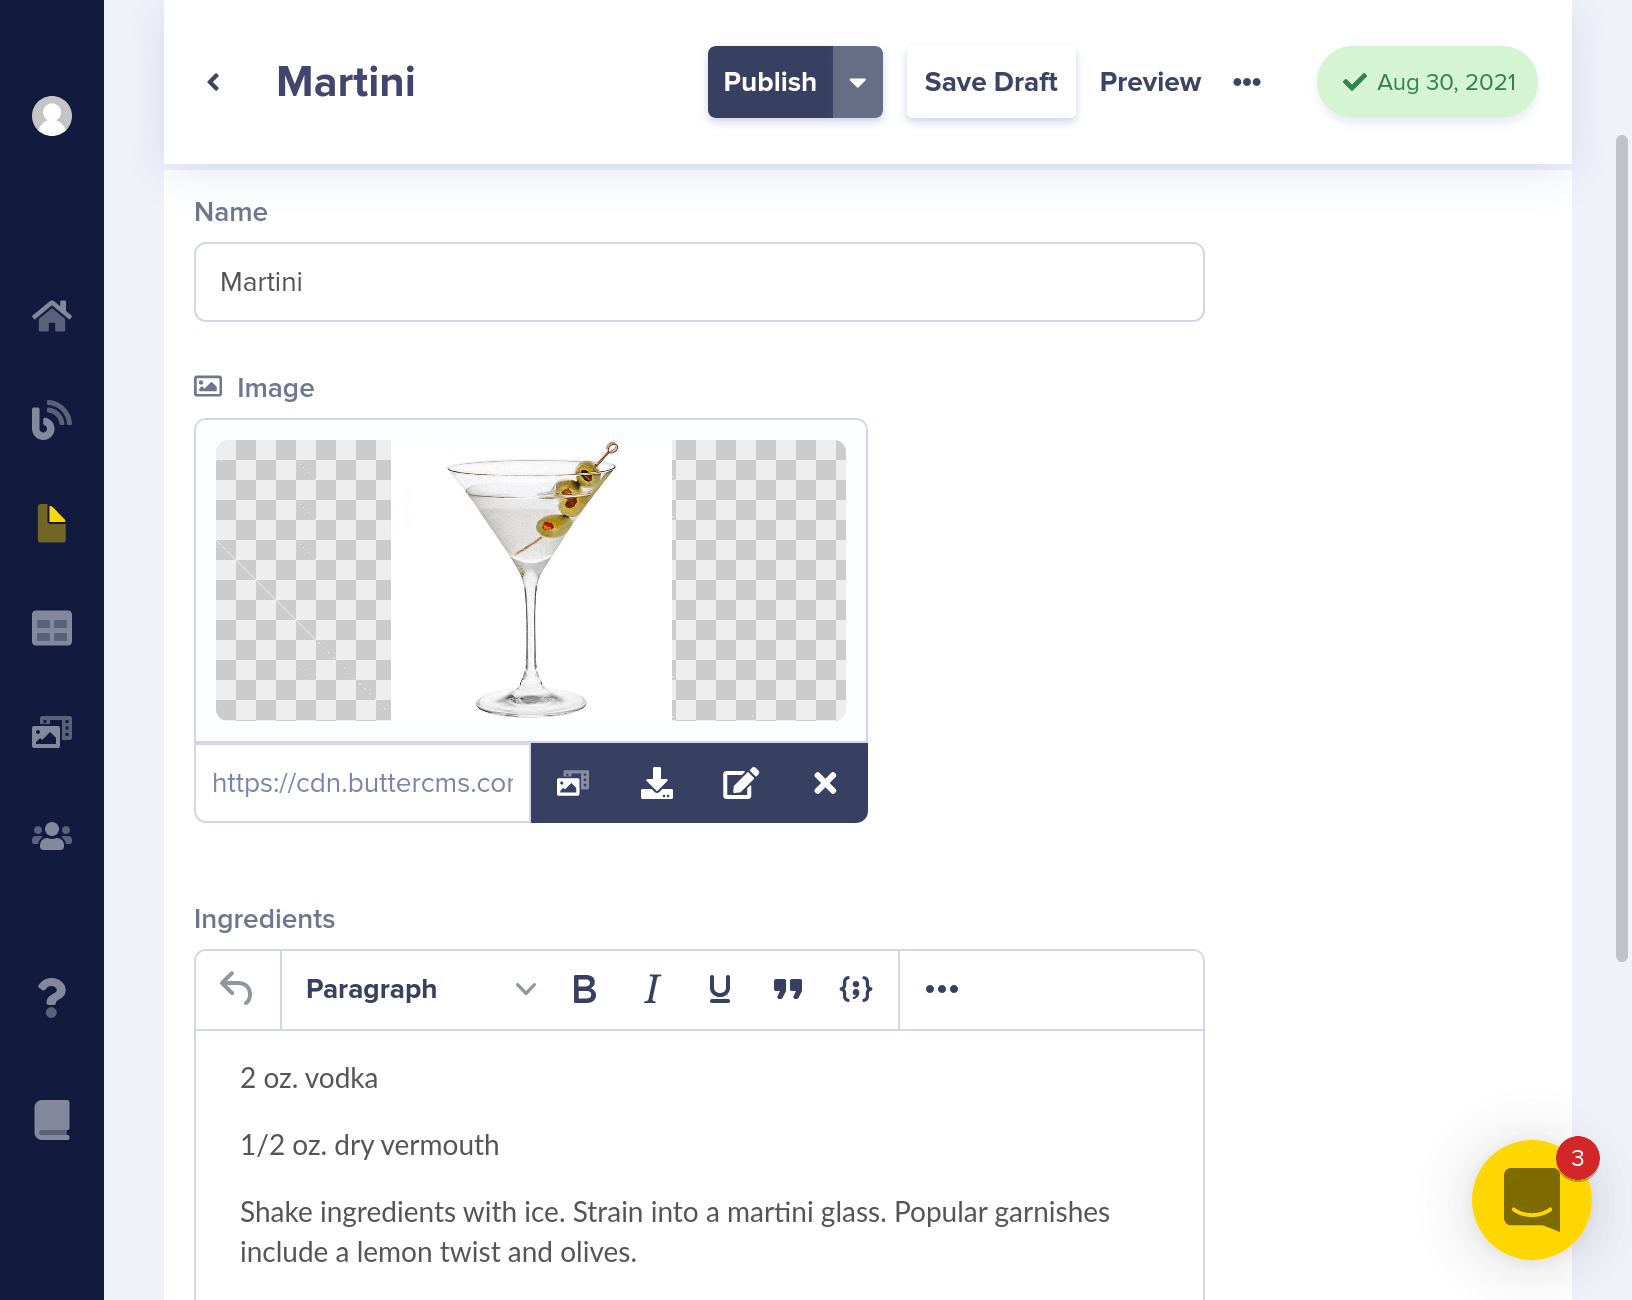
You can use Collections as Facets (filterable properties) for your Pages. The simpliest example would be to add Categories to your Pages. Let's say you have a recipe website for different cocktails and you want to add categories to better organize these cocktail pages for your customers.
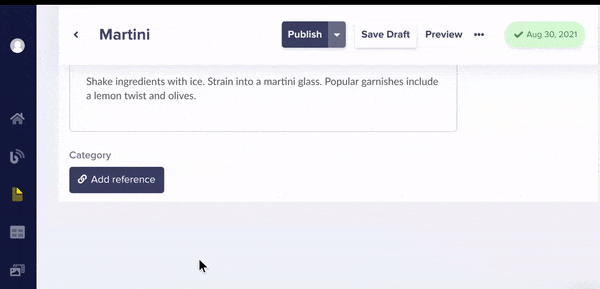
Each cocktail Page has a name, image, and ingredients, like the below example:
Here's what the API JSON response looks like for your cocktail pages. You're going to enhance this by adding a Reference to a Category Collection.
GET https://api.buttercms.com/v2/pages/cocktails/
{
    "data": [
        {
            "slug": "old-fashioned",
            "fields": {
                "name": "Old Fashioned",
                "image": "https://cdn.buttercms.com/k4UHbZOuRhOMKw3Gys8s",
                "ingredients": "<p>1/2 tsp Sugar<br />3 dashes Angostura bitters<br />1 tsp Water<br />2 oz Bourbon</p>"
            }
        },
        {
            "slug": "martini",
            "fields": {
                "name": "Martini",
                "image": "https://cdn.buttercms.com/UKVn6r1RQSVyKoZIVeHU",
                "ingredients": "<p>2 oz. vodka</p>\n<p>1/2 oz. dry vermouth</p>\n<p>Shake ingredients with ice. Strain into a martini glass. Popular garnishes include a lemon twist and olives.</p>"
             }
        }
    ],
    meta": {
        "count": 2,
        "previous_page": null,
        "next_page": null
    }
}
To add a Category to your cocktail pages, create a new collection. Configure your Collection data structure by adding "Name" and "Slug" properties to it.
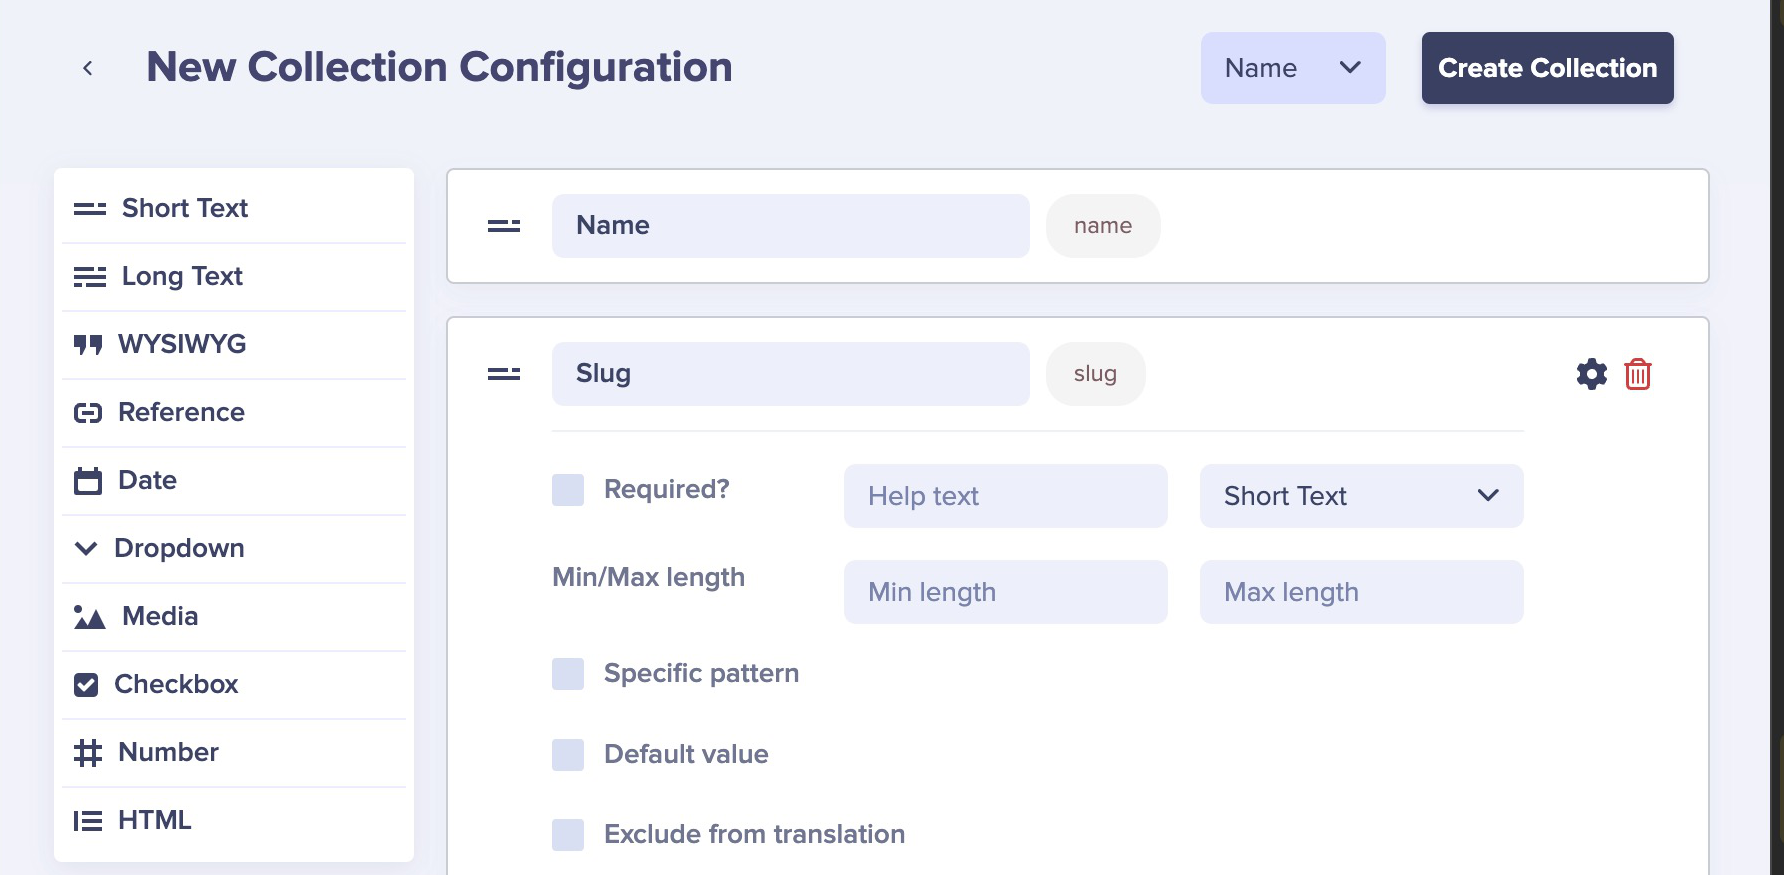
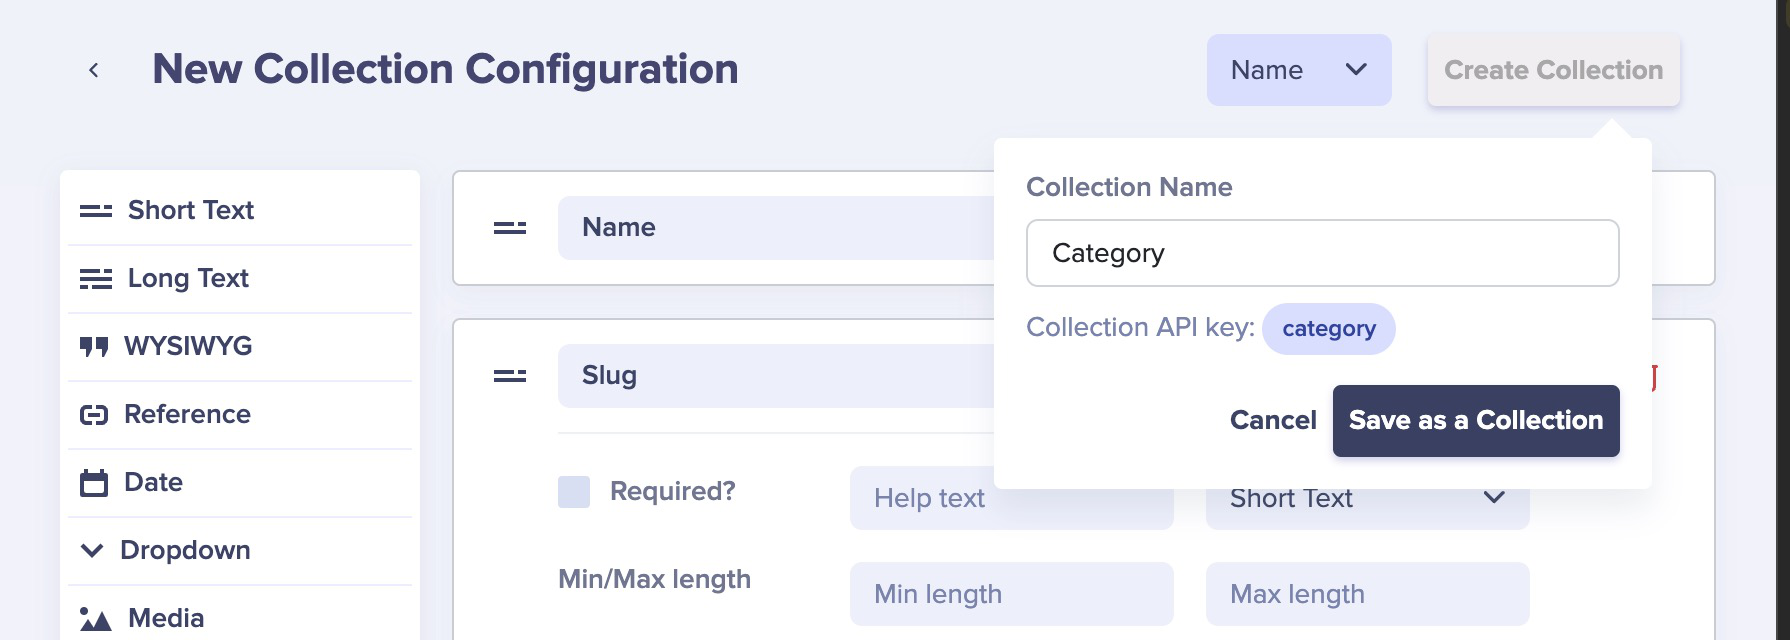
Save it with the name "Category".
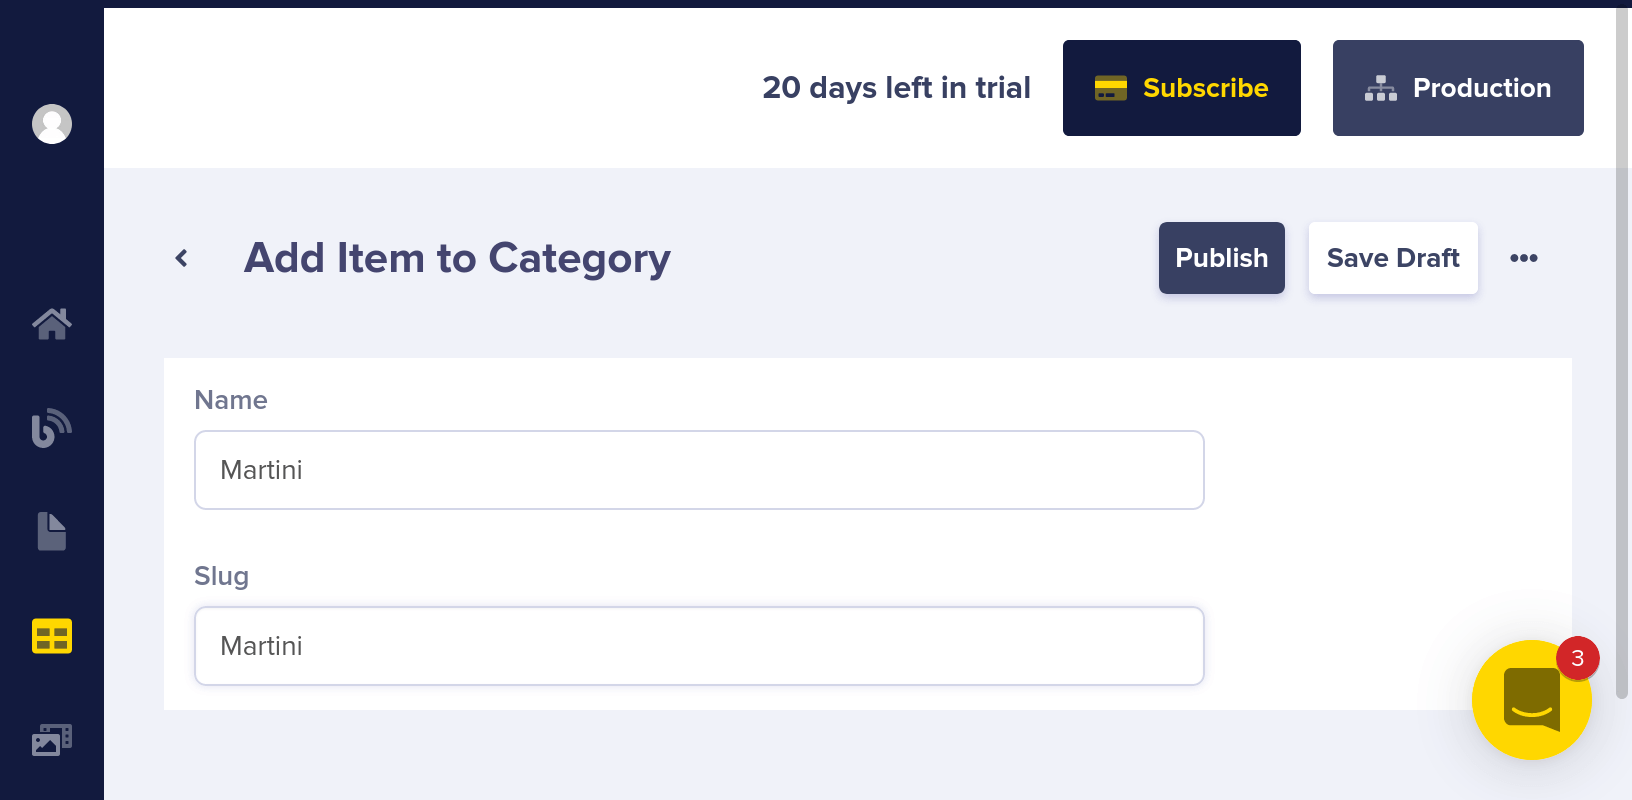
Now you can add some cocktail categories to it like Martini, Old Fashioned, etc...
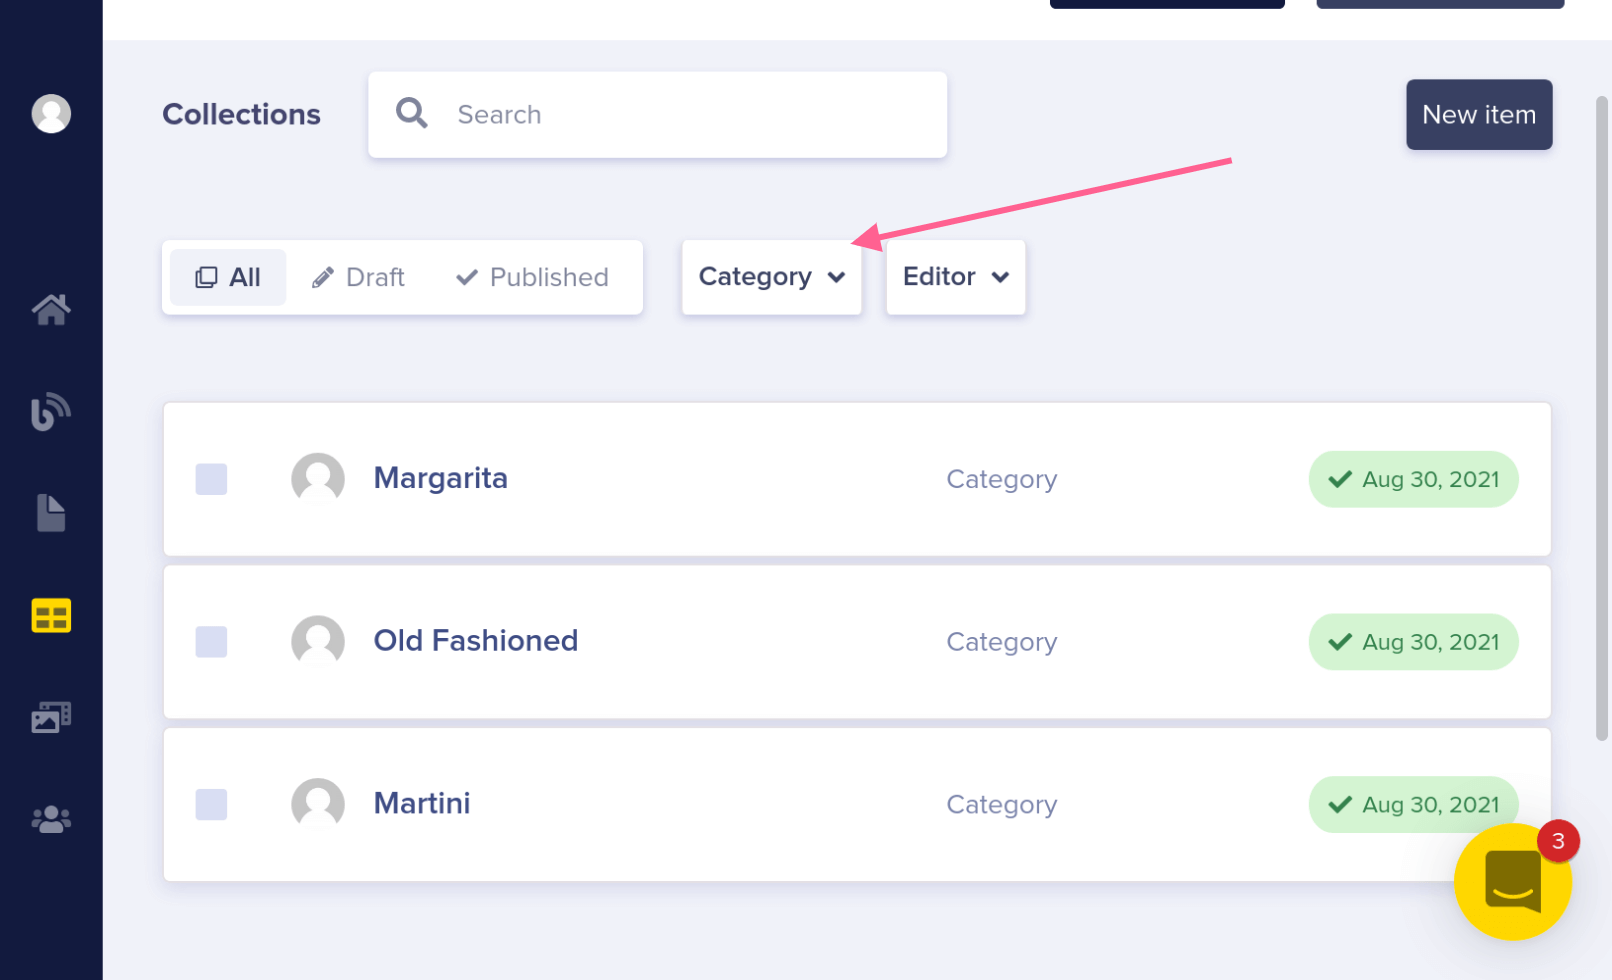
You can choose "Category" in the drop-down on the collections dashboard to see all of your categories.
With your Collection in place, go back to your Cocktail Page Type by clicking on the three dots in the corner of any Cocktail page and clicking on "edit schema." Add a new Reference field called "Category" to the Category Collection

Now when editing your cocktail pages, you can now categorize your cocktails.
These categories of course also show up in your API response your cocktails:
GET https://api.buttercms.com/v2/pages/cocktails/
{
    "data": [
        {
            "slug": "old-fashioned",
            "fields": {
                "name": "Old Fashioned",
                "image": "https://cdn.buttercms.com/k4UHbZOuRhOMKw3Gys8s",
                "ingredients": "<p>1/2 tsp Sugar<br />3 dashes Angostura bitters<br />1 tsp Water<br />2 oz Bourbon</p>",
                "category": {
                    "name": "Old Fashioned",
                    "slug": "old-fashioned"
                }
            }
        },
        {
            "slug": "martini",
            "fields": {
                "name": "Martini",
                "image": "https://cdn.buttercms.com/UKVn6r1RQSVyKoZIVeHU",
                "ingredients": "<p>2 oz. vodka</p>\n<p>1/2 oz. dry vermouth</p>\n<p>Shake ingredients with ice. Strain into a martini glass. Popular garnishes include a lemon twist and olives.</p>",
                "category": {
                    "name": "Martini",
                    "slug": "martini"
                }
             }
        }
    ],
    meta": {
        "count": 2,
        "previous_page": null,
        "next_page": null
    }
}
Naturally, now that your pages have categories, you'll want to filter your pages by category. To do this just add fields.category.slug=martini to your API query.
GET https://api.buttercms.com/v2/pages/cocktails/?&fields.category.slug=martini
{
    "data": [
        {
            "slug": "martini",
            "fields": {
                "name": "Martini",
                "image": "https://cdn.buttercms.com/UKVn6r1RQSVyKoZIVeHU",
                "ingredients": "<p>2 oz. vodka</p>\n<p>1/2 oz. dry vermouth</p>\n<p>Shake ingredients with ice. Strain into a martini glass. Popular garnishes include a lemon twist and olives.</p>",
                "category": {
                    "name": "Martini",
                    "slug": "martini"
                }
             }
        }
    ],
    meta": {
        "count": 1,
        "previous_page": null,
        "next_page": null
    }
}
To take this example further, let's say you wanted multiple Facets to organize your cocktails by. You could set up multiple Collections such as:
- Drink Types: Cider, Colada, Cosmo, ...
- Spirits: Bourbon, Whiskey, Gin
- Color: Brown, Yellow, Orange
Then you would add a corresponding Reference field to link each Collection to your cocktail Pages.
This use case demonstrates is how you can use Collections to add filterable Facets to your Pages.
Reusable Promotional Page Content
There are many use cases for Collections. Another is using Collections to store reusable promotional content that can be Referenced by multiple pages. A common example is customer testimonials. You can store all of your testimonials in a Collection, then Reference those testimonials from your Pages. Here's how you'd do that:
First let's assume your marketing site has some features Pages, each focusing on a particular feature of your product or service.
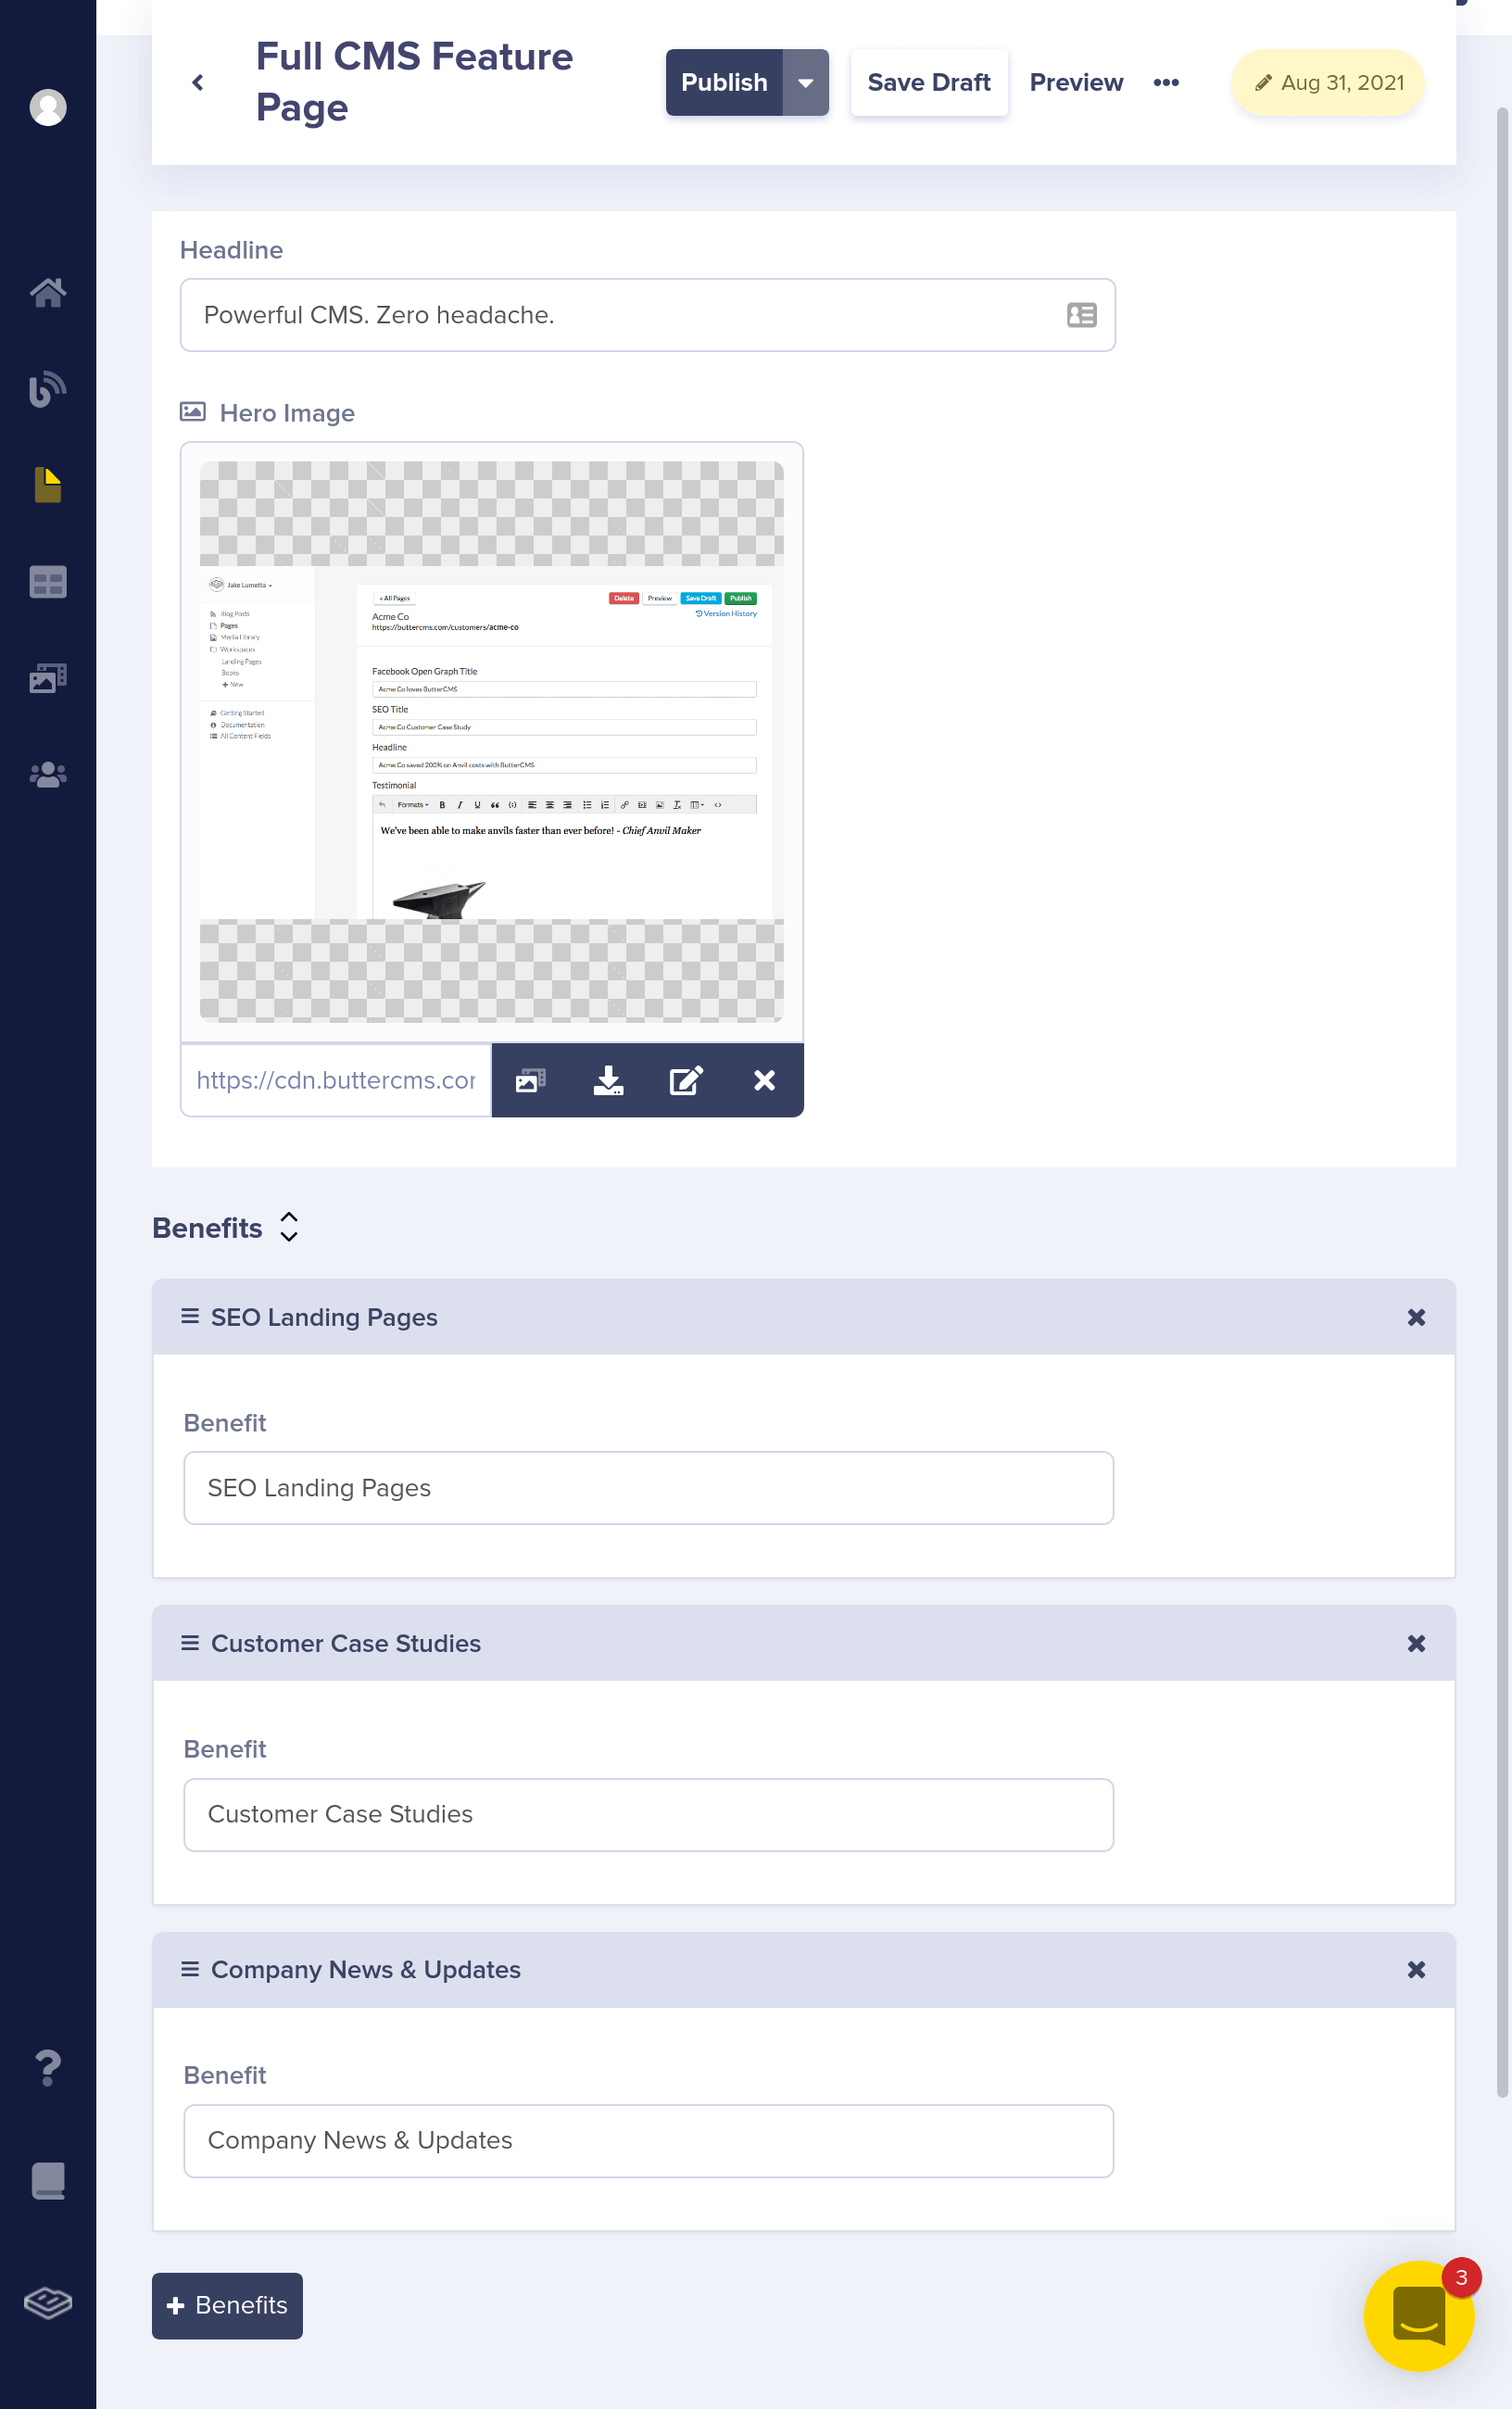
Here's what the API JSON response looks like for your feature page. You're going to enhance this by adding a Reference to a Testimonials Collection.
GET https://api.buttercms.com/v2/pages/*/full-cms-feature-page
{
"data": {
"slug": "full-cms-feature-page",
"name": "Full CMS Feature Page",
"published": "2021-08-31T14:36:13.120532Z",
"updated": "2021-08-31T14:36:13.120532Z",
page_type": null,
"fields": {
"headline": "Powerful CMS. Zero headache.",
"hero_image": "https://cdn.buttercms.com/RB2R32WbSxqcanOXiHYA",
"benefits": [
{
"benefit": "SEO Landing Pages"
},
{
"benefit": "Customer Case Studies"
},
{
"benefit": "Company News & Updates"
}
]
}
}
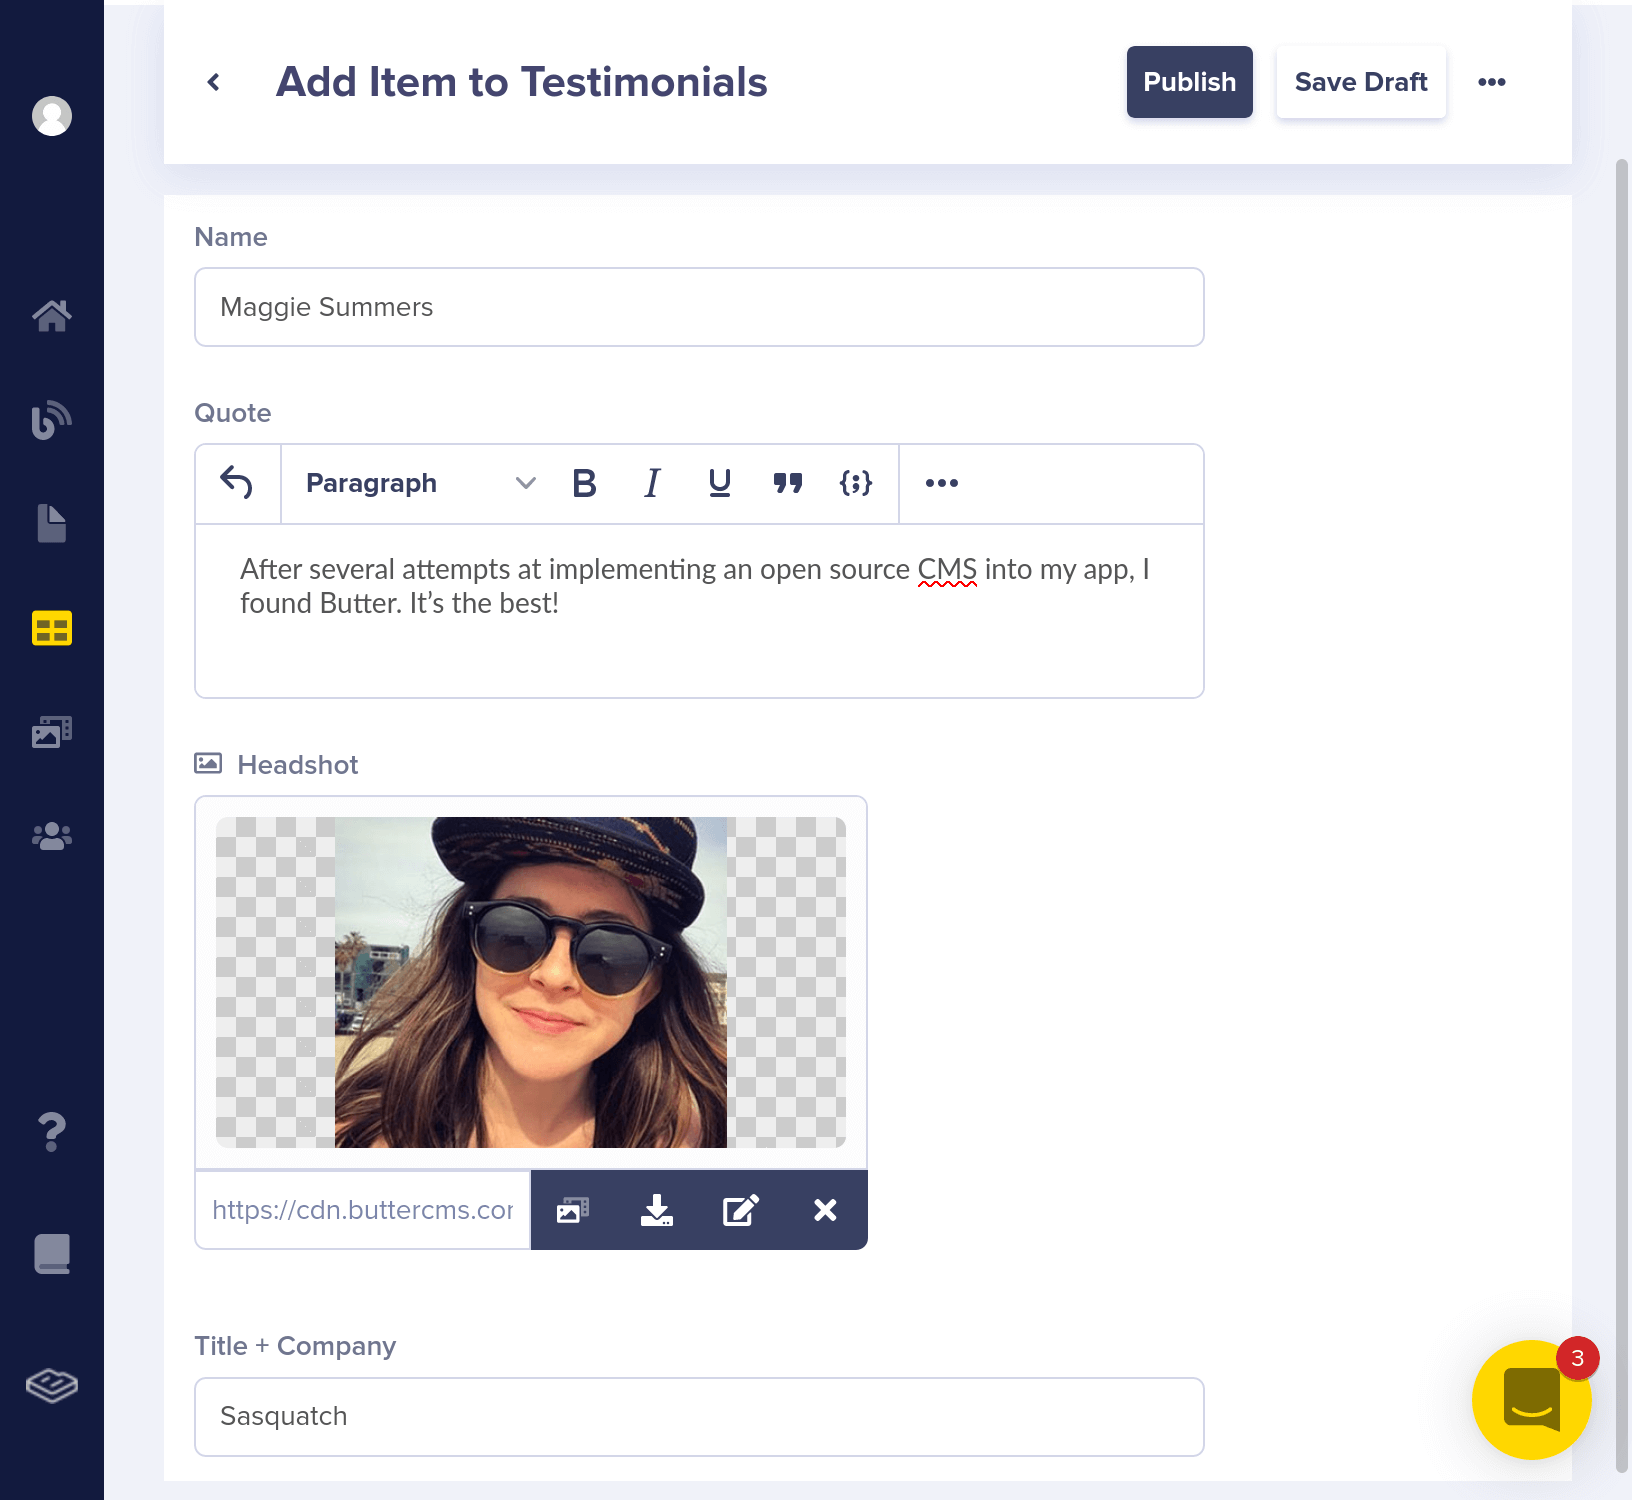
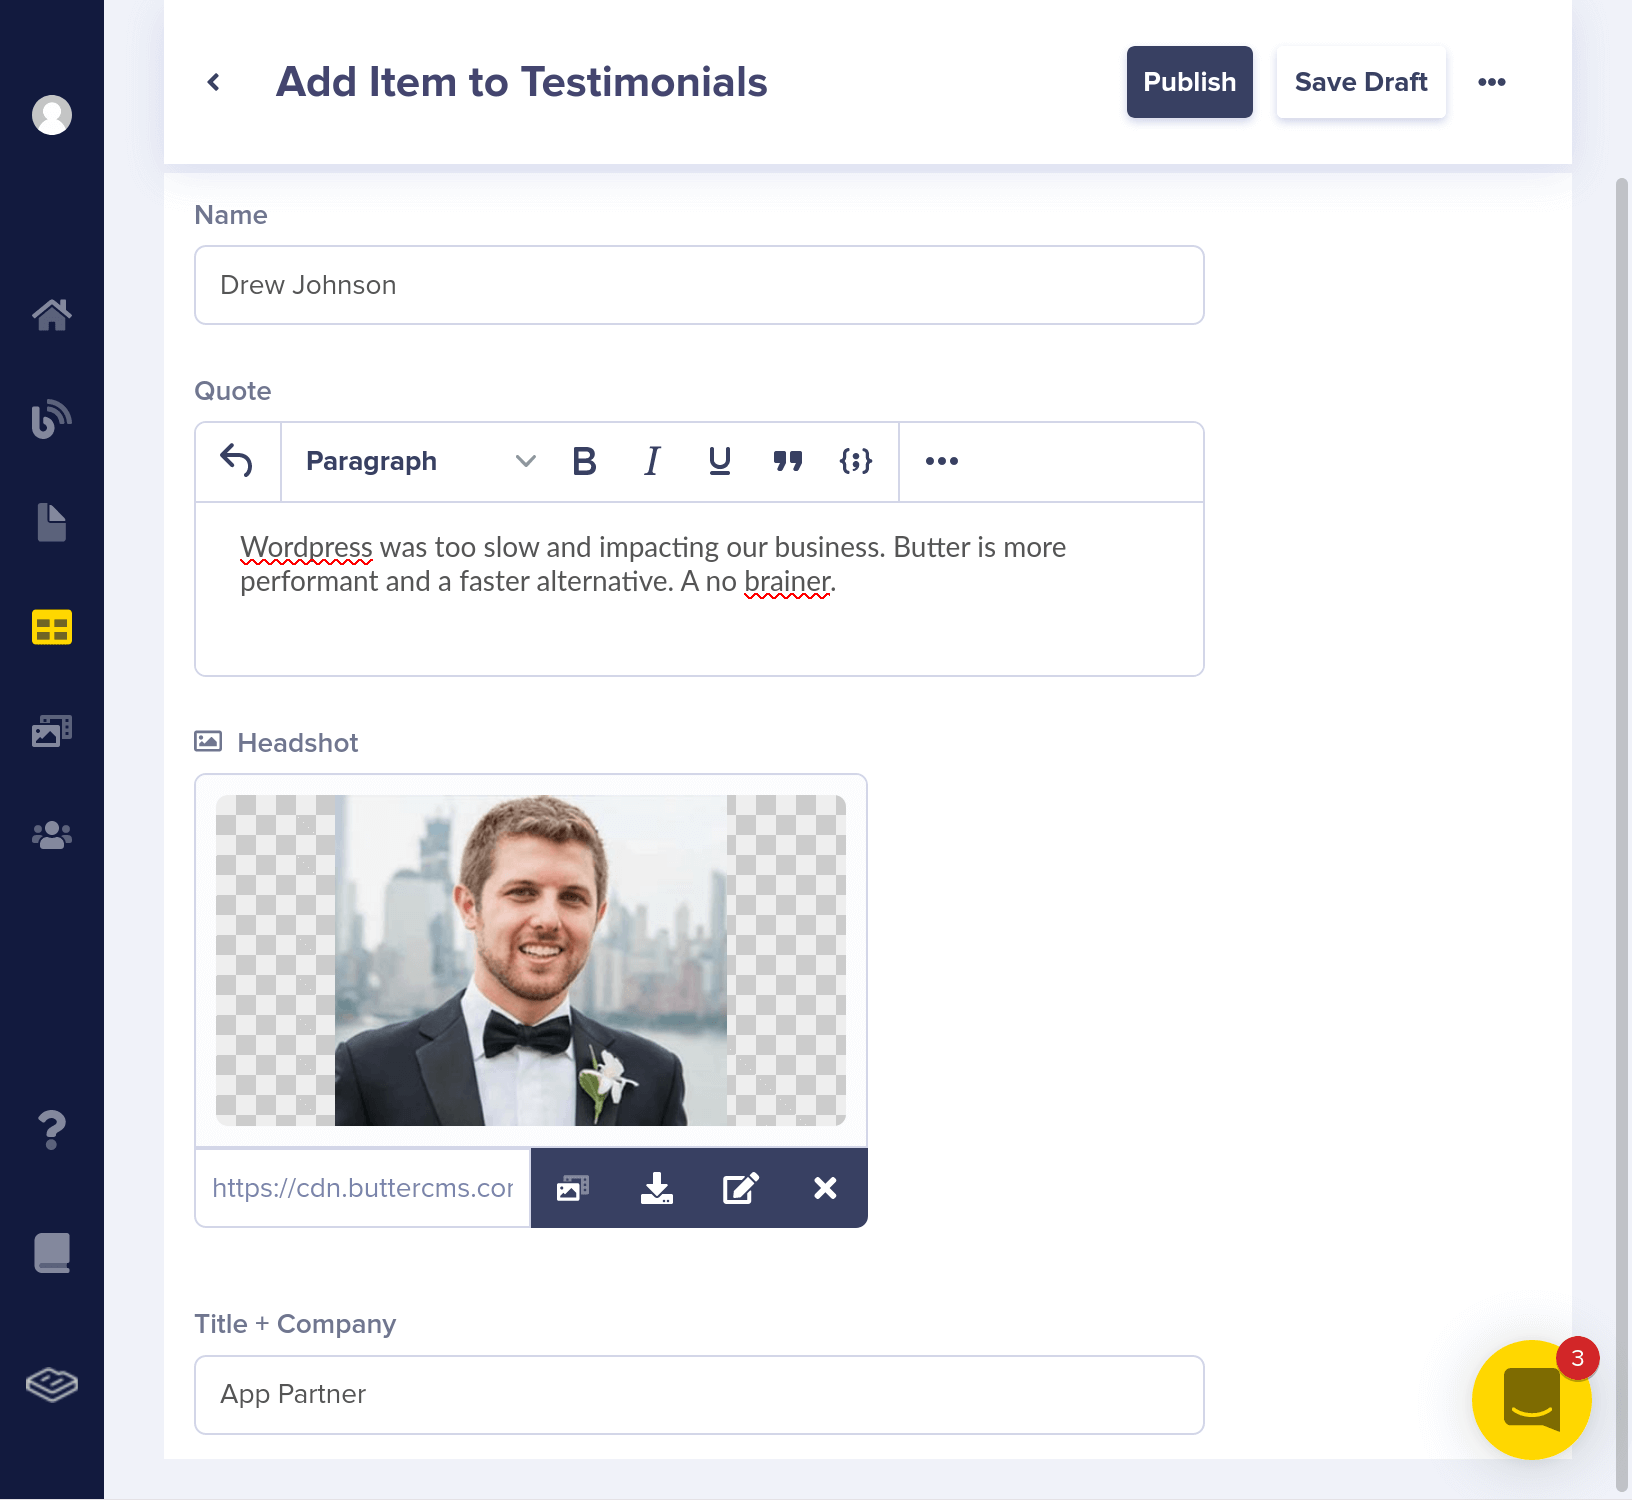
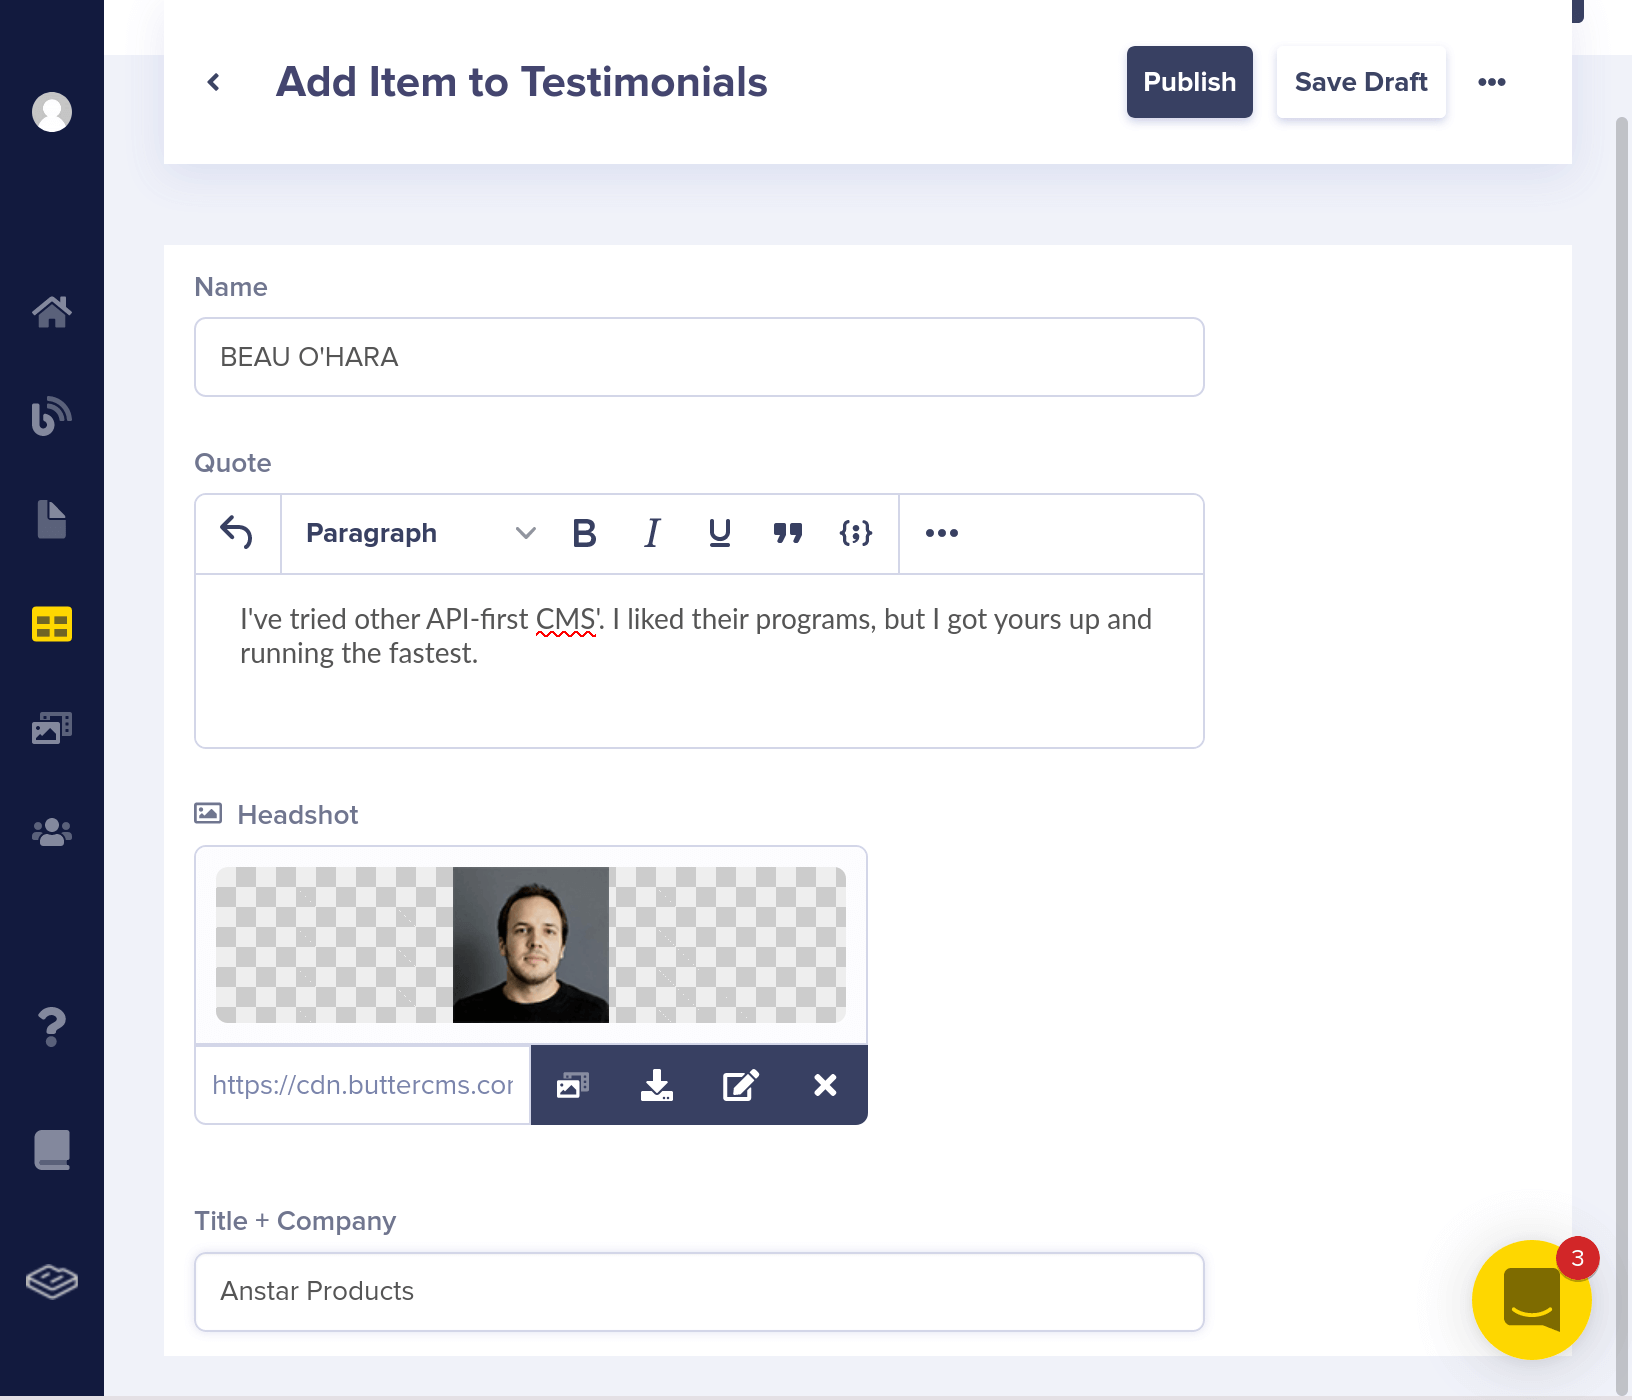
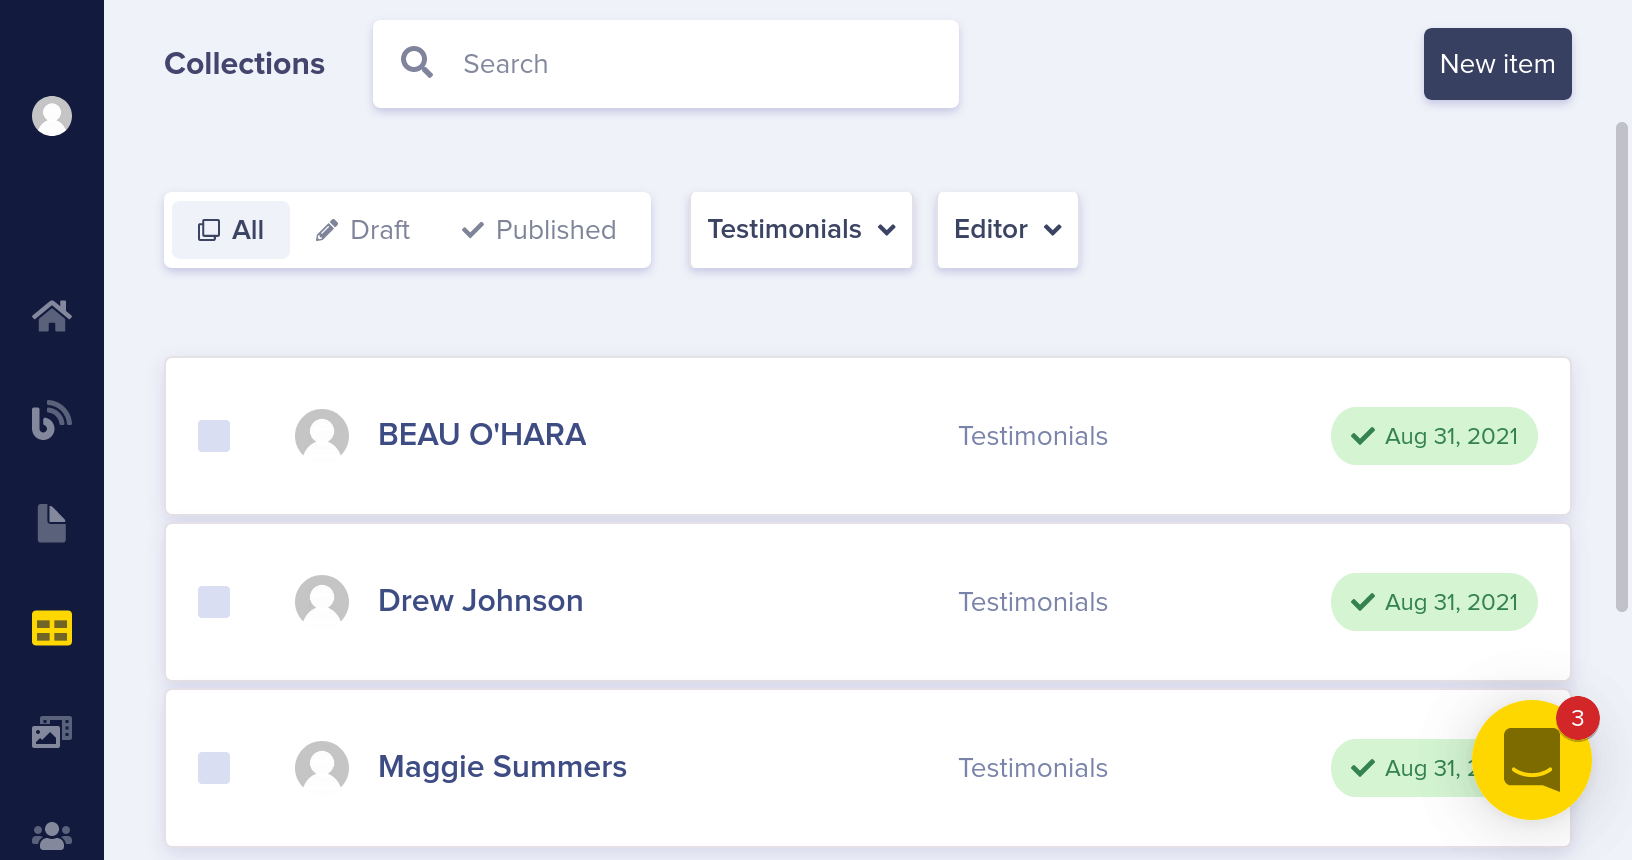
}Create a Collection for testimonials, each having the name of the person, their quote, a headshot, and their title + company.
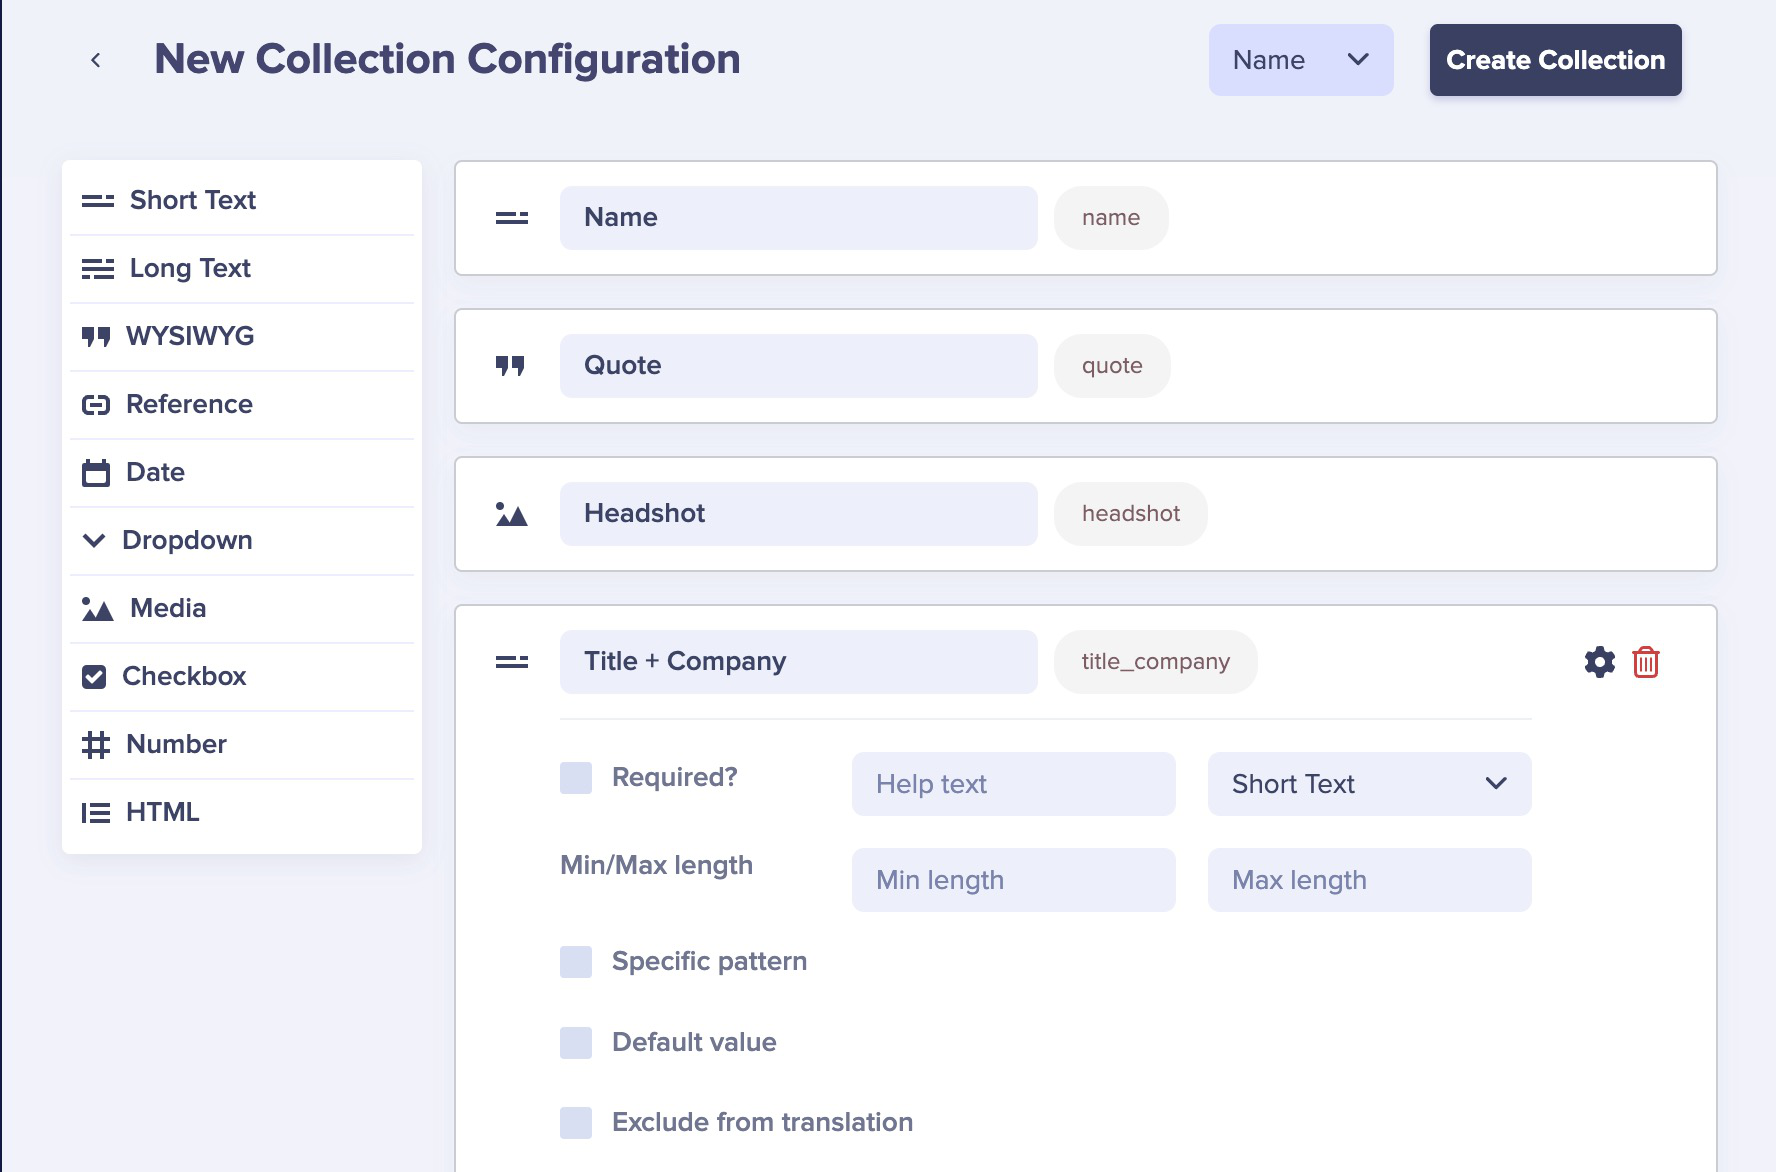
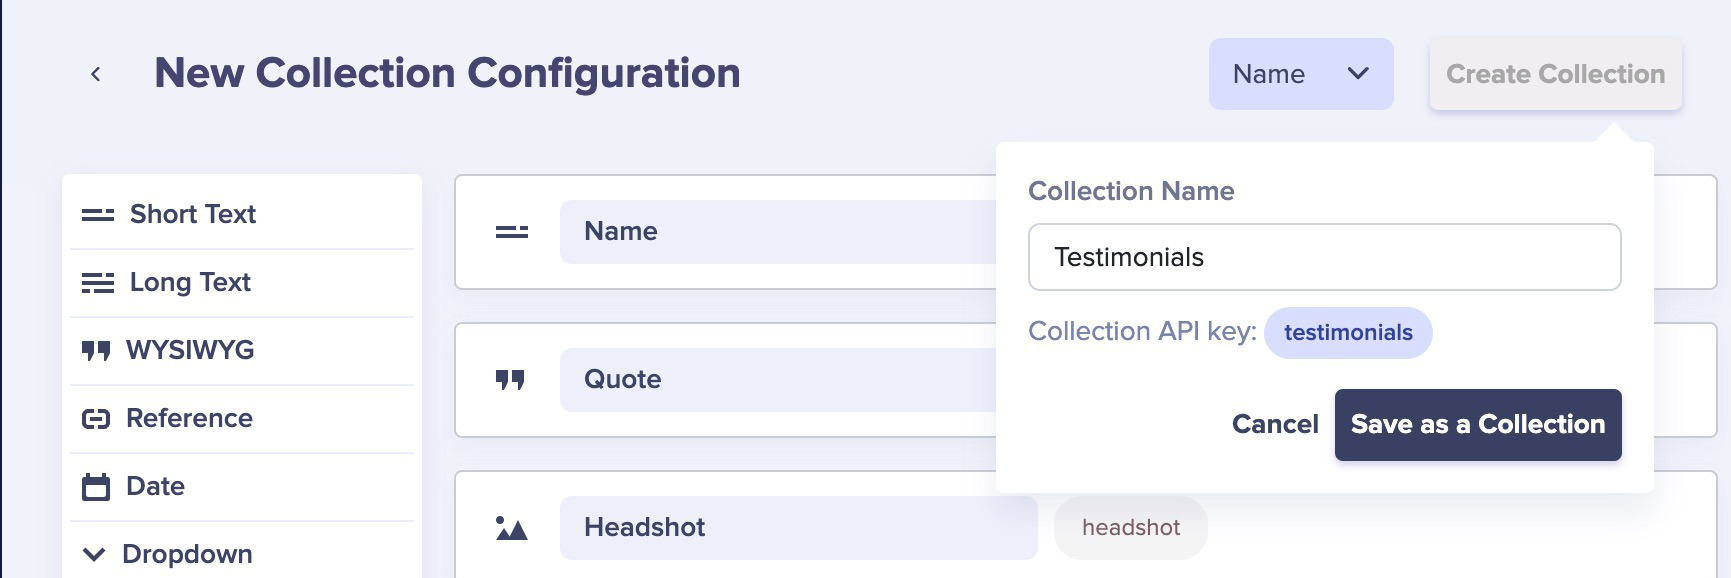
Create some testimonials.
Here's your collections panel, filtered by "Testimonials."
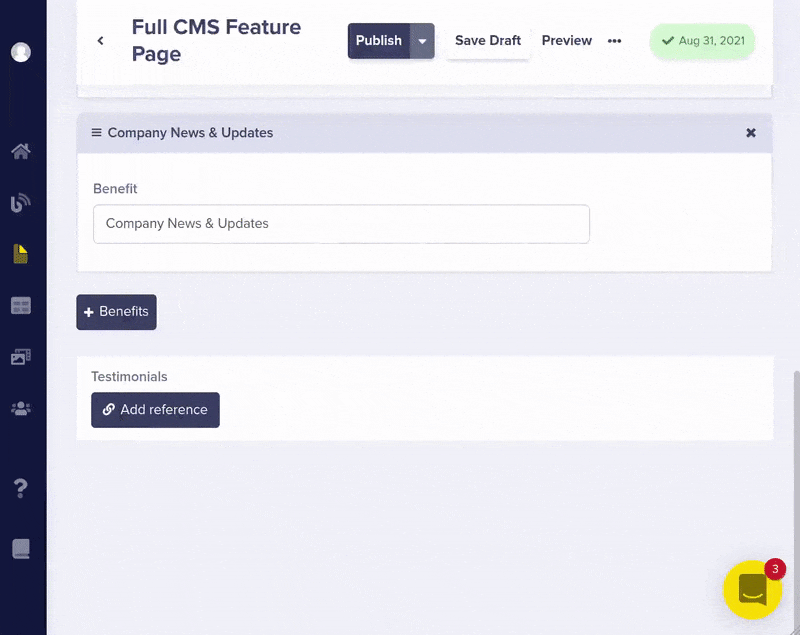
Then add a Reference field from your feature Pages to your Testimonials Collection by clicking on the three dots in the upper right hand corner of any feature page and editing the page schema.
Now you can easily add multiple testimonials to display on your marketing Pages
The API JSON response for your feature page now includes the testimonials you just linked.
GET https://api.buttercms.com/v2/pages/*/full-cms-feature-page
{
    "data": {
        "slug": "full-cms-feature-page",
        "fields": {
            "headline": "Powerful CMS. Zero headache.",
            "hero_image": "https://cdn.buttercms.com/RB2R32WbSxqcanOXiHYA",
            "benefits": [
                {
                    "benefit": "SEO Landing Pages"
                },
                {
                    "benefit": "Customer Case Studies"
                },
                {
                    "benefit": "Company News & Updates"
                }
            ],
            "testimonials": [
                {
                    "name": "Maggie Summers",
                    "headshot": "https://cdn.buttercms.com/iAvdwmxmSjKVfpuqPjWJ",
                    "title_company": "Sasquatch",
                    "quote": "After several attempts at implementing an open source CMS into my app, I found Butter. It’s the best!"
                },
                {
                    "name": "Drew Johnson",
                    "headshot": "https://cdn.buttercms.com/q3z0MfVTJWso2JM5IXvg",
                    "title_company": "App Partner",
                    "quote": "Wordpress was too slow and impacting our business. Butter is more performant and a faster alternative. A no brainer."
                },
                {
                    "name": "BEAU O'HARA",
                    "headshot": "https://cdn.buttercms.com/vOWy5G1LRzm60NyRd3P0",
                    "title_company": "Anstar Products",
                    "quote": "I've tried other API-first CMS'. I liked their programs, but I got yours up and running the fastest"
                }
            ]
        }
    }
}
This use case demonstrates is how you can use Collections to store reusable promotional content that can be Referenced by multiple pages.
If you need help after reading this, contact us via email or livechat.
Table of Contents
-
Introduction
Install SDK
Displaying Posts
Previewing Posts
Categories, tags, and authors
RSS, Atom, and Sitemap
Comments
Social Sharing
CSS
Migration
Introduction
GET https://api.buttercms.com/v2/posts/?auth_token=your_token
Learn how to quickly build a CMS-powered blog with Next.js with great SEO. Butter also works with other client-side JavaScript frameworks like Angular and Vue.js For a sample project, check out out this Next.js + ButterCMS Github Repo. To get started even quicker, here's a set of sample blog templates you can use.
If you need help after reading this, contact us via email or livechat.
Install SDK
If you haven't already, you'll want to install our SDK to make querying your content from our API into your app even easier. Once you've done that, you're ready to begin setting up your blog.
Display Posts
We need to display paginated list of all posts. Since we use Static Site Generation we need to dynamically create route like pages/posts/page/[page].js for each possible page number.
The ButterCMS API already returns paginated posts list so we need only to make requests for each page number until there are no more pages. The function getAllPostsPaginated implements this logic in lib/api.js:
const postsPageSize = 10;

export async function getAllPostsPaginated(pageSize = postsPageSize) {
    const paginatedPosts = [];
    let currentPage = 1;
    while (!!currentPage) {
        const pagePostsData = await getPostsData(currentPage, pageSize);
        paginatedPosts[currentPage - 1] = pagePostsData.posts;
        currentPage = pagePostsData.nextPage;
    }
    return paginatedPosts;
}

export async function getPostsData(page = 1, pageSize = postsPageSize) {
    const response = await butter.post.list({
        page_size: pageSize,
        page: page,
    });

    return {
        posts: response.data.data,
        prevPage: response.data.meta.previous_page,
        nextPage: response.data.meta.next_page,
    };
}
The default number of posts on each page is 10. It could be any other positive integer number less or equal to 100. See our API reference for additional options such as filtering by category or author.
In pages/posts/page/[page].js we need to do the following:
- Inside the getStaticProps function get the page number in the url and fetch posts on this page from Butter
- Inside the getStaticPaths function get all possible page numbers for posts pagination and generate a list of routes
- Make each post to have a link to its details
- Each page with paginated posts list should have links to previous and next pages if they exist
The result should be this code:
import Link from "next/link";
import { useRouter } from "next/router";
import ErrorPage from "next/error";
import { getPostsData, getAllPostsPaginated } from "../../../lib/api";

export default function Posts({ posts, prevPage, nextPage }) {
    const router = useRouter();
    if (!router.isFallback && !posts) {
        return <ErrorPage statusCode={404} />;
    }
    return router.isFallback ? (
        <div>Loading…</div>
    ) : (
        <div>
            {posts.map((post, key) => {
                return (
                    <Link href={`/posts/${post.slug}`}>
                      <a>{post.title}</a>
                    </Link>
                );
            })}

            <div>
                {prevPage && (
                    <Link href={`/posts/page/${prevPage}`}>
                        <a>Prev</a>
                    </Link>
                )}
                {nextPage && (
                    <Link href={`/posts/page/${nextPage}`}>
                        <a>Next</a>
                    </Link>
                )}
            </div>
        </div>
    );
}

export async function getStaticProps({ params }) {
    const page = parseInt(params.page, 10);
    const { posts, prevPage, nextPage } = await getPostsData(page);

    return {
        props: { posts, prevPage, nextPage },
        revalidate: 1,
    };
}

export async function getStaticPaths() {
    const allPosts = await getAllPostsPaginated();
    const paths = Object.keys(allPosts).map(
        (pageIndex) => `/posts/page/${parseInt(pageIndex, 10) + 1}`
    );

    return {
        paths,
        fallback: true,
    };
}
getStaticProps function returns object with property revalidate - an optional amount in seconds after which a page re-generation can occur - because we want to changes done in the CMS to be reflected in the posts list without waiting for application re-build.
Setup the Blog Post page to list a single post
We'll also update our post component to fetch blog posts via slug and render the title and body. See a full list of available post properties in our API reference. In this file we do the folliwing:
- In the getStaticProps function we get the slug from the url and fetch post data from the API
- In the getStaticPaths function we define which dynamic routes to create. In this case we don't need the pagination, so to minimize the build time, we make as little requests as possible and get posts slugs by 100 (API allows to fetch maximum 100 posts per page) at once.
import { useRouter } from "next/router";
import ErrorPage from "next/error";
import { getPost, getAllPostsPaginated } from "../../lib/api";

export default function Post({ post }) {
    const router = useRouter();
    if (!router.isFallback && !post) {
        return <ErrorPage statusCode={404} />;
    }

    return router.isFallback ? (
        <div>Loading…</div>
    ) : (
        <div>
            <h1>{post.title}</h1>
            <div dangerouslySetInnerHTML={{__html: post.body }} />
        </div>
    );
}

export async function getStaticProps({ params }) {
    const post = await getPost(params.slug);
    return {
        props: {
            post,
        },
    };
}

export async function getStaticPaths() {
    const allPosts = await getAllPostsPaginated(100);
    const paths = Object.entries(allPosts).reduce((res, [_, posts]) => {
        const pagePaths = posts.map((post) => `/posts/${post.slug}`);
        return [...res, ...pagePaths];
    }, []);

    return {
        paths,
        fallback: true,
    };
}
Now our app has a working blog that can be updated easily in the ButterCMS dashboard.
Previewing Posts
Butter is a headless CMS, which means the design, layout, and general look & feel of your blog is controlled by your own application. As you've seen above, we return your blog content as JSON data, which you then inject into your own templates. In other words, your blog templates are just another set of templates in your app and customizing how your blog looks is the same workflow as any other page in your app. A huge benefit to this is that your blog instantly utilizes all of your existing brand CSS styling so it looks great and visually matches the rest of your app.
Because your app controls the design of your blog, Butter utilizes it to generate live previews for your content editors when they want to preview a blog post before they publish it.
Click here to configure your Blog Preview URL
To setup previewing you will need to tell Butter what your Blog's base preview URL is. i.e.:
https://yoursite.com/blog/
Once that's defined, when you preview a blog post, Butter will append the blog post slug to that preview URL and take you to:
https://yoursite.com/blog/blog-post-slug
To provide a great content editing experience, we highly recommend setting your preview URL.
Categories, Tags, and Authors
Use Butter's APIs for categories, tags, and authors to feature and filter content on your blog:
List all categories and get posts by category
We can use the ButterCMS API to get all post categories and all posts under a category. Let's create file pages/posts/categories.js for the page categories, and the index of pages under a single category - file pages/posts/category/[slug].js:
To get categories data from API create new functions in lib/api.js:
export async function getCategories() {
    const categories = await butter.category.list();
    return categories.data.data;
}

export async function getCategoryWithPosts(slug) {
    const response = await butter.category.retrieve(slug, {
        include: "recent_posts",
    });
    return response.data.data;
}
We can then create content for file pages/posts/categories.js:
import Link from "next/link";
import { getCategories } from "../../lib/api";

export default function Categories({ categories }) {
    return (
        <div>
            {categories.map(({ name, slug }, key) => {
                return (
                    <div key={key}>
                        <Link href={`/posts/category/${slug}`}>
                            <a>{name}</a>
                        </Link>
                    </div>
                );
            })}
        </div>
    );
}

export async function getStaticProps() {
    const categories = await getCategories();
    return { props: { categories } };
}
This will create a page that will list all categories, along with linking each of them to their own page. Now, paste this into the pages/posts/category/[slug].js file, that will contain the component to list all pages under a single category:
import Head from "next/head";
import ErrorPage from "next/error";
import { useRouter } from "next/router";
import { getCategories, getCategoryWithPosts } from "../../../lib/api";

export default function Category({ name, slug, recentPosts }) {
    const router = useRouter();
    if (!router.isFallback && !slug) {
        return <ErrorPage statusCode={404} />;
    }
    return router.isFallback ? (
        <div>Loading…</div>
    ) : (
        <div>
            <Head>
                <title>{name}</title>
            </Head>
            <h1>{name}</h1>
            <div>
                {recentPosts.map((post, key) => {
                    return (
                        <div key={key}>
                            <a href={`/posts/${post.slug}`}>{post.title}</a>
                        </div>
                    );
                })}
            </div>
        </div>
    );
}

export async function getStaticProps({ params }) {
    const { name, slug, recent_posts } = await getCategoryWithPosts(
        params.slug
    );

    return {
        props: { name, slug, recentPosts: recent_posts },
    };
}

export async function getStaticPaths() {
    const categories = await getCategories();

    return {
        paths:
            categories.map((category) => `/posts/category/${category.slug}`) ||
            [],
        fallback: true,
    };
}
The links on these pages will be to the individual posts themselves.
See our API reference for more information about these objects:
RSS, Atom, and Sitemap
Butter generates RSS, Atom, and sitemap XML markup. To use these on your blog, return the generated XML from the Butter API with the proper content type headers.
We can fetch the RSS, Atom, and Sitemap feeds using the ButterCMS API, and pipe the response to routes in our app. To fetch feed data from the API create new functions in lib/api.js:
export async function getAtomData() {
    const atom = await butter.feed.retrieve("atom");
    return atom.data.data;
}

export async function getRssData() {
    const rss = await butter.feed.retrieve("rss");
    return rss.data.data;
}

export async function getSitemapData() {
    const sitemap = await butter.feed.retrieve("sitemap");
    return sitemap.data.data;
}
Create new file pages/sitemap.js with this content:
import { getSitemapData } from "../lib/api";

export default function Sitemap({ sitemap }) {
    return sitemap;
}

export async function getStaticProps() {
    const sitemap = await getSitemapData();
    return { props: { sitemap } };
}
Create new file pages/atom.js with this content:
import { getAtomData } from "../lib/api";

export default function Atom({ atom }) {
    return atom;
}

export async function getStaticProps() {
    const atom = await getAtomData();
    return { props: { atom } };
}
Create new file pages/rss.js with this content:
import { getRssData } from "../lib/api";

export default function Rss({ rss }) {
    return rss;
}

export async function getStaticProps() {
    const rss = await getRssData();
    return { props: { rss } };
}
SEO
Next.js provides a <Head> component for setting HTML titles and meta tags. Add import Head from 'next/head' to the top of ./pages/post.js and use the component in the render() method:
return (
    <div>
        <Head>
          <title>{post.seo_title}</title>
          <meta name="description" content={post.meta_description} />
          <meta name="og:image" content={post.featured_image} />
        </Head>

        <h1>{post.title}</h1>
        <div dangerouslySetInnerHTML={{__html: post.body }} />
    </div>
)
Restart the server and inspect the HTML source of a post to verify that tags are getting set correctly.
Setup to create feeds and sitemap
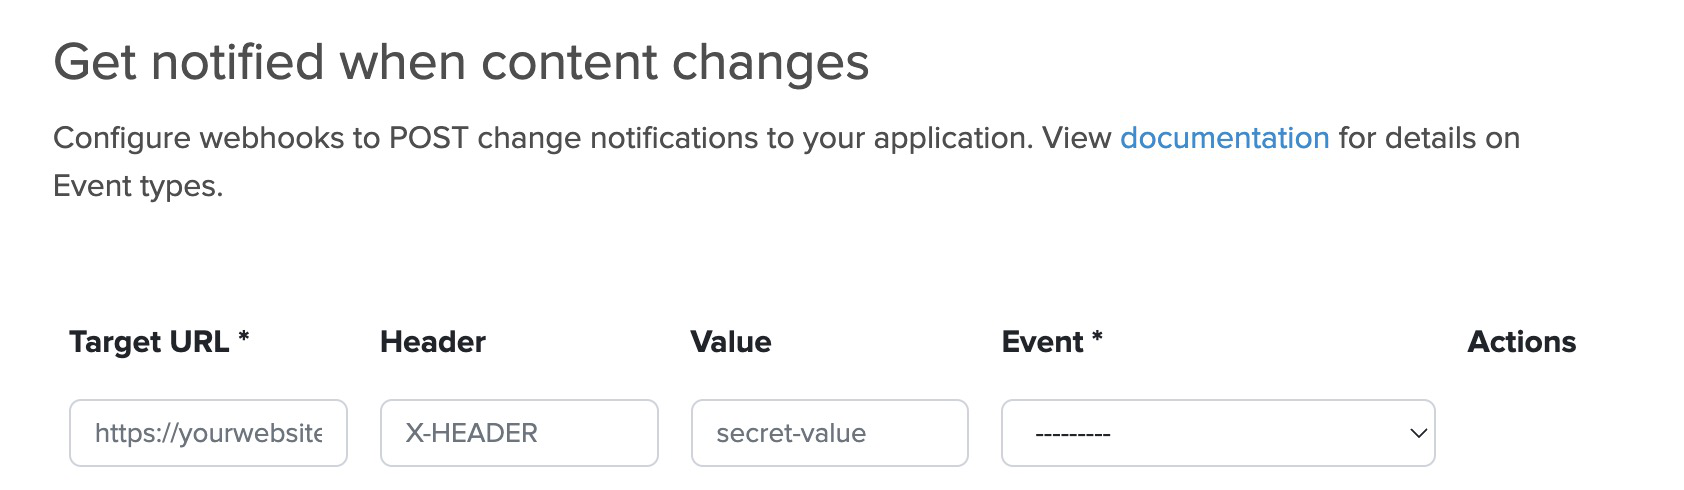
If you want to statically generate these xml files you can use our Webhooks which will POST change notifications to your app.
Setup up a listener webhook on your hosting that will trigger a rebuild or redeploy of your static site when it receives a POST request.
Setup a POST Webhook in the ButterCMS dashboard with the Event "Blog Post Create, Update, or Delete" and paste the listener url into Target URL field.

Comments
Butter doesn't provide an API for comments due to the excellent existing options that integrate easily. Two popular services we recommend are:
Both products are free, include moderation capabilities, and give your audience a familiar commenting experience. They can also provide some additional distribution for your content since users in their networks can see when people comment on your posts. For a minimalist alternative to Disqus, check out RemarkBox or for an open-source option, Isso.
Social Sharing
To maximize sharing of your content, we recommend using a free tool called AddThis.
They provide an attractive and easy to integrate social sharing widget that you can add to your website.

CSS
Butter integrates into your front-end so you have complete control over the design of your blog. Use the following CSS as boilerplate for post content styling.
.post-container {
  h1, h2, h3, h4, h5 {
    font-weight: 600;
    margin-bottom: 1em;
    margin-top: 1.5em;
  }

  ul, ol {
    margin-bottom: 1.25em;

    li {
      margin-bottom: 0.25em;
    }
  }

  p {
    font-family: Georgia, Cambria, "Times New Roman", Times, serif;
    font-size: 1.25em;
    line-height: 1.58;
    margin-bottom: 1.25em;
    font-weight: 400;
    letter-spacing: -.003em;
  }

  /* Responsive default image width */
  img {
    max-width: 100%;
    height: auto;
  }

  /* Responsive floating */
  @media only screen and (min-width: 720px)  {
    .butter-float-left {
      float: left;
      margin: 0px 10px 10px 0px;
    }

    .butter-float-right {
      float: right;
      margin: 0px 0px 10px 10px;
    }
  }

  /* Image caption */
  figcaption {
    font-style: italic;
    text-align: center;
    color: #ccc;
  }

  p code {
    padding: 2px 4px;
    font-size: 90%;
    color: #c7254e;
    background-color: #f9f2f4;
    border-radius: 4px;
    font-family: Menlo, Monaco, Consolas, "Courier New", monospace;
  }

  pre {
    display: block;
    padding: 1em;
    margin: 0 0 2em;
    font-size: 1em;
    line-height: 1.4;
    word-break: break-all;
    word-wrap: break-word;
    color: #333333;
    background-color: #f5f5f5;
    font-family: Menlo, Monaco,Consolas, "Courier New", monospace;
  }
}
Migration
To import content from another platform like WordPress or Medium, send us an email.
Contents
-
Headless CMS
Write API
Webhooks
Image Transform API
Localization
Roles and Permissions
Multiple Environments
Environment Workflow
Multiple Websites
Headless CMS
ButterCMS is a headless CMS that lets you manage content using our dashboard and integrate it into your tech stack of choice with our content APIs. You can use ButterCMS for new projects as well as add it to existing codebases.
If you're familiar with Wordpress, see how ButterCMS compares to WordPress.
ButterCMS provides a user-friendly UI for managing marketing sites, blogging, and custom content scenarios. We can be used for SEO landing pages, customer case studies, company news & updates, events + webinar pages, education center, location pages, knowledgebases, and more.
We are different from a traditional CMS like Drupal or Wordpress in that we're not a large piece of software you need to download, host, customize, and maintain. Instead we provide easy to consume, performant content API's that you add to your application.
For example, if you wanted to enable a non-technical person to be able to add customer case study pages to your marketing site, you might create a Case Study Page Type to represent these pages. The non-technical person would be able to manage these pages from our dashboard and the JSON API output would look something like this:
{
  "data": {
    "slug": "acme-co",
    "name": "Acme Co",
    "published": "2021-08-23T14:28:21.077112Z",
    "updated": "2021-08-23T14:28:21.077112Z",
    "page_type": "case_study",
    "fields": {
      "seo_title": "Acme Co Loves Butter CMS",
      "seo_description": "Acme Co saved 200% on Anvil costs with ButterCMS",
      "headline": "Acme Co saved 200% on Anvil costs with ButterCMS",
      "facebook_open_graph_title": "Acme Co Customer Case Study",
      "customer_logo": "https://cdn.buttercms.com/66oMGYOuSP2V0bsK6gKd",
      "testimonial": "<p>We've been able to make anvils faster than ever before!<em>--Chief Anvil Maker Anvil</em></p>
      <p><img src="https://cdn.buttercms.com/queOG6fITpiJAUc7GV30\" alt="" /></p>"""
    }
  }
}
Use Postman to experiment
Postman is a great tool for experimenting with our API. We wrote a post about it here. Once you've installed Postman, click this button to quickly add our end point Collection to your Postman.

Write API
We have a Write / POST API that allows you to programmatically create content. This can enable many powerful use cases and allow you to scale your content faster than ever.
Refer to our API Documentation to learn more.
Our Write API is available in our Enterprise plan and you will need to use a write-enabled token which is provided on request. Just contact us via email or livechat to get yours.
Webhooks
Webhooks are a powerful feature that allow you to notify your internal systems whenever content in ButterCMS has changed. You can learn more about Webhooks in this blog post.
Example Use Case: Reloading An App When New Pages are Added
One great use of the ButterCMS webhooks to notify our application everytime a new page is added or modified, and reload our Next.js application.
You can add a new webhook by going to the https://buttercms.com/webhooks/ page. There, you can provide the URL of your deployed application:
Suppose your server is deployed with the address http://abc.def/,
we can create a /webhook-receiver route, so that the resulting webhook
URL configured on ButterCMS would be http://abc.def/webhook-receiver.
We will get a POST request everytime there is a change, so lets create the corresponding
route inside server.js
server.post('/webhook-receiver', (req, res) => {
console.log('a post has been modified')
app
  .prepare()
  .then(() => {
    console.log('app refreshed')
    res.end()
  })
  .catch((e) => {
    res.status(500).end()
  })
})
The route will call the app.prepare function, which reloads the Next.js application.
Image Transformation
ButterCMS has integrated with a rich image transformation API called Filestack. This allows you to modify your uploaded images in dozens of ways. Everything from resizing, cropping, effects, filters, applying watermarks and more. Check out Filestack full documentation for more detail.
After you upload an image to ButterCMS, it's stored on our CDN. To create a thumbnail, here's an example:
Original URL = https://cdn.buttercms.com/zjypya5tRny63LqhHQrv
Thumbnail URL = https://cdn.buttercms.com/resize=width:200,height:200/zjypya5tRny63LqhHQrv
Resizing is just one of the many different transformations you can do to your images. Refer to the Filestack docs for full details.
Localization
ButterCMS has full support for localization of your content. Locale names and keys are completely customizable and there's no limit to the number of locales you can have. View our API Reference to learn how to query by locale.
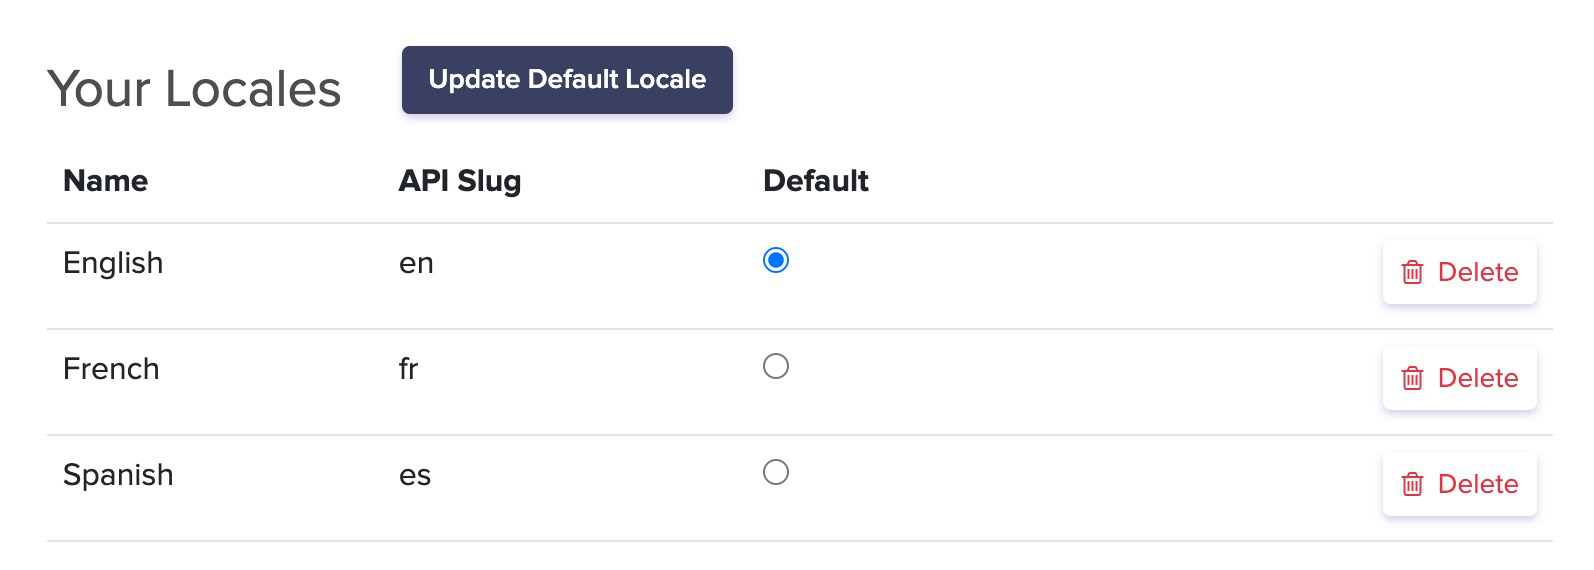
Admins can ensure your global team of marketers and translators safely work side-by-side by setting permissions for just their local markets.

Roles and Permissions
In addition to permissions by locale, your ButterCMS account comes with three roles by default, to give your team maximum control over what your users can do:
- Admin - can do everything on an account. You'll want to use this for your developers as they deal with the content configuration that is used within your project's code.
- Publisher - can edit, publish and delete content, but cannot manage users or configure content schemas.
- Author - can create and edit draft content (Blog Posts, Pages, Collections) but cannot publish content live to your site.
Custom built roles are available in our Enterprise plan. Chat with us to discuss Enterprise options.
Manage Multiple Environments
ButterCMS Multisite allows you to manage multiple websites and multiple environments from one place. You can get an admin level view and quickly switch between your ButterCMS instances.
Each site has it's own unique API token which allows for clean separation and easy querying of your content.
From the Environment dashboard you can quickly switch between your different ButterCMS environments. In the example below, John is currently logged into Production and can switch into Staging, Dev, or QA in one-click

Multiple Environments are available in our Enterprise plan. Just contact us via email or livechat to get yours.
Multi-Environment Workflow
Preview content before it goes live
To preview draft content before it goes live on your production site, you'll want to set up your own preview site (i.e. preview.yoursite.com or staging.yoursite.com).
Both your preview and production site will connect to your ButterCMS Production environment, but your preview site will always pass preview=1 as a parameter when fetching content from our API:

Using preview=1 will cause the draft version of content to be returned when viewing your preview site. Your marketers can then preview their draft content safely before it appears on your production site.
Make your content editors happy with this seamless workflow
Setting things up in this way is an optimal workflow for your marketers and prevents them from having to worry about physicaly copy/migrating content across your ButterCMS environments. They do all of their work from the same ButterCMS environment.
To publish new content, their workflow is simple and efficient. They can Save Draft (1), Preview (2), and Publish (3) all from the same screen:

- Save Draft - create a draft version of content that only appears in your preview site, not production
- Preview - content editors see this draft rendered on your preview site
- Publish (instantly or scheduled): publish the draft content so it now appears on your production site
Don't use environments for your daily content publishing workflow
If you've used other CMS', you may be used to a workflow where to preview content in a staging site, you put content in a staging CMS environment/database. Then to publish it, you physically copy it over into a production CMS environment/database (either by copying pasting, writing a migration script, building a content sync tool, etc). In a traditional CMS, this makes sense because that's the only way to preview draft content without it first appearing on a production site.
With Butter, that's not the case and you can enable this streamlined workflow your content managers will love.
Use environments for safely iterating on schema changes
A quick note on schema versus content in ButterCMS environments. Schema (Page Types and Collections) in Butter is akin to a schema for a database. They are distinct from the content (data in a database). We recommend using ButterCMS environments for iterating on schema changes safely without worrying about impacting your production environment. For example, testing out launching a new PageType or Collection or making changes to an existing one. Since this impacts the structure of the JSON from our API, you will want to test this in coordination with code changes in your application to display this new content. You can do this safely via a ButterCMS Staging/Dev/etc environments and migrate across environments using our Schema Migration feature.
Schema Migrations
Using multiple environments is a development best practice for creating new content experiences. Working in a non-production environment helps separate experimental changes so you can safely work without accidentally impacting your production application.
ButterCMS Migrations make migrating configuration data across your environments dead simple. Simply create a Migration from a test environment that specifies what you want to migrate and to which environment. For example, let's say we are working on creating a new FAQ section to our site, so we've developed a FAQ Page Type in our Dev environment. Now we are ready to move it to our Staging environment, simply create a Migration:
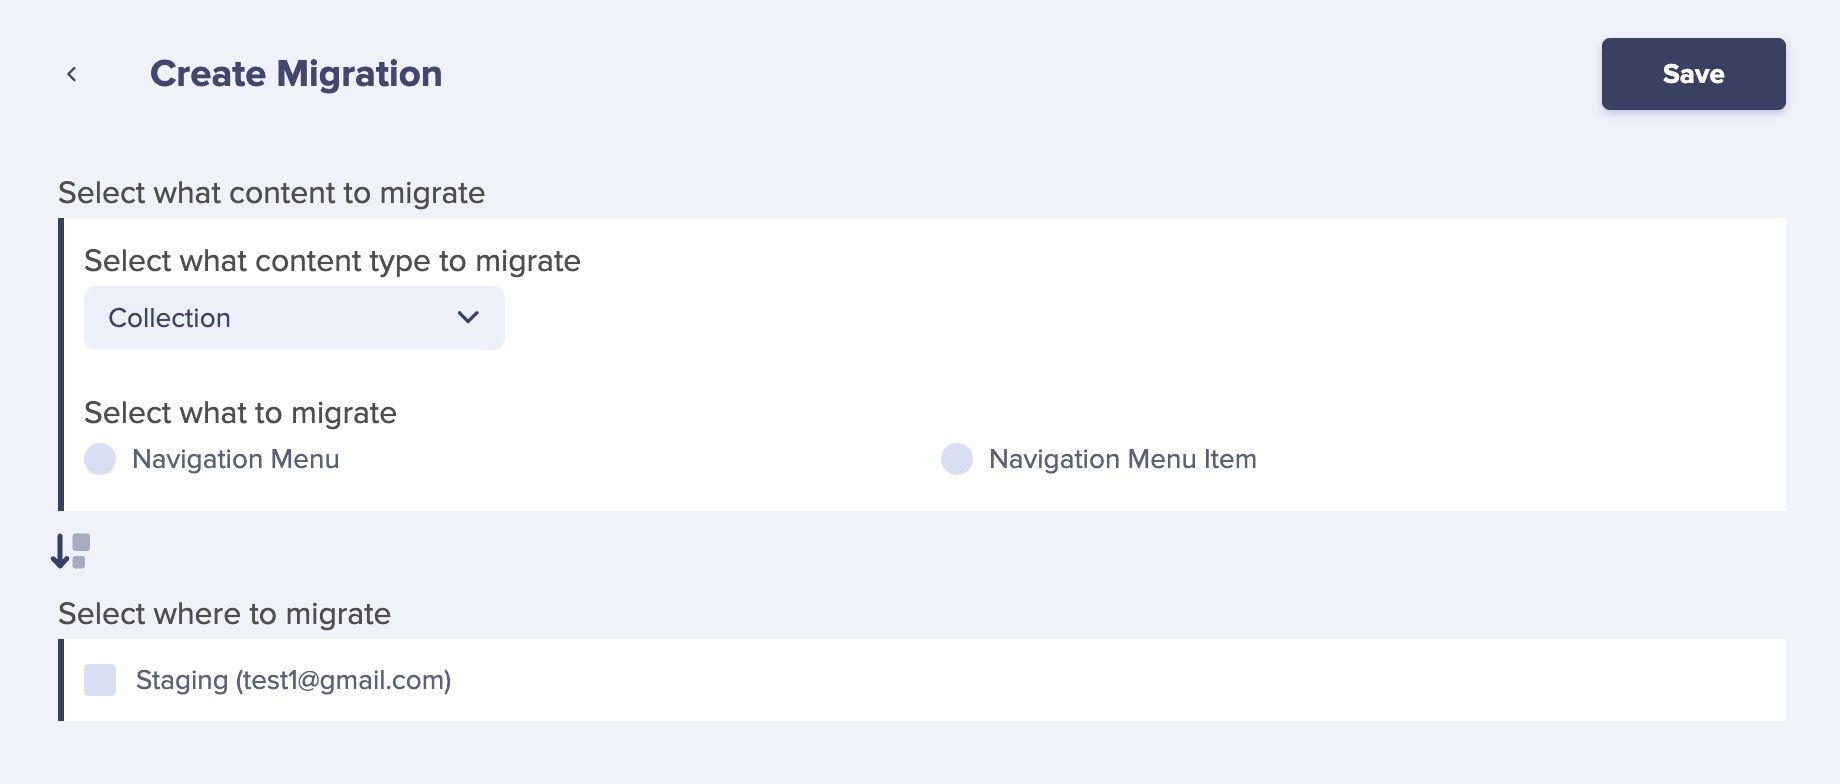
Configuration versus content
A quick note on migrating configuration data versus content across ButterCMS environments. Configuration data (Page Types and Collections) in Butter is akin to a schema for a database. They are distinct from the content (data in a database). We recommend using ButterCMS environments for Migrating schema only. For example, testing out launching a new PageType or Collection or making changes to an existing one. Since this impacts the structure of the JSON from our API, you will want to test this in coordination with code changes in your application to display this new content. You can do this safely via ButterCMS environments and migrate across environments using our schema Migration feature.
How to handle References
ButterCMS has a powerful feature called References which allows you to create relationships between your content types. In database terminology, this is like a foreign key from one table to another. Here's how to handle this when migrating:
- PageTypeA has Reference to PageTypeB
- Migrate PageTypeB first
- Then migrate PageTypeA
If you have any questions chat with us and we're happy to help.
Manage Multiple Websites
Being able to manage multiple environments is great for a single project, but what about massive initiatives that span several sites and environments at once? If you’re an enterprise with multiple sub-brands, our multisite dashboard has you covered. For example, picture a company that starts with one flagship site and later adds two sister brands—everything can live under one ButterCMS roof. When the team logs in to the multisite dashboard, they’ll see each brand neatly organized and can switch between them with a single click.
Our dashboard easily scales to meet this need. Now when John visits the multisite dashboard, he will see this:
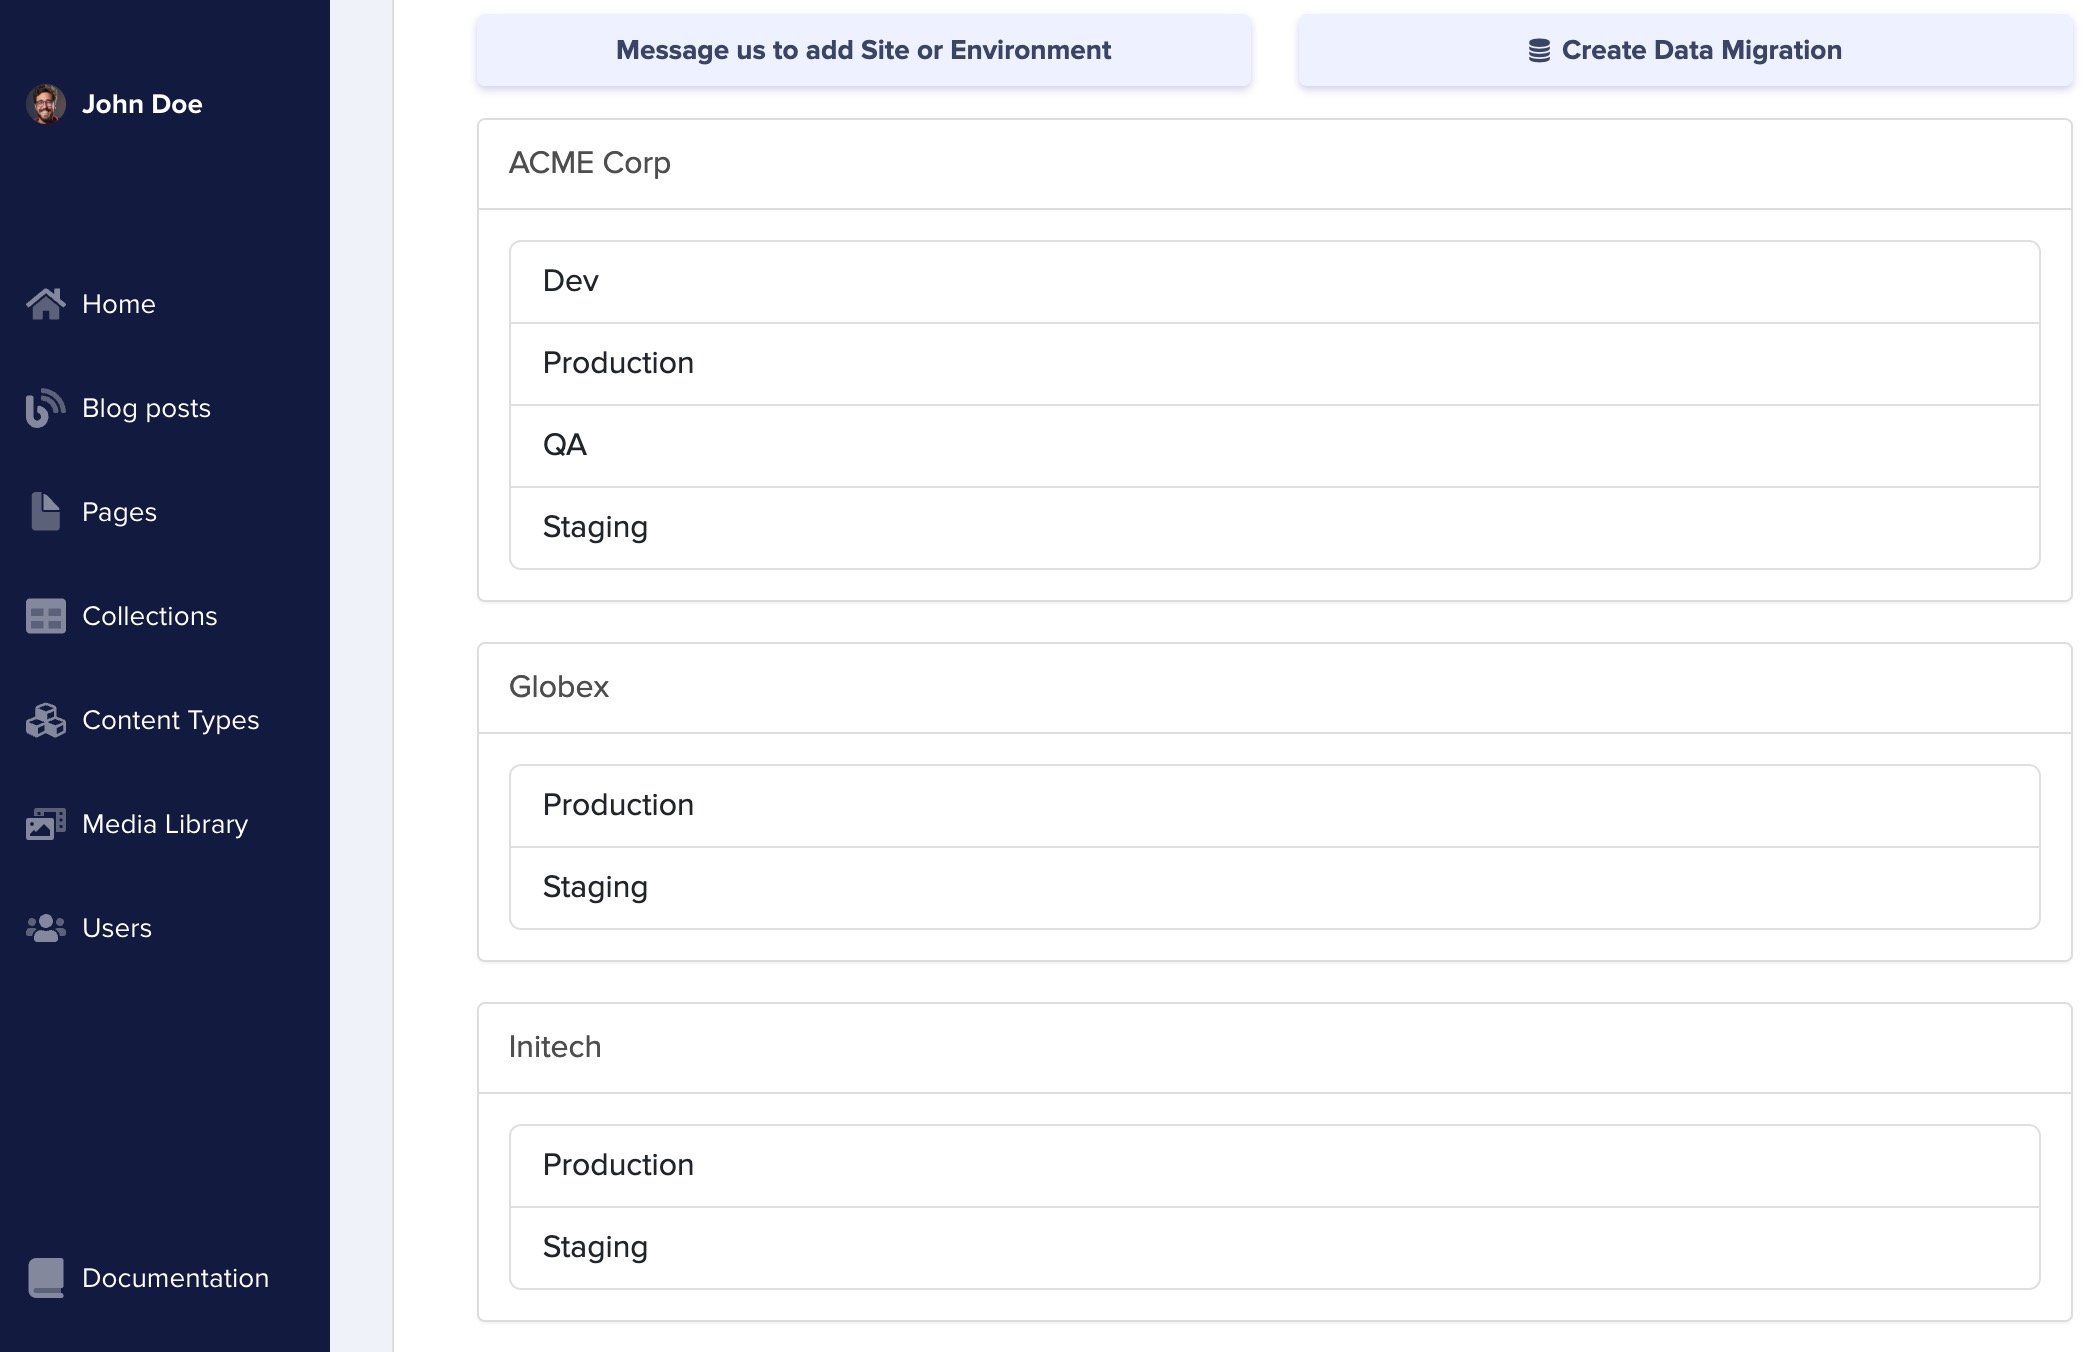
Multiple Websites and Environments are available in our Enterprise plan. Just contact us via email or livechat to get yours.
- Need help? Contact us via email or livechat.
- Found a bug? You can open a GitHub issue.