Access to information is an important factor to consider when building a product or service. A knowledge base will come in handy for customers and even employees who need to navigate around a product or service themselves and find answers to questions without contacting a support agent.
The relevance of a knowledge base can be demonstrated in several scenarios. Take, for example, a customer service representative at an electronics retailer. A customer who recently purchased a device and encounters issues with it can reach out to the service representative who, in turn, can use the knowledge base to find a solution to the customer’s issue by entering keywords similar to the issue and looking up relevant articles. Similarly, if the knowledge base is open to the customer, the customer can easily find a solution to their issue themselves without having to contact customer service.
In this Nuxt tutorial, we’ll take a look at how we can quickly and easily build a knowledge base with ButterCMS, our headless CMS which will contain our KB (knowledge base) articles and FAQs, and Nuxt 3, a frontend framework with SSR (server-side rendering) features which comes with many benefits when building sites.
Let’s quickly look at what a knowledge base is and why a company should utilize one. A knowledge base is more or less a central hub of structured information about a specific product, service, or similar—likely collected from multiple sources and organized for easy retrieval of relevant information. A knowledge base can contain information stored in a number of formats, from articles to how-to guides to FAQs to videos.
A knowledge base can be an important tool for any organization that needs to store and access large amounts of structured information. Some of the key benefits of a knowledge base include:
Now that we’re familiar with what a knowledge base is and its importance, in the following sections, we’ll be looking at the technologies we can use to build our own knowledge base.
First of all, Nuxt is a meta framework built on Vue.js that offers features focused on delivering an optimized user experience. One vital feature is on-demand rendering which lets developers decide what rendering strategy to use, which includes server-side rendering (SSR), static site generation (SSG), etc. Let’s look at some of the features offered by Nuxt and how they might be beneficial to us.
With Nuxt, applications can leverage its SSR features which allow HTML files to be generated and sent to the browser. This results in faster load times and a better user experience as content is already loaded on the page even before hydration (where the client loads the JavaScript code for interactivity) kicks in.
Thanks to SSR, Nuxt websites are indexable by search engines and can be crawled by their bots for relevant content which helps in SEO ranking.
Nuxt offers a great developer experience due to its many features offered out of the box, which include automatic routing, auto-imports, simple state management using composables, and more.
Nuxt applications do not require extensive configuration to work. During installation, it sets up a simple template project with all the relevant files, structures, and packages to work. You can then start modifying the files to suit your project needs.
Due to its server-side capabilities, Nuxt features server/API routes that handle API requests for server routes and return data as JSON like a regular backend API. With this feature, we can extend the functionality of our website and enjoy some backend features without having to set up a separate backend server.
With a GitHub star count of 55,000 (and counting, at the time of writing), the Nuxt community, together with the Vue community, is pretty impressive and very active.
ButterCMS is a headless CMS which, simply put, is a content management system (CMS) that acts as your content backend, or content API, that allows you to create and manage content. The content is made available via an API, and developers can build their own custom front-end applications to consume and display the content as needed for websites and applications.
But why use ButterCMS? Let's look at a few reasons:
In the following sections, we’ll get into the interesting part of this article where we walk through how to build a working knowledge base with Butter and Nuxt.
To follow along, you should have the following:
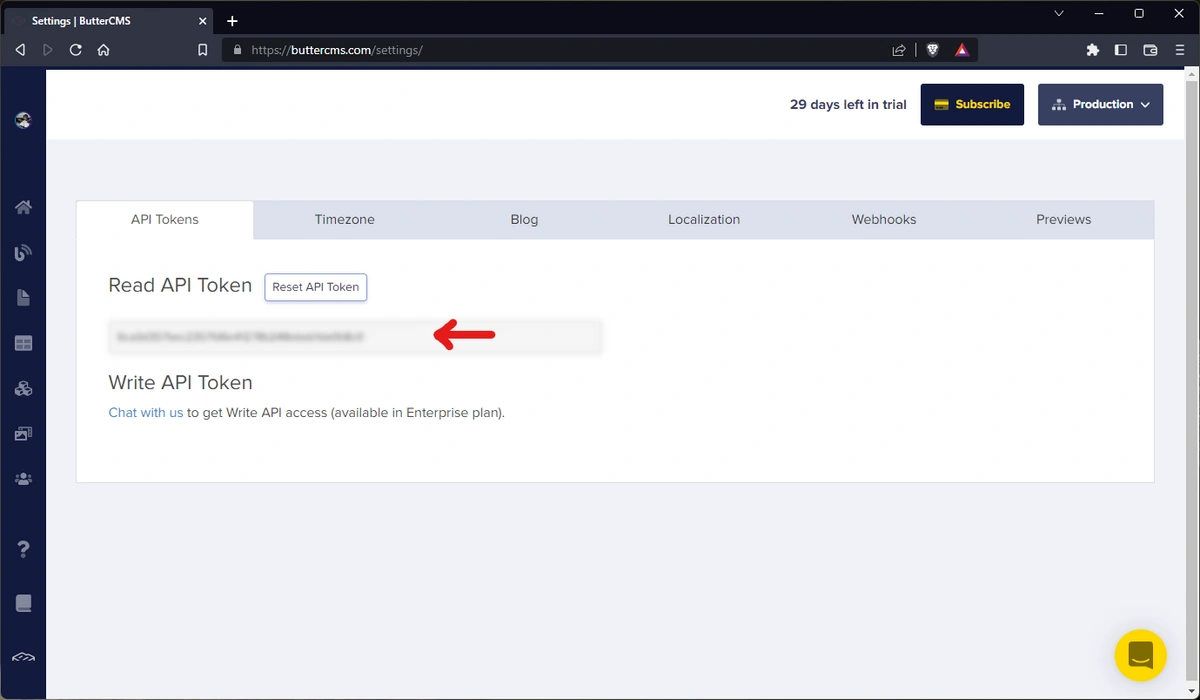
First, navigate to your Butter dashboard, and then to Settings in order to obtain our Read API Token.
Save this API Token as we’ll use it to connect our Nuxt app to ButterCMS later on.
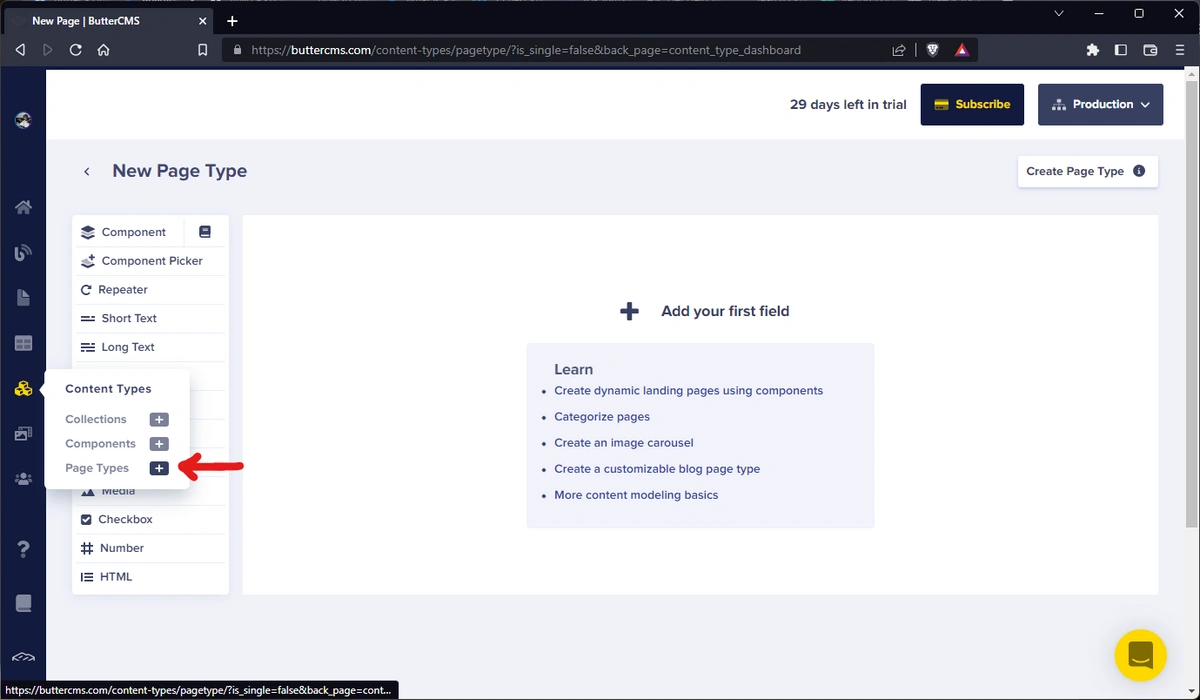
Now, let's build out the content structure in our Butter dashboard. First, we have to set up our knowledge base article page type.
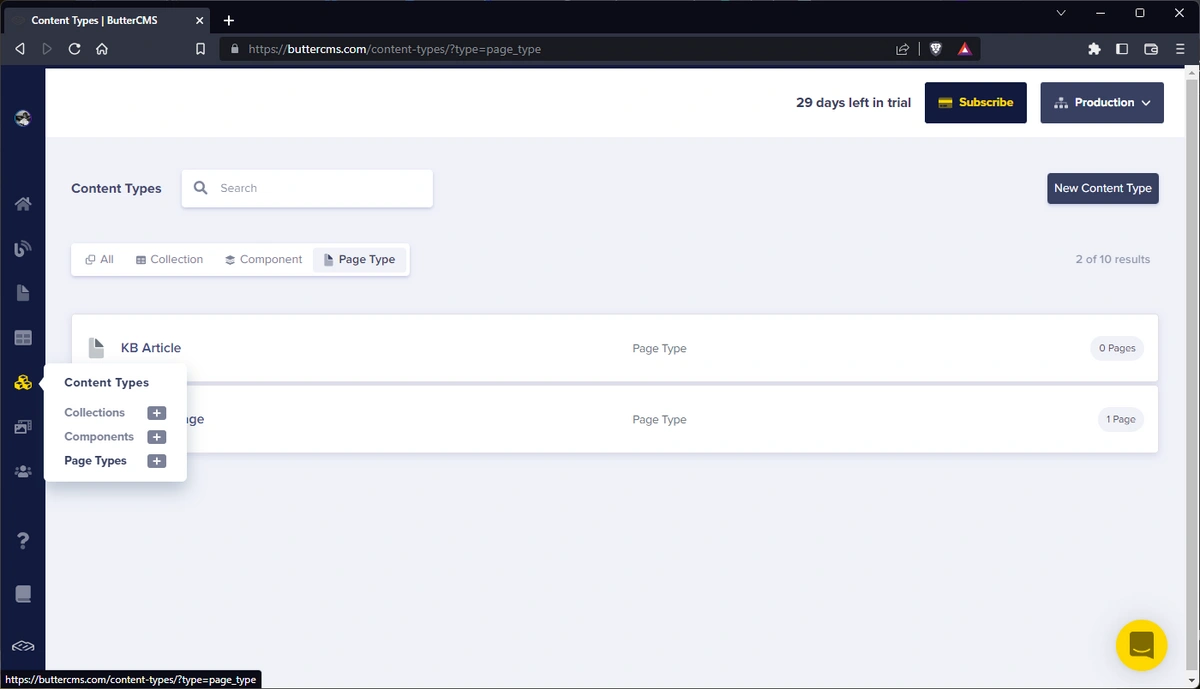
Navigate to the page type page by clicking on the “+” icon on the Page Types option on the Content Types drop-down from the side menu.
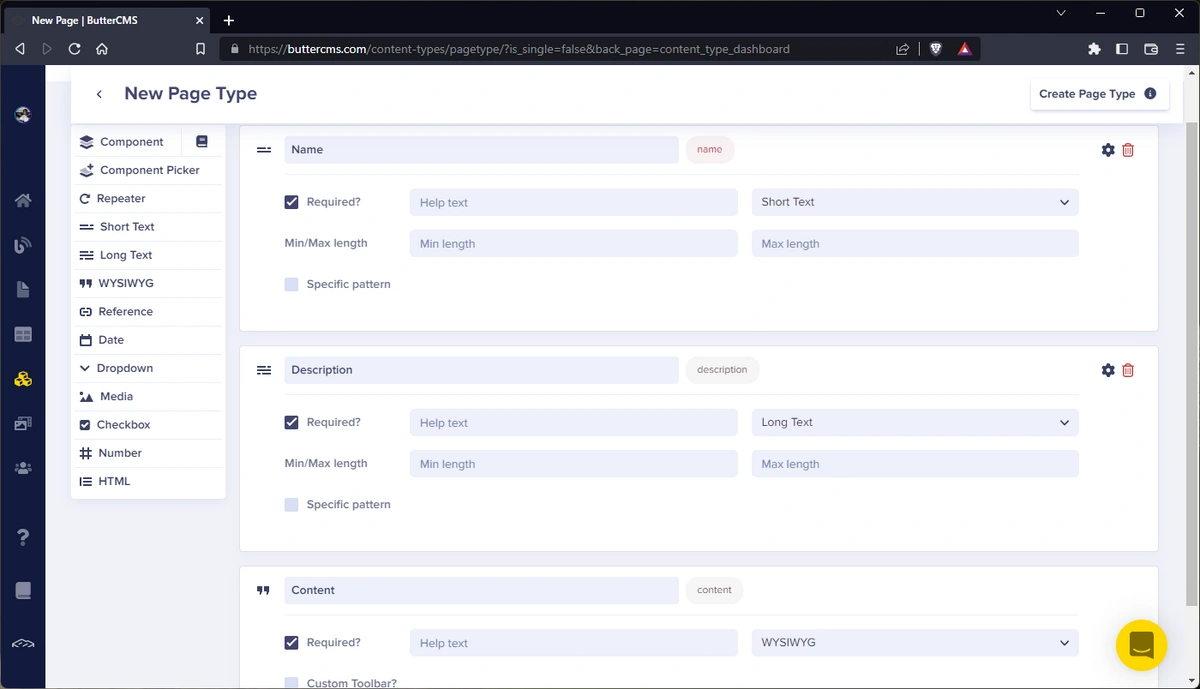
Now, we can create our page-type structure, which includes:
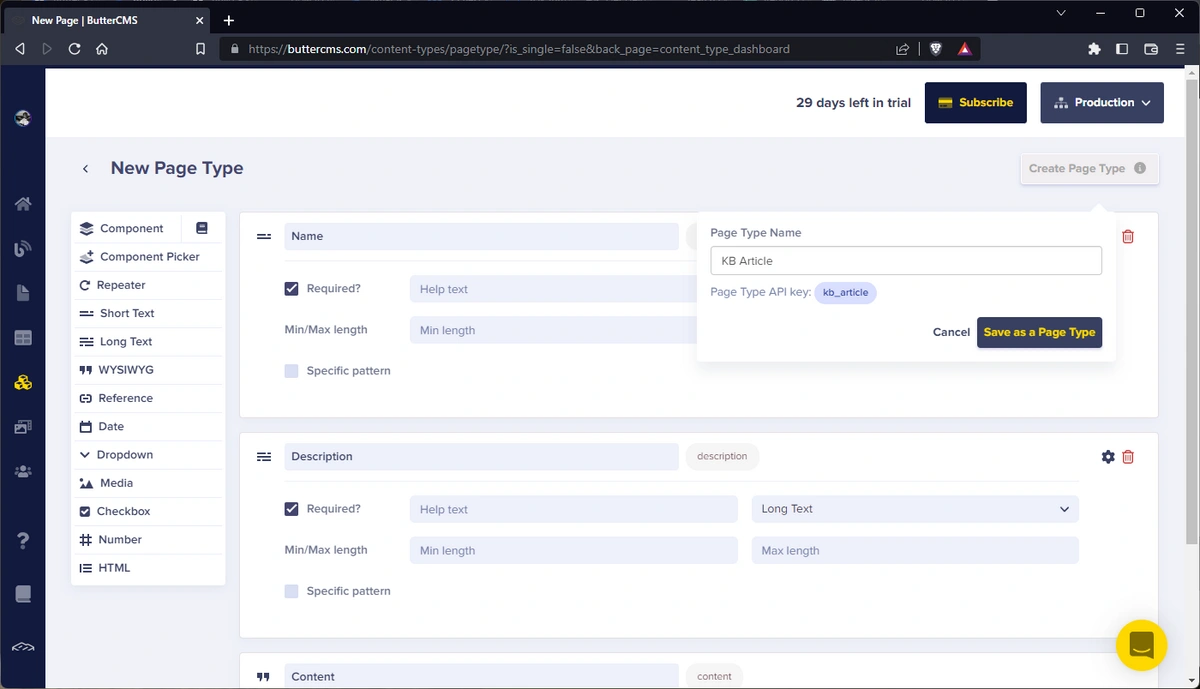
With that, we should have something like this:
Now, we can save it by clicking on the Create Page Type button at the top of the page and naming our page type “KB Article”.
Now, click on Save as Page Type to save the page type.
Next, we’ll create a few collection types, one for our knowledge base categories and another for our knowledge base FAQs.
We’ll create a category page type which will allow us to create category pages to categorize our knowledge base article.
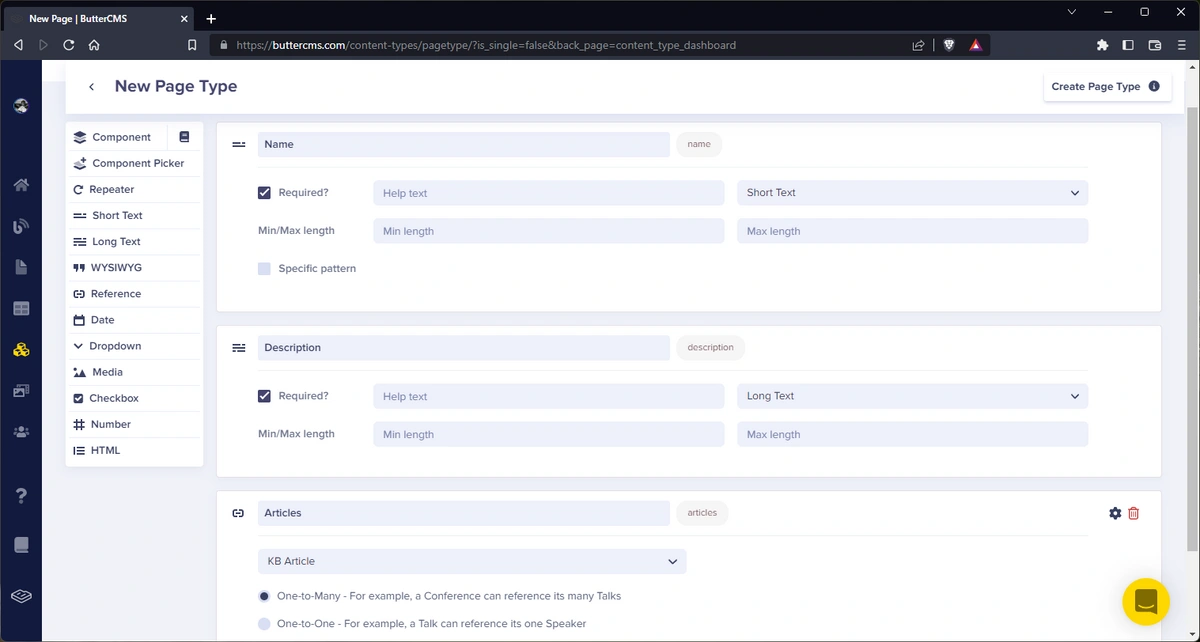
To create it, once again, we’ll navigate to the page type page by clicking on the “+” icon on the Page Types option on the Content Types drop-down from the side menu. Now, create a page structure/schema of our category page by adding the following fields:
With that, we should have something like this:
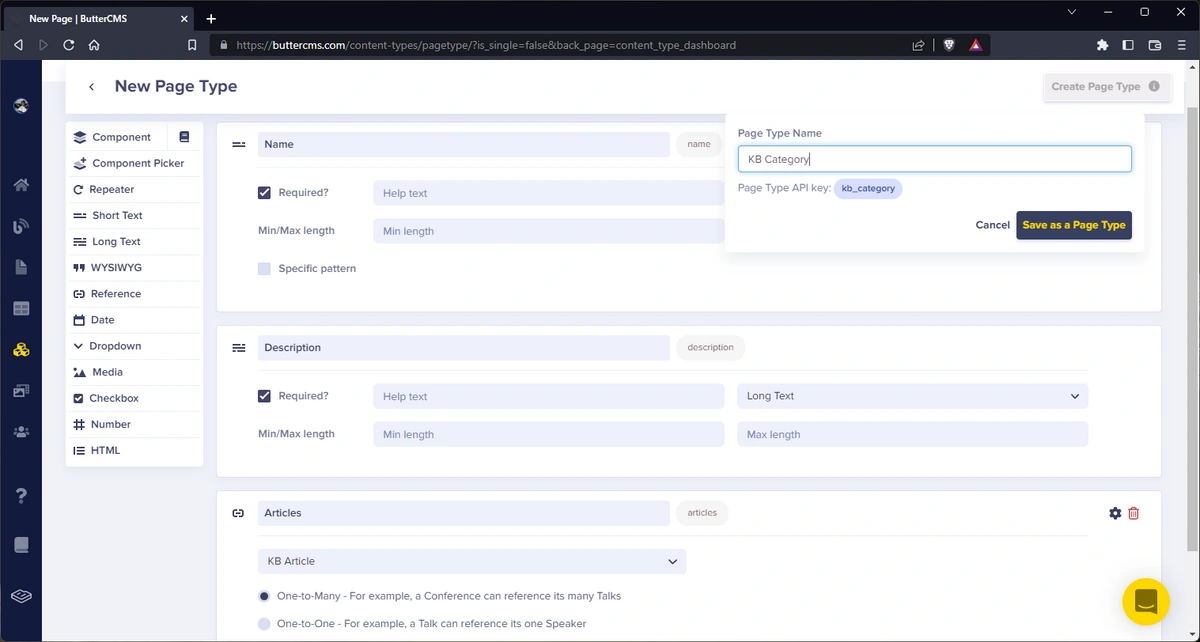
Now click on Create Page Type to name and save our page type. Here, we’ll name it “KB Category”.
Click on Save as a Page Type to save it.
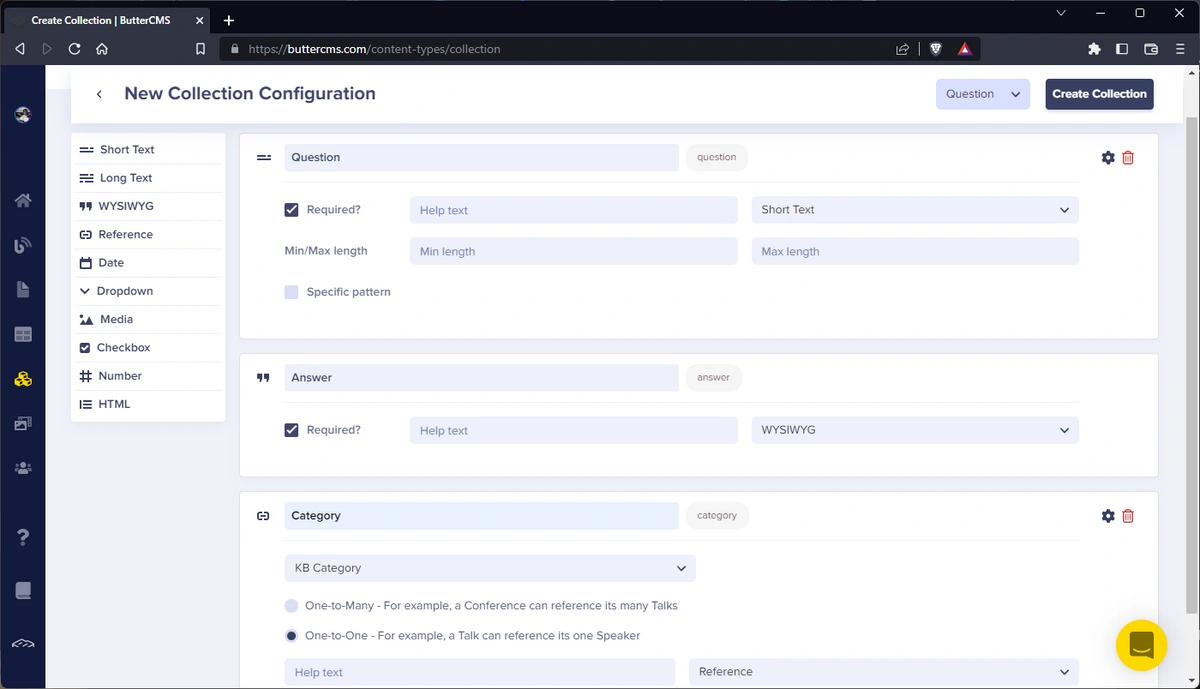
Navigate to the collection type page by clicking on the “+” icon on the Collections option on the Content Types drop-down from the side menu.
Now, we can create our page-type structure which includes:
With that, we should have something like this:
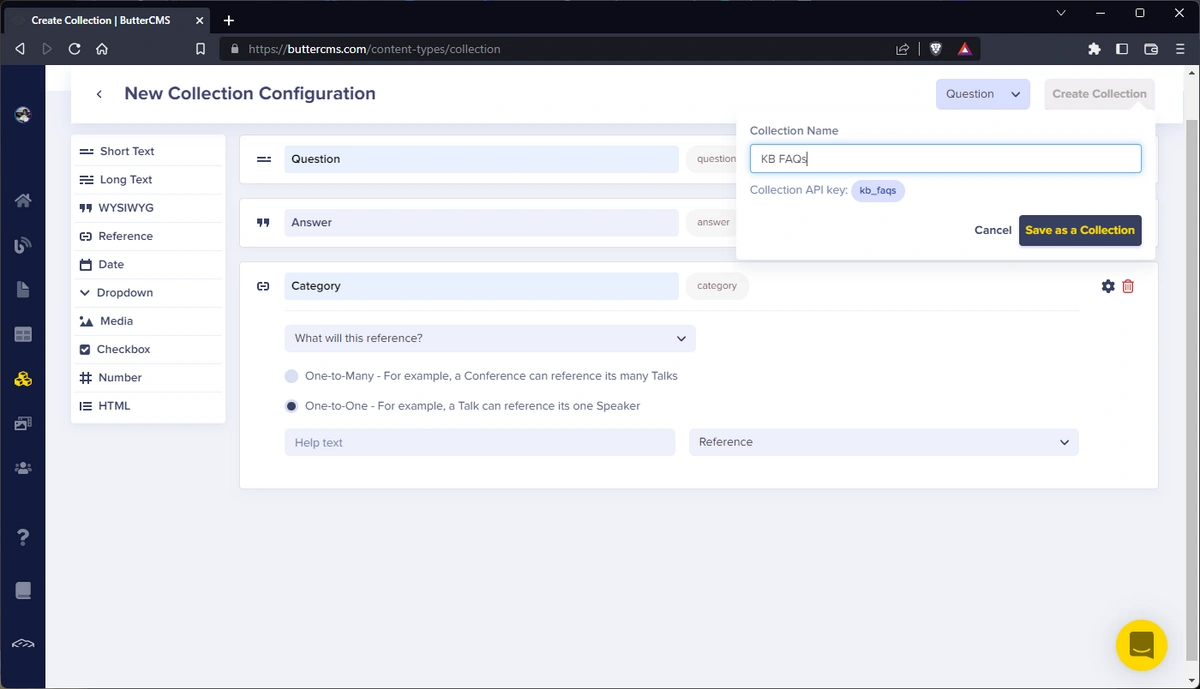
To save, click on the Create Collection button at the top of the page and enter “KB FAQs” as the Collection Name.
Click on Save as Collection to save the collection. Note how we added the Category reference to our KB FAQs collection, we’ll be doing the same for our KB Articles page type so that we can be able to categorize our articles and FAQs.
Navigate to the collection type page by clicking on the Page Types option on the Content Types drop-down from the side menu.
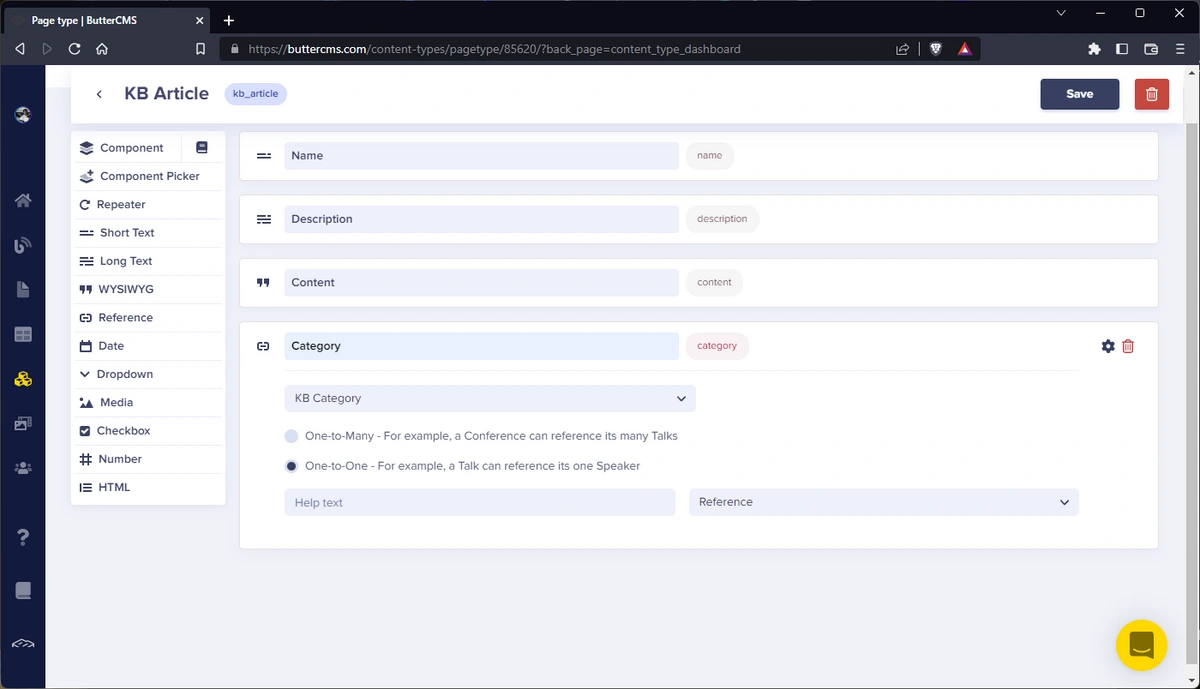
Now, click on the KB Article page type to edit it.
Add a new reference field with the name “Category” and the following attributes:
It should look something like this now:
With that, click on the Save button to save the changes. Now, we can proceed to create our content.
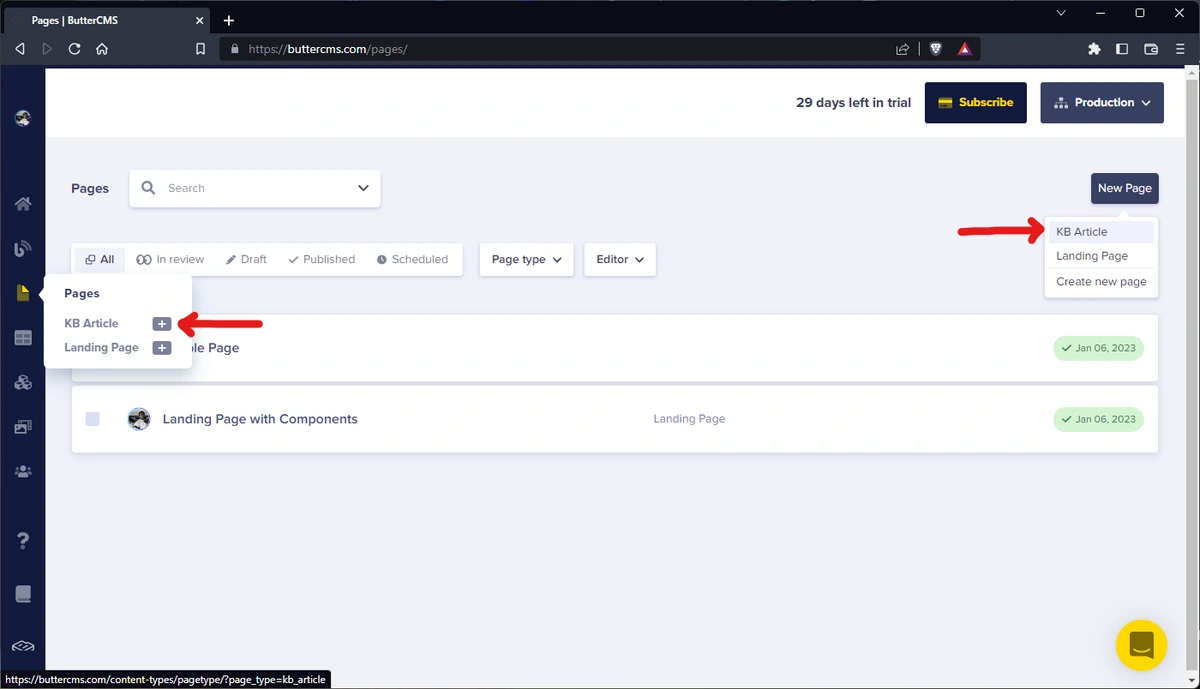
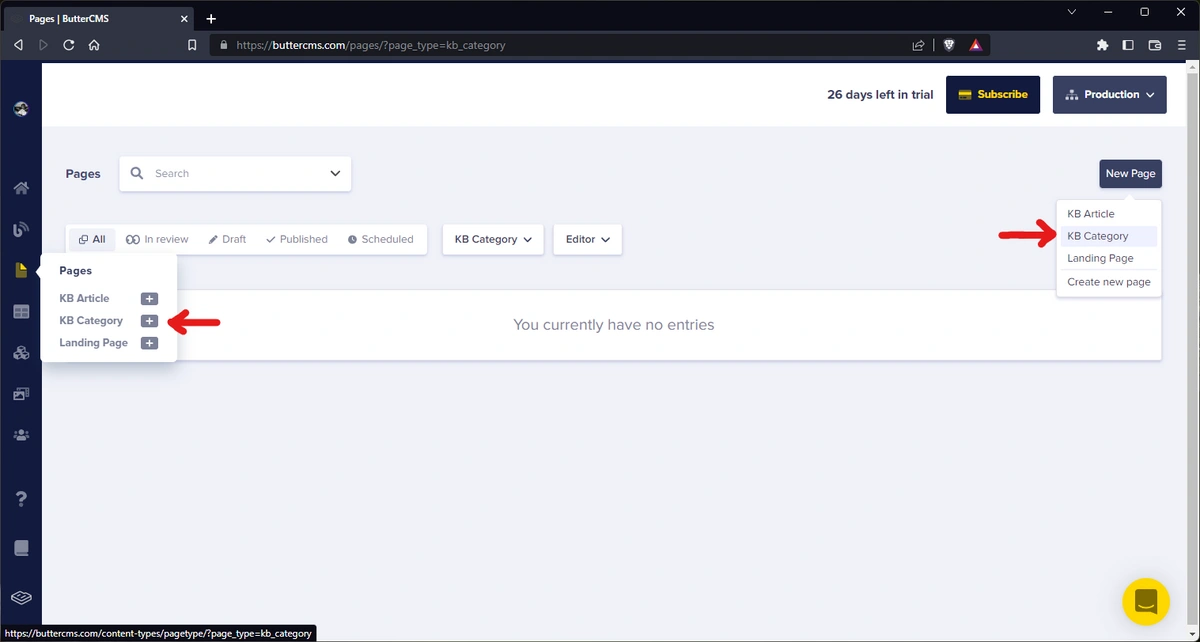
Now, let’s create a few pages for our knowledge base. To create a new page, you can click on the “+” icon on the KB Article option on the Pages menu item on the sidebar. Or, navigate to the /pages page and click on the New page button at the top right of the page and select the KB Article option.
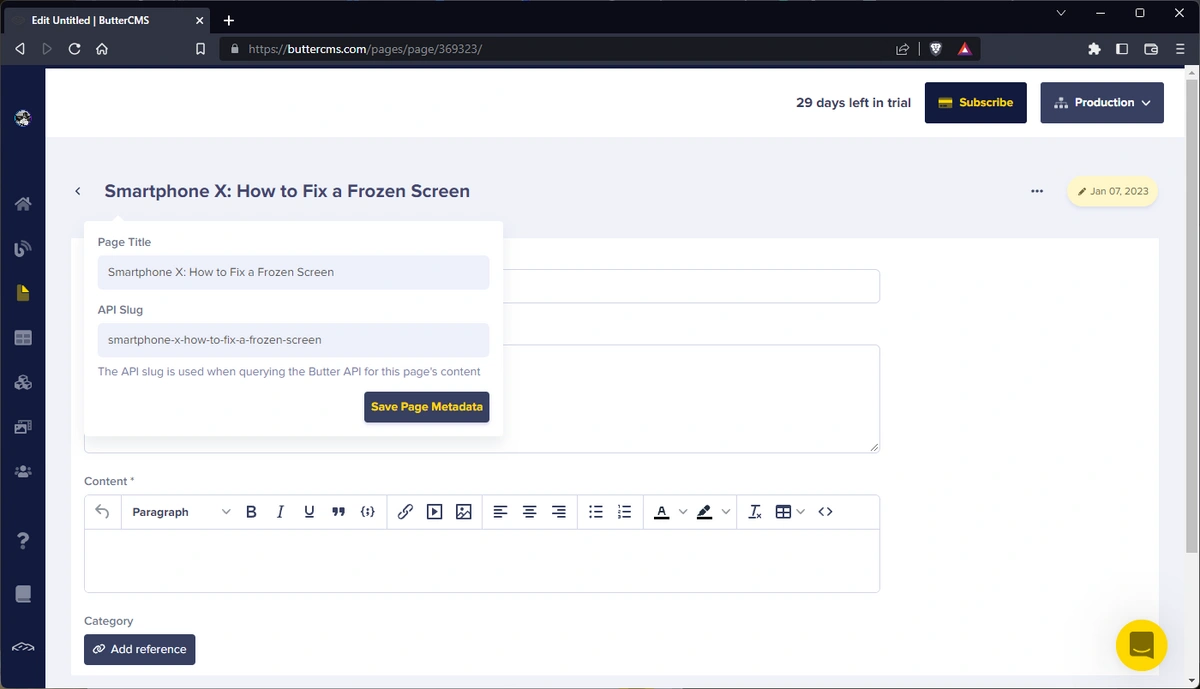
Next, we’ll enter the page metadata of our new KB article, the page title, and the API slug (automatically populated).
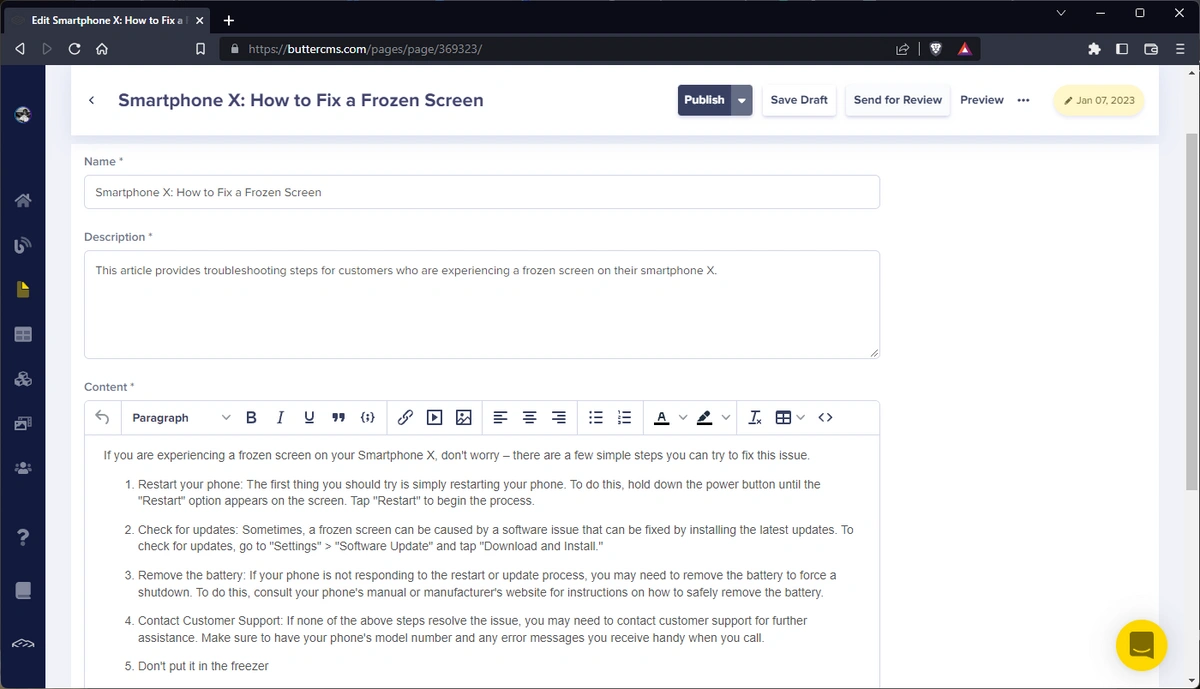
Next, we’ll enter the name, description, and content of our article:
Now, save and publish the article by clicking on the Publish button. Follow the same steps to create and publish more articles.
Now, let’s create a few categories for our knowledge base articles. To create a new page, you can click on the “+” icon on the KB Category option on the Pages menu item on the sidebar. Or, navigate to the /pages page and click on the New Page button at the top right of the page and select the KB Category option:
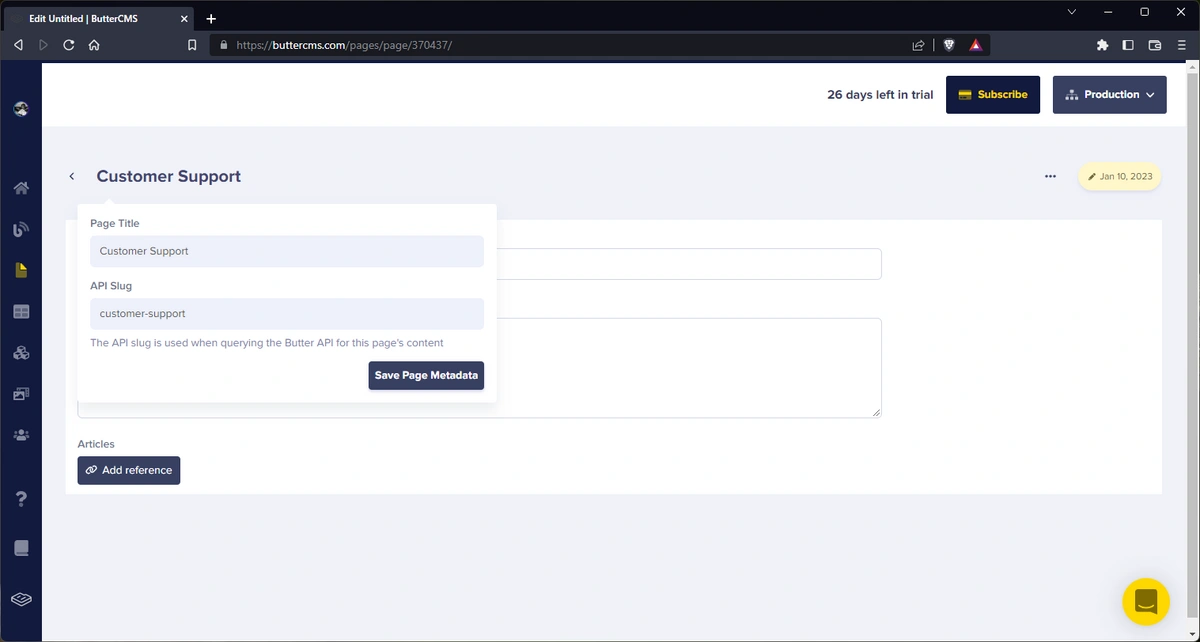
Now, we’ll enter the page metadata of our new KB category, the page title, and the API slug (automatically populated). Here, we’re naming it “Customer Support”.
Click on Save Page Metadata to save it.
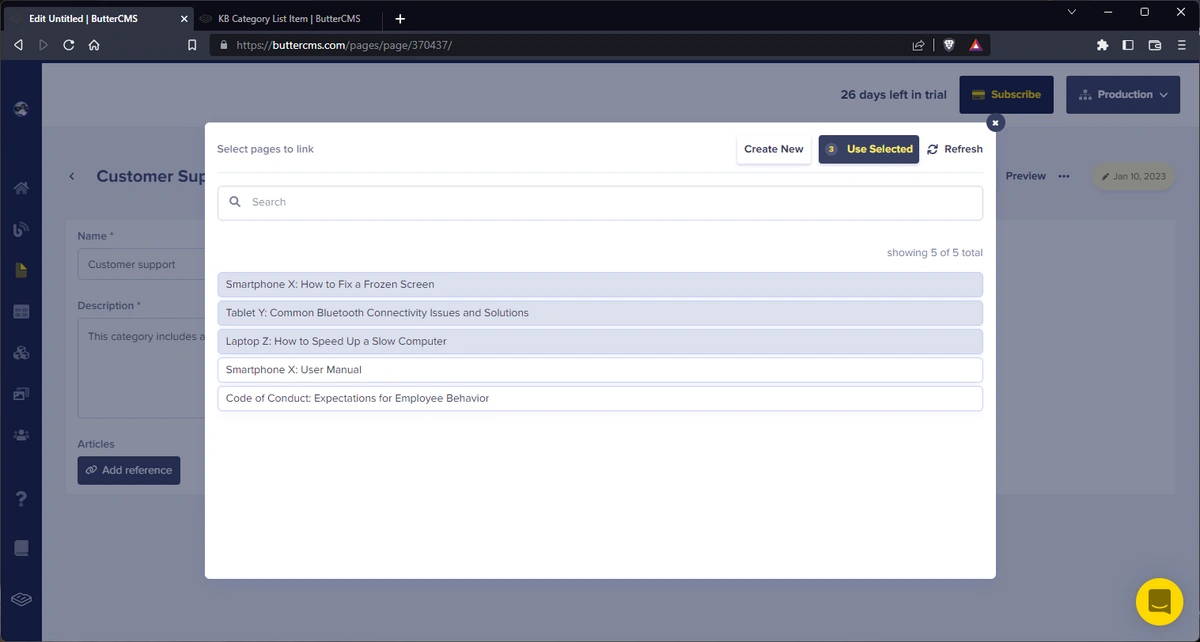
Now, we enter the name, description, and article references to previously created KB articles. To add article references, click on the Add Reference button and select the articles that should belong to the category:
Once selected, click on Use Selected to add the selected articles to the reference.
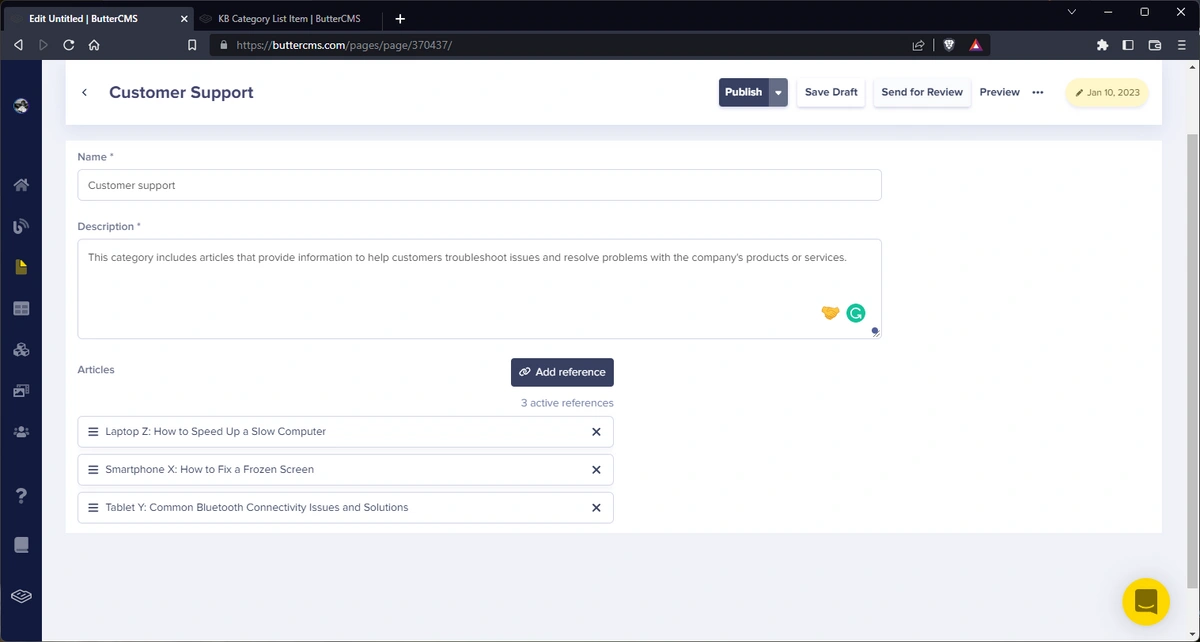
Now, click on the Publish button to save and publish the category. Repeat the steps to create multiple categories and article references.
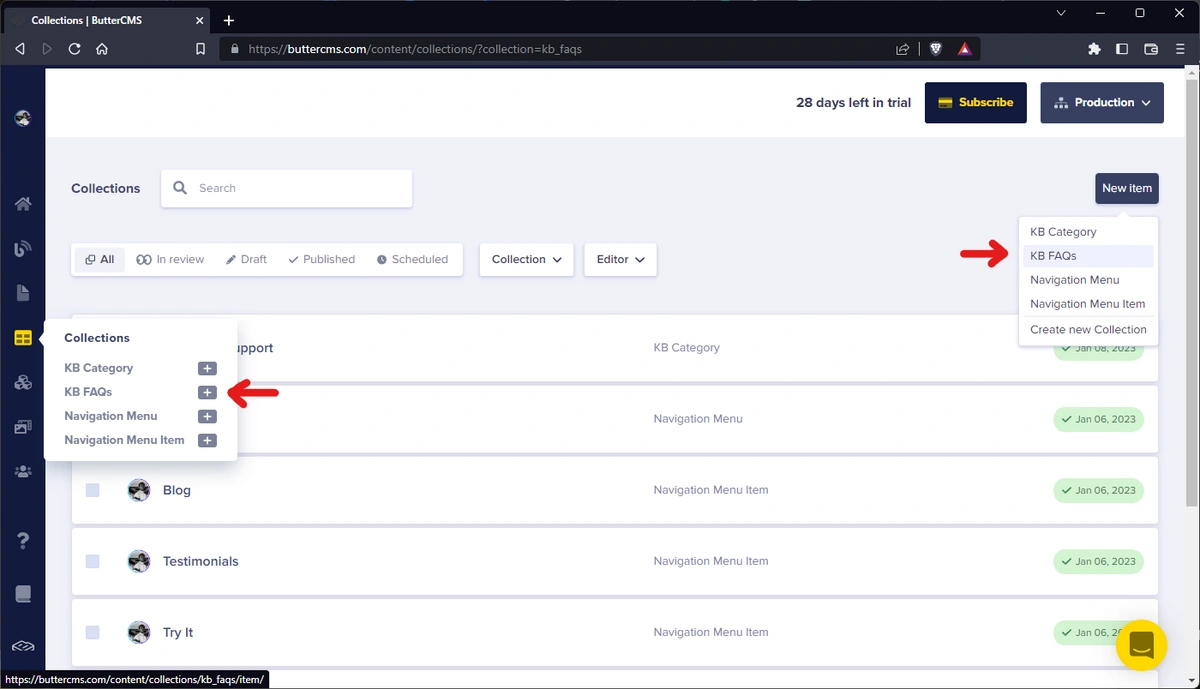
Now, let’s create a few FAQs for our knowledge base. To create a new collection, you can click on the “+” icon in the KB FAQs option in the Collections menu item on the sidebar. Or, navigate to the /collections page and click on the New collection button at the top right of the page and select the KB FAQs option:
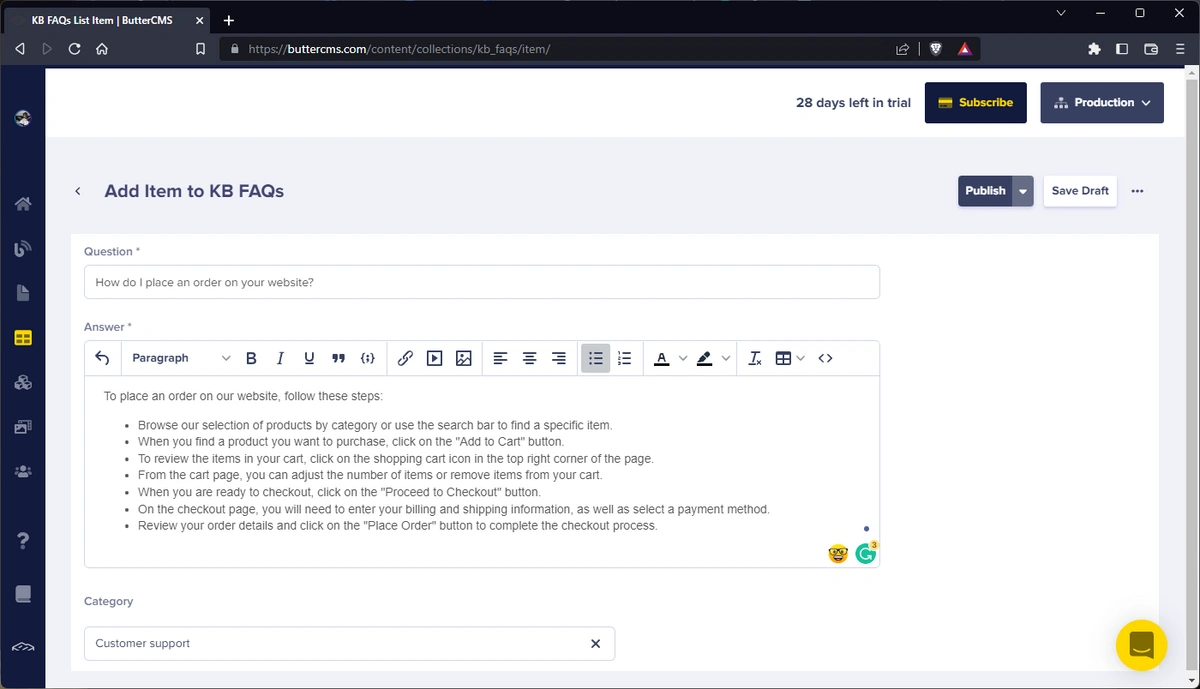
In the Add Item to KB FAQs page, enter the question and answer for the FAQ and category references to previously created KB categories.
To add article references, click on the Add Reference button and select the category that the FAQ belongs to. Once selected, click on Use Selected to add the selected articles to the reference.
Once satisfied, click on the Publish button to save and publish the FAQ. Follow the steps to create more FAQs.
Once that’s all done and we have our content set up, we can create our Nuxt front-end and integrate ButterCMS.
To install Nuxt, navigate to a folder of your choice, open up a terminal window, and run the command:
npx nuxi init nuxt-butter-kb
Once the project has been created, navigate to the new nuxt-butter-kb folder and install dependencies by running the command:
cd nuxt-butter-kb
npm installNow, we’ll set up Tailwind and install a few plugins, namely: Tailwind Typography and Tailwind Forms.
npm install -D tailwindcss postcss autoprefixer @tailwindcss/typography @tailwindcss/forms
Once installed, run the following command to initialize Tailwind:
npx tailwindcss initThis will also generate a tailwind.config.ts file. After that, we’ll also have to configure our template paths where Tailwind will look for classes and specify our typography and forms plugins. Our ./tailwind.config.js file looks like below:
// ./tailwind.config.js

/** @type {import('tailwindcss').Config} */
module.exports = {
  content: [
    "./components/**/*.{js,vue,ts}",
    "./layouts/**/*.vue",
    "./pages/**/*.vue",
    "./plugins/**/*.{js,ts}",
    "./nuxt.config.{js,ts}",
    "./app.vue",
  ],
  theme: {
    extend: {},
  },
  plugins: [
    require('@tailwindcss/typography'),
    require('@tailwindcss/forms'),
  ],
}
Next, we’ll create an ./assets/css/main.css file and add the @tailwind directives:
// ./assets/css/main.css

@tailwind base;
@tailwind components;
@tailwind utilities;
Next, we’ll add the CSS file and Tailwind to our PostCSS configuration in our ./nuxt.config.ts file:
// ./nuxt.config.ts

// https://v3.nuxtjs.org/api/configuration/nuxt.config
export default defineNuxtConfig({
  css: ['~/assets/css/main.css'],
  postcss: {
    plugins: {
      tailwindcss: {},
      autoprefixer: {},
    },
  },
})Create a new ./.env file to store our Butter Read API Token we copied from our dashboard:
// ./.env
BUTTER_READ_API_TOKEN=<TOKEN>
Next, we’ll set up the Nuxt runtime config to expose configuration and environment variables within our application. In ./nuxt.config.ts:
// ./nuxt.config.ts

export default defineNuxtConfig({
  runtimeConfig: {
    // The private keys which are only available within server-side
    butterApiToken: process.env.BUTTER_READ_API_TOKEN,
  },
  // ...
})
Finally, let's install the ButterCMS SDK which will help us communicate with the Butter API.
npm install buttercmsIn the next section, we’ll create a few functions that will help us fetch the data we need from Butter.
In a new file, ./utils/butter.ts, we’ll create a few functions that will handle data fetching for article pages, category pages, and FAQs collections:
// ./utils/butter.ts

import Butter from "buttercms";
const { butterApiToken } = useRuntimeConfig();
// initialize butter
export const butter = Butter(butterApiToken);
// function to fetch categories
export const getCategories = async (params?: any) => {
  try {
    const res = await butter.page.list("kb_category", params);
    return res?.data;
  } catch (error) {
    console.log(error);
    return null;
  }
};
// function to fetch category by slug
export const getCategory = async (slug: any) => {
  try {
    const res = await butter.page.retrieve("kb_category", slug);
    return res?.data;
  } catch (error) {
    console.log(error);
    return null;
  }
};
// function to get articles
export const getArticles = async (params?: any) => {
  try {
    const res = await butter.page.list("kb_article", params);
    return res?.data;
  } catch (error) {
    console.log(error);
    return null;
  }
};
// function to get article by slug
export const getArticle = async (slug: any) => {
  try {
    const res = await butter.page.retrieve("kb_article", slug);
    return res?.data;
  } catch (error) {
    console.log(error);
    return null;
  }
};
// function to get FAQs
export const getFAQs = async (params?: any) => {
  try {
    const res = await butter.content.retrieve(["kb_faqs"], params);
    return res?.data;
  } catch (error) {
    console.log(error);
    return null;
  }
};
// function to get search results
export const getSearchResults = async (query?: any, params?: any) => {
  try {
    const res = await butter.page.search(query, params);
    return res?.data;
  } catch (error) {
    console.log(error);
    return null;
  }
};
Here, we import Butter and initialize it with our butterApiToken from our runtime config. Next, we create the helper functions:
getCategories() - This function fetches pages of the kb_category page type using the butter.page.list() method which allows us to get multiple pages of a specified page type.getCategory() - This function fetches a single page of the kb_category page type using the butter.page.retrieve() method which allows us to get a single page of a specified page type.getArticles() - Similar to getCategories(), this function fetches pages of the kb_article.getArticle() - Also similar to getCategory(), this function fetches a single page of the kb_article page type.getFAQs() - This function fetches the kb_faqs collection using the butter.content.retrieve() method.getSearchResults() - This function fetches pages that match the specified search query using the butter.page.search() method. Also, notice that each function accepts a params argument which is an object of parameters passed to butter for filtering and pagination.
Now that our functions are ready, we can begin using them in our server API routes which allow us to make server-side requests in Nuxt to the ButterCMS API.
We can set up our server API routes in Nuxt by creating new files in the ./server/api/ directory. Each file created here will match the API route for its file name. For example, if we create the file ./server/api/hello.ts, we can access that API on localhost:3000/api/hello.
In the following sections, we’ll be creating each of the API routes we’ll need in our project using the functions we created earlier.
Now, we’ll create an API route to get categories by creating a new file called ./server/api/getCategories.ts:
// ./server/api/getCategories.ts

import { getCategories } from "~~/utils/butter";
export default defineEventHandler(async (event) => {
  // get the query from the event
  const query = getQuery(event);
  const data = await getCategories(query);
  return data;
});In a new file called ./server/api/getCategory.ts, enter the following:
// ./server/api/getCategory.ts

import { getCategory } from "~~/utils/butter";
export default defineEventHandler(async (event) => {
  // get the slug from query from the event
  const { slug } = getQuery(event);
  const data = await getCategory(slug);
  return data;
});In a new file called ./server/api/getArticles.ts, enter the following:
// ./server/api/getArticles.ts

import { getArticles } from "~~/utils/butter";
export default defineEventHandler(async (event) => {
  // get the query from the event
  const query = getQuery(event);
  const data = await getArticles(query);
  return data;
});In a new file called ./server/api/getArticle.ts, enter the following:
// ./server/api/getArticle.ts

import { getArticle } from "~~/utils/butter";
export default defineEventHandler(async (event) => {
  // get the slug from query from the event
  const { slug } = getQuery(event);
  const data = await getArticle(slug);
  return data;
});In a new file called ./server/api/getFAQs.ts, enter the following:
// ./server/api/getFAQs.ts

import { getFAQs } from "~~/utils/butter";
export default defineEventHandler(async (event) => {
  // get query from event
  const query = getQuery(event);
  const data = await getFAQs(query);
  return data;
});In a new file called ./server/api/searchArticles.ts, enter the following:
// ./server/api/searchArticles.ts

import { getSearchResults } from "~~/utils/butter";
export default defineEventHandler(async (event) => {
  // get the query from the event
  const query = getQuery(event);
  // get the search results from butter
  // pass the query and params to the function
  const data = await getSearchResults(query.query, {
    page_type: query.page_type || "kb_article",
    page: query.page || 1,
    page_size: query.page_size || 10,
  });
  return data;
});
Awesome. Now that we’re done creating our server API routes, let’s create a few components.
Let’s create a few components that we’ll be using in our project, namely our site header and search form.
In order to maintain the readability and conciseness of the code, the styles and Tailwind classes for the components and pages in this tutorial will be placed in external CSS files. The CSS files containing the styles can be accessed in the GitHub code here.
Create a new file called ./components/SiteHeader.vue:
<!-- ./components/SiteHeader.vue -->
<template>
  <header class="site-header">
    <div class="wrapper">
      <NuxtLink class="flex gap-2 items-center text-teal-600" to="/">
        <figure class="site-logo">
          <span class="font-black text-xl uppercase">GizmoGenius</span>
        </figure>
        <span> | Knowledge Base</span>
      </NuxtLink>
    </div>
  </header>
</template>
<style scoped>
@import url("~/assets/css/components/SiteHeader.css");
</style>This component is simply a form that takes in a search query as input and navigates to the /routes page with the search query using useRouter(). Create a new file called ./components/Search.vue:
<!-- ./components/Search.vue -->
<script setup>
const query = ref("");
const router = useRouter();
const submitForm = (e) => {
  e.preventDefault();
  // route to search page with query
  router.push({ path: "/search", query: { query: query.value } });
};
</script>
<template>
  <div class="form-cont">
    <form @submit="submitForm" class="search-form">
      <div class="wrapper">
        <div class="form-control search">
          <input
            v-model="query"
            name="search"
            id="search"
            type="text"
            class="form-input"
            placeholder="Enter your query"
          />
          <button class="cta search">Search</button>
        </div>
      </div>
    </form>
  </div>
</template>
Now that we’ve created our components, let’s begin to create our pages.
First, we’ll start with the home page.
To enable routing and create our home page, we just have to create a new file in the ./pages/directory. For our home page, we’ll create a new ./pages/index.vue file. On this page, we’ll be doing quite a few things. First, in the <script>, we’ll use useAsyncData and $fetch to make requests to the server API endpoints we created earlier to fetch our articles, categories, and FAQs:
<!-- ./pages/index.vue -->

<script setup>
const { data, error } = await useAsyncData("home", async () => {
  const categories = await $fetch("/api/getCategories?page=1&page_size=10");
  const articles = await $fetch("/api/getArticles?page=1&page_size=10");
  const FAQs = await $fetch("/api/getFAQs?page=1&page_size=10");
  return {
    categories,
    articles,
    FAQs,
  };
});
useHead({
  title: "GizmoGenius Knowledge Base",
  meta: [
    {
      key: "description",
      name: "description",
      content:
        "Your one-stop resource for information on our products and services.",
    },
  ],
});
</script>
<!-- ... -->
Here, we also use useHead() to add title metatags containing information about our page. Next, in the same ./pages/index.vue file, in the <template> section, we’ll enter the markdown to display our content:
<!-- ./pages/index.vue -->
<!-- ... -->
<template>
  <main class="site-main">
    <header class="site-hero">
      <div class="wrapper">
        <h1 class="font-medium text-4xl">
          Welcome to GizmoGenius Knowledge Base
        </h1>
        <p class="text-lg">
          Your one-stop resource for information on our products and services.
        </p>
        <!-- Search component -->
        <Search />
      </div>
    </header>
    <section class="site-section categories-section">
      <div class="wrapper">
        <header class="section-header">
          <h2 class="text-xl text-teal-800">Top Categories</h2>
        </header>
        <ul v-if="data.categories" class="categories-list">
          <li
            v-for="category in data.categories?.data"
            :key="category.slug"
            class="category-item"
          >
            <NuxtLink :to="`/categories/${category.slug}`">
              <div class="wrapper">
                <h3 class="font-medium text-teal-800 text-3xl capitalize mb-2">
                  {{ category.name }}
                </h3>
                <p class="text-lg">{{ category.fields.description }}</p>
              </div>
            </NuxtLink>
          </li>
        </ul>
        <span v-else>Oops... Nothing to see here</span>
      </div>
    </section>
    <section class="site-section articles-section">
      <div class="wrapper">
        <header class="section-header section-header">
          <h2 class="text-xl text-teal-800">Top Articles</h2>
        </header>
        <ul v-if="data.articles" class="articles-list">
          <li
            v-for="article in data.articles?.data"
            :key="article.slug"
            class="article-item"
          >
            <NuxtLink :to="`/articles/${article.slug}`">
              <div class="wrapper">
                <h3 class="font-medium text-teal-800 text-2xl capitalize mb-2">
                  {{ article.name }}
                </h3>
                <p class="text-lg">{{ article.fields.description }}</p>
              </div>
            </NuxtLink>
          </li>
        </ul>
        <span v-else>Oops... Nothing to see here</span>
      </div>
    </section>
    <section class="site-section faqs-section">
      <div class="wrapper">
        <header class="section-header">
          <h2 class="text-xl text-teal-800">Top FAQs</h2>
        </header>
        <ul v-if="data.FAQs" class="faqs-list">
          <li
            v-for="FAQ in data.FAQs?.data['kb_faqs']"
            :key="FAQ.meta.id"
            class="faq-item"
          >
            <details class="wrapper">
              <summary>
                <h3 class="inline font-medium text-teal-800 text-xl capitalize">
                  {{ FAQ.question }}
                </h3>
              </summary>
              <div class="prose p-4 max-w-4xl" v-html="FAQ.answer"></div>
            </details>
          </li>
        </ul>
        <span v-else>Oops... Nothing to see here</span>
      </div>
    </section>
  </main>
</template>
Here, we also added our <Search /> component in the header section. Next, in order to display our page, we have to use the <NuxtPage /> component in the ./app.vue file:
<!-- ./app.vue -->
<template>
  <div class="site">
    <NuxtLoadingIndicator color="#134e4a" />
    <SiteHeader />
    <NuxtPage />
  </div>
</template>
Here, we’re also adding the <NuxtLoadingIndicator /> and <SiteHeader /> components. Now, when we start our application and navigate to the home page, Nuxt makes the requests to the server API routes on the server side which fetches the data from the ButterCMS API. The page is then rendered server-side and sent as pre-rendered HTML with all the content to the browser.
Let’s start our application by running:
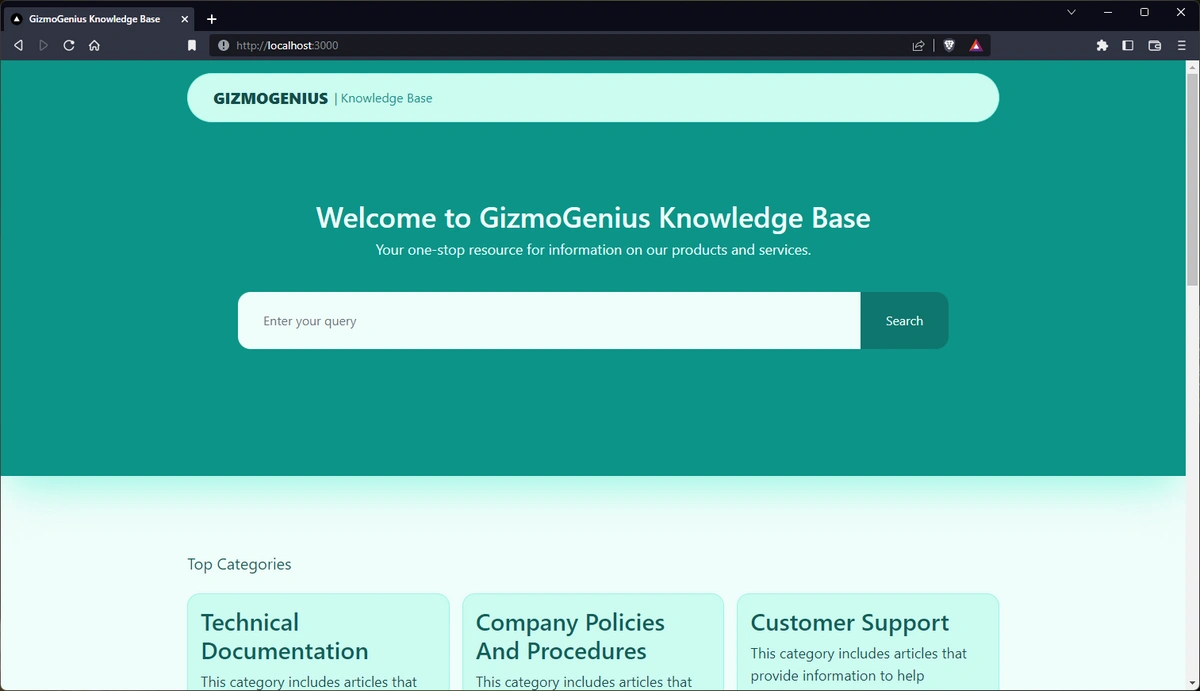
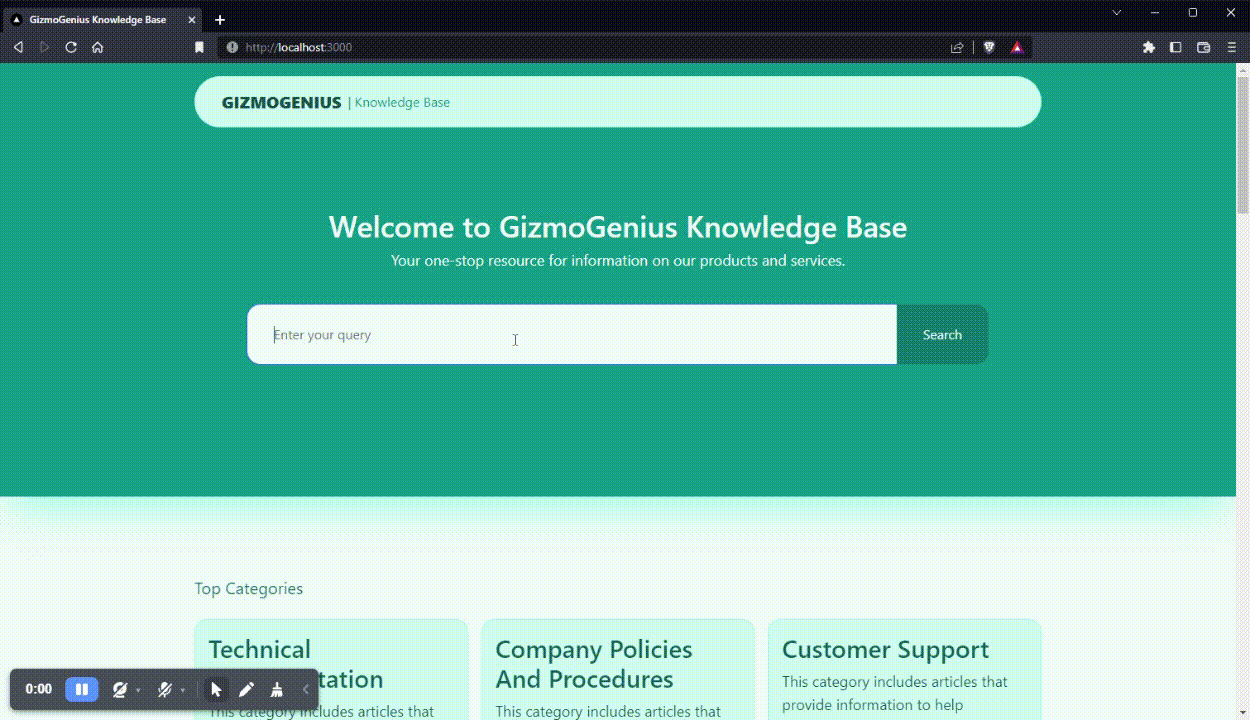
npm run devWe should see something like this:
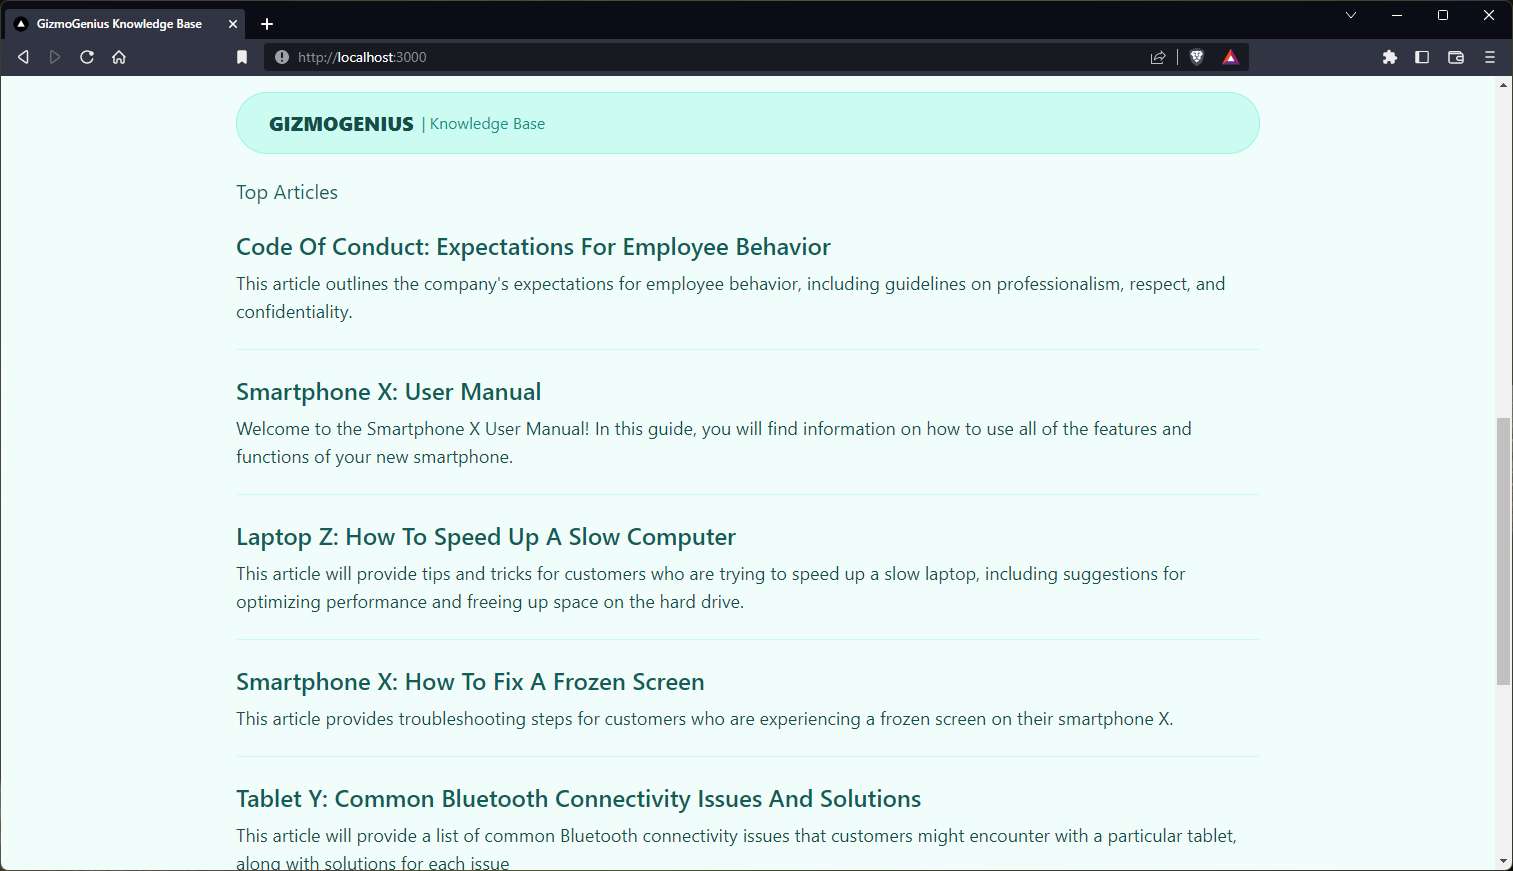
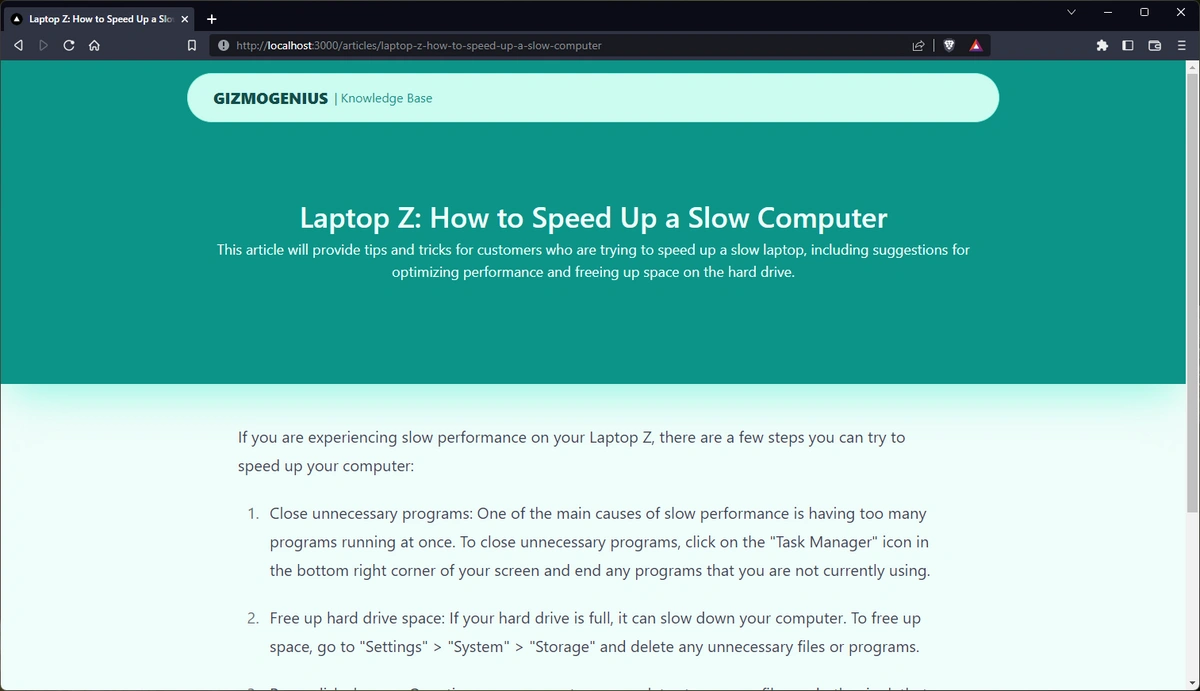
For the articles section:
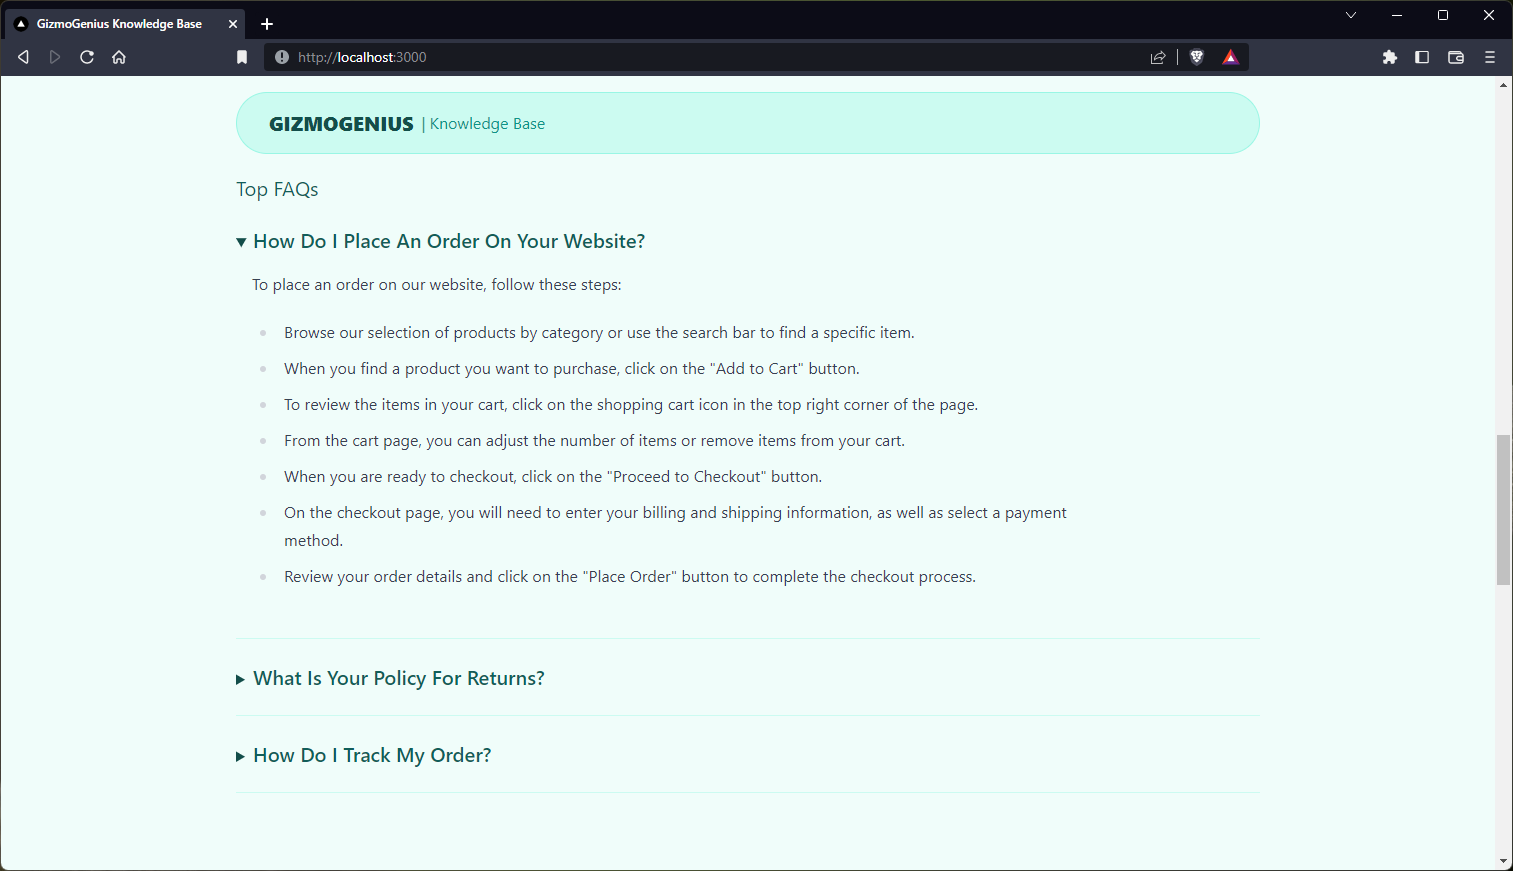
For the FAQs section:
Awesome. Next, we’ll create our dynamic category page.
This page will show a category and articles under that category by its slug. First, we create a new file called ./pages/categories/[slug].vue which is a dynamic page. We get the slug from the route parameters and use it to fetch our article. We’ll fetch the article using the /api/getCategory server API route and pass the slug as a query parameter:
<!-- ./pages/categories/[slug].vue -->
<script setup>
const route = useRoute();
// get slug from route params
const { slug } = route.params;
const { data: category, error } = await useAsyncData(slug, async () => {
const category = await $fetch(`/api/getCategory?slug=${slug}`);
return category;
});
// set page title and meta description
useHead({
title: category.value?.data.name,
meta: [
{
key: "description",
name: "description",
content: category.value?.data.fields.description,
},
],
});
</script>
<template>
<main class="site-main">
<header class="site-hero">
<div class="wrapper">
<h1 class="font-medium text-4xl">
{{ category?.data.fields.name }}
</h1>
<p class="text-lg">
{{ category?.data.fields.description }}
</p>
</div>
</header>
<section class="site-section articles-section">
<div class="wrapper">
<ul v-if="category?.data.fields.articles" class="articles-list">
<li
v-for="article in category?.data.fields.articles"
:key="article.slug"
class="article-item"
>
<NuxtLink :to="`/articles/${article.slug}`">
<div class="wrapper">
<h3 class="font-medium text-teal-800 text-2xl capitalize mb-2">
{{ article.name }}
</h3>
<p class="text-lg">{{ article.fields.description }}</p>
</div>
</NuxtLink>
</li>
</ul>
<span v-else>Oops... Nothing to see here</span>
</div>
</section>
</main>
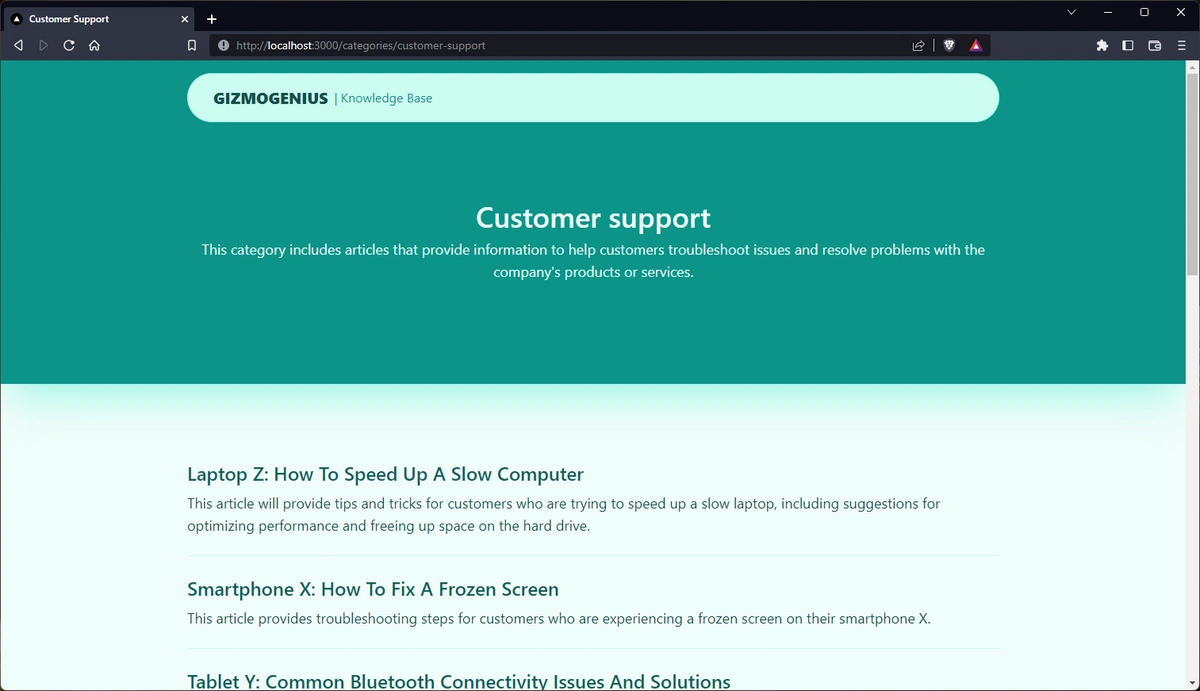
</template>With that, when we navigate to a category, we should have something like this:
Next, we’ll do something similar for our dynamic articles page.
Create a new file called ./pages/articles/[slug].vue and enter the following:
<!-- ./pages/articles/[slug].vue -->
<script setup>
const route = useRoute();
// get slug from route params
const { slug } = route.params;
const { data: article, error } = await useAsyncData(slug, async () => {
  const article = await $fetch(`/api/getArticle?slug=${slug}`);
  return article;
});
// set page title and meta description
useHead({
  title: article.value?.data.name,
  meta: [
    {
      key: "description",
      name: "description",
      content: article.value?.data.fields.description,
    },
  ],
});
</script>
<template>
  <article class="site-main">
    <header class="site-hero">
      <div class="wrapper">
        <h1 class="font-medium text-4xl">
          {{ article?.data.fields.name }}
        </h1>
        <p class="text-lg">
          {{ article?.data.fields.description }}
        </p>
      </div>
    </header>
    <div
      class="prose prose-xl max-w-4xl m-auto py-12"
      v-html="article?.data.fields.content"
    />
  </article>
</template>
Here, we render the markup sent from the article content field using the v-html directive. We also use the prose class to add default typography styling. With that, when we view an article, we should have something like this:
Awesome. Next, we’ll create our search page.
All we have to do in our search page is to make a request to /api/searchArticles and pass in the search query which will be obtained from the route using:
const route = useRoute();
const { query } = route.query;
To obtain the current page route and query, create a new file called ./pages/search.vue. In the <script>, we obtain the search query and make a request to get the results:
<!-- ./pages/search.vue -->
<script setup>
const route = useRoute();
// get `query` from route query
const { query } = route.query;
const { data: search } = await useAsyncData("search", async () => {
  const data = await $fetch(`/api/searchArticles?query=${query}`);
  return data;
});
useHead({
  title: `Search results for: ${query}`,
});
</script>
Then, in the same ./pages/search.vue file, in our template we render the article results:
<!-- ./pages/search.vue -->
<!-- ... -->
<template>
  <main class="site-main">
    <header class="site-hero">
      <div class="wrapper">
        <h1 class="font-medium text-4xl">Search results for: {{ query }}</h1>
        <Search />
      </div>
    </header>
    <section class="site-section articles-section">
      <div class="wrapper">
        <header class="section-header section-header">
          <h2 class="text-xl text-teal-800">Top Matches</h2>
        </header>
        <ul v-if="search.data" class="articles-list">
          <li
            v-for="article in search?.data"
            :key="article.slug"
            class="article-item"
          >
            <NuxtLink :to="`/articles/${article.slug}`">
              <div class="wrapper">
                <h3 class="font-medium text-teal-800 text-2xl capitalize mb-2">
                  {{ article.name }}
                </h3>
                <p class="text-lg">{{ article.fields.description }}</p>
              </div>
            </NuxtLink>
          </li>
        </ul>
        <span v-else>Oops... Nothing to see here</span>
      </div>
    </section>
  </main>
</template>
With that, we should have something like this:
Awesome.
Here, we've been able to build a search page by leveraging the Butter CMS search API. We take the query entered by the user, send a request to our Nuxt API route which then in turn, makes a secure request to the Butter CMS search API and returns a list of pages that matches our query.
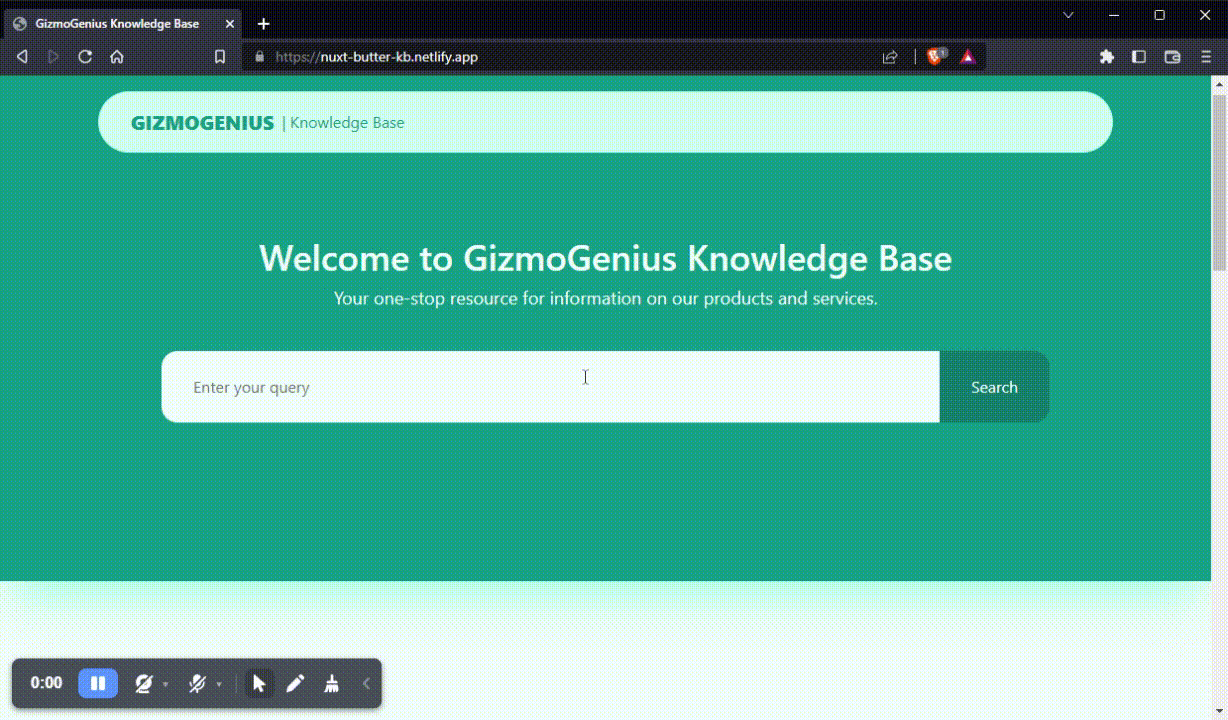
Finally, here if what our finished application should look like:
So far, we’ve been able to cover what a knowledge base is, its importance, and its benefits. We’ve also discussed the technologies we can use to build our own knowledge base: a headless CMS, Butter CMS, and a frontend framework, Nuxt. We also covered why both of them are great for building a knowledge base. Finally, we covered how we can set up ButterCMS and Nuxt to build our very own knowledge base with articles, categories, and FAQs. We were also able to add search functionality to our knowledge base.
Here are a few links I think you might find useful: