Table of contents
Introduction
In a world of ever-increasing content consumption, mobile devices play a critical role. While creating a product, companies need to develop applications for several platforms including Android, iOS, Web and occasionally, Windows, MacOS, and Linux. Managing data across platforms has more importance than ever today. As such, a single data storage solution for all platforms is the best way to go ahead instead of the developer nightmare that is setting up a solution for each platform. There are several options to consider for this and choosing the right one is not always black and white.
To fully understand the need and working of a Mobile Content Management System (CMS), we first need to understand the status quo in mobile app development regarding how data can be distributed to mobile clients.
Data flow and storage in a typical mobile application
Before we take a detailed look at CMS for a mobile app, it’s important to understand the various ways in which we can distribute data across platforms and acknowledge the qualities of each option. Data flow is an important characteristic of how an app and the underlying system works to present data to the user. Each option differs on cost, speed, flexibility, ease of use, ease of integration and the ideal use cases. There is no silver bullet for storing content and every option may be suitable for a certain type of application.
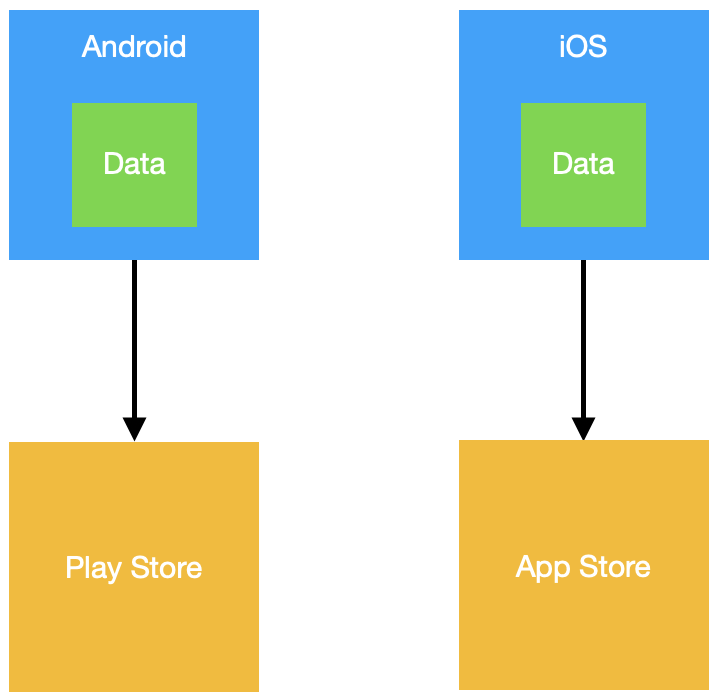
Option 1: Store data locally (On-device)
The first and most basic option to distribute content in mobile applications is simply to package the data in the application itself and push it to the respective app store. There is no central store of data, the device has all the data it always needs. There is no data flow as such and the device simply holds on to the data regardless of size and offers no capacity for change.
This option has little merit compared to its various disadvantages.
Ideally, this should only be used when the data in the app rarely needs to be changed. Data can be accessed instantly as it is stored on-disk. The other advantage of this system is that no backend is needed to store data in the app.
This is where the pitfalls begin. Most apps have constantly changing data: social media platforms, blogs, messaging, pretty much all kinds of applications apart from utilities need a stream of data flowing to them. If data inside the app needs to be changed, the application needs to be shipped to the respective app stores again and sent as an update to the users. The size of data also needs to be minimal as any data added affects the app size and users may not prefer to download a large app over data or storage concerns. This is tedious to both developers and users and impractical to use for a lot of apps.
An example of such an app would be a dictionary mobile app assuming it does not need to be updated very often. Apps such as utilities may also employ this model.
Option 2: Build your own backend
The best way to avoid shipping multiple updates to an app is to centralise the app data to a server and pull data to the device instead of storing it there. For this, one solution is to build a custom backend for the platforms. The custom backend supplies data to the devices and can be built according to spec.
It works something like this:
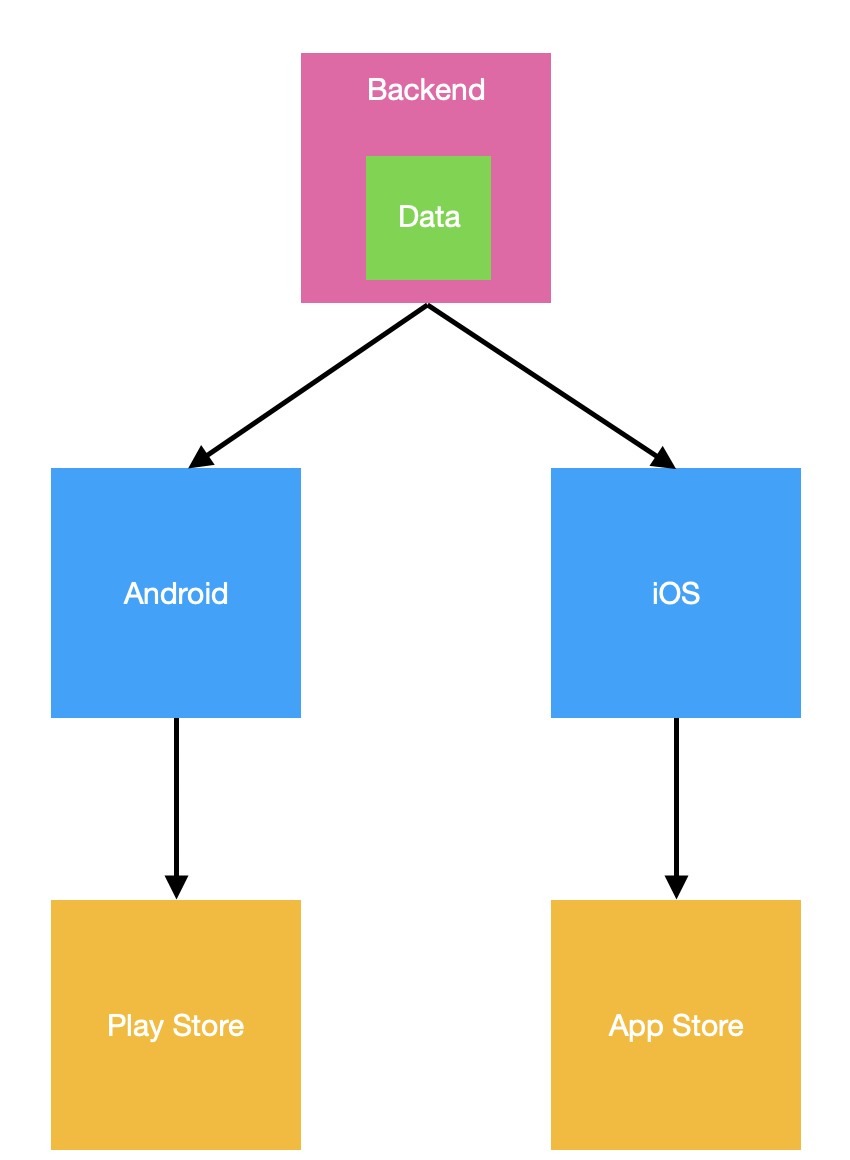
In this approach, the data is stored in the backend and when needed, pulled and/or cached onto the device allowing dynamic data flow between platforms. This also allows communication between platforms as data is stored centrally and not bounded by any system.
Building a backend gives developers fine-grained control, at the same time, increasing setup complexity, developer cost and time (since fine-tuning is required) making it infeasible for several types of applications and companies.
As this option offers a lot of flexibility, a variety of applications can be built with it notwithstanding the extra cost associated with it.
Option 3: BaaS (Backend-As-A-Service)
A Mobile BaaS offers a variety of services along with databases and are good solutions for developers not wanting to build their own backend for their mobile apps. It also takes care of most of the setup required and scales according to use without the developer intervening. BaaS provides most backend setup out-of-the-box and therefore reduces the work required by the developer for the backend allowing more focus on the front-end.
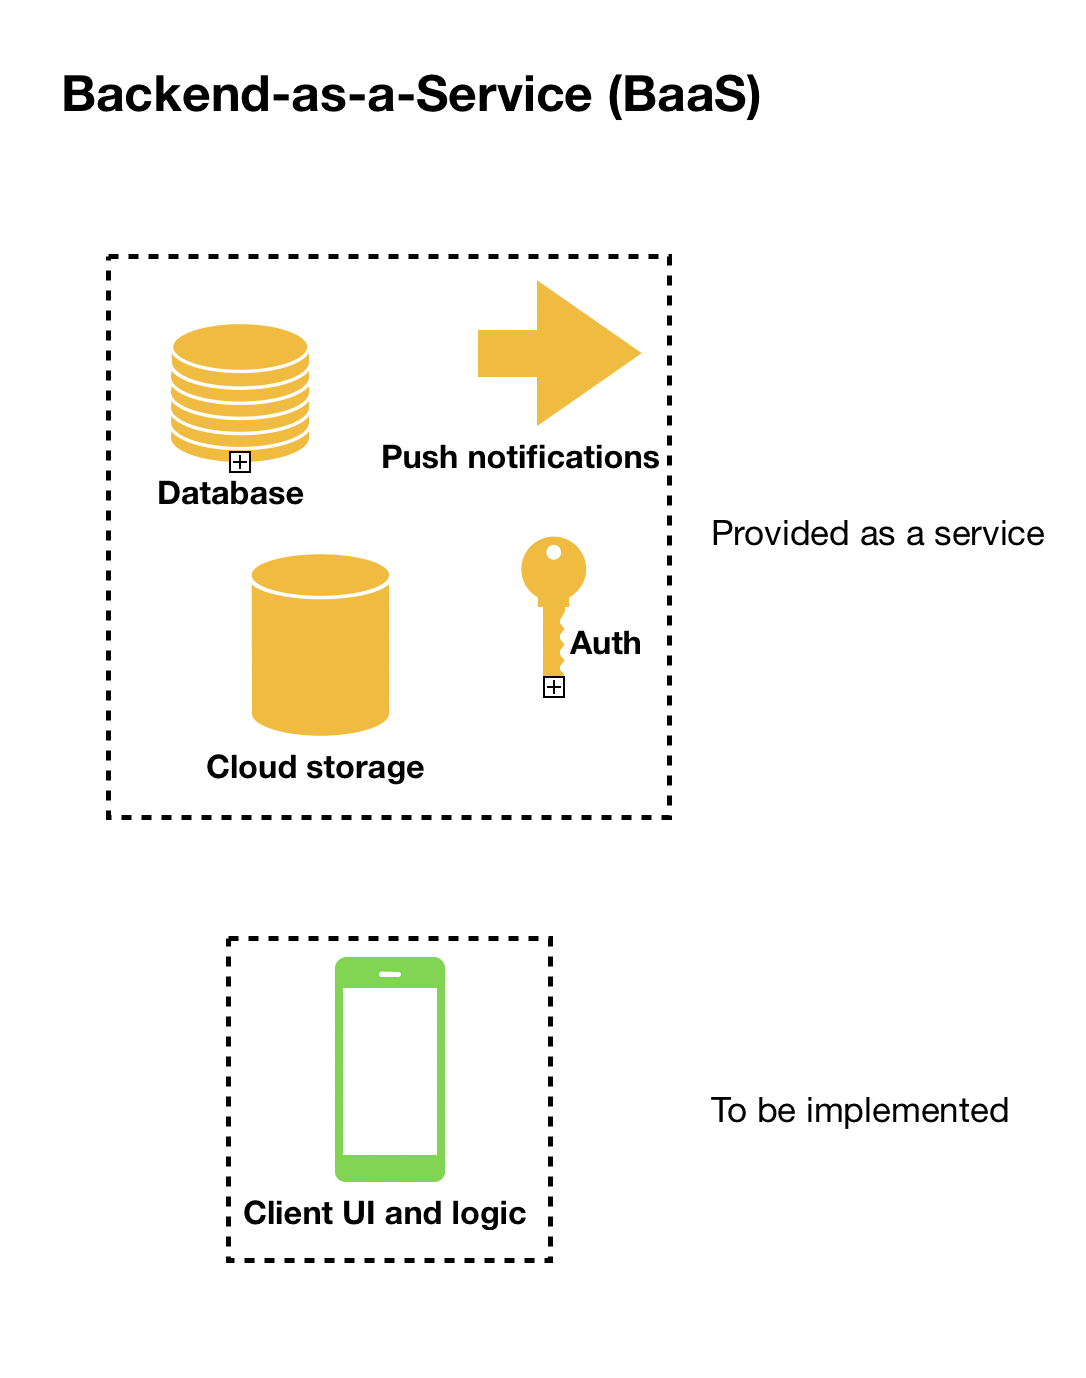
The compromises come when the ease-of-use of non-technical users is considered. A Mobile BaaS is mostly developer-first and not easy to use for content creators. In addition to this, some flexibility is lost in the process compared to custom backends as the services used in it can rarely be customized. They also do not fare well when handling content heavy data. For this reason, the ideal use case for this is when there are few non-technical users editing the content.
What is Mobile CMS?
A Mobile Content Management System (CMS) is a centralized data store that allows managing content for multiple platforms. A Mobile CMS is often used as a backend for mobile applications and delivers content to several platforms at once from a common data store.
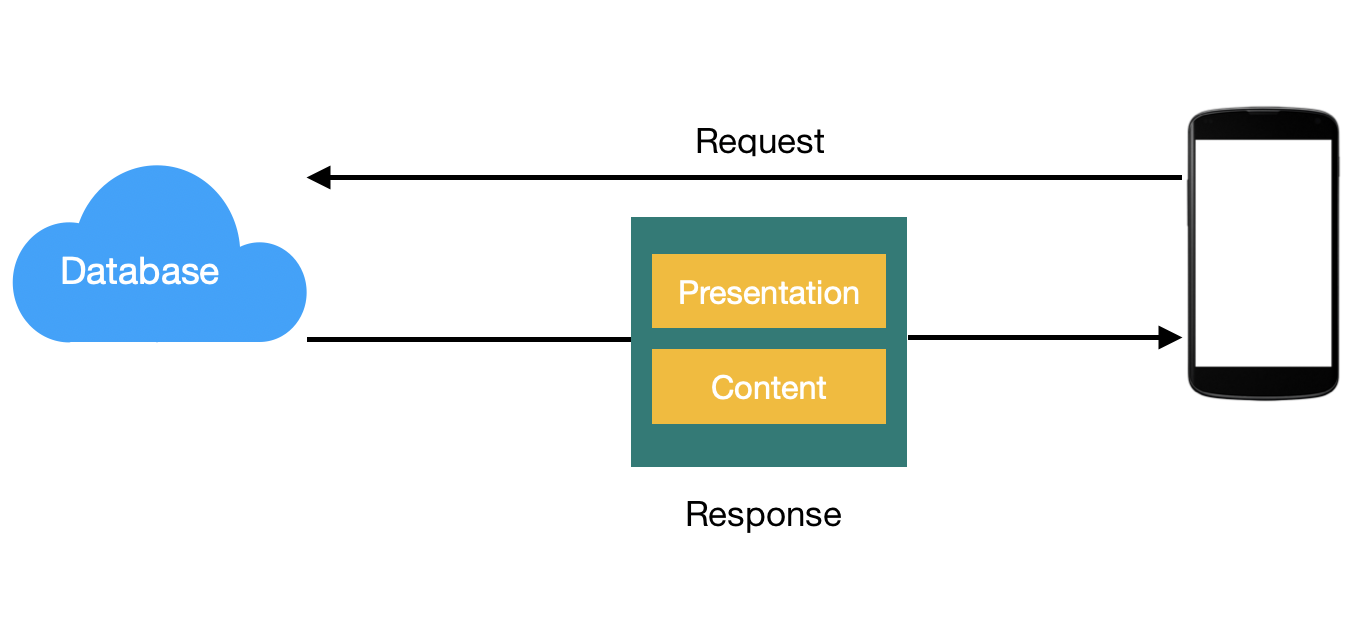
Mobile CMS can deliver two types of information to your mobile app: content and presentation. Presentation directly supplies directives for building the look and feel of the content, for example, supplying HTML directly. In the mobile world however, different platforms adopt separate styling and design choices, fonts, colors, etc. Therefore, the presentation part of the response is often unnecessary.
Advantages of a Mobile CMS
- A Mobile CMS allows the content of mobile applications to be stored in the cloud and lets platforms dynamically load data into their applications. Mobile CMSes are much faster to set up than traditional backends and often easier to use as well. They allow non-technical users to add and modify content without writing code.
- A Mobile CMS also allows changes to content without reshipping applications or building and setting up expensive backends for a product.
- It also gives the developer autonomy over the way content is treated on the client side by using decoupled or Headless CMS. We will go into more detail about Headless CMS in a bit.
How an API-first Mobile CMS works
An API-first Mobile CMS stores data on an online database and then exposes it via API endpoints to fetch different categories of content. The mobile app would make an API call to fetch a specific item in the collection of data (or maybe query the collection itself) and then display it to the platform’s needs.
Diagrammatically, it can be represented as:
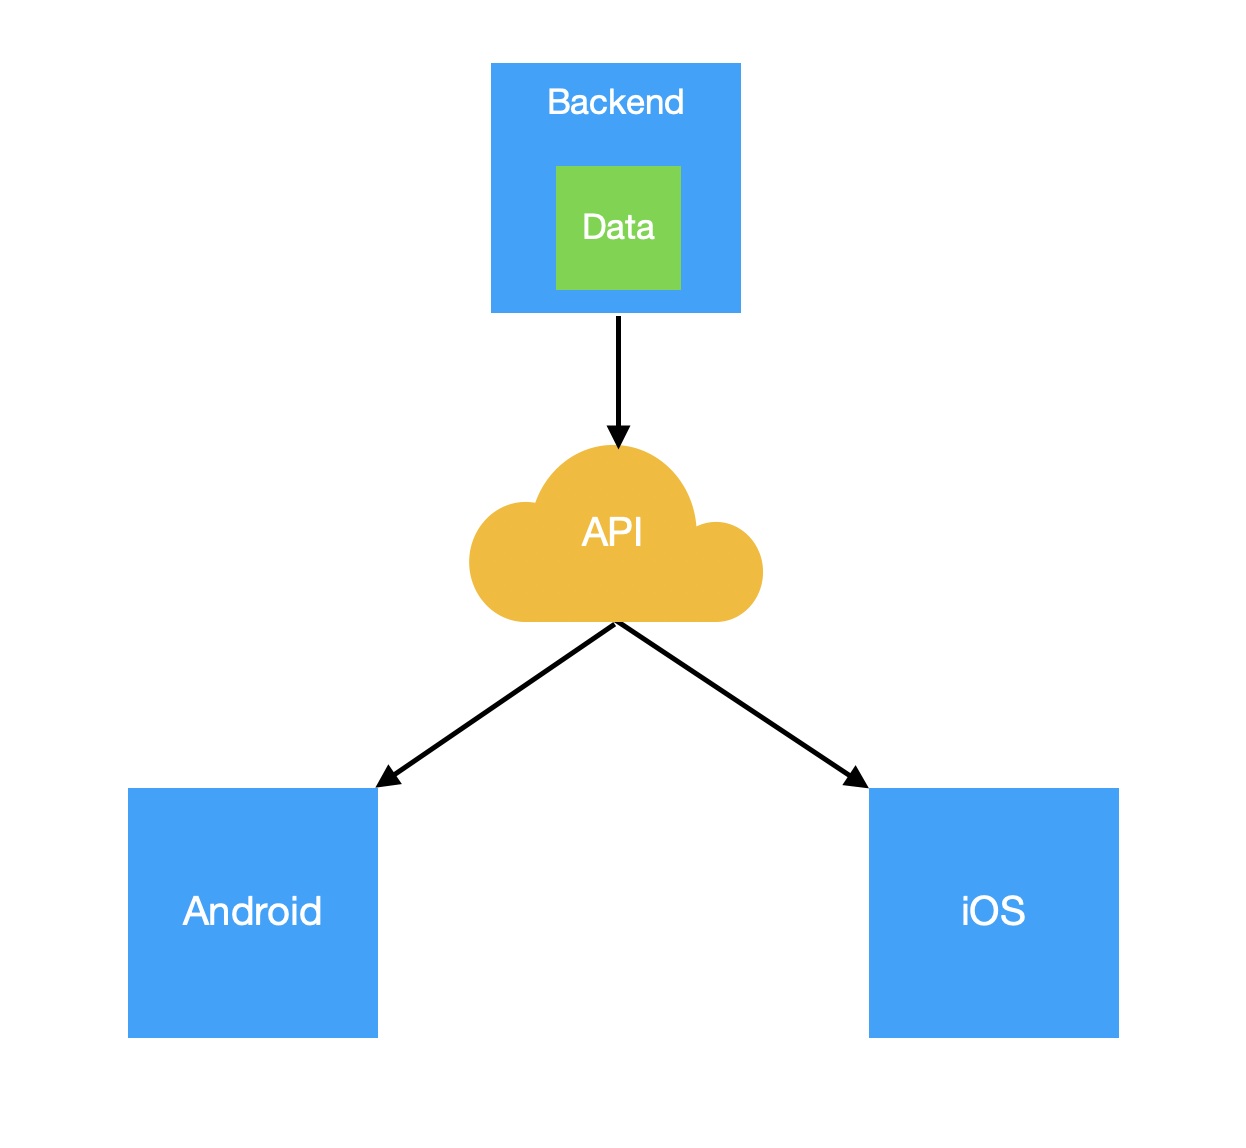
Since data is fetched from an API directly, we can integrate the backend with any platform using HTTP calls. This makes the CMS extensible and works without having a custom SDK built for that specific platform.
Headless Mobile CMS
In this context, it is important to know about Headless CMS for your mobile app.
A Headless CMS cuts off the presentation part of the API response (hence, HEADless) and only gives us the important content that we need on the mobile application so that the mobile application can decide the way it needs to display it to feel native to the device platform and not just follow instructions from the CMS itself. This not only reduces the code required to be sent to the device but also reduces the work required on the server-side since the presentation is no longer handled by it.
With our concepts set, let’s try to create an actual Mobile CMS and the mobile implementation of it.
Let’s create our own Mobile CMS solution
This section will focus on setting up your own Mobile CMS using Butter and how to get it running on multiple mobile platforms. A hands-on approach is always better than just theory.
Introduction to ButterCMS as a Mobile CMS solution
Butter is an API-first Headless CMS that fits our purpose perfectly. We can use Butter APIs to fetch and update content in all platforms, fast. Unlike other systems, Butter requires very minimal setup from the developer end and is user-friendly enough for non-technical people to use as well. In the following examples, we will be integrating Butter with Flutter, Google’s mobile cross-platform SDK. We could have just as easily done this tutorial with React Native. We've also written a helpful guide on Flutter vs React Native to help you can make the right choice for your specific project and experience. You could also check out Ionic Framework.
Even if you don’t know or use Flutter, the working code is API based and the concepts should stay the same between platforms.
How to set up your Mobile CMS
Butter offers a no-hassle setup from sign-up to using your content in a mobile application.
First up, sign in to see the Butter home page.
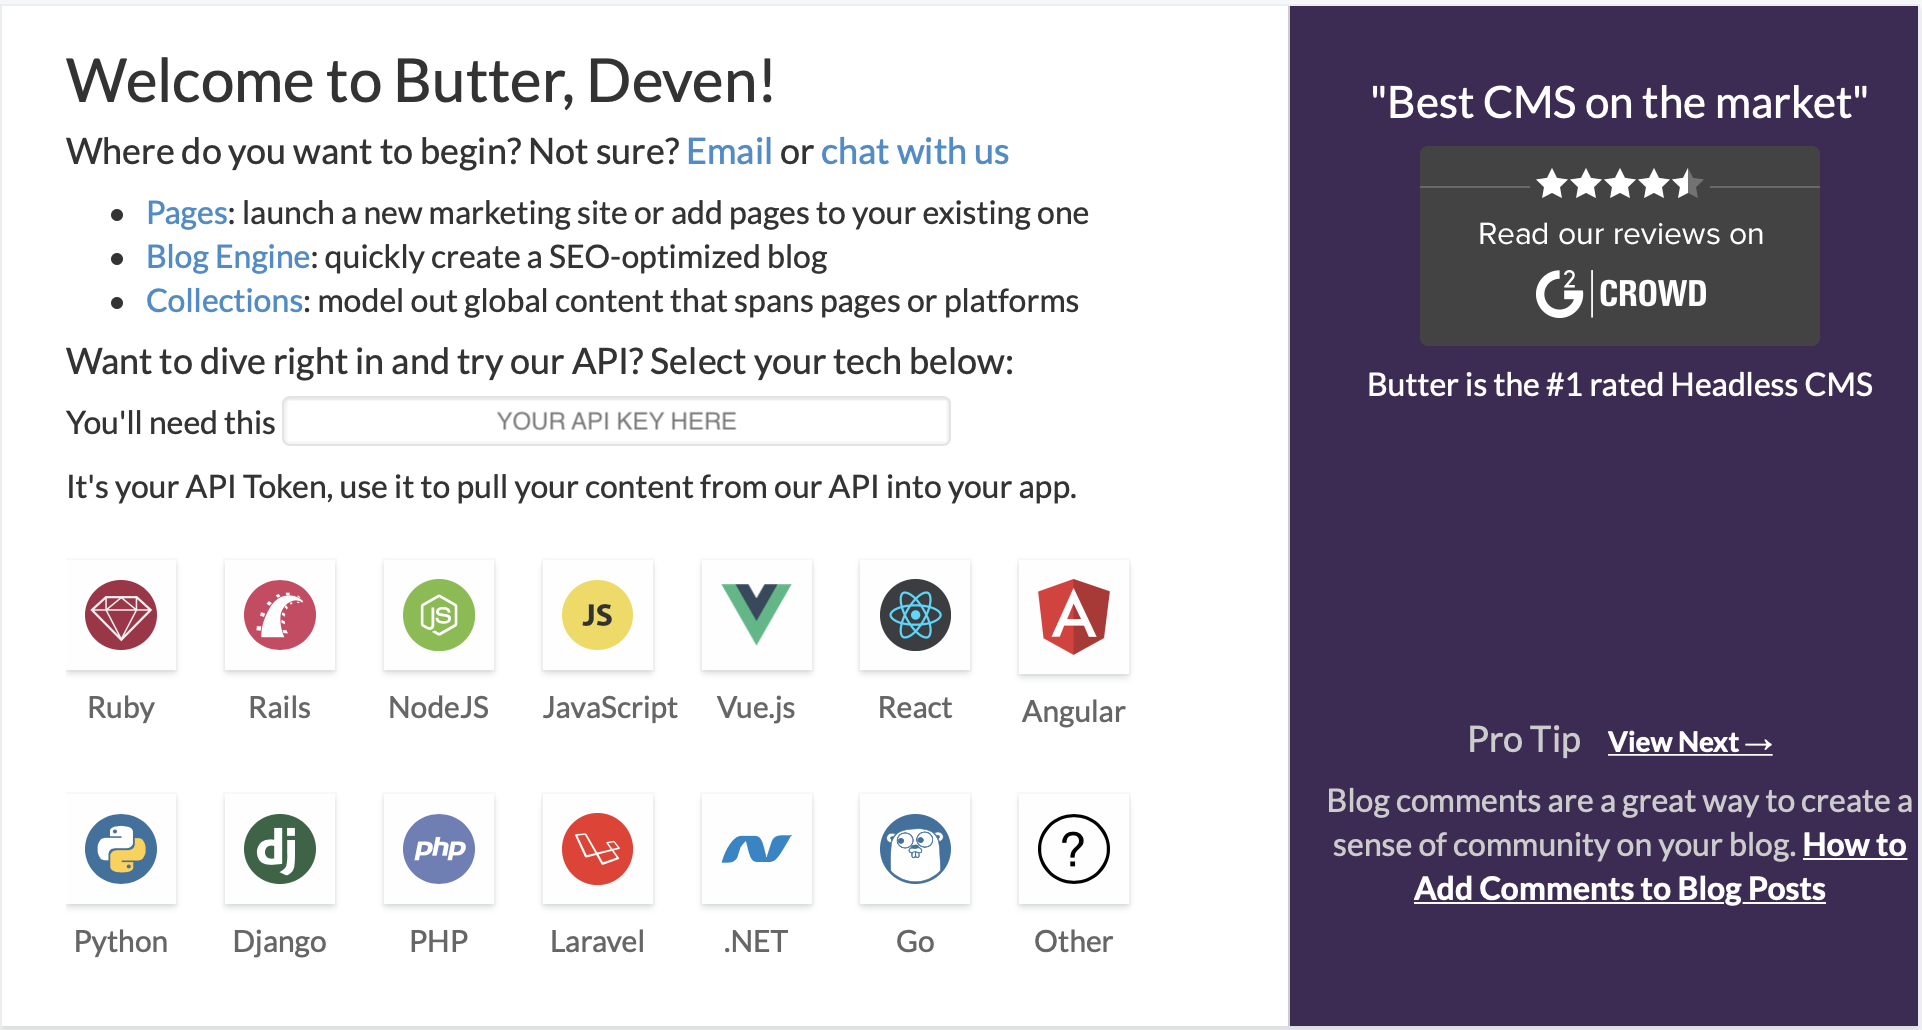
The main thing to note here is the API key. This will be needed to access all data from your mobile clients.
For a Mobile CMS, Blog Engine and Collections can be useful to set up your own blogs or data collections respectively.
One of the great things about Butter is that there’s no extra setup required between first logging in and starting to enter data and working with Butter APIs.
First, we will add some data to our system to use it in our mobile applications.
Adding data to Mobile CMS
For this example, we are going to store a list of books and retrieve them from the client side. We can use Collections in Butter for this purpose.
Collections are ordered tables of similar items that can be queried via an API. Collections also offer an easy interface to modify content for any kind of user regardless of technical background.
First, we go to the Collections tab on the menu:
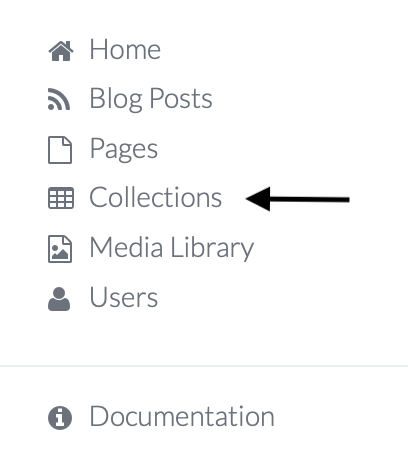
At the moment, we have no collections in our database.
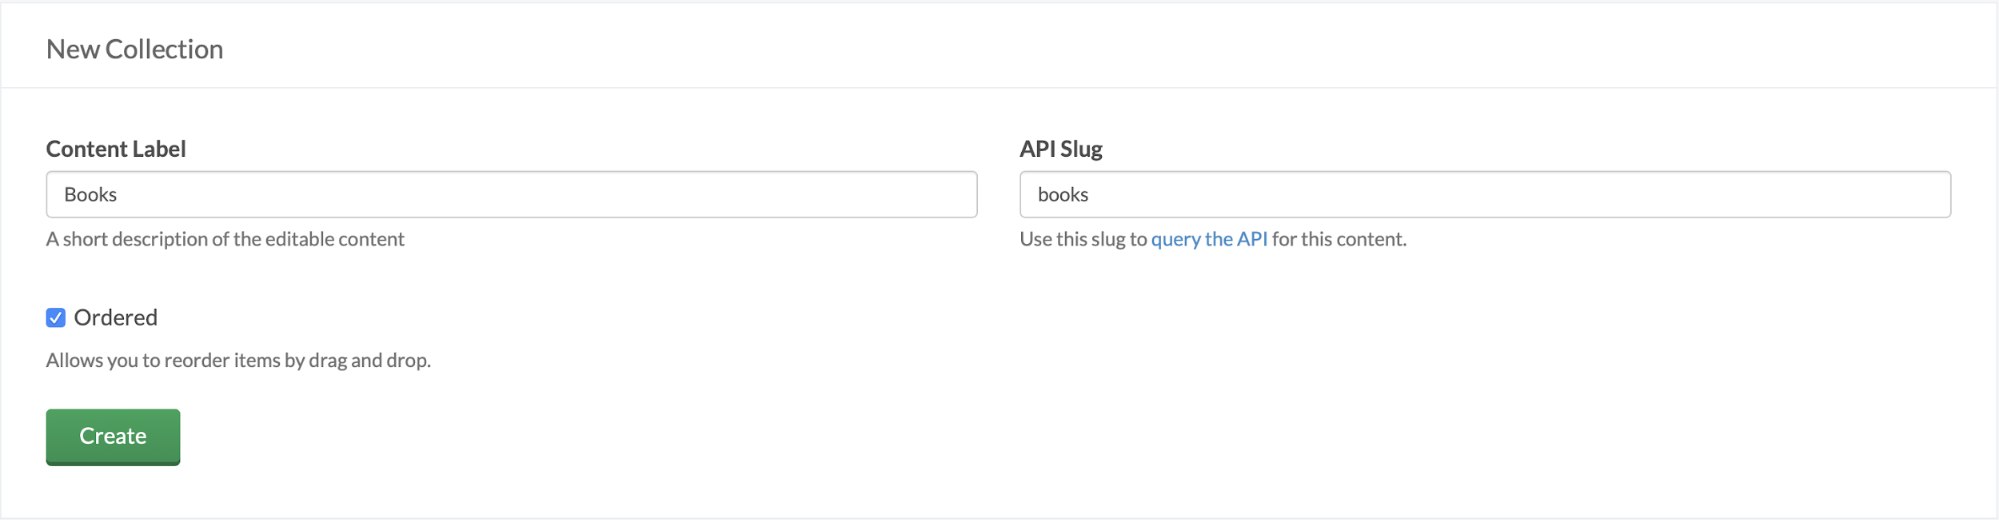
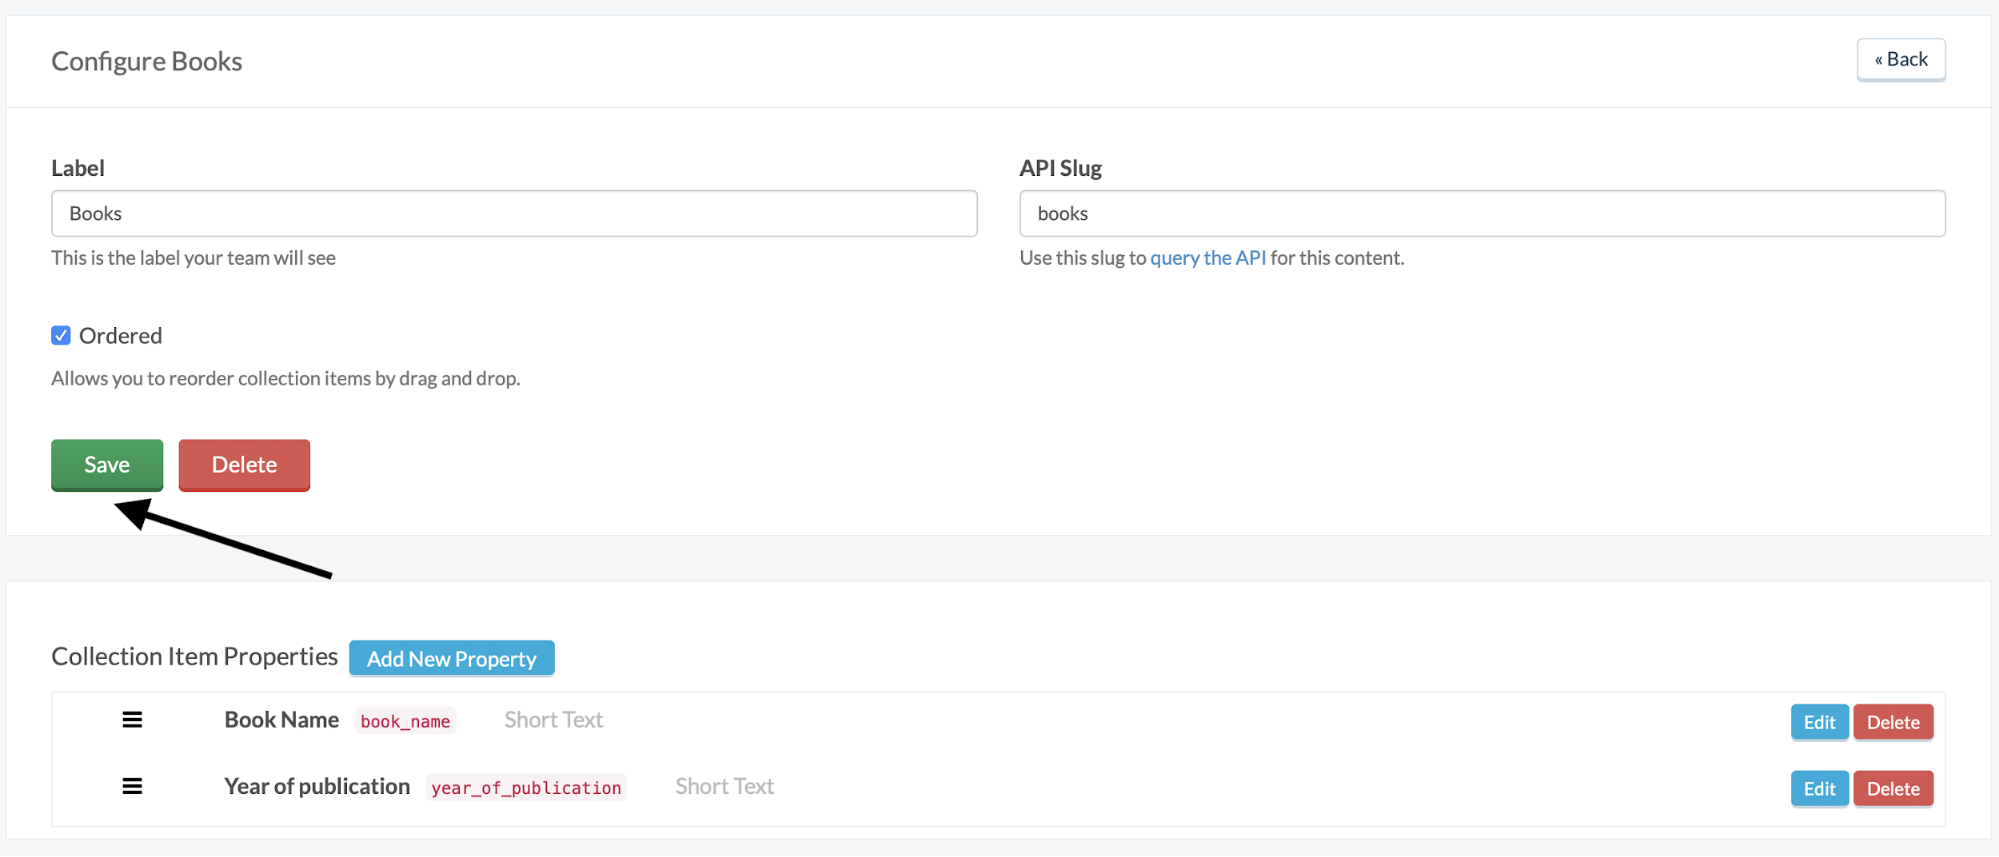
Since we want to store books in our database, we will create a ‘Books’ collection which stores the book name and year of publication.
First, click the “New Collection” button to get started.

We give our collection a label and make it an ordered collection. After this, we can simply create the collection. The API slug mentioned here is simply the name with which the API will refer to the collection.
Now that the Collection is created, we can define properties for this collection. A property defines some kind of characteristic about objects in the collection. Since our object here is a book, our properties can be the book name and year of publication. In addition, you can also add ISBN code, rating, etc. to the book.

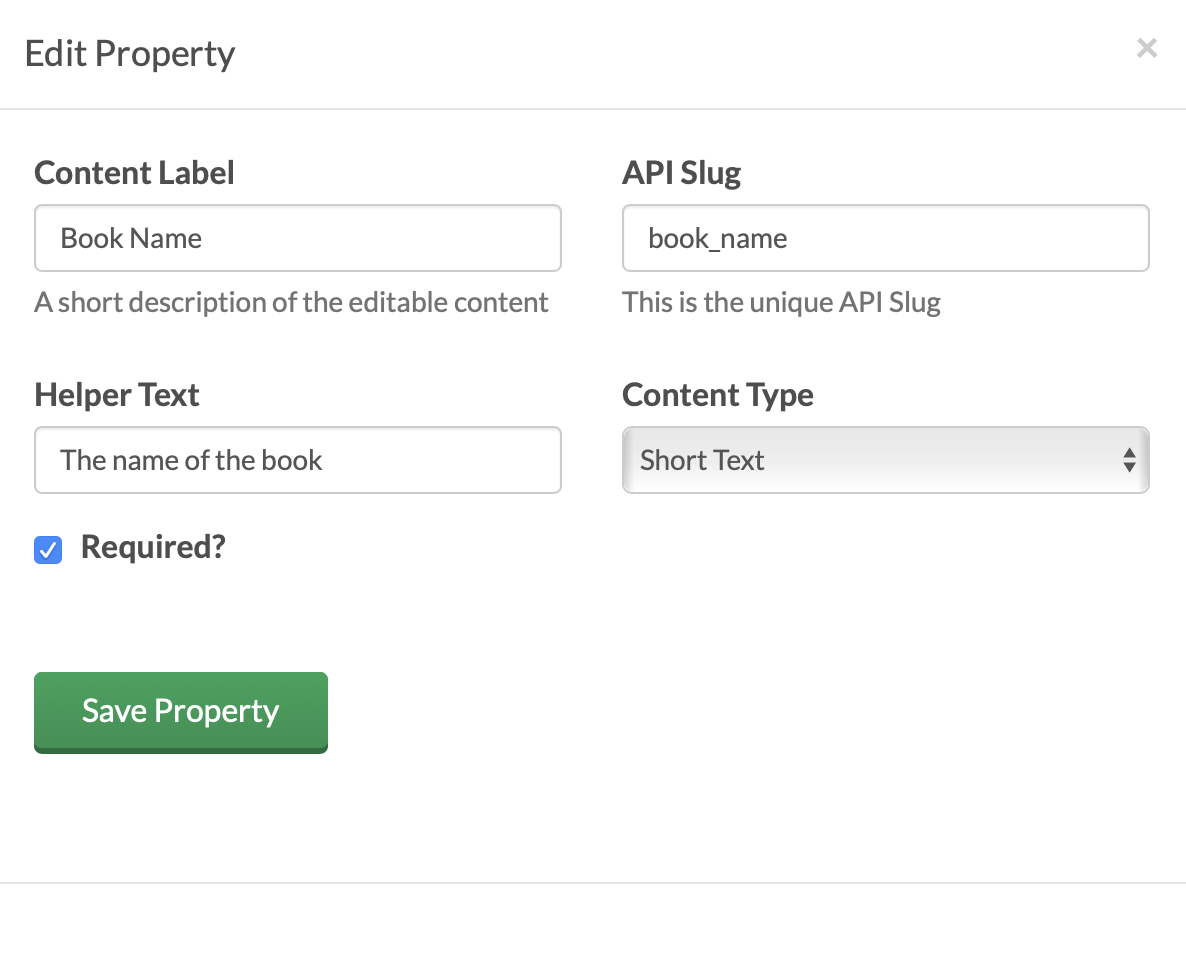
We can set the data type to ‘Short Text’ but Butter offers several data types including HTML, Date and more.
The ‘required’ field makes it compulsory for that specific field to be filled when a new object is added.
We set the field to required as we don’t want a book without a name. We can do a similar process with the year of publication.
We now have our fields set up and we can save our collection.
Once saved, go back to the Collections tab where we can enter a few fields for us to display on our clients.
We can add a few entries to the Collection using the “Add to Books” button.
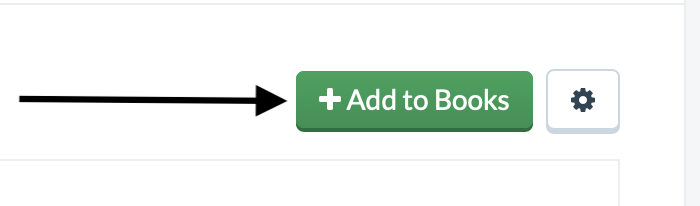
Fill the two fields with books of your choice.
Our final ‘Books’ collection state looks like this:

We are now done with the addition of data into the system and the next section will focus on the integration of Butter APIs with Flutter and retrieving data into the mobile app.
Integrating Butter with Flutter
(TL;DR: Show me the code)
In this example, we will integrate Butter with Flutter, Google’s cross-platform mobile SDK.
As the end-point, we will display the list of books in our app and then add a book from the client side of the user’s choice.
1. Create Flutter project
First, create a new Flutter project from Android Studio:
File -> New Flutter Project -> Flutter Application
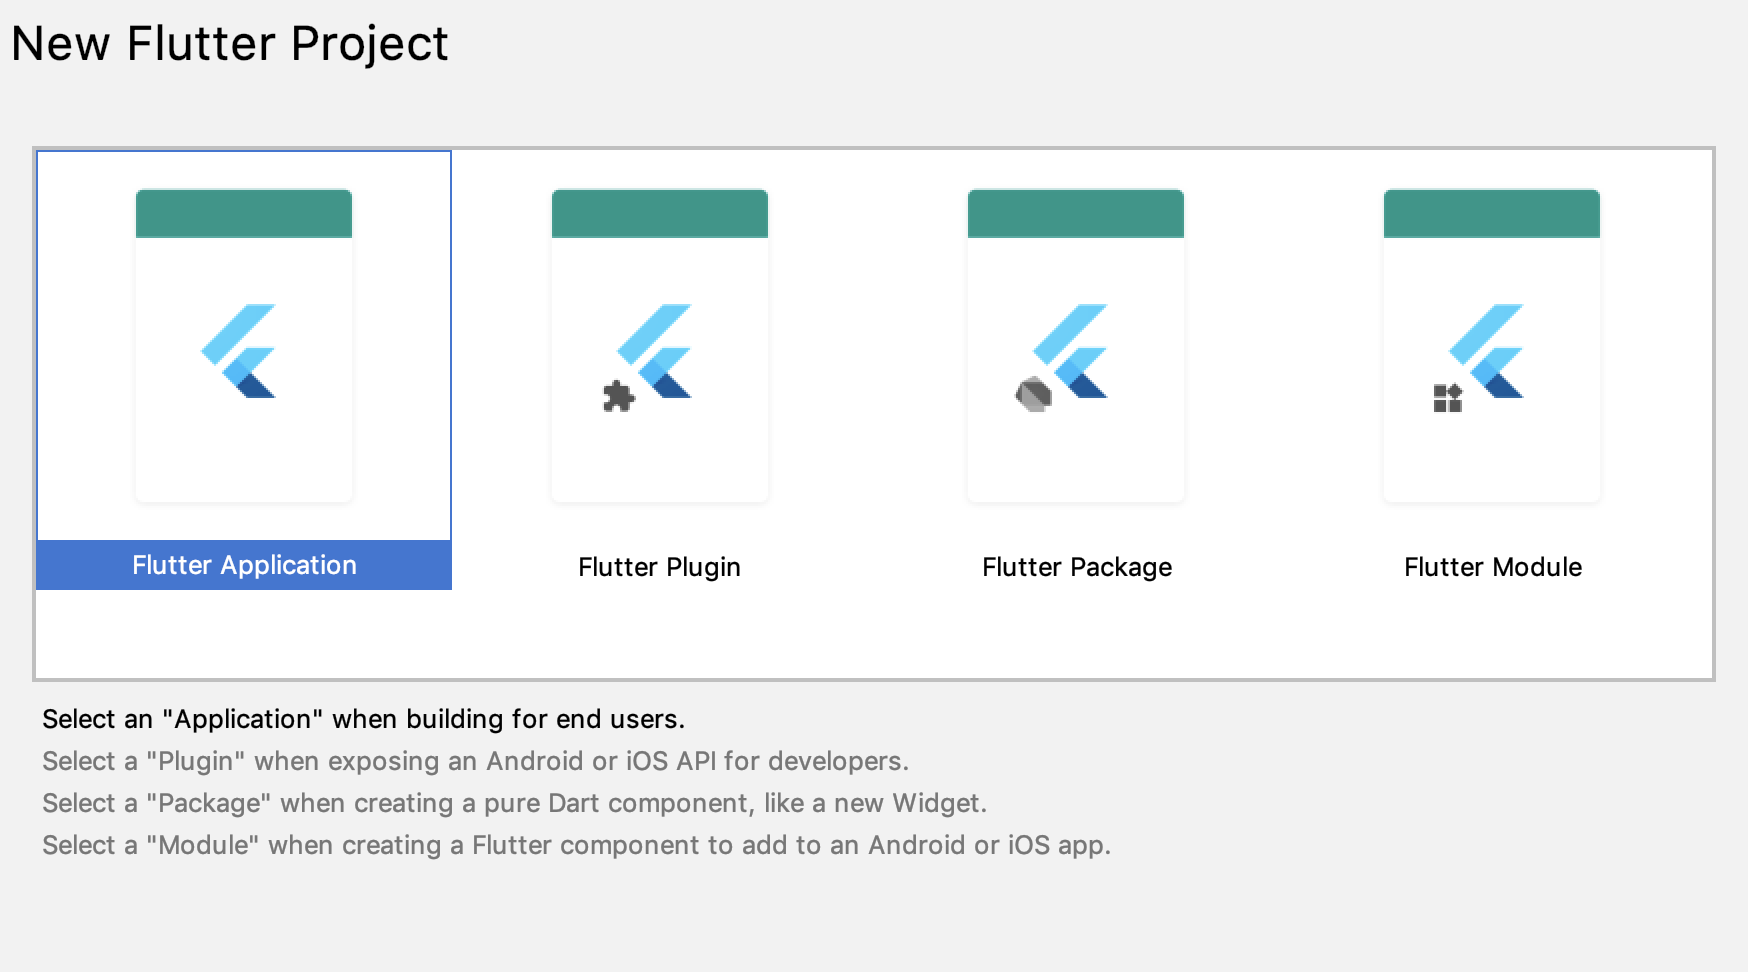
Let everything else be set to its default values and click Finish.
2. Create JSON model
The Butter content API once queried returns a JSON response in this format:
<span style="font-weight: 400;">{</span><span style="font-weight: 400;">
</span><span style="font-weight: 400;">    "data": {</span><span style="font-weight: 400;">
</span><span style="font-weight: 400;">        "books": [{</span><span style="font-weight: 400;">
</span><span style="font-weight: 400;">            "book_name": </span><span style="font-weight: 400;">"A Brief History Of Time"</span><span style="font-weight: 400;">,</span><span style="font-weight: 400;">
</span><span style="font-weight: 400;">            "year_of_publication": </span><span style="font-weight: 400;">"1988"</span><span style="font-weight: 400;">
</span><span style="font-weight: 400;">        }, {</span><span style="font-weight: 400;">
</span><span style="font-weight: 400;">            "book_name": </span><span style="font-weight: 400;">"The Selfish Gene"</span><span style="font-weight: 400;">,</span><span style="font-weight: 400;">
</span><span style="font-weight: 400;">            "year_of_publication": </span><span style="font-weight: 400;">"1976"</span><span style="font-weight: 400;">
</span><span style="font-weight: 400;">        }, {</span><span style="font-weight: 400;">
</span><span style="font-weight: 400;">            "book_name": </span><span style="font-weight: 400;">"On The Origin Of Species"</span><span style="font-weight: 400;">,</span><span style="font-weight: 400;">
</span><span style="font-weight: 400;">            "year_of_publication": </span><span style="font-weight: 400;">"1859"</span><span style="font-weight: 400;">
</span><span style="font-weight: 400;">        }]</span><span style="font-weight: 400;">
</span><span style="font-weight: 400;">    }</span><span style="font-weight: 400;">
</span><span style="font-weight: 400;">}</span>
We need to construct a model class for encoding, decoding and storing the values retrieved by the API.
I recommend using QuickType for saving time on manually making a class for it. QuickType automatically generates JSON model classes as well as utility functions by simply pasting the example JSON response.
Our model class looks something like this:
// To parse this JSON data, do
//
//     final bookData = bookDataFromJson(jsonString);

import 'dart:convert';

BookData bookDataFromJson(String str) => BookData.fromJson(json.decode(str));

String bookDataToJson(BookData data) => json.encode(data.toJson());

class BookData {
 Data data;

 BookData({
   this.data,
 });

 factory BookData.fromJson(Map<String, dynamic> json) => new BookData(
   data: Data.fromJson(json["data"]),
 );

 Map<String, dynamic> toJson() => {
   "data": data.toJson(),
 };
}

class Data {
 List<Book> books;

 Data({
   this.books,
 });

 factory Data.fromJson(Map<String, dynamic> json) => new Data(
   books: new List<Book>.from(json["books"].map((x) => Book.fromJson(x))),
 );

 Map<String, dynamic> toJson() => {
   "books": new List<dynamic>.from(books.map((x) => x.toJson())),
 };
}

class Book {
 String bookName;
 String yearOfPublication;

 Book({
   this.bookName,
   this.yearOfPublication,
 });

 factory Book.fromJson(Map<String, dynamic> json) => new Book(
   bookName: json["book_name"],
   yearOfPublication: json["year_of_publication"],
 );

 Map<String, dynamic> toJson() => {
   "book_name": bookName,
   "year_of_publication": yearOfPublication,
 };
}
It includes the normal data structures to store the data once retrieved as well as utilities to parse and encode JSON.
All we need to do now is get data from our API.
3. Get data from API
Now that we have our model ready, we can retrieve our book information from the API.
To get data from a Collection called Books,
our API call would be:
GET https://api.buttercms.com/v2/content/?keys=books&auth_token=YOUR_API_KEYHence, we can write a simple Dart function to retrieve it:
Future<BookData> _getBooks() async {
 String baseUrl = "https://api.buttercms.com/v2/content/?keys=";
 String collection = "books";

 //TODO: ENTER API KEY HERE
 String authToken = "";

 if(authToken == "") {
   print("EMPTY API KEY. Please paste API key from ButterCMS console.");
 }

 Response response =
     await get(baseUrl + collection + "&auth_token=" + authToken);
 return bookDataFromJson(response.body);
}
This function uses an HTTP GET call and once complete returns a BookData object that we created earlier. We return a Future<BookData> since we need to wait for the asynchronous call to complete and cannot just return a BookData object.
And finally, to display the list, we can use a ListView.builder to display our books list:
//Outside build()
BookData bookdata;


//Inside build()
ListView.builder(
   itemBuilder: (context, position) {
     return ListTile(
       leading: Icon(Icons.book),
       title: Text(bookData.data.books[position].bookName),
     );
   },
   itemCount: bookData.data.books.length,
 )
This code builds a list of ListTiles and populates them with our result fields.
After we run our code, we get:
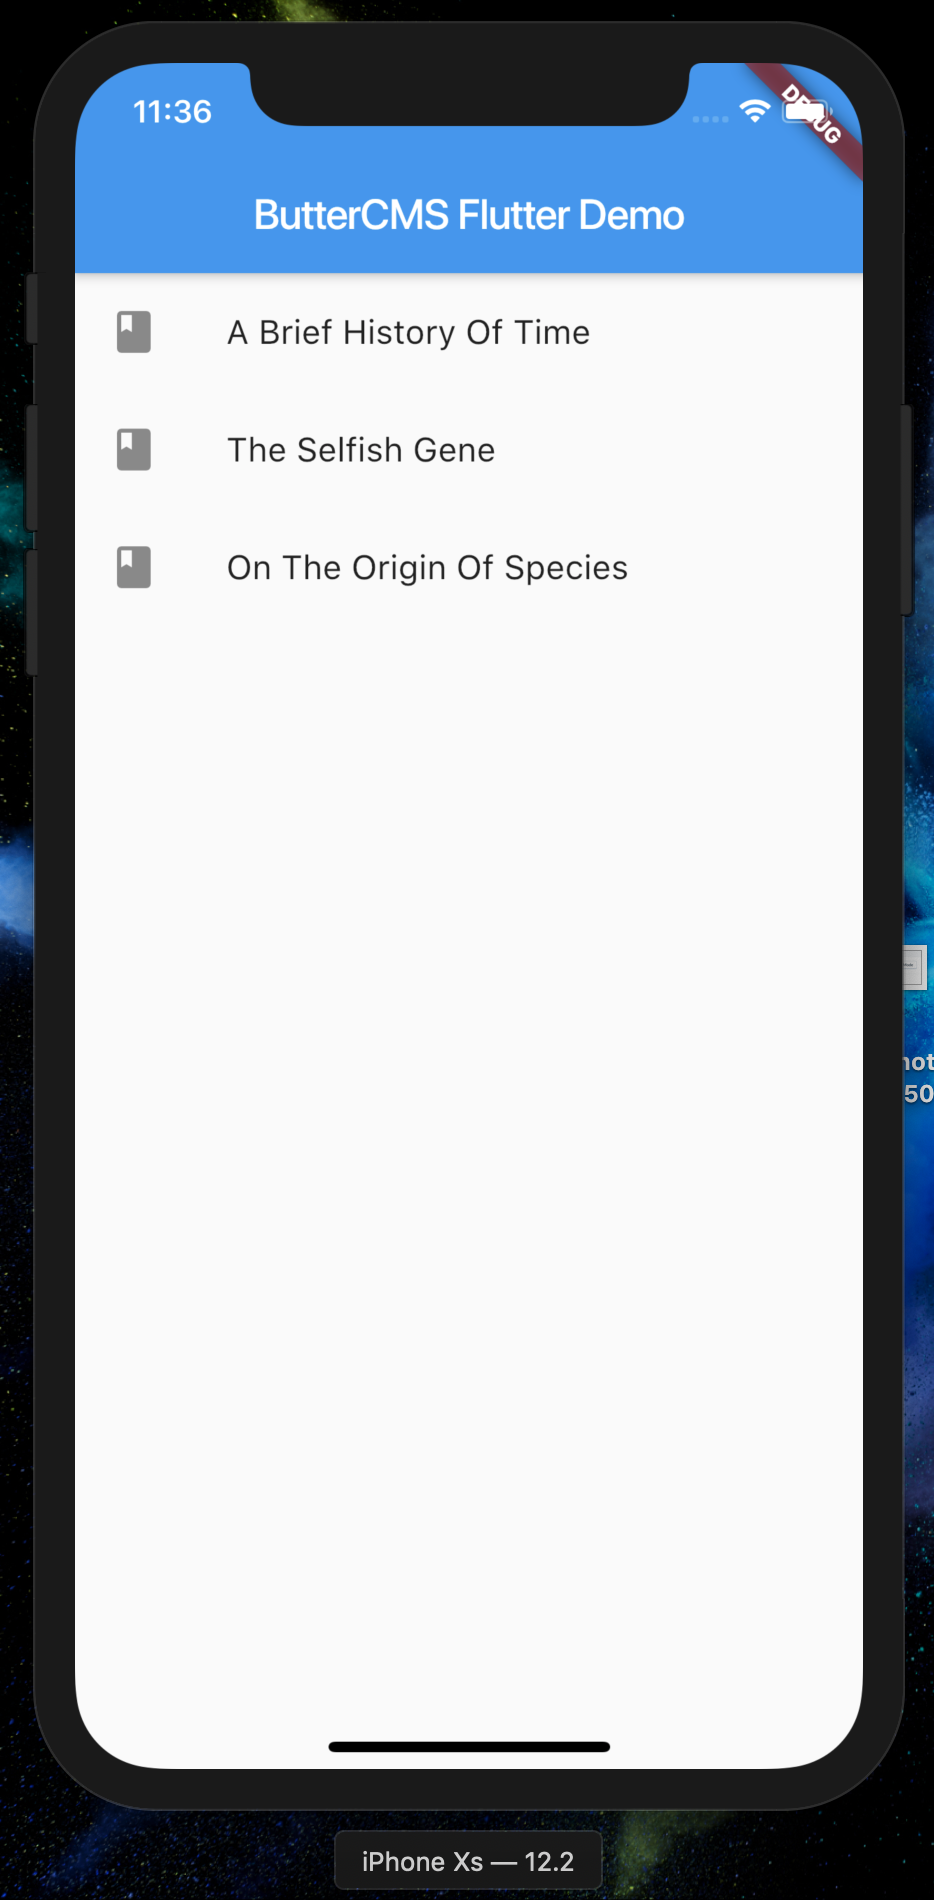
The API data is now retrieved.
Since the integration is API based, the steps are similar for any platform including Android or iOS, the only difference being language and ways to make HTTP calls.
The code above handles getting data, but often users may add collection items of their own. For this, the next section handles updating the collection from the device side.
Administration of Content via the CMS
Often, we may need to add books from the device instead of from a console. We can use the Write API for uploading our book. For this, Butter provides a POST request to add a new item to the collection.
Note that this POST request requires a different WRITE KEY that you can get from Butter support. Try to keep this key secure as it can be used to write to your database.
This is the format of the request:
curl -X POST \
  https://api.buttercms.com/v2/posts/ \
  -H 'Authorization: Token your_write_api_token' \
  -H 'Content-Type: application/json' \
  -d '{
    "key": "collection_api_slug",
    "status": "published",
    "fields": [
        {
          "field1_key": "Field value",
          "field2_key": "Field value"
        },
        ...
    ]
}'
We need to send collection items in the body. Therefore, for the body, we will construct a JSON model class to make it easier.
1. Create JSON model
We can make a JSON object for the required POST request body:
// To parse this JSON data, do
//
//     final bookPostBody = bookPostBodyFromJson(jsonString);

import 'dart:convert';

BookPostBody bookPostBodyFromJson(String str) => BookPostBody.fromJson(json.decode(str));

String bookPostBodyToJson(BookPostBody data) => json.encode(data.toJson());

class BookPostBody {
 String key;
 String status;
 List<Field> fields;

 BookPostBody({
   this.key,
   this.status,
   this.fields,
 });

 factory BookPostBody.fromJson(Map<String, dynamic> json) => new BookPostBody(
   key: json["key"],
   status: json["status"],
   fields: new List<Field>.from(json["fields"].map((x) => Field.fromJson(x))),
 );

 Map<String, dynamic> toJson() => {
   "key": key,
   "status": status,
   "fields": new List<dynamic>.from(fields.map((x) => x.toJson())),
 };
}

class Field {
 String field1Key;
 String field2Key;

 Field({
   this.field1Key,
   this.field2Key,
 });

 factory Field.fromJson(Map<String, dynamic> json) => new Field(
   field1Key: json["field1_key"],
   field2Key: json["field2_key"],
 );

 Map<String, dynamic> toJson() => {
   "field1_key": field1Key,
   "field2_key": field2Key,
 };
}
2. Accept fields and upload values
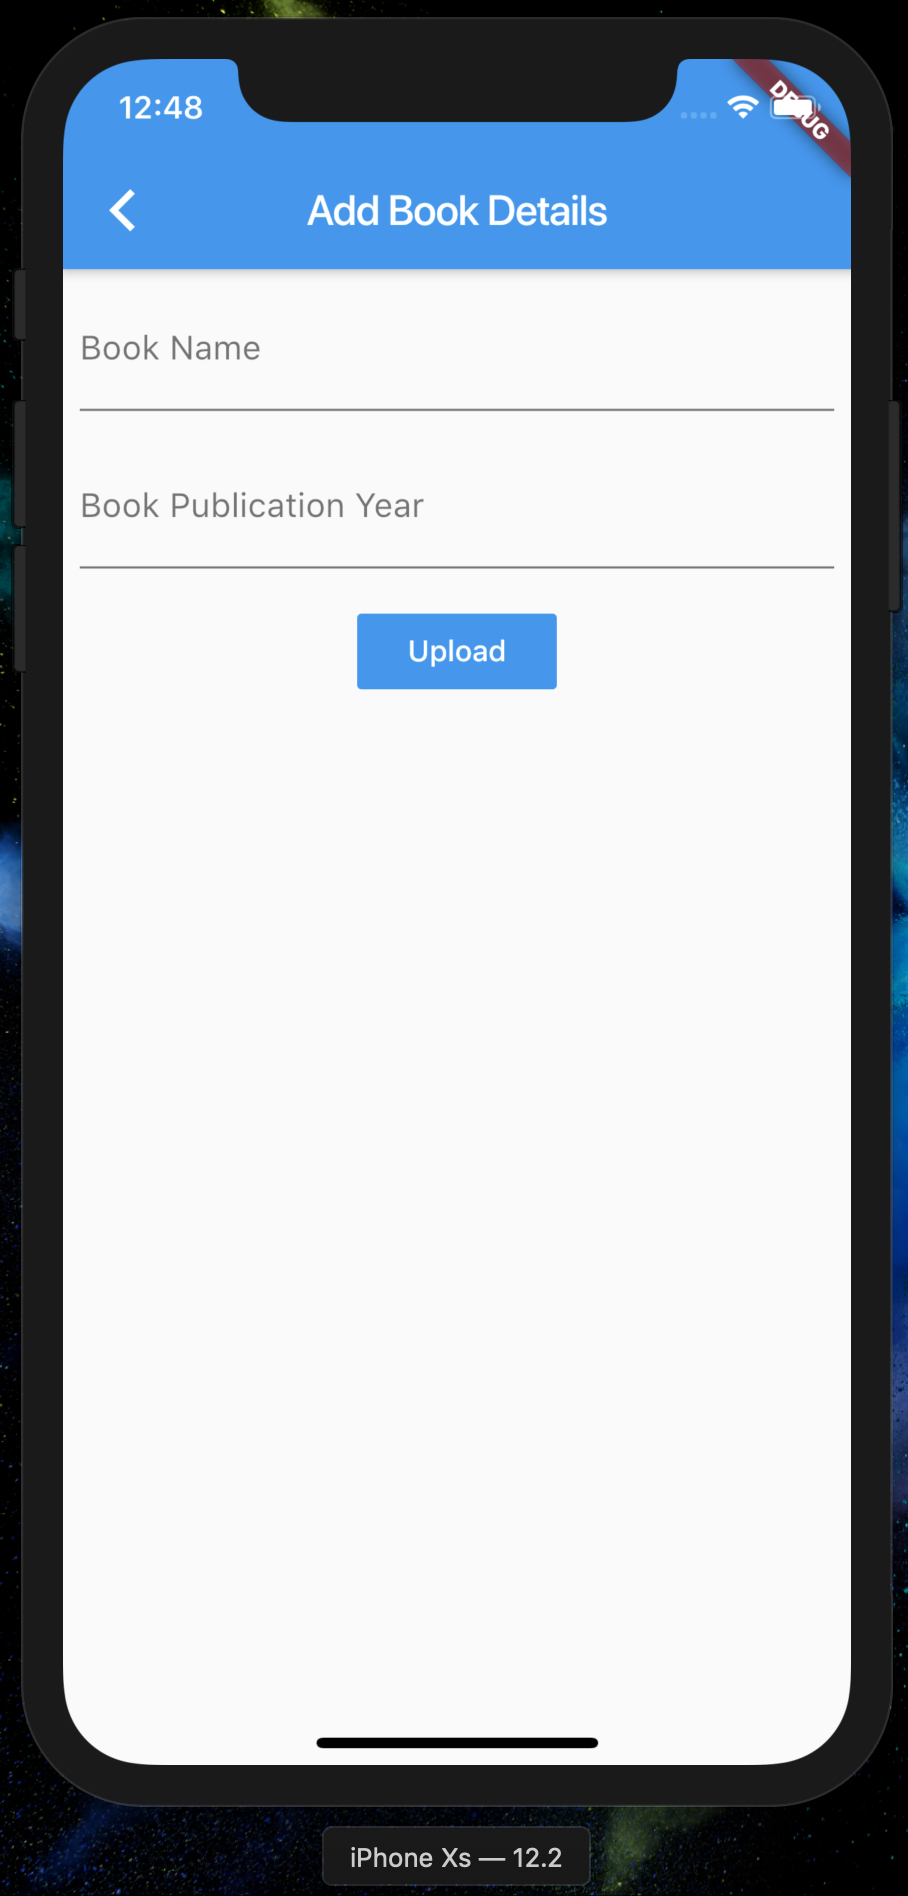
We need to accept fields from the user and then upload them to the Books Collection. For this, we will construct a simple UI consisting of two TextFields and a Button to upload the items.
// Outside build()
TextEditingController nameController = TextEditingController();
TextEditingController yearController = TextEditingController();


// Inside build()
Column(
 children: <Widget>[
   Padding(
     padding: const EdgeInsets.all(8.0),
     child: TextField(
       controller: nameController,
       decoration: InputDecoration(labelText: "Book Name"),
     ),
   ),
   Padding(
     padding: const EdgeInsets.all(8.0),
     child: TextField(
       controller: yearController,
       decoration: InputDecoration(labelText: "Book Publication Year"),
     ),
   ),
   Padding(
     padding: const EdgeInsets.all(8.0),
     child: FlatButton(
       onPressed: () {
         _uploadDetails(nameController.text.toString(),
             yearController.text.toString());
       },
       child: Padding(
         padding: const EdgeInsets.all(8.0),
         child: Text(
           "Upload",
           style: TextStyle(color: Colors.white),
         ),
       ),
       color: Colors.blue,
     ),
   ),
 ],
)
After running the app, the UI is shown as:
The only thing remaining now is to upload the values we get from the user.
For this, let’s create a function.
void _uploadDetails(String name, String year) async {
 String baseUrl = "https://api.buttercms.com/v2/posts";
 String collection = "books";

 // TODO: ENTER WRITE TOKEN HERE
 // THIS IS SEPARATE FROM NORMAL API KEY TO READ DATA
 String authToken = "";

 Response r = await post(
   baseUrl,
   headers: {'Authorization': authToken, 'Content-Type': 'application/json'},
   body: bookPostBodyToJson(
     BookPostBody(
       key: collection,
       status: "published",
       fields: [Field(field1Key: name, field2Key: year)],
     ),
   ),
 );
}
The main thing to note is that the WRITE key here is not the same key we were using earlier. Please contact Butter support for getting your WRITE key.
After we add the correct headers and convert our body to JSON, we’re all set.
The complete example can be found here.
Similar to getting content from the Collections API, we can set up blog posts as well.
An example of a retrieve call for blog posts would be:
GET 'https://api.buttercms.com/v2/posts/?page=1&page_size=10&auth_token=your_api_token'Blogs posts return more comprehensive details about the article to accurately portray the post on mobile UI.
Mobile CMS Use Cases
A Mobile CMS can be applied across the spectrum of mobile apps from blogs to social media.
A few examples include
- Creating personal blogs
- Online marketplaces
- Company websites
- SaaS businesses
- eCommerce platforms
Butter can serve a variety of product types and several companies use it to get the job done.
A couple of them are:
- HappyFresh is a mobile grocery shopping service
- HonestBee is Asia’s fastest growing food and grocery service
Moving Forward
Ultimately, every app will have a different feature set and there is no one-size-fits-all solution that works for content storage for mobile applications. However, a Mobile CMS offers quick setup, flexibility and user-friendliness which makes it an ideal choice for a lot of use cases.
Mobile CMSs are only going to grow in popularity as content consumption increases and developers switch to a modern API based structure over other rigid solutions. A Headless Mobile CMS allows content tailored to the platform allowing amazing custom UI that feels native to the platform.
I hope this article brought some clarity to the concept of Mobile CMS and how Butter provides a great experience in building Mobile CMS solutions.
Any questions? Let us know in the comments.
Do you want your product or marketing team to test Butter CMS? We can set up a live demo to walk your team through the fast, easy-to-use interface.