

Table of contents
In the ever-evolving world of web development, it seems there's always a new piece of technology to checkout. For me, I've been getting into the world of headless CMSs. As a developer advocate, I get to sit between the worlds of development and marketing, so I often end up in situations where I need to have a stack that is both developer-friendly and non-developer friendly. I wanted to check out ButterCMS and see if it could achieve this goal and build a small app with Ionic and Angular.
Setup
If you want to follow along, you'll need to have the following installed:
- node
- npm
Once node/npm are installed, we'll install the Ionic CLI:
bash
npm install -g @ionic/cli
You might need to use an admin prompt on Windows or Sudo on Linux/Mac unless you have node/npm configured to be owned by the user.
Once this is done, we can create a new app using the Ionic CLI
bash
ionic start butter-cms-demo blank --type=angular
To break down what this command is doing, we have the following:
- ionic start: This will call the Ionic CLI and tell it to run the start command.
- butter-cms-demo: This will be the name of our project and directory.
- blank: The starter template for our project. Other options are tabs, list, or sidemenu.
- --type=angular: This will tell the CLI to create an Angular project. React is also a supported framework.
When our project setup is done, we can cd into the directory and open our favorite editor.

Adding ButterCMS
Let's first add Butter CMS to our project by installing the npm package:
bash
npm install buttercms
With ButterCMS installed, we'll want to configure the API for our app. Since we're using Angular as our framework of choice, we'll utilize a service to do so.
ionic generate service services/butter/butterThis will create a file located at src/app/services/butter/butter.service.ts. The extra folders are probably not needed, but for me, it's a force of habit. The same command could also be ionic generate service butter if you want fewer folders.
With the Service created, let's scaffold out the functionality and go over what we have.
typescript
import { Injectable } from '@angular/core';
import { from, Observable } from 'rxjs';

import Butter, {ButterStatic} from 'buttercms';

@Injectable
  providedIn: 'root'
})
export class ButterService {
  butterBase: ButterStatic
  constructor() {
    this.butterBase = Butter('YOUR_API_KEY')
  }

  getPosts(): Observable<Butter.Response>{
    return from(this.butterBase.post.list());
  }
}
For developers who've worked with Angular before, this should seem familiar. We're creating a service and providing it in the root of our app, thus making this a singleton:
typescript
@Injectable({
  providedIn: 'root'
})
export class ButterService {
Next, we're creating a new instance of our ButterCMS API in the constructor. Since the service is a singleton, this will be the same instance throughout the entire app.
typescript
butterBase: ButterStatic
constructor() {
  this.butterBase = Butter('YOU_SECRET_API_KEY')
}
Finally, we'll create a getPosts method, which will utilize RxJS. If you're not familiar with RxJS, don't worry. All you need to know is that the from function will convert Butter's post.list method from a promise to an observable.
typescript
getPosts(): Observable<Butter.Response>{
  return from(this.butterBase.post.list());
}
With this in place, we can move to our page component and start to update things there.
Rendering Our Posts
In src/app/home/home.page.ts, we have essentially an empty component that is ready to load content. First, let's add some import statements to include our service and a few types.
typescript
import { Component } from '@angular/core';

// Our service
import { ButterService } from '../services/butter/butter.service';
// map, more on that later on...
import { map } from 'rxjs/operators';

// For strict types
import { Observable } from 'rxjs';
import Butter from 'buttercms';
The import for our service and the map function are the two most important imports here. Without that, we can't really do anything in our app. The types are nice to have and can make the following examples easy, but they are not required.
With the service imported, we can inject into our component and provide a class property for later usage.
typescript
@Component({...})
export class HomePage {
  // What we'll set our posts to
  public posts: Observable<Butter.Response>;
  // Injecting our ButterService
  constructor(private butterService: ButterService) {}
With that in place, we can utilize an Angular lifecycle hook to start to load the posts from our CMS.
typescript
ngOnInit() {
  this.posts = this.butterService
    .getPosts()
      .pipe(map((res: Butter.Response) => res.data.data));
}
All this does is load the posts from our getPosts call, which returns an observable. With that observable, we can use map to essentially destructure the response and only return the actual post data.
The final results should be something like this:
typescript
import { Component } from '@angular/core';
import { ButterService } from '../services/butter/butter.service';
import { map } from 'rxjs/operators';
import { Observable } from 'rxjs';
import Butter from 'buttercms';
@Component({
selector: 'app-home',
templateUrl: 'home.page.html',
styleUrls: ['home.page.scss'],
})
export class HomePage {
public posts: Observable<Butter.Response>;
constructor(private butterService: ButterService) {}
ngOnInit() {
this.posts = this.butterService
.getPosts()
.pipe(map((res: Butter.Response) => res.data.data));
}
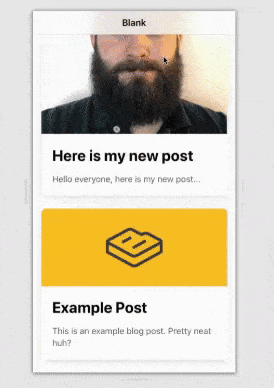
}Now, on to the HTML! For the HTML, we can utilize Ionic's card component to display the post data.
html
<ion-header [translucent]="true">
  ...
</ion-header>

<ion-content [fullscreen]="true">

  <ion-card *ngFor="let post of posts | async ">
    <img [src]="post.featured_image" alt="" />
    <ion-card-header>
      <ion-card-title>
        {{post.title}}
      </ion-card-title>
    </ion-card-header>
    <ion-card-content>
      {{post.summary}}
    </ion-card-content>
  </ion-card>

</ion-content>
Again, this is fairly typical Angular here with our ngFor and async pipe. So as we'll loop over our posts we can display the content and set up our bindings for the featured image, the post title, and the summary.
Parting Thoughts
I'm still exploring ButterCMS and the whole world of Headless CMS. It's amazing how effortless it was to set up and author the content, then build out the front end for our app with a few lines of code. Kudos to the ButterCMS team for this!

