- Why React is great for building blogs
- Tutorial goals and prerequisites
- Tutorial: Building a blog with React
- Building the blog's front-end
- Setting up ButterCMS
- Connecting our application to ButterCMS
- Handling on-site search
- What is the future of React blog development?
- Questions about building a blog with React
- Closing thoughts
If you are a software developer, the odds that you have used React.js to build a web application are pretty high. This is because React is unarguably one of the most popular JavaScript frameworks. According to Statistica, it is the second most used web framework among developers worldwide after Node.js, with a 40.58% usage rating from respondents. React has been used to build popular web apps such as Instagram, Dropbox, Netflix, etc, and can be used for different kinds of websites, including blogs, which is the focus of this tutorial.
There are different ways to create a blog with React. Still, if you want an organized and flexible way of managing your content while saving the time and effort it will take to develop a solution yourself, then, using a headless content management system (CMS) like ButterCMS is one of the best ways to do that.
In this tutorial, we’ll guide you through setting up a blog using React and ButterCMS. If you'd like to follow along, you can start a 14-day free trial of ButterCMS to get hands-on experience as we build. Before we dive into implementation, let’s look at a few reasons why React is great for building a blog:
Table of contents
Why is React great for building blogs
React offers features and capabilities that could make it exactly what you need for your blog. Let’s explore a handful below:
React is SEO-friendy
Out of the box, React is client-side rendered (CSR-ered). A few years ago, this would have made it a bad option for blogs due to SEO (search engine optimization) concerns, but with the support of Javascript by popular search engines like Google and Bing, React CSR-ered websites can now be crawled and indexed, making it a viable option for creating blogs.
For better SEO and to avoid the challenges associated with CSR, we can enable server-side rendering (SSR) using server React DOM APIs like renderToString and renderToPipeableStream or generate static HTML using renderToStaticMarkup. With this, search engines will no longer need to execute JavaScript to crawl our site, resulting in improved SEO performance.
Enhanced UI capabilities
React’s rich ecosystem offers a large pool of tools and packages that add enhanced UI capabilities to your blog. From WYSIWYG editor and code syntax highlighter to slick animations, you name it; there is probably a library out there you can integrate to provide the desired experience for your users. Additionally, with React’s virtual DOM – an out-of-the-box mechanism that efficiently handles DOM updates, the process of adding UI capabilities, is much easier and faster, giving you more time to create the desired user experience.
Below are a few tools that can be used to enhance the UI capabilities of your blog:
-
Tiptap Editor: A customizable WYSIWYG rich text editor. It can be added to the comment section to facilitate communication.
-
React Syntax Highlighter: A React component for code syntax highlighting. It can be used to highlight code snippets in a blog post.
-
Framer motion: A popular React animation library. It can be used to add page transitions, scroll animations, hover effects, etc.
Reusable components
One of the key concepts of React is components. Components enable us to break down a user interface (UI) into independent pieces that can be used in different parts of an application. Utilizing components for a blog, the blog postcard, header, footer, custom button, etc., can be created separately and used through the blog application. This can improve productivity by enabling the reuse of said components. Additionally, several component libraries like Material UI, Chakra UI, Ant Design, etc., offer ready-to-use components that could save you time.
React is flexible
React can be used on different platforms to build high-quality user interfaces. It can be used for web apps, mobile apps, and desktop apps. In the context of creating blogs, it allows the setting of unique meta descriptions and titles that contribute to SEO. It can be used for server-side rendering and static-site generation, which can be enabled with a few tweaks to your code. Furthermore, its large community of developers continuously develops tools to accelerate the incorporation of desired features into your blog app.
Tutorial goals and prerequisites
In this tutorial, we will learn how to create a blog with React and manage its content using ButterCMS. In the blog, we will fetch the data from ButterCMS, display it in our app, and add a search feature to sort content based on their category.
To follow along with this tutorial, you should have the following:
-
Basic knowledge of React.js.
-
Node.js installed on your local machine.
-
A code editor, preferably VS Code.
Tutorial: Building a blog with React
There are different approaches to building a blog with React. We can choose to hard-code a blog (i.e., manually enter all data to be displayed on the blog). While this could work, it can quickly become cumbersome to update the blog’s content. Moreover, it is not suitable for a developer-to-client project, as it would require the client to possess the technical know-how of the used programming language or the developer’s assistance to update the blog.
One alternative to this is to create a back-end along with an authentication-protected interface to manage the blog’s content. This provides more flexibility and makes carrying out CRUD operations feasible for the client.
However, a better approach is to use a content management system (CMS), namely a headless CMS. This approach provides a ready-to-use dashboard where we can view and manage all our content. We will be using this approach in this article.
We will start by building the front-end of the blog with React, then set up our content structure using ButterCMS, and finally, link the CMS to our app to display content.
Building the blog’s front-end
The first step to setting up the front-end with React is to create a new React application. This can be done via the CLI in your chosen directory with the following command:
npm create vite@latest blogreact -- --template react
cd blogreact
npm install
If you’re prompted to install create-vite, enter y. The above command creates a project folder blogreact with all necessary dependencies for React installed.
To handle API requests and routing in our blog application and to navigate from the landing page to specific blog content, we will be using Axios and React-routers (a React module for creating dynamic routes in a React application). We can install these dependencies via the CLI with the following commands:
npm install react-router-dom axiosOnce installation is complete, we can open this in a code editor and proceed to create the front-end of our application.
Defining the application’s routes
Firstly, we will define the routes for our blog application. These routes are the landing page, a route to a specific blog post, and a redirect route back to the home page.
We will do this using the React-router-dom package we installed. In main.jsx, make the following changes to allow for routing in the application:
import { BrowserRouter } from "react-router-dom";

ReactDOM.createRoot(document.getElementById('root')).render(
  <React.StrictMode>
    <BrowserRouter>
      <App />
    </BrowserRouter>
  </React.StrictMode>,
)
Then, we can create specific routes in App.jsx:
import "./App.css";
import { Route, Routes } from "react-router-dom";
import HomePage from "./pages/HomePage";
import BlogPost from "./pages/BlogPost";
import { React, useState } from "react";

function App() {
const [getBlogContent, setGetBlogContent] = useState([]);
  const getData = (blog) => {
    setGetBlogContent(blog);
  }
  return (
    <div>
      <div className="container">
        <Routes>
          <Route path="/" element={<HomePage data={getData}/>} />
          <Route path="/blog/:id" element={<BlogPost content={getBlogContent}/>} />
        </Routes>
      </div>
    </div>
  );
}
export default App;
Here, we set up the route to our HomePage and BlogPost. The home page has an empty path for the route, while the blog route has the pathname “blog,” along with the ID of the specific React blog we will be viewing. In this case, it will be the name of the content.
Creating the landing and blog pages
We will create two folders in the src directory of the project folder: pages and components. In the former, we will have the HomePage and BlogPost pages, while the latter will contain the components that make up our application's two main pages. In HomePage.jsx, we have the following:
import {React,  useState, useEffect } from 'react';
import EmptyList from '../components/EmptyList';
import BlogList from '../components/BlogList';
import Header from '../components/Header';
import SearchBar from '../components/SearchBar';
import { blogList } from '../config/Api';

const HomePage = ({data}) => {
  const [blogs, setBlogs] = useState([]);
  const [filteredBlogs, setFilteredBlogs] = useState([])
  const [searchKey, setSearchKey] = useState('');
  // Search submit
  const handleSearchBar = (e) => {
    e.preventDefault();
    handleSearchResults();
  };
  // Search for blog by category
  const handleSearchResults = () => {
   //handle search inputs
  };
  // Clear search and show all blogs
  const handleClearSearch = () => {
    blogList().then((res) => {
      setBlogs(res);
    })
    setSearchKey("");
  };

  // function to get selected blog content
 const BlogContent = (id) => {
  data(id);
}
  return (
    <div>
      {/* Page Header */}
      <Header />
      {/* Search Bar */}
      <SearchBar
        value={searchKey}
        clearSearch={handleClearSearch}
        formSubmit={handleSearchBar}
        handleSearchKey={(e) => setSearchKey(e.target.value)}
      />
      {/* Blog List & Empty View */}
      {!filteredBlogs.length ? <EmptyList /> : <BlogList blogs={filteredBlogs} content = {BlogContent}/>}
    </div>
  );
};
export default HomePage;
This will be the page structure of our landing page. It will contain a Header component and a SearchBar component, and it will render the content of our React blog.
In BlogPost.jsx we have the following:
import {React} from 'react';
import Chip from '../components/Chip';
import EmptyList from '../components/EmptyList';
import '../index.css';
import { Link } from 'react-router-dom';
const Blog = () => {
return (
<>
<Link className='blog-goBack' to='/'>
<span> &#8592;</span> <span>Go Back</span>
</Link>
</>
);
};
export default Blog;This page describes the structure of the React blog view page. When the user selects content from the landing page, they can view more information on that content. This will be made possible using the BlogPost page.
Creating our components
Next, we will define all components we will be using in our application. In the components directory, create the following files: Chip.jsx, EmptyList.jsx, BlogList.jsx, BlogItem.jsx, Header.jsx, and SearchBar.jsx.
The first component, Chip.jsx, will be responsible for containing the tags of specific blog content. We will use these tags to classify content and return content whose tags match the search field input when we wish to search through our React blog. The listed components will contain the following blocks of code:
//Chip.js

import React from 'react';
import '../index.css';
const Chip = ({ label }) => <p className='chip'>{label}</p>;
export default Chip;

//EmptyList.js

import React from 'react';
import '../index.css';
const EmptyList = () => (
  <div className='emptyList-wrap'>
    <img src='/assets/13525-empty.gif' alt='empty' />
  </div>
);
export default EmptyList;
This component defines an image that will be displayed when there is no content to be displayed on the page, or when the search query does not match the tags of any article.
//BlogList.js

import React from 'react';
import BlogItem from './BlogItem';
import '../index.css';
const BlogList = ({ blogs, content }) => {
  return (
    <div className='blogList-wrap'>
      {blogs.map((blog) => (
        <BlogItem blog={blog} content={content}/>
      ))}
    </div>
  );
};
export default BlogList;
And in BlogItem.jsx, we have:
import React from 'react';
import { Link } from 'react-router-dom';
import Chip from './Chip';
import '../index.css';
const BlogItem = ({blog, content}) => {
  return (
    <div className='blogItem-wrap'>
    </div>
  );
};
export default BlogItem;
BlogItem.jsx and BlogList.jsx will handle rendering the content received from our CMS in our React application. In our Header.jsx, we have the following:
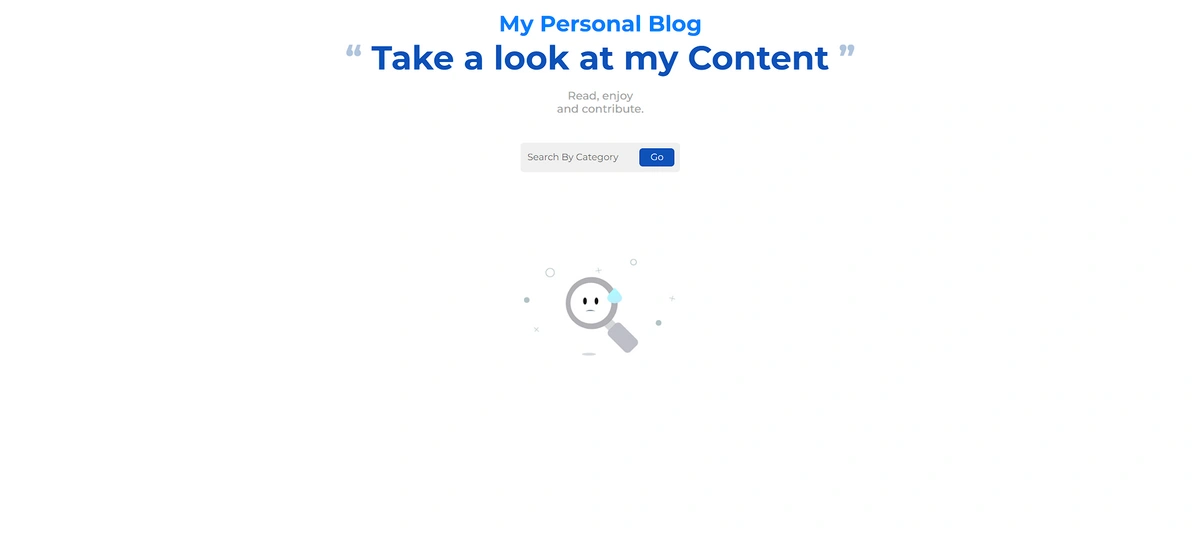
import React from 'react';
import '../index.css';
const Header = () => (
  <header className='home-header'>
    <h2>My Personal Blog</h2>
    <h1>
      <span>"</span> Take a look at my Content <span>"</span>
    </h1>
    <p>
      Read, enjoy <br /> and contribute.
    </p>
  </header>
);
export default Header;
For the SearchBar.js component, we have:
import React from 'react';
import '../index.css';
const SearchBar = ({ formSubmit, value, handleSearchKey, clearSearch }) => (
  <div className='searchBar-wrap'>
    <form onSubmit={formSubmit}>
      <input
        type='text'
        placeholder='Search By Category'
        value={value}
        onChange={handleSearchKey}
      />
      {value && <span onClick={clearSearch}>X</span>}
      <button>Go</button>
    </form>
  </div>
);
export default SearchBar;
And finally we will create a file called Api.js in a new directory, config, within the src folder. This file will handle all API requests for our CRUD operations:
import React from 'react'
export const blogList = async ()=>{
}
Styling our blog application
To style our application, add the following styles in index.css:
@import url('https://fonts.googleapis.com/css2?family=Montserrat:ital,wght@0,100;0,200;0,300;0,400;0,500;0,600;0,700;0,800;0,900;1,100;1,200;1,300;1,400;1,500;1,600;1,700;1,800;1,900&display=swap');
*,
*::after,
*::before {
  box-sizing: border-box;
  margin: 0;
}
body {
  font-family: 'Montserrat', sans-serif;
}
button,
input {
  font-family: 'Montserrat', sans-serif;
}
.container {
  max-width: 1140px;
  width: 95%;
  margin: 0 auto;
  padding: 1rem 0;
}
/* BlogPost */
.blog-wrap {
  max-width: 700px;
  margin: 0 auto;
}
.blog-goBack {
  text-decoration: none;
  font-size: 0.8rem;
  color: #a9a9a9;
  font-weight: 500;
  margin-bottom: 2rem;
  display: block;
}
.blog-wrap header {
  text-align: center;
}
.blog-date {
  font-size: 0.8rem;
  color: #a9a9a9;
  font-weight: 500;
}
.blog-wrap img {
  width: 100%;
}
.blog-subCategory {
  display: flex;
  justify-content: center;
}
.blog-subCategory > div {
  margin: 1rem;
}
.blog-content p{
  margin-top: 1.5rem;
}
.blog-content h1, .blog-content h2, .blog-content h3, .blog-content h4, .blog-content h5, .blog-content h6 {
  margin-top: 1.5rem;
}

.blog-content img {
  margin: 10px 0;
}
/* Search Bar */
.searchBar-wrap, .create-form input {
  background-color: #f0f0f0;
  width: fit-content;
  margin: 2.5rem auto 4rem auto;
  padding: 0.5rem;
  border-radius: 5px;
}
.searchBar-wrap form, .create-form input {
  display: flex;
  align-items: center;
}
.searchBar-wrap input {
  background-color: #f0f0f0;
  outline: none;
  border: none;
}
.searchBar-wrap span {
  padding-right: 0.5rem;
  cursor: pointer;
}
.searchBar-wrap button, .btn {
  outline: none;
  border: none;
  padding: 0.3rem 1rem;
  border-radius: 5px;
  background-color: #0f52ba;
  color: #fff;
}

.btn{
  z-index: 5;
}
/* Header */
.home-header {
  text-align: center;
}
.home-header h2 {
  color: #0080ff;
  font-size: 2rem;
}
.home-header h1 {
  font-size: 3rem;
  color: #0f52ba;
  margin-bottom: 1rem;
}
.home-header h1 span {
  color: #b0c4de;
}
.home-header p {
  color: #a9a9a9;
  font-weight: 500;
}
/* Blog List */
.blogList-wrap {
  display: grid;
  grid-template-columns: repeat(3, 1fr);
  grid-gap: 3rem;
}
@media (max-width: 768px) {
  .blogList-wrap {
    grid-template-columns: repeat(2, 1fr);
  }
}
@media (max-width: 600px) {
  .blogList-wrap {
    grid-template-columns: repeat(1, 1fr);
  }
}
/* Blog Item */
.blogItem-wrap {
  display: flex;
  flex-direction: column;
}
.blogItem-cover {
  width: 100%;
  height: 250px;
  object-fit: cover;
  border-radius: 20px;
  margin-bottom: 0.5rem;
}
.blogItem-wrap h3 {
  margin: 0.5rem 0 1rem 0;
  flex: 1;
}
.blogItem-desc {
  position: relative;
  max-height: 50px;
  overflow: hidden;
  padding-right: 0.6rem;
  font-size: 0.8rem;
  color: #a9a9a9;
}
.blogItem-desc::before {
  position: absolute;
  content: '...';
  bottom: 0;
  right: 0;
}
.blogItem-wrap footer {
  display: flex;
  align-items: center;
  margin-top: 1rem;
  justify-content: space-between;
}
.blogItem-link {
  text-decoration: none;
  color: inherit;
}
.blogItem-author {
  display: flex;
  align-items: center;
}
.blogItem-author img {
  width: 40px;
  height: 40px;
  border-radius: 50%;
  object-fit: cover;
  margin-right: 0.5rem;
}
.blogItem-author p {
  font-size: 0.6rem;
  color: #a9a9a9;
  font-weight: 600;
}
/* Empty List */
.emptyList-wrap {
  display: flex;
  justify-content: center;
}
.emptyList-wrap img {
  max-width: 250px;
  width: 100%;
}
/* Chip */
.chip {
  font-size: 0.7rem;
  background: linear-gradient(to right, #6190e8, #a7bfe8);
  color: #fff;
  padding: 0.3rem 0.5rem;
  border-radius: 5px;
  width: fit-content;
  text-transform: capitalize;
}

/* Create content form */
.create-form{
  position: absolute;
  height: 90vh;
  top: 0;
  z-index: 3;
  backdrop-filter: blur(5px);
  width: 80%;
  display: flex;
  justify-content: center;
  align-items: center;
}
.formcont{
  background: #fff;
  width: 80%;
  display: flex;
  padding: 10px 10px;
  flex-direction: column;
  height: 80%;
  justify-content: center;
}
.formcont textarea{
  border: 1px solid #ccc;
  outline: none;
  resize: none;
  padding: 10px;
  font-size: 0.7rem;
  border-radius: 5px;
  margin-bottom: 1rem;
  width: 100%;
  height: 12em;
}
.formcont span{
  display: flex;
}
.file{
  margin: 7px!important;
  padding: 0 !important;
}
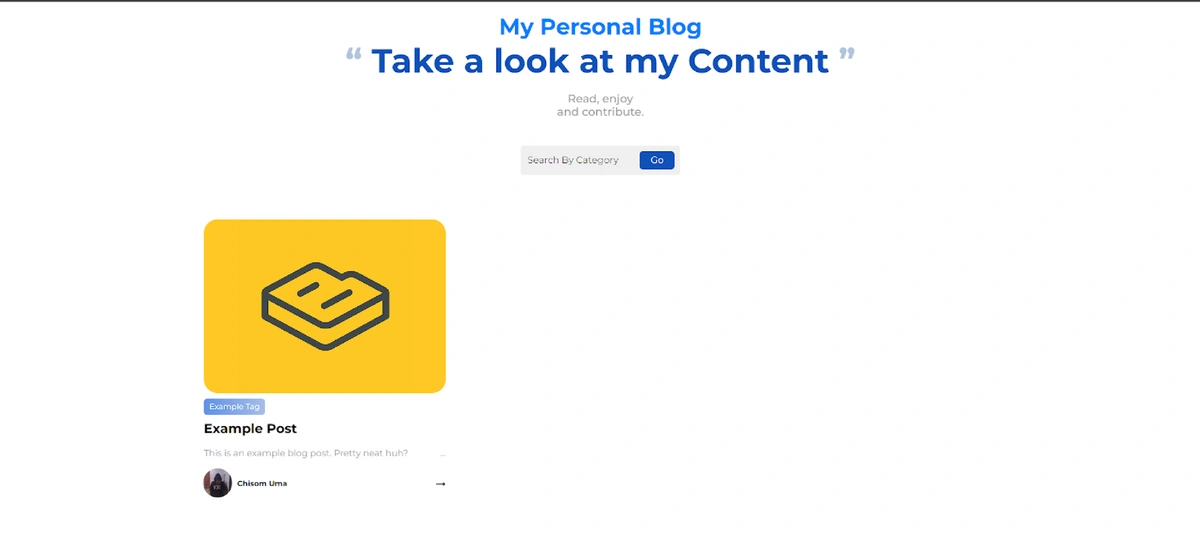
Now, if we run our application using the npm run dev command in the CLI, we get a result similar to the below image:
Setting up ButterCMS
To get started with ButterCMS, you will first need to create a user account and log in to your dashboard on the ButterCMS website. ButterCMS has a content structure set up designed for creating React blog posts. With this, we do not need to create our own setup. To make use of React blog posts, select Blog posts from the left sidebar:
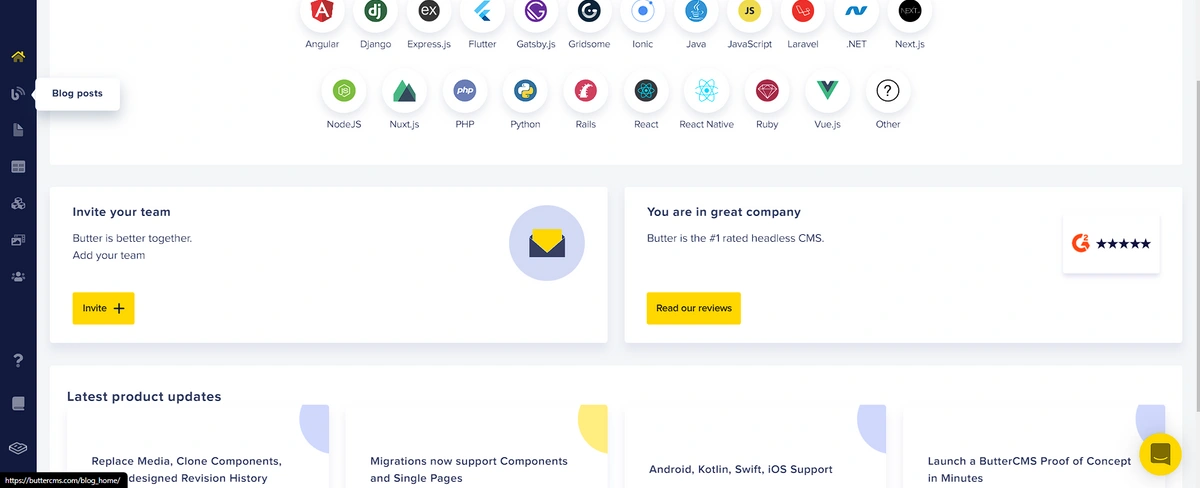
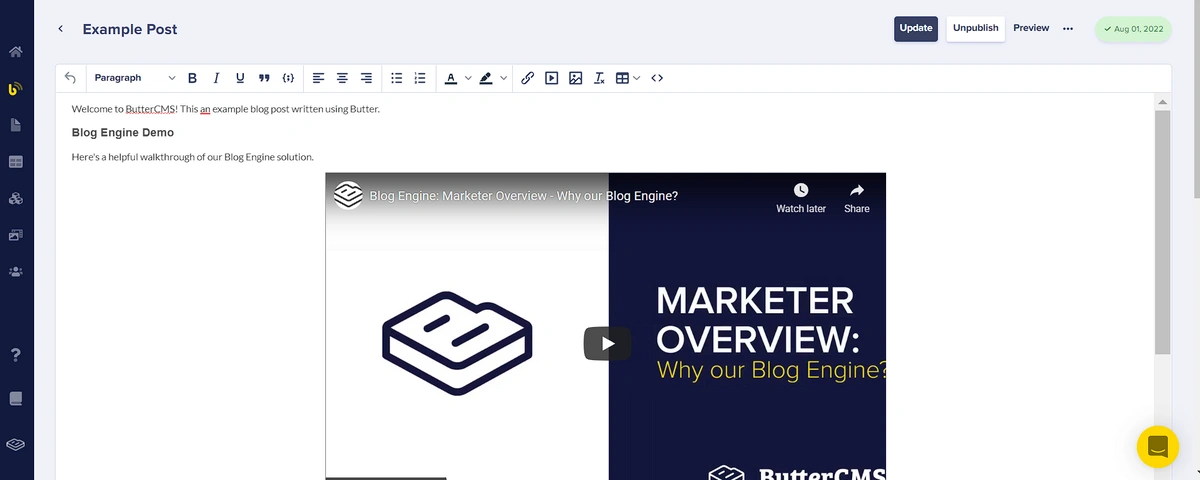
On the new page that opens up, we have an example blog post already created for us. If you wish to create a new blog post, click on the New Post button at the top-right and fill out the form on the page that opens. The WYSIWYG editor provided by the Blog Post type makes it easy to create content for a React blog site, including inserting media and videos into it.
Connecting our application to ButterCMS
To connect our application to ButterCMS, we will need the read token to fetch content from the CMS. This can be found in the settings tab on the dashboard. Copy and store this key in a .env file in your project directory. In Api.js, we will set up our fetch operation:
import React from "react";
import axios from "axios";

const read_token = import.meta.env.VITE_READ_TOKEN;

export const blogList = async () => {
  const url = `
  https://api.buttercms.com/v2/posts?auth_token=${read_token}`;
  return axios.get(url).then((res) => {
    return res.data.data;
  });
};
In HomePage.jsx, we can get the data from this API request and store it in our blog state:
// get content from buttercms
useEffect(() => {
    blogList().then((res) => {
        setBlogs(res);
    })
} , []);
Then, we will render the content in BlogItem.jsx:
const BlogItem = ({blog, content}) => {
  return (
   <div className='blogItem-wrap' key={blog.title}>
      <img className='blogItem-cover' src={blog.featured_image} alt='cover' />
      <Chip label={blog.tags[0].name} />
      <h3>{blog.title}</h3>
      <p className='blogItem-desc'>{blog.summary}</p>
      <footer>
        <div className='blogItem-author'>
          <img src={blog.author.profile_image} alt='avatar' />
          <div>
            <h6>{blog.author.first_name+" "+blog.author.last_name}</h6>
            <p>{blog.created_at}</p>
          </div>
        </div>
        <Link className='blogItem-link' to={`/blog/${blog.title}`} onClick={()=>{content(blog)}}>
          ➝
        </Link>
      </footer>
    </div>
  );
};
This will render the content stored on our CMS. Below is an image showing some sample content I created in my blogreact collection:
To be able to view our content via the arrow at the bottom right of the BlogItem component, we just need to make the following changes to BlogPost.jsx:
const Blog = ({content}) => {
return (
<>
<Link className='blog-goBack' to='/'>
<span> &#8592;</span> <span>Go Back</span>
</Link>
{content ? (
<div className='blog-wrap'>
<header>
<p className='blog-date'>Published {content.created}</p>
<h1>{content.title}</h1>
<div className='blog-subCategory'>
<div>
<Chip label={content.tags[0].name} />
</div>
</div>
</header>
<img src={content.featured_image} alt='cover' />
<div className='blog-content' dangerouslySetInnerHTML={{__html: content.body}}></div>
</div>
) : (
<EmptyList />
)}
</>
);
};Here, we have the structure for the React blog content that will be displayed in the BlogPost.jsx file. The WYSIWYG editor returns its content in the form of HTML. We can then render this to produce the required results.
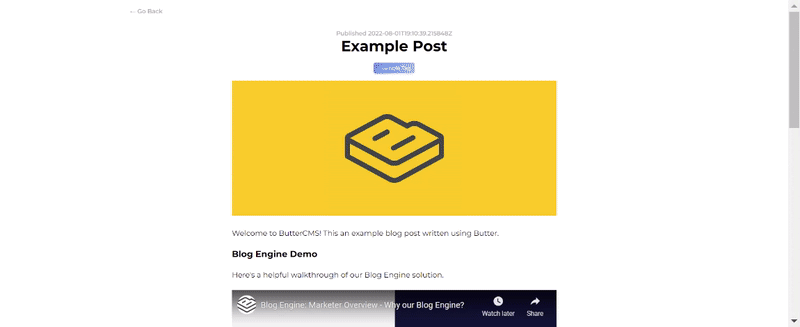
With this, we get a preview of the selected React blog content:
Handling on-site search
With our search field in the HomePage component, we will be able to search through our content and display results corresponding to a search query. To do this, edit the handleSearchResults function in HomePage.jsx as shown below:
 // Search for blog by category
  const handleSearchResults = () => {
    const filtered = blogs.filter((blog) => {
      return blog.tags[0].name.toLowerCase().includes(searchKey.toLowerCase().trim());
    });
    setFilteredBlogs(filtered);
  };
What is the future of React blog development?
The React team is consistently introducing innovative improvements to build better React apps. Over the years, features like Streaming and Server Components have been introduced offering better performance along with Concurrent Rendering, which improves responsiveness, all of which are great for blogs. In the upcoming version of React: React 19, several new features have also been introduced, and one of the notable ones essential for blog applications is the support for Document metadata, enabling the use of tags like <title> and <meta> directly in components. This was previously done using effects or libraries like React Helmet. With all these improvements, we can tell how enthusiastic the React team is about making React more performant, which is very important for blog applications.
Questions about building a blog with React
How do you use React components in a blog?
React components are independent segments of code created for reuse to prevent a repetition of code blocks. In a blog use case, portions of the code such as the card display of articles on the blog can be created as a component to avoid having to repeat the same code for different posts. This component can then be imported to handle the rendering of as many posts that are to be displayed on a page. Also, sections such as the header and footer sections, which are the same for each article page, can be created as components and rendered with changes to their content to reflect the current article’s name and details on the article page.
How do you test your React blog?
React applications usually have different levels of sophistication. The first step to application testing is to outline sections of the application to be tested. There is not really any general method of classifying aspects of applications to be tested. However, if you are to carry out a test on a React blog application, these are the following sections you should consider:
- Core features of the blog: Fetching blog content from whatever data source it is linked to and rendering individual content in a manner that boosts user experience
- User interactions: Include testing scope for user interactions, such as actions to be handled by onClick events on the cards and the resulting action of opening and displaying the article content. Testing the search events using the on-site search field.
- Components and state changes: Test the most used components that make up the blog and consider state changes and updates caused by prop changes in the blog. An example of this is the prop passed from the “all contents” display component of a React blog to the page where an individual content has its entire data displayed due to the user selecting a particular article from the list of items.
What should I learn before starting with React.JS?
By now, you are fully aware that React is one of the most popular JavaScript frameworks, and its popularity increases on a day-by-day basis as more people dive into software development.
Starting out as a “newbie” developer can be very overwhelming, as there is tons of information out there at your disposal. So what should you learn before React.js? Here’s a list of the top 5 things:
Why should I learn React?
Learning React is like holding a master key to different frameworks and libraries. Its flexibility makes it possible to be used for not just web applications but mobile, desktop, and AR/VR apps as well. It is the backbone or fundamental part of powerful tools like Next.js – a full stack framework for building CSR, SSR, and SSG apps; React Native – a framework for building apps for Android, IOS, Desktop, and other platforms; ViroReact – a library for building AR/VR experience, etc. So by learning React, you are also equipping yourself with the knowledge to quickly pick up other useful tools as well which might be required as you progress in your development journey.
Additionally, React is popular, so it has an active community of developers who create helpful tools to solve problems and ease development. This means that many companies use React, making knowledge of it a valuable skill in the job market.
Can a beginner learn React?
React is easier to learn and more beginner-friendly compared to Angular and Vue. React uses JSX which has a syntax similar to HTML and JavaScript, making it beginner-friendly if you already have basic knowledge of HTML, CSS, and JavaScript. One of the best ways to learn React is by building projects and practicing regularly.
How to create a blog with React and Firebase?
To do this, you can start by creating your blog’s front-end along with an interface protected by authentication to manage your blog content. The content management interface could be part of the front-end or a separate domain. Alternatively, rather than creating a content management interface from scratch, ButterCMS can be used, which also means it can be used as your database. Continuing from where we left off, head over to your Firebase Console, add a new project, create a Firestore database, and set up authentication by enabling a sign-in method. Next, configure your newly created Firebase project for the web and copy the configurations you are given to your clipboard. Finally, head over to your project, install the Firebase SDK, initialize Firebase using the copied configurations, and then implement the needed functionalities.
How do I create a full-stack website using React?
To build a full-stack website with React, it is recommended to use a React-powered framework like Next.js or Remix. These frameworks allow you to write both your front-end and back-end in a single codebase, saving you the time and effort of deploying and maintaining a separate backend server.
Closing thoughts
In this article, we learned how to build a blog with React. We also learned how to set up a blog web application with React, and manage the React blog’s content using ButterCMS. We also fetched data from the CMS to be displayed in the application. An on-site search feature to easily sort content based on its category was also built into our React blog application.
I will love to know what else you would want to Build with React and ButterCMS. You can access the code for this tutorial in this Github repo.
For more articles on using React, read:
- Building a React Ecommerce Application
- Web Analytics Tools for React Websites
- Best Practices for Building Large-Scale Applications
- React Best Practices: Maintaining Large Scale Projects
- Firebase and Google Analytics: Set Up and Log Events
- Building a Food Ordering App with React
Or check out our React starter projects, our react headless CMS and blog engine.
Post updated May 2024 by Taminoturoko Briggs.