- Characteristics of a React food ordering application
- React food ordering app tutorial prerequisites
- How React empowers popular food ordering apps
- How ButterCMS can benefit our React food ordering application
- Setting up the development area
- Preparing our backend structure
- Integrating ButterCMS in our application
- Building our application
- Tips for creating the app successfully
- Your food ordering app questions answered
- Closing thoughts
E-commerce has worked really hard to support our ease in purchasing the goods and services we want. Even though we don't often feel like going out to our favorite spots, we always want to eat. As a result, services like Uber Eats and Grubhub were born.
Food delivery platforms—like Uber Eats—act as a middle-man between restaurants and customers facilitating both the ordering and delivery of goods, whereas food ordering applications are typically used to place orders for meals directly from a specific restaurant that may or may not offer delivery as well. This article will focus on the food ordering aspect of these applications and won't dive into the delivery side of things.
Table of contents
In this tutorial, we'll be building a react js food ordering website with the help of ButterCMS. They say that a two-edged blade gives a great warrior the ability to win battles, and by combining the power of React and ButterCMS, developers can create not just visually appealing but also fast and functional applications.
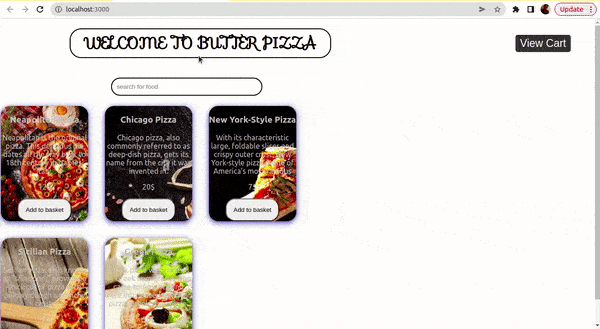
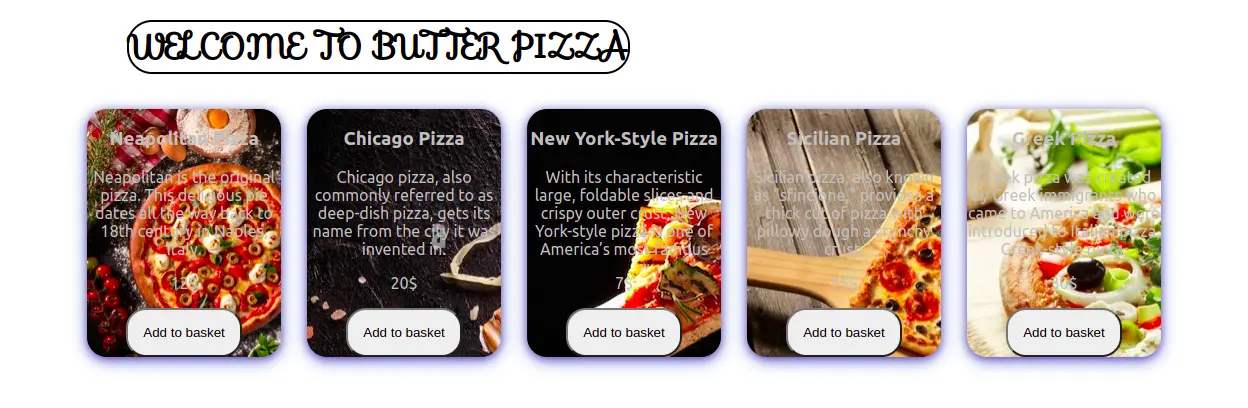
At the end of this tutorial, we should be able to build this pizza-ordering site:
During the pandemic, meal orders were frequently made using food ordering and delivery apps. These applications allowed you to look up your favorite restaurant, place your order, and track it on a map until it was delivered to your door.
Despite the fact that dine-in eateries struggled during the pandemic, delivery services like UberEats and restaurants offering online ordering have managed to survive and in some cases flourish. Food ordering has unquestionably helped keep many restaurants afloat.
Characteristics of a React food ordering application
Apps for ordering meals can be very sophisticated or very simple, like any other application, but they all accomplish the same thing. There are a few essential features that are expected from a food-ordering application, including:
- Simple and easy payment options
- Well-presented products and description
- Clean, flexible, and easy-to-navigate user interface
- Add-to-cart and remove-from-cart capabilities
- A search bar that can be used to find preferred meals without having to browse like you would at a restaurant
React food ordering app tutorial prerequisites
You must meet the following requirements in order to effectively follow along with this article:
- A fundamental knowledge of JavaScript syntax, React, React components, and React hooks
- A fundamental understanding of APIs, how to fetch from them, and how a content management system (CMS) works
- A brief understanding of CLIs and their commands
- A fundamental understanding of CSS
- A ButterCMS trial account
- Node.js installed on the local computer (Optional)
- React and Axios installed (Optional)
How React empowers popular food ordering apps
Having an interactive site is advantageous for your company's online presence, whether it is a web or mobile application, and getting your site as close to ideal as possible requires a powerful tool. JavaScript frameworks like React make it simpler for companies to create seamless, interactive, and compelling online and web applications.
We will use Uber Eats and DoorDash as use cases in this section.
Building, state management, and rendering
Uber Eats utilizes React.js for state management and application rendering. A few teams have been experimenting with Redux as their future-state container.
Styling
Uber Eats' styling transformed an existing OOCSS/BEM-type CSS toolkit, termed Superfine, into a collection of React.js UI components that are CSS-encapsulated and made using style objects.
Observing and utilizing data
The front end of the Uber engine, known as Marketplace, directs real-world, on-the-spot requests and locations into Uber's engineering ladders and chutes.
JavaScript is used by Uber Eats in its online front-end applications. One of the libraries and frameworks used by this group was React. For data processing, streaming, querying, machine learning, and graph processing, data engineers at Marketplace use a variety of databases, in-house programs, and open-source third-party technologies.
Create reusable front-end components
Caviar was acquired by DoorDash in 2019, giving them the chance to run Caviar on their current platform and boost efficiency. However, they rebuilt the Caviar web experience using React components on top of the DoorDash platform in order to preserve the ordering experience for its devoted clients.
Caviar concentrates more on regional premium and food fans whereas DoorDash caters to a wide range of restaurant and merchant options.
There was a need to keep the amenities that customers had grown accustomed to as it had built up a customer base prior to the acquisition.
Serving the appropriate online experience to site visitors while ensuring that DoorDash customers could order from restaurants supported by DoorDash and Caviar customers could order from restaurants supported by Caviar posed a difficulty for this project.
One of the quick fixes was to build the appropriate components within the already-existing React web codebase. They were ready to be used whenever a new experience filter was required.
Additional benefits of using React
- The development team of these companies has benefited from this technology's excellent competence and functionality for creating sites, as React helps them in styling, state management, and building.
- Using react was a huge plus to the interactivity of these sites.
- Without adding to complexity, this framework has undoubtedly increased the app's functionality, enabling companies like DoorDash to house two backend providers with one frontend.

How ButterCMS can benefit our React food ordering application
ButterCMS is a headless CMS SaaS (software as a service) that hosts and manages the whole CMS platform, including the content API and CMS dashboard. Using your preferred tech stack, you can run a query through their API to fetch content into your app.
Some of ButterCMS's key advantages are:
- Frees marketers with weak technical backgrounds from having to engage with complex code bases
- Enables developers to create and scale apps more quickly
- Cuts the costs of maintaining a site
- Enables you to display your content on the front-end of your choice without having to duplicate it
- Eases the creation and iteration of landing pages, product pages, and images, if needed (We will utilize these content capabilities in this article.)
Setting up the development area
For the front-end of our application, run the below commands in the CLI:
npx create-react-app butter
npm i axios
//axios will be used to interact between our React application and ButterCMS.
cd butter
npm start
//clear your App.js file, and return nothing in the JSX
Preparing our backend structure
We will create our content structure using ButterCMS. ButterCMS is an API-based CMS with a user-friendly interface for creating and managing content, supporting a variety of programming languages. This content manager is made to fit any application of your choice to manage the data for our application. We will be using Butter to host our products and, through a special key, we will integrate our products with our application. This is made seamless with ButterCMS, thanks to the development team!
Developers are first advised to create a personal account with ButterCMS, after which you will see a dashboard like the one below:

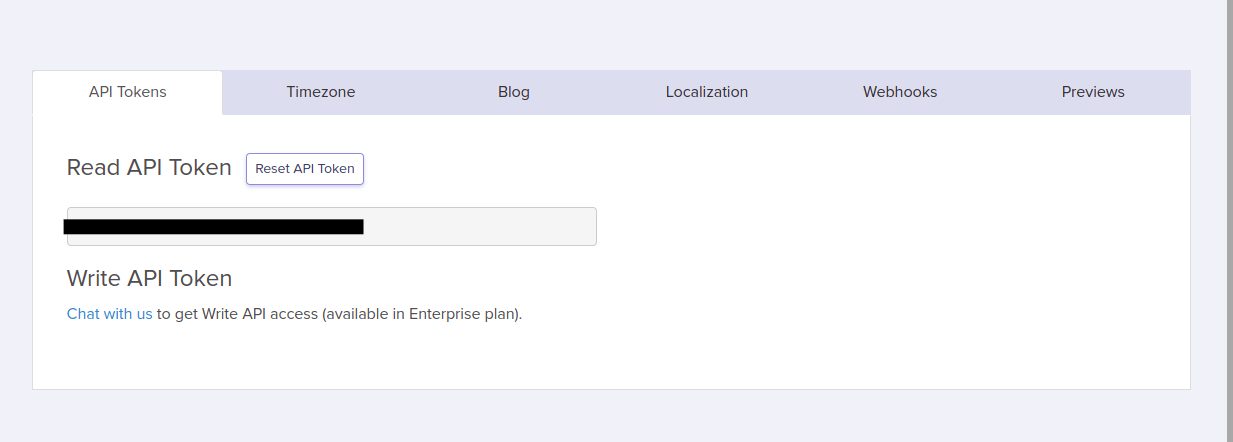
As aforementioned, to integrate CMS content into our application, ButterCMS makes available an authorization token. This can be accessed via the settings window. To access this token, hover over your profile at the top left of your dashboard, click on Settings, and then copy the Read API Token.
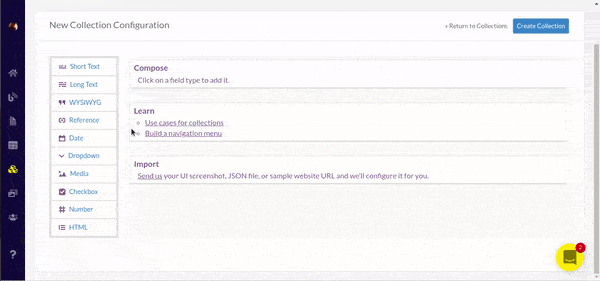
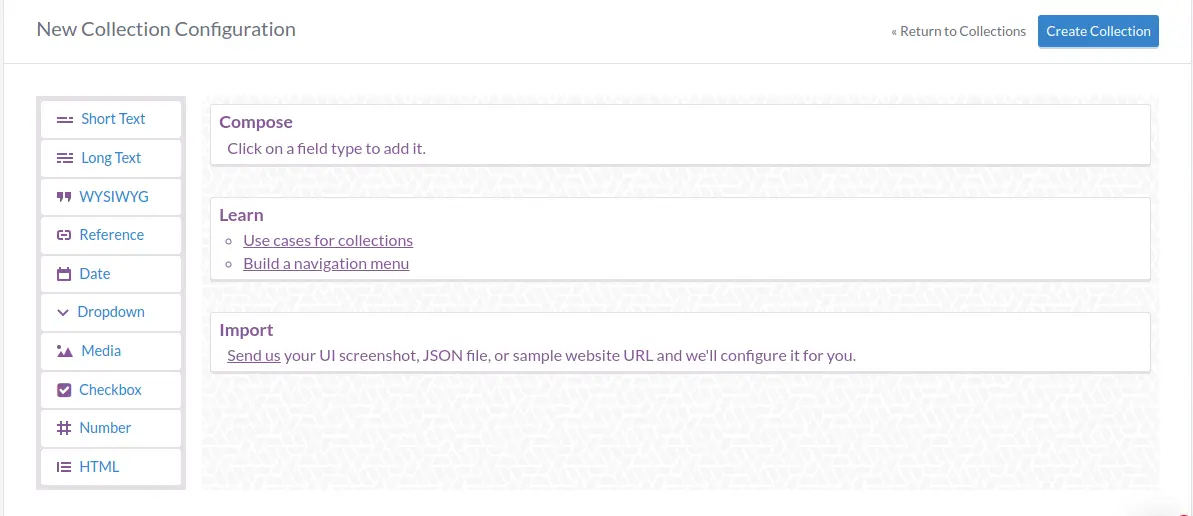
We'll be creating a collection with the content-type option. This collection will house the content of the products in our application:

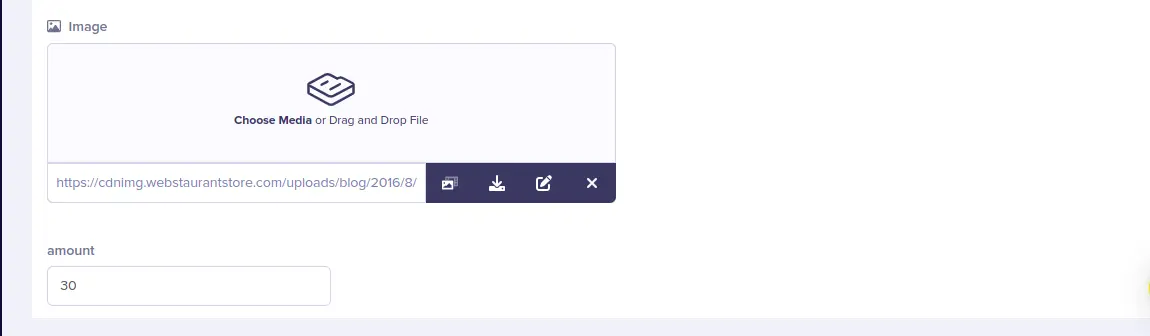
The items that populate this collection will contain four fields:
- Short text as Product Name
- Long text as Product Description
- Media as Product Image
- Number as Product Price
ButterCMS makes it seamless to achieve this. By adding a short text, long text, media, and number—viola! We have our products ready.
Next we see a new window where we may enter our product details for our collection after successfully creating the collection. Here we will enter various names of pizza, their descriptions, images, and amounts, and then publish. The steps below may be of great help.
Putting our data in our collection
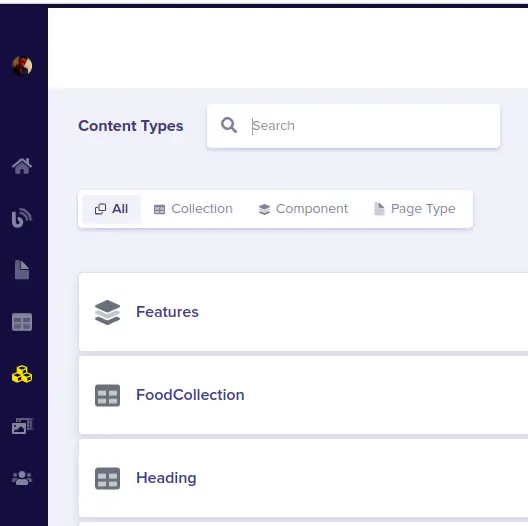
To create our collections, select the Content Types option from the yellow menu by clicking on it:
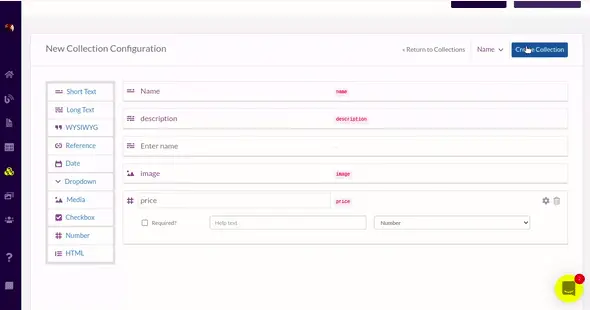
Thanks to ButterCMS, there are a variety of content fields, including short and long texts:
Only a few of these content fields will be required for our collections. The setup method is detailed below:
We will need the following content types:
- Short text for our product’s name
- Long text for our product’s description
- Media for our product’s image
- Number for our product’s price
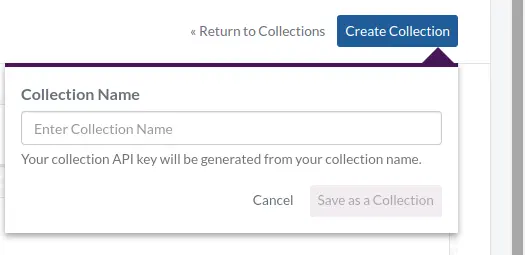
When we click on the collection, a pop-up appears where we will name our collection for the different pizzas on our menu, Butter Pizza.
Then, we proceed to our collection menu to create individual items for our newly created collection:

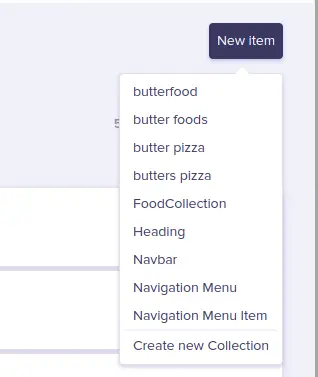
Go ahead and click the New Item button:

We then choose the collection that the item should be in. We will be selecting Butter Pizza:
Then, fill in our details:
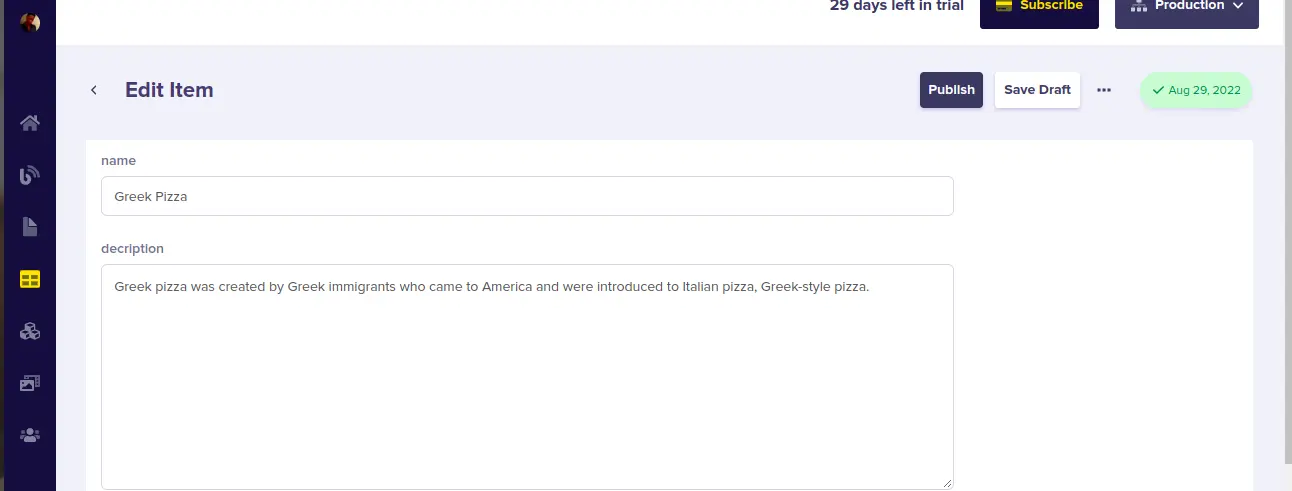
Then, we click the Publish button.

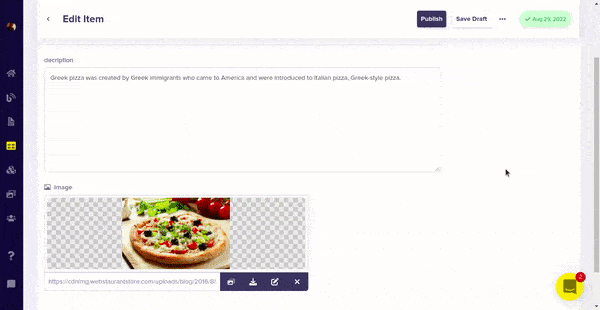
Following all of these processes, we ought to have the image below.
You can repeat this process to add more pizza menu items to this collection.
Integrating ButterCMS in our application
To connect our CMS to our application so we can perform our fetch operations, we will require our Read Token which was received from the settings in our dashboard.
Create a .env file in the root of your application. Copy the Read Token and store it in the .env file within your project root directory:
BUTTER_READ_TOKEN = "xxxxxxxxxxxxxxxxxxx";Create an Api.js file. This file will be used to handle API calls. After importing Axios, which is a data fetching library, we will create an asynchronous function, HandleFetch, which will perform a GET request using Axios to ButterCMS’s butters_pizza collection.
import axios from "axios";
const read = process.env.BUTTER_READ_TOKEN;

export const HandleFetch = async () => {
 const url = `https://api.buttercms.com/v2/content/butters_pizza/?auth_token=${read}`;
 return axios.get(url).then((res) => {
   return res.data.data.butters_pizza;
 });
};
Building our application
In this section, we will build a dynamic food-ordering application. We will also see a step-by-step breakdown on how to build our application.
Header
The header is the top area of every application. We'll have a plain header with a straightforward design. We will first create Header.js and it should look like this:
import React from "react";
import "./App.css";
function Header({showing}) {
 //host this in butter
//   burron state
   const [show, setShow] = React.useState(false);
 return (
   <div>
     <div className="container">
       <h1 className="header">WELCOME TO BUTTER PIZZA</h1>
   </div>

   </div>
 );
}
Styling:
.header {
   display: flex;
   text-align: center;
   justify-content: center;
   color: black;
   font-family: "Sofia", sans-serif;
   border: 2px solid black;
   border-radius: 25px;
}
//to get the font paste the code below under your head tag in index.html file:
<link rel="stylesheet" href="https://fonts.googleapis.com/css?family=Sofia">
To see our components we need to import them into our App.js file.
import {React, useState} from 'react'
import './App.css';
import Header from './header';
function App() {
 return (
   <div className="App" >
     <Header/>
   </div>
 );
}
export default App;
Results:

Data rendering in our application
We will create a product.js file. The first thing we will import is React and the HandleFetch() function which will be used to render our products
useEffect(() => {
   const getList = async () => {
     try {
       await HandleFetch().then((data) => {
         setPro(data);
       });
     } catch (err) {
       console.log(err);
     }
   };
   getList();
 }, []);
We will then store our products in a state and display data in JSX by mapping through the data. Our code should look like this, and these are the products being referred to:
The code:
<div className="pizza">
{product &&
 product.map((item) => {
   return (
     <div
       style={{ backgroundImage: `url(${item.image})` }}
       className="pizza1"
     >
       <h3>{item.name}</h3>
       <p>{item.decription}</p>
       <p>{item.amount}$</p>
       <button className="btn">Add to basket</button>
     </div>
   );
 })}
We can go ahead and import our product component in our App.js file.
import {React, useState} from 'react'
import './App.css';
import Product from './product';
import Header from './header';
function App() {
 return (
   <div className="App" >
     <Header/>
     <Product/>
   </div>
 );
}
export default App;
If you properly pasted the code above, you should have this:

Styling
.pizza1 {
   background-color: rgb(241, 237, 237);
   height: 25%;
   width: 15%;
   box-shadow: 0px 2px 8px 0px rgba(39, 10, 141, 0.5), 0px 4px 16px 0px rgba(7, 71, 190, 0.5);
   text-align: center;
   border-radius: 20px;
   margin: 1%;
   cursor: pointer;
}

.btn {
   border-radius: 20px;
   padding: 15px;
   cursor: pointer;
}

.pizza {
   color: silver;
   background: white;
   display: flex;
   justify-content: center;
   align-items: center;
   cursor: pointer;
}
Results
Our website looks nice right now. Our next steps will be to develop a feature that automatically adds our product to the shopping cart whenever we click, a feature that removes items from the cart when we no longer want them, and, finally, a search bar that filters products.
Adding to cart
Feel free to copy the styles of the section below. If you are wondering where they are pasted in our project, they are all done in our App.css and imported into each component that needs it:
//App.css
.App {
   margin: 0;
}

.header {
   display: flex;
   text-align: center;
   justify-content: center;
   color: black;
   font-family: "Sofia", sans-serif;
   border: 2px solid black;
   border-radius: 25px;
}

.food-grid {
   display: grid;
   grid-template-columns: 1fr 1fr 1fr;
   gap: 2em;
}

.pizza {
   color: silver;
   display: flex;
   justify-content: center;
   align-items: center;
   cursor: pointer;
   flex-direction: column;
   width: 50%;
}

.pizza1 {
   background-color: rgb(241, 237, 237);
   /* height: 25%;
   width: 15%; */
   box-shadow: 0px 2px 8px 0px rgba(39, 10, 141, 0.5), 0px 4px 16px 0px rgba(7, 71, 190, 0.5);
   text-align: center;
   border-radius: 20px;
   margin: 1%;
   cursor: pointer;
}

.btn {
   border-radius: 20px;
   padding: 15px;
   cursor: pointer;
}


/* new style to accomodate cart */

.d {
   display: flex;
   justify-content: space-between;
   align-items: center;
   padding: 0px 50px 0px 150px;
}

.d h1 {
   padding: 5px 30px;
}

.d button {
   outline: none;
   border: none;
   color: #fff;
   background: #333;
   padding: 5px 10px;
   font-size: 23px;
   border-radius: 5px;
   z-index: 4;
}

.d button:hover {
   cursor: pointer;
}


/* cart */

.cart-cont {
   position: absolute;
   top: 0;
   right: 0;
   width: 500px;
   height: 100vh;
   background: #fff;
   box-shadow: 0px 0px 10px 0px rgba(39, 10, 141, 0.5), 0px 4px 16px 0px rgba(7, 71, 190, 0.5);
   transition: all 0.3s ease-in-out;
   display: flex;
   justify-content: center;
   align-items: center;
   flex-direction: column;
}

.cart-list {
   height: 80%;
   width: 90%;
   overflow-y: scroll;
   display: flex;
   justify-content: center;
   align-items: center;
   flex-direction: column;
}

.cart-cont h1 {
   text-align: left;
}

.cart {
   background-color: rgb(241, 237, 237);
   height: 25%;
   width: 80%;
   box-shadow: 0px 2px 8px 0px rgba(39, 10, 141, 0.5), 0px 4px 16px 0px rgba(7, 71, 190, 0.5);
   text-align: center;
   border-radius: 20px;
   margin: 1%;
   cursor: pointer;
   margin-bottom: 8px;
}

.input {
   border-radius: 20px;
   padding: 10px;
   margin: 10%;
   width: 150%;
}

.p {
   color: silver;
}
Since we have two components for our application— header.js and product.js we will add a button to display the cart in the header component. We will then pass a prop that will show the cart and its content to the product component. In header.js, make the following modifications:
function Header({showing}) {
   const [show, setShow] = React.useState(false);
 return (
   <div>
     <div className="d">
       <h1 className="header">WELCOME TO BUTTER PIZZA</h1>
       {/* view cart button */}
       <button href="/cart" className="cart-btn" onClick={()=>{setShow(!show)
       showing(!show)
       }}>
         {show? "close": "View Cart"}
       </button>
     </div>
   </div>
 );
}
export default Header;
Here, we created a state to store a Boolean variable which we will use to display or hide the cart. When the cart is displayed, show is set to true and the button changes to a “close” button. In App.js we can pass this prop down to the child product component:
import {React, useState} from 'react'
const [show, setShow] = useState(false);
 const getDta =  (a) => {
   setShow(a);
 }
 return (
   <div className="App" >
     {/* pass down function to header to extract button state, set state show then pass down value to product */}
     <Header showing={getDta}/>
     <Product toshow={show}/>
   </div>
 );
Here, we passed a function which returns the state of the cart button as an argument. We then update the state show with the value and pass it to the product component to show or hide the cart window.
To display or hide the cart based on the value of the state show, make the following changes in product.js:
function Product({toshow}) {
   //  new state for cart

   const [cart, addToCart] = useState([]);
Above, we created a state where we will add items from our food-ordering app to be displayed in the cart. To add items to the cart, we will add an onClick event handler to the “add to basket” button to populate the state whenever a user selects a dish:
<button
className="btn"
   onClick={() => {
     // added a function to add the pizza to the cart
     alert(`${item.name} has been added to cart`);
     // spread previous values and append new one
     addToCart([...cart, item]);
   }}
 >
   Add to basket
 </button>
The next step is to create the cart window and, using a ternary operator, we will display the window only when the state show is true:
{toshow ? (
   <div className=" cart-cont">
     <div className="cart-list">
       <h1>Cart</h1>
       {/* cart items */}
       {cart.map((item) => {
         return (
           <div
             style={{ backgroundImage: `url(${item.image})` }}
             className="cart"
           >
             <h3>{item.name}</h3>
             <p>{item.amount}$</p>
           </div>
         );
       })}
     </div>
     <div className="total">
       <h1>Total</h1>
       <p>{cart.reduce((a, b) => a + b.amount, 0)}$</p>
       <button>Check out</button>
     </div>
   </div>
 ) : null}
Filtering food items
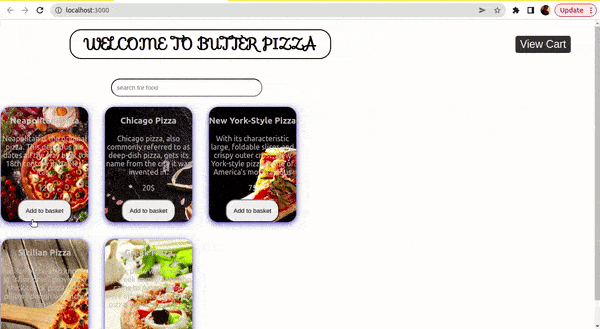
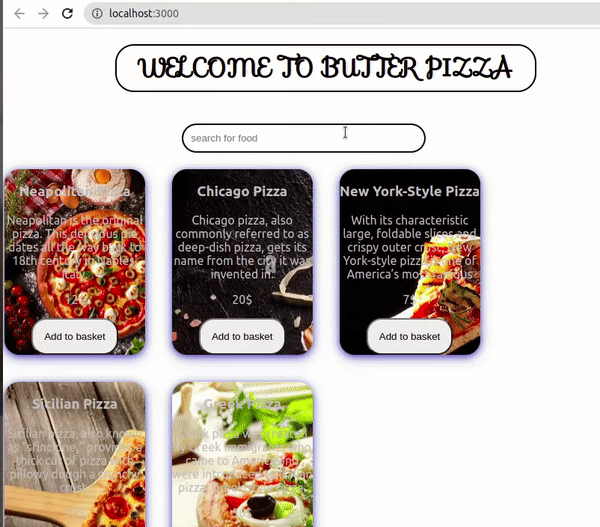
Here's the search functionality we're aiming for:
To allow for a better user experience, we will add a search field with which users can easily filter available dishes to find one that suits their needs. To do this, add the following code to product.js:
const [value, setValue] = useState('')
const [filtered, setFiltered] = useState([])
Next, we will populate the state filtered with the response from the CMS:
useEffect(() => {
   const getList = async () => {
       try {
         await HandleFetch().then((data) => {
           setPro(data);
           setFiltered(data)
         });
       } catch (err) {
         console.log(err);
       }
     };
     getList();
   }, []);
We will use the filtered state to display items based on the search field entry and use the pro state to reset the filtered state when the search field is cleared or empty:
const handleSearchResults = () => {
   if (value !== "") {
     return pro.filter((item) =>
       item.name.toLowerCase().includes(value.toLowerCase())
     );
   } else if (value === "" && pro !== []) {
     return pro;
   }
 };
 useEffect(() => {
   // Search for food
   let filtered = handleSearchResults();
   setFiltered(filtered);
 }, [value]);
Next, we just need to add the search field and map through the filtered state instead of the pro state when rendering the application:
<div className="">
   <input
     type="text"
     value={value}
     onChange={(e) => {
       setValue(e.target.value);
     }}
   />
 </div>
<div className="food-grid">
 {filtered &&
   filtered.map((item) => {
     return (
       // added an onclick event to each pizza item
       <div
         style={{ backgroundImage: `url(${item.image})` }}
         className="pizza1"
       >
         <h3>{item.name}</h3>
         <p>{item.decription}</p>
         <p>{item.amount}$</p>
         <button
           className="btn"
           onClick={() => {
             // added a function to add the pizza to the cart
             alert(`${item.name} has been added to cart`);
             // spread previous values and append new one
             addToCart([...cart, item]);
             console.log(cart);
           }}
         >
           Add to basket
         </button>
       </div>
     );
   })}
</div>
Remove from cart
Here's the effect we're looking for:

To remove an added product from the cart, we use a splice operator to remove the item from the selected index position and we add a new array to the state. The code should look like this:
{cart && cart.map((item, index) => {
   return (
     <div
       style={{ backgroundImage: `url(${item.image})` }}
       className="cart"
       key={index}
     >
       <h3>{item.name}</h3>
       <p>{item.amount}$</p>
       <button onClick={(e)=>{
         // remove item from cart
         cart.splice(index, 1);
         let x = cart;
         addToCart([...x]);
       }} >Remove Item</button>
     </div>
   );
 })}
At this point, we can say we are done!
Tips for creating the app successfully
You should adopt specific optimization practices when developing applications like this. Such optimizations include the following:
- Verify that the application is simple to operate with just one hand.
- Include good, descriptive pictures.
- Ensure that your UI/UX design is clear and basic.
- Make the checkout procedure easier by using seamless third-party payment providers.
- The application should be well-organized, simple to use, easy to navigate, and makes good use of the search bar.
- Make it simple to revisit purchases and order confirmations should be seamless.
- Ensure that there are numerous payment methods.
Your food ordering app questions answered
Did Uber Eats use react?
According to them, "Our experience utilizing it to rebuild the Restaurant Dashboard has been quite positive." Even if it only represents a small portion of the whole Uber Eats engineering ecosystem, the literal answer is, “Yes, Uber Eats used React for their web application initially and React Native for their mobile application, which is widely recognized.”
Does DoorDash use react?
DoorDash, as opposed to UberEats, heavily relies on React components to provide a dynamic, personalized experience for its users.
How much will it cost to develop a food delivery app?
A food delivery app typically costs between $15,000 and $30,000. Cloning sites like Uber Eats and DoorDash, with all their functionalities, would cost about $52,000 to $90,000. All the information you require to create a basic, functional food-ordering app is included in our article.
What other programming languages do food delivery apps use?
Food ordering applications rely on JavaScript Kotlin, Node.js, and Django for their backend and front-ends:
- Grubhub employed JavaScript on both the front-end and the backend of business processes to give them as much flexibility as possible. Node.js is also used to build the backend. It enabled code and solutions to be shared between the server and the client.
- Zomato, a well-known food delivery service, employs the Kotlin programming language to provide shorter, safer code.
- DoorDash’s initial team chose to use Django, a well-respected web framework, to create their web application. Django proved to be a suitable choice for quickly producing a minimum viable product with a small team of engineers.
Closing thoughts
In this tutorial, we learned how to use ButterCMS and React to construct a simple food-ordering application. Like other e-commerce applications, food ordering apps have many advantages, and in this article, I've outlined the specific procedures and best practices for developing one for your business or yourself. At this point, I would like to thank you for reading this article and express my hope that it added significantly to your knowledge.
To obtain the source code for this article and react food ordering app, go here: GitHub repository.
For more articles on using React, read:
- Building a React Ecommerce Application
- Web Analytics Tools for React Websites
- Best Practices for Building Large-Scale Applications
- React Best Practices: Maintaining Large Scale Projects
- Firebase and Google Analytics: Set Up and Log Events
Or check out our React starter projects, our react headless CMS and blog engine.