- What is a podcast and why are they trendy?
- Benefits of podcasting for small businesses
- Why building a JAMstack site is the best option for small businesses
- Tutorial: How to showcase your podcast on a JAMstack site
- Part 1: Create a Nuxt 3 project and connect it to ButterCMS
- Part 2: Storing podcast episodes in the ButterCMS dashboard
- Conclusion
In this article, we will talk about the growth of podcasts today and the benefits they bring to companies that want to improve their online presence. In addition, we will see how a JAMstack site can improve the simplicity with which we create and serve online content.
Furthermore, we will see how to integrate and take advantage of what the podcast offers us to create content that brings our audience closer to us. We will do this by creating a JAMstack application from scratch using Nuxt 3 and ButterCMS, and using the Spotify API to get the data from our podcast.
Table of contents
What is a podcast and why are they trendy?
A podcast is a series of audio episodes, focused on a specific topic. It is a type of web-based audio streaming, similar to a radio show, but this time you can subscribe to the show with an app and listen to it whenever and wherever you want.
Although most radio stations are joining the world of podcasting by recording their episodes and uploading them for offline listening, the true essence of podcasting lies in the freedom to choose the approach of the format. Podcasts can be found with different lengths, from 1 minute to 3 hours, with different frequencies, from one episode per month to one per day, and on any topic.
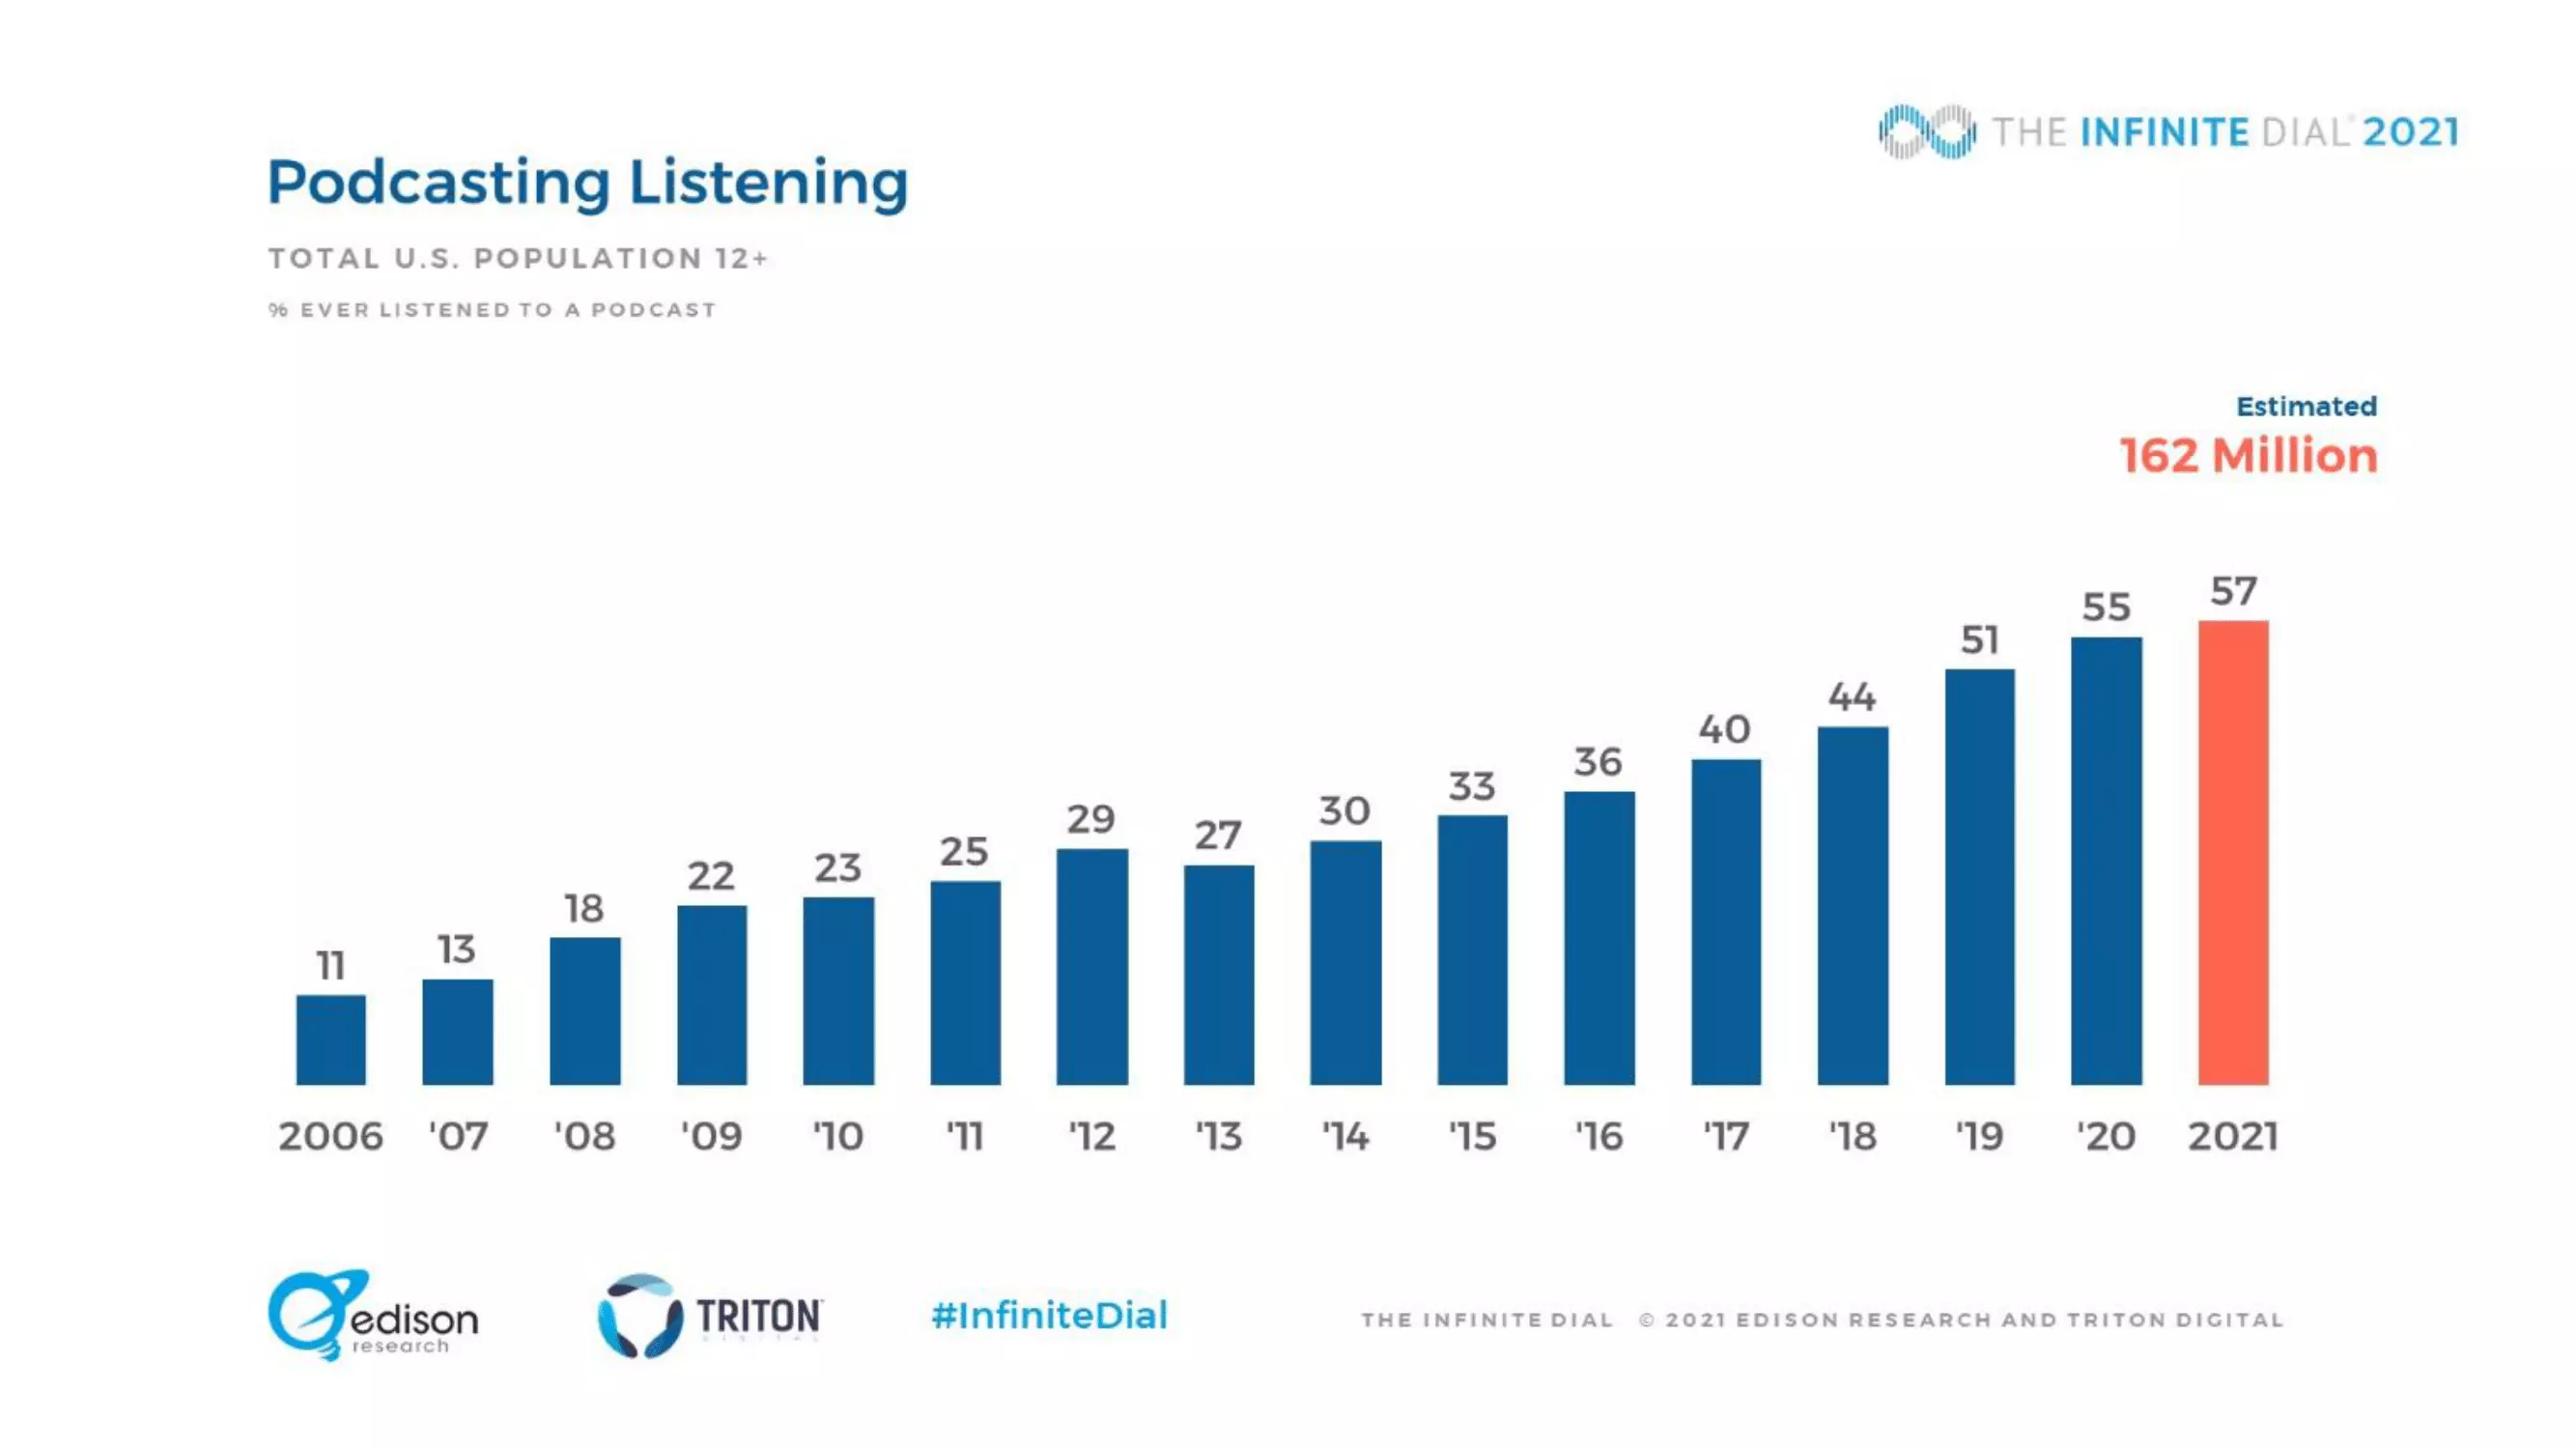
Podcasting Listening US – Source: Edison Research 2021
As can be seen in the graph above, podcasting is a booming medium nowadays, and not without reason. As the new generations are very technology-centric, our attention spans have shortened, and we have a greater ability to access anything instantly – Why would we spend 30 minutes reading a newspaper when we can listen to it in audio format on our smartphones?
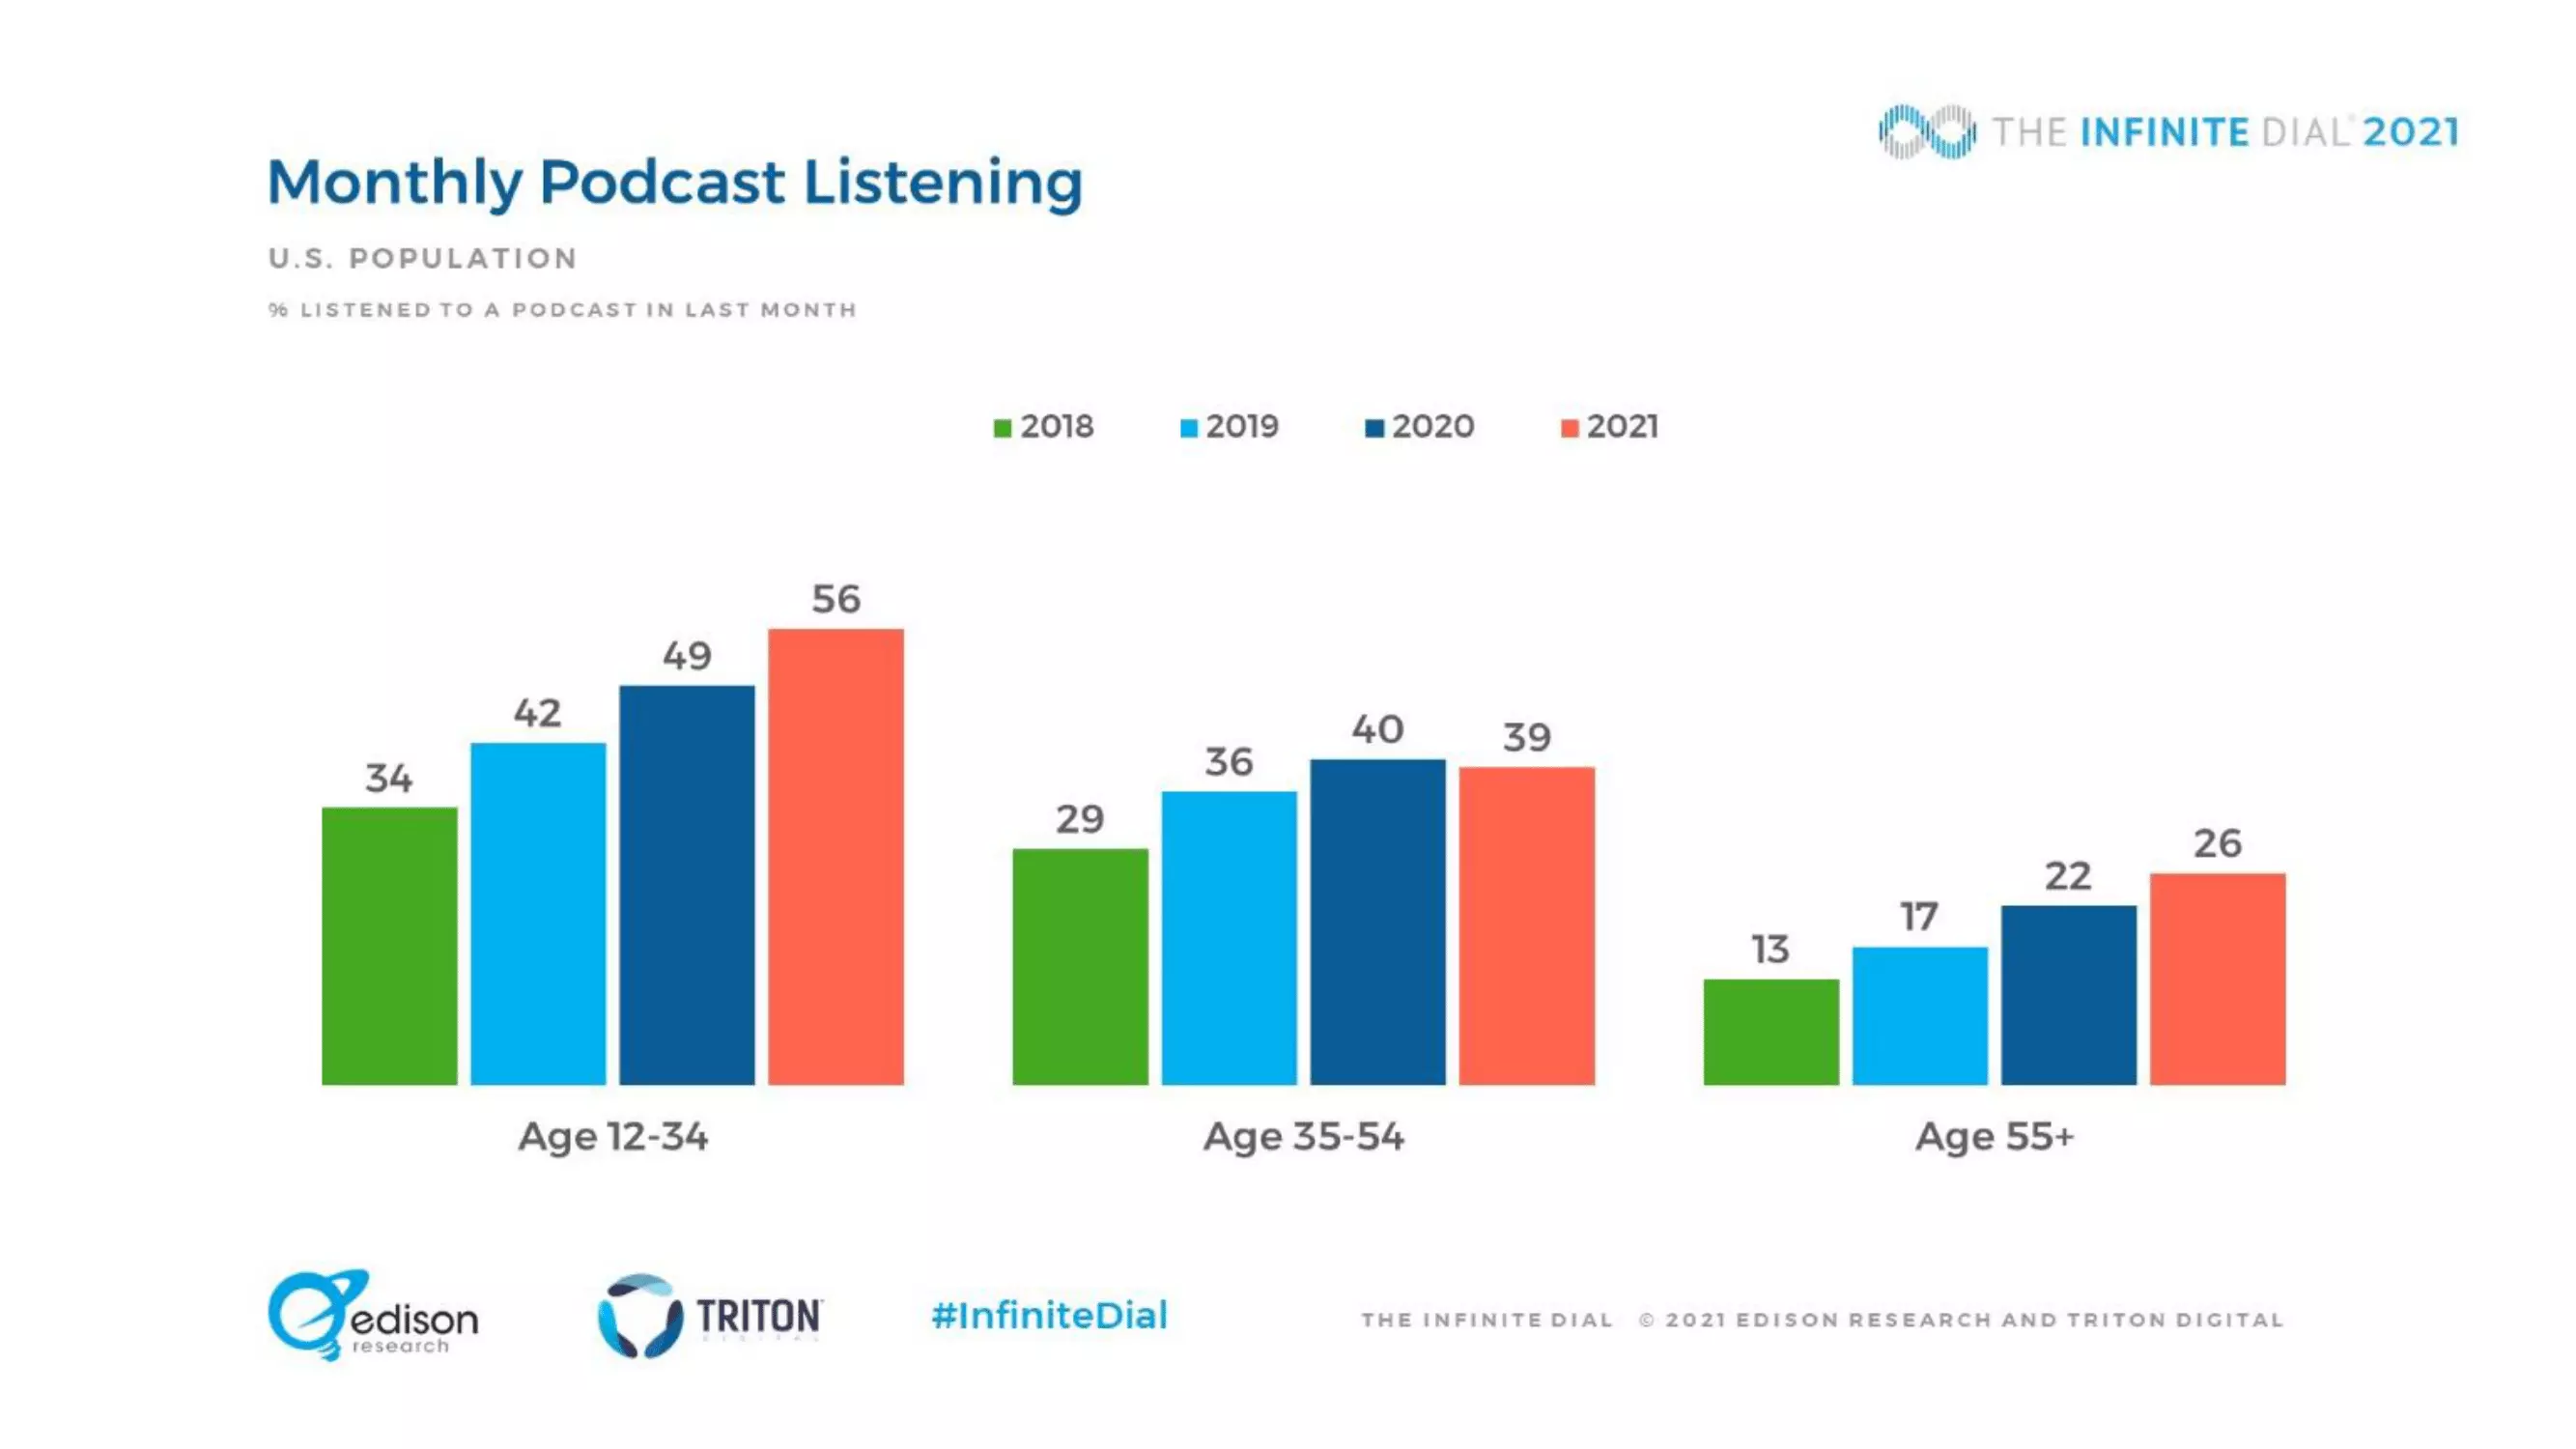
Monthly Podcast Listening US – Source: Edison Research
Arguably due to today's culture of immediacy, more people are now listening to podcasts with regularity, as they are an easier way to absorb information and entertainment with little effort. As a result, more companies start podcasting to build new and more “loyal” audiences, build trusting relationships with customers, and generate more sales.
What are you waiting for to discover the benefits this medium can bring you? Let's see them!

Benefits of podcasting for small businesses
Now that you know the broad outline of the current state of podcasting, it's time to look at how it benefits you as a business to create your own podcast.
The first thing to keep in mind when embarking on the creation of a podcast is that the focus should be on the quality of the leads it generates and on brand reinforcement, not just on numbers and statistics.
It's the quality of the leads you generate and how your messaging bolsters your brand that should be the aim of the game. — by Lower Street
With this in mind, it is true that a podcast will also help to build and expand certain areas. Podcasting helps:
1. Building your brand.
Every company needs to promote or publicize its services or products. And the chances are that your company is already doing it — Probably using conventional formats such as SEO, advertisements, written content or videos. So podcasting is likely to be your next target, and knowing the benefits will only confirm your next step.
As with written content, the podcast allows you as a company to express the expertise and skills of your team, thus increasing your reliability and reputation. This includes not only sharing technical or professional guidance, but also opinions about the sector and experiences, in order to better communicate the company's values and human side.
When building a brand, the first thing to do is to consider how we want to be seen, and a podcast is a great way to get the message across in an easy-to-consume format.
Let's take an existing podcast as an example and analyze how they are representing their brand:

CSS Podcast is a technology podcast hosted by two Google Developer Advocates. They are two experts who altruistically explain the most complex parts of this technology, CSS, to make it more bearable to the listener.
In this case, the brand (Google) is trying to bring its product closer to the audience by sharing, free of charge, the knowledge of experts so that developers frustrated with this technology can fall in love with it again.
It's a great way to get the brand to show thought leadership — not by publishing content for the sake of producing it, but for the sake of providing value.
When you are looking at growing your brand, it makes sense to aim at building brand awareness and truthfulness. Who doesn't think of Google as a search engine when they need to search for something? Or who doesn't think of Kindle when they want to buy/read an e-book?
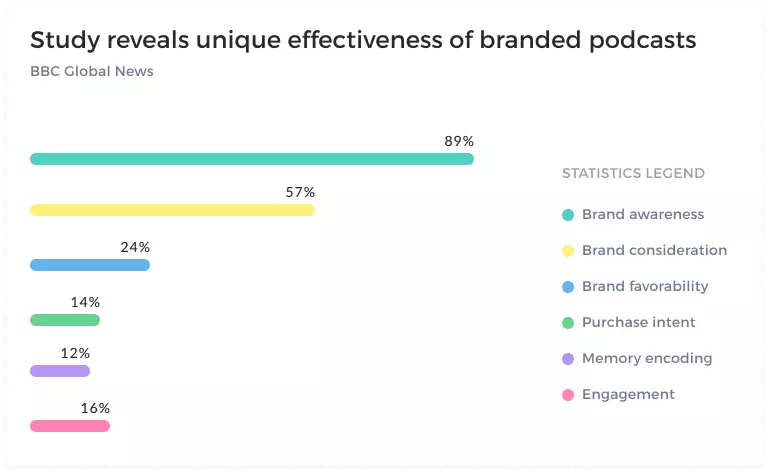
Audio activated research - Source: BBC
As you can see from the BBC statistics, a podcast can help us develop these goals. It can do so by producing closer and more trusting relationships, answering listeners’ questions in a more personal way, generating greater visibility through interviews with other industry experts, and collaborating with other podcasts.
Claritas research analyzes 834 million podcast impressions and finds that podcasts uplift brand awareness from 24% to 79% (30 times higher than traditional channels).
2. Expanding your audience.
A podcast can reach a different audience than traditional marketing and advertising media. In the end, listeners can consume this format in many ways, unlike written formats that rely on stronger concentration. Moreover, a podcast can be easily found by being present on the hosting platforms where other podcasts coexist, and not in a specific company space.
The US leads the world in podcast listenership, 117.8 million monthly podcast listeners, representing 40.0% of all internet users. Coming in second place in terms of penetration is Sweden, where 34.6% listen to podcasts. Adoption is similarly widespread in Norway, Australia, Canada, and Spain. — Source: eMarketer
As people are becoming busier and more active, podcasting has become incredibly popular because of the need for educational or entertaining content in the background while doing other boring or rote activities. People listen to podcasts when reading isn't an option, allowing them to multitask and saving them time.
Podcasts can reach people who are not in front of their computer. The audio format and portability of smartphones offer the possibility of listening on the go or while doing any physical or routine activity, as mentioned above.
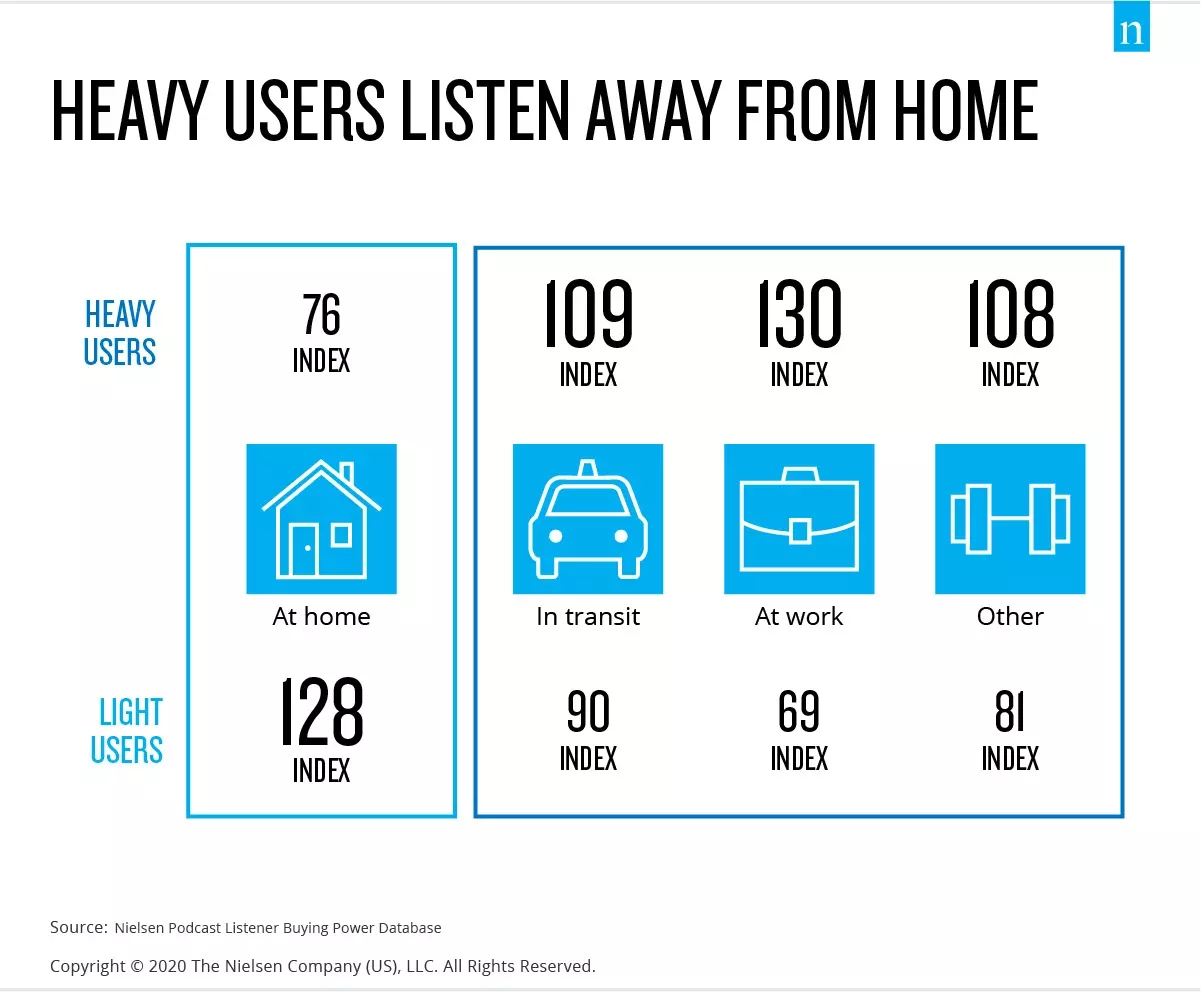
The Nielsen Podcast statistics show that 49% of the audience is listening to podcasts at home, 22% while driving, 11% at work, 4% on public transportation and 7% while working out or walking. — Source: Nielsen
As previously stated, one of the greatest advantages of podcasts is that they tend to have more visibility because they are included in hosting platforms such as Spotify, Google Podcasts, etc.
Of course, behind that growth, there will always be the work of promotion that has to be done in social networks and websites. But word of mouth and subscriber gain will also play a big role, making platforms start adding the podcast to their list of recommendations by which many users discover new podcasts.
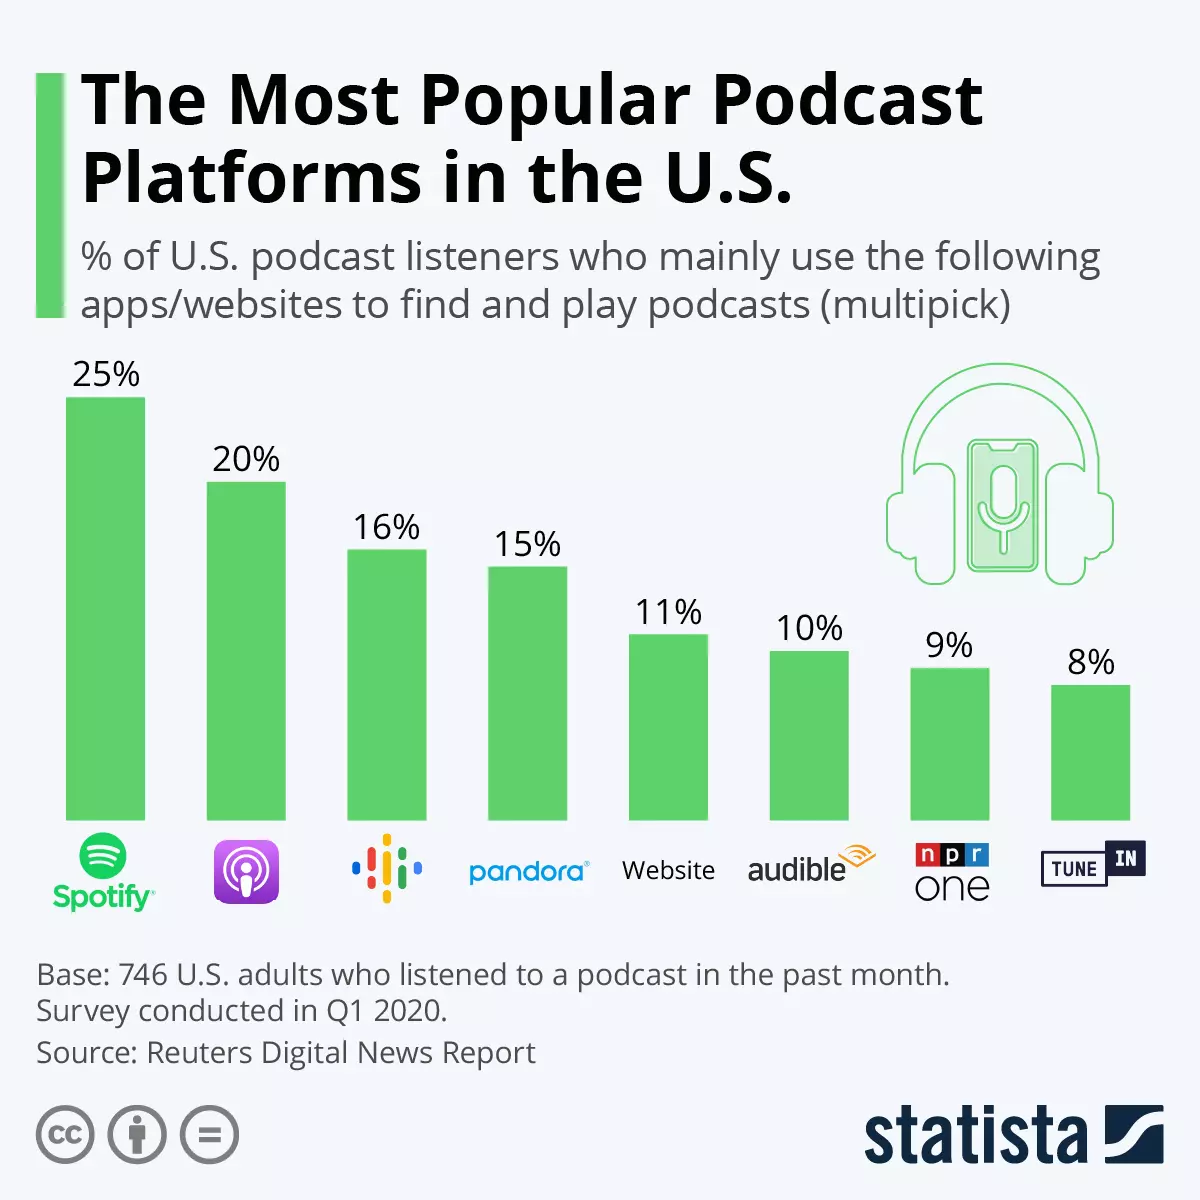
The Most Popular Podcast Platforms US 2020 – Source: Statista
In addition to the famous platforms, there are also podcast platforms that are more focused on specific sectors, so that people can find what they are looking for easier. It would be good to do a study of the communities in your sector and participate in them. That will make it easier to reach your ideal audience.
3. Creating and publishing content at a low cost.
Today, podcast production and distribution platforms are surprisingly affordable and easy to use. With the rise of the format, more startups and reputable companies have begun to create tools that make it easy to create and publish podcasts at a low price.
From a marketing perspective, this has made podcasting a more economical way to reach customers than other advertising channels.
It's cost-effective to produce a podcast. You don't need more than:
- A decent microphone and a headset. For $100 you can get a Blue Yeti, one of the most widely used for podcast production, and it's way more than enough.
- A “studio”. That can be a room in your house or in your office.
- A software or online tool for recording. You can record a Zoom meeting for free on your personal computer. Or, if you prefer to use an online platform to record with more people remotely, with better quality, or even with video, there are pay-per-month platforms such as Riverside.
- Software for editing. If your hosting provider doesn't have one on-site already, you can find editing software separately.
And to distribute it? Well, it turns out it's even easier. Nowadays, there are podcast hosting platforms that distribute them for you on all the free platforms: Spotify, Google Podcasts, Apple Podcasts, etc. Just by uploading your audio file for the episode and defining the fields requested, you will be publishing it on all platforms for free with a simple click.
The kicker is that on a platform like Spotify's Anchor, you could even record and edit your episode from there, saving you two of the requirements for production: the recording and editing tools.
Anchor is a free, beginner-friendly platform for podcast creation, containing tools that allow users to record and edit audio, arrange it into podcast episodes, publish podcasts to listening platforms, and monetize content by collecting listener contributions or adding advertisements into episodes. — Wikipedia
4. Building a personal connection.
Podcasts tend to be more authentic because of the more personal, and sometimes informal, side that articles fails to capture. People tend to connect with and trust a brand more when they share their experiences as a company. That can be with customer case studies or statistical data, showing transparency and truthfulness, or with a more humorous touch, such as telling anecdotes from day-to-day life at work.
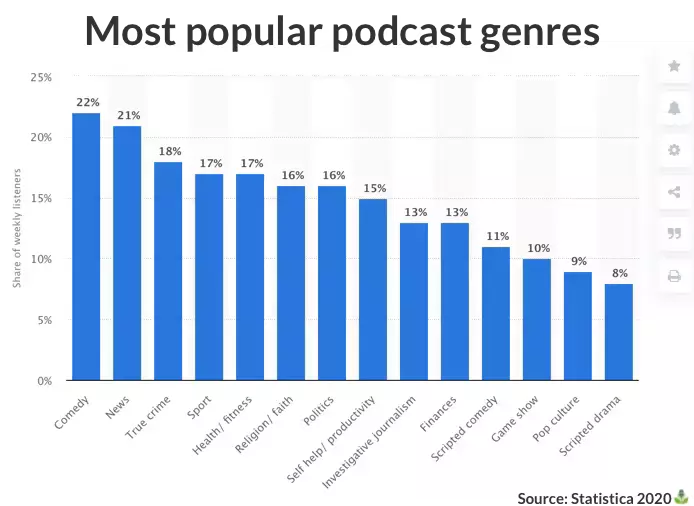
Most popular podcast genres – Source: Statistica 2020
As can be seen in the graph, listeners seek to be informed about what is going on in the world, to disconnect through laughter, and to learn how to take care of themselves, both physically and mentally. Listeners are open to improving and learning about new topics.
The advantage of podcasting is not only in building a brand, but it also helps us to acquire new customers that are loyal and engaged. It also brings us even closer to the clients we already work with, connecting on a deeper level than before.
More than 90% of the podcast audience listens to most of an episode, while only ~12% do so in video format.
As we have mentioned before in Building your brand, it’s worth noting that a very common way to establish crucial connections for brand growth, and long-term relationships, is to bring in quality guests from the same sector. This is not only to encourage their followers to get to know the product or service you offer, but also to create a closer relationship with your guests and grow your network.
5. Expanding online marketing opportunities.
As we have seen, we have the traditional marketing channels pretty well assimilated – SEO, written content, events, ads – and we know that they benefit each other. But, what about using podcasting to leverage other channels? Are we aware of the content it can help us generate?
The idea is that the podcast can also help us to present new content on our website and give us ideas for social media posts, improving SEO and our online presence.
There are software and online tools that allow you to transcribe audio content directly into text. But there are also many others that offer to use the audio in video format, adding subtitles and wave effects. It is clear that the world of podcasting continues to grow, and there are more and more alternatives for sharing content on the most widely used platforms. A clear example of this would be the Shameless podcast, who publish part of their podcast in video format on TikTok, allowing them to reach a wider audience.
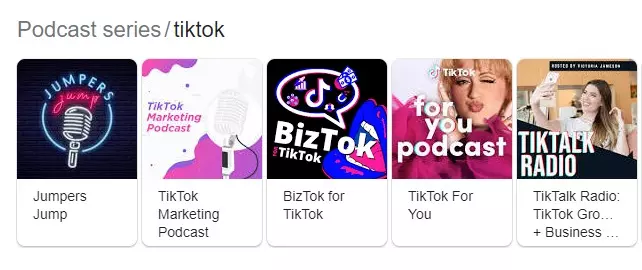
Podcast series on TikTok – Google search
Another recommendation is that, just as you can redirect to the podcast from the company's website and social networks, it is advisable to redirect to the rest of the media through the podcast. By creating show notes in each episode, you can do things like advertise your services and leave links to the topics discussed.
This is a technique of repurposing and recycling content, this time from podcast episodes, to have recurring content across all platforms.
And now that you know the details of the benefits that a podcast can bring to your company, why not see how you can reuse its content on your JAMstack site? Let's do it!
Why building a JAMstack site is the best option for small businesses
If you are not familiar with the term JAMstack yet, JAMstack is the concept that gave name to the new fashion of generating static sites with modern technology. It is a web development architecture and a set of best practices, which allow a website to have better performance, better security, lower costs, and higher productivity.
The word JAM refers to:
- (J): JavaScript, the static site generator needed to render our application, that would be Nuxt in this tutorial.
- (A): API that we are going to use to get our data, which in this demo is a Headless CMS called ButterCMS, as well as the Spotify API to get the podcast data.
- (M): Markup (precompiled), which is what a static site is based on.
And you may be asking yourself, why am I interested in setting up my website with this type of architecture? Well, the advantages of having a JAMstack website today are:
-
Better development experience and increased productivity.
Isolating the front-end from the back-end makes it possible for your development team to change visual appearances without modifying the content structure. It also allows for choosing different technologies for the front-end and back-end, making it easier to migrate projects or update them in the long term.
Furthermore, if you are using a Headless CMS as a back-end, it will take care of content management and delivery, allowing developers to focus on the rendering part while editors will be completely independent.
-
Improved site performance and speed.
By having the page in pre-generated HTML, being plain text, it is much faster to deliver, which helps the performance of your site and SEO.
Besides, if you use a Headless CMS, it also provides services to optimize the assets and the speed of responses in which they are served. This is because all data is being delivered through CDNs.
A content delivery network (CDN) refers to a geographically distributed group of servers that work together to provide fast delivery of Internet content. — Cloudflare
-
Increased security.
It provides more security. As you are not communicating with any API on the fly, there is less chance of being hacked.
Moreover, a Headless CMS takes care of maintaining the security of the platform and updating it on your behalf.
-
Greater reliability and stability.
Thanks to being hosted on a CDN network with lots of servers all over the world, if one server fails, it can be redirected to another one. This avoids issues such as 500 errors which servers used to produce on certain occasions.
-
Lower cost solution.
Just like podcasting, a JAMstack website also benefits you economically, both for the price of the Headless CMS where you store your data and the price of the hosting where you store the pre-rendered HTML.
This is because the price of a server is determined by the number of requests it receives, and as your website is pre-rendered, you only call the API when you generate it. And once generated, the type of hosting that allows you to store this type of site is very cheap as well.
-
Easily scalable.
Increasing the scalability of your project is very easy with this architecture. Just by increasing the bandwidth of your hosting provider, more people will be able to visit the website simultaneously. In fact, there are always plans that allow you to automate this process by following the growth of your website.
Since new projects are constantly being created, it has been necessary to make improvements in the way websites were made. And, although this architecture already existed under the name of static sites, advances in technology have brought about huge changes in the last few years, just look at how Vercel and Next.js are doing.
Vercel, the company behind the popular Next.js framework for front-end developers, announced a $150 million Series D round that puts its valuation at $2.5 billion. - Techcrunch
Therefore, for this article, I couldn't bring you anything else but a JAMstack project. Also, it will be using ButterCMS, which will facilitate data storage, image processing and the UI for the editors working on the project.
Tutorial: How to showcase your podcast on a JAMstack site
For this demo, Nuxt 3 will be used as the front-end framework and ButterCMS as the Headless CMS. In addition, to get the data from the podcast, the Spotify Web API for developers will be used.
What is Nuxt?
Nuxt is a free & open-source framework that helps you build server or pre-rendered Vue apps easily. It’s the backbone of a Vue project, that gives you the structure to build the project with confidence and flexibility.
The best part of Nuxt, is the number of modules that can be found in its ecosystem, making it super easy to extend your application and integrate with any other software/tool.
Although the core of Nuxt 3 is the same, in the latest version it improves and adds features that make the framework a better resource for building JAMstack sites. The Nitro server is a clear example of this. More info can be found at New server engine: Nitro.
New standalone server in Nuxt 3 (Nitro): The output is combined with both runtime code to run your Nuxt server in any environment and serve you static files, making it a true hybrid framework for the JAMstack. — Nuxt 3 website
💡 Although in this tutorial we see how to create the website from scratch, both the script to migrate content from Spotify to Butter CMS and the component to represent this data can be integrated into another website without any problem.
Part 1: Create a Nuxt 3 project and connect it to ButterCMS
Now that you are familiar with Nuxt, let's start with the installation by following the official guide and using Visual Studio Code as the code editor for this tutorial.
When it comes to connecting the front-end to the Headless CMS, we will make use of the How to connect Nuxt to ButterCMS guide.
1.1. Installation: Nuxt, Windi CSS and ButterCMS js client.
To create the Nuxt 3 project, run the following commands in your terminal:
Recommendation: Upgrade the Node’s version before creating a new project. At the time of this tutorial, I’m running v16.13.0.
npx nuxi init butter-podcast-app
code butter-podcast-app // Open the project folder in VS Code
Install the dependencies and run the project in development mode:
yarn install // npm install
yarn dev -o // npm run dev -- -o
Your app is now available at http://localhost:3000.
For more details on the process or to migrate from Nuxt 2 to Nuxt 3, go to the Installation guide.
Apart from the initial setup, for this demo I will use a CSS utility framework called Windi CSS. Windi is an alternative to Tailwind, providing faster loading times and additional features.
To install it, it’s as simple as adding the Nuxt module to use Windi, which is fully compatible with Nuxt 3. Run the command:
yarn add nuxt-windicss -DIf you want to know what other modules are compatible with Nuxt 3, visit the list of Nuxt 3 modules.
Then, add the module in nuxt.config.ts:
import { defineNuxtConfig } from 'nuxt3'

// https://v3.nuxtjs.org/docs/directory-structure/nuxt.config
export default defineNuxtConfig({
  buildModules: [
    'nuxt-windicss',
  ],
})
Lastly, to connect to your Headless CMS, and to get all the data you need to render your page, add the JavaScript client provided by ButterCMS.
You must already have an account, or use the free trial one.
Install the client:
yarn add buttercmsCreate a plugin called buttercms.js under the plugins’ folder, and add the JS client as a helper:
import { defineNuxtPlugin } from '#app'
import Butter from 'buttercms'

export default defineNuxtPlugin(() => {
	const config = useRuntimeConfig();

  return {
    provide: {
			// Call the JS client with a private runtime config variable
      butter: Butter(config.API_TOKEN)
    }
  }
});
This time, unlike Nuxt 2, you don't have to register the plugin in nuxt.config.js. All plugins in the
plugins/directory are auto-registered by Nuxt 3.
To access your ButterCMS space, you will need the API Token found in Settings as a Read API Token. For security reasons, it is best not to have the token stored in any code repository.
To address this, create an .env file in the root of the project with your token:
API_TOKEN='your-token'To be able to read API_TOKEN from the config variable in the plugins folder, you need to add the new environment variable in nuxt.config.ts:
export default defineNuxtConfig({
  privateRuntimeConfig: {
    API_TOKEN: process.env.API_TOKEN
  },
})
To understand when to use publicRuntimeConfig or privateRuntimeConfig, take a look at https://v3.nuxtjs.org/docs/usage/runtime-config.
1.2. Create the landing page
Once the project can connect to your dashboard in ButterCMS, the next thing will be to render one of the example pages. In this case, the page: Landing Page with Components.
Let's start by using the helper $butter, created in the previous section, to call the landing page from App.vue:
App.vue is the main view of the Nuxt app. And, as we will not represent more pages in this project, you won’t need to make use of the pages folder; App.vue will be enough.
<template>
	<!-- Renders the page' components dynamically        -->
	<!-- by passing their data through the fields' prop. -->
  <component
    :is="component.type"
    :fields="component.fields"
    v-for="component in story.fields.body"
  />
</template>

<script setup>
// Get the helper from the main app.
const { $butter } = useNuxtApp();

// Obtain the page's structure & data by its path 'landing-page-with-components'.
const { data: { data: story } } = await $butter.page.retrieve('*','landing-page-with-components');
</script>
As you can see in the code above, with the SFC basic syntax, any variable inside <script setup> could be called right inside the template. For that, story is called inside the v-for without returning it in the script section.
Recommendation: Use Vue 3 Chrome extension (beta) to check the content of story.
Now that all the data is in place, it’s time to create the page components.
1.3. Create and declare components
One of the advantages of using a Headless CMS, is that we won’t have to worry about naming our components twice. The name the components receive in the dashboard will be the name we will use in the front-end project.
First, we'll have to create a components/ folder in the root of the project.
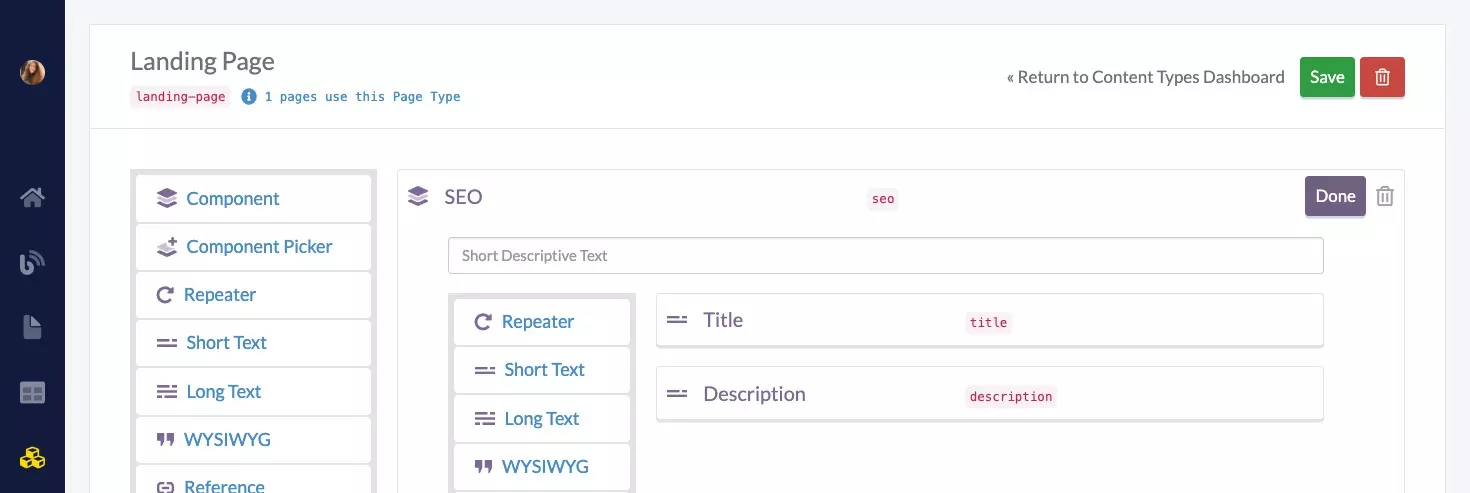
Then, in order to declare the components coming from the dashboard, go to Page type and open Landing Page to see its schema and the components' name/fields.

Landing Page Content type schema in ButterCMS dashboard
With this information, we can add in the buttercms.js plugin the declaration of the components that we see in the schema, which are: Hero, Features, Testimonials and TwoColumnWithImage.
Nuxt automatically imports any components in the components/ directory that are being called in the project. These components, on the other hand, come dynamically from the API response and, therefore, we need to declare them initially.
import { defineNuxtPlugin } from '#app';
import Butter from 'buttercms';

// ButterCMS dynamic components
// https://v3.nuxtjs.org/docs/directory-structure/components
import Hero from '~/components/Hero.vue';
import Features from '~/components/Features.vue';
import Testimonials from '~/components/Testimonials.vue';
import TwoColumnWithImage from '~/components/TwoColumnWithImage.vue';

export default defineNuxtPlugin((nuxtApp) => {
  const config = useRuntimeConfig();

	// Global Vue components
  nuxtApp.vueApp.component('hero', Hero);
  nuxtApp.vueApp.component('features', Features);
  nuxtApp.vueApp.component('testimonials', Testimonials);
  nuxtApp.vueApp.component('two-column-with-image', TwoColumnWithImage);

  return {
    provide: {
      butter: Butter(config.API_TOKEN),
    }
  }
});
The next step is to create the components, .vue files, in the components/ folder. As in App.vue we have passed the component data through the prop fields, this will be the initial content of all the components:
<template>
  <section :id="$props.fields.scroll_anchor_id">
    <!-- Other fields content representation -->
  </section>
</template>

<script>
export default {
  props: ['fields']
}
</script>
Now, for each of them, we will review the fields we want to represent by looking at their schema. As an example, let's see how the Hero.vue component would look like given these fields:
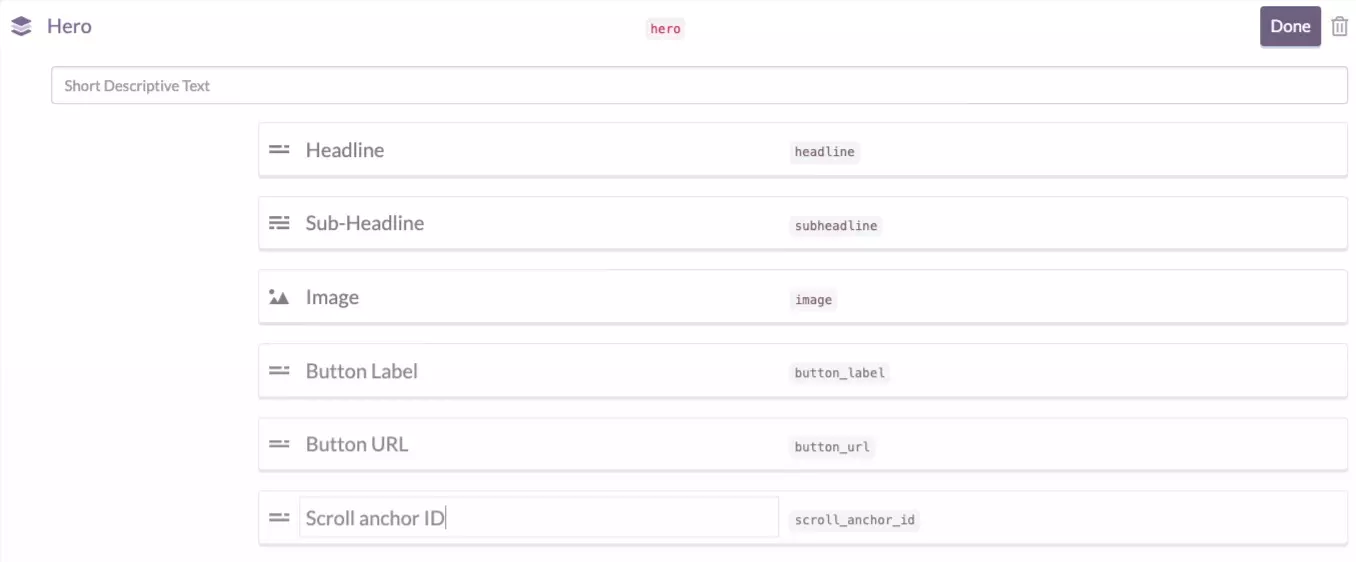
The equivalent Vue component would be:
<template>
  <section :id="$props.fields.scroll_anchor_id" class="flex flex-wrap bg-light-blue-700 text-white px-6 md:px-12 py-12 md:pt-24 mb-24 md:mb-32">
    <header class="w-full md:w-1/2 lg:w-2/5 flex flex-col items-center text-center md:items-start md:text-left">
      <h1>{{ $props.fields.headline }}</h1>
      <p class="pb-6 md:pb-8">{{ $props.fields.subheadline }}</p>
      <atom-button
				:url="$props.fields.button_url"
				:label="$props.fields.button_label"
			/>
    </header>
    <figure class="w-full md:w-1/2 lg:w-3/5 z-2 -mb-24 md:-mb-32 pt-8 md:pl-12">
      <atom-image
        :srcUrl="$props.fields.image"
				:alt="`${$props.fields.headline} image`"
        width="800" height="460" class="mx-auto w-full h-full object-cover rounded-xl shadow"
      />
    </figure>
  </section>
</template>

<script>
export default {
  props: ['fields']
}
</script>
All the components code can be found in the demo project https://github.com/Dawntraoz/butter-nuxt3-podcasts-showcase/.
As you can see in the previous example, not all the code is using basic HTML tags. We also make use of other Vue components. When we develop a large-scale project we have to try to reuse as much code and logic as possible, to make it easier to update or adapt our project to changes.
The two elements that were most repeated among components were the button and the image. And so, for both of them, we are going to create an individual/reusable component.
To distinguish them from the components that come from the Headless CMS, create a folder called atom/ and, in it, create the components:
AtomButton.vue:
<template>
  <a :href="$props.url" target="_blank" rel="noopener noreferrer" class="bg-light-blue-900 font-bold text-white py-4 px-8 rounded-full">
    {{ $props.label }}
  </a>
</template>

<script>
export default {
  props: ['url', 'label']
}
</script>
AtomImage.vue (Using the Transformation API provided by ButterCMS):
Having the logic of the image transformation in a single component allows for extending its functionality in the future, adding responsive images, renditions, etc.
<template>
<img :src="transformImage()" :width="$props.width" :height="$props.height" />
</template>
<script>
export default {
props: {
srcUrl: String,
width: String,
height: String
},
setup(props) {
const transformImage = () => {
const imageParts = props.srcUrl.split('/');
const resize = !props.width && !props.height ? '' : `/resize=w:${props.width},h:${props.height}`;
return `https://fs.buttercms.com/output=format:webp,quality:100${resize}/${imageParts[imageParts.length - 1]}`;
}
return { transformImage }
}
}
</script>
To see the rest of the project, please go to https://github.com/Dawntraoz/butter-nuxt3-podcasts-showcase/.
1.4. Adding SEO metadata
SEO is a very important part of any website, and it is also important for a Headless CMS. In the example landing page, we find an SEO section with the title and description fields.
To add it to our Nuxt project, it is as simple as adding in the <script setup> of App.vue, just after the call to $butter:
useMeta({
  htmlAttrs: {
    lang: 'en-US',
  },
  title: story.fields.seo.title,
  meta: [
    {
      name: 'viewport',
      content: 'width=device-width, initial-scale=1',
    },
    {
      name: 'description',
      content: story.fields.seo.description,
    },
  ],
})
And voilà, we now have the landing page created representing the data coming from the dashboard!
Part 2: Storing podcast episodes in the ButterCMS dashboard
The main objective of this section, and the core of this tutorial, is to be able to represent our podcast episodes with the ButterCMS data. We want to have it all in one place.
To achieve our goal, we will have to follow certain steps:
- Create a content-type collection
podcast_episodein the ButterCMS dashboard. - Store the podcast episodes creating a script that extracts the data from Spotify and transforms it to send it to the dashboard using the Write API.
- Create a reference field on the landing page to choose the podcast episodes we want to show.
2.1. Create podcast_episode content-type collection.
To create the collection type, we need to be clear about what data we want from each episode.
In the following list, I propose several fields that could be useful to represent the episode. For each item, I suggest a name and type of field:
- Title: the name of the episode. Type: Short Text.
- Description: the episode formatted text. Type: HTML.
- Url: the link to the podcast episode in Spotify. Type: Short Text.
- Release Date: the episode release date. Type: Date.
- Cover Image: the episode cover image. Type: Media.
Go to the collection content-type builder and add the fields to the content-type until you have something like this:

2.2. Import Third-Party data into your dashboard: Spotify case study
The flow to follow to import data from an external API to our dashboard, and a case study, can be found in the following guide: Importing Third-Party data into ButterCMS. We will rely on this guide, and the following flowchart, for this section:
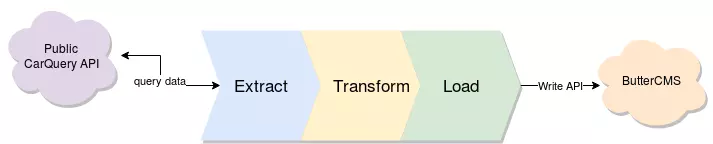
This diagram consists of 3 sections: extract (get data), transform (do mapping) and load (upload via Write API). Three parts that we will explain in detail as we define the script.
But first, to store the script in the project, we will create a scripts/ folder. In it, we will create a file called spotify-to-butter of type .mjs, since we want to take advantage of the convenience of ECMAScript modules.
And, to run the script as we develop features, we’ll create a script in package.json that will be executed as yarn podcasts:build.
"podcasts:build": "node scripts/spotify-to-butter.mjs"Extract: Get the podcast show episodes from Spotify.
This basically refers to making a query to an external resource to obtain its data. In this case, the external resource will be the Spotify Web API and the data we want to obtain will be the episodes of the podcast show “No me da la vida”.
To get the episodes of any show, there’s an endpoint called “Get Show Episodes”. But to be able to make any call to the Spotify API, we need to have access to it; we need to be authorized.
This is solved by creating a developer account and obtaining the client credentials by following the steps below:
As the data is public, and not personal data from a private account, customer credentials are sufficient to make the request. Please note that for other types of queries, a different type of token will be required.
1. Create an App:
Create an App in the Spotify dashboard by following the App Settings guide to get your Client ID and Secret.
Add the following variables to the .env file, already created at the root of the project, and fill them with your own Client ID, Secret and show ID:
SPOTIFY_CLIENT_ID=''
SPOTIFY_CLIENT_SECRET=''
SPOTIFY_SHOW_ID='0RctycUmwttpDjMvKovO7r' // No me da la vida example2. Create Spotify API requests:
It's time to start adding content to the spotify-to-butter.mjs script. The first thing we will develop will be the calls to get the access token from our Spotify client, and then get the episodes using it.
As you can see in the guide, Spotify provides a sample script to get the access token, but it is exemplified with the request package. In our case, since we have axios installed and the ButterCMS js client also uses it, axios will be used for this script:
/**
 * Client Credentials oAuth2 flow to authenticate against the Spotify Accounts.
 * More info at https://developer.spotify.com/web-api/authorization-guide/#client_credentials_flow
 */
import axios from 'axios';
import querystring from 'querystring';

import dotenv from 'dotenv';
dotenv.config();

const client_id = process.env.SPOTIFY_CLIENT_ID;
const client_secret = process.env.SPOTIFY_CLIENT_SECRET;
const auth_base_64 = btoa(`${client_id}:${client_secret}`);

// Your app requests authorization options
const authOptions = {
  method: 'post',
  url: 'https://accounts.spotify.com/api/token',
  headers: {
    'Content-Type':'application/x-www-form-urlencoded',
    'Authorization': `Basic ${auth_base_64}`,
  },
  data: querystring.stringify({grant_type: 'client_credentials'})
};

// (POST) The authorization request
axios(authOptions)
  .then(function(response) {
    // Use the access token obtained to access the Spotify Web API
    const token = response.data.access_token;
    const options = {
      method: 'get',
      url: `https://api.spotify.com/v1/shows/${process.env.SPOTIFY_SHOW_ID}/episodes?market=ES`,
      headers: {
        'Authorization': `Bearer ${token}`
      }
    };

		// (GET) The show episodes request
    axios(options).then(function(response) {
      console.log(response.data.items);
      console.log(`${response.data.items.length} episodes from Spotify`);
    });
  })
  .catch(error => console.log(error));
Things to keep in mind when making the POST call https://accounts.spotify.com/api/token from axios:
The form option in the request package is the equivalent of data in the axios package.
// request version
var authOptions = {
  // ...
  form: {
    grant_type: 'client_credentials'
  }
};
But to make it work, we must make use of the querystring package and execute the stringify method with the data value: {grant_type: 'client_credentials'}.
And then, for the Spotify endpoint to read it correctly, we need a header that specifies the Content-Type to application/x-wwww-form-urlencoded. Like this:
const authOptions = {
  // ...
  headers: {
    'Content-Type':'application/x-www-form-urlencoded',
    'Authorization': `Basic ${auth_base_64}`,
  },
  data: querystring.stringify({grant_type: 'client_credentials'})
};
In the Authorization header, we need to send our Spotify client ID and Secret in base64 format.
By getting the values from our .env file using the dotenv package and composing the base64 string with btoa, we are good to go!
import dotenv from 'dotenv';
dotenv.config();

const client_id = process.env.SPOTIFY_CLIENT_ID;
const client_secret = process.env.SPOTIFY_CLIENT_SECRET;
const auth_base_64 = btoa(`${client_id}:${client_secret}`);

const authOptions = {
  headers: {
    'Authorization': `Basic ${auth_base_64}`,
  },
};
On the other hand, when we’ve already received the access token, and we go to make the GET call https://api.spotify.com/v1/shows/ID/episodes, we will see that it doesn’t find our podcast. This is due to:
The market parameter.
If we don't set this parameter, Spotify won’t search in the country where the podcast exists and, therefore, won’t find the show.
To specify the country, in the call's URL add:
// https://api.spotify.com/v1/shows/ID/episodes?market=ES
?market=[Country Code]
At this point, once we have the necessary credentials and have started the script, we can view the episodes locally by running yarn podcasts:build in the terminal.
Transform - Map the Spotify episodes to the content-type collection podcast_episode.
Sometimes, information coming from third-parties is not stored in the same way as our data. This is why, between the extraction and load step, it is necessary to perform a transformation of the data.
To know which fields we want in our system and which ones are the equivalent in the third-party, we need to have their schemas nearby.
- For data coming from Spotify, we will look at the response from the body of an episode.
- For the expected data in our ButterCMS dashboard, we will look at the schema of the content-type
podcast_episode.
With this in hand, all that's left is to create a function that waits for the episodes coming from Spotify, and returns the data mapped for the ButterCMS Write API request. This would be the result for this demo:
const spotify2Butter = (episodes) => ({
  "key": "podcast_episode", // The unique name for the Collection. (REQUIRED)
	"status": "published", // Should be published (DEFAULT) or draft. (OPTIONAL)
  "fields": episodes.map(episode => { // Array of objects. (REQUIRED)
    return { // Each object represents a collection item with fields.
			"title": episode.name, // The field is created by key:value.
	    "description": episode.description,
	    "url": episode.external_urls.spotify,
	    "release_date": episode.release_date,
	    "cover_image": episode.images[0].url,
		};
  })
});
NOTE: Images and other media can be added by providing remote URLs. The content from the provided URL at cover_image will be uploaded to ButterCMS as an image.
Load - Store the data into the Headless CMS.
As with Spotify, we need an access token to have the write permission on our dashboard. This time, getting it will be a lot easier:
-
Go to your profile picture and click Settings.
-
Copy the token in Write API Token and paste it into a variable in your
.envfile calledAPI_WRITE_TOKEN.If you don't have the Write API Token enabled, contact ButterCMS to get access.
And, once we have the token, we go to the guide that explains how to create a new collection item: Create Collection Item, and we use it to upload each podcast’s episode.
In the code below you will see how after getting the data from Spotify and transforming it for the request, I make the POST request with the episodes as a string in the data field:
const episodes = await getEpisodes(options); // Spotify Episodes
const butterEpisodes = spotify2Butter(episodes); // Mapped Episodes

axios("https://api.buttercms.com/v2/content/", { // Write API request
  method: "POST",
  headers: {
    "Authorization": `Token ${process.env.API_WRITE_TOKEN}`,
    "Content-Type": "application/json"
  },
  data: JSON.stringify(butterEpisodes) // Collection data
})
  .then(() => {
    console.log(`Uploaded the ${episodes.length} episodes to ButterCMS`);
  })
  .catch(error => console.log("Request to ButterCMS Failed: ", error));
Final script result
Here is the resulting script after performing the three steps of the process: extract, transform and load.
import axios from 'axios';
import querystring from 'querystring';

import dotenv from 'dotenv';
dotenv.config();

const clientId = process.env.SPOTIFY_CLIENT_ID;
const clientSecret = process.env.SPOTIFY_CLIENT_SECRET;
const authBase64 = btoa(`${clientId}:${clientSecret}`);

const authOptions = {
  method: 'post',
  url: 'https://accounts.spotify.com/api/token',
  headers: {
    'Content-Type':'application/x-www-form-urlencoded',
    'Authorization': `Basic ${authBase64}`,
  },
  data: querystring.stringify({grant_type: 'client_credentials'})
};

const getEpisodes = (options) => (axios(options).then((response) => {
  const episodes = response.data.items;
  console.log(`Download ${episodes.length} episodes data from Spotify`);

  return episodes;
}));

const spotify2Butter = (episodes) => ({
    "key": "podcast_episode",
    "status": "published",
    "fields": episodes.map(episode => ({
      "title": episode.name,
      "description": episode.description,
      "url": episode.external_urls.spotify,
      "release_date": episode.release_date,
      "cover_image": episode.images[0].url,
    }))
});

const loadEpisodes = (butterEpisodes) => {
  const tokenButterCMS = process.env.API_WRITE_TOKEN;

  axios("https://api.buttercms.com/v2/content/", {
    method: "POST",
    headers: {
      "Authorization": `Token ${tokenButterCMS}`,
      "Content-Type": "application/json"
    },
    data: JSON.stringify(butterEpisodes)
  })
    .then(() => {
      console.log(`Uploaded the ${butterEpisodes.fields.length} episodes to ButterCMS`);
    })
    .catch(error => console.log("Request to ButterCMS Failed: ", error));
};

axios(authOptions)
  .then(async function(response) {
    const token = response.data.access_token;
    const show_id = process.env.SPOTIFY_SHOW_ID;
    const options = {
      method: 'get',
      url: `https://api.spotify.com/v1/shows/${show_id}/episodes?market=ES`,
      headers: {
        'Authorization': `Bearer ${token}`
      }
    };

    const episodes = await getEpisodes(options);
    const butterEpisodes = spotify2Butter(episodes);

    loadEpisodes(butterEpisodes);
  })
  .catch(error => console.log("Request to Spotify Failed: ", error));
2.3. Reference field: Use of saved podcast episodes
Now that our podcast episodes are on our dashboard, it's time to represent them on our JAMstack site.
Create Podcast Episodes List:
Create a component called Podcast Episodes List in the Landing Page Schema, containing a list of podcast episodes.
Components: Elements that enable your marketers to compose flexible page layouts and easily reorder those layouts. — ButterCMS
To be able to choose between the episodes we have stored, we will create a reference field of type One-to-Many and with the Collection type Podcast Episode.
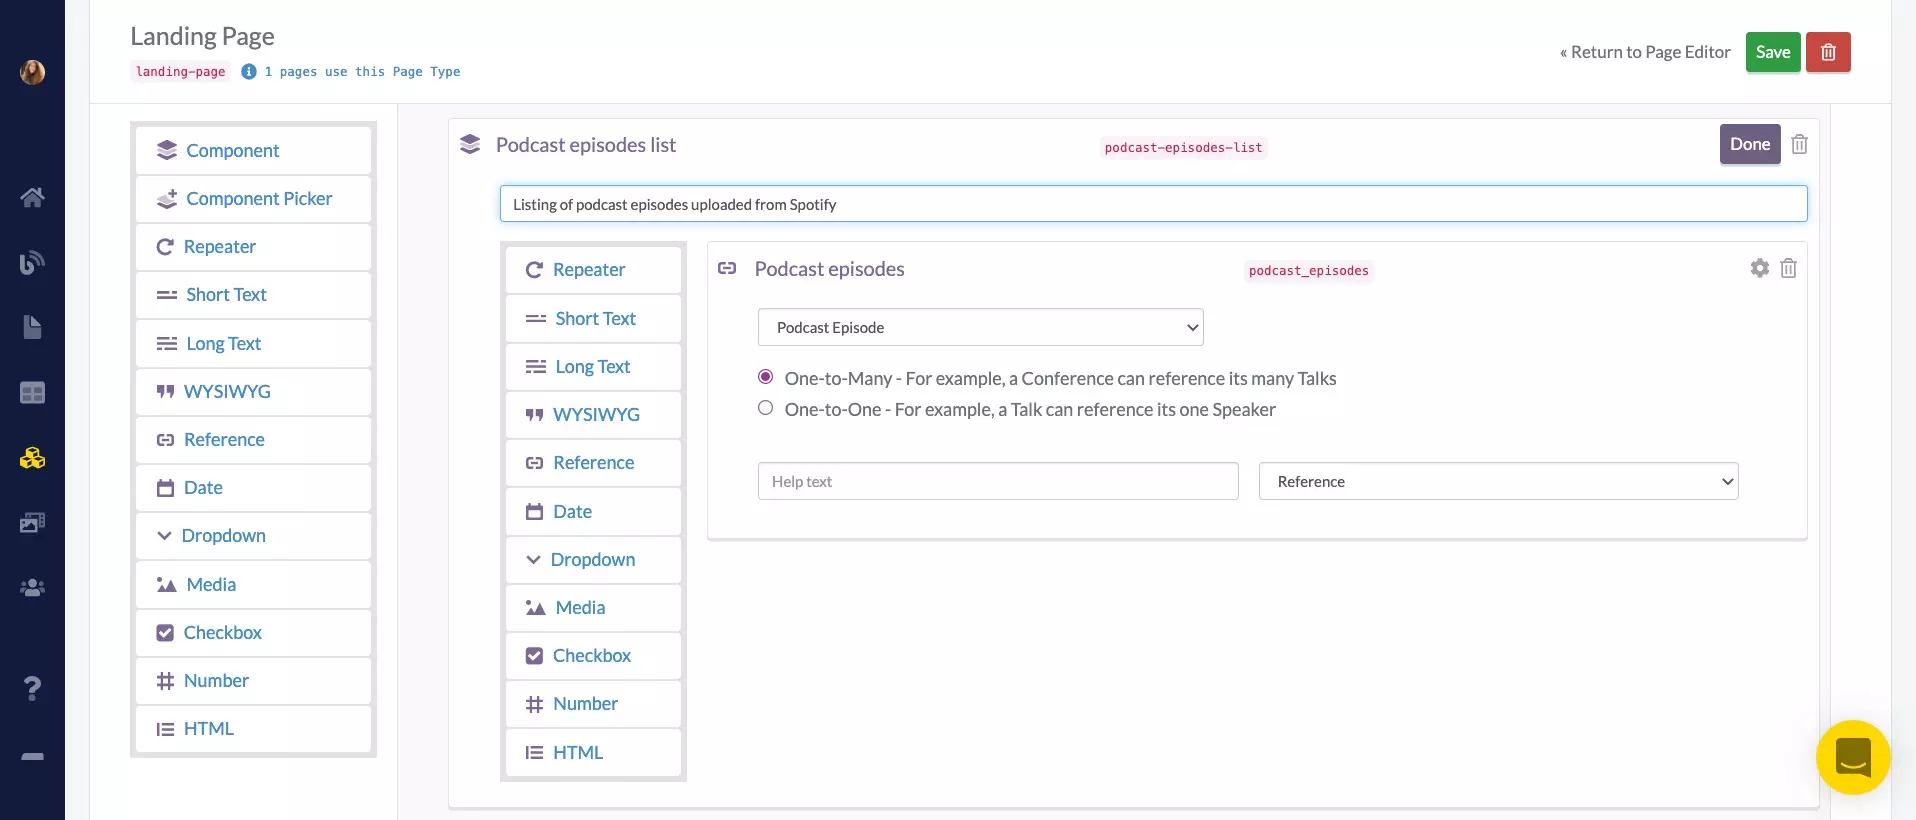
Now press Done and then Save, and you're done!
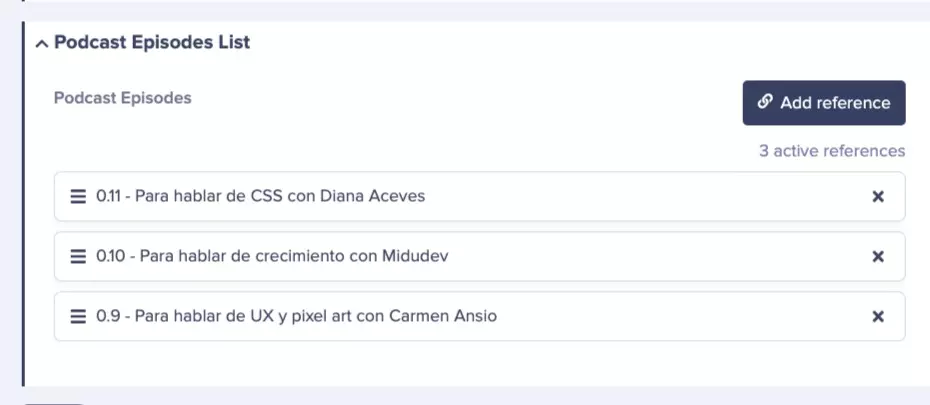
Add episodes to the Landing Page:
Go to Pages, on the left side menu, and select Landing Page with components.
Add the Podcast Episodes List component, click the Add reference button and select the episodes you want to show there. Then, click Use Selected.
Now that we have the episodes selected, publishing the page and going to the API reference will show us how the data will get to our front-end project:
{
  "type": "podcast-episodes-list",
  "fields": {
    "podcast_episodes": [ /* Array of podcast episode objects */
      {
        "meta": { "id": 194675 },
        "title": "Podcast title",
        "description": "Podcast description",
        "url": "https://podcast.url",
        "release_date": "2021-12-30T00:00:00",
        "cover_image": "https://cdn.buttercms.com/podcast-cover-uploaded"
      }
    ]
  }
}
Next create PodcastEpisodesList.vue in Nuxt:
To render the component, create a file called PodcastEpisodesList.vue in the components/ folder and paste the code below:
<template>
  <section class="container mx-auto px-6 pb-12 md:pb-16 grid grid-cols-1 md:grid-cols-2 lg:grid-cols-3 gap-6">
    <header class="col-span-full">
      <h2 class="h1 pb-2">Latest podcast episodes</h2>
    </header>
    <div v-for="episode in $props.fields.podcast_episodes" tabindex="0" class="grid grid-cols-4 gap-4 p-6 rounded-md bg-white">
      <figure>
        <atom-image :srcUrl="episode.cover_image" :alt="`${episode.title} icon`" width="90" height="90" class="col-1 rounded-md" loading="lazy" />
      </figure>
      <h3 class="col-start-2 col-end-5 pt-3 pb-2">
        <a :href="episode.url" target="_blank" rel="noopener noreferrer">{{ episode.title }}</a>
      </h3>
      <p class="col-span-full text-sm line-clamp-2">{{ episode.description }}</p>
    </div>
  </section>
</template>

<script>
export default {
  props: ['fields']
}
</script>
And finally, register it in plugins/buttercms.js along with the other components coming from the dashboard:
// ...
import PodcastEpisodesList from '~/components/PodcastEpisodesList.vue';

export default defineNuxtPlugin((nuxtApp) => {
  // ...
  nuxtApp.vueApp.component('podcast-episodes-list', PodcastEpisodesList);
});
This is what the result looks like on the page! 👏
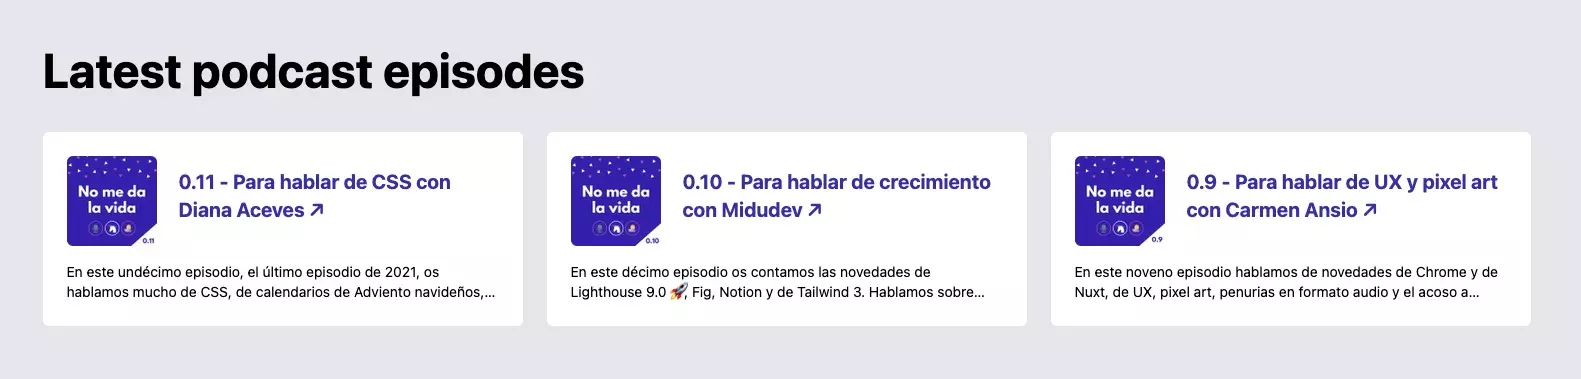
You can check out the live site here → https://trusting-brahmagupta-b1aa4e.netlify.app/.
Conclusion
After reading this article, I hope you will agree with me that creating a podcast is a great initiative for companies that want to grow their business and make themselves known. But they are also, for those who want to generate better relationships with their regular customers or produce more recurring content in their marketing strategies.
But that's not all! You may have noticed from the speed with which we’ve created a project from scratch, that the podcast, coupled with a JAMstack web architecture, provides quality content to the audience and gives you the freedom to add new sections wherever you want.
For the future, here are a couple of ideas on how you could use the episodes we’ve already stored and improve the storage process:
-
Run the script asynchronously: When new episodes are published on Spotify, the script could be run automatically through a GitHub action or any automation service to keep the CMS up to date.
-
Use them in different places on your website or platforms: Create playlists with the audio content provided by the Spotify API. Add an in-article reference field to show the podcast related to the post.
You lose nothing by putting out your own podcast and checking them out for yourself! And remember, you can always use this article as a reference.