Meet the NextJS blog engine that integrates with your website using a straightforward API. Smooth, simple, and tasty content integration — that’s Butter.
So easy to use. So easy to customize. You’re going to love the blog you build with ButterCMS.
Handy integration with NextJS
Our NextJS blog engine has a simple content API and drop-in SDKs that makes the magic happen in minutes, not hours.
A truly zero-maintenance solution
With ButterCMS, you’ll never worry about security upgrades, hosting, or performance again.
You've got better things to do than build another blog
Drop our NextJS blog engine into your app, and get back to more interesting problems.
ButterCMS is an API-based blog engine that integrates seamlessly with new and existing NextJS apps. It's great for SEO, and provides a clean and modern user interface that your marketing team will love. You can deploy ButterCMS in minutes using our NextJS API client.
That leaves plenty of time for you and your marketing team to do what you do best: create killer apps with killer content.
After shopping the market, it was clear that ButterCMS was the perfect choice. It allows our developers to build powerful components and makes it easy for our marketing team to drive a better customer experience.
Hampton Catlin Creator of Sass and Haml
Deploy our Next.JS starter in 30 seconds
Or follow the below commands to clone a copy of the repo from github, install dependencies, set your free Butter token, and
run your local server on localhost:3000/.
$ git clone https://github.com/ButterCMS/nextjs-starter-buttercms.git
$ cd nextjs-starter-buttercms
$ npm install # or yarn install
$ echo 'NEXT_PUBLIC_BUTTER_CMS_API_KEY=your_free_api_token_here' >> .env
$ npm run dev # or yarn dev
ButterCMS is the best NextJS blog engine for a simple reason: NextJS developers can build solutions that marketing people love. Our API allows your content gurus to quickly spin up high-converting blog templates, sidebars, related content features, and more, all using simple drag-and-drop functionality.
Our mission was to make it easy to integrate Butter with your existing NextJS app in minutes. It’s so simple! To demonstrate, here’s a mini tutorial to give you a feel for the process of adding Butter to your NextJS app.
See how easily you can integrate the ButterCMS Pages API with your NextJS app.
Seamless NextJS components
Empower your marketing team to create a customized blog engine that aligns perfectly with your NextJS components.
Components are the essential building blocks of any NextJS app, and ButterCMS handles them with ease.
Our drag and drop interface makes it simple to structure your content to match existing NextJS components and to create new reusable components whenever you need them.
The best NextJS blog engine for SEO
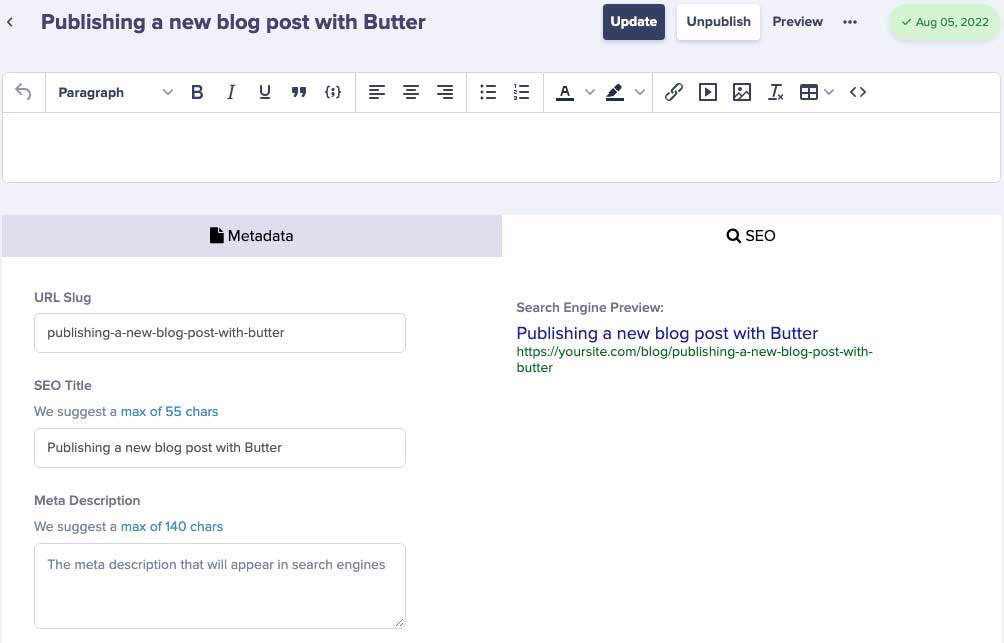
ButterCMS gives you absolute control over on-page SEO ranking factors. Key SEO variables are built into our default post template, giving your marketing team direct access to configure all of these settings, and more.
How to integrate ButterCMS into your NextJS application
Integrating the Butter blog engine into your NextJS app is dead simple. Here's a mini tutorial to get a feel for setting up your blog home and blog post pages.
To display posts we create a new component inblog.jsto fetch and list blog posts from the Butter API. See ourAPI referencefor additional options such as filtering by category or author. The response also includes some metadata we'll use for pagination.
Inblog.js:
import React from 'react' import Link from 'next/link' import Butter from 'buttercms'
const butter = Butter('')
export default class extends React.Component { static async getInitialProps({ query }) { let page = query.page || 1;
With Next.jsgetInitialPropswill execute on the server on initial page loads, and then on the client when navigating to a different routes using the built-in<Link>component.getInitialPropsalso receives a context object with various properties – we access thequeryproperty for handling pagination. We are fetching posts from a ButterCMS test account –sign in with Githubto setup your own posts.
In ourrender()method we use some clever syntax to only display pagination links only when they're applicable. Our post links will take us to a 404 – we'll get these working next.
Setup the Blog Post page to list a single post
We'll also update our post component to fetch blog posts via slug and render the title and body. See a full list of available post properties in ourAPI reference:
import React from 'react' import Butter from 'buttercms'
To get our post links working we need to setup dynamic routing for our blog posts. First, create a custom server./server.jsthat routes all/posts/:slugURLs to our post component, and the/postsURL to our index page:
const next = require('next') const express = require('express') const dev = process.env.NODE_ENV !== 'production' const app = next({ dev }) const handle = app.getRequestHandler() const port = 3000
app.prepare().then(() => { const server = express()
server.listen(port, (err) => { if (err) throw err console.log(`> Ready on http://localhost:${port}`) }) })
Finally, update ourpackage.jsonstart script to use our customer server and restart:
"scripts": {
  "start": "node server.js"
}
SEO
Next.js provides a Head component for setting HTML titles and meta tags. Add import Head from 'next/head' to the top of ./pages/post.js and use the component in the render() method:
Restart the server and inspect the HTML source of a post to verify that tags are getting set correctly. Now our app has a working blog that can be updated easily in the ButterCMS dashboard.
That's it! The blog posts created in your Butter dashboard will immediately show up in your app.