For decades CMSs have proven to be an indispensable part of many web development stacks. Statistics have predicted that the CMS market in general will reach a $123 billion valuation by 2026 with 43.6% websites today being powered by a custom-made CMS.
With these figures, you might be interested in knowing what makes CMS platforms vital to developers and how you can quickly integrate one into a vanilla HTML application.
Table of contents
Why should you use a CMS?
CMS platforms help organizations easily build their websites as they are shipped with built-in content editors to create data and serve them using pre-defined templates and plugins. For small websites, the developers do not need to create additional backend systems as the CMS platform stores the website data and further provides non-technical members of the team with a web-based dashboard to interact with the stored data.
In recent times, however, content delivery channels have expanded significantly beyond mobile and desktop devices. Now, other devices such as smart speakers with voice-enabled home assistants, wrist watches, and TVs have features to read content aloud to their owners. According to the Statista Research Department there will be approximately 135.6 million users of voice assistants in the U.S. alone by 2022.
Sadly, delivering content to multiple clients, including the ones mentioned above, is a functionality not provided by traditional CMS platforms as the website’s data is locked into a template and there is no way to serve that data to the outside world without visiting the website. This limitation has given birth to the rise of headless CMS platforms.
Is going headless a better option?
Unlike traditional CMSs, headless CMS platforms were developed with the goal of giving more control and flexibility to developers. As the name implies, a headless CMS focuses on storing and organizing your application data, while giving you the freedom to retrieve and display the data on your presentation layer (head) of choice using whatever frontend framework, library, or package you desire.
Agencies and organizations using a Headless CMS can build dynamic content catalogs and serve this data to multiple clients via the headless CMSs API. They can also use their headless CMS to create data models to store user feedback and view the values within their headless CMS dashboard.

When do I need a headless CMS?
The decision to adopt a headless CMS will always be based on your business needs. However, the three points below highlight ways in which an application will benefit from leveraging a headless CMS:
- Managing Large Content Teams — Modern headless CMS platforms are shipped with Role-Based Access Control (RBAC) features that allow multiple members of the content team to edit stored content based on what level of access they have been granted by the CMS admin. Assigning the right roles to new team members ensures that vital data is not accidentally deleted.
- Using Multiple Delivery Channels — Having the CMS completely detached from the client application provides developers with the ability to fetch data across multiple clients such as mobile, web, and desktop. A React Native application could be built for mobile users, while web-based users make use of a web application built with Gatsby.js. Each of the independent frontend clients will consume data from the robust Content API exposed by the headless CMS platform.
- Building Jamstack Applications — The Jamstack architecture, which consists of a JavaScript, API, and Markup layer, is being widely adopted by content-heavy platforms such as blogs and brand pages. With the help of JavaScript, developers fetch data from an API and render the data in lightweight markup pages.
One amazing example of a headless CMS is ButterCMS, which provides the three functionalities outlined above.
Introducing ButterCMS
ButterCMS is an enterprise api-first headless CMS built by developers for developers that doesn't skimp on usability for non-technical team members with a portal that allows content editors to create and model content with tools such as collections, page types, blog engine, etc. that can be rendered or displayed on a variety of platforms and devices with the ButterCMS Content API.
To ensure that you have an awesome developer experience (DX) when integrating ButterCMS into your application, ButterCMS provides well-documented SDKs for frequently used programming languages and frameworks such as JavaScript, Java, PHP, Python, Flutter, Swift, Laravel, and .Net, etc. Each SDK provides developers with the functionality to retrieve, search, edit and filter data stored within ButterCMS.
For applications without a supported ButterCMS SDK, HTTP requests can be made to the REST API endpoint of your ButterCMS instance to fetch data.
Let’s learn about the approach you will need to take if you were to integrate ButterCMS into an application without a supported SDK.
Tutorial: Integrating a CMS with an HTML Website
With your understanding of ButterCMS, you can now proceed to build an HTML website to serve as a marketplace for antique items. The website will provide collectors with the ability to post antique items for sale. Other users will be able to view the posted items and contact their owners for purchase. You will use TailwindCSS through its CDN link to style the application.
While the HTML website will not have advanced features such as authentication, it will provide users with two pages. One page will display a list of all antique items posted for sale, while the other will contain a form for collectors who want to sell their antique items.
Each post to sell antique items will be stored within a collection in your ButterCMS instance. By using ButterCMS, you will reduce the need for your own backend application to store the data for each antique item. Doesn’t that sound amazing?
Asides from the reduced cost of operation, the status field on each collection item allows you to implement a workflow where each post to sell an antique item is marked as a draft and must be reviewed by your ButterCMS admin before it is published and listed on your website.
To begin, let’s create a collection in the next section via the ButterCMS portal.
Tutorial Prerequisites
This tutorial contains hands-on demonstrations that involve the ButterCMS REST API and an HTML website. To follow along, it is expected that you have:
- A ButterCMS account. You can create a trial account that is free to use for 30 days
- A basic understanding of JavaScript and Hyper Text Markup Language (HTML)
The code for this tutorial can also be found in this GitHub repo.
Creating a ButterCMS Collection
A ButterCMS collection can be likened to a table within a database as it stores data. The ButterCMS portal and `/content` endpoint within the ButterCMS API provides you with the ability to perform CREATE, DELETE, UPDATE and DELETE operations on items within a collection.
To get started, navigate to the ButterCMS web portal where you will create a collection and model seven fields within the collection.
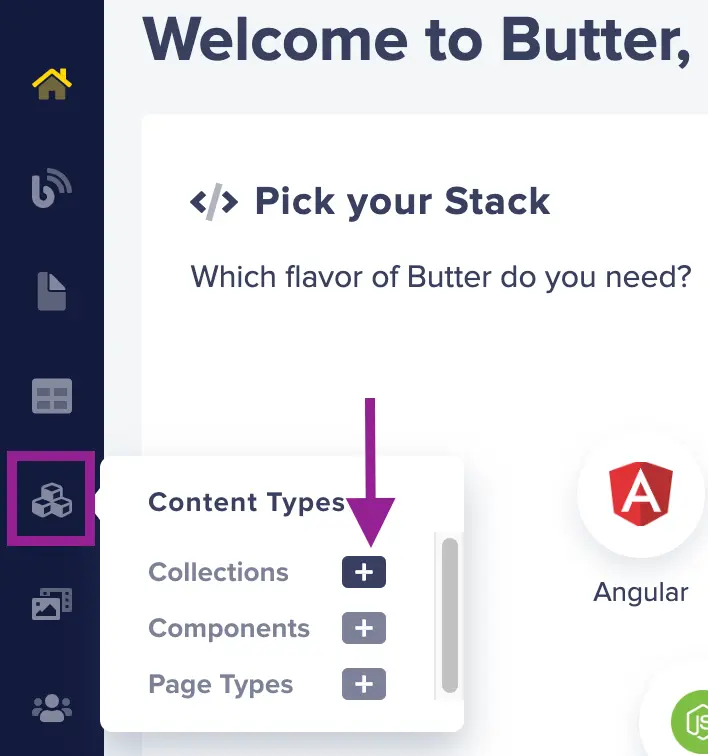
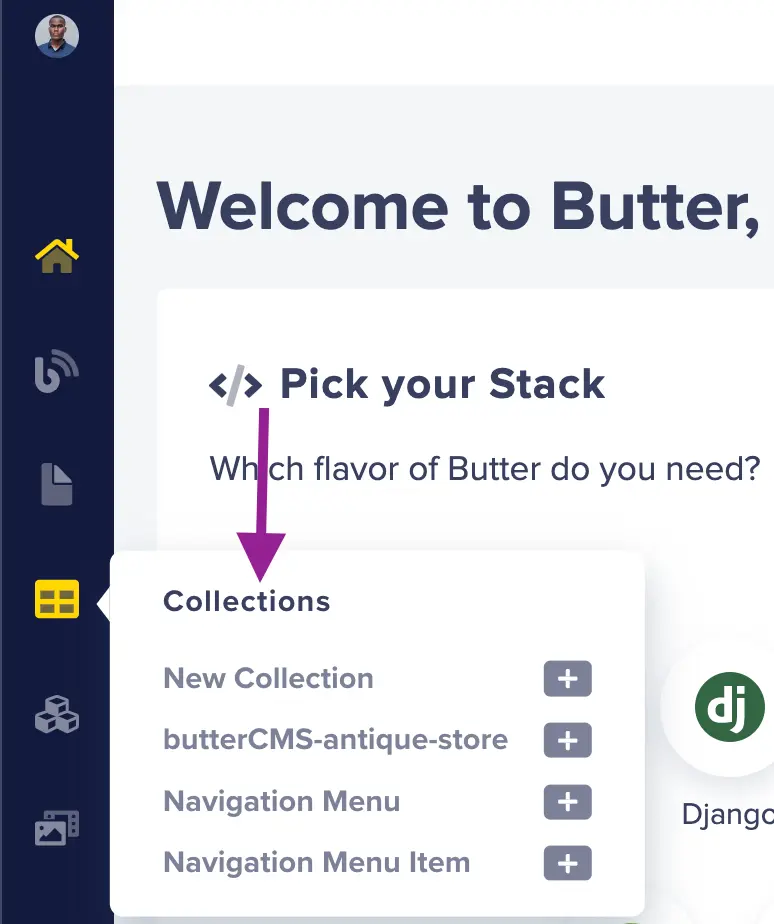
On the left sidebar, click the Content Types icon, then click the + icon beside the Collections text to navigate to the next page for configuring a collection.
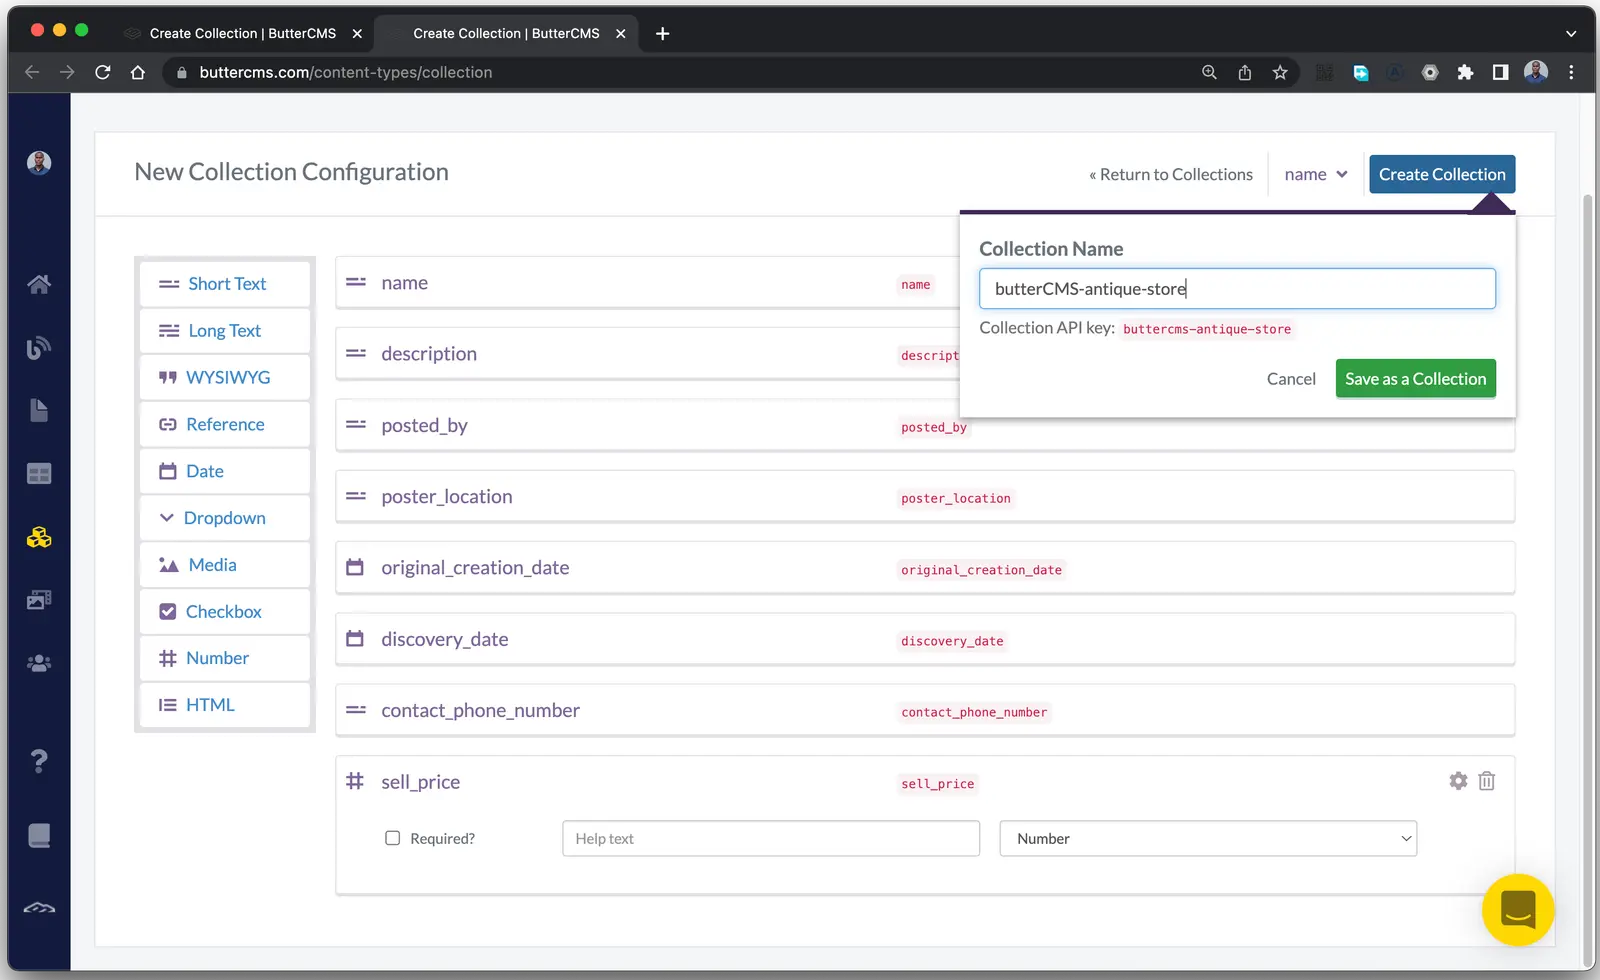
The outlined steps below will guide you through the process of configuring eight field types and their names into the collection:
- Click the Short Text field and use “name” for the field’s name. The name field will contain the name of the antique item being posted.
- Click the Short Text field and use “description” for the field’s name. The description field will contain a description of the antique item being posted.
- Click the Short Text field type and use “posted_by” for the field’s name. The posted_by field will store the name of the user posting an antique item for sale.
- Click the Short Text field type and use “poster_location” for the field’s name. The poster_location field will store the location of the user posting an antique item for sale.
- Click the Date field and use “original_creation_date” for the field’s name. The original_creation_date field will store the time in the past when the antique item was created.
- Click the Date field and use “discovery_date” for the field’s name. The discovery_date field will store the date when the antique item was discovered.
- Click the Short Text field and use “contact_phone_number” for the field’s name. The contact_phone_number field will store the contact number of the user posting the antique item.
- Click the Number field and use “sell_price” as the field’s name. The sell_price field will store the price at which the seller wants to sell the antique item.
Click the Create Collection button to reveal a dropdown to provide a name for the collection.
Next, use “butterCMS-antique-store” as the name of the collection, then click the Save as a Collection button.
With the butterCMS-antique-store collection configured, the next step is to retrieve the API keys that will authenticate the API requests from the HTML website to your ButterCMS instance.
Retrieving ButterCMS API Keys
The ButterCMS content API is categorized into a Read API for retrieving content through GET HTTP requests and a Write API that allows developers to programmatically create, update, and delete content through POST HTTP requests.
Each HTTP request made against these APIs is authenticated by providing a corresponding Read or Write API key. The Read API key is readily available when a ButterCMS instance is created, but the Write API key must be requested by contacting the ButterCMS support via chat or email at support@buttercms.com.
Using your web browser, navigate to your ButterCMS instance dashboard and click your profile avatar, then the Settings item.
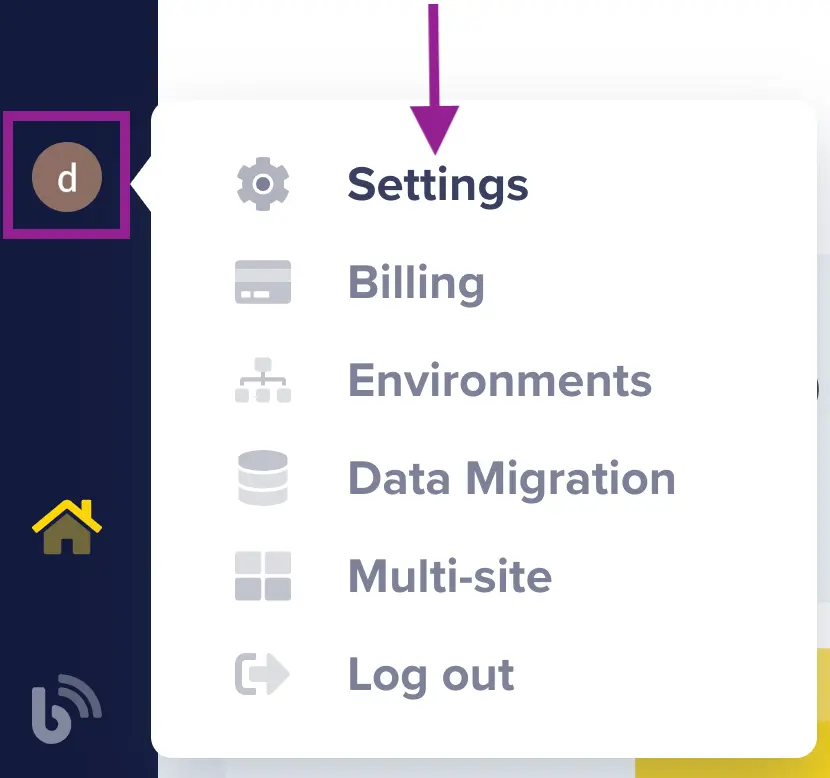
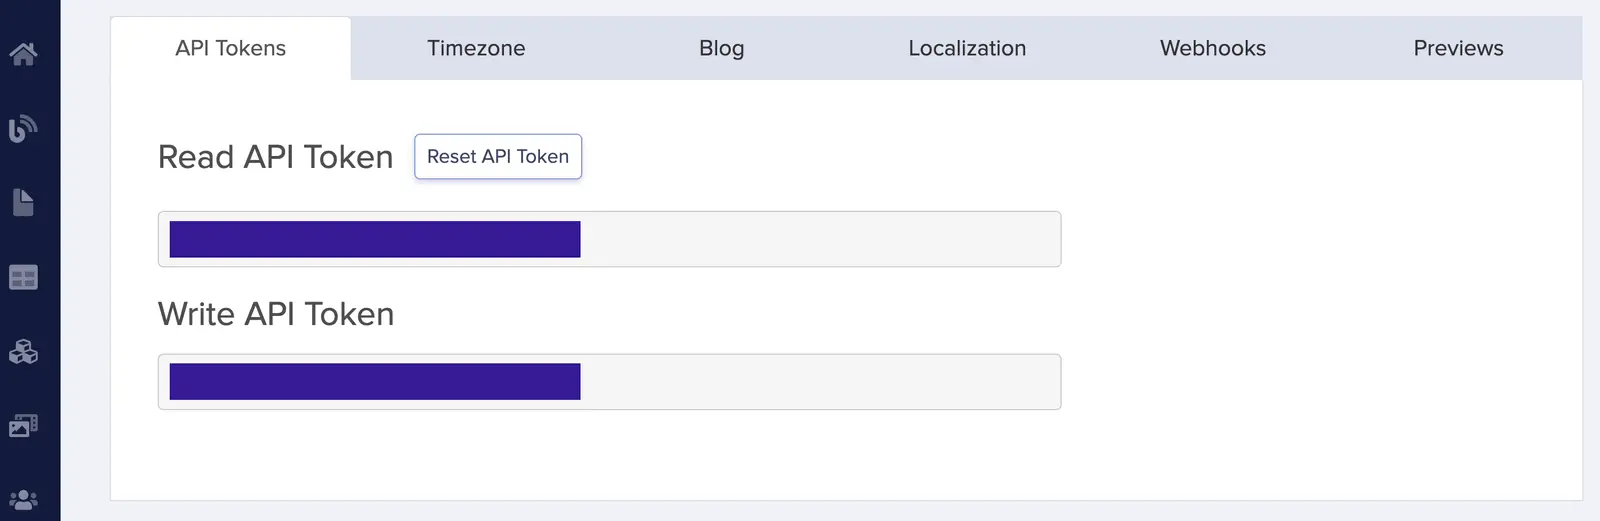
Within the API Tokens tab on the Settings page, copy the Read API Token and Write API Token onto a secure notepad. You will use the tokens to authenticate HTTP requests made from the HTML website to ButterCMS.
Note: If you have not requested your Write API Key, only the Read API key will be shown in the API Tokens tab.
With the API keys obtained, you are now set to use the Content API as you build the HTML website
Creating the HTML Website
In the previous section, you created everything you needed to use ButterCMS. Let’s now proceed to build the two pages within the HTML website.
To begin, create a folder named buttercms-html on your computer. The directory will serve as a container to store the HTML website files.
Using your preferred code editor, open the buttercms-html directory as you will begin to create files within the directory.
Retrieving Items from the ButterCMS Collection
Create an index.html file within the project to build the index page of the HTML website. The index page is expected to retrieve all published items within the butterCMS-antique-store collection on ButterCMS and display them after the page is loaded.
Add the code below into the index.html file. The code contains an unordered list element (ul) and also a button to navigate a user to the next page for posting an antique to be sold. The collection items loaded from ButterCMS will populate the unordered list.
<!-- buttercms-html/index.html -->
<!DOCTYPE html>
<html lang="en">
<head>
    <meta charset="UTF-8">
    <meta http-equiv="X-UA-Compatible" content="IE=edge">
    <meta name="viewport" content="width=device-width, initial-scale=1.0">
    <title>ButterCMS Antique</title>
    <script src="https://cdn.tailwindcss.com"></script>
</head>

<body>
    <div class='w-full flex justify-center items-center p-8' style="height: 450px; background-image: url(https://res.cloudinary.com/dkfptto8m/image/upload/v1649937503/butterCMS-tarvel-journal.jpg)">
        <div class="bg-white p-12 rounded-xl shadow-md " >
            <h1 class="text-4xl bg mb-2 text-center"> ButterCMS Antique Store</h1>
            <hr />
            <p class="text-xl text-center mt-4"> Take a peep and find the value of history
 from antiques sold by collectors around the world.</p>
        </div>
    </div>
    <div class="flex items-center justify-center min-h-82" style="background-color: #fff5e8;" >
        <div>
            <div class="w-full rounded-lg shadow-lg flex justify-between p-5 bg-white h-20" style="transform: translateY(-50px);">
                <div>
                    <p class="pt-2" id="antiques-count"> </p>
                </div>
                <div>
                    <button class="mb-5 bg-blue-500 hover:bg-blue-700 text-white font-bold py-2 px-4 rounded">
                        <a href="/sell-item.html">
                            Sell Your Antique Item
                        </a>
                    </button>
                </div>
            </div>

            <hr />
            <ul class="grid grid-cols-3 gap-10 mt-5" id="posted-antiques">
            </ul>
        </div>
    </div>
</body>

<script src="home_script.js"></script>
</html>
The HTML code above relies on a JavaScript file added through the script tag to fetch the data that will populate the unordered list.
Create a home_script.js file and add the code below to fetch the data the index page needs. The code below will set the onload window property to contain a lambda function.
When executed, the asynchronous function will make a GET request to the /post endpoint to retrieve items within the collection. The ButterCMS Read Key is added to the request URL as the auth_token query parameter value to authenticate the request.
The /content endpoint being used also accepts other parameters to structure the returned data. The page_size parameter for specifying how many items should be returned is an example. The arguments table of the API documentation explains all supported parameters.
// buttercms-html/home_script.js
const BUTTERCMS_READ_KEY = '<BUTTERCMS_READ_KEY>'

window.onload = async () => {
  const ulElement = document.getElementById("posted-antiques")
  const amountOfAntiques = document.getElementById("antiques-count")
  amountOfAntiques.innerText = `Loading antiques for sale...`
  const req = await fetch(`https://api.buttercms.com/v2/content/buttercms-antique-store?auth_token=${BUTTERCMS_READ_KEY}`)
  const { data } = await req.json();
  const antiques = data['buttercms-antique-store']
  amountOfAntiques.innerText = `${antiques.length} antiques available for sale`

 if (antiques.length < 1) {
    ulElement.innerHTML = `
            <li class="h-full flex justify-center items-center" >
                <p class="text-center"> No antiques have been approved for sale yet! </p>
            </li>
        `
    return
  }

   antiques.map(({
    description,
    discovery_date,
    name,
    original_creation_date,
    posted_by,
    contact_phone_number,
    poster_location,
    sell_price
  }) => (
    ulElement.innerHTML += `
          <div class="mb-7 flex">
            <div class="shadow-xl bg-white rounded-lg w-96 flex flex-col justify-between leading-normal">
              <div class="p-3 flex justify-between" >
                <div>
                  <p class="text-gray-900 font-bold text-xl mb-2">${name}</p>
                  <p class="mt-1 text-gray-700 text-base">Posted by <span class="font-semibold" > ${posted_by} <span> </p>
                </div>
                <div>
                  <span class="inline-block bg-gray-200 rounded-full px-3 py-1 text-sm font-semibold text-gray-700 mr-2 mb-2">${sell_price}</span>
                </div>
              </div>
              <hr />
              <div class="my-4 p-2" >
                <p class="text-gray-900 mb-4 leading-none">${description}</p>
                <div class="flex flex-col" >
                  <span class="inline-block bg-gray-200 rounded-full px-3 py-1 text-sm font-semibold text-gray-700 mr-2 mb-2">${poster_location}</span>
                  <span class="inline-block bg-gray-200 rounded-full px-3 py-1 text-sm font-semibold text-gray-700 mr-2 mb-2">${contact_phone_number}</span>
                </div>
              </div>
              <hr />
              <div class="mt-2 p-3" >
                <p class="text-gray-600" style="text-transform: capitalize;" > <span class="font-semibold" > Time created: </span>  ${new Date(original_creation_date).toDateString()}</p>
                <p class="text-gray-600" style="text-transform: capitalize;" > <span class="font-semibold" > Time discovered: </span>  ${new Date(discovery_date).toDateString()}</p>
              </div>
            </div>
        </div>
       `
  ))
}
The code above will iterate over the array returned from the GET request to ButterCMS, and the eight fields within the collection from each object are used to make a list of cards that each display an antique item for sale.
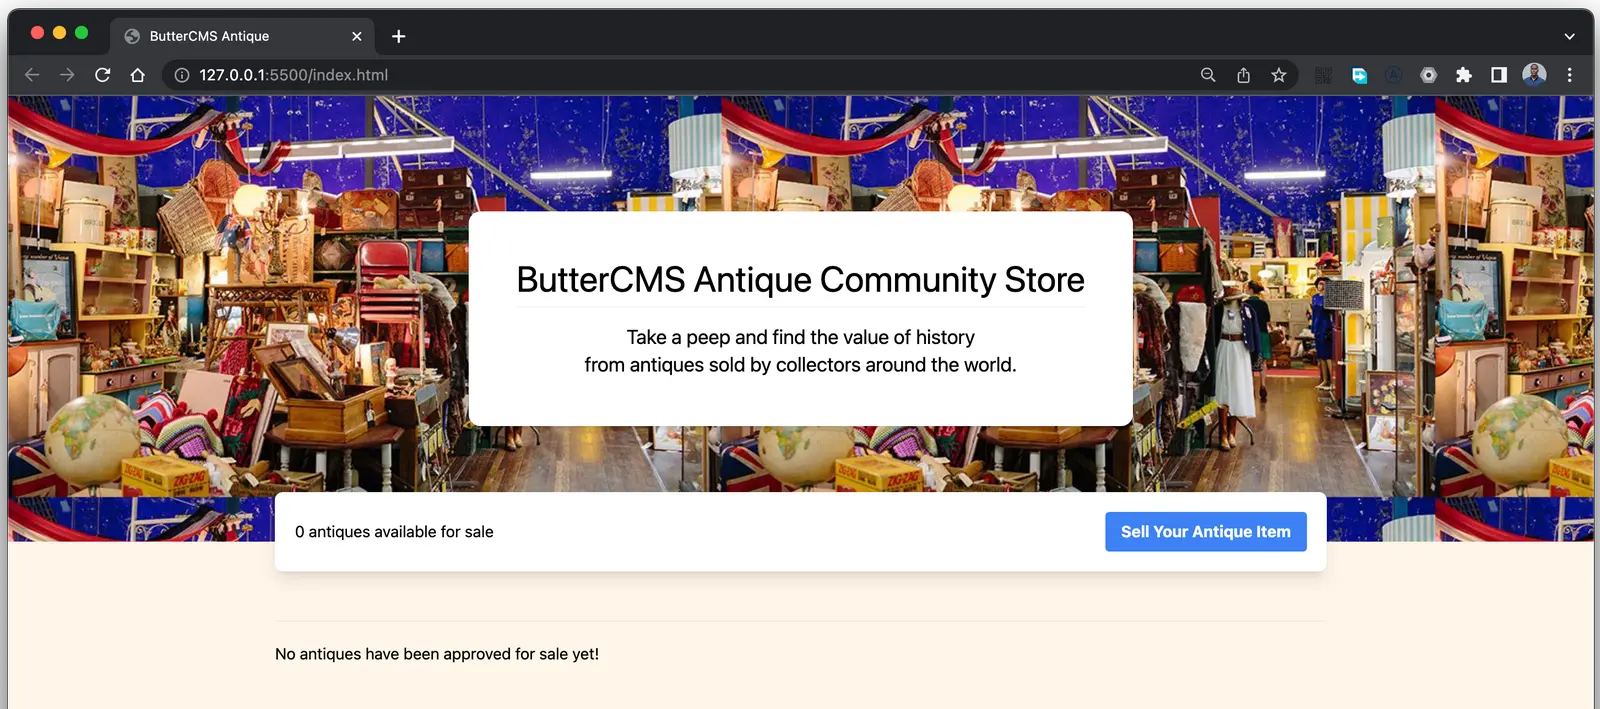
Open the index.html file through your web browser to test the index page you created. You will observe that no antique item is displayed in the list as the buttercms-antique-store collection is also empty.
Let’s now proceed to build the second page for posting an antique item into the buttercms-antique-store collection.
Inserting Items into the ButterCMS Collection
Create an HTML file with the name sell-item.html and add the code below into the file.
The HTML code below contains a form with seven input fields for collecting details of the antique item a user wants to sell. Five input fields are for collecting text values, while the remaining two fields are date pickers for selecting the timestamp of the antique item.
<!-- buttercms-html/sell-item.html -->
<!DOCTYPE html>
<html lang="en">
<head>
    <meta charset="UTF-8">
    <meta http-equiv="X-UA-Compatible" content="IE=edge">
    <meta name="viewport" content="width=device-width, initial-scale=1.0">
    <title>Post An Antique</title>
    <script src="https://unpkg.com/flowbite@1.4.7/dist/datepicker.js"></script>
    <script src="https://cdn.tailwindcss.com"></script>
</head>

<body>
    <nav class="p-4 mb-2 shadow-lg">
        <h2 class="text-md"><a href="/"> ButterCMS Antique Community Store | Post An Antique </a></h2>
    </nav>
    <div class=" h-screen" style="background-color: #fff5e8;">
        <div class="flex items-center justify-center">
            <div class="mt-2 p-5 bg-white shadow-md rounded-lg">
                <div class="mb-8">
                    <h2 class="text-center text-xl font-semibold mb-2">Post Your Antique For Sale </h2>
                    <hr />
                </div>
                <form class=" w-full max-w-lg">
                    <div class="flex flex-wrap -mx-3 mb-6">
                        <div class="w-full px-3">
                            <label class="block uppercase tracking-wide text-gray-700 text-xs font-bold mb-2"
                                for="antique-name">
                                Antique Name
                            </label>
                            <input
                                class="appearance-none block w-full bg-gray-200 text-gray-700 border border-gray-200 rounded py-3 px-4 mb-3 leading-tight focus:outline-none focus:bg-white focus:border-gray-500"
                                id="antique-name" placeholder="What antique are you posting? E.g Crown of fire">
                            <p class="text-gray-600 text-xs italic">Provide item name only</p>
                        </div>
                    </div>
                    <div class="mb-6">
                        <div class="mb-3">
                            <p class="font-semibold uppercase text-xs"> Your details </p>
                        </div>
                        <div class="flex items-between -mx-3 mb-2">
                            <div class="w-full px-3 mb-6 md:mb-0">
                                <label class="block uppercase tracking-wide text-gray-700 text-xs font-bold mb-2"
                                    for="poster-name">
                                    Fullname
                                </label>
                                <input
                                    class="appearance-none block w-full bg-gray-200 text-gray-700 border border-gray-200 rounded py-3 px-4 mb-3 leading-tight focus:outline-none focus:bg-white focus:border-gray-500"
                                    id="poster-name" placeholder="E.g John Doe">
                            </div>
                            <div class="w-full px-3 mb-6 md:mb-0">
                                <label class="block uppercase tracking-wide text-gray-700 text-xs font-bold mb-2"
                                    for="poster-location">
                                    Antique Location
                                </label>
                                <input
                                    class="appearance-none block w-full bg-gray-200 text-gray-700 border border-gray-200 rounded py-3 px-4 mb-3 leading-tight focus:outline-none focus:bg-white focus:border-gray-500"
                                    id="poster-location" placeholder="E.g Madrid, Spain" />
                            </div>
                            <div class="w-full px-3 mb-6 md:mb-0">
                                <label class="block uppercase tracking-wide text-gray-700 text-xs font-bold mb-2"
                                    for="contact_phone_number">
                                    Phone Number
                                </label>
                                <input
                                    class="appearance-none block w-full bg-gray-200 text-gray-700 border border-gray-200 rounded py-3 px-4 mb-3 leading-tight focus:outline-none focus:bg-white focus:border-gray-500"
                                    id="contact_phone_number" placeholder="E.g +234909999999999" />
                            </div>
                        </div>
                    </div>
                    <div class="mb-6">
                        <div class="mb-3">
                            <p class="font-semibold uppercase text-xs"> Antique Timestamps </p>
                        </div>
                        <div class="flex items-between -mx-3 mb-2">
                            <div class="w-full px-3 mb-6 md:mb-0">
                                <label class="block uppercase tracking-wide text-gray-700 text-xs font-bold mb-2"
                                    for="country">
                                    Speculated Time Of Creation
                                </label>
                                <div class="relative">
                                    <div class="absolute inset-y-0 left-0 flex items-center pl-3 pointer-events-none">
                                        <svg class="w-5 h-5 text-gray-500" fill="currentColor" viewBox="0 0 20 20"
                                            xmlns="http://www.w3.org/2000/svg">
                                            <path fill-rule="evenodd"
                                                d="M6 2a1 1 0 00-1 1v1H4a2 2 0 00-2 2v10a2 2 0 002 2h12a2 2 0 002-2V6a2 2 0 00-2-2h-1V3a1 1 0 10-2 0v1H7V3a1 1 0 00-1-1zm0 5a1 1 0 000 2h8a1 1 0 100-2H6z"
                                                clip-rule="evenodd"></path>
                                        </svg>
                                    </div>
                                    <input id="original_creation_date" datepicker type="text"
                                        class="border border-gray-300 text-gray-900 sm:text-sm rounded-lg focus:ring-blue-500 focus:border-blue-500 block w-full pl-10 p-2.5"
                                        placeholder="Select date">
                                </div>
                            </div>
                            <div class="w-full  px-3 mb-6 md:mb-0">
                                <label class="block uppercase tracking-wide text-gray-700 text-xs font-bold mb-2"
                                    for="state">
                                    Time Item Was Discovered
                                </label>
                                <div class="relative">
                                    <div class="absolute inset-y-0 left-0 flex items-center pl-3 pointer-events-none">
                                        <svg class="w-5 h-5 text-gray-500" fill="currentColor" viewBox="0 0 20 20"
                                            xmlns="http://www.w3.org/2000/svg">
                                            <path fill-rule="evenodd"
                                                d="M6 2a1 1 0 00-1 1v1H4a2 2 0 00-2 2v10a2 2 0 002 2h12a2 2 0 002-2V6a2 2 0 00-2-2h-1V3a1 1 0 10-2 0v1H7V3a1 1 0 00-1-1zm0 5a1 1 0 000 2h8a1 1 0 100-2H6z"
                                                clip-rule="evenodd"></path>
                                        </svg>
                                    </div>
                                    <input id="discovery_date" datepicker type="text"
                                        class="border border-gray-300 text-gray-900 sm:text-sm rounded-lg focus:ring-blue-500 focus:border-blue-500 block w-full pl-10 p-2.5"
                                        placeholder="Select date">
                                </div>
                            </div>
                        </div>
                    </div>
                    <div class="flex flex-wrap -mx-3 mb-4">
                        <div class="w-full px-3">
                            <label class="block uppercase tracking-wide text-gray-700 text-xs font-bold mb-2"
                                for="antique-description">
                                antique Description
                            </label>
                            <textarea id="antique-description"
                                placeholder="E.g The silver crown was forged in the 1450 A.D in Spain by the three Spaniards"
                                class="resize-x font-sm rounded-md appearance-none block h-28 w-full bg-gray-200 text-gray-700 border border-gray-200 rounded py-3 px-4 mb-3 leading-tight focus:outline-none focus:bg-white focus:border-gray-500"></textarea>
                            <p class="text-gray-600 text-xs italic">Describe the uniqueness of your antique item!
                            </p>
                        </div>
                    </div>
                    <div class="flex flex-wrap -mx-3 mb-6">
                        <div class="w-full px-3">
                            <label class="block uppercase tracking-wide text-gray-700 text-xs font-bold mb-2"
                                for="sell-price">
                                Sell Price
                            </label>
                            <input
                                class="appearance-none block w-full bg-gray-200 text-gray-700 border border-gray-200 rounded py-3 px-4 mb-3 leading-tight focus:outline-none focus:bg-white focus:border-gray-500"
                                id="sell-price" placeholder="$200,000.00">
                        </div>
                    </div>
                    <button id="saveAntiqueBtn"
                        class="w-full mb-2 mt-2 bg-blue-500 hover:bg-blue-700 text-white font-bold py-2 px-4 rounded">
                        Post Antique Item
                    </button>
                </form>
            </div>
        </div>
    </div>
</body>
<script src="post_script.js"></script>
</html>
Next, create a file named post_script.js and add the code below into the file. The JavaScript code within the post_script file will be responsible for submitting the details of an antique to your ButterCMS collection as a draft.
The code below accesses the values of the input fields using querySelectors, then makes a POST request to the ButterCMS content /endpoint. The values retrieved from the input fields are included in the POST request body.
After the post has been submitted, the location object is set to point to the index page as a means of informing the user that their action was successful.
// ./buttercms-html/post_script.js
const BUTTERCMS_WRITE_KEY = '<BUTTERCMS_WRITE_KEY>'
const postAntiqueCollectionBtn = document.getElementById('saveAntiqueBtn');
postAntiqueCollectionBtn.addEventListener('click', async function (event) {
event.preventDefault()
const name = document.querySelector('#antique-name').value
const description = document.querySelector('#antique-description').value
const posted_by = document.querySelector('#poster-name').value
const poster_location = document.querySelector('#poster-location').value
const contact_phone_number = document.querySelector('#contact_phone_number').value
const original_creation_date = document.querySelector('#original_creation_date').value
const discovery_date = document.querySelector('#discovery_date').value
const sell_price = document.querySelector('#sell-price').value
try {
const writeReq = await fetch(`https://api.buttercms.com/v2/content/`, {
method: "POST",
headers: {
"Authorization": `Token ${BUTTERCMS_WRITE_KEY}`,
"Content-Type": "application/json"
},
body: JSON.stringify({
key: "buttercms-antique-store",
status: 'draft',
fields: [
{
name,
contact_phone_number,
description,
posted_by,
sell_price,
poster_location,
original_creation_date,
discovery_date,
}
],
})
})
const data = await writeReq.json()
if (data?.status === 'pending') {
window.location.href = '/';
}
} catch (e) {
console.log(e)
}
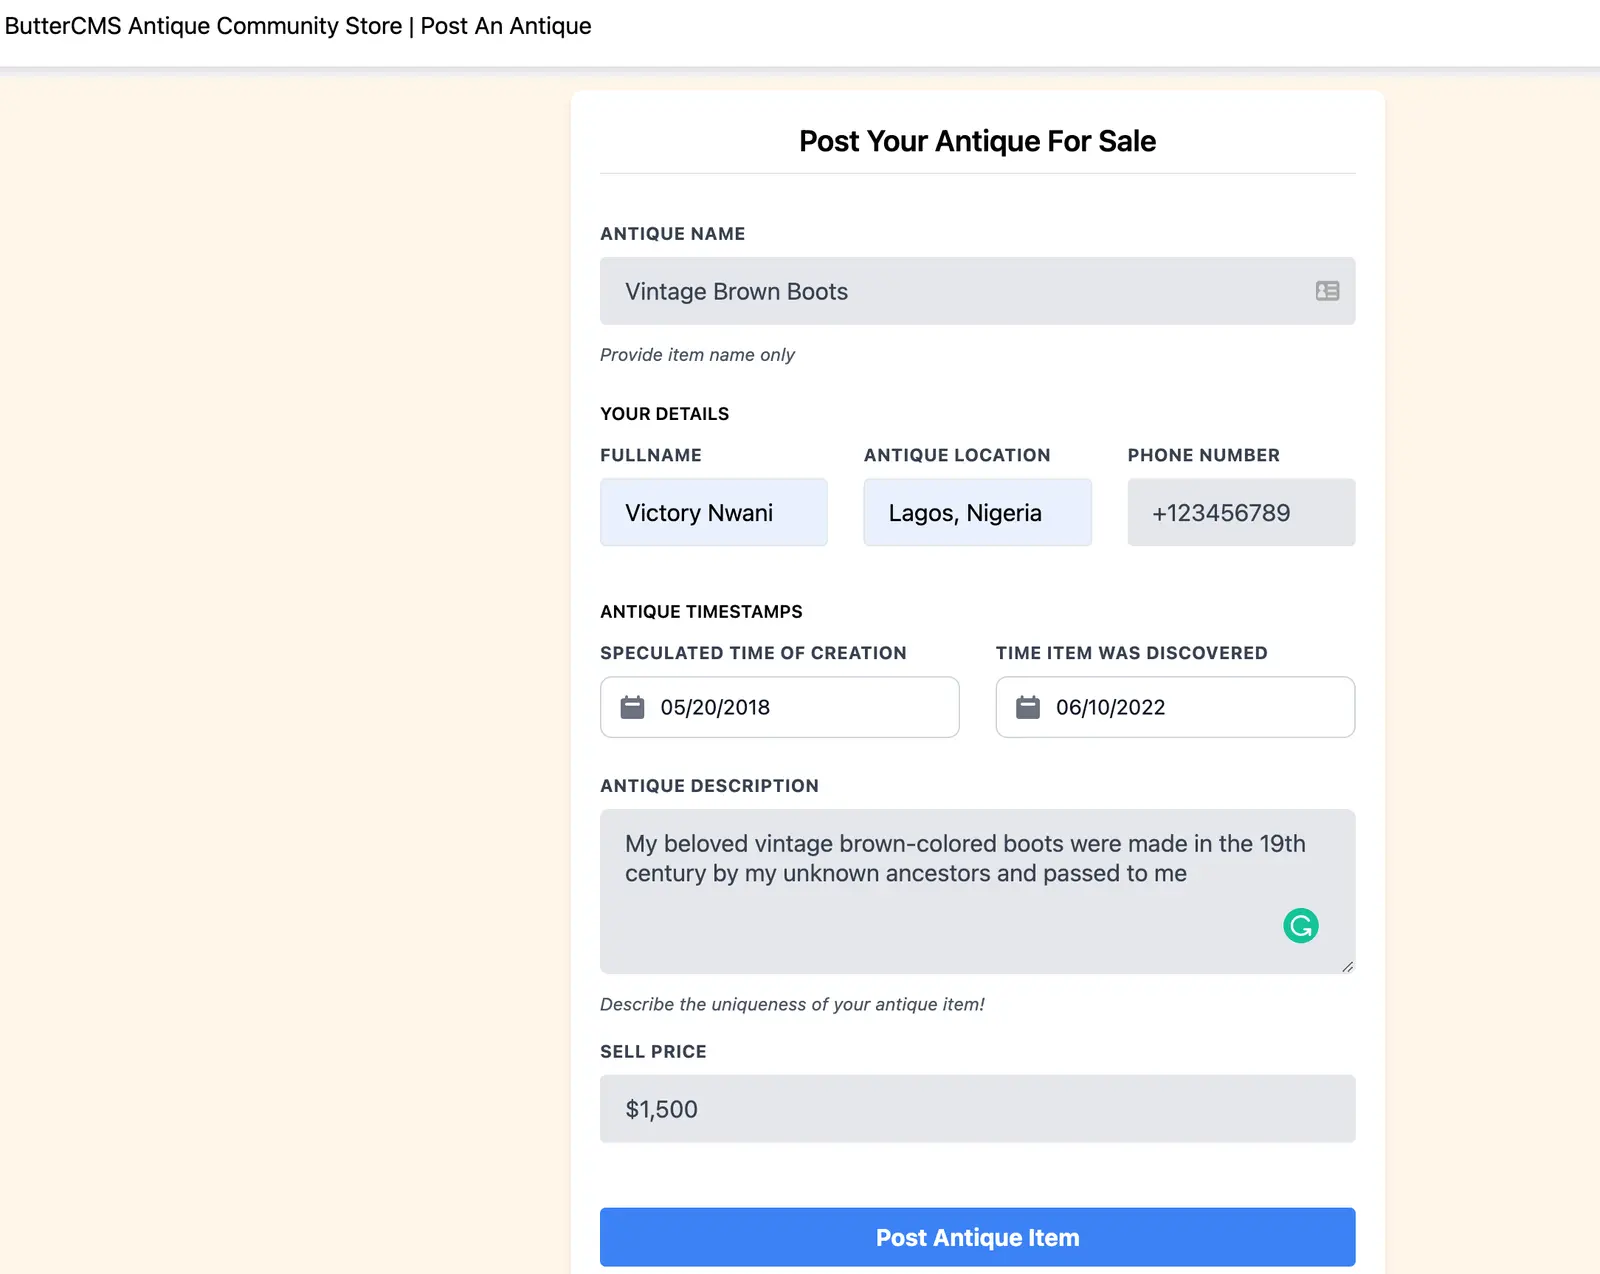
})On the index page, click the Sell Your Antique Item button to navigate to the second page where you will make a post to sell an imaginary antique item.

Next, provide your preferred details into the input fields and click the Post Antique Item button to submit the form.
You will be redirected back to the index page and immediately the details will be saved on ButterCMS.
At this point, you now have the first item within your ButterCMS collection. However, you will not see the item on the index page because the collection item only returns published items by default. Can you recall that the post_script.js file specifies “draft” as the status of each post?
Note: You can pass an additional parameter to the GET HTTP request to also retrieve draft items. However, the ButterCMS API will only retrieve items with a published status by default.
Let’s proceed to the last step of this tutorial where you will publish the draft item within the collection via the ButterCMS web dashboard.
Publishing a Collection Item
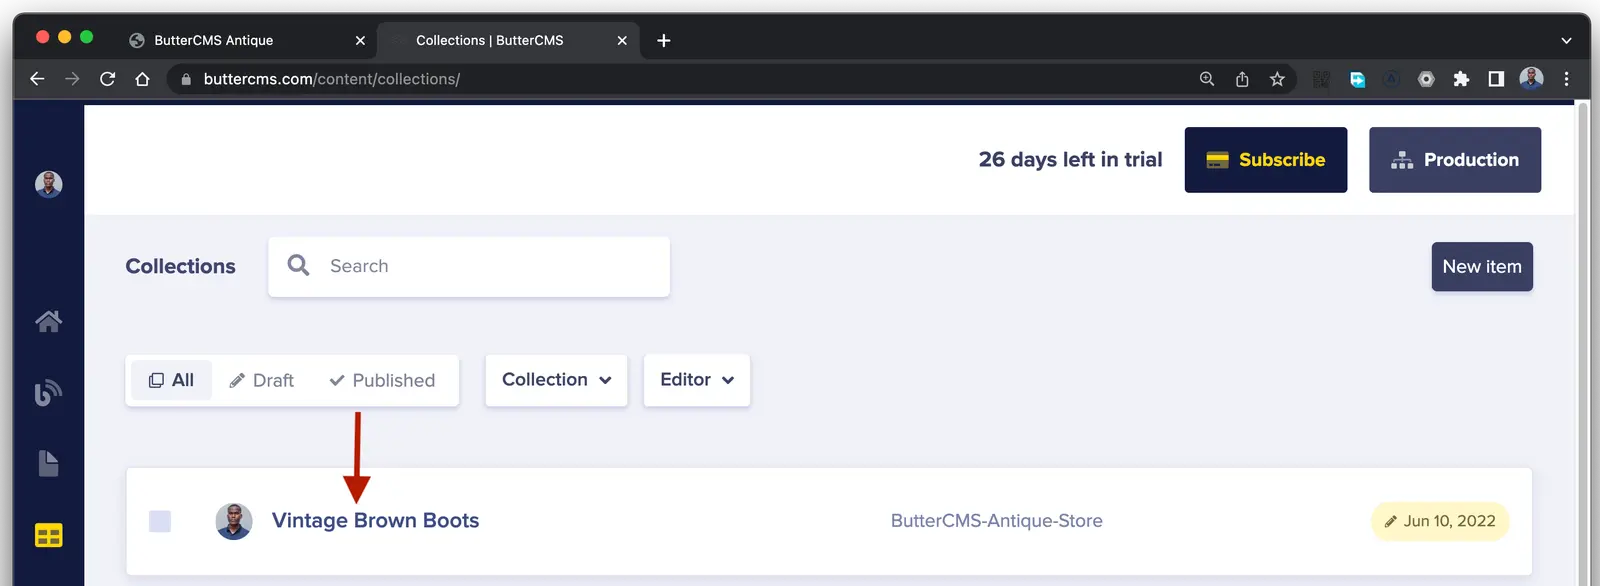
Using your web browser, click the Collection icon at the sidebar to navigate the collection overview page to view the post you created from the HTML website.
On the overview page, click the item’s name to navigate to the next page where you will edit the status of the item.
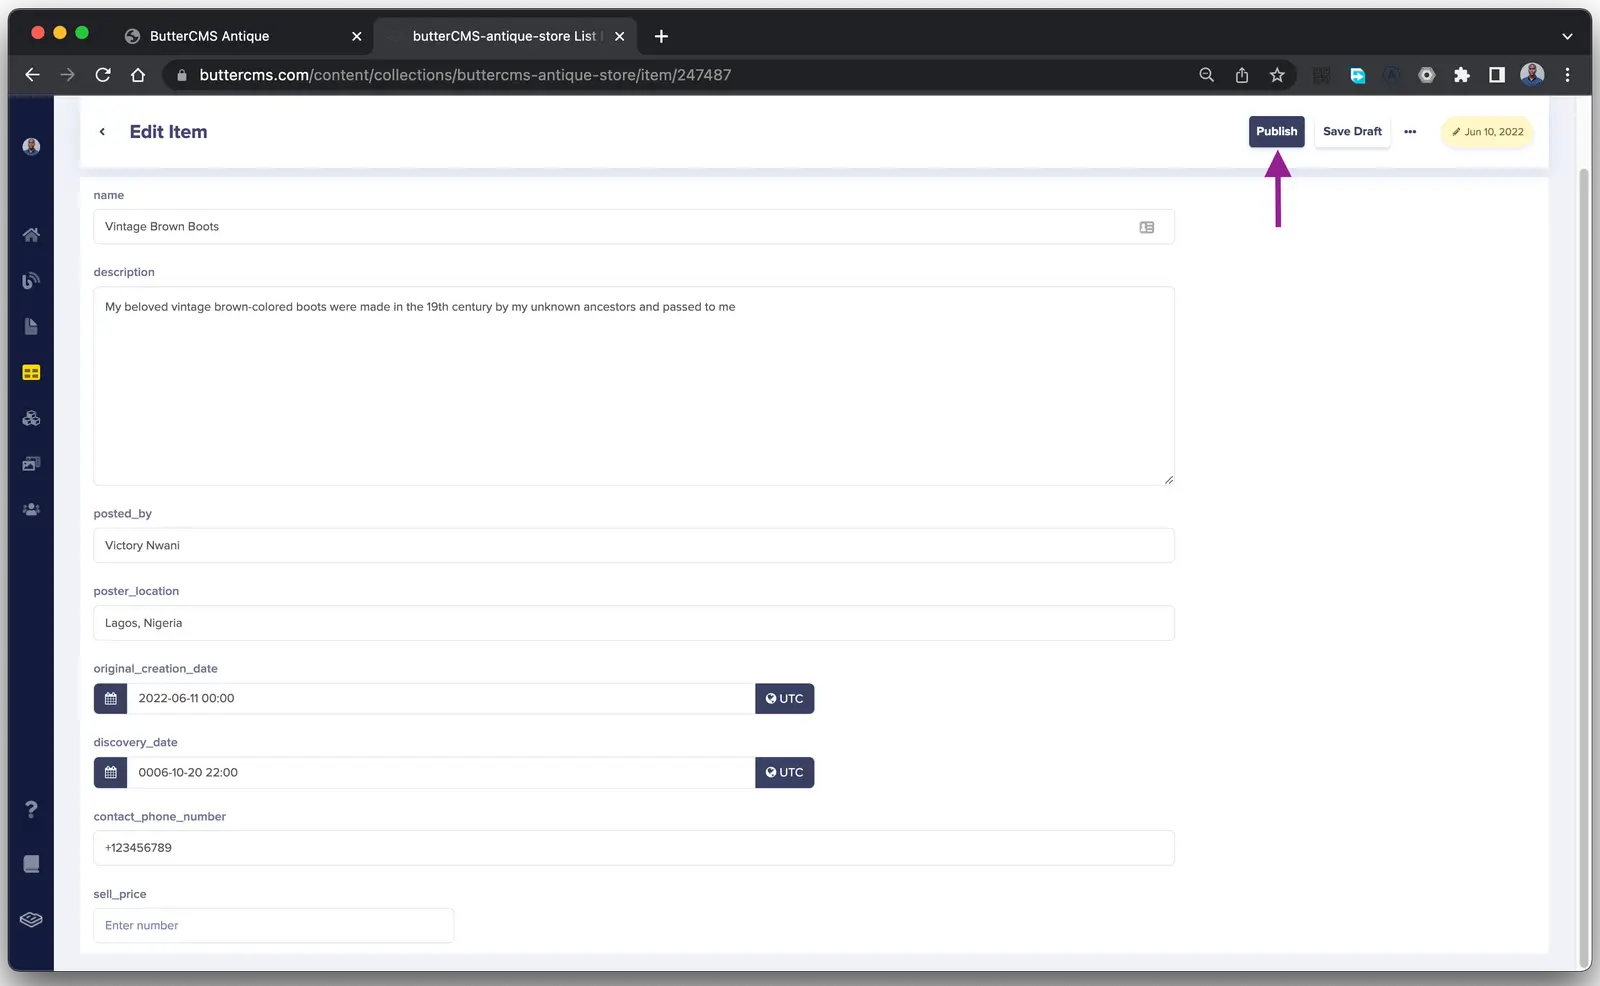
On the next page, you will find the values which you specified for the antique item from the HTML website.
Click the Publish button at the top to approve the antique item. After it is published, the antique item will be displayed whenever the index page of the HTML website is loaded.
Finally, reload the ButterCMS website to re-fetch the items and display the published item.
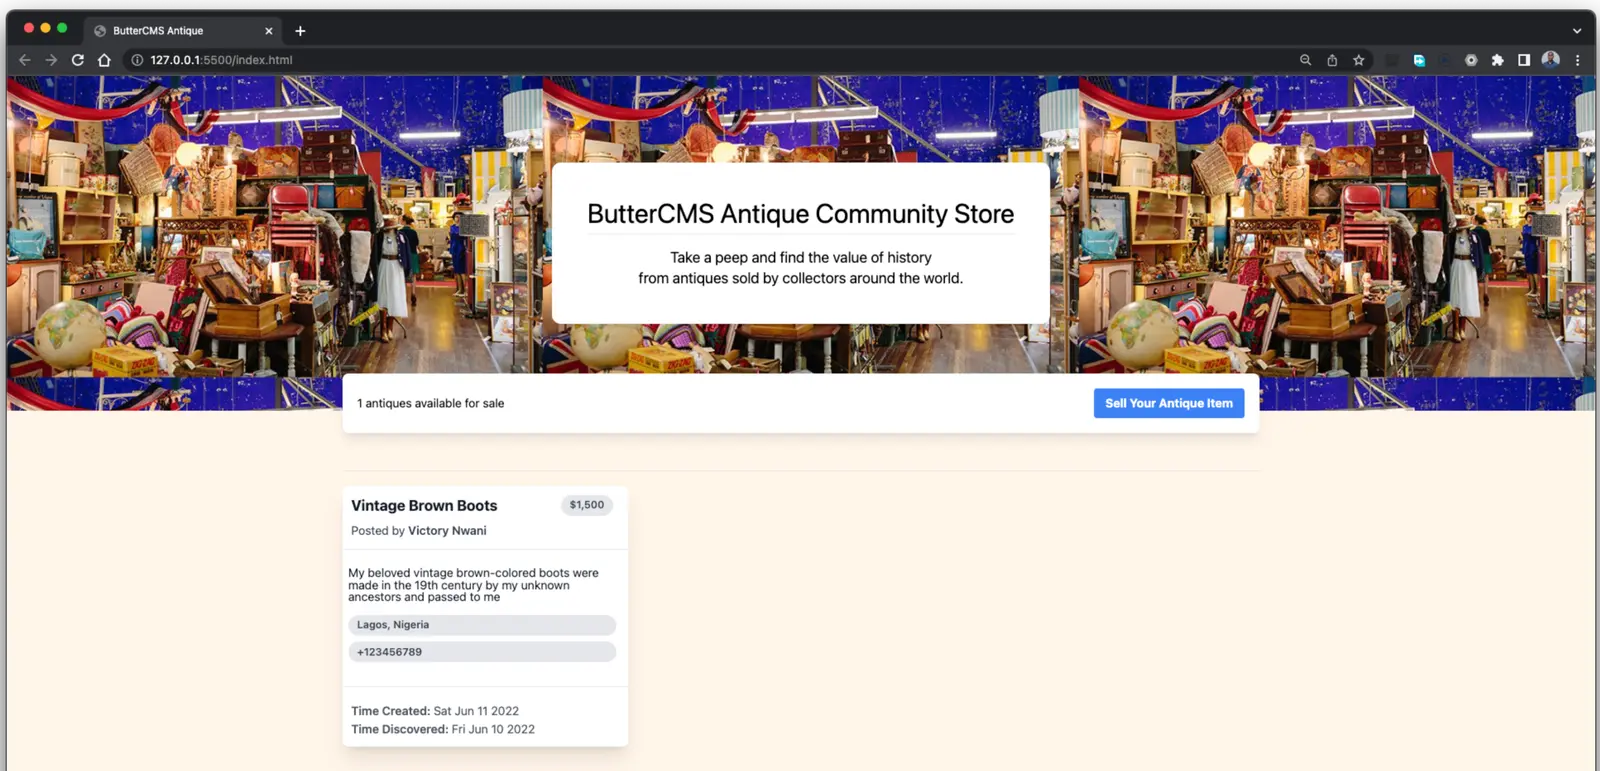
Congratulations!
Your basic antique marketplace built with HTML and ButterCMS is now functional. Repeat the process of posting and publishing more antique items to increase the data.
Closing thoughts
If you want to leverage the HTML website that was built, it is recommended that you consider the following:
- Consider setting up a module bundle such as Rollup to bundle the HTML and store your ButterCMS API keys as environment credentials for better security.
- Adjust the collection fields schema to perform validations on the values submitted from the HTML website and also mark them as required.
- Take a look at the Localization of Collections section of the ButterCMS documentation to learn how to localize content within the collection for a wide audience.
Aside from the /post endpoint, the ButterCMS REST-based API provides several endpoints for performing other operations against your ButterCMS instance. One example of this is the /search endpoint for performing either text or voice-based search.
To recap, in this tutorial, you started off with learning about traditional and headless CMS platforms and eventually learned about ButterCMS and how to use the ButterCMS Content API to build a demo antique application written using JavaScript and HTML.