Back in the old days, websites were all static. That meant that all content rendered on the page was fetched previously from the server and no change would take place until the files were updated. Time has passed and the need for dynamic data has increased — now users are demanding faster, timelier updates and the traditional model has become outdated.
Technologies like React, which can be used with our React CMS, popularized the concept of client-side apps, where the browser would download the JavaScript from the server and render the whole app from there. If further data was needed, the application would issue as many HTTP requests as needed in order to get recent, up-to-date information.
The idea was great and people quickly adopted it. However, this approach had some shortcomings: because the application had to be constructed from scratch after the JavaScript was downloaded and parsed, larger apps could face performance issues. Moreover, SEO was a problem since web crawlers had less time to get available content to index your web page (only after they got smart enough to crawl JavaScript).
In order to address these issues and retain the good from the dynamic approach, the concept of server-side rendered applications was introduced. Now, the app is rendered on the server during a phase called build time, which yields a bunch of static files to be served very much like the old days. During build time, data can be sourced from different places (e.g. a database, an external API, etc), which enables the static file to actually have dynamic information.
Now, considering that all data is fetched during build time, the app is as up-to-date as the last build. This means that if you don’t routinely rebuild it, your app won’t differ very much from the traditional model.
The goal of this article is to explain how you can easily set up and edit cron jobs to schedule a build for your static website at regular intervals, so you can use the latest cutting-edge tools for web development and still retain the ability to create SEO-friendly applications.
A cron job is simply a task scheduled to be executed at defined intervals. You can instruct a computer program to perform a routine at those intervals using a crontab.
Crontabs follow a specific structure that can be quickly learned. Fortunately, there are applications such as crontab guru that help you to edit cron jobs very easily. Diving into the specifics of crontabs is out of the scope of this article, but as a quick example, the following is the cron structure necessary to run a task at 8 pm every weekday:
0 20 * * 1-5
The first position (0) is the minute that the task must be executed. The next one (20), is the hour. Combining both, we are instructing the computer to execute the task at minute 0 of the 20th hour (8 pm).
The third position states the day of the month, while the fourth position is about the month itself. An asterisk means that any value is fine for both entries. Finally, the last value is the day of the week, where we are instructing the computer to only execute on days 1 to 5 (starting from 0, which is Sunday). Therefore, only days from Monday to Friday are included. We can view a nice, human-readable description of cron here.
Earlier we learned that server-side rendered applications render static files during their build. In a production environment, it is important that you are able to automatically trigger a build so you can set up a workflow for the deployment of your website.
One of the many tools available nowadays is Netlify Build. Netlify Build is a modern way to go from code to deployment without too much of a hassle. As the name suggests, it takes care of building your website and deploying the output to the internet. There are several articles explaining how to use Netlify and its benefits (including What is Serverless and How to Use It in Practice) but if you haven’t used it yet, don’t worry — we are going to see how it works step by step.
Considering that Netlify allows you to trigger builds, a natural question is how can you programmatically instruct Netlify that a build is due.
Fortunately, Netlify provides what are called build hooks. In their own words, build hooks are URLs you can use to trigger new builds and deploys. It means that every time you make a POST request to the provided URL, you are able to trigger a build.
We are getting closer to our goal: we know already that we can rebuild and deploy static websites using Netlify and that there is a unique URL that can be used to trigger a build programmatically. If we find a way to make POST requests at regular intervals, then we will be able to schedule builds for our static website.
The answer to this problem lies in a feature called GitHub Actions. Actions are a very powerful service offered by GitHub that can leverage your application’s CI/CD (continuous integration and deployment) workflow. We are not getting into details of all the advantages that Actions can provide to you, but I suggest reading their docs in order to get a broader understanding of it.
For today, what is important is that GitHub Actions allow us to issue a cURL request at regular intervals. This fills the last piece of our puzzle. Here’s how our workflow looks:
We are going to fit all the pieces together in a practical project, but before we get into it, let us discuss the implications and shortcomings of such an approach.
All looks very well but as with everything in life, there are some constraints.
Most importantly, even if we schedule builds at reduced intervals, our data will never be real-time. As always, it is part of the engineering job to decide the best tool for the task at hand, and if your application is very sensitive to real-time information, going server-side rendered might not be the best choice for you.
Moreover, if you significantly reduce the interval, you will perform more builds, which means that you are going to spend more build minutes. Many build tools charge by the minute, and even though most services will provide you a free tier, triggering too many builds can stack up minutes quickly and cost you a lot of money.
Also note that if your build is heavy, meaning that it fetches too much information or builds too many pages, every build will also take more time to complete. This will directly impact costs.
That said, setting up cron jobs to trigger static builds is a fairly elegant solution if your application can afford small delays (like updating once a day or every X hours). Remember that the ultimate goals for a static website are to be fast and SEO-friendly, and if you have dynamic, real-time pages, such as a social network feed, you probably won’t want it to be statically rendered anyway.
Enough talk. Let's learn how to implement all the concepts explained so far in a practical project.
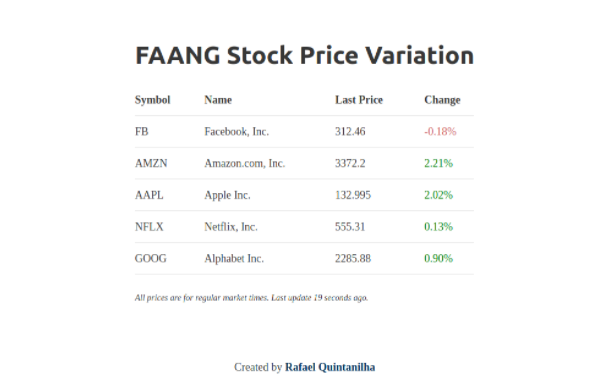
To illustrate the process, we will create a basic static stock price website. Our project will be very simple: we are going to build an application where users will be able to check how much the stock prices of FAANG companies have changed since the last trading day.
The application will be statically generated using GatsbyJS and will fetch data from Yahoo Finance’s API. On top of that, we will set up a GitHub Action to trigger a build every workday at the end of the regular trading session (4 pm ET or 8 pm UTC). You can check the source code at any point on the GitHub repo. The final version will look like this.
In order to start with Gatsby, make sure you have Gatsby’s CLI installed on your machine. Once you have it, run the following commands in your terminal to create a new project and start the default application:
<span style="font-weight: 400;">$ gatsby new faang-variation<br>$ cd faang-variation<br>$ gatsby develop</span></code><span style="font-weight: 400;"></span></pre>
<p><span style="font-weight: 400;">Go to </span><a href="http://localhost:8000/" rel="follow noopener" target="_blank"><span style="font-weight: 400;">http://localhost:8000/</span></a><span style="font-weight: 400;"> and check that the app is up and running.</span></p>
<p><span style="font-weight: 400;"></span></p>
<h3><span style="font-weight: 400;">Step 2: Fetching data from the API</span></h3>
<p><span style="font-weight: 400;">A server-side rendered application will typically fetch information from multiple sources. Today, we are going to use Yahoo Finance’s API to achieve our goal. The </span><a href="https://www.npmjs.com/package/yahoo-finance" rel="follow noopener" target="_blank"><span style="font-weight: 400;">yahoo-finance</span></a><span style="font-weight: 400;"> module is all we need:</span><span style="font-weight: 400;"></span></p>
<pre><code><span style="font-weight: 400;">$ yarn add yahoo-finance</span></code><span style="font-weight: 400;"></span><span style="font-weight: 400;"></span></pre>
<p><span style="font-weight: 400;">With the module installed, it’s time to edit </span><i><span style="font-weight: 400;">gatsby-node.js</span></i><span style="font-weight: 400;">. </span><a href="https://www.gatsbyjs.com/docs/reference/config-files/gatsby-node/" rel="follow noopener" target="_blank"><span style="font-weight: 400;">Gatsby Node API</span></a><span style="font-weight: 400;"> is an interface provided by Gatsby that allows us to dynamically generate static pages, which is precisely what we need.</span></p>
<p><span style="font-weight: 400;">Add the following to your </span><a href="https://github.com/rafaelquintanilha/faang-variation/blob/master/gatsby-node.js" rel="follow noopener" target="_blank"><span style="font-weight: 400;">gatsby-node.js</span></a><span style="font-weight: 400;">:</span></p>
<pre><code><span style="font-weight: 400;">const yf = require("yahoo-finance")<br>const path = require(`path`)<br><br>exports.createPages = async ({ actions: { createPage } }) => {<br> const homePageTemplate = path.resolve(`src/components/Home.js`)<br><br> const symbols = ["FB", "AMZN", "AAPL", "NFLX", "GOOG"]<br> const prices = await yf.quote({<br> symbols,<br> modules: ["price"],<br> })<br><br> const buildTime = new Date()<br><br> createPage({<br> path: `/`,<br> component: homePageTemplate,<br> context: {<br> prices,<br> buildTime,<br> },<br> })<br>}</span>The code should be very straightforward: we are quoting prices for our desired stocks and recording the build time. Next, we use the createPage function to generate our home page using the Home component at src/components/Home.js as a template.
Now that we already have the stock information available at build time in Gatsby, the final piece of the app is to actually create the Home component, which we will use to render the content based on data.
Go ahead and delete the pages folder, which has a static index.js file that we won’t be using. Then, create Home.js in src/components and add the following:
<span style="font-weight: 400;">import React from "react"<br><br>const Home = ({ pageContext: { prices, buildTime } }) => {<br> return (<br> /* Code here */<br> )<br>}<br><br>export default Home</span>The actual UI is not relevant. What really matters is that you can access the prices and buildTime variables generated in the previous step, using the pageContext prop of the component.
If you copy the code from GitHub and start the server again, you should be able to see our simple app up and running!
For this step, I am assuming you have your code hosted on a GitHub repository. Our app is ready, so it’s time to make it available to the world.
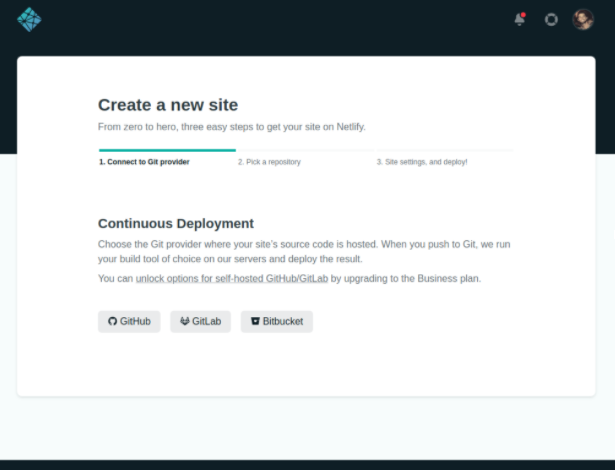
Make sure you have already signed up to Netlify. After this is done, go to https://app.netlify.com/start in order to connect your GitHub repository.
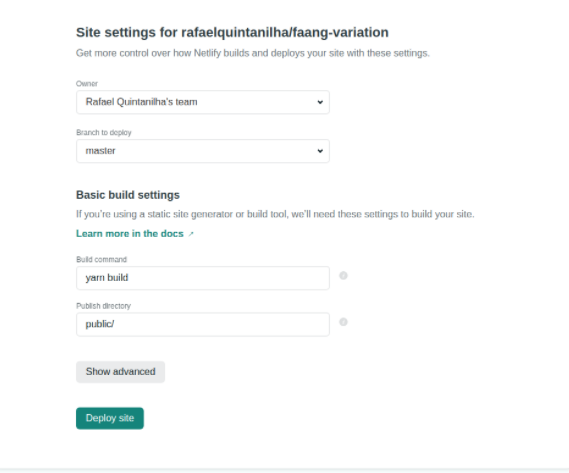
Click on “GitHub” and authorize the integration. Next, select your repo and proceed to deploy:
It’s that simple. In a few minutes, your website will be available. Change the domain name if you want and it’s done! The live result can be seen here.
The ultimate goal of today’s article is to set up a cron job that will trigger a build every weekday at 8 pm UTC. As discussed before, first we need to get a unique URL to which we will issue a POST request.
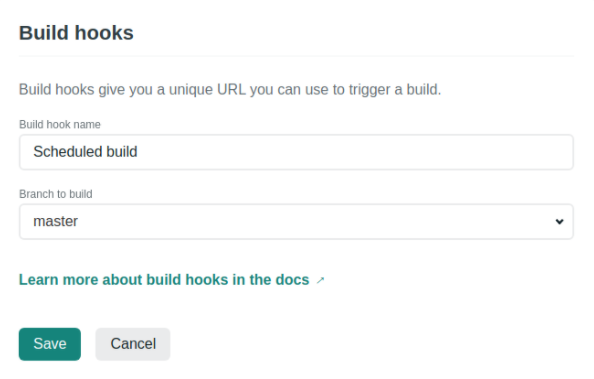
Go to Netlify > Site settings, then select “Build & deploy” and scroll to “Build hooks.” Click to add a new hook and fill it up with some descriptive information:
After you save it, a unique URL will be available to you.
Finally, we are ready to integrate with GitHub Actions in order to schedule the builds. But before we jump into that, let’s make sure the build hook is working.
Open your terminal and run the following command, replacing BUILD_HOOK_URL with the URL you generated before.
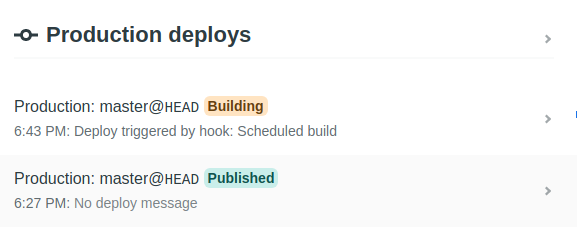
<span style="font-weight: 400;">$ curl -X POST -d {} </span><span style="font-weight: 400;">BUILD_HOOK_URL</span>Go back to Site overview in Netlify and make sure you see something like this:
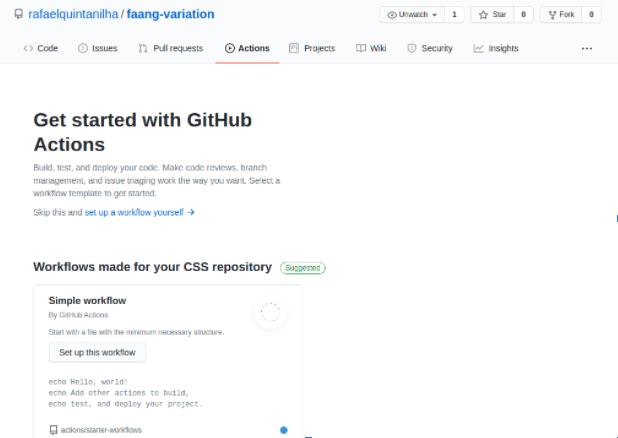
The hook is working! Now go to your GitHub repository, click on “Actions” and then on “set up a workflow yourself”.
Finally, get rid of everything on the left side editor and add the following (again, replace BUILD_HOOK_URL with your own):
<span style="font-weight: 400;">name: Trigger Netlify Build<br>on:<br> schedule:<br> # “At 20:00 on every day-of-week from Monday through Friday.”<br> # https://crontab.guru/#0_20_*_*_1-5<br> - cron: '0 20 * * 1-5'<br>jobs:<br> build:<br> name: Build Hook<br> runs-on: ubuntu-latest<br> steps:<br> - name: Curl request<br> run: curl -X POST -d {} BUILD_HOOK_URL</span>Commit your changes and that’s it! You have now learned how to edit cron jobs in order to schedule builds for your static application.
Static sites are very fast and great for SEO, which makes them very appealing when designing your application. However, those benefits come with drawbacks, especially if you want data to be regularly updated.
Scheduling cron jobs is a viable solution assuming that you can afford some delay when triggering your rebuilds. Note that the smaller the delay, the more builds will run, and the more expensive it will be for you to adopt this strategy (however, most services will provide you some kind of free tier if you want to test it out).
This approach is very useful if you use a headless CMS such as ButterCMS with a javascript framework like React. Consider this strategy to regularly update the content on your page!