
In today's dynamic and rapidly evolving digital landscape, introducing a product to the market involves more than simply sharing it with friends, family, and on social media platforms. The journey from conceptualizing a groundbreaking or trending product to its actual launch demands meticulous research, comprehensive data gathering, insightful market analysis, and various other preparatory steps to ensure its potential to create excitement and drive revenue.
At the culmination of your efforts, after translating research into actionable decisions, the challenge lies in effectively converting the initial attention garnered through social media posts and personal announcements. A centralized hub becomes essential—a dedicated space where intrigued individuals can delve deeper into your product's details and explore its various iterations. This is precisely where a product landing page comes into play.
Table of contents
Why use Swift and ButterCMS?
ButterCMS is a cloud-based headless content management system that balances the world between developers and content marketers. It allows developers to integrate content on their applications utilizing their preferred stack. With the ButterCMS REST API, integration with any system is possible, while allowing content marketing professionals to create, edit, delete, organize, and distribute content of various kinds, like blog posts, video content, images, and more all from one centralized location. ButterCMS provides an intuitive user interface that allows content marketers to interact easily with the application.
Meanwhile, Swift is a general-purpose programming language created by Apple Inc. and introduced in 2014. In just a few years, it is already known to be one of the most popular programming languages. It is designed to be fast, safe, and expressive, which makes it suitable for building applications for the Apple ecosystem.
When used together, Swift and ButterCMS offer several benefits for building iOS and macOS applications. These benefits include the following:
-
Separation of concerns: ButterCMS offers an easy way to manage your content while Swift focuses on giving users the best user interaction, logic, and presentation. This makes content editing easy as you do not have not to make any code changes to implement new edits. In the tutorial section, we will set up our application in a way that we do not need to write any code to make changes to our content.
-
Content agility: Swift-powered apps can adapt to content change needs. You can update content without needing to release new app updates. This is particularly useful for heavy content apps like your landing page.
-
Developer experience: ButterCMS provides a well-structured REST API that allows developers to fetch content easily in your Swift application.
Learn how ButterCMS can revolutionize your content management.Start my free trial
Tutorial Prerequisites
To complete this tutorial, you need the following:
-
Knowledge of Swift.
-
A ButterCMS account ( if you don’t already have one).
-
Leaf Templating engine.
All the code for this tutorial can be found at the following GitHub repo.
Crafting a Product Landing Page: A Comprehensive Swift Tutorial
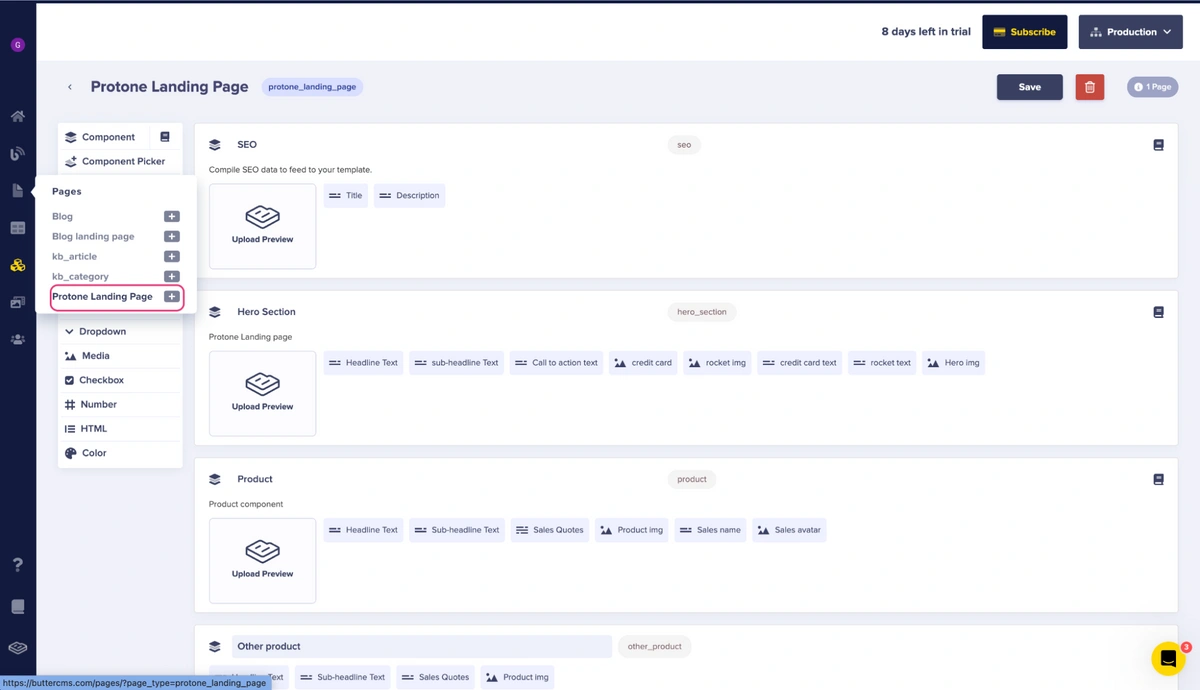
Before we can start building our product landing page, we need to set up our ButterCMS using Pages, Page types, and Components which will help allow us to create other pages without having to create new fields.
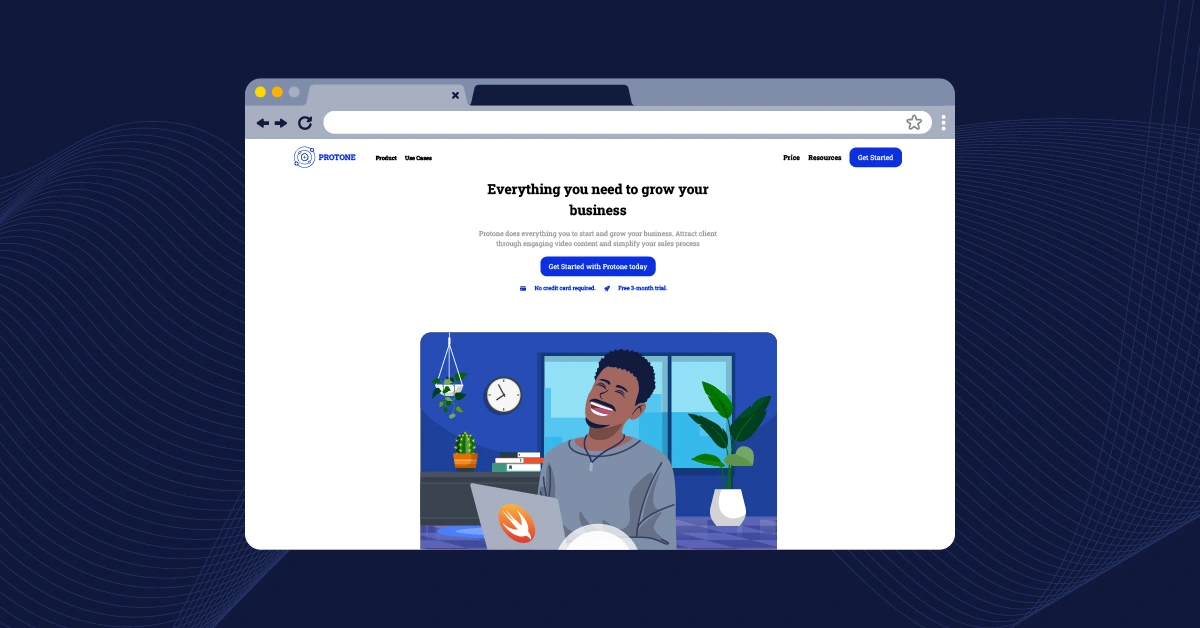
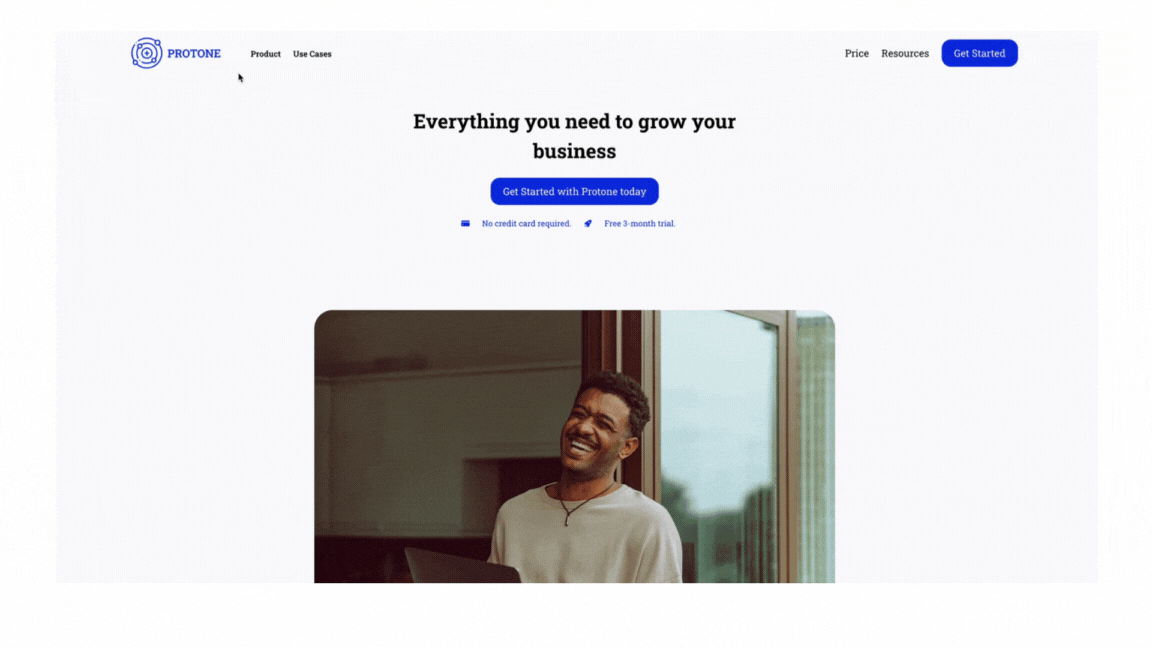
This is what our landing page should look like:
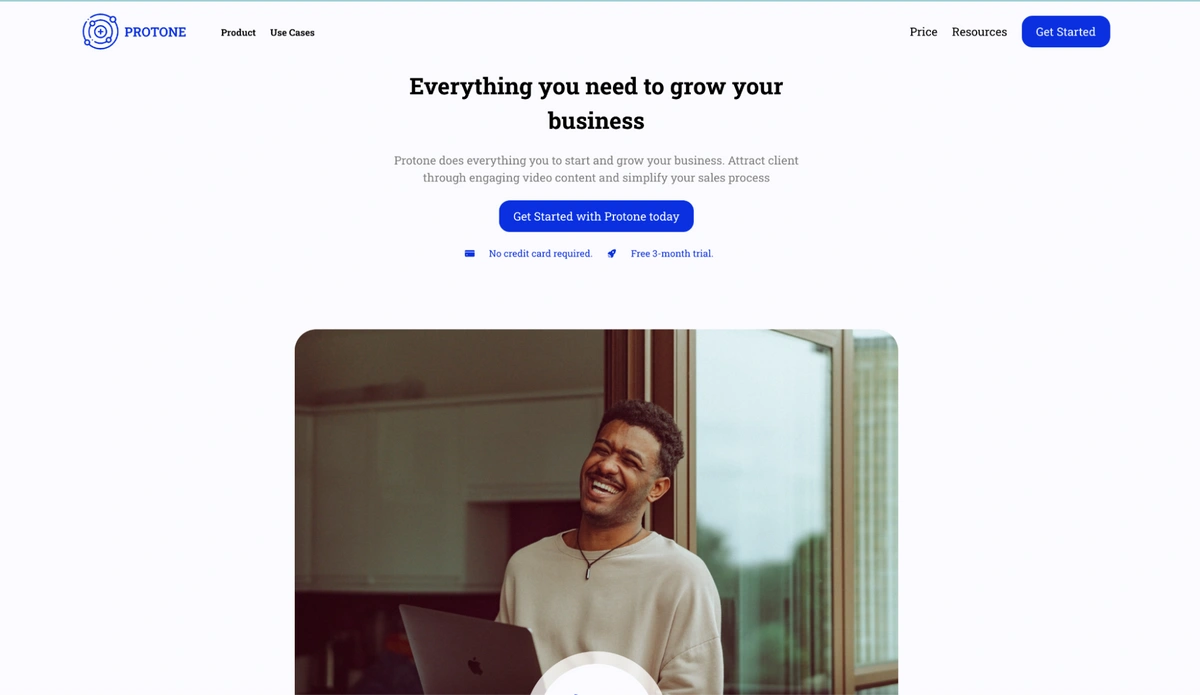
Our landing page has a hero section, two product sections that show our video app tool and give some details about the product and a section that links the users to a Playstore so they can download the application.
Creating Our Page Type
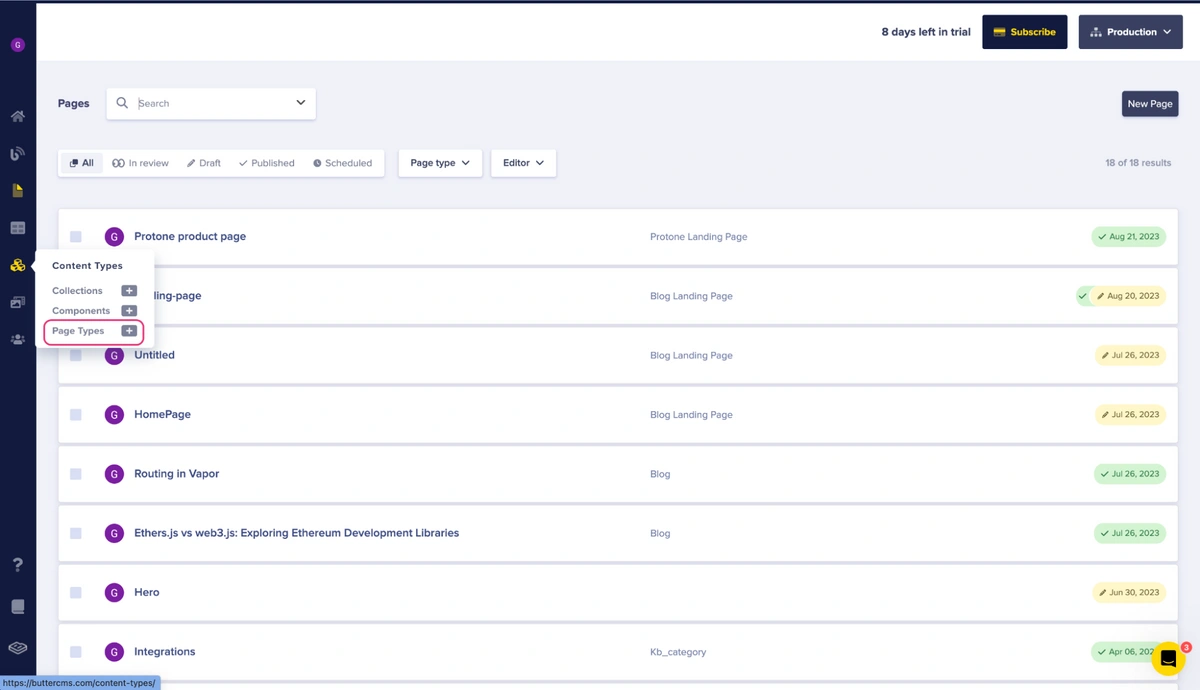
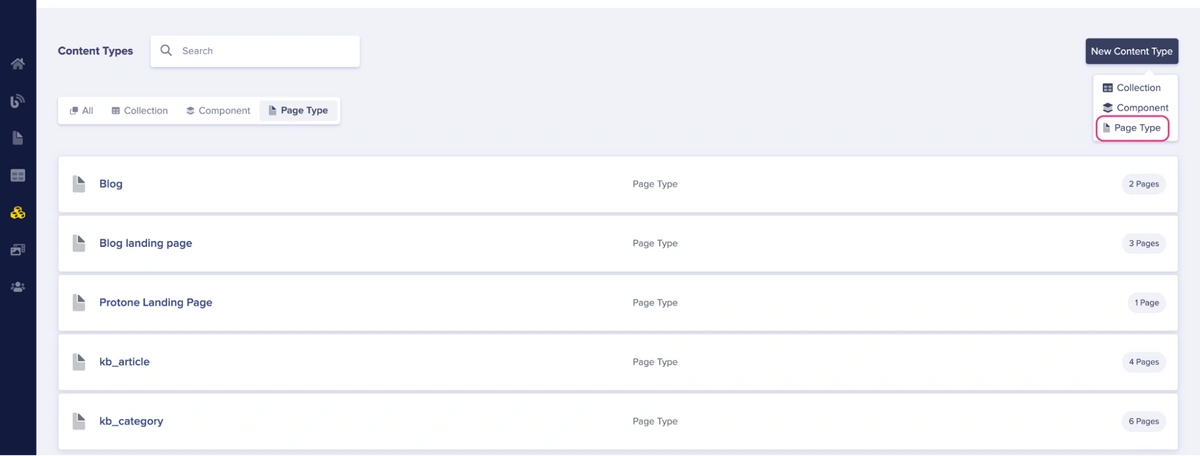
To create a new page type, in your ButterCMS navigation pane, click on Content Type or hover on the Content Type and click on the Pages Type. See the image below:
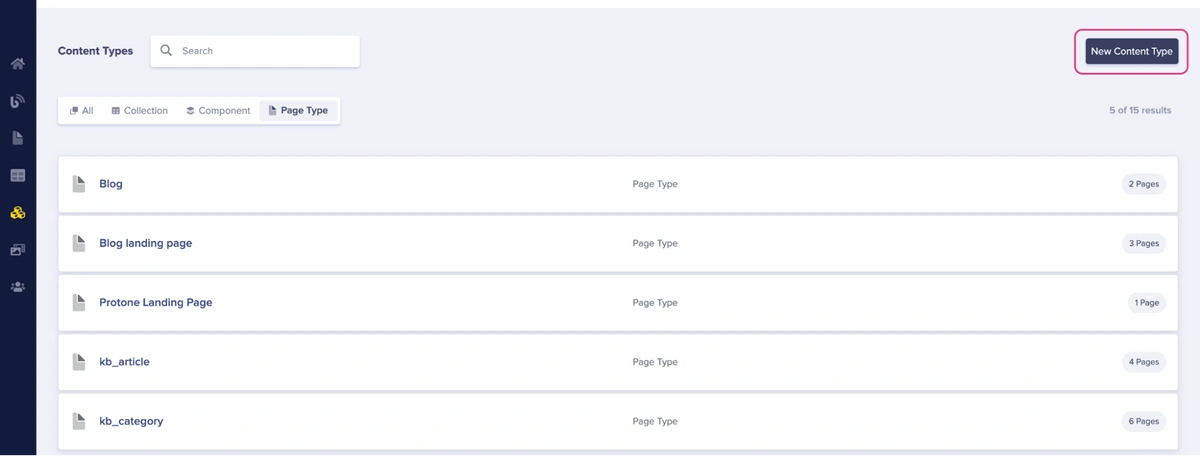
Next, you should see your Content Types dashboard filtered to display only Page Types. Click on the New Content Type button in the top right:
Next, you should see a dropdown, choose the Page Type option to create a new page type. See the image below:
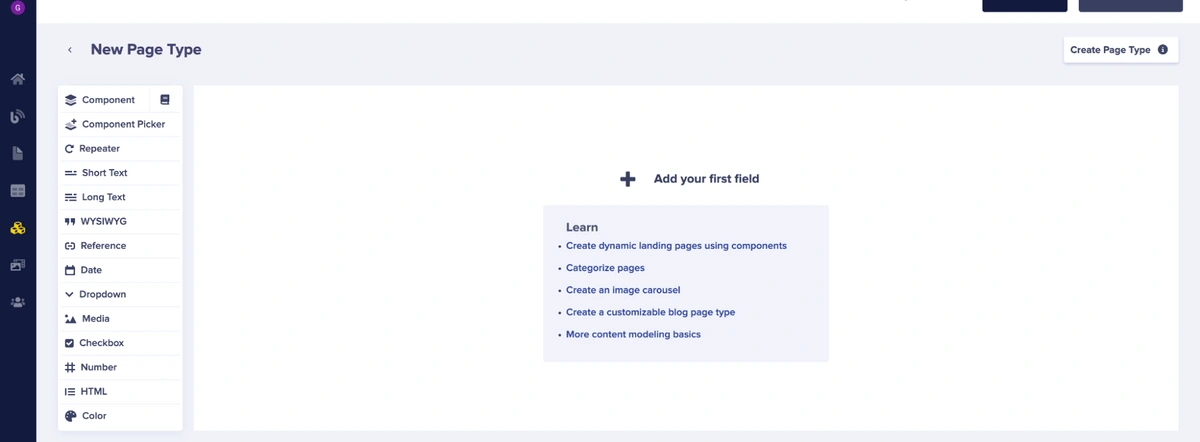
Next, you should see a New Page Type configuration page where we can start creating our landing page, and page type. See the image below:
Creating the landing page components
We will have four (4) components to create our product landing page:
-
SEO section
-
Hero section
-
Product
-
Download section
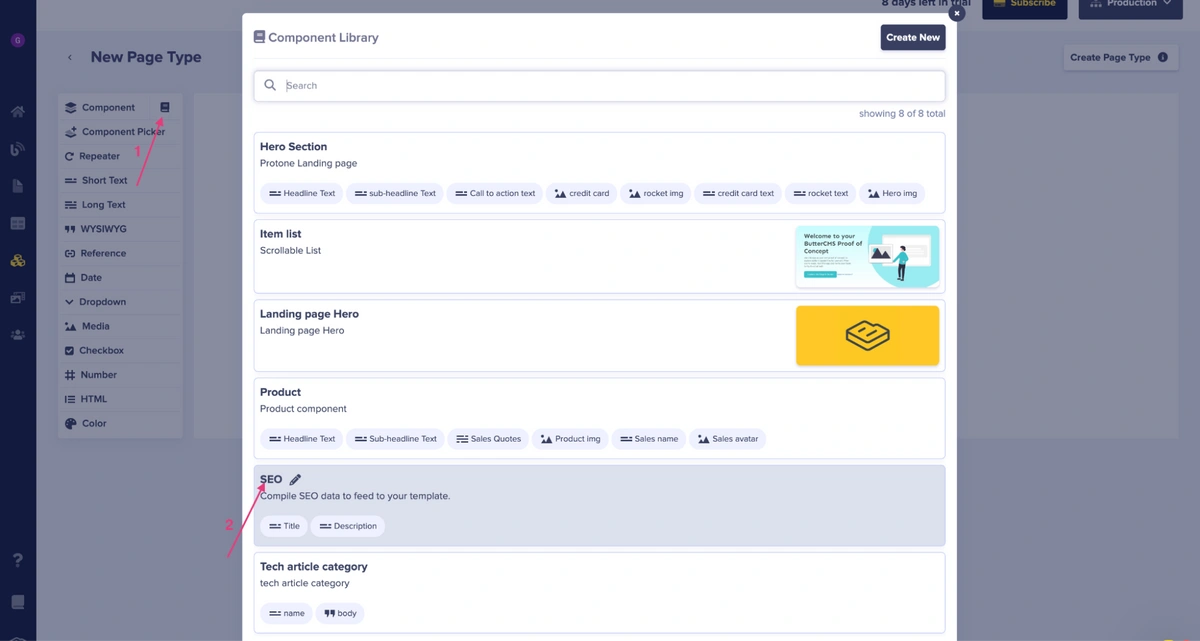
To create the SEO section, you can pick it from the component library— the component library allows you to reuse a particular component across all your pages. The SEO component is a default component that comes prepacked with your ButterCMS dashboard instance.
Note: You can create your own SEO component that meets your application's needs.
To use the SEO component, click on the Component Library button (1) next to the component field. This will open the component library where you will see a list of available components. Select the SEO component. See the image below for clarity:
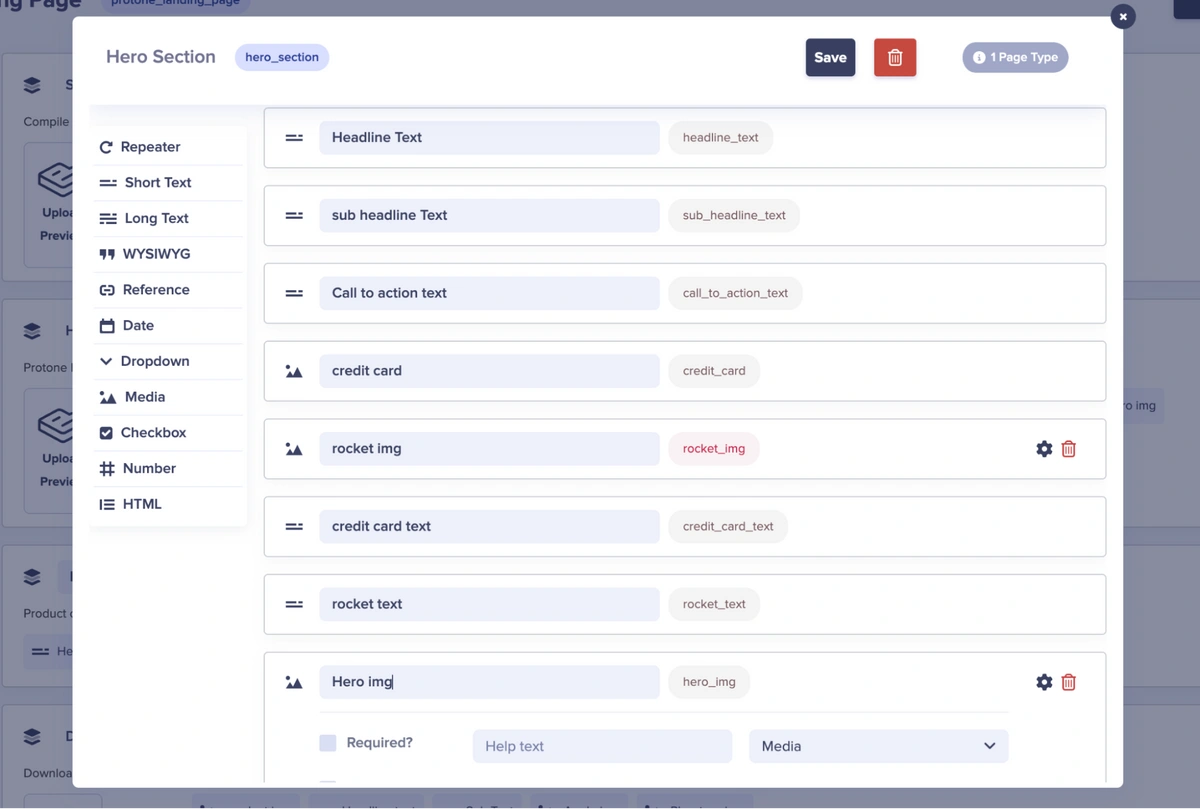
After selecting the SEO component, we will create our Hero component. Click the component field and name it Hero section. This component will have the following 8 fields:
-
Short Text: Headline Text
-
Short Text: Aub headline Text
-
Short Text: Call to action text
-
Media: Credit card
-
Short Text: Credit card text
-
Media: Rocket img
-
Short Text: Rocket text
- Media: Hero img
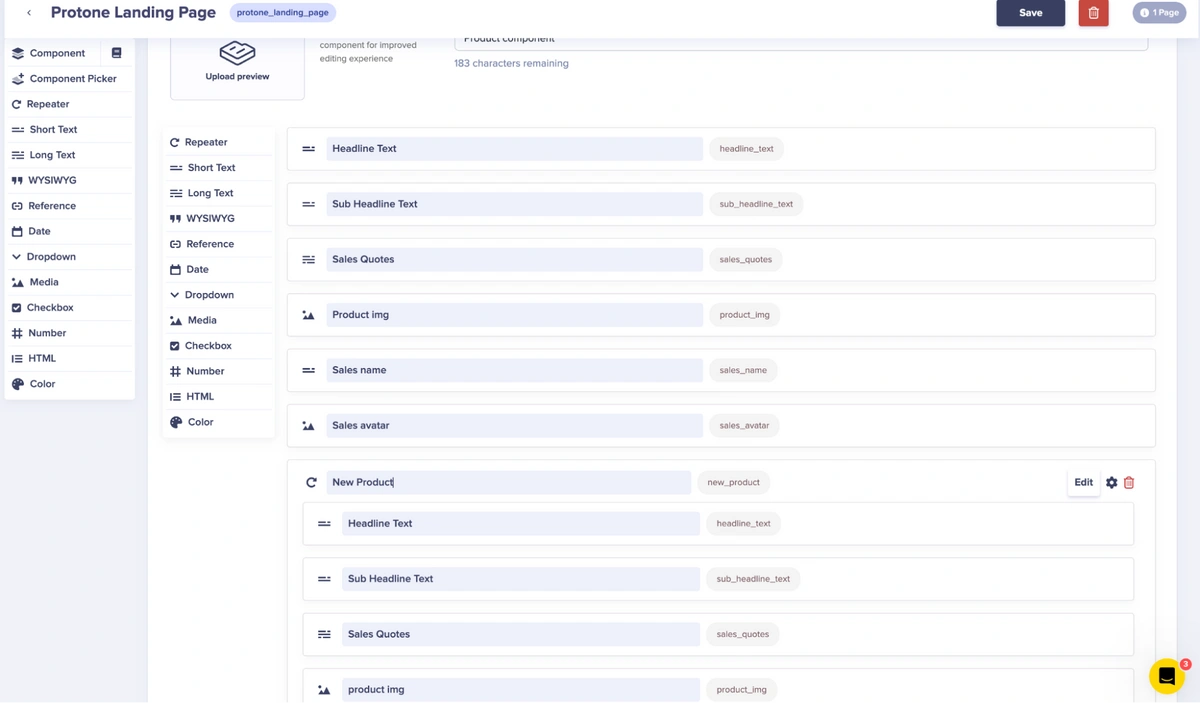
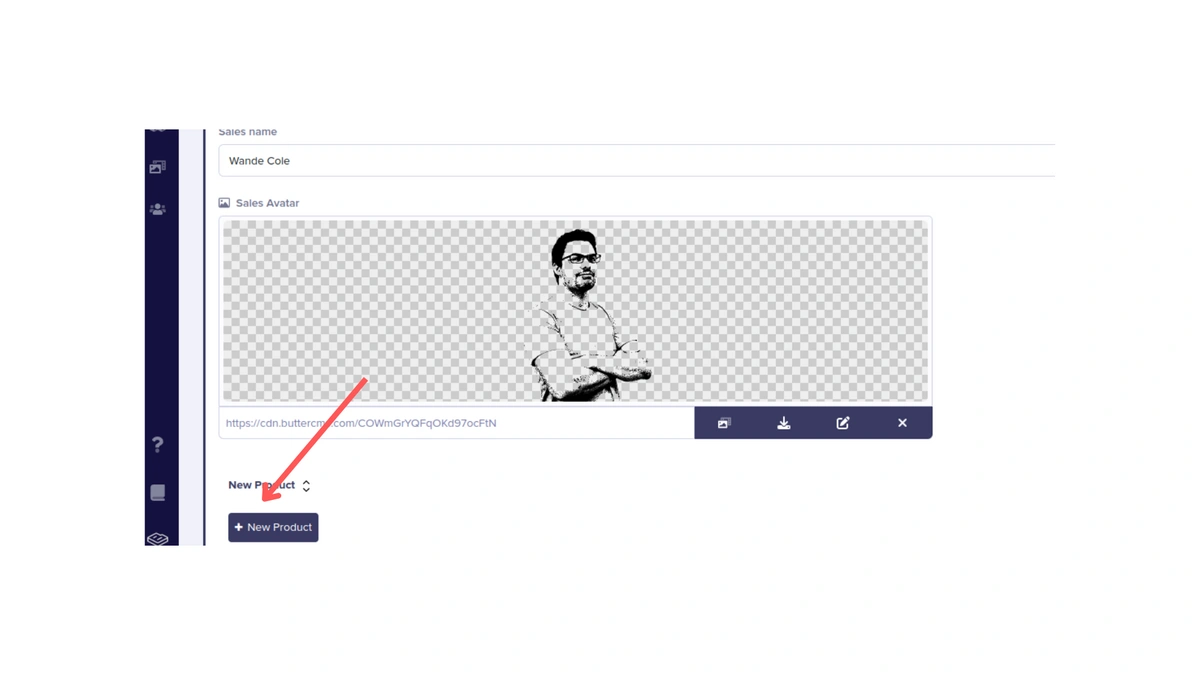
Next, we will create a component for the Product section: This Product component will contain the following fields:
-
Short Text: Headline Text
-
Short Text: Sub headline Text
-
Long Text: Sales Quotes
-
Media: Product img
-
Short Text: Sales name
-
Media: Sales avatar
-
Repeater: New product
-
Short Text: Headline Text
-
Short Text: Sub headline Text
-
Long Text: Sales Quotes
-
Media: product img
-
See the image below:
The gif below shows steps to creating repeaters:
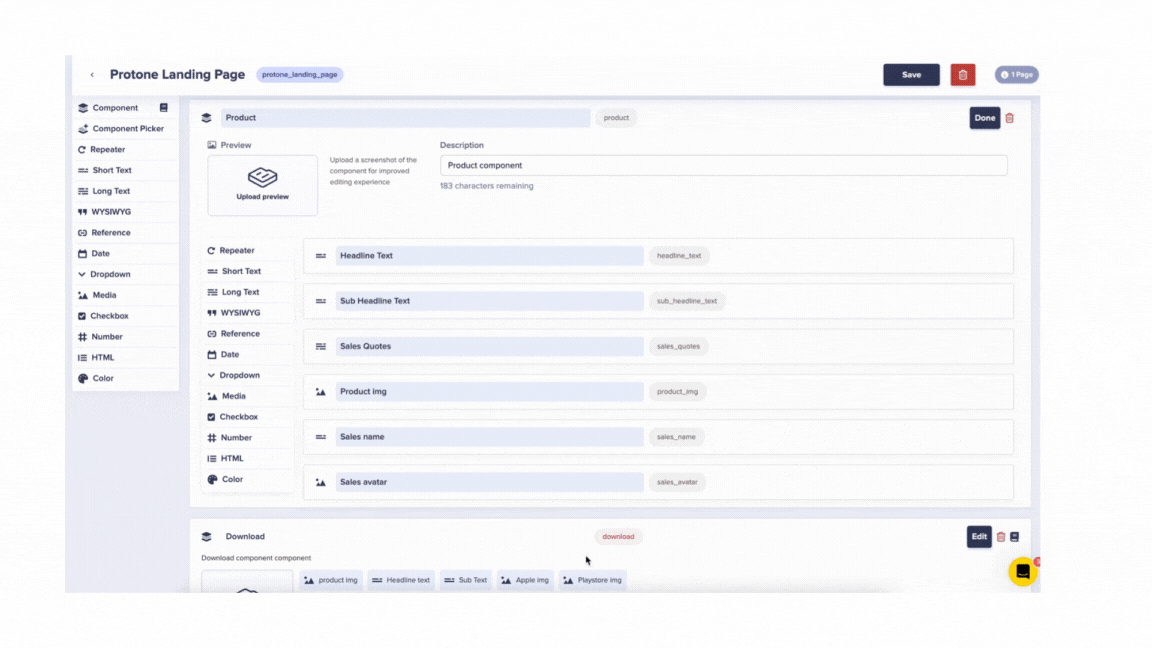
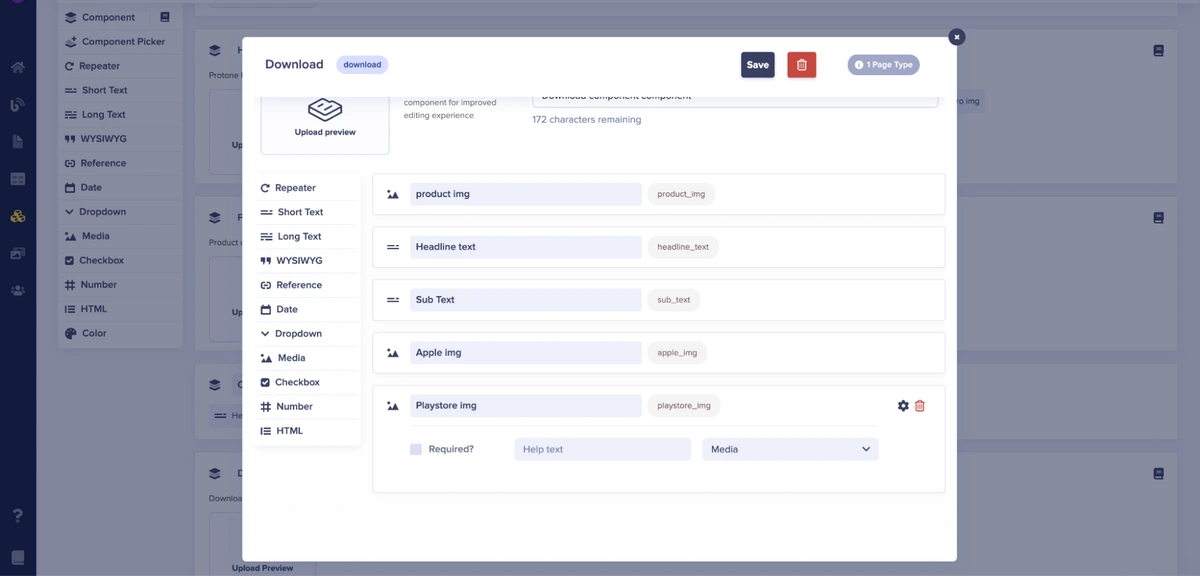
Next, we will create a component for the Download section. The Download component will have the following five fields:
-
Media: Product img
-
Short Text : Headline Text
-
Short Text: Sub Text
-
Media: Apple img
-
Media: Playstore img
See the image below:
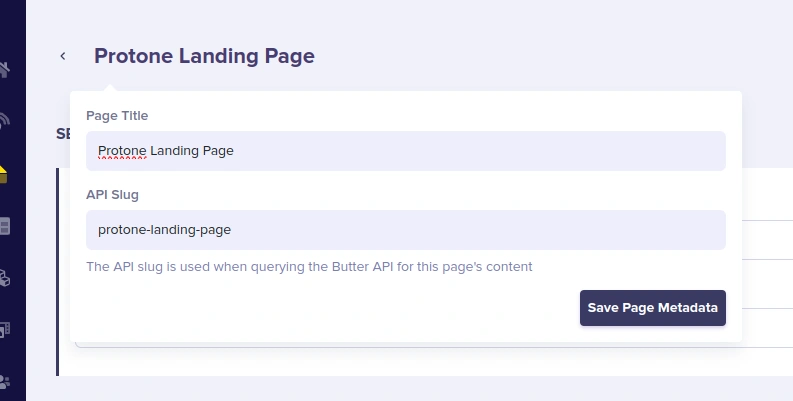
Next, after creating all our components, click on the Create Page Type button at the top right corner of your screen, a simple modal will prompt you to enter a name for the page type.
Name the page Protone Landing Page.
Afterward, click the Save as Page Type button.
Creating Our Landing Page Using the Protone Landing Page Page Type
In the previous section, we successfully created a page type named Protone Landing Page. In this section, we will create a new landing page using this page type.To create a new landing page, click on Pages on the navigation pane in your ButterCMS dashboard or hover on Pages and select the “+” next to Protone Landing Page from the dropdown to create a new page using the page type we just configured. See the image below:
Next, you should see a new blank page based on the Protone Landing Page page type schema.
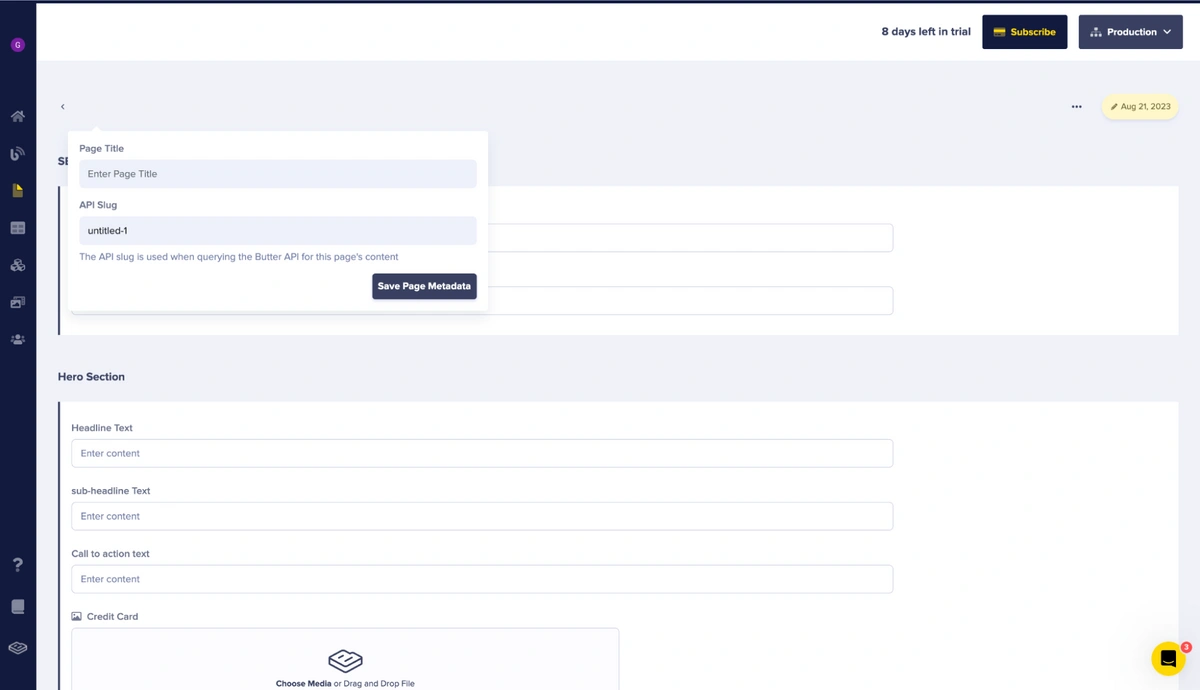
Next, let's title the landing page “Protone product page”. Then we can start entering our landing page content.
Next, we will enter the content for our SEO section:

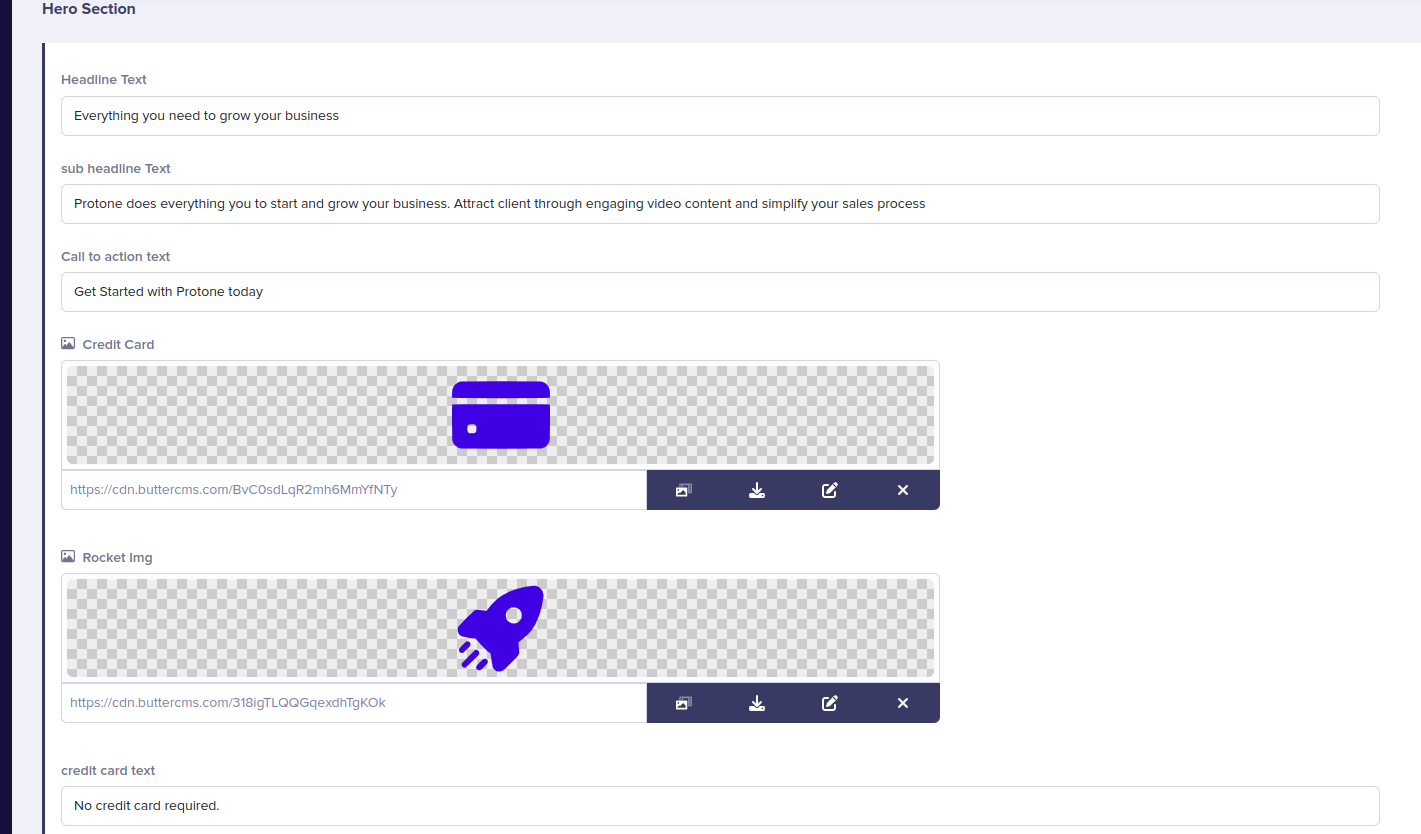
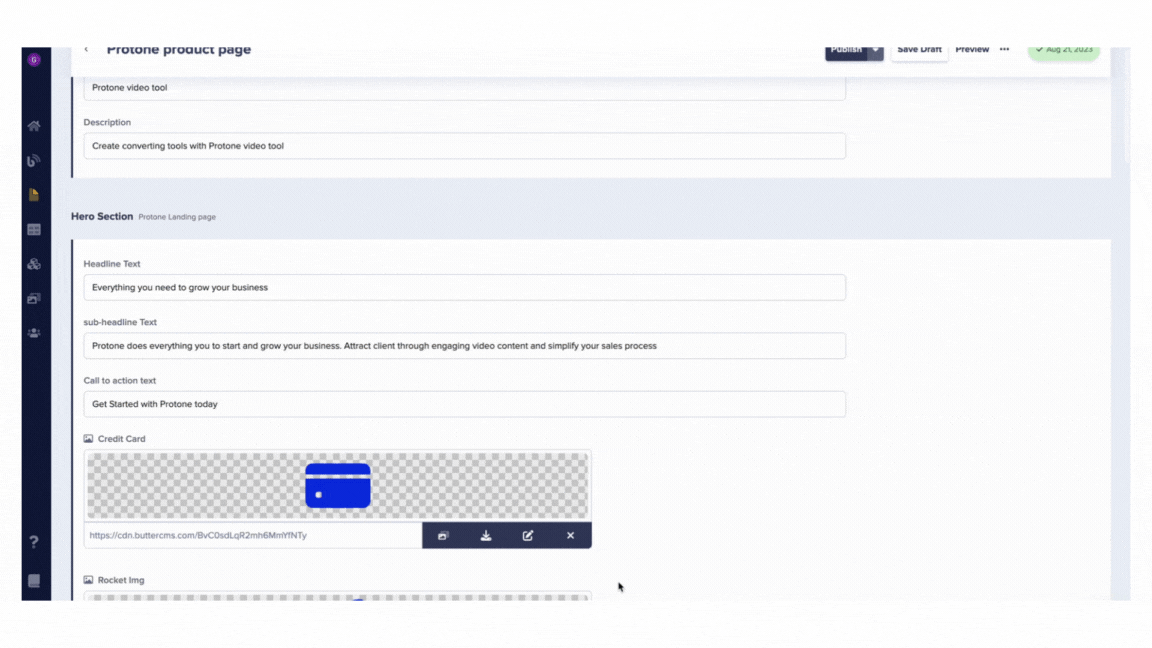
Next, let us enter content for our Hero section:
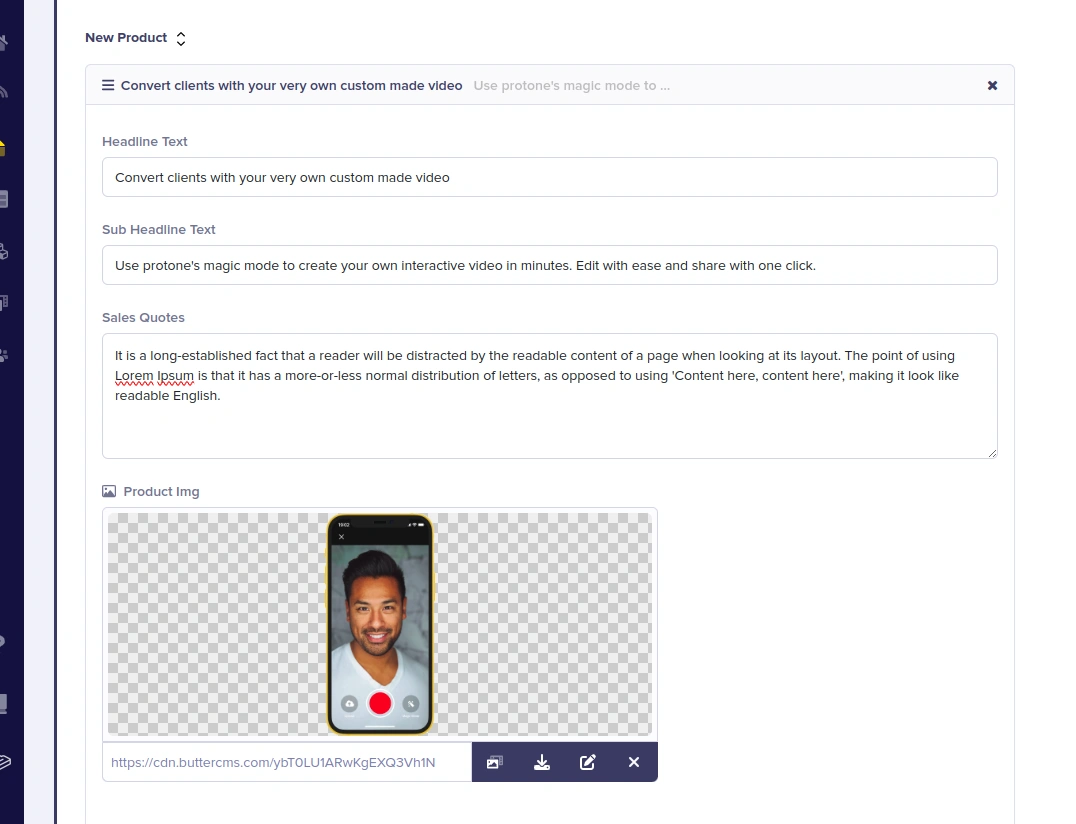
Next, let us enter content for our product component:
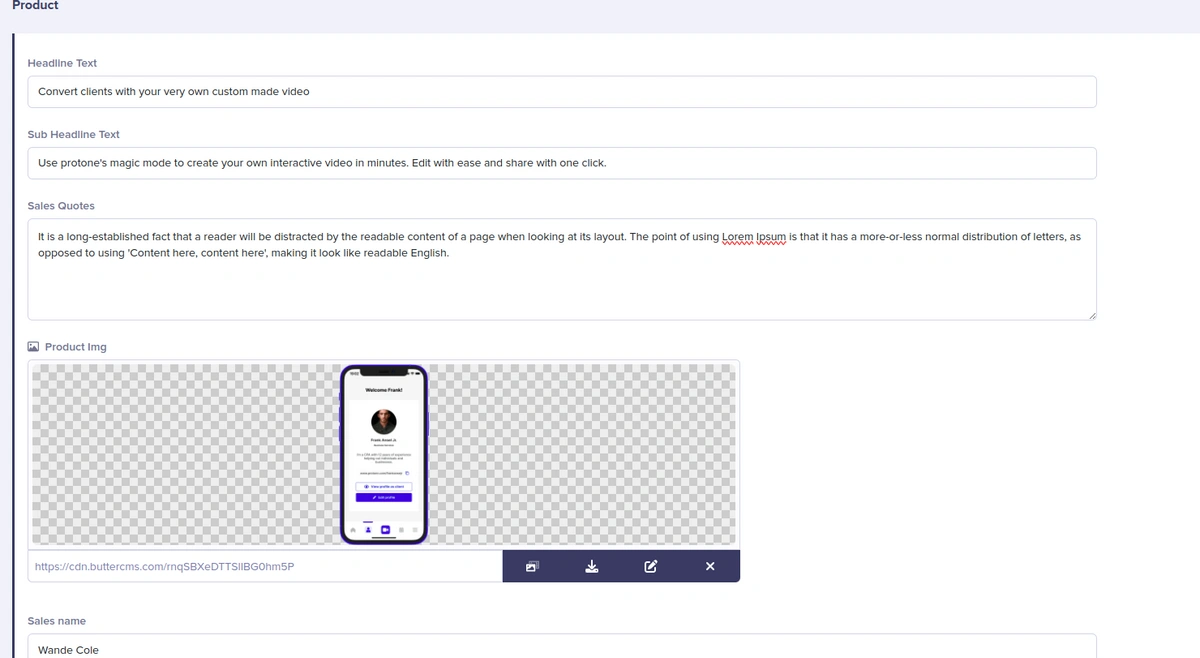
Note: The product section is split in two. We first have the fields from the component which we used above for our first product item and now we will add a second product using the repeater within that component.
Now let’s add more items to our product section using the repeaters, click the New Product button as shown below:
After clicking the button, you should see a new group of fields like below :
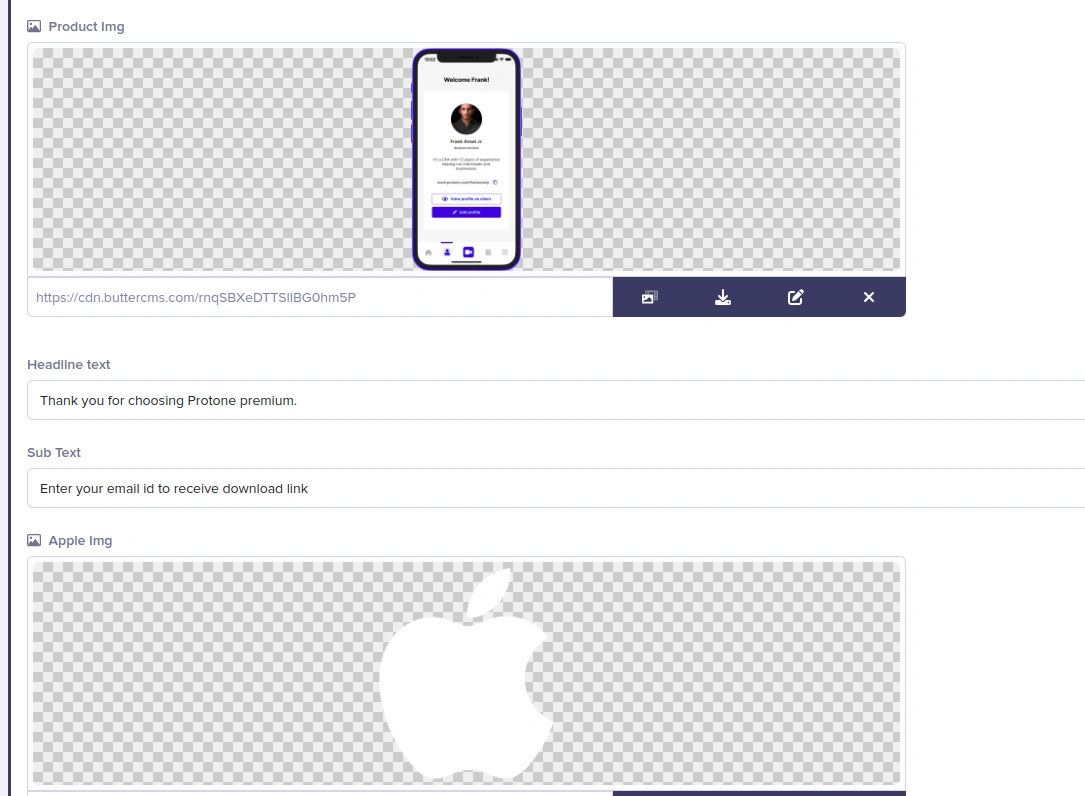
Next, let’s add content to our download section :
Finally, our content should look like this:
Setting up Swift
For this project, we will be using the leaf templating engine from the Vapor framework to build our landing page.
Installing the Vapor CLI
Vapor is a framework built by the Swift community to help build server-side rendered applications.
We need the Vapor command line interface because it helps us bootstrap and build our Swift application. To install the CLI, use the following commands below:
//macOS
brew install vapor//Linux
git clone https://github.com/vapor/toolbox.git
cd toolbox
git checkout <desired version> make install
To confirm that it is properly installed, run the command below:
vapor --helpThe above command, when run, should show the list of available Vapor commands.
Installing the Leaf Templating Engine
Leaf is a templating engine created by the Vapor community to help write dynamic values into your static HTML pages using tags. You can learn more here.
To use Leaf inside our project, we need to add it as a package in your package file.
Add the following lines to your dependencies array, if not already there:
dependencies: [
        // 💧 A server-side Swift web framework.
        .package(url: "https://github.com/vapor/vapor.git", from: "4.76.0"),
        .package(url: "https://github.com/vapor/leaf.git", from: "4.0.0"),
    ],
targets: [
.executableTarget(
name: "App",
dependencies: [
// Add these two lines if not available
.product(name: "Vapor", package: "vapor"),
.product(name: "Leaf", package: "leaf")
],
swiftSettings: [
.unsafeFlags(["-cross-module-optimization"], .when(configuration: .release))
]
),
.testTarget(name: "AppTests", dependencies: [
// Add this line
.product(name: "XCTVapor", package: "vapor"),
])
]Inside the Resources folder, create a View folder and create a file called index.leaf.
Add the following dummy HTML code to your index file.
<!DOCTYPE html>
<html>
<head>
<title>Protone Page</title>
</head>
<body>

<h1>Product landing page</h1>
<p>This is a paragraph.</p>

</body>
</html>
Rendering Our HTML File
We have to set up how we need to render our HTML file. To do that, see the steps below:
Step 1: Create a folder called Controller inside your Sources/App folder. Inside the Controller folder, create a new file called WebsiteController.swift.
The controller file will hold all the website routes.
Replace the content of the controller file with the code below:
import Vapor
import Leaf

struct WebsiteController: RouteCollection {

  func boot(routes: RoutesBuilder) throws {
    routes.get(use:landingPageHandler)
  }

  func landingPageHandler(_ req: Request) -> EventLoopFuture<View> {
    return req.view.render("index")
  }
}
The req.view returns a ViewRenderer. Since we configured LeafRenderer as our ViewRenderer, we can use the file extension .leaf. This is why we name our index with the .leaf extension.
Step 2: Inside your routes file located at Sources/App, open the routes folder and see the following code:
app.get { req in
  return "It works!"
}
Replace the code with the following:
import Vapor

func routes(_ app: Application) throws {
    let websiteController = WebsiteController()
    try app.register(collection: websiteController)

}
Step 3: Next, open configure.swift and add the following to the imports section below:
import Vapor
import Leaf
Step 4: Next, add the following line to configure.swift
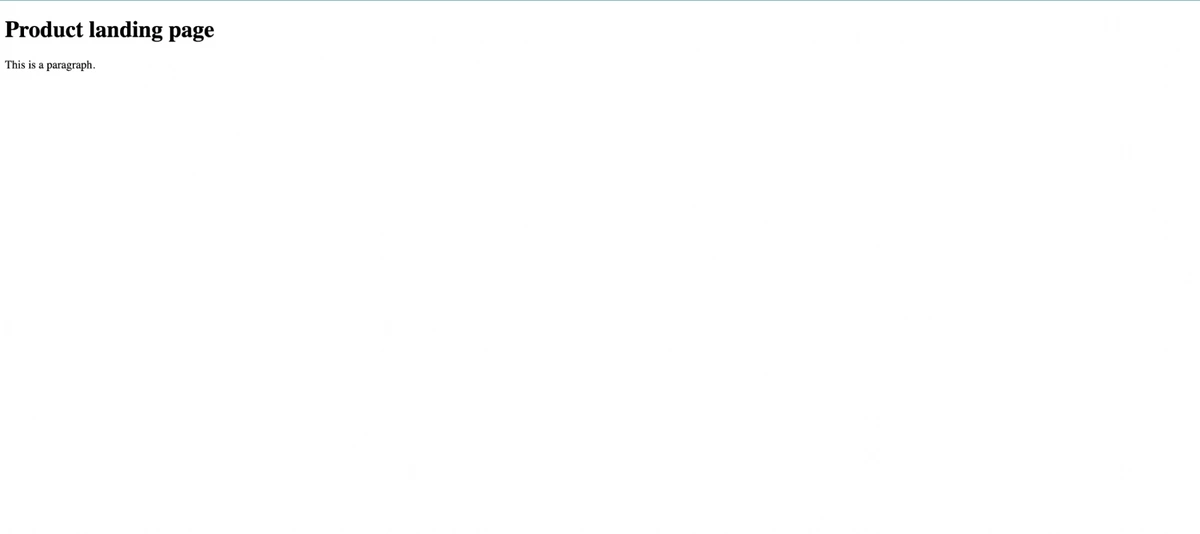
app.views.use(.leaf)Congratulations, Vapor is now aware that we will be using Leaf as our renderer. Click the build button. Once this is done, you should see your application running on port http://127.0.0.1:8080.
You should see the text in our index.leaf file renders like below:
Adding CSS for Styling
For this project, we will be using vanilla CSS to style our project. To be able to do this, we will have to set up a middleware. With this middleware setup, we can serve assets to our static HTML page easily.
Step 1: Go to your configure.swift file, and add the following line of code:
let files = FileMiddleware(publicDirectory: app.directory.publicDirectory)app.middleware.use(files)Step 2: Then create a folder called Public. Inside the Public folder, create a folder called Styles. Inside the Styles folder, create another file called Styles.css. This is where we will serve our styles in this tutorial.
Integrating ButterCMS with Swift
To start integrating ButterCMS, we need the API key which will allow us access to fetch content from ButterCMS.
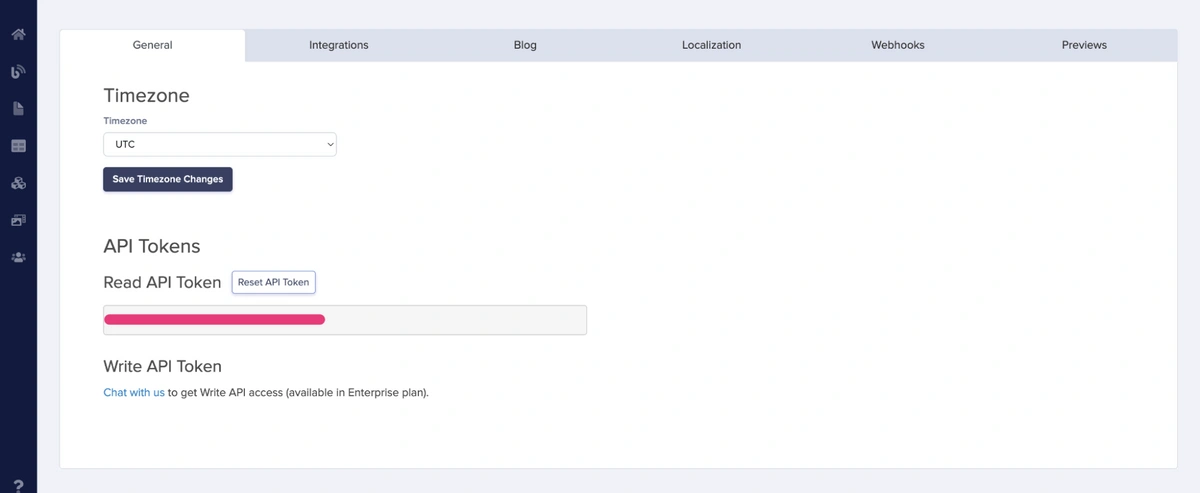
To get the API key, go to your settings page on your ButterCMS dashboard. See the image below:
Next, you should see a new page, under the General tab, underneath Timezone in the general tab, you should see the API key. See the image below:

Creating our Models
ButterCMS sends content to our application using json format but our Swift app cannot directly consume json, so we need to create models to help us parse the json format into Swift objects.
Head over to Source/App folder and create a folder called Model. Inside the folder, create a file called ProductPageFields and add the following block of code.
import Foundation

// MARK: - ProductPageFields
struct ProductPageFields: Codable {
    let seo: SEO?
    let heroSection: HeroSection?
    let product: Product?
    let otherProduct: OtherProduct?
    let download: Download?
}

// MARK: - Download
struct Download: Codable {
    let productImg, headlineText, subText, appleImg: String?
    let playstoreImg: String?
}

// MARK: - HeroSection
struct HeroSection: Codable {
    let headlineText, subHeadlineText, callToActionText, creditCard: String?
    let rocketImg, creditCardText, rocketText, heroImg: String?
}

// MARK: - OtherProduct
struct OtherProduct: Codable {
    let headlineText, subHeadlineText, salesQuotes, productImg: String?
}

// MARK: - Product
struct Product: Codable {
    let headlineText, subHeadlineText, salesQuotes, productImg: String?
    let salesName, salesAvatar: String?
}

// MARK: - SEO
struct SEO: Codable {
    let title, description: String?
}
The models above are created based on the response from the ButterCMS REST API. With this model, we should be able to consume the response from ButterCMS.
Making the API Request
We will be using the ButterCMS software development kit (sdk) to handle requests to ButterCMS. To use the sdk, we need to add the package to our Swift application.
To do this, go to your Package.swift file in your Xcode ide, and add the following line of code:
Add the line of code below to the dependencies section of your Package.swift file.
.package(url: "https://github.com/Prn-Ice/buttercms-swift.git", from: "1.1.3"),Add the next line of code to your target section in your package file.
.product(name: "ButterCMSSDK", package: "buttercms-swift"),See the complete code:
// swift-tools-version:5.8
import PackageDescription

let package = Package(
    name: "ButterLandingPage",
    platforms: [
        .macOS(.v13),
    ],
    dependencies: [
        // 💧 A server-side Swift web framework.
        .package(url: "https://github.com/vapor/vapor.git", from: "4.76.0"),
        .package(url: "https://github.com/vapor/leaf.git", from: "4.0.0"),
        .package(url: "https://github.com/Prn-Ice/buttercms-swift.git", from: "1.1.3"),
    ],
    targets: [
        .executableTarget(
            name: "App",
            dependencies: [
                .product(name: "Vapor", package: "vapor"),
                .product(name: "Leaf", package: "leaf"),
                .product(name: "ButterCMSSDK", package: "buttercms-swift"),
            ],
            swiftSettings: [
                // Enable better optimizations when building in Release configuration. Despite the use of
                // the `.unsafeFlags` construct required by SwiftPM, this flag is recommended for Release
                // builds. See <https://www.swift.org/server/guides/building.html#building-for-production> for details.
                .unsafeFlags(["-cross-module-optimization"], .when(configuration: .release)),
            ]
        ),
        .testTarget(name: "AppTests", dependencies: [
            .target(name: "App"),
            .product(name: "XCTVapor", package: "vapor"),
        ]),
    ]
)
Next, inside the Source/App file create a folder called Manager. Inside the manager folder, Create a file called ButterCMSManager.swift. Add the following block of code inside the new file:
 import ButterCMSSDK
import Combine
import NIO

class ButterCMSManager {
    static var shared = ButterCMSManager()
    let butter = ButterCMSClient(apiKey: "")
    let productPagesSubject = PassthroughSubject<PagesResponse<ProductPageFields>, Error>()


    func getProductPage(eventLoop: EventLoop) -> EventLoopFuture<[Page<ProductPageFields>]> {
        let promise = eventLoop.makePromise(of: [Page<ProductPageFields>].self)

        butter.getPages(pageTypeSlug: "protone_landing_page", type: ProductPageFields.self) { result in
            switch result {
            case let .success(pages):
                promise.succeed(pages.data)

            case let .failure(error):
                promise.fail(error)
                print(error)
            }
        }

        return promise.futureResult
    }
}
The getProductPage function is an asynchronous function that gets a list of Pages of type ProductPageFields and it is able to find a particular page we need through the slug of the page.
Creating the Controller
Next, go to your Source/App/Controller folder, inside the WebsiteController.swift file, replace the code the file with the following line of code:
import Leaf
import Vapor
import Foundation
import ButterCMSSDK

struct WebsiteController: RouteCollection {
    func boot(routes: RoutesBuilder) throws {
        routes.get(use: landingPageHandler)
    }

    func landingPageHandler(_ req: Request) -> EventLoopFuture<View> {
        let pageFuture = ButterCMSManager.shared.getProductPage(eventLoop: req.eventLoop)

        return pageFuture.flatMap { pages in
            let typedPages = pages as [ButterCMSSDK.Page<ProductPageFields>]?
            let fields = typedPages?.first?.fields
            let context = PageContext(data: fields)

            return req.view.render("index", context)
        }
    }
}

struct PageContext: Encodable {
    let data: ProductPageFields?
}
The landingPageHandler is a request handler that fetches the product page using the getProductPage function from the ButterCMS manager and renders a view using the obtained data.
The landingPageHandler calls the getProductPage handler. The returns a list of Page of type ProductPageFields object. It then uses the flatMap method to transform the data from EventLoopFuture<NewValue> to ButterCMSSDK.Page<ProductPageFields>. It then extracts the fields if any and passes the extracted fields into a struct of PageContext of Encodable, and passes it to the leaf renderer as context.
Now, our data is available to use on our front end.
Implementing the Frontend
Now that we have all our data ready for our index file from the previous section, lets get started.
<!DOCTYPE html>
<html lang="en">
  <head>
    <meta charset="utf-8" />
    <meta name="viewport" content="width=device-width, initial-scale=1" />
    <link rel="stylesheet" href="Styles/Stylesheet.css" />
    <link rel="preconnect" href="https://fonts.googleapis.com" />
    <link rel="preconnect" href="https://fonts.gstatic.com" crossorigin />
    <link
      href="https://fonts.googleapis.com/css2?family=Erica+One&family=Roboto+Slab:wght@100;200;300;400;500;600;700;900&display=swap"
      rel="stylesheet"
    />
    <title>Proton</title>
  </head>
To use the css stylesheet, all we need to do is use the link tag and add the source to our stylesheet.
<link rel="stylesheet" href="Styles/Stylesheet.css" />Hero Section
<div class="main-content">
  <div class="hero-text">
    <div class="hero-heading">
      <h1>#(data.heroSection.headlineText)</h1>
    </div>
    <p class="hero-paragraph">#(data.heroSection.subHeadlineText)</p>
    <button class="hero-cta-button">
      #(data.heroSection.callToActionText)
    </button>
    <div class="card-lunch">
      <img src="#(data.heroSection.creditCard)" alt="" />
      <p>#(data.heroSection.creditCardText)</p>
      <img src="#(data.heroSection.rocketImg)" alt="" />
      <p>#(data.heroSection.rocketText)</p>
    </div>
  </div>
</div>;
Our tag is utilizing data from made available to it from via the PageContext. To learn more about how to use the leaf tags, see here.
This way, any any edit made in ButterCMS, we do not need to change the code, it updates automatically.
Product Section
<div class="new-container">
  <div class="big-container">
    <div class="container-text">
      <p>#(data.product.headlineText)</p>
      <p>#(data.product.subHeadlineText)</p>
      <div class="client-review">
        <div class="blue-tag">
          <div class="blue-tag-text">
            <p>#(data.product.salesQuotes)</p>
            <div class="sizedbox"></div>
            <div class="avatar-container">
              <div class="avatar">
                <img src="#(data.product.salesAvatar)" alt="" />
              </div>
              <div class="avatartext">
                <p>#(data.product.salesName)</p>
                <p>Product sales</p>
              </div>
            </div>
          </div>
        </div>
      </div>
    </div>
    <div class="container-image">
      <img src="#(data.product.productImg)" alt="iphone mock up image" />
    </div>
  </div>
</div>;
Download Section
<div class="new-container3">
  <img src="#(data.download.productImg)" alt="iphone mock up image" />
  <div class="container-text3">
    <p>#(data.download.headlineText)</p>
    <p>#(data.download.subText)</p>
    <div class="email-input">
      <input type="email" placeholder="Enter your email" />
      <button>Send link</button>
    </div>
    <p>
      By clicking "Send link" you agree to our Terms of
      <a href="">Service</a> and <a href="">Privacy Policy</a>
    </p>
    <div class="download-btn">
      <button class="btn btn--ios btn--radius">
        <img class="btn__logo" src="#(data.download.appleImg)" alt="" />
        <div class="btn__content btn__content--big">Download</div>
        <div class="btn__content">on the App Store</div>
      </button>
      <div class="sizedbox"></div>
      <button class="btn btn--android btn--radius">
        <img class="btn__logo" src="#(data.download.playstoreImg)" alt="" />
        <div class="btn__content btn__content--big">Download</div>
        <div class="btn__content">on Google Play</div>
      </button>
    </div>
  </div>
</div>;
If we run our code, this is what our landing page should look like:
Final thoughts
In this tutorial, we went over how to set up a product landing page using Pages and Page types and integrate it with the leaf templating engine and Swift.
With ButterCMS CDN, your Swift application can easily fetch real-time content changes without needing to build new releases. Furthermore, ButterCMS handles the content presentation logic while you can focus on continuing to work on delivering the best user experience with your preferred stack. Also, get the best developer experience with our well-structured REST API that makes retrieval of content seamless.
With Swift and ButterCMS, you can streamline the process, and ensure quality, dynamic, and up-to-date content. Don't just stop here; explore even more capabilities with these tools to build more impactful landing pages.

