- Voice-based search
- Benefits of voice search
- Voice search with headless CMS
- Voice search with ButterCMS
- Tutorial prerequisites
- Cloud services offering speech recognition services
- Deploying a speech service on Microsoft Azure
- Creating a speech service key
- Integrating Azure Cognitive Service into a frontend application
- Conclusion
Within this tutorial, you will learn about speech recognition, and how voice-based search can be added as an alternative to the regular text-based search in applications. You will use the third-party Speech-to-Text feature of Azure to convert audio into text before searching through ButterCMS for data.
You can have a quick glance through the code by going through the GitHub Repository. You can also perform a quick test of the voice-based search added to the deployed demo frontend application here.
Table of contents
Ever since the Audrey system was developed in the 1950s, there has been a massive improvement in speech recognition systems. From big physical devices that could only recognize numbers from speech spoken at lengthy intervals, to cloud-based services that can process large amounts of speech data in a single stretch.
One of the features of modern speech recognition systems is the ability to convert speech by turning it into text and vice-versa. Similar to its name, a Speech-to-Text conversion processes speech and returns an accurate text equivalent of the words spoken.
Over the years, several products have leveraged speech processing services on cloud platforms such as AWS and Azure to provide voice support features to their applications. One such feature is voice-based search, which was previously done by inputting text to find a specific item.
Voice-based search
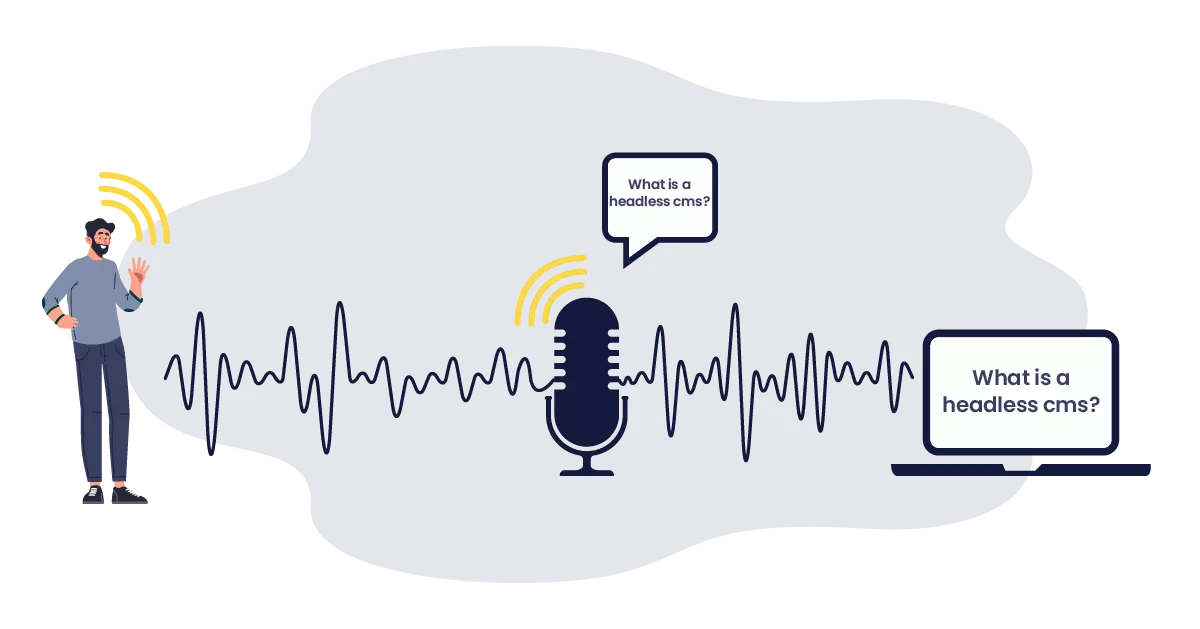
Voice search refers to searching for an item from a smart device through the use of a voice recording. In most scenarios, a voice-based search is done to search for data over the internet. A smart device can be a mobile device, a computer, a wristwatch, or even speakers such as Alexa and Google Home.
Benefits of voice search
Recent statistics have shown an increase in the number of people embracing the use of voice-enabled devices. For the year 2021, Gartner predicted that 30% of all web browsing done will be performed through voice search from smart devices. This number is expected to increase, as another report has predicted that by 2022, 55% of the U.S population will own at least one smart speaker in their home. Another report shows that more than half of the owners of these smart devices will use them daily.
Let’s consider some use cases where speech-to-text and voice search are being applied:
- Search-on-the-go — In 2018, Google’s statistics showed that 27% of online users used voice search on their mobile devices. Through speech-to-text, these users could perform hands-free voice searches by recording utterances while commuting or working.
- Smart Shopping — E-commerce owners are leveraging voice search technology to improve the shopping experience and appeal to customers already using voice search. Customers using voice search will be more time-efficient while shopping, as statistics from Bing have shown that searching by voice is 3.7x faster than typing.
Using voice search, a shopper can quickly filter through a large eCommerce catalog by calling out the desired product, add it to their cart, and then immediately check out their cart with the product.
- ChatBots — Unlike humans, most chatbots cannot understand a recorded utterance. This limitation presents the need to convert the voice utterance into text using speech-to-text. Voice-enabled chatbots offer users several benefits such as an improved user experience and engagement, and also the ability for a user to multitask while using the chatbot.
- Smart Assistants — Smart assistants built into speakers such as the Amazon Echo Dot or Google Home often have no virtual or physical keyboard. These smart assistants rely on speech-to-text technology to provide their users with an interface to process a voice search or command.
- Overcome Language Barriers — Speech recognition systems are developed with the ability to recognize words from a wide variety of languages. This multi-lingual feature is an added advantage for applications built with Internationalization (I18n) in mind. Foreign language-speaking users can record in their native tongue and the speech recognition system will translate the utterance into a recognized language.

Voice search with headless CMS
Headless content management systems (CMSs) have the common goal of providing developers with an API for interacting with data. Voice-enabled devices such as smart speakers can also interact with the API exposed from the headless CMS by using webhooks that are executed when an intent is recognized from a user’s speech. For example, an utterance containing the words “Find all posts on ButterCMS” will execute a webhook to find posts through the headless CMS API.

Let’s proceed to consider a conceptual overview of how voice search can be implemented in an application powered by ButterCMS, a headless CMS.
Voice search with ButterCMS
One of the awesome features of ButterCMS is the ability to search for created blogs and pages. To perform a search through the ButterCMS API or SDK, a string containing keywords of the data we intend to retrieve is required. This means that the end-users performing the search will have to type in the keywords.
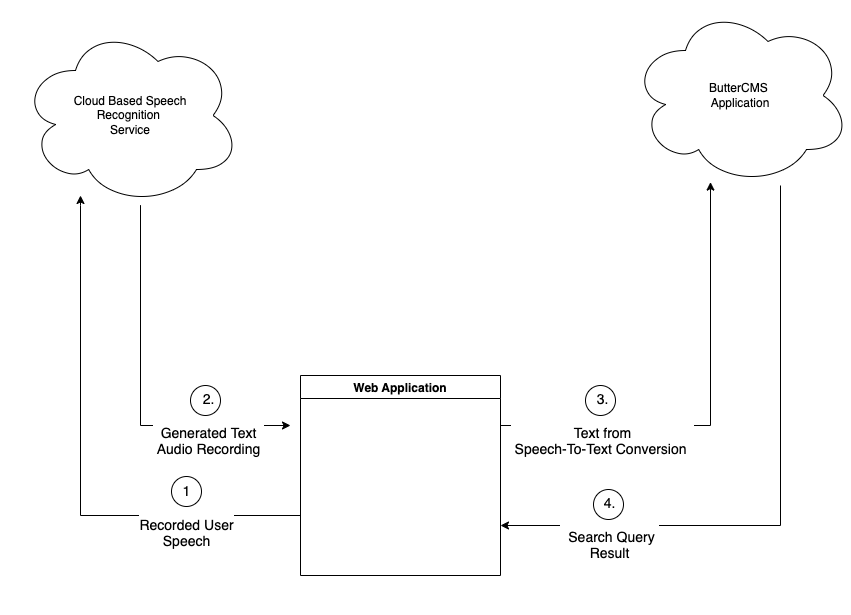
As the previous section of this tutorial highlighted, you can improve the search experience of your application by providing voice support for data searches. To implement voice search in your application, you will need to use a third-party service to convert a user’s speech to text, then use the converted text to search for data in ButterCMS.
It is important to note that ButterCMS does not currently support the use of audio input when searching for data.
The diagram below provides a conceptual overview of how one would work with a third-party cloud service that offers Speech-to-Text conversion.
Tutorial prerequisites
This tutorial contains hands-on steps to implement voice search with the ButterCMS Search API. To follow along, it is expected that you have the following:
- A ButterCMS account. You can create a trial account that is free to use for 30 days.
- A Microsoft Azure account with an active subscription. You cancreate a free account to get free credits valid for 30 days.
- Node.js installed on your computer. Node v14.18.2 was used while creating this tutorial.
Cloud services offering speech recognition services
Several cloud platforms provide speech recognition services that use Machine and Deep learning. Here are a few of them:
- Speech-to-Text and Text-to-Speech services on the Google Cloud Platform.
- Transcribe and Polly services on Amazon Web Services.
- Cognitive Services on Microsoft Azure with a Speech-to-Text feature.
- Watson Speech to Text on IBM Cloud.
Amongst the services outlined above, the Speech-to-Text feature within Azure’s Cognitive services is the easiest to work with for a web application, as it provides a web-compatible SDK that abstracts recording audio using the MediaRecorder API, and also sends the recorded audio to the Cognitive Service API.
For the upcoming demo within this tutorial, you will use the cloud-based Speech-to-Text feature within Azure to convert audio recorded from a web application before using the returned text to search through ButterCMS.
Let’s proceed to the first step where you will use the Azure Portal to create and deploy a Speech Service.
Deploying a speech service on Microsoft Azure
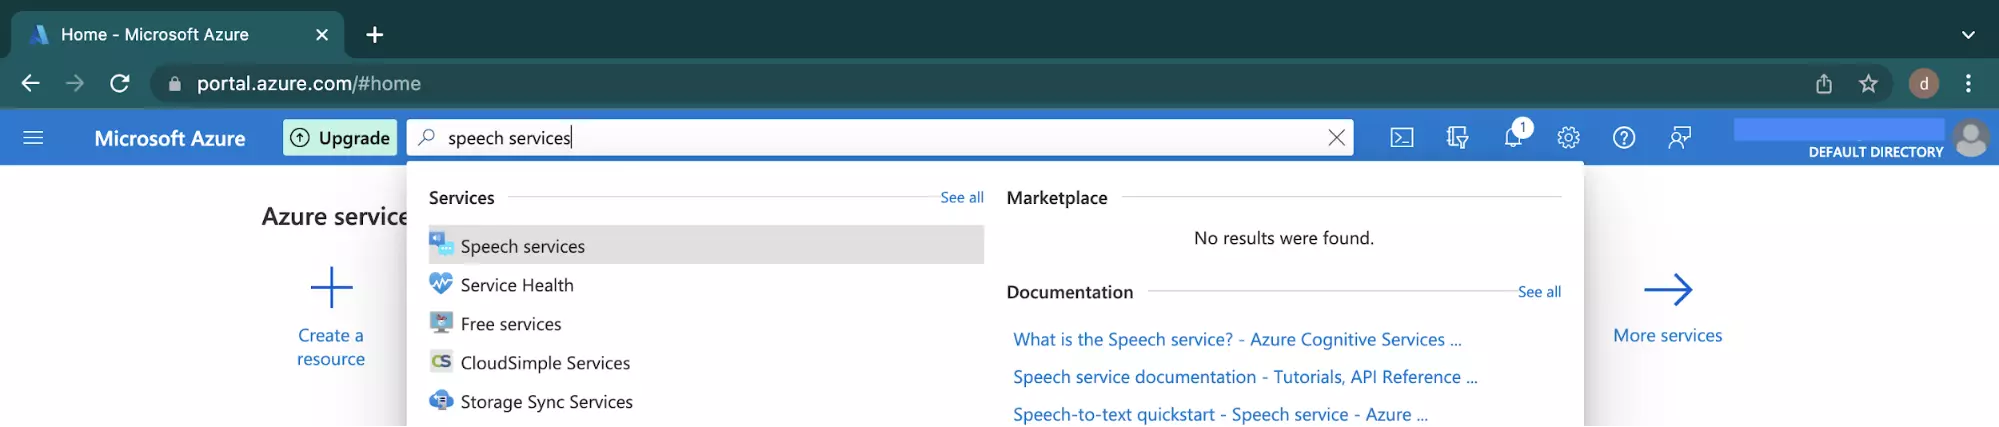
To use the speech services on Azure, navigate to your Azure Portal and type Speech Services into the top search bar. Click the Speech Service item that is returned from the search.
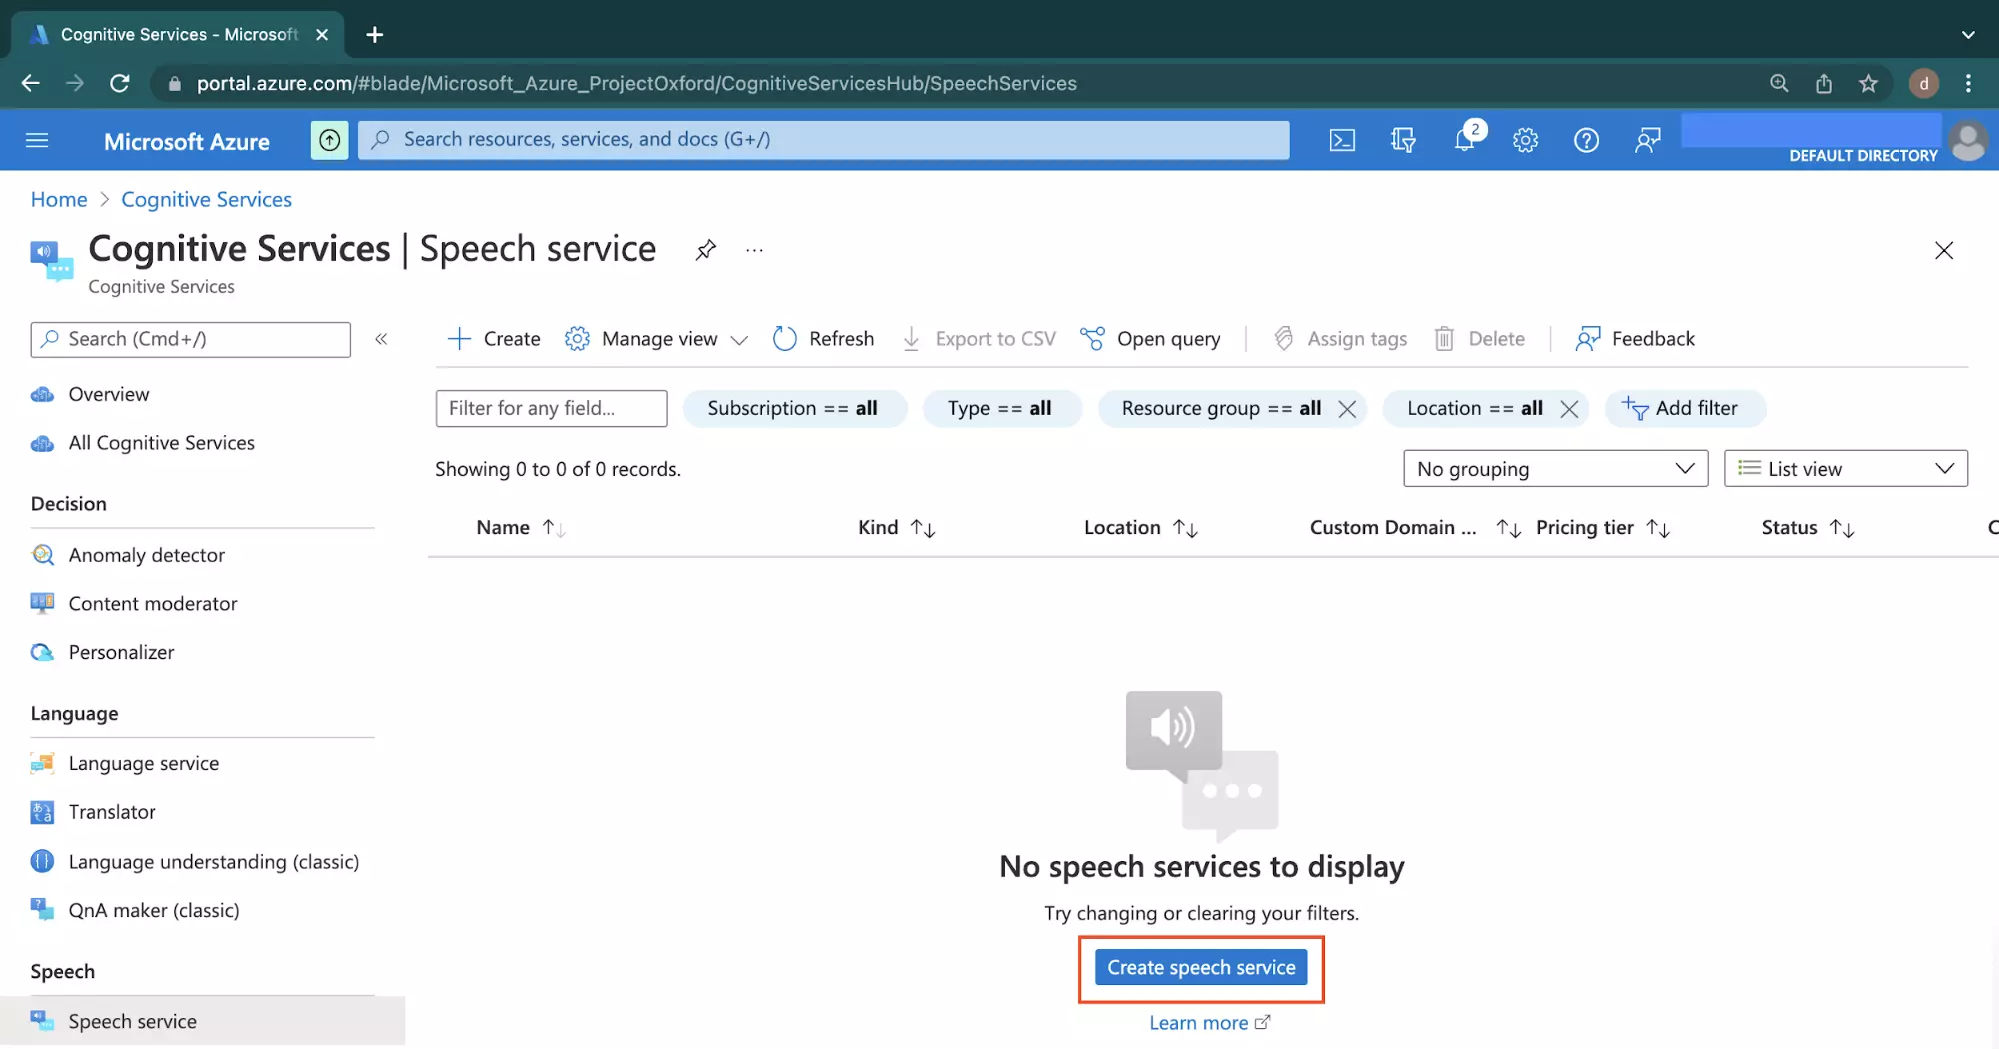
On the next page, click the centered Create speech service button to begin the steps of creating your first speech service on Azure.
In the Basic tab of the Create Speech Services page, locate the Create new text below the Resource group dropdown element shown in the image below.
An Azure resource group can be understood as a container to store independent Azure resources created for a project.
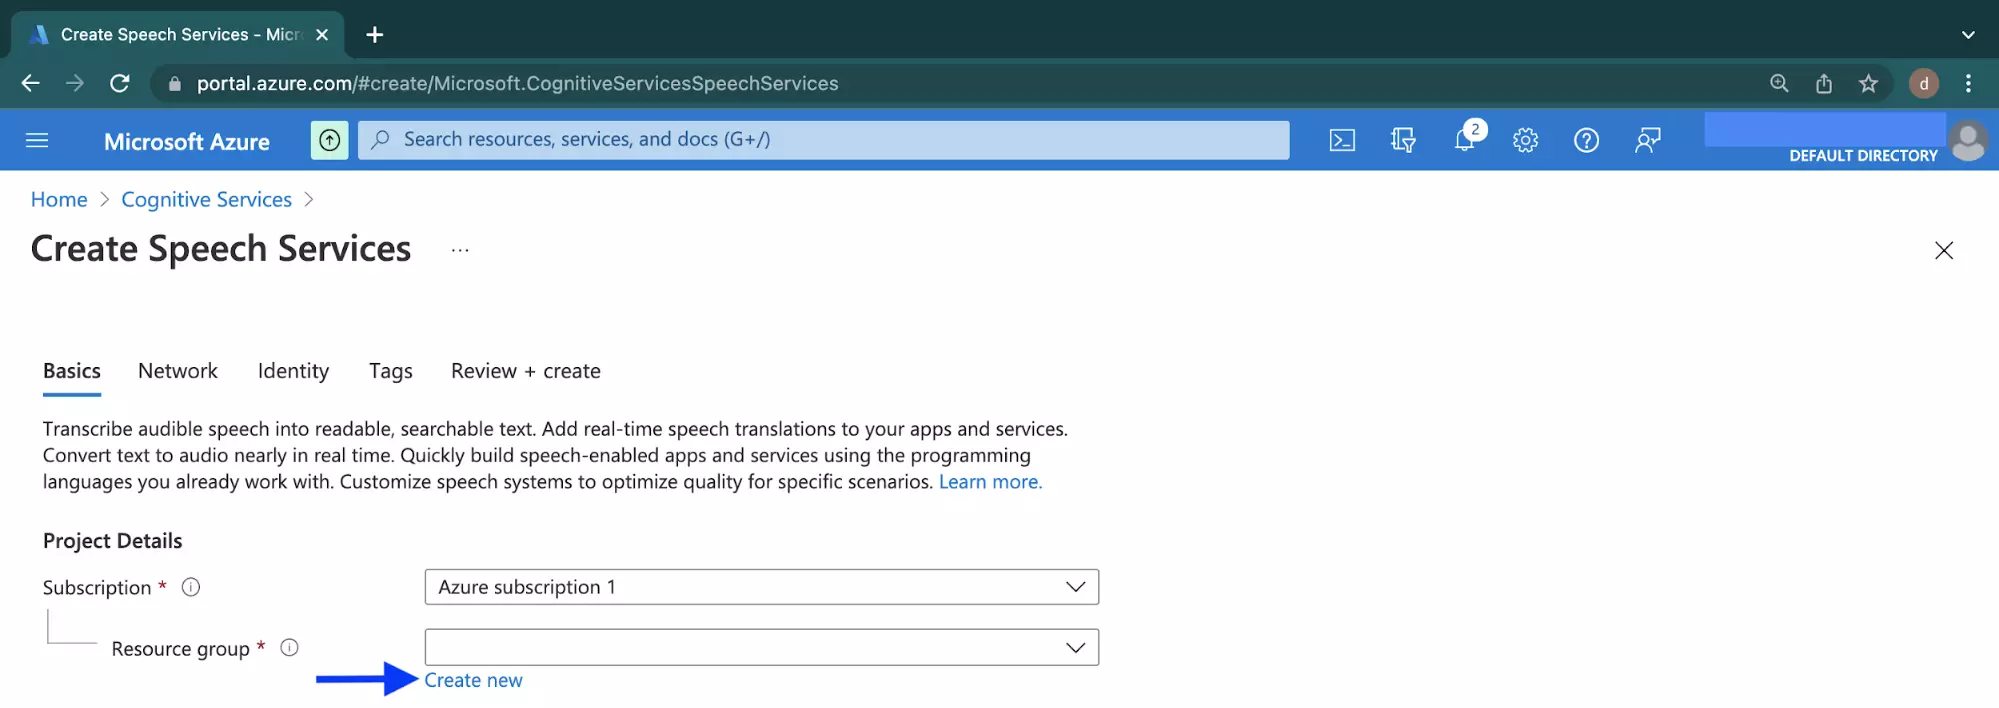
Click the Create new text to launch a modal for creating a new resource group to contain the speech service for this project.
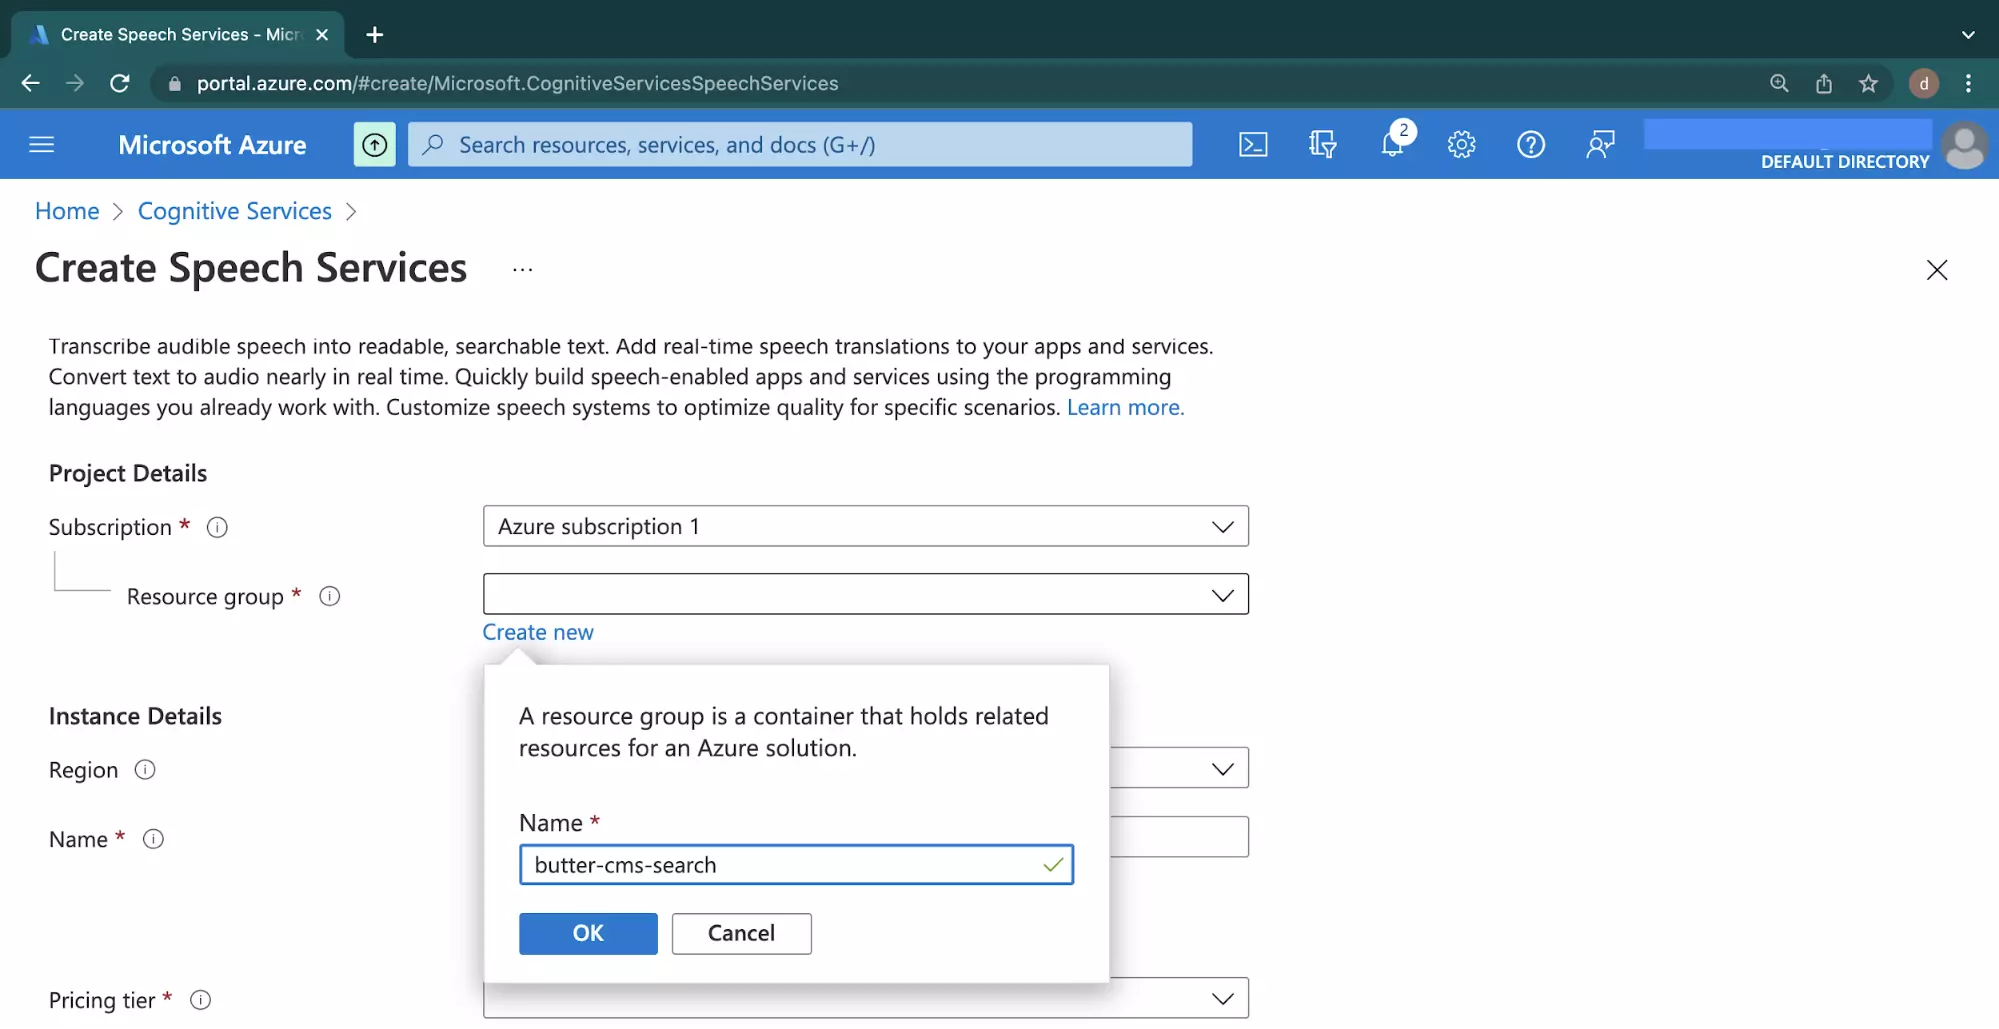
Enter a unique name for the resource group into the Name input field within the launched modal.
Click the Ok button to save and create the new resource group for your ButterCMS project.
Provide a unique value to the Name input field within the Instance Details section.
Click the Pricing Tier dropdown and select the Free F0 option.
Leave other settings at their default values and click the Review + Create button at the bottom to review the configurations provided.
After a brief moment, you will have a passing validation with a configuration similar to what is shown in the image below:
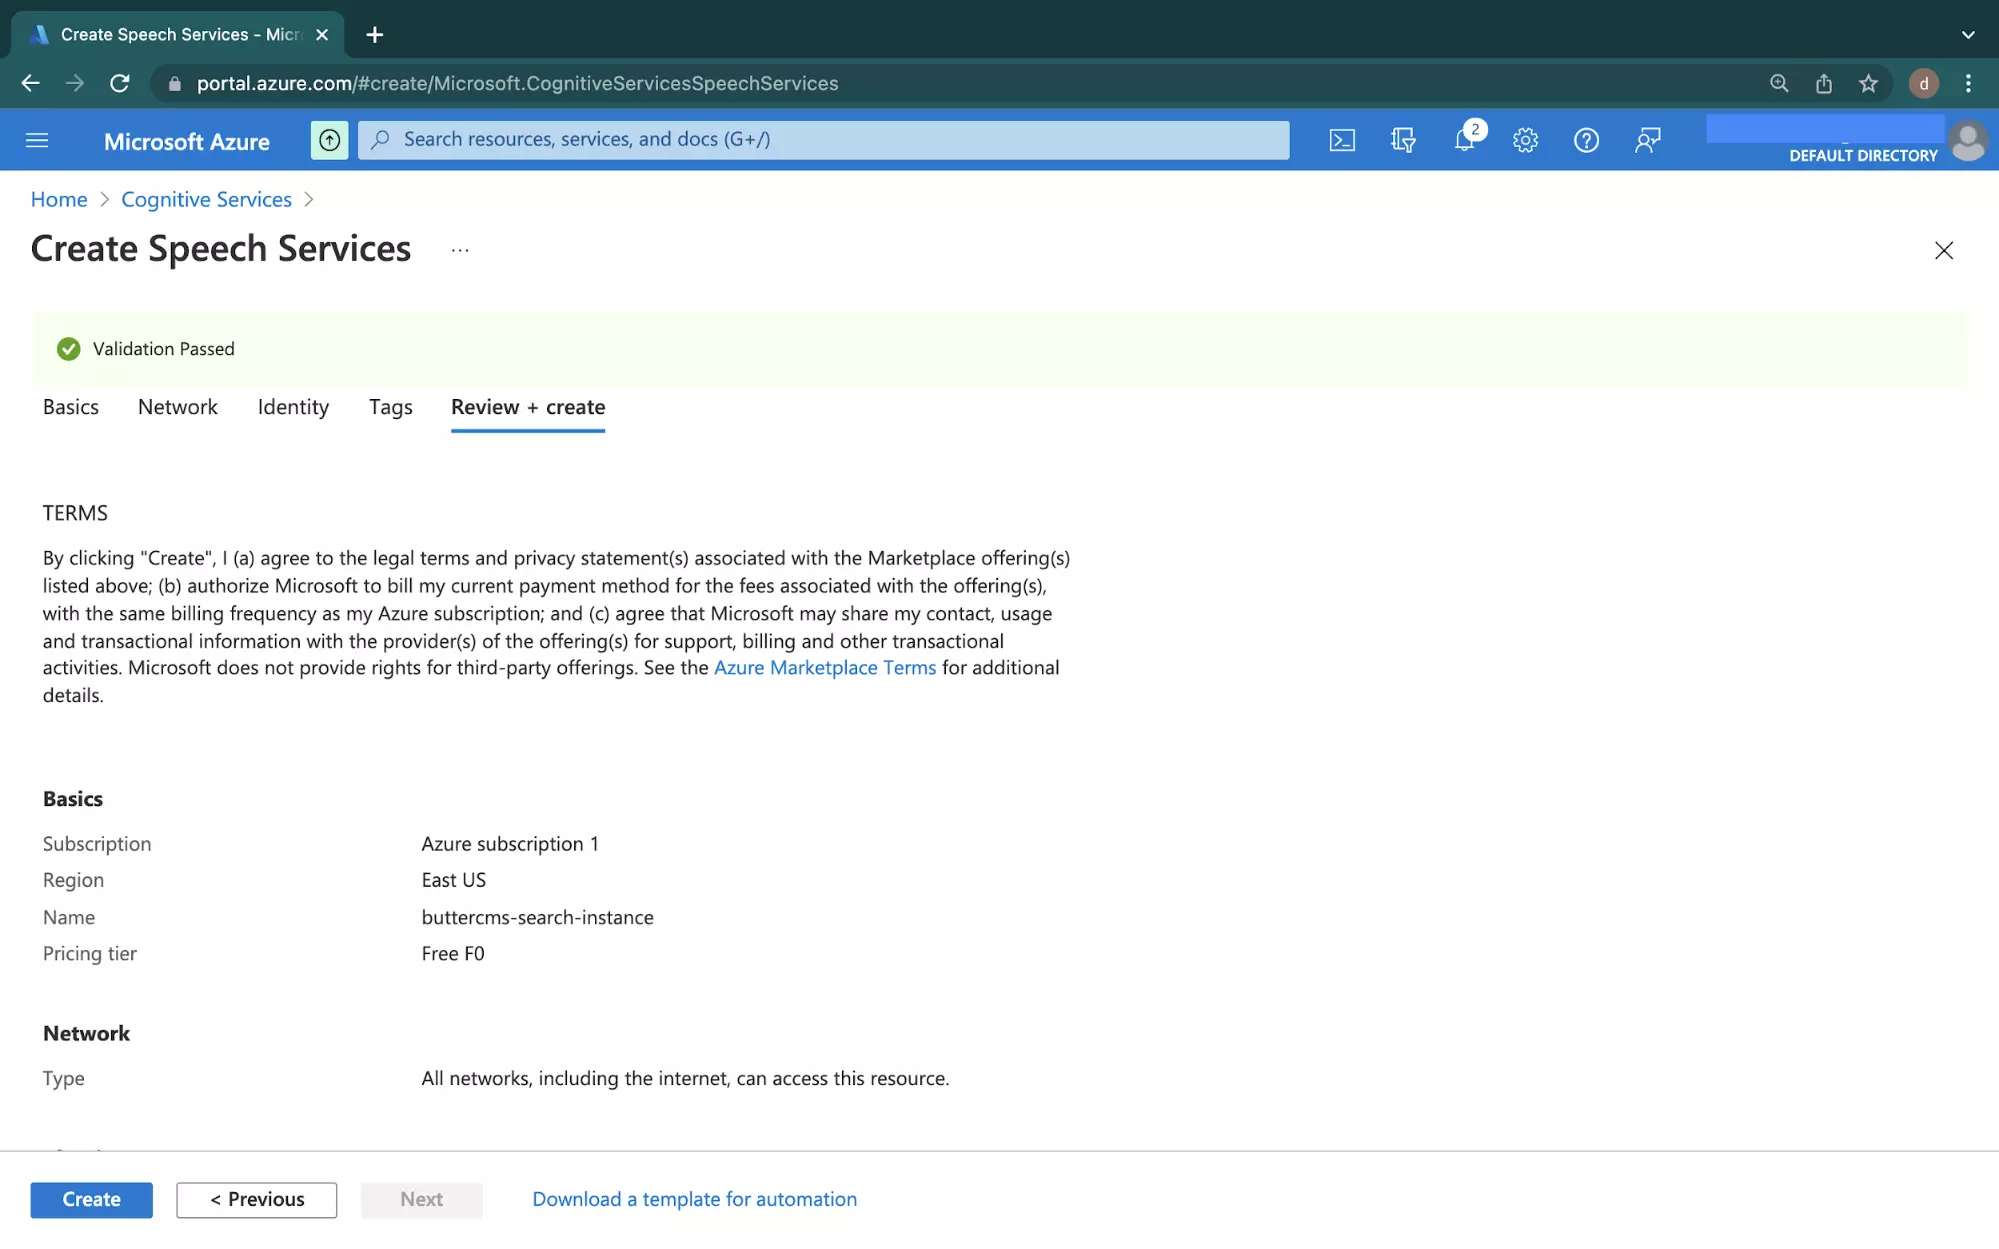
Click the Create button at the bottom to deploy a new Speech Service.
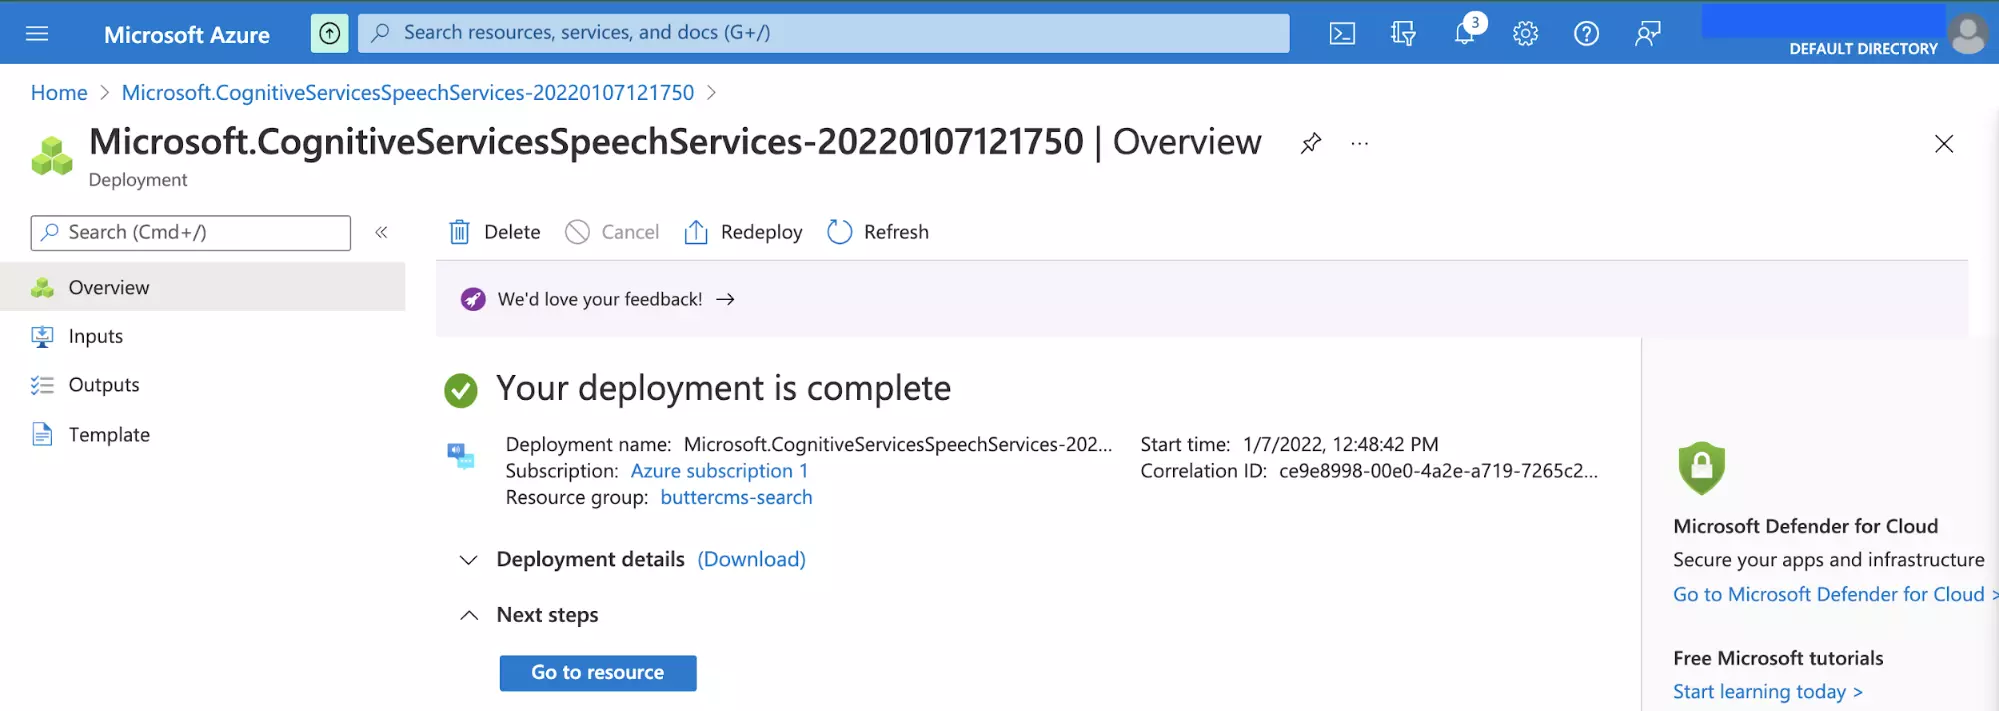
A new page will be displayed to show you the deployment status of the service. The deployment process will take a few seconds to complete.
Click the Go to resource button after the deployment is complete to view the deployed resource.
Creating a speech service key
To use the deployed speech service outside the Azure Portal, you will need some form of authentication to access the Cognitive Speech Service API. Secret keys are offered within the cognitive service to authenticate and grant you access to features within the Cognitive Service.
Scroll down the navigation bar on the left side to the Resource Management section, then click the Keys and Endpoint item.
Copy the secret key in either one of the two keys to a secure text editor. You will make use of the key when connecting to the speech service from a frontend application in the next section.

Integrating Azure Cognitive Service into a frontend application
In the previous section, you created a Speech Service on Azure and also obtained a secret key to connect to the Cognitive Service API. Within this section, you will proceed to use the speech service by using an SDK directly from a React.js application.
To keep this tutorial focused on explaining the integration process, you will clone a pre-built React.js application that was designed to be a clone of the FAQ section within the ButterCMS Knowledge Base. The text received from a user’s audio recording will be used to search through questions within the FAQ section.
Setting Up a React.js Application
Execute the git command below from a terminal to clone the pre-built application from its repository on GitHub.
<span style="font-weight: 400;">git clone https://github.com/vickywane/buttercms-voice-search-integration</span></code><span style="font-weight: 400;"></span></pre>
<p><span style="font-weight: 400;">Next, change your terminal directory into the cloned application.</span><span style="font-weight: 400;"></span></p>
<pre><code><span style="font-weight: 400;">cd buttercms-voice-search-integration</span></code><span style="font-weight: 400;"></span></pre>
<p><span style="font-weight: 400;">Execute the </span><code><span style="font-weight: 400;">npm</span></code><span style="font-weight: 400;"> command below to install the application’s dependencies. </span><span style="font-weight: 400;"></span></p>
<pre><code><span style="font-weight: 400;">npm install</span>The application cloned above already has a setup of React Context to manage the application state. It also fetches data from the ButterCMS API by using the buttercms package.
Create a .env file in the root directory to store the sensitive credentials used to connect to the Cognitive Service and ButterCMS API. Replace the placeholder values and their enclosing angle brackets with the actual values.
Note: The COGNITIVE_SERVICE_KEY and COGNITIVE_SERVICE_REGION can be found in the Key and Endpoint section of the Cognitive Service dashboard at the Azure Portal.
# .env

REACT_APP_SPEECH_SERVICE_KEY=<COGNITIVE_SERVICE_KEY>
REACT_APP_SPEECH_SERVICE_REGION=<COGNITIVE_SERVICE_REGION>
REACT_APP_BUTTERCMS_TOKEN=<BUTTERCMS_TOKEN>
Now you can start the application by running the npm run start command from your terminal.
With the cloned application running in your terminal, you can view the application through your web browser at http://localhost:3000.
The ButterCMS application being connected to by the demo application already has five questions taken from the FAQ section of the ButterCMS Knowledge Hub as posts. The five questions are displayed in the image below:
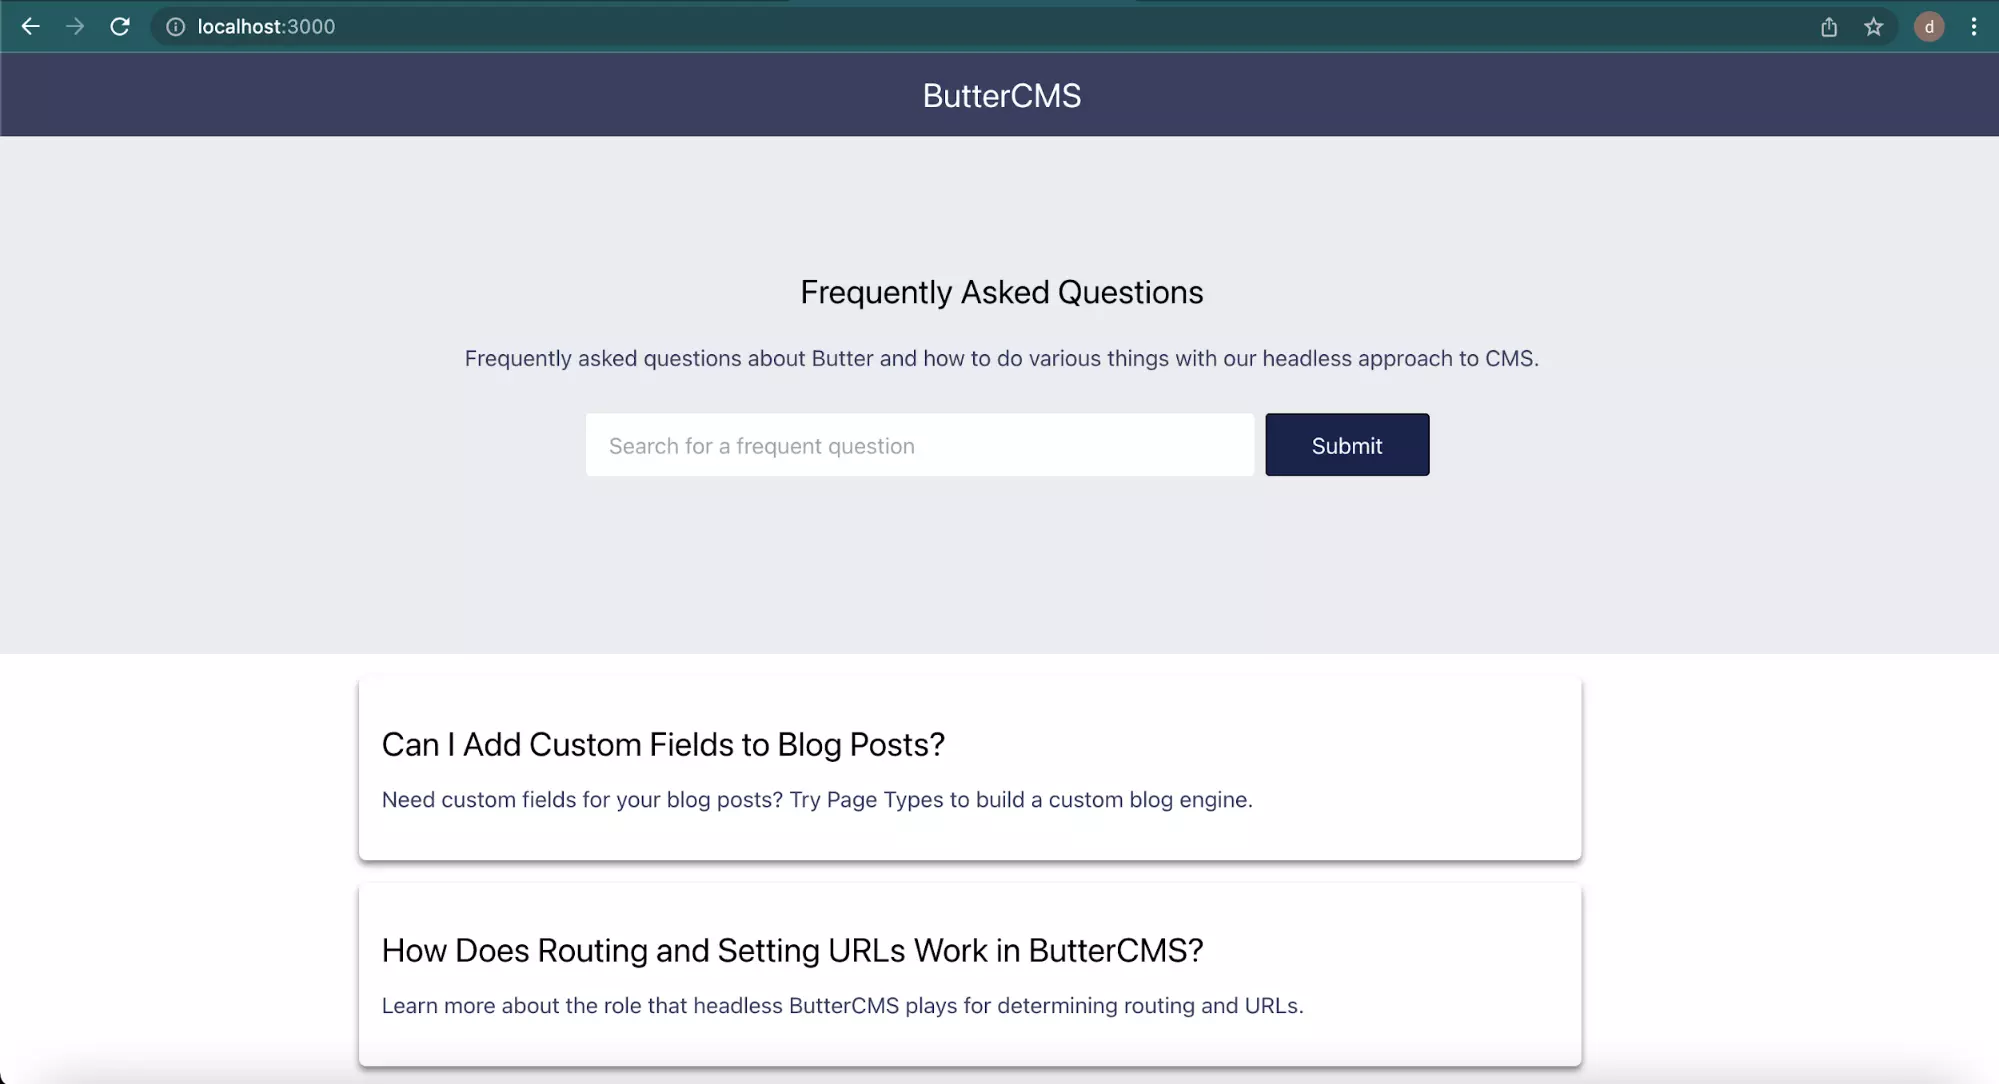
The image above shows the home page of the web application with an input field for only a text-based search.
Creating the React.js Application State for Recording Audio
At this point, you have been able to run and view the pre-built React.js application on your computer. Let’s now proceed to modify the home page of the prebuilt application to record a user’s audio.
To get started, execute the command below to install the microsoft-cognitiveservices-speech-sdk package from NPM. The microsoft-cognitiveservices-speech-sdk package is an SDK which simplifies the use of most features offered by the Cognitive Service on Azure.
<span style="font-weight: 400;">npm install microsoft-cognitiveservices-speech-sdk</span></code><span style="font-weight: 400;"></span></pre>
<p><span style="font-weight: 400;">Using your preferred code editor, open the </span><code><span style="font-weight: 400;">app-context.js</span></code><span style="font-weight: 400;"> file and add the highlighted import statement and properties into the </span><code><span style="font-weight: 400;">initialRecordState</span></code><span style="font-weight: 400;"> object. </span></p>
<pre class="language-javascript"><code>// ./src/state/app-context.js
import React, { createContext, useReducer } from 'react'
import { SpeechConfig, AudioConfig, SpeechRecognizer } from 'microsoft-cognitiveservices-speech-sdk'
const ButterCMS = require('buttercms')(process.env.REACT_APP_BUTTERCMS_TOKEN)
export const initialRecordState = {
recorderStatus: "STOPPED",
convertedAudioResult: null,
recognizerInstance: null,
startRecorder: () => {},
stopRecorder: () => {},
connectionError: null,
searchText: '',
blogPosts: null,
fetchBlogPosts: () => { },
dispatch: () => { },
performTextSearch: () => { }
};
const AppContext = createContext(initialRecordState);
export default AppContext;
const reducer = (state, action) => {
const { payload } = action
switch (action.type) {
case "LOADING_STATE":
return {
...state,
[payload.loaderType]: payload.loadStatus
}
case "RECORD_ERROR":
return {
...state,
connectionError: payload.errorType,
recorderStatus: "STOPPED",
recognizerInstance: null``
}
case "COMPLETE_AUDIO_CONVERSION":
return {
...state,
convertedAudioResult: payload.textData
}
case "START_RECORDING":
return {
...state,
recorderStatus: payload.recorderStatus,
};
case "RECORD_CONVERSION_RESULT":
return {
...state,
recorderStatus: payload.recorderStatus,
}
default:
return state;
}
};
export const AppProvider = ({ children }) => {
const [state, dispatch] = useReducer(reducer, initialRecordState);
const startRecorder = async () => {
console.log("START AUDIO RECORDER")
};
return (
<AppContext.Provider
value={{
...state,
startRecorder,
stopRecorder,
dispatch,
performTextSearch,
fetchBlogPosts
}}
>
{children}
</AppContext.Provider>
);
};
The new code above added into the app-context.js file contains a function to start recording a user’s audio ( startRecorder ). The new properties added to the initialRecordState object will be used to track changes in the recording process, then update the React components based on their values.
Taking a close look at the body of the startRecorder function, you will observe that it logs a string to the console when executed. In the step below, you will modify the function to use the microsoft-cognitiveservices-speech-sdk package.
1. Recording a User’s Audio
Using your code editor, replace the body of the startRecorder function with the highlighted code to record and send stream data to the Cognitive Service API through the Microsoft-cognitiveservices-speech-sdk.
// ./src/state/app-context.js

    const startRecorder = async () => {
        const SPEECH_KEY = process.env.REACT_APP_SPEECH_SERVICE_KEY
        const SPEECH_REGION = process.env.REACT_APP_SPEECH_SERVICE_REGION
        try {
            handleLoaderState("RECORDING", dispatch)
          let speechConfig = SpeechConfig.fromSubscription(SPEECH_KEY, SPEECH_REGION);
          speechConfig.speechRecognitionLanguage = "en-US";
            const audioConfig = AudioConfig.fromDefaultMicrophoneInput();
            state.recognizerInstance = new SpeechRecognizer(speechConfig, audioConfig)
            handleLoaderState("GENERATING_VOICE_RESULT", dispatch)
            state.recognizerInstance.recognizeOnceAsync((result, error) => {
                if (error) {
                    return dispatch({
                        type: "RECORD_ERROR", payload: {
                            connectionError: result.errorDetails,
                        }
                    });
                }
                dispatch({
                    type: "COMPLETE_AUDIO_CONVERSION", payload: {
                        textData: result.text
                    }
                });
                handleLoaderState("PERFORM_TEXT_SEARCH", dispatch)
                performTextSearch(result.text)
            });
        } catch (error) {
            console.log("RECORD ERROR", error)
            dispatch({
                type: "RECORD_ERROR", payload: {
                    connectionError: error,
                }
            });
        }
    };
The startRecorder function above retrieves the key and region environment variables, then uses them through the fromSubscription method to construct the SpeechConfig. The speechRecognitionLanguage is manually set to en-US to recognize English words.
Note: For multi-lingual applications, it is recommended that you obtain the user’s language through the browser’s Accept-Language-Request-Header value.
The fromDefaultMicrophoneInput method also is used to handle the recording of a user’s audio through their device’s microphone as an audio source. When using this method in a web application, you do not have to use the MediaRecorder API to gain access to the user’s microphone to manually start and stop the recording stream.
The SpeechRecognizer class is instantiated and the returned instance is stored in the recognizerInstance field within the application state. The recognizeOnceAsync method from the SpeechRecognizer class is used to start speech recognition. The recognizeOnceAsync method accepts a callback having the recognition result and an error as arguments. The recognition result, when available, is stored in the application state
It is important to note that the recognizeOnceAsync method will automatically generate the recorded audio’s text after an interval or when the user stops talking. Hence for this application, there is no need to manually stop the speech recognition.
However, for other use cases, you can manually stop the speech recognition by calling the stopContinuousRecognitionAsync() method on the SpeechRecognizer class.
Creating the React.js Application Interface
In the previous section, you expanded the application store to contain a new reducer function to perform speech recognition on a user’s audio. Let’s now modify the Hero React component within the home page to contain a button that executes the startRecorder reducer function.
Open the hero.js file using your code editor and replace the existing code with the content of the code block below.
// ./src/components/hero.js
import * as React from "react"
import AppContext from "../state/app-context"
import "../home.css"

const AudioRecorder = () => {
    const { startRecorder, recorderStatus, convertedAudioResult } = React.useContext(AppContext)
    return (
        <div className="align-center" >
            {recorderStatus === "GENERATING_VOICE_RESULT" ?
                <p> Generating Text From Your Voice Record ... </p>
                :
                recorderStatus === "PERFORM_TEXT_SEARCH" ?
                    <div>
                        <p> Searching for <b> {convertedAudioResult} </b> within ButterCMS FAQ... </p>
                        <br />
                        <div className="flex align-center" >
                            <p className="mr-2 text-gray-400 pointer:text-hover" > Wrong Text? </p>
                            <p onClick={() => startRecorder()} > Record Audio Again </p>
                        </div>
                    </div>
                    :
                    <button className="custom-btn" onClick={() => startRecorder()} > Try Audio Based Search </button>
            }
        </div>
    )
}

const Hero = () => {
    const [searchItem, setSearchItem] = React.useState('')
    const { performTextSearch, recorderStatus } = React.useContext(AppContext)
    return (
        <div className="container" >
            <div>
                <div className="mb-5" >
                    <h1 className="text-2xl mb-5 text-center" >
                        Frequently Asked Questions
                    </h1>
                    <p className="text-center" >
                        Frequently asked questions about Butter and how to do various things with our headless approach to CMS.
                    </p>
                </div>
                {recorderStatus !== "GENERATING_VOICE_RESULT" &&
                    (
                        <form onSubmit={(e) => {
                            performTextSearch(searchItem)
                            e.preventDefault()
                        }} className="align-center" >
                            <input className="custom-input" placeholder="Search for a frequent question" value={searchItem} onChange={e => setSearchItem(e.target.value)} />
                            <button className="custom-btn" type="submit"> Submit  </button>
                        </form>
                    )}
                <br />
            <RecordingProgress />
            </div>
        </div>
    )
}
export default Hero
The highlighted code above contains a new AudioRecorder component that uses the properties you previously added to the application store to start an audio recording.
For an improved user experience, the `AudioRecorder` component initially displays a button, then the recorderStatus value is also used in a ternary operator to change the view when a recording is inactive, active, or being submitted for processing.
Navigate to the home page of the React.js application to view the Try Audio Based Search button added to the Hero section.
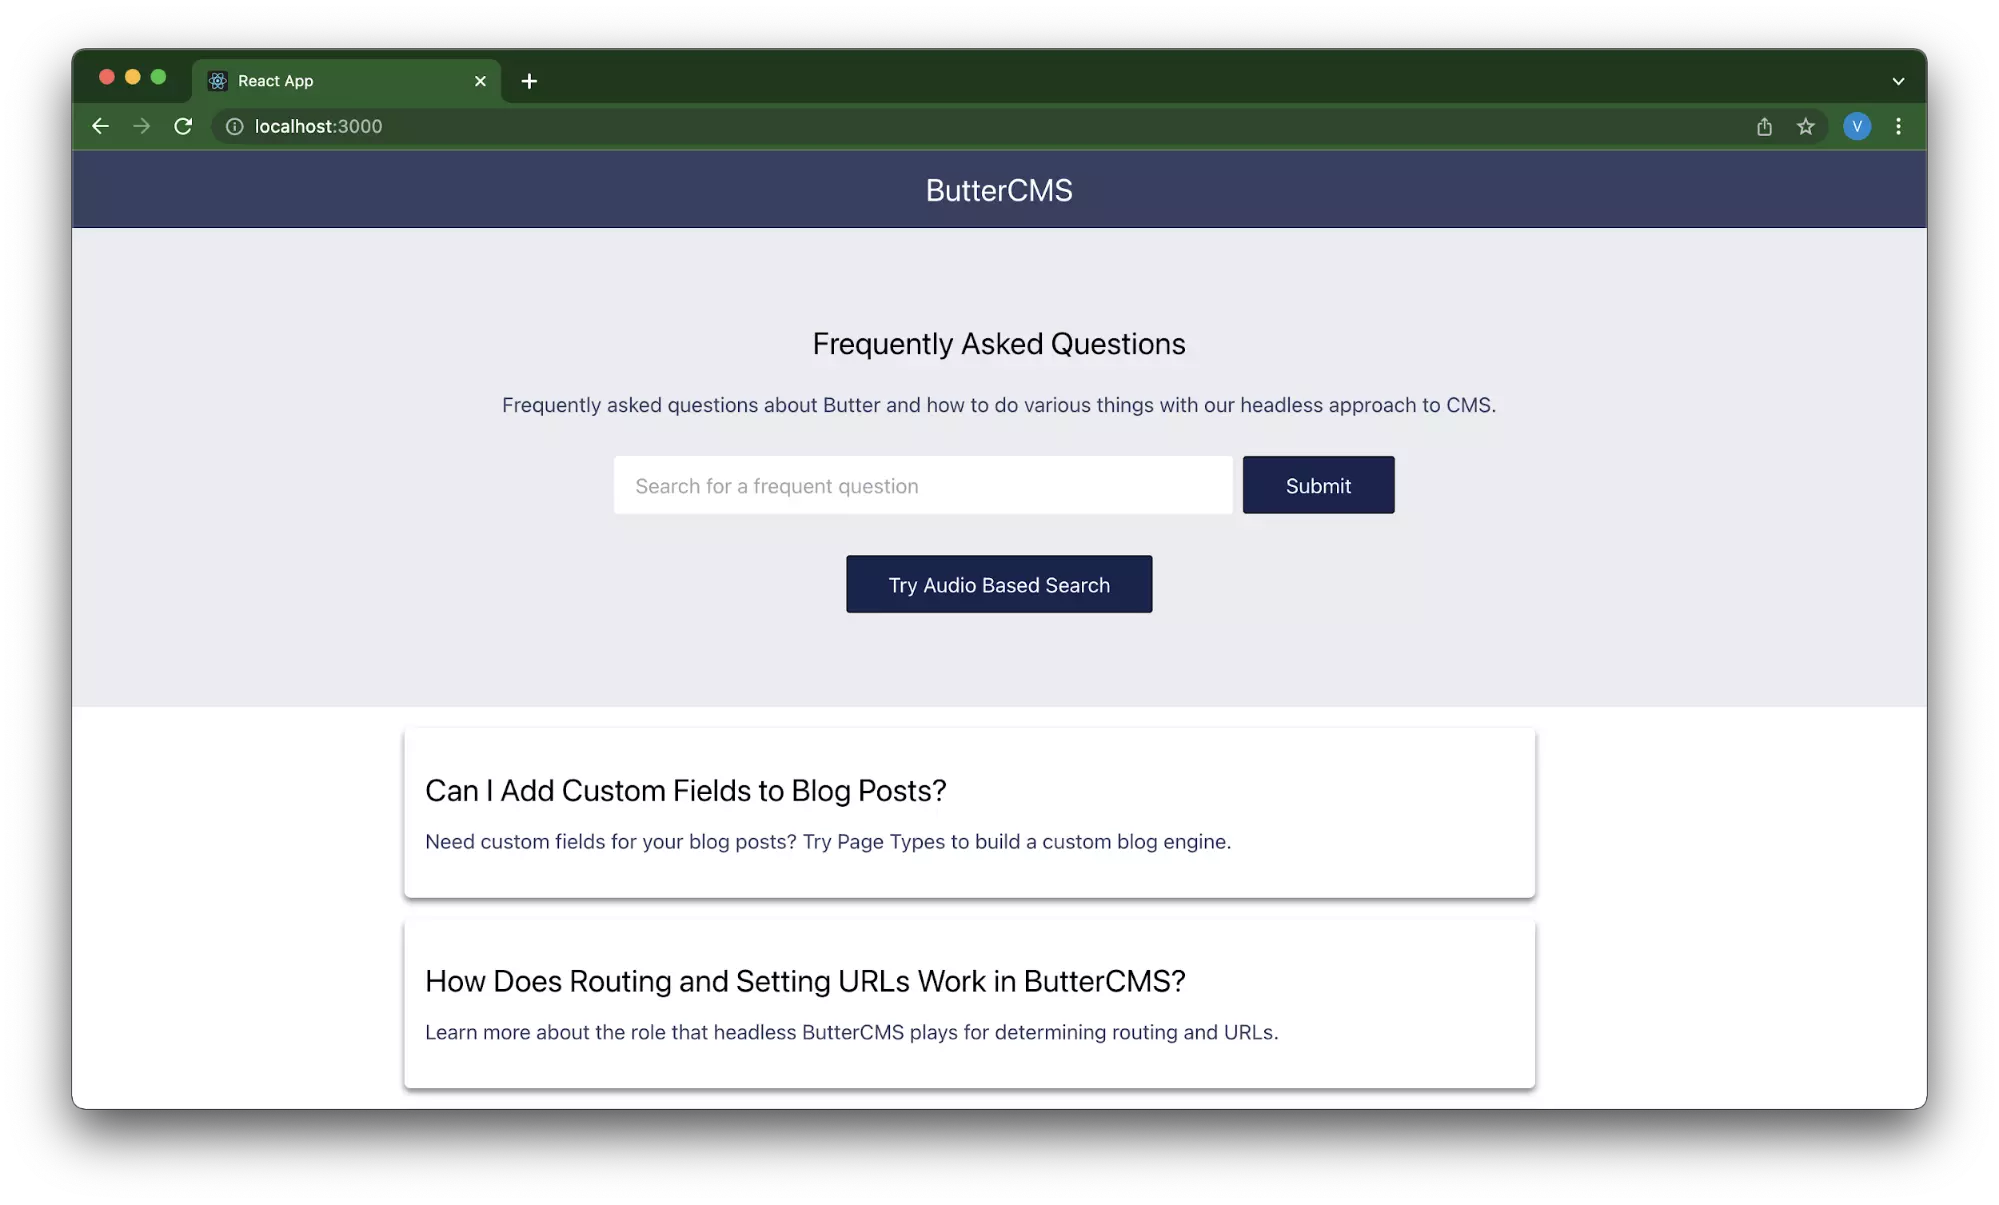
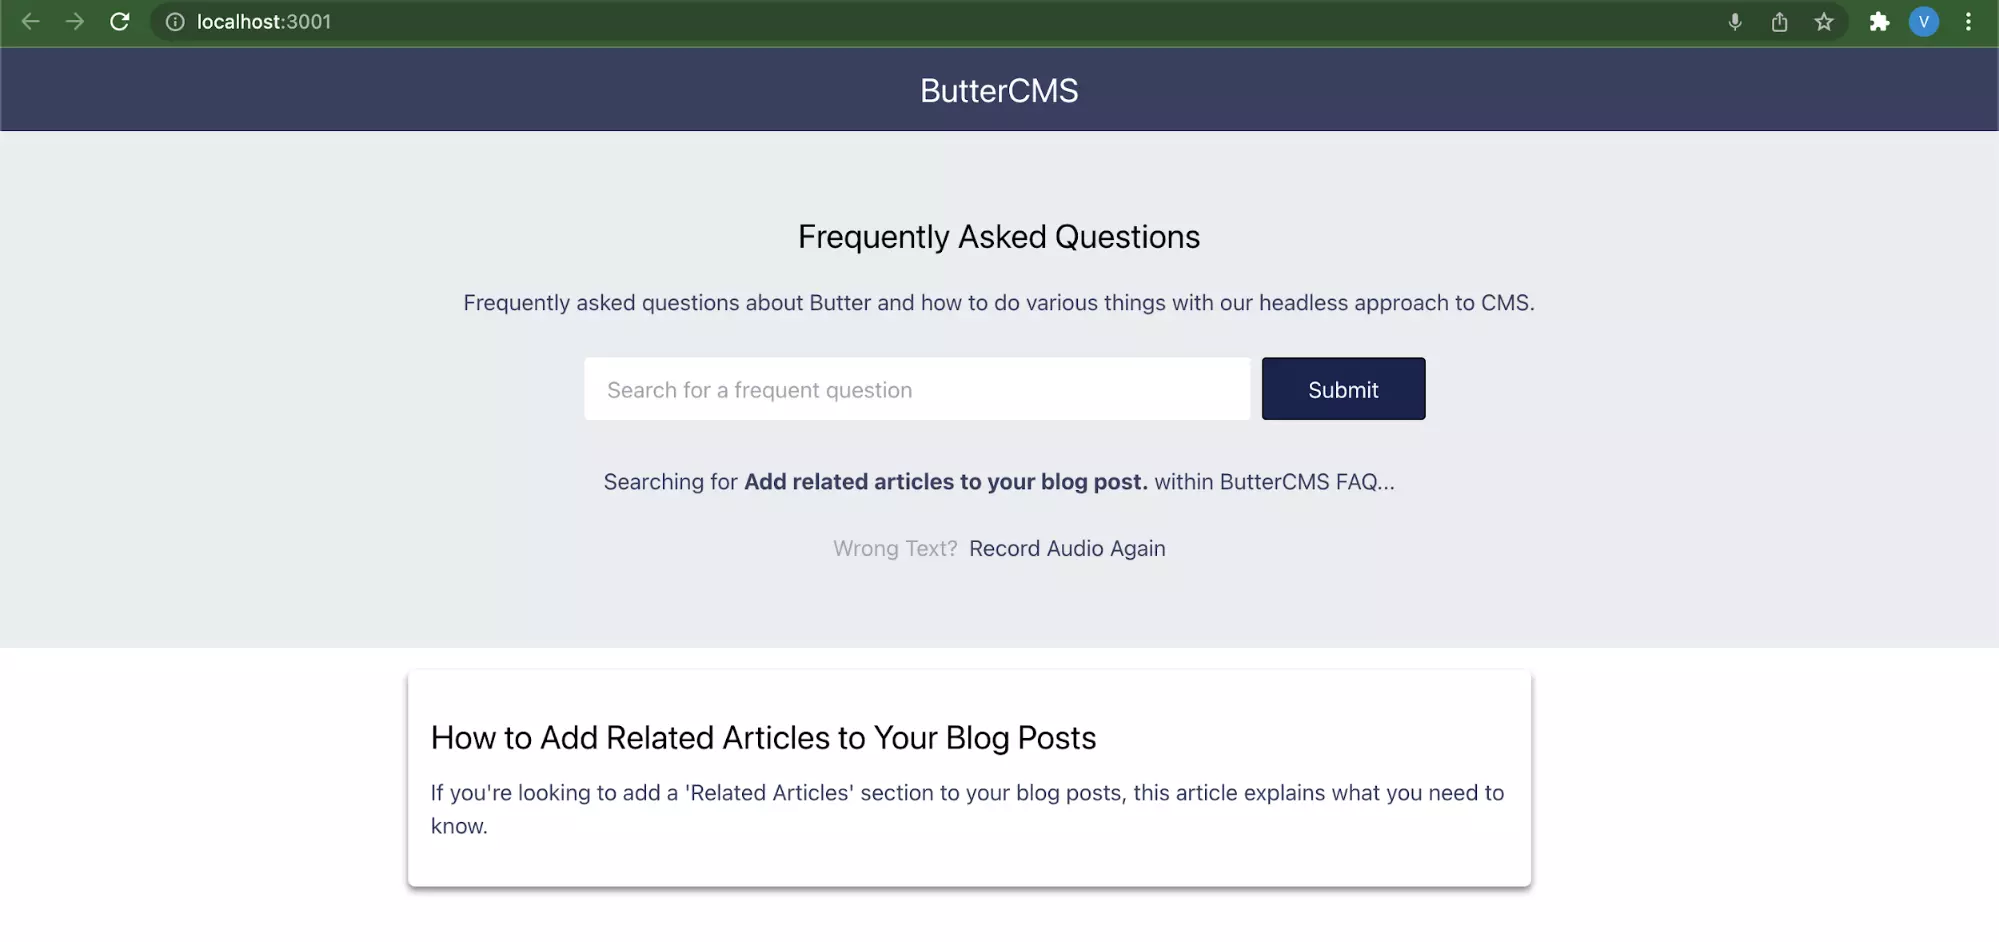
Click the Try Audio Based Search button and say “Add Related Articles to Your Blog Posts”.
The Cognitive Service SDK will record the audio and return the text “related articles” which will be further used to search for a post having “related articles” in the title.
Conclusion
In this tutorial, you had a brief introduction to voice search and learned how to use combine the power of the ButterCMS Search API with the Azure Cognitive Service to add voice-based search to a web application. Asides from blogging applications, voice search can also be extremely beneficial to the other categories of applications including e-commerce, learning management systems, customer care support, and personal life care applications.