
Blogs play a crucial role in modern society, serving as a platform for companies to connect with their customers and for individuals to share knowledge and ideas with a wider audience. The value of blogs in today's world cannot be underestimated.
Blogging is now a widely known form of advertising and a way to earn money online. Companies and individuals leverage blogs to reach a larger audience and distribute important information. Developers and marketers alike can seamlessly create and host their own blog sites using Golang and ButterCMS.
This tutorial will serve as a Golang blog tutorial and guide you through the process of building a blog using the Golang programming language and ButterCMS, a headless content management system. You will create controllers and routers, as well as learn how to manage environment variables.
Table of contents
Why use Golang?
Golang is a programming language created by Google to aid in software development. It has grown in popularity exponentially since its inception in 2009, and it is now used by many high-end web-serving applications.
Golang was created to overcome common development limitations of existing programming languages, such as the lack of static typing in modern programming languages, the poor readability of class-based programming, and the slow compilation of large programs while retaining other essential features.
There are several reasons why Golang has stood out so far, including
- Speed: Golang is a compiled language that compiles its code directly to machine code, making it faster to execute. In terms of speed, Golang outperforms interpreted languages such as Python and JavaScript, which must convert and execute their code line by line.
- Concurrency: Most modern applications require the handling of multiple processes at the same time, such as fetching, processing, and serving data from multiple users. Golang demonstrates an exceptional ability to handle multiple processes at the same time. Concurrency was built into Golang by including constructs such as goroutines and channels, making it affordable and simple to use.
- Powerful error handling: Golang has a distinct error-handling mechanism that does not hinder code execution (except in some specific cases). Most function calls result in errors. This enables developers to handle errors easily based on whether they are returned.
- Language of the cloud: Most cloud infrastructures use Golang to manage microservices and cloud computing because of its faster compilation time. Most popular cloud-based tools, such as Terraform, Kubernetes, and even Docker, were written in Golang and are well-known for their speed.

Why use ButterCMS?
ButterCMS is an API-based content management system (CMS), also known as a headless CMS. It is popular because it not only provides a decoupled CMS that makes it simple to integrate with front-ends created by developers but also because it has an easy-to-use dashboard and a lightning-fast content API that creates a modern web experience. Additionally, it has several features, such as pages, blog engines, and so on, that can facilitate the quick setup of websites and blogs.
Some features offered by ButterCMS include:
- Language software development kits (SDKs): ButterCMS has made available SDKs for several languages, such as Golang and Python. These kits make it easier to interact with ButterCMS content.
- Flexible content model: In developing applications, one of the essentials is being able to create content models that can handle data. ButterCMS provides a flexible content model that can work for a wide variety of data structures.
- Content security: Ensuring the security of your content is vital to prevent issues such as theft and data loss. Fortunately, ButterCMS takes care of all content protection and security updates, allowing developers to focus on other tasks without worrying about security responsibilities.
- Content availability: Because ButterCMS is a SaaS, its managed content is available 24 hours a day, seven days a week, with no downtime.
Please note that for this tutorial, we will be using the ButterCMS blog engine, which is an out-of-the-box blog editor suitable for most blog use cases. However, if your blog needs additional or custom fields, you’re still in luck, as you can build a custom blog page using the Pages feature.
Golang blog tutorial prerequisites
To follow along with this tutorial, ensure that you have the following:
- A ButterCMS account
- An understanding of Golang
- Golang installed
- NodeJS installed
- VS Code
- Terminal Access
All the code for this tutorial can be found in this GitHub repo.
Setting up our project
Start by creating a directory to house your project by running the following commands in your terminal:
mkdir buttercms-blog
cd buttercms-blog
code .
After creating the project’s directory, change into the directory and run this command:
go mod init github.otrex/blog
Once you run the command, a go.mod file will be created for tracking your code dependencies.
Next, create the following folders in your directory for your project structure, as described below:
``` js
|-- buttercms-blog
   |-- go.mod
   |-- src
   |   |-- assets
   |   |   |-- css
   |   |   |-- img
   |   |   |-- js
   |   |   |-- scss
   |   |       |-- partials
   |   |-- config
   |   |-- controllers
   |   |-- resources
   |   |-- router
   |   |-- routes
   |   |-- templates
   |   |   |-- partials
   |   |   |-- views
   |   |-- utils
   |-- tests
```
Create a server.go file in the src directory to serve as the entry point for your application.
Installing project dependencies
Following the project setup, you’ll need to install all the dependencies required for this project.
To begin, in your project’s root directory, install the Gin framework. Gin handles requests and page rendering
To install, use the command:
go get -u github.com/gin-gonic/gin
Next, install the Go SDK provided by ButterCMS with this command:
go get -u github.com/ButterCMS/buttercms-go
Afterwards, install godotenv to handle the mounting of your project’s environment variables with this command:
go get -u github.com/joho/godotenv
Now that you are done with the installations, you can move on to building the project.
Building our Golang application
This section comprises the various steps required to build this project.
Setting up the Env and Utility functions
Firstly, you’ll need to set up a configuration file to load up your env variables. To do this, change the current directory to src/config and create a main.go file.
The purpose of the main.go file is to house the ENV load-up function, which exports all the env in the specified file so that it can be assessed using the os module.
Copy the code below and paste it into your main.go file:
//// src/config/main.go
package config

import (
 "os"

 "github.com/joho/godotenv"
 "github.otrex/blog/src/utils"
)

func SetupConfig(path string) error {
 err := godotenv.Load(utils.AbsPath(path))
 os.Setenv("TEMPLATE_PATH", utils.AbsPath("templates"))
 os.Setenv("ASSETS_PATH", utils.AbsPath("assets"))
 os.Setenv("BUTTERCMS_BASE_URL", "https://api.buttercms.com/v2/")
 if os.Getenv("PORT") == "" {
   os.Setenv("PORT", "8000")
 }
 return err
}
Create another main.go file in the src/utils directory and paste the code below:
//// src/utils/main.go

package utils

import (
 "os"
 "path"
 "path/filepath"
 "runtime"
)

func RootDir() string {
 _, b, _, _ := runtime.Caller(0)
 d := path.Join(path.Dir(b))
 return filepath.Dir(d)
}

func AbsPath(path string) string {
 r := RootDir()
 return filepath.Join(r, path)
}

func ReadFiles(root string) ([]string, error) {
 var files []string
 err := filepath.Walk(root, func(path string, info os.FileInfo, err error) error {
   if !info.IsDir() {
     files = append(files, path)
   }
   return nil
 })
 return files, err
}
The main.go file above contains utility functions such as the AbsPath function, which gets the absolute path to a specified directory; the ReadFiles function, which reads a directory recursively and gets the absolute path to its files and subfolder files, and the RootDir function, which gets the path to the root directory of the project.
Setting up the router
You will also need to set up a router file that will serve as a mounting point for the main routes that will be created. To do this, create another main.go file in the src/router directory and add the following code:
/// src/router
package router


import (
 "fmt"
 "html/template"
 "os"


 "github.otrex/blog/src/routes"
 "github.com/gin-gonic/gin"
 "github.otrex/blog/src/utils"
)


func SetupRouter() *gin.Engine {
 r := gin.Default()


 // Reads templates
 templatePath := os.Getenv("TEMPLATE_PATH")
 files, err := utils.ReadFiles(templatePath)


 if err != nil {
   fmt.Print(err)
   os.Exit(0)
   return r
 }


 // Set max file size to 8 << 20
 r.MaxMultipartMemory = 8 << 20


 // loads up template
 html := template.Must(template.ParseFiles(files...))


 r.SetHTMLTemplate(html)
 // r.LoadHTMLFiles(files...)


 r.Static("/p", os.Getenv("ASSETS_PATH"))


 routes.BlogRoutes(r)
 // NOT FOUND HANDLER
 r.NoRoute(func(c *gin.Context) {
   c.HTML(404, "404.html", gin.H{})
 })


 return r
}
Setting the routes and controllers
To set up your controllers, create a blog.controller.go file in the src/controllers directory and paste the following code in it:
package controllers

import (
 "os"

 ButterCMS "github.com/ButterCMS/buttercms-go"
 "github.com/gin-gonic/gin"
)

type BlogController struct{}

func (x BlogController) Index(ctx *gin.Context) {
 ButterCMS.SetAuthToken(os.Getenv("BUTTERCMS_TOKEN"))

 size := "10"
 page := "1"

 if ctx.Query("page_size") != "" {
   size = ctx.Query("page_size")
 }

 if ctx.Query("page") != "" {
   page = ctx.Query("page")
 }

 params := map[string]string{
   "page":         page,
   "page_size":    size,
   "exclude_body": "false",
 }
 posts, _ := ButterCMS.GetPosts(params)

 ctx.HTML(200, "index.html", gin.H{"Posts": posts})
}

func (x BlogController) GetBlog(ctx *gin.Context) {
 ButterCMS.SetAuthToken(os.Getenv("BUTTERCMS_TOKEN"))

 slug := ctx.Param("slug")
 post, err := ButterCMS.GetPost(slug)

 if err != nil {
   ctx.HTML(200, "blog.html", gin.H{"Error": err})
   return
 }

 ctx.HTML(201, "blog.html", gin.H{"Post": post.Post})
}
The code above consists of controllers which are functions such as:
- Index: This handles the landing page of the blog site. It fetches all blogs using the ButterCMS read key from the env and the ButterCMS's GetPosts function from the SDK. The result is then passed into the template and rendered.
- GetBlog: This handles getting and previewing the content of a single blog post. Similarly, it gets the blog using its slug provided via URL params.
To set up your project’s routes, create a blog.router.go file and add the following code:
package routes

import (
 "github.com/gin-gonic/gin"
 "github.otrex/blog/src/controllers"
)

var BlogController = controllers.BlogController{}

func BlogRoutes(r *gin.Engine) {
 r.GET("/", BlogController.Index)
 r.GET("/blog/:slug", BlogController.GetBlog)
}
Adding the templates
Next, you’ll add templates for your project, which will be HTML content to be rendered. To add the template, in the src/template/views directory, create an index.html file which is mapped to the Index controller, and add the following:
{{ template "header.html" }}
<main class="mx-auto">
 <div class="w-80% tp__wrapper_flex col">
   {{ template "crumbs.html" }}
   <div class="tp__wrapper_articles">
     {{ range .Posts.PostList }}
     <a
       class="article_wrapper"
       data-key="{{ .Slug }}"
       href="/blog/{{ .Slug }}"
     >
       <div>
         <img src="{{ .FeaturedImage }}" />
       </div>
       <h4>{{ .Title }}</h4>
       <p>{{ .Published }}</p>
     </a>
     {{ end }}
   </div>
 </div>
</main>
{{ template "footer.html" }}
The template above loops through the posts passed into it, and renders each post.
Then, add a 404.html template with the following:
{{ template "header.html" }}
<h1>404</h1>
<p>Page Not Found</p>
{{ template "footer.html" }}
Then, you need to add the template for rendering a blog post. To do this, create a blog.html file in the src/templates/views directory and add the following code:
{{ template "header.html" }}
<main class="mx-auto">
 <div class="w-80% tp__wrapper_flex col">
   {{ template "crumbs.html" }}
   <div class="tp__wrapper_blog">
     {{ if .Error }}
     <div class="error-wrapper">
       <div class="error">
         <div class="flex-row">
           <div class="img-wrapper">
             <img src="/p/img/warning.png" />
           </div>
           <div class="h1-wrapper">
             <h1>An Error Occured</h1>
           </div>
         </div>


         <div class="message">
           <h3><span> MESSAGE: </span>{{ .Error }}</h3>
         </div>
       </div>
     </div>
     {{ else }}
     <div>
       <div class="article_img_wrapper">
         <img src="{{ .Post.FeaturedImage }}" alt="article-image" />
       </div>
       <h1>{{ .Post.Title }}</h1>
       <div id="body" class="body"></div>
       <script>
         const content = "{{ .Post.Body }}";
         document.getElementById("body").innerHTML = content;

         const style = document.createElement("style");
         style.innerHTML = `
           div#body, div.body {
             text-align: left;
           }

           #body figure img {
             width: 100%;
           }
         `;

         document.head.appendChild(style);
       </script>
     </div>

     {{ end }}
   </div>
 </div>
</main>
{{ template “footer.html” }}
Then, you can proceed to adding the partials, which are chunks of HTML tags that are common across each template. Create the partials in the src/templates/partials directory.
First, create a header.html file with the following code:
{{ define "header.html" }}
<!DOCTYPE html>
<html lang="en">
 <head>
   <meta charset="UTF-8" />
   <meta http-equiv="X-UA-Compatible" content="IE=edge" />
   <meta name="viewport" content="width=device-width, initial-scale=1.0" />
   <title>Treasure's ButterCMS Blog</title>
   {{ template "part.html" }}
 </head>
 <body>
   <div class="tp__container">{{ template "topnav.html" }} {{ end }}
Then, create a footer.html file as follows:
{{ define "footer.html" }}
</div>
</body>
</html>
{{ end }}
Next, create a _part.assets.html file with the following:
{{ define "part.html" }}
<script src="/p/js/main.js"></script>
<link href="/p/css/main.css" rel="stylesheet" />
<link rel="preconnect" href="https://fonts.googleapis.com" />
<link rel="preconnect" href="https://fonts.gstatic.com" crossorigin />
<link
 href="https://fonts.googleapis.com/css2?family=Poppins:ital,wght@0,500;0,600;0,700;1,100&display=swap"
 rel="stylesheet"
/>
<style>
 * {
   font-family: "Poppins", sans-serif;
 }
</style>
{{ end }}
Then, create a _part.topnav.html file with the following:
{{ define "topnav.html" }}
<div class="mx-auto tp__container_topnav">
 <div class="w-80% tp__wrapper_flex top-nav">
   <div class="-wrapper-logo">
     <h1 class="large">TREX BLOG'</h1>
   </div>
   <div class="-wrapper-search">
     <input
       class="search"
       type="text"
       maxlength="2000"
       placeholder="Search"
       data-name="search"
     />
   </div>
 </div>
</div>

{{ end }}
Lastly, create a _part.crumbs.html file with the following:
{{ define "crumbs.html" }}
<div class="tp__crumbs wrapper">
 <div>
   <a href="/"> Back </a>
 </div>
</div>

{{ end }}
These partials are already imported in the templates index.html, blog.html, and 404.html.
Adding the assets
The assets folder will contain the stylings and images that are used by the application. To add the CSS, copy the code here and add it to src/assets/css. Then, download the error image and add it to the src/assets/img folder. Ensure that the names of each file remain the same.
Setting the entry point of the app
Now, you can proceed to create your project’s entry point. This is the server.go file in the src directory. Add the code below to the file:
/// src/server.go

package main

import (
 "os"

 "github.otrex/blog/src/config"
 "github.otrex/blog/src/router"
)

func main() {
 config.SetupConfig("../.env")
 r := router.SetupRouter()
 r.Run(":" + os.Getenv("PORT"))
}
Adding our environmental variables
To do this, you need to create a .env file in the root directory of the project as defined in config.SetupConfig("../.env"). Then, add the following to env:
GIN_MODE=release
PORT=5001
Getting the ButterCMS Read API token
ButterCMS has two types of tokens that can be obtained. The first is the read token, and the other is the write token. The write token can only be obtained by communicating with customer service, while the read token can be obtained from the dashboard’s settings page.
For this tutorial, we will be using the read token to perform our operations.
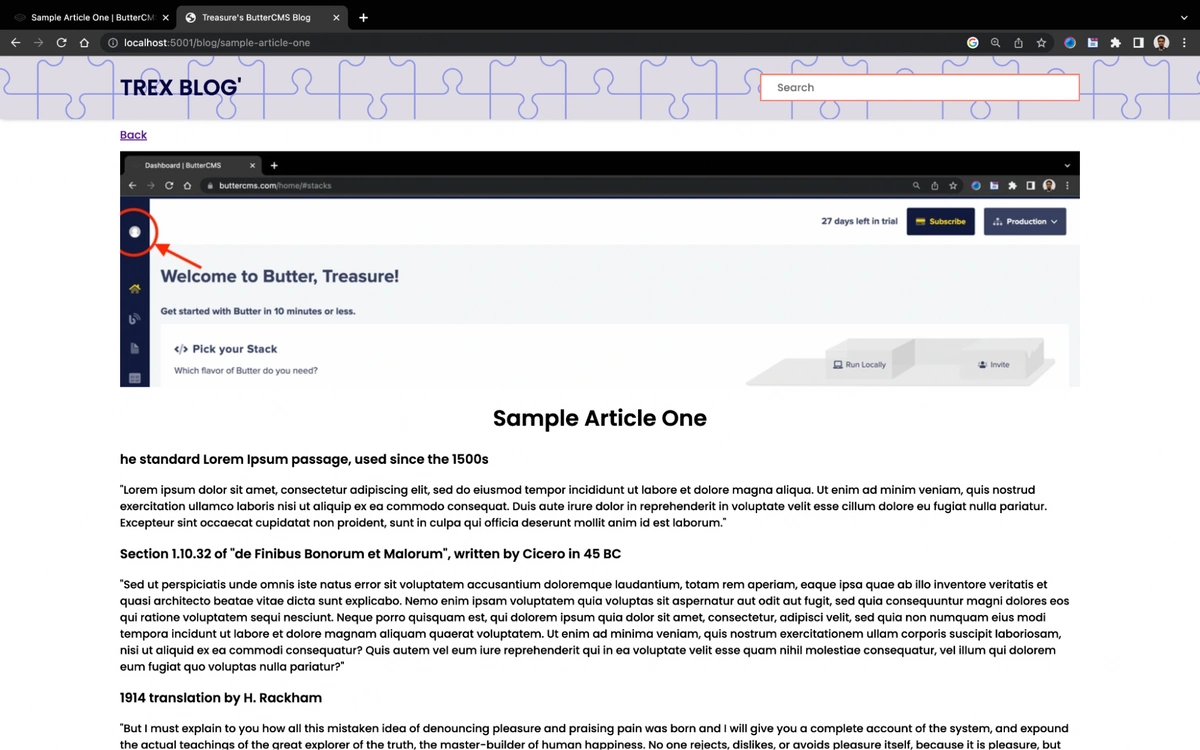
To retrieve your read token, log in to your ButterCMS account and click on the user icon as indicated in the screenshot below:
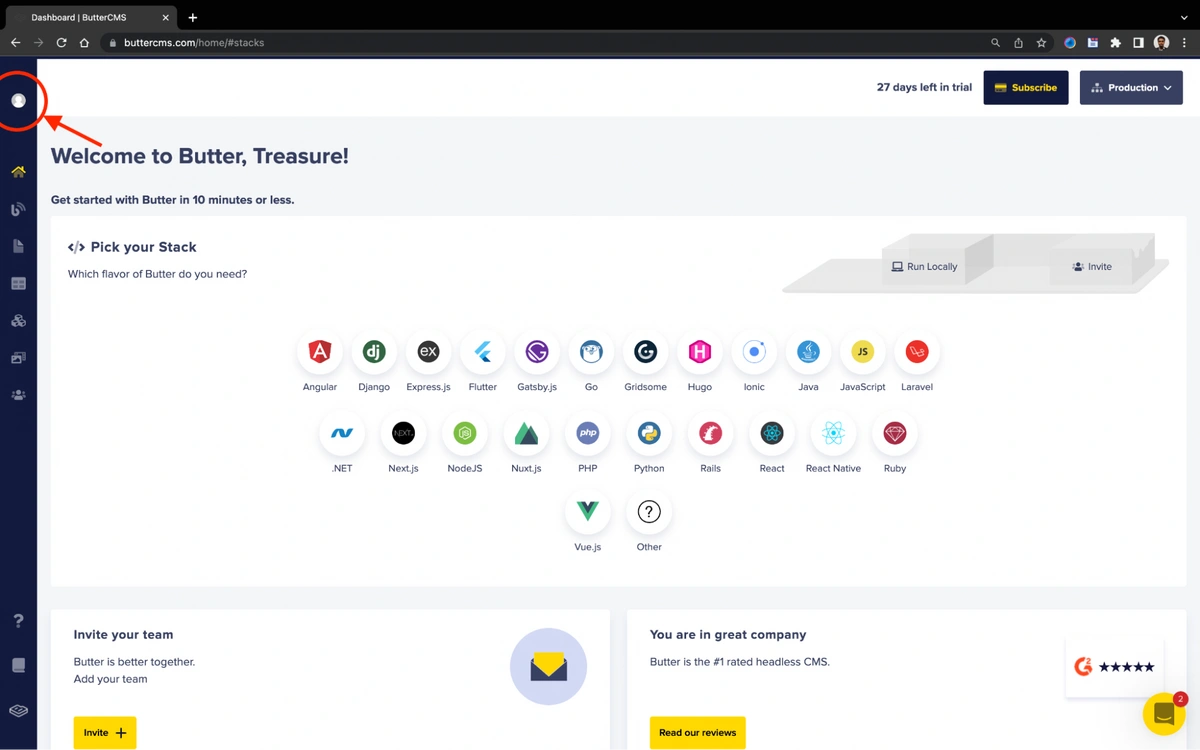
A screenshot showing the user icon and the dashboard’s home interface
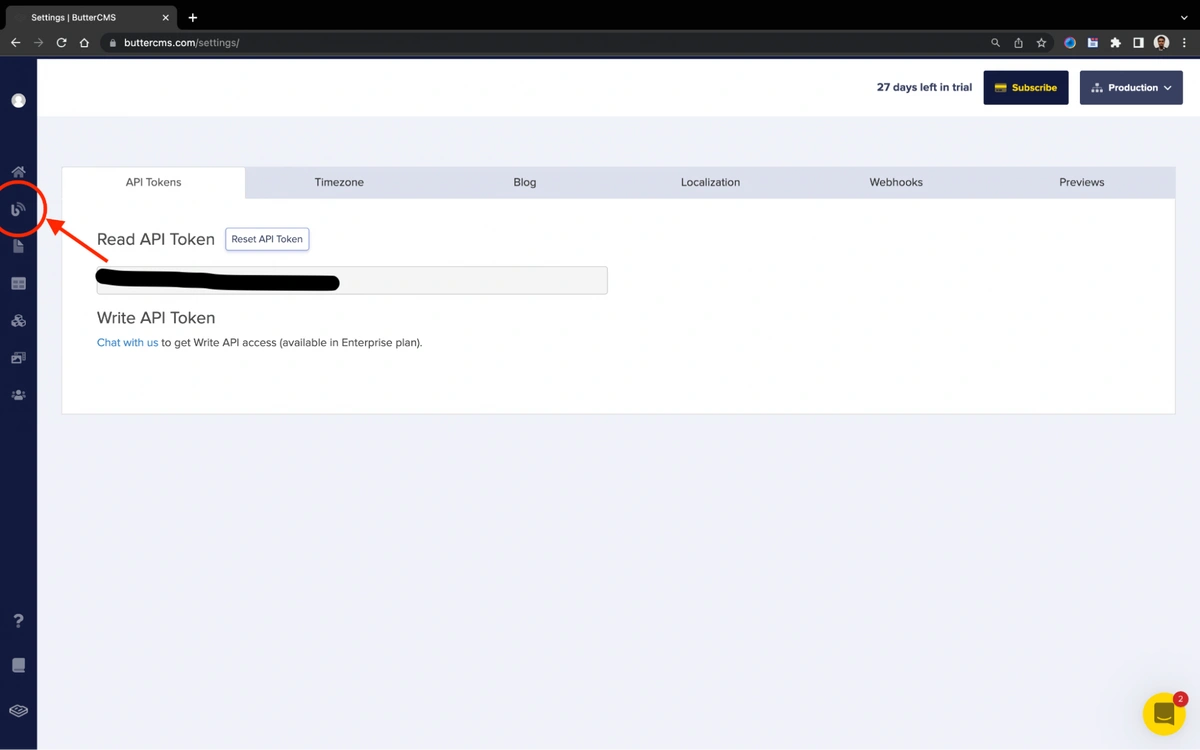
Then, copy our Read API token from the page indicated in the screenshot below.

A screenshot showing the read API token to be used
Next, add your read token to the .env file as follows.

Afterward, you can now try out your application.
ButterCMS initially provides you with an example blog post, but you can add yours via the dashboard by following the steps in the next section.
Creating blog posts using the ButterCMS blog engine
By virtue of using the blog engine, you can easily add new blog posts by clicking on the blog icon in the side navigation bar, as indicated in the screenshot below:
A screenshot showing the blog icon
Then, you can add a new post by clicking on the New Post button at the top left corner, as indicated below:
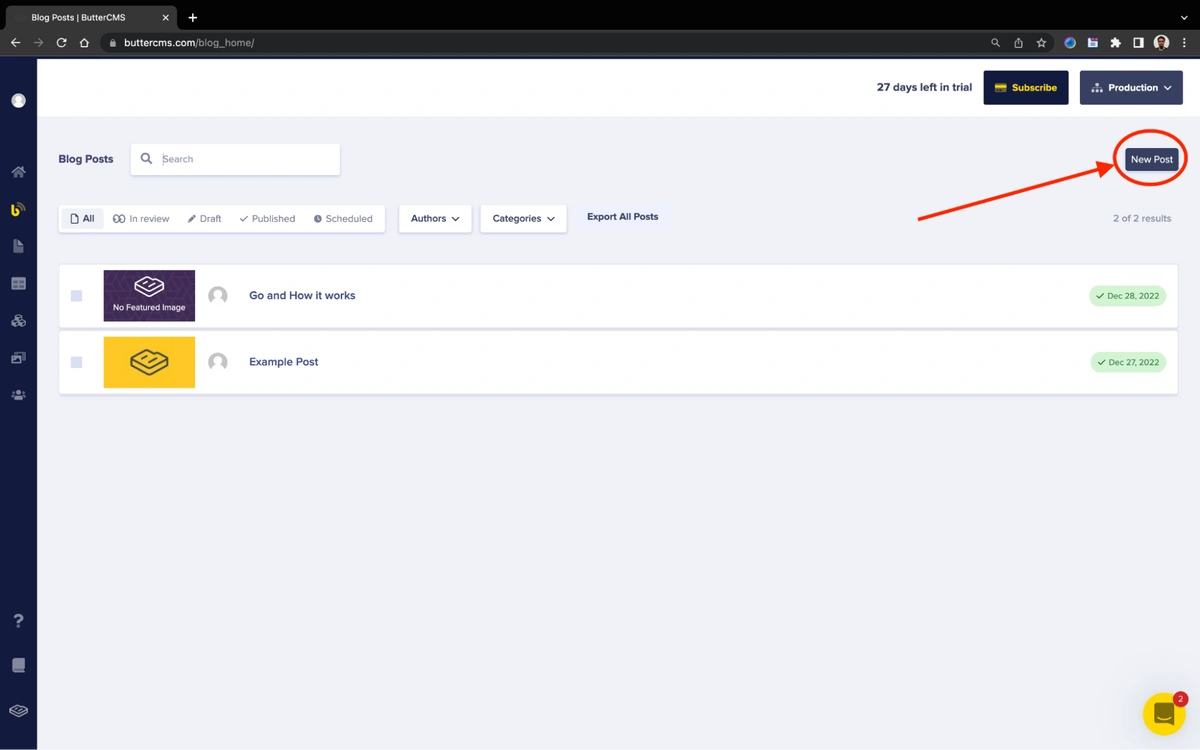
Click the "New post" button in the top right corner of the screen
Next, enter the content of the article as follows:
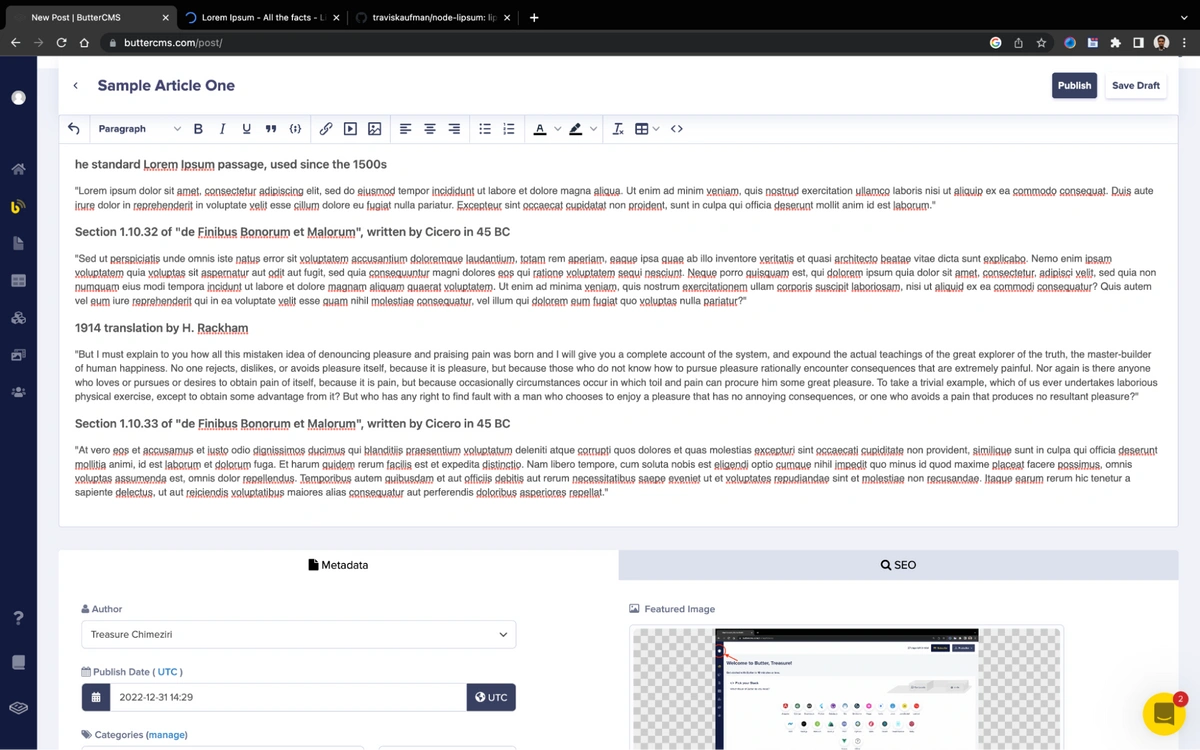
New data entered into the content editor and SEO fields
Don’t forget to enter your metadata and SEO information in the built-in fields at the bottom of the page.
After entering your data, you can publish the blog by clicking on the Publish button at the top right corner of the screen, as shown below:
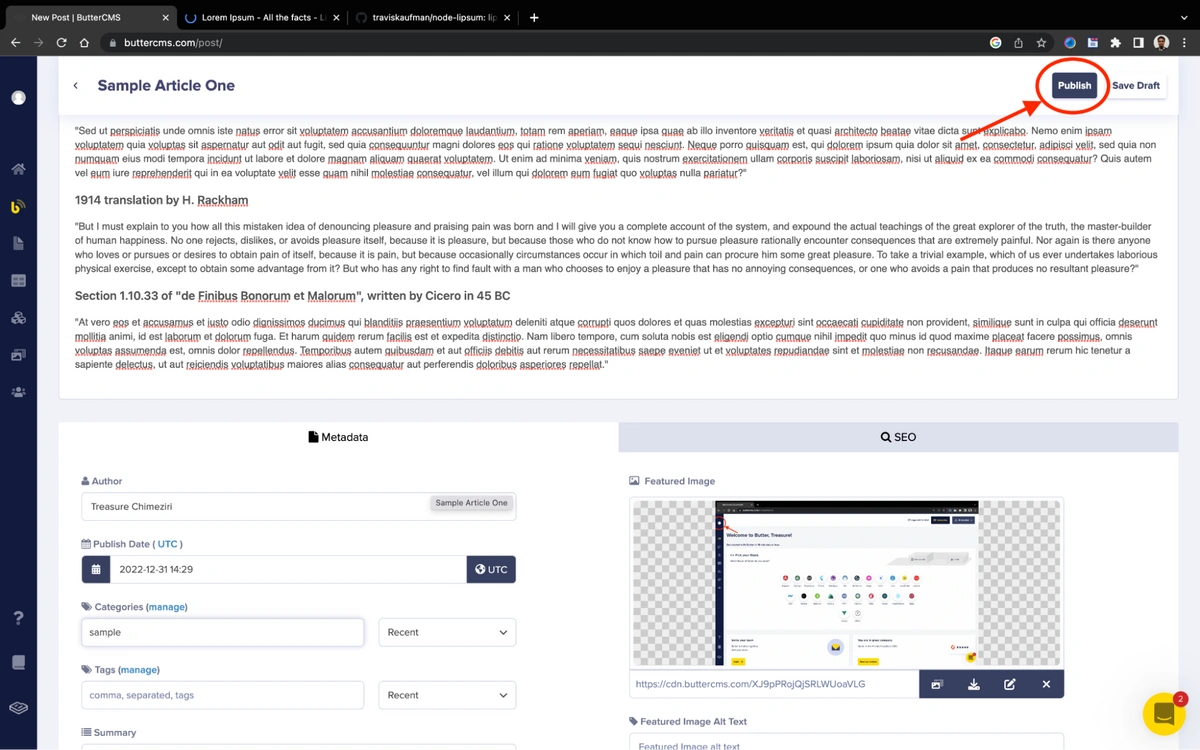
Publish button in top right corner of the page

Post publish date appears in the top right corner
Previewing our blog pages
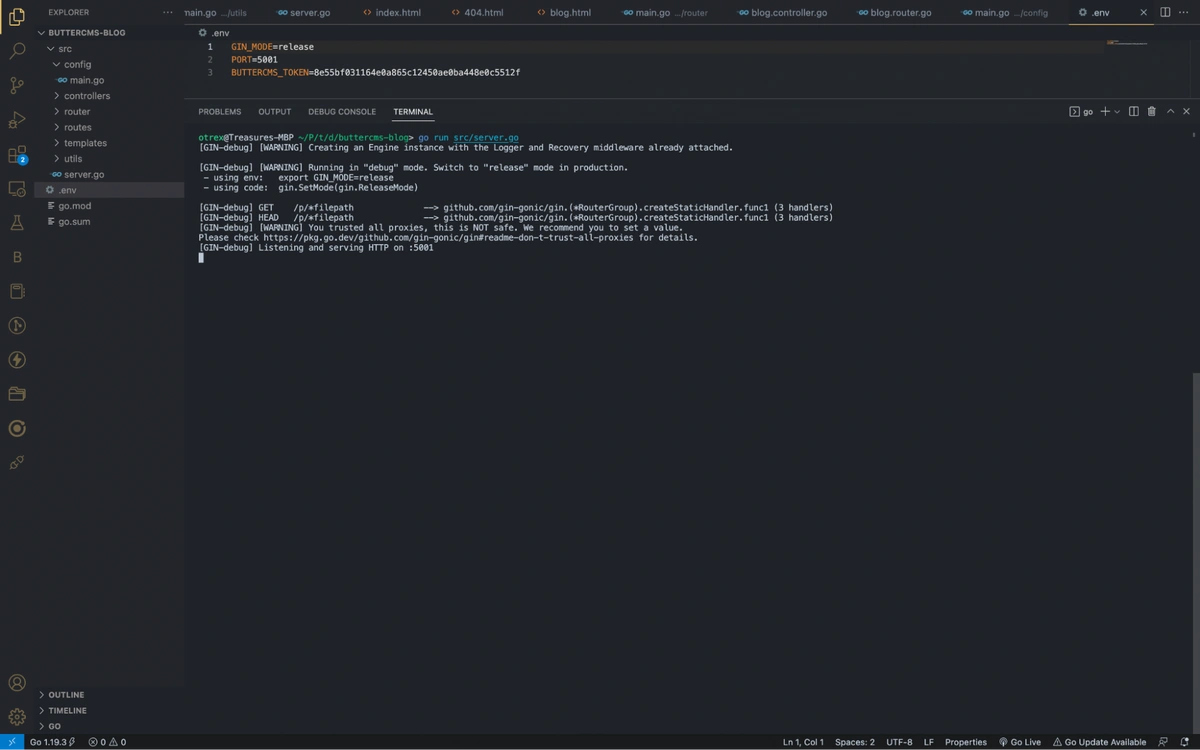
To preview the blog pages, use the following command:
go run src/server.go
Once you run that command, your Go server starts running as follows:
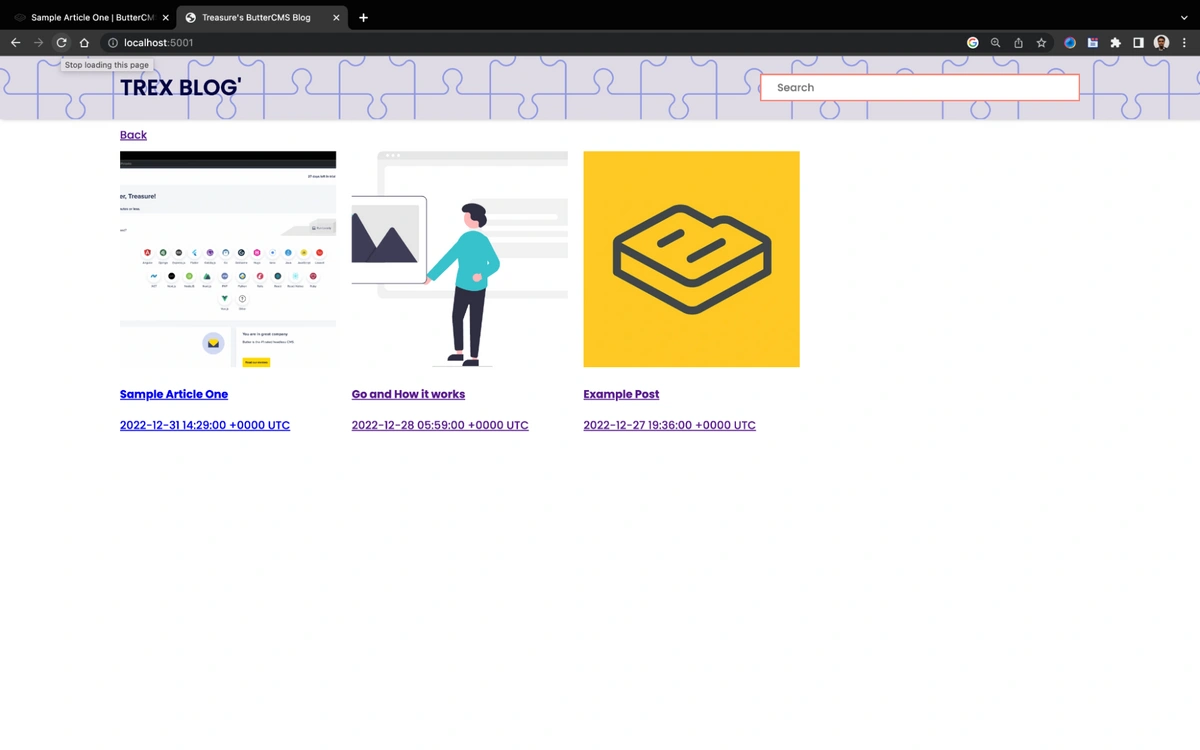
View the pages by visiting http://localhost:5001 in your web browser, and this will render the blogs published on the ButterCMS platform.
Here’s the blog homepage:
And here is an individual blog post page:
Final thoughts
In this Golang blog tutorial, we have demonstrated how we can build a blog site using Go and ButterCMS and introduced how we can use the ButterCMS blog engine to create blog posts. ButterCMS is a very fascinating tool that can fast-track your development process and provide users with seamless platform integration. To learn more about using ButterCMS, we can check out their documentation.

