
A knowledge base is a centralized repository of information that organizations, teams, and individuals use to store and share information such as tutorials, how-to guides, and FAQs. Such systems are required to be efficient in terms of management and distribution, and should also provide easy and prompt access to information.
In this Gridsome tutorial, we will demonstrate how a knowledge base can be built using ButterCMS and Gridsome.
Table of contents
Why use ButterCMS?
ButterCMS is a headless content management system (CMS), that provides a clean and efficient way of creating, managing, and delivering content for websites and applications. It possesses a user-friendly interface, making the job of creating and managing content easy even for those with little technical knowledge.
ButterCMS has a wide range of support for different platform development frameworks such as Python, Swift, Flutter, Nuxt.js, Ionic, etc. It also allows content of various types such as blog posts, dynamic pages, etc. to be created within the CMS and also makes provision for collaboration between creators or developers.

Why use Gridsome?
Gridsome is a modern web development framework for developing static web pages and applications. It is built on Vue.js, and also leverages other web technologies like GraphQL, Node.js, and the Jamstack web development architectural pattern to build scalable web apps. It is also PWA efficient.
Gridsome has a data-driven approach where it fetches data from sources such as APIs, CMSs, and markdown files, and then optimizes it for users. Other pages can also be prefetched to allow lightning-fast responses to users without the need for reloads.
Using Gridsome to build a knowledge base will provide us with the following benefits:
- Fast performance: Knowledge base applications are required to be fast in providing responses to users, and also light to ensure fast page loading. Gridsome provides static-site generation to ensure information is prefetched and always readily available, and as such is suitable for building knowledge bases.
-
Flexible data sources: Gridsome supports different sources of data. It could be in the form of markdown files, APIs, or CMSs. With these, it is easy to provide data for the knowledge base without having to use only a specific type of data source.
-
SEO-friendly: Gridsome sites load initially as static HTML and also generate meta tags. This makes it easier for search engines to crawl the knowledge base and pick out information to provide a better SEO ranking.
-
Deployment: Gridsome supports easy deployment to various hosting platforms. A knowledge base can be deployed and scaled as the application progresses, without encountering issues.
-
Page and assets optimization: It is a better-optimized knowledge base, as Gridsome provides features for code splitting, image optimization, and link prefetching to ensure pages load quickly. It also supports plugins to enable developers to add extra features to their applications.
Tutorial prerequisites
To follow along with this tutorial, you need the following:
- Knowledge of Vue.js
-
Node.js >= v16.12.0 installed
-
An active ButterCMS account
Gridsome tutorial: Building a knowledge base with Gridsome and ButterCMS
For this tutorial, we will build a clone of the Flutterwave knowledge base. We will start by setting up ButterCMS and adding the content for the knowledge base. After that, we will integrate it with Gridsome. All the code for this tutorial can be found in this GitHub repo.
Setting up ButterCMS
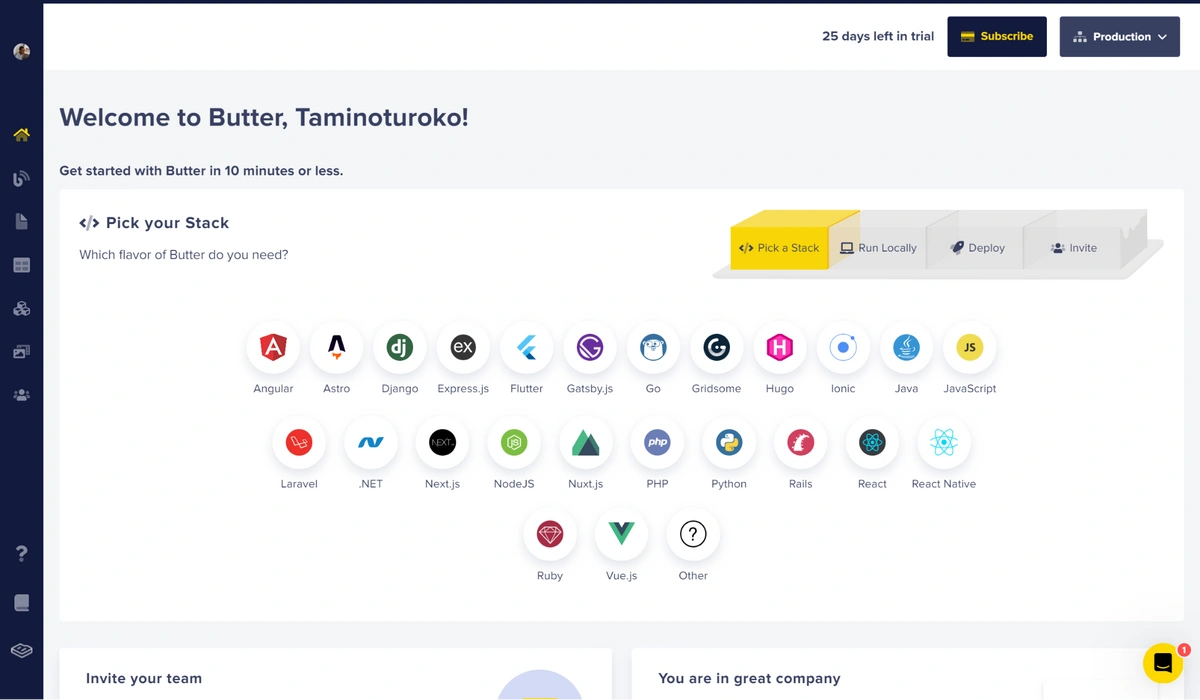
Navigate to the ButterCMS site and create an account if you don’t have one already. After successfully creating an account and logging in, you will be directed to a homepage similar to the image below:
Creating a Navigation Menu with collections
For our knowledge base, we can define the navigation items that will appear in our site from ButterCMS. Thanks to ButterCMS collections, we can build a navigation menu using a collection.
In order to create a navigation menu collection, we’ll have to create a collection type for each menu item in the menu.
Create the Navigation Menu Item collection
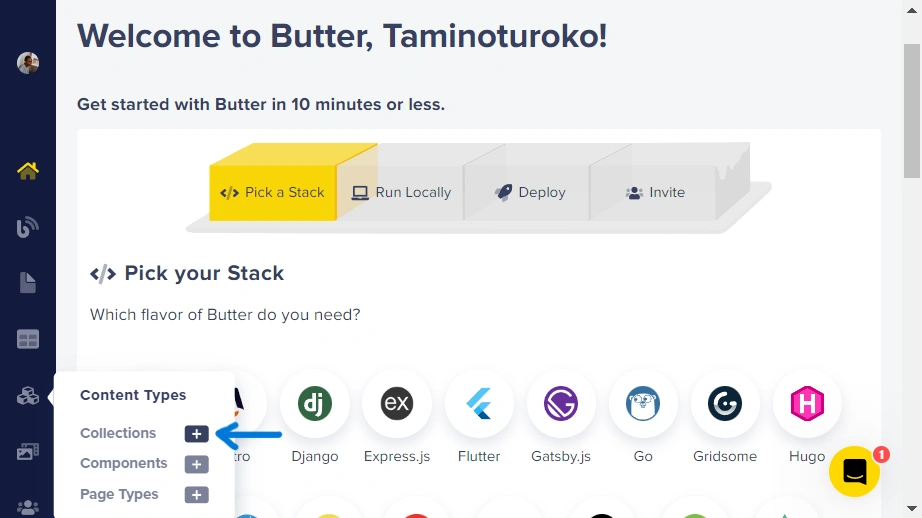
To create a collection, navigate to the New Collection Configuration page by hovering on the Content Types icon on the left sidebar and clicking on the “+” icon next to the Collections item in the drop-down menu.
Now, in the collection configuration page, add the following fields:
- A Short Text field with the name “Label” and the following attribute:
-
Required: True
-
-
A Long Text field with the name “Slug” and the following attribute:
-
Required: True
-
It should look something like this:
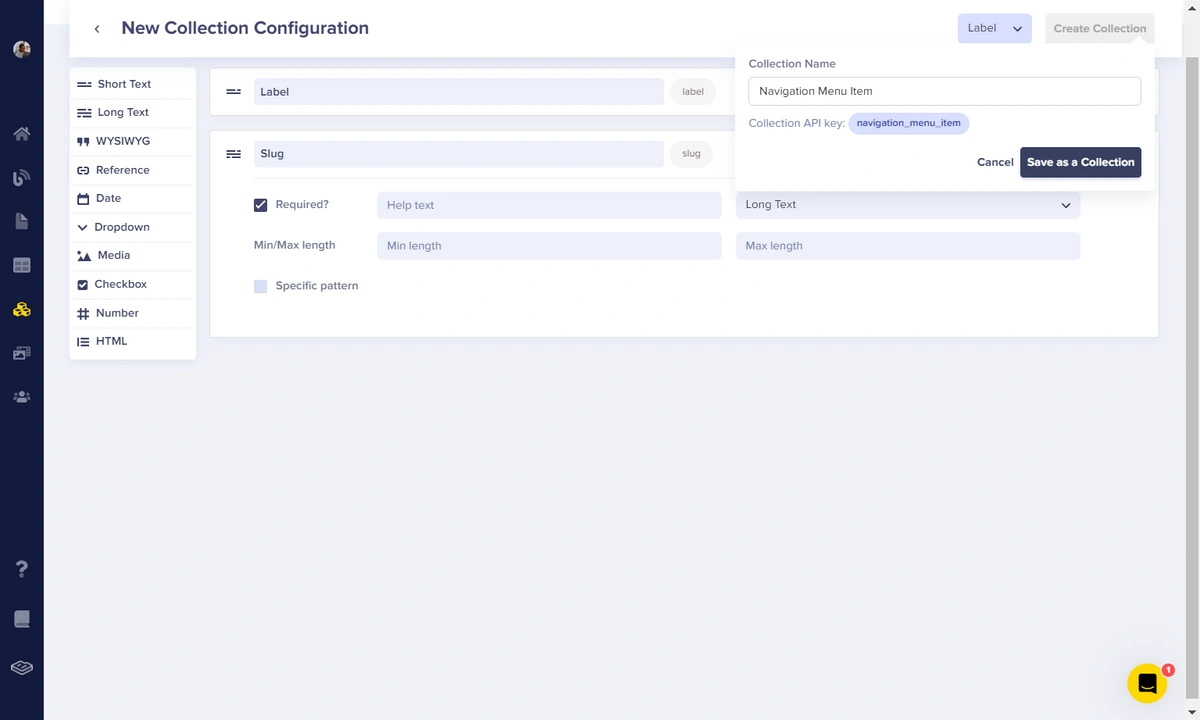
You can also see that we named the collection “Navigation Menu Item”. To save this collection, simply click on Save as Collection.
Next up, we’ll create our navigation menu.
Create the navigation menu
Now, follow the same steps above to create a new collection again with the following fields:
- A Media Field with the name “Logo” and the following attribute:
-
Required: True
-
-
A References field with the name “Menu Items” and the following attributes:
-
What will this reference?:
Navigation Menu Item -
Reference Type:
One-to-Many
-
-
A References field with the name “CTA” and the following attributes:
-
What will this reference?:
Navigation Menu Item -
Reference type:
One-to-One
-
With that, we should have something like this:
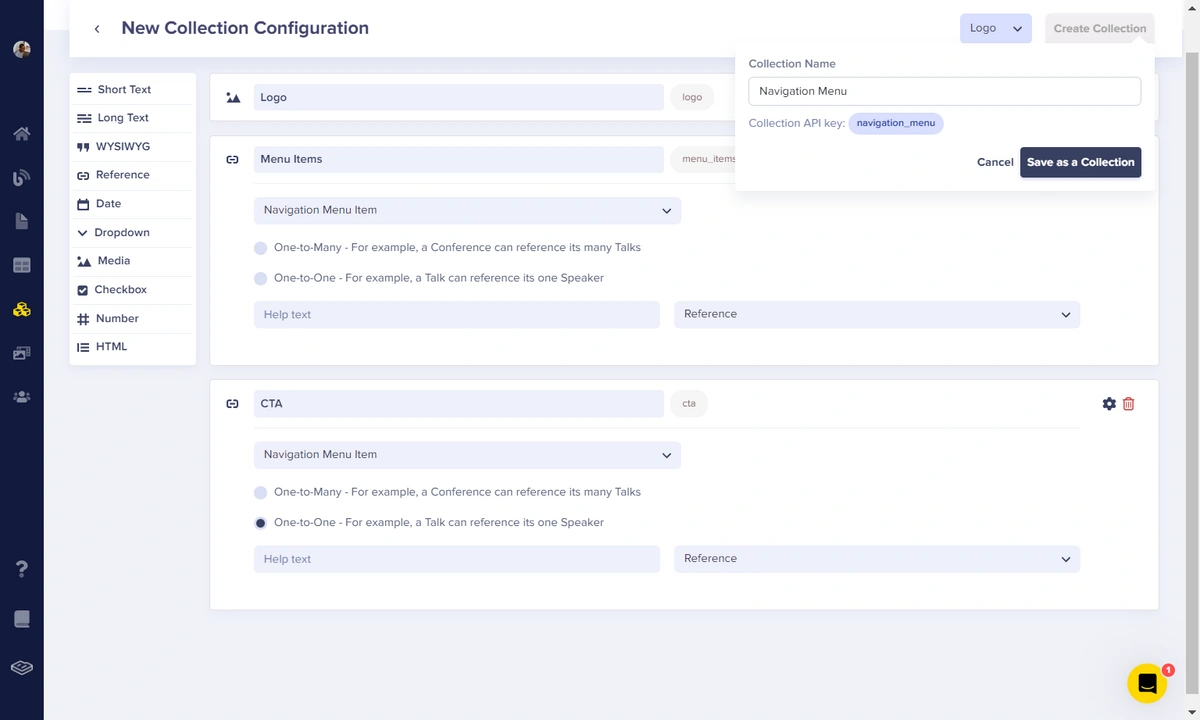
Once again, to save this collection, name the collection “Navigation Menu” and click on Save as Collection. We will set these aside for now and come back to them later on in the tutorial.
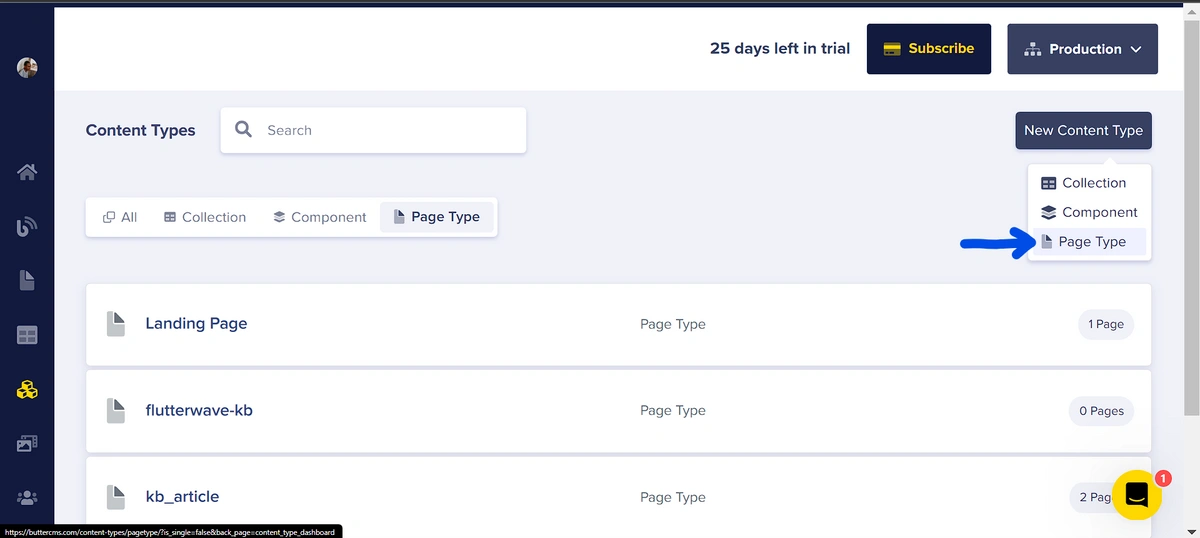
Creating the Article page type
The Article page type will define the structure of each knowledge base article. To create a page type, navigate to the Content Types page, click the New Content Type button, and then select the Page Type option from the drop-down.
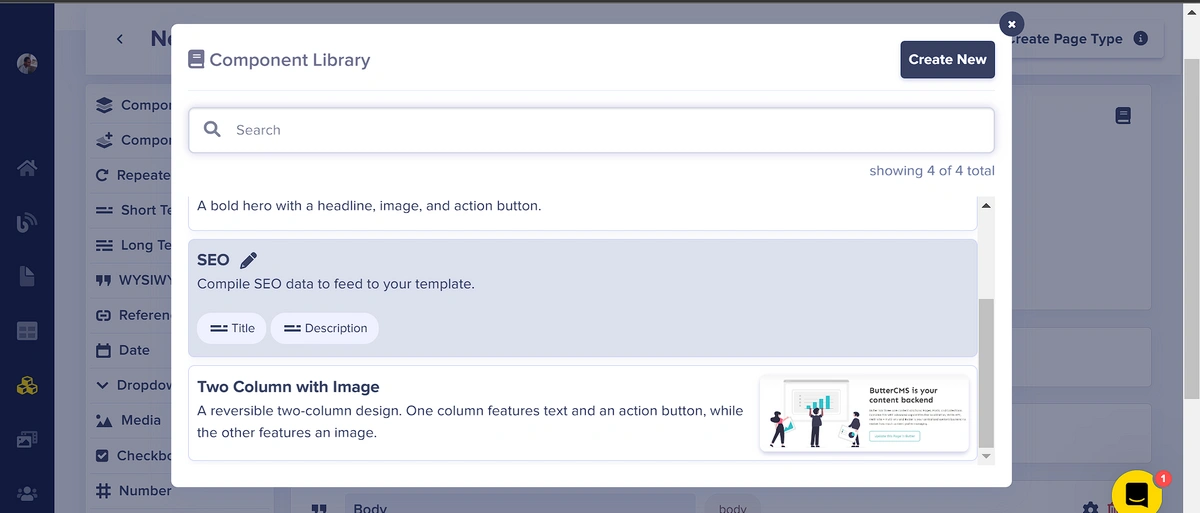
On the New Page Type page, add the following components and fields:
- An SEO component. To add it, click on the Component Library button (
) from the field menu, and from the Component Library, select the SEO component. This component is a prebuilt component provided by Butter:
- A Short Text field with the name “Title” and the following attribute:
-
Required: True
-
-
A Long Text field with the name “Description”
-
A WYSIWYG field with the name “Body” and the following attribute:
-
Required - True
-
With that, our page structure should look something like this:

Save this new page type by clicking on the Create Page Type button at the top right corner of the page. Next, enter the page name as “flutterwave-kb article”:

To create the page type, click the Save as a Page Type button.
Now that the page has been created, the next step is to create the Category page type.
Creating the Category page type
This page type will be used to group articles under their respective categories/topics. It will have a reference field that will reference multiple articles that belong to the category.
To create a page type, navigate to the Content Types page, click the New Content Type button, and then select the Page Type option from the drop-down.
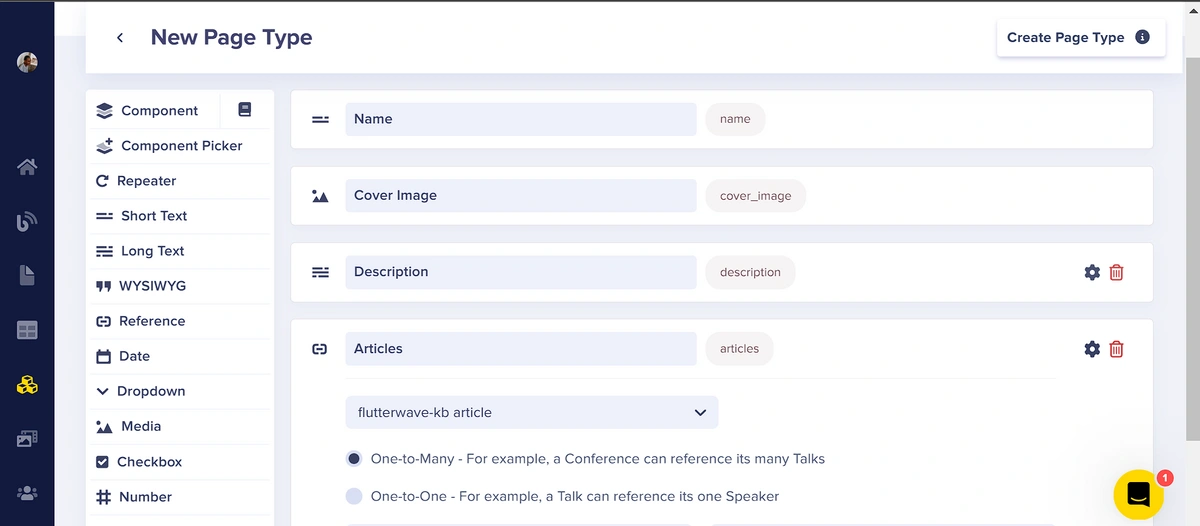
Now, add the following fields to the page type:
- A Short Text field with the name “Name” and the following attribute:
-
Required: True
-
-
A Media field with the name - “Cover Image” and the following attribute:
-
Required - True
-
-
A Long Text field with the name “Description”
-
A Reference field with the name “Articles” and the following attributes:
-
What will this reference?:
flutterwave-kb article -
Reference type:
One-to-Many
-
Here’s what our content structure should look like:
To save this page type, click on the Create Page Type button at the top right of the page and enter the name of the page type as “flutterwave-kb category”
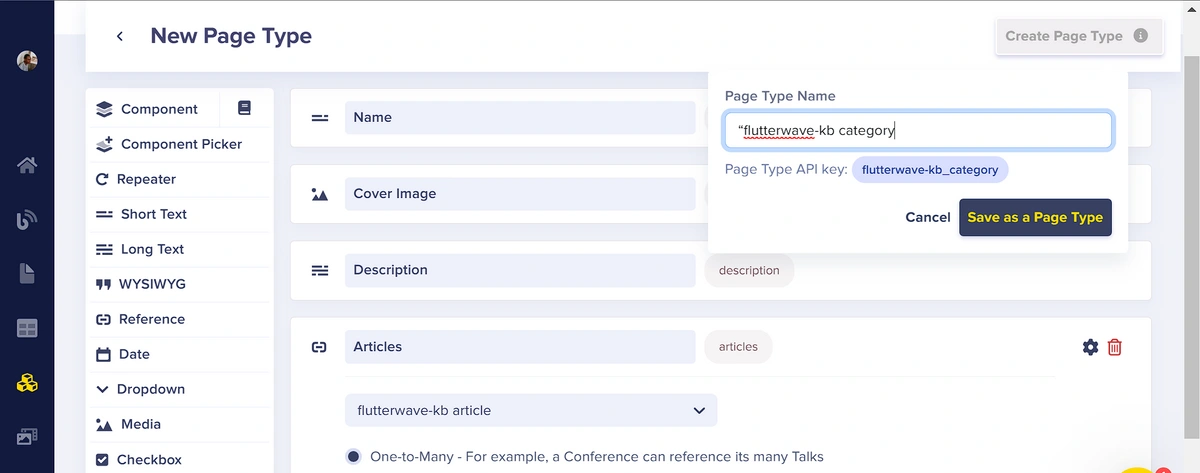
Click on Save as a Page Type to create the page type.
Adding content to our page types
In the previous sections, we have completely set up the content structure for the Flutterwave knowledge base application. To be able to view data in the knowledge base application and make use of the search feature, we will require some pre-existing data in ButterCMS, which we will create in this section.
Adding content to the Navigation collections
First, we will add the navigation content to the Navigation-menu-items collection. For this collection, we will have three labels:
- Submit a Request
-
API Documentation
-
Sign in
We will create a label and slug for these as shown in the image below:

Repeat the step in the image above to create the other navigation menu items: API Documentation and Sign in.
For the Navigation Menu collection, we only need to create one item that will contain a logo image, a reference to the Navigation Menu Item collection items, and a reference to a CTA link.:

As you can see, in the image above, we have the site logo, and have also added the nav items from the Navigation Menu Item collection as references for both Menu Item and CTA in this collection.
Adding content to the article page
For the article content, create a new page in flutterwave-kb-article and fill in the content of your choice:
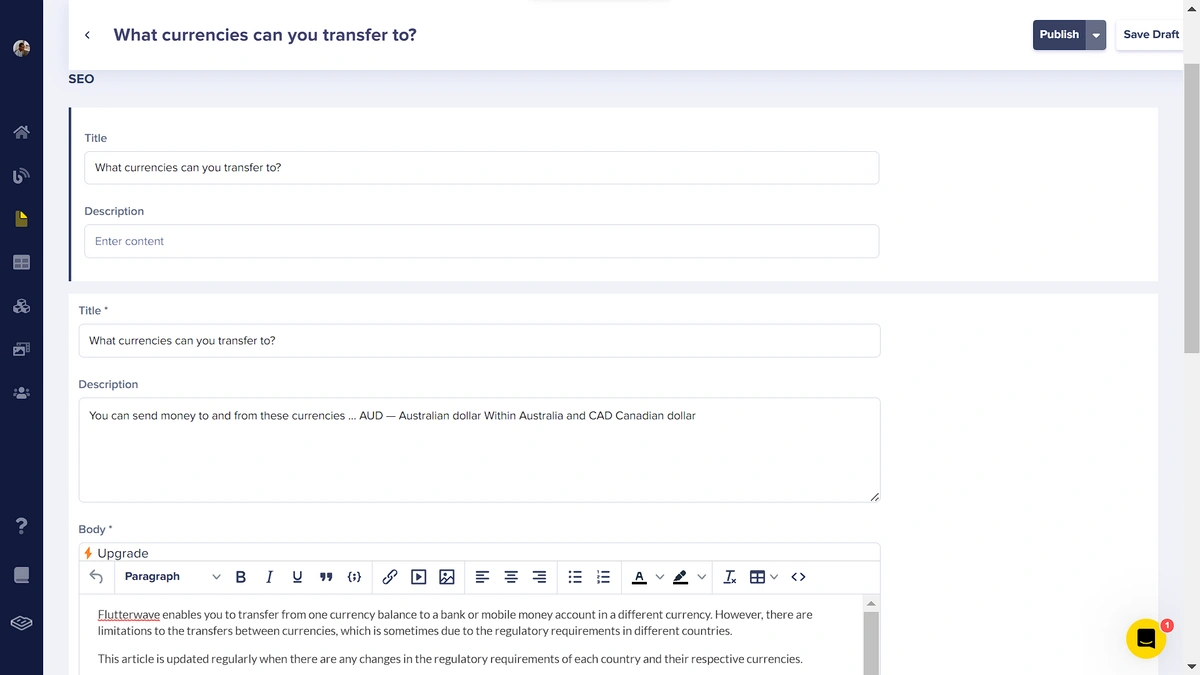
In the image above, I entered content for an article on the knowledge base. The page name in this case is “What currencies can you transfer to” and it contains a title for the knowledge base article, along with its description and a body of content.
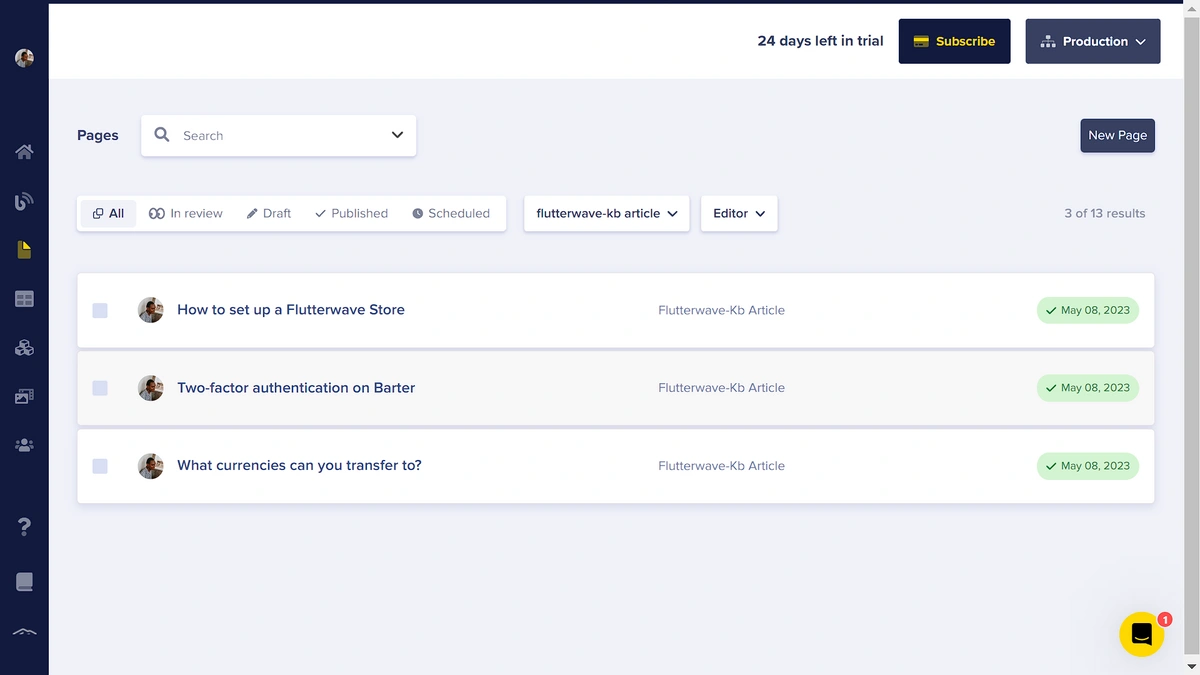
After entering content for a knowledge base article, click on the Publish button to save the content. In a similar manner, we will create two more article pages. In my case, I created two additional knowledge base articles titled “How to set up a Flutterwave Store” and “Two-factor authentication on Barter”, each with a description and a body. After creating a total of three pages using the “flutterwave-kb-article” page type, they should appear in the Pages dashboard.
Adding content for article categories
Next, we will create categories to organize the created articles. On the Page Type page, select flutterwave-kb-category, and in this page type, click on New Page. An example is illustrated below:
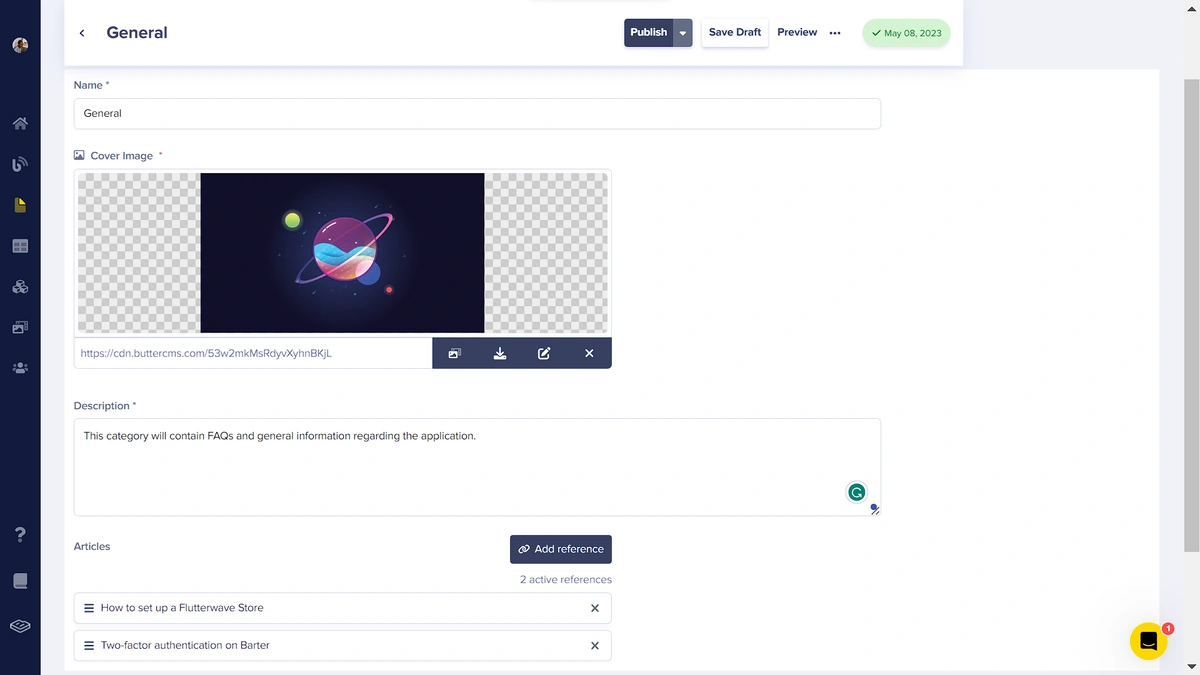
In the image above, I created a category named “General” and added a cover image and description to it. I also added references to two of the articles earlier defined using the flutterwave-kb-articles page type. Also, we will create another category for the remaining article.
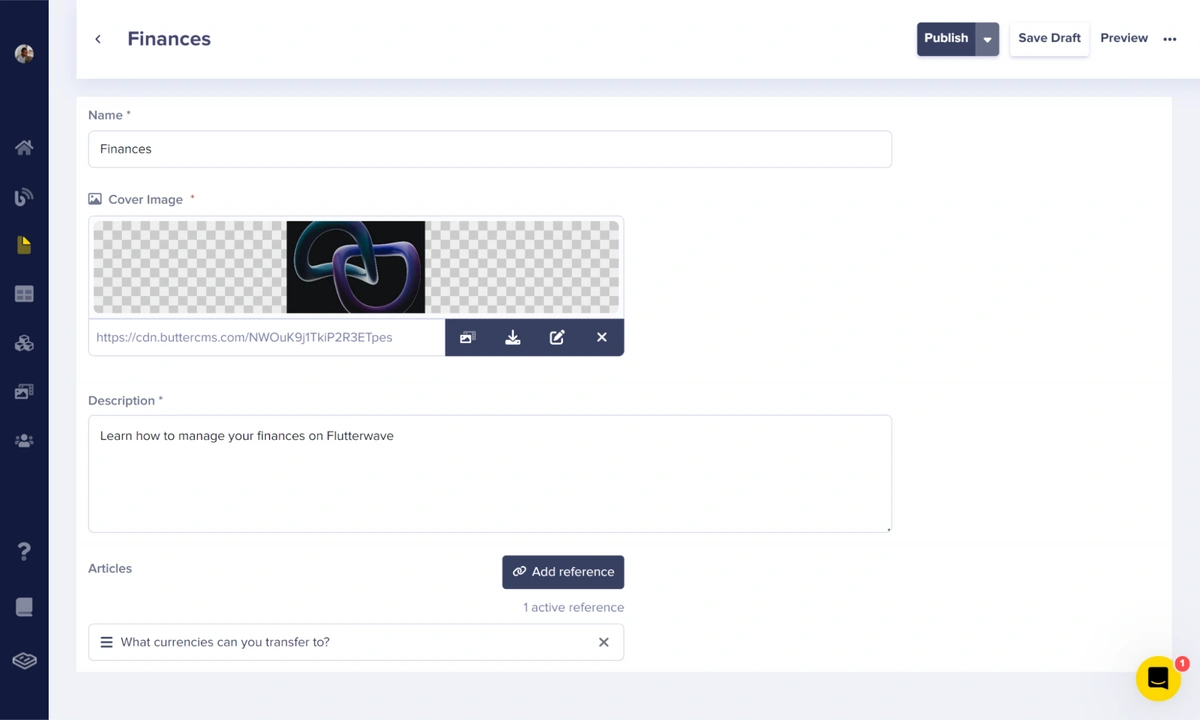
Here, I created a new category called “Finances” and added a cover image, description, and referenced an article in the articles field. With the CMS populated with content, we can proceed to build the front-end interface of the knowledge base.
Creating the Gridsome project
To set up a Gridsome application on a local machine we will require the Gridsome CLI installed to run its associated commands. This can be installed with the following:
// yarn users
yarn global add @gridsome/cli

// npm users
npm install --global @gridsome/cli
The above command installs the Gridsome CLI globally on your system, making it easy to make use of the tool from any directory on the local machine.
Next, we’ll create a new Gridsome project by running the command:
gridsome create <project name>
This command clones the default Gridsome starter and attempts to install the dependencies for the project. Once the installation is complete, navigate to the newly created directory and start the project:
cd <project name>
npm run develop
If the project was not automatically installed, navigate to the folder to install it and start the project:
cd <project name>
npm install
npm run develop
Setting up Tailwind
For styling this application, we’ll be using TailwindCSS. To set it up, we have to install the following packages:
npm i -D @tailwindcss/postcss7-compat postcss@^7 @tailwindcss/typography
Next, generate a ./tailwind.config.js file by running the command:
npx tailwind init
In the generated file, enter the following:
// ./tailwind.config.js

module.exports = {
  content: [
    "./src/**/*.vue",
    "./src/**/*.js",
    "./src/**/*.jsx",
    "./src/**/*.html",
    "./src/**/*.pug",
    "./src/**/*.md",
  ],
  darkMode: "media", // or 'media' or 'class'
  theme: {
    extend: {},
  },
  variants: {
    extend: {},
  },
  plugins: [require("@tailwindcss/typography")],
};
Next, create the file ./src/main.css and enter the following:
/* ./src/main.css */
@tailwind base;
@tailwind components;
@tailwind utilities;
Once we’ve created our CSS file, we’ll import it into ./sec/main.js:
// ./src/main.js

// This is the main.js file. Import global CSS and scripts here.
// The Client API can be used here. Learn more: gridsome.org/docs/client-api

// Import global styles
require('~/main.css')
import DefaultLayout from '~/layouts/Default.vue'
export default function (Vue, { router, head, isClient }) {
  // Set default layout as a global component
  Vue.component('Layout', DefaultLayout)
}
Finally, we have to configure Tailwind in ./gridsome.config.js:
// ./gridsome.config.js
const tailwind = require("tailwindcss");
const postcssPlugins = [tailwind()];
module.exports = {
siteName: 'Gridsome',
plugins: [],
css: {
loaderOptions: {
postcss: {
plugins: postcssPlugins,
},
},
},
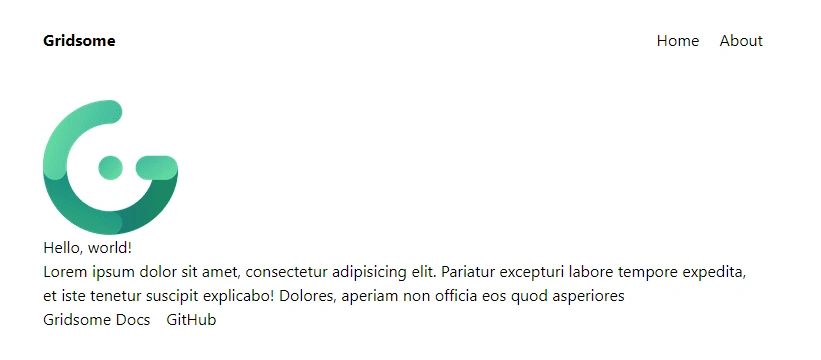
}With that, we should have Tailwind configured in our application. Now if we navigate to our project on https://locahost:8080, we should have something like this:
In the following sections, we will proceed to build the knowledge base and connect the CMS to it.
Integrating ButterCMS with the knowledge base
For this tutorial, we will be recreating Flutterwave’s knowledge base. In this section, we will build the knowledge base modeled after Flutterwave’s support system and add content to it using ButterCMS.
First off, we will install the ButterCMS SDK and set it up with our Read API key to allow communication with the CMS.
npm install buttercms
The authentication key required for this tutorial is the READ API TOKEN and this can be found in the Settings section of the ButterCMS dashboard. In your project directory, create a .env file and store this key:
BUTTER_READ_TOKEN= <your API token here>In order to use data from APIs in Gridsome from the server side, we need to import data from the content API using the Data Store API.
In our ./gridsome.server.js file, we’ll use the api.loadSource() hook to fetch our content from Butter and create collections for the content.
First, in order to fetch the data, we will need to initialize Butter with the API key in .env. Create a new file called ./src/libs/butter.js:
// ./src/libs/butter.js
const butter = require("buttercms");
const Butter = butter(process.env.BUTTER_READ_TOKEN);
module.exports = Butter;
Now we can use Butter to fetch our navigation_menu collection which contains the menu items for our site header.
In the ./gridsome.server.js file, we’ll use the Data Store API to create a kbNavMenu collection, fetch the page data, and add it as a node in the collection:
// ./gridsome.server.js
// Server API makes it possible to hook into various parts of Gridsome
// on server-side and add custom data to the GraphQL data layer.
// Learn more: https://gridsome.org/docs/server-api/
// Changes here require a server restart.
// To restart press CTRL + C in terminal and run `gridsome develop`
module.exports = function(api) {
api.loadSource(({ addCollection }) => {
// Use the Data Store API here: https://gridsome.org/docs/data-store-api/
// create a kbNavMenu collection from the navigation menu collection type
const kbNavMenu = addCollection({
typeName: "KBNavMenu"
})
// retrieve the kbNavMenu collection from Butter CMS
const navMenuResponse = await Butter.content.retrieve(['navigation_menuu'], {
"page": 1
})
const navMenu = await navMenuResponse.data
// add the data to the kbNavMenu collection
kbNavMenu.addNode({id: "navmenu", ...navMenu.data.navigation_menuu[0]});
});
api.createPages(({ createPage }) => {
// Use the Pages API here: https://gridsome.org/docs/pages-api/
});
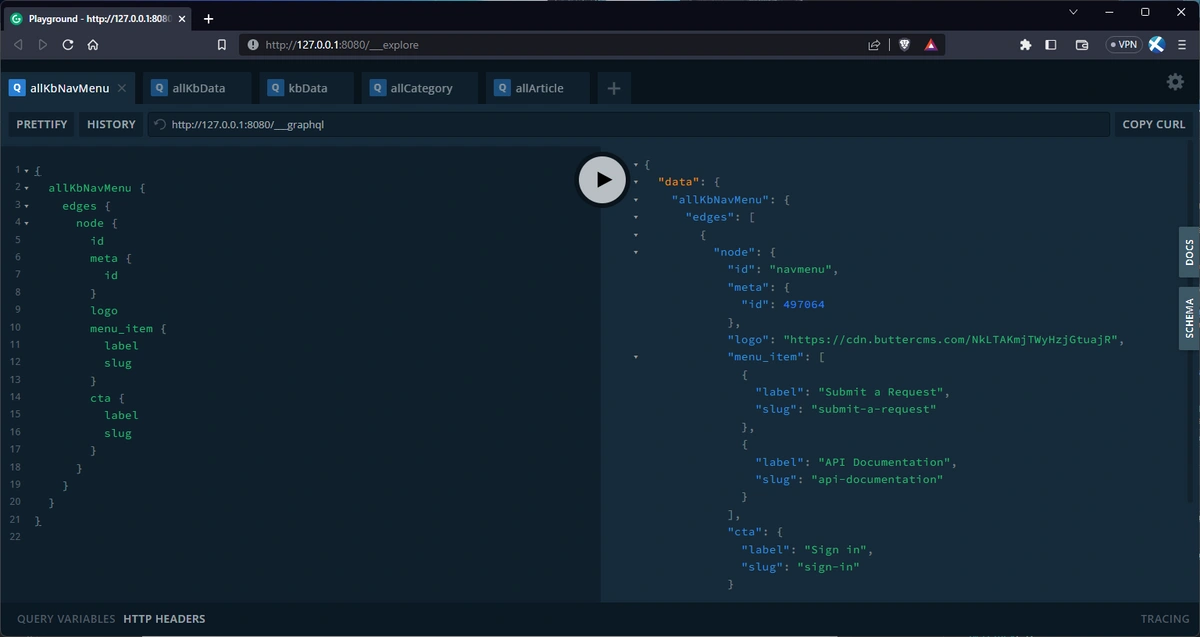
};With that, when we restart our server and visit the GraphQL playground at http://127.0.0.1:8080/___explore, we should see something like this:
Now that we’ve successfully set up Butter and seen how we can fetch data and add it to our data store, let’s create the components we’ll need for our site.
Create the SiteHeader component
Create a new file called ./src/components/SiteHeader.vue:
<!-- ./src/components/SiteHeader.vue -->
<script>
export default {
  name: "SiteHeader",
  props: ["logo", "navItems", "cta_button"],
};
</script>
<template>
  <header class="site-header">
    <div class="wrapper">
      <g-link to="/">
        <div class="site-header__logo img-cont">
          <img :src="logo" alt="Flutterwave" />
        </div>
      </g-link>
      <nav class="site-nav">
        <ul class="site-nav__links">
          <li class="site-nav__link" v-for="item in navItems" :key="item.label">
            <g-link :to="`${item.slug}`">{{ item.label }}</g-link>
          </li>
          <li class="site-nav__link">
            <g-link :to="`${cta_button.slug}`" class="cta">
              {{ cta_button.label }}
            </g-link>
          </li>
        </ul>
      </nav>
    </div>
  </header>
</template>
<style scoped>
.site-header {
  @apply sticky top-0 w-full p-4 bg-white border-b border-gray-200 z-10;
}
.site-header > .wrapper {
  @apply flex justify-between items-center gap-4 w-full max-w-7xl mx-auto;
}
.site-header__logo {
  @apply h-12;
}
.site-nav__links {
  @apply flex items-center gap-8;
}
.site-nav__link {
  @apply text-sm font-medium;
}
</style>
Here, we have logo, cta_button and navItems as props which will be rendered within this component.
Next, we’ll create the SiteFooter component as well.
Create the SiteFooter component
Create a new file called ./src/components/SiteFooter.vue:
<!-- ./src/components/SiteFooter -->
<!-- ./src/components/SiteFooter -->
<script>
export default {
  name: "SiteFooter",
  data() {
    return {
      footer_items: [
        {
          label: "Privacy policy",
          slug: "/privacy-policy",
        },
        {
          label: "Terms of use",
          slug: "/terms-and-conditions",
        },
        {
          label: "Cookie policy ",
          slug: "/cookie policy",
        },
        {
          label: "Merchant service agreement",
          slug: "/merchant-service-agreement",
        },
      ],
    };
  },
};
</script>
<template>
  <footer class="site-footer site-section">
    <div class="wrapper">
      <span class="site-footer__cp">
        © Flutterwave
      </span>
      <ul class="site-footer__links">
        <li
          v-for="item in footer_items"
          :key="item.label"
          class="site-footer__link-item"
        >
          <g-link to="/">
            {{ item.label }}
          </g-link>
        </li>
      </ul>
    </div>
  </footer>
</template>
<style scoped>
.site-footer {
  @apply w-full mt-4 p-4 border-t border-gray-200;
}
.site-footer > .wrapper {
  @apply flex justify-between items-center gap-4 w-full;
}
.site-footer__links {
  @apply flex items-center gap-8;
}
</style>
Now, let’s get the data that will be passed to our header and footer.
To get this data, we’ll use the <static-query> block which allows us to query data in any component in the ./src/layouts/Default.vue file:
<!-- ./src/layouts/Default.vue -->
<static-query>
query {
  kbNavMenu(id: "navmenu"){
    id
    meta {
      id
    }
    logo
    menu_item {
      label
      slug
    }
    cta {
      label
      slug
    }
  }
}
</static-query>
<script>
import SideMenu from "../components/SideMenu.vue";
import SiteFooter from "../components/SiteFooter.vue";
import SiteHeader from "../components/SiteHeader.vue";
export default {
  components: {
    SiteHeader,
    SiteFooter,
    SideMenu,
  },
  props: {
    showSidebar: {
      type: Boolean,
      default: false,
    },
  },
  metaInfo: {
    title: "Blog",
  },
  data() {
    return {
      navMenu: {
        logo: "",
        menu_item: [],
        cta: {},
      },
    };
  },
  created() {
    let navMenu = this.$static.kbNavMenu;
    this.navMenu = navMenu;
  },
};
</script>
<template>
  <div class="layout">
    <!-- Header & Navigation -->
    <SiteHeader
      :logo="navMenu.logo"
      :nav-items="navMenu.menu_item"
      :cta_button="navMenu.cta"
    />
    <div class="site-content">
      <div class="wrapper">
        <!-- conditionally render side menu -->
        <SideMenu v-if="showSidebar" />
        <!-- Page Content -->
        <main class="site-main">
          <slot />
        </main>
      </div>
    </div>
    <SiteFooter />
  </div>
</template>
<style scoped>
.site-content {
  @apply w-full;
}
.site-content > .wrapper {
  @apply flex flex-col md:flex-row w-full max-w-[92rem] mx-auto;
}
.site-main {
  @apply grow;
}
</style>
Here, you can see that we’re querying our kbNavMenu using the static-query block.
And within the created() hook in <script>, we use $static to create navMenu which we pass on to the <SiteHeader> component.
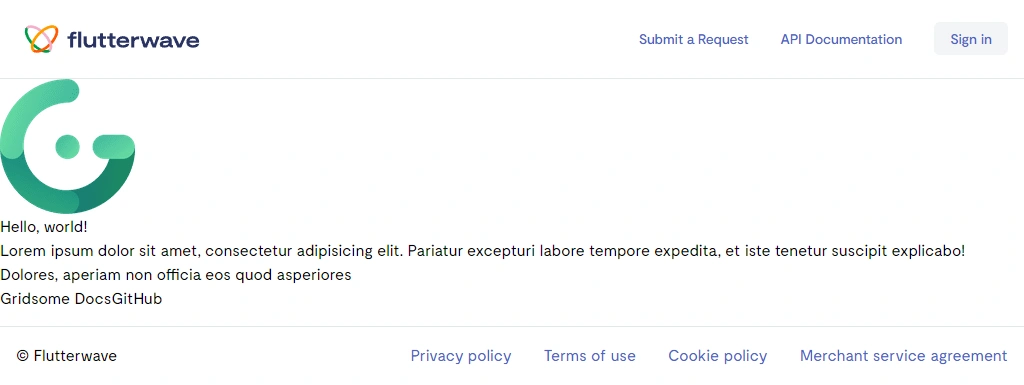
With that, we should have something like this:
Next, we’ll create a few other components which we will use later on in the application.
Create the Search component
Create a new file called ./src/components/Search.vue:
<!-- ./src/components/Search.vue -->
<script>
export default {
  data() {
    return {
      // search query
      searchQuery: "",
    };
  },
  methods: {
    // method to handle search
    handleSearch(e) {
      // navigate to search page with query
      this.$router.push({
        path: "/search",
        query: {
          q: this.searchQuery,
        },
      });
    },
  },
};
</script>
<template>
  <!-- call handleSearch when form is submitted -->
  <form @submit.prevent="handleSearch" class="search-form" action="">
    <div class="wrapper">
      <div class="form-control search-form-control">
        <span class="icon">
          <svg
            xmlns="http://www.w3.org/2000/svg"
            width="24"
            height="24"
            fill="none"
            stroke="currentColor"
            stroke-width="2"
            stroke-linecap="round"
            stroke-linejoin="round"
            class="feather feather-search"
            viewBox="0 0 24 24"
          >
            <defs></defs>
            <circle cx="11" cy="11" r="8"></circle>
            <path d="M21 21l-4.35-4.35"></path>
          </svg>
        </span>
        <input
          type="text"
          class="form-input form-control__input"
          placeholder="Search help articles..."
          v-model="searchQuery"
          required
        />
      </div>
      <div class="action-cont">
        <!-- submit form -->
        <button type="submit" class="cta">
          Search
        </button>
      </div>
    </div>
  </form>
</template>
<style scoped>
.search-form > .wrapper {
  @apply flex flex-col gap-4;
}
</style>
Here, our component consists of a form with a search input and a submit button. When the user enters a search query and submits the form, the handleSearch method is called.
In the data section, the searchQuery variable is initialized to an empty string. This variable is bound to the search input using v-model, so any changes in the input field will update the searchQuery variable.
The handleSearch method is responsible for handling the search functionality. When the form is submitted, it prevents the default form submission behavior (@submit.prevent). The method then uses this.$router.push to navigate to the "/search" page, passing the search query as a parameter in the URL query string. The search query is accessed using this.searchQuery.
This means that later on, we’ll create a search page that will use the ButterCMS search API to run a search using the query passed to it.
Create the CategoryCard component
This component will display category information and a few of the articles contained in the category. It will also have a View More link which opens the category page. To create this component, create a new file called ./src/components/CategoryCard.vue:
<!-- ./src/components/CategoryCard.vue -->
<script>
export default {
  props: {
    category: {
      type: Object,
      required: true,
    },
  },
  computed: {
    coverImage() {
      return this.category.cover_image;
    },
    articles() {
      return this.category.articles;
    },
  },
};
</script>
<template>
  <article class="category-card">
    <header class="category-card__header">
      <h2 class="category-card__title">
        {{ category.name }}
      </h2>
      <figure class="category-card__cover img-cont">
        <img :src="coverImage" alt="Category" />
      </figure>
    </header>
    <ul class="category-card__article-list">
      <li
        class="category-card__article-list-item"
        v-for="article in articles"
        :key="article.slug"
      >
        <g-link
          :to="`/article/${article.slug}`"
          class="category-card__article-link"
        >
      </li>
    </ul>
    <g-link :to="`/category/${category.slug}`" class="category-card__link">
      View all
    </g-link>
  </article>
</template>
<style scoped>
.category-card {
  @apply flex flex-col gap-4;
}
.category-card__header {
  @apply flex flex-col gap-4;
}
.category-card__title {
  @apply text-2xl text-rhino-800 font-bold;
}
.category-card__cover {
  @apply w-full h-56;
}
.category-card__cover img {
  @apply rounded-2xl border border-rhino-100;
}
.category-card__article-list {
  @apply flex flex-col gap-2;
}
.category-card__article-list-item {
  @apply font-normal text-lg;
}
.category-card__link {
  @apply text-rhino-400 font-bold;
}
</style>
For this component, in the script section, we define the props property to specify that the component expects a prop named "category" of type Object, which is required.
This prop will be passed from the parent component to provide the necessary data for rendering the category card.
Inside the computed properties, we define two computed properties: coverImage and articles. The coverImage property retrieves the cover image URL from the category object, while the articles property retrieves the articles array from the category object.
Fetching category pages data using the Data Store API
Now, let's see how we can fetch the category page data from Butter using the Data Store API and display them on our home page. In order to do this, we first need to create a Category collection and add the category pages as nodes to that collection in ./gridsome.server.js:
// ./gridsome.server.js
const Butter = require("./src/libs/butter");
module.exports = function(api) {
  api.loadSource(async ({ addCollection, getCollection }) => {
    // ...

    // create a categories collection from the flutterwave-kb_category page type
    // with the typeName of Category
    const categories = addCollection({
      typeName: "Category",
    });

    // retrieve the categories from ButterCMS
    const categoryParams = {
      order: "published",
    };

    // add the categories to the categories collection
    await Butter.page.list("flutterwave-kb_category", categoryParams).then(
      function(response) {
        for (const category of response.data.data) {
          categories.addNode({
            id: category.slug,
            ...category
          });
        }
      }
    );
};
Here, within the api.loadSource method, we are creating a collection of categories with the type name of "Category". We are then retrieving categories from the ButterCMS API by making a request with the Butter.page.list method and passing in the flutterwave-kb_category page type and some query parameters.
Once we have the response, we are iterating over the data array within the response.data object and adding each category to the categories collection with the categories.addNode method. We are using the spread operator to spread the category object and add it to the node with the addNode method.
In summary, we are creating a collection of categories by retrieving data from an external API, iterating over the response data, and adding each category to the collection.
Now, to use this data in our page, we’ll have to query the Data Store within the <page-query> block of our page.
Create the SideMenu component
This component will be used to show a list of the category pages we fetched from Butter using the Data Source API in ./gridsome.server.js.
<!-- ./src/components/SideMenu -->
<static-query>
query {
  allCategory {
    edges {
      node {
        id
        name
        slug
      }
    }
  }
}
</static-query>
<template>
  <aside class="side-menu">
    <div class="wrapper">
      <nav class="categories-nav">
        <ul class="categories-nav__list">
          <li
            v-for="({ node }) in $static.allCategory.edges"
            :key="node.id"
            class="categories-nav__list-item"
          >
            <g-link :to="`/category/${node.slug}`">
              {{ node.name }}
            </g-link>
          </li>
        </ul>
      </nav>
    </div>
  </aside>
</template>
<style scoped>
.side-menu {
  @apply w-64 h-full p-4 px-8;
}
.side-menu > .wrapper {
  @apply flex flex-col gap-4 w-full max-w-7xl mx-auto;
}
.categories-nav {
  @apply py-12;
}
.categories-nav__list {
  @apply flex flex-col gap-2;
}
.categories-nav__list-item {
  @apply font-medium;
}
</style>
Here, we used the <static-query> block to query the data from the Data Source API and create links for each category page.
Next, we’ll conditionally render this component from the ./src/layouts/Default.vue layout:
<!-- ./src/layouts/Default.vue -->
<!-- ... -->
<script>
import SideMenu from "../components/SideMenu.vue";
// ...
export default {
  components: {
    SiteHeader,
    SiteFooter,
    SideMenu,
  },
  props: {
    showSidebar: {
      type: Boolean,
      default: false,
    },
  },
  // ...
};
</script>
<template>
  <div class="layout">
    <!-- Header & Navigation -->
    <!-- ... -->
    <div class="site-content">
      <div class="wrapper">
        <!-- conditionally render side menu -->
        <SideMenu v-if="showSidebar" />
        <!-- Page Content -->
        <!-- ... -->
      </div>
    </div>
    <!-- ... -->
  </div>
</template>
Now, when we pass the show-sidebar prop the side menu will be rendered.
Display categories on the index page
In our ./src/pages/Index.vue, in order to display the categories we have pulled from Butter in the home page, enter the following:
<page-query>
  query {
    allCategory{
      totalCount
      edges{
        node{
          id
          slug
          name
          published
          updated
          page_type
          fields{
            name
            cover_image
            description
            articles {
              slug
              name
            }
          }
        }
      }
    }
  }
</page-query>
<script>
import CategoryCard from "../components/CategoryCard.vue";
import Search from "../components/Search.vue";
export default {
  metaInfo: {
    title: "Knowledge Base",
  },
  components: {
    CategoryCard,
    Search,
    Search,
  },
};
</script>
<template>
  <Layout>
    <section class="site-section">
      <div class="wrapper">
        <header class="search-header">
          <div class="wrapper">
            <h1 class="search-header__title">How can we help?</h1>
            <Search />
          </div>
        </header>
      </div>
    </section>
    <section class="site-section">
      <div class="wrapper">
        <ul class="category-list">
          <li
            v-for="category in $page.allCategory.edges"
            :key="category.node.id"
            class="category-item"
          >
            <CategoryCard
              :category="{ slug: category.node.slug, ...category.node.fields }"
            />
          </li>
        </ul>
      </div>
    </section>
  </Layout>
</template>
<style scoped>
.search-header > .wrapper {
  @apply flex flex-col gap-6;
}
.search-header__title {
  @apply font-heading font-black text-rhino-800 text-4xl lg:text-5xl;
}
.category-list {
  @apply grid gap-8;
  grid-template-columns: repeat(auto-fit, minmax(20rem, 1fr));
}
</style>
Here, we have a page query that retrieves data from the Data Store in the <page-query> block.
In the <script> section, we import two components: CategoryCard and Search. These components will be used in the template section to display category cards and provide search functionality.
The metaInfo property is used to set the page title as "Knowledge Base" for search engine optimization (SEO) purposes.
In the template, we have an unordered list (<ul>) in the second section with the class "category-list". We iterate over each category retrieved from the page query using v-for, and for each category, we render a CategoryCard component passing the necessary data as props.
With that, we should have something like this:
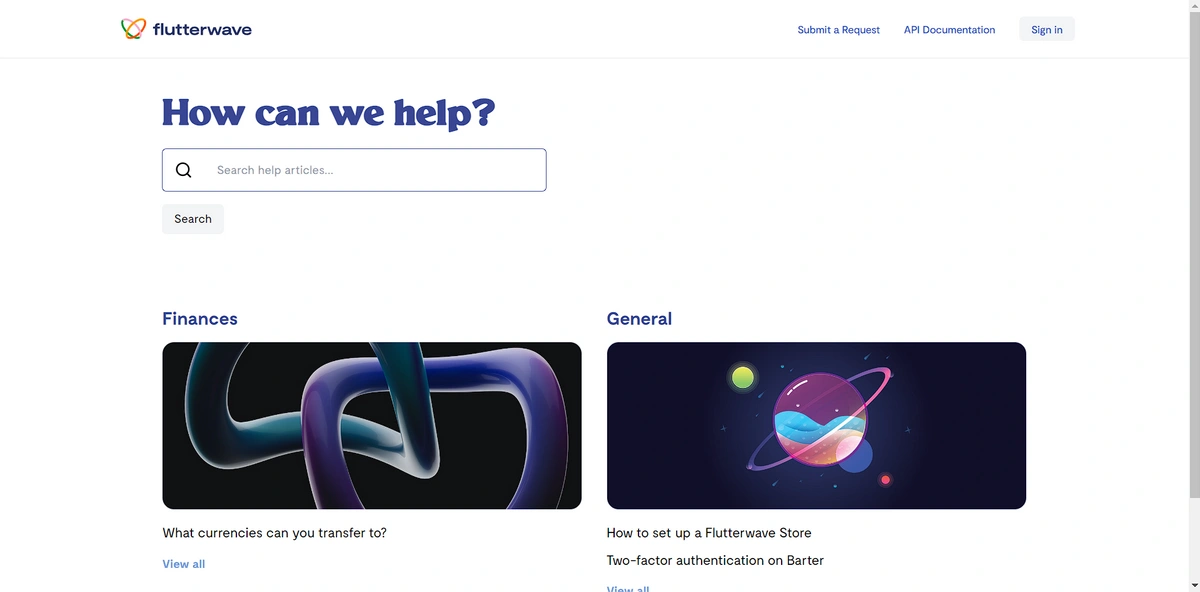
Awesome.
Next, we’ll create our dynamic category and article pages using Gridsome’s managed pages.
Create dynamic category and article pages using managed pages
Managed pages on Gridesome is a feature that allows developers to define templates and queries for fetching data from the specified data sources. The data responses can then be used to generate individual site pages during the build process. With this feature, web pages are scalable and efficient as content can be updated dynamically without manually creating separate data for pages. In our ./gridsome.server.js file, add the following:
// ./gridsome.server.js

//...

module.exports = function(api) {

  //...

  api.createManagedPages(async ({ graphql, createPage }) => {
    const categoriesResponse = await Butter.page.list(
      "flutterwave-kb_category",
      {
        order: "published",
      }
    );

    const categories = await categoriesResponse.data;

    categories.data.forEach((category) => {
      createPage({
        path: `/category/${category.slug}`,
        component: "./src/templates/Category.vue",
        context: {
          ...category,
        },
      });
    });

    const articlesResponse = await Butter.page.list("flutterwave-kb_article", {
      order: "published",
    });

    const data = await articlesResponse.data;

    data.data.forEach((article) => {
      createPage({
        path: `/article/${article.slug}`,
        component: "./src/templates/Article.vue",
        context: {
          ...article,
        },
      });
    });
  });
};
Here, using the ButterCMS API, we fetch a list of categories by calling Butter.page.list with the content type "flutterwave-kb_category". The response is stored in categoriesResponse, and we extract the data using await categoriesResponse.data.
We then iterate through each category using categories.data.forEach and create a page for each category using createPage. We specify the path of the page as /category/${category.slug}, set the component as ./src/templates/Category.vue, and pass the category data as the context object.
Next, we fetch a list of articles from ButterCMS, similar to fetching categories. The content type is "flutterwave-kb_article". We store the response in articlesResponse and extract the data using await articlesResponse.data.
We iterate through each article using data.data.forEach and create a page for each article using createPage. The path is set as /article/${article.slug}, the component is ./src/templates/Article.vue, and the article data is passed as the context object.
By using createManagedPages, we dynamically create pages for each category and article fetched from ButterCMS, allowing us to generate and render the necessary content based on the data received from the CMS during the build process.
Create a category template for dynamic category pages
Next, we will create a new file called ./src/templates/Category.vue. In this file, we will display the categories with the article references from the data response obtained from ButterCMS.
<!-- ./src/templates/Category.vue -->
<template>
<Layout show-sidebar>
<section class="site-section">
<div class="wrapper">
<header class="section-header">
<div class="wrapper">
<h1 class="section-header__caption">
{{ $context.name }}
</h1>
<p class="section-header__description">
{{ $context.fields.description }}
</p>
</div>
</header>
<ul class="article-list">
<li
v-for="(article, i) in $context.fields.articles"
:key="article.slug"
class="article-item"
>
<g-link :to="`/article/${article.slug}`">
{{ article.fields.title }}
</g-link>
</li>
</ul>
</div>
</section>
</Layout>
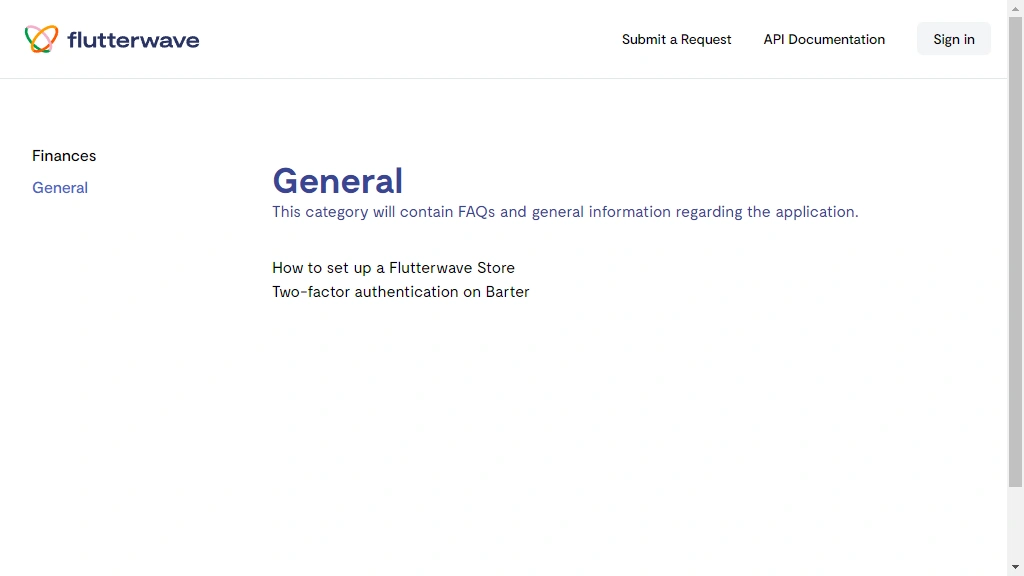
</template>Here, we simply access the data passed to the template when it was created using managed pages using $context and render it. With that, we should have something like this:
Next, we’ll create the template for articles.
Create the article template for dynamic pages
Create a new file called ./src/templates/Article.vue:
<!-- ./src/templates/Article.vue -->
<script>
export default {
  metaInfo() {
    return {
      title: this.$context.fields.seo.title,
      description: this.$context.fields.seo.description,
    };
  },
};
</script>
<template>
  <Layout show-sidebar>
    <article class="article site-section">
      <div class="wrapper">
        <!-- {{ $context }} -->
        <header class="article__header section-header">
          <div class="wrapper">
            <div class="section-header__content">
              <h1 class="section-header__caption">
                {{ $context.fields.title }}
              </h1>
              <p>
                {{ $context.fields.description }}
              </p>
              <span class="section-header__meta-item">
                Published:
                {{
                  new Date($context.published).toLocaleDateString("en-US", {
                    year: "numeric",
                    month: "long",
                    day: "numeric",
                  })
                }}
              </span>
            </div>
          </div>
        </header>
        <div class="article__content prose" v-html="$context.fields.body"></div>
      </div>
    </article>
  </Layout>
</template>
With that, we should have something like this:
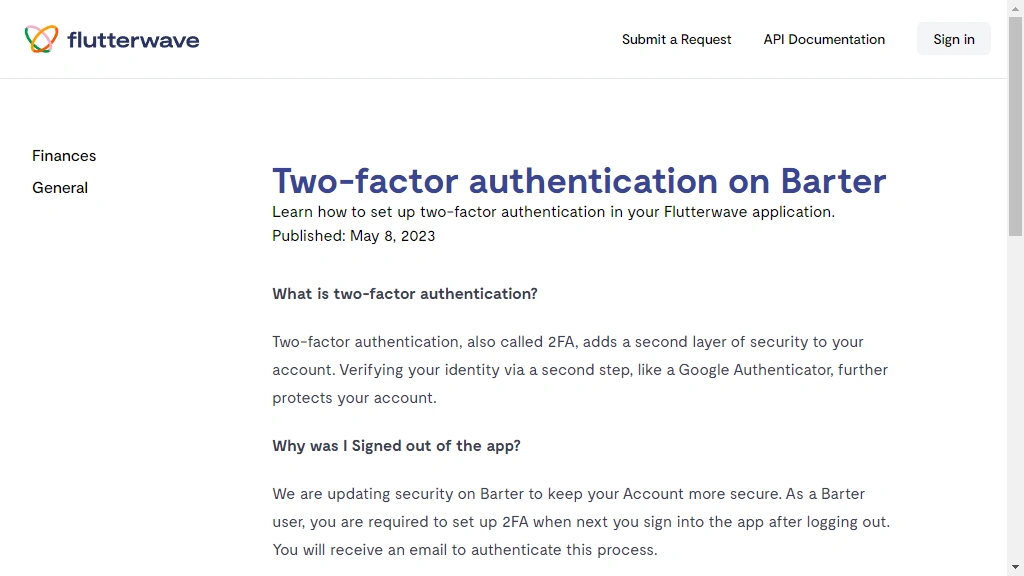
Awesome.
Next, we’ll create our search page.
Create the search page
Since our search component redirects users to the /search route with the query parameter, we’ll create a page that gets the query from the route and makes the search request using butter.page.search.
Create a new file called ./src/pages/Search.vue:
<!-- ./src/pages/Search.vue -->
<script>
import Search from "../components/Search.vue";
// initialize buttercms with grdsome client token
const butter = require("buttercms")(process.env.GRIDSOME_BUTTER_READ_TOKEN);
export default {
  metaInfo: {
    title: "Search",
    description: "Search for articles",
  },
  components: {
    Search,
  },
  data() {
    return {
      articles: [],
    };
  },
  methods: {
    // function to search articles
    async searchArticles(query) {
      const response = await butter.page.search(query, {
        page_type: "flutterwave-kb_article",
        page: 1,
      });
      this.articles = response.data.data;
    },
  },
  // search articles on page load
  async created() {
    await this.searchArticles(this.$route.query.q);
  },
};
</script>
<template>
  <Layout show-sidebar>
    <section class="site-section">
      <div class="wrapper">
        <header class="section-header">
          <div class="wrapper">
            <Search />
          </div>
        </header>
      </div>
    </section>
    <section class="site-section site-section--no-py">
      <div class="wrapper">
        <h2 class="section-header__caption">Results</h2>
        <ul v-if="articles.length" class="article-list">
          <li
            v-for="(article, i) in articles"
            :key="article.slug"
            class="article-item"
          >
            <g-link :to="`/article/${article.slug}`">
              {{ article.fields.title }}
            </g-link>
          </li>
        </ul>
        <p v-else>No results found</p>
      </div>
    </section>
  </Layout>
</template>
<style scoped>
.article-list {
  @apply flex flex-col gap-4 py-6;
}
</style>
Here, we define the searchArticles method that sends a search query to the ButterCMS API for articles of the "flutterwave-kb_article" page type and updates the component's articles data property with the results.
The created lifecycle hook calls the searchArticles method with the query parameter from the current route.
The template for the component includes a Search component and displays the search results in a list of article titles, with each title linking to the article's page. If no results are found, a message is displayed instead.
With this, here is our search functionality in action:
Final results
Congratulations on reaching the end of this Gridsome knowledge base tutorial! By following this guide, you should have successfully set up your Gridsome project, integrated ButterCMS as your content management system, created and structured your knowledge base pages, and built out a functional front-end.
After deploying your Gridsome knowledge base, you have the flexibility to customize the site name to better suit your needs.
To give you a glimpse of the final outcome, here's a GIF showcasing the expected appearance of your Gridsome knowledge base:
Closing thoughts
In conclusion, this Gridsome tutorial has provided a comprehensive guide to building a knowledge base using Gridsome and ButterCMS. By following this tutorial, you have learned the benefits of using Gridsome and ButterCMS for building a knowledge base.
Gridsome's data-driven approach allows you to fetch data from various sources like APIs, CMSs, and markdown files, optimizing it for users. This results in lightning-fast responses without the need for page reloads, enhancing the overall user experience. While ButterCMS, provides you with a straightforward, yet powerful, interface for managing knowledge base content.
That said, this tutorial only scratches the surface of what you can achieve with Gridsome and ButterCMS. There are numerous additional features and possibilities to explore. I encourage you to delve deeper into their documentation and continue expanding your knowledge and skills.
Happy learning and building!

