Table of contents
What is Headless Commerce?
Headless Commerce is the concept of separating your store’s front-end from the e-commerce platform in an effort to better customize the user experience for your customers. By separating the two, you can greatly enhance the performance and user experience for your customers while still utilizing the core features of Shopify that help you sell your products. By going this route, you can integrate a headless CMS with your store to build dynamic, content-rich landing pages and promotional pages that better complement your products.
In this tutorial, we will create a headless Shopify store using The Shopify Storefront API and ButterCMS. Shopify’s Storefront API allows you to add Shopify buying experiences to any website. By integrating ButterCMS with your site, you’ll be able to create unique marketing content such as promotional pages, SEO landing pages, and much more to solidify your brand and improve your business’s performance. We'll show you how to build a simple promotional page:

This tutorial will cover how to use the Shopify Storefront API to create a headless Shopify store integrated with ButterCMS to create promotional pages. We will show you how to build your headless commerce site in-depth, covering the following:
- Create a private Shopify application
- Display store collection products in an Angular application
- Synchronize a collection from ButterCMS, a headless CMS for Shopify, with your Shopify products using Node.js and Express
- Integrate ButterCMS into the storefront by creating and using ButterCMS page types
The full code is available in the GitHub repository https://github.com/ButterCMS/headless-shopify, and a demo is available at https://cranky-galileo-d83d7f.netlify.app/.
Create a private Shopify app
You will need to create a private Shopify app in order to build a headless commerce site with Shopify. This private Shopify app is created by and for your single Shopify store and it cannot be sold in the Shopify marketplace.
To create a private Shopify app, we need to have a store. If you don’t have one yet, you may create a development store using your Shopify partner account.
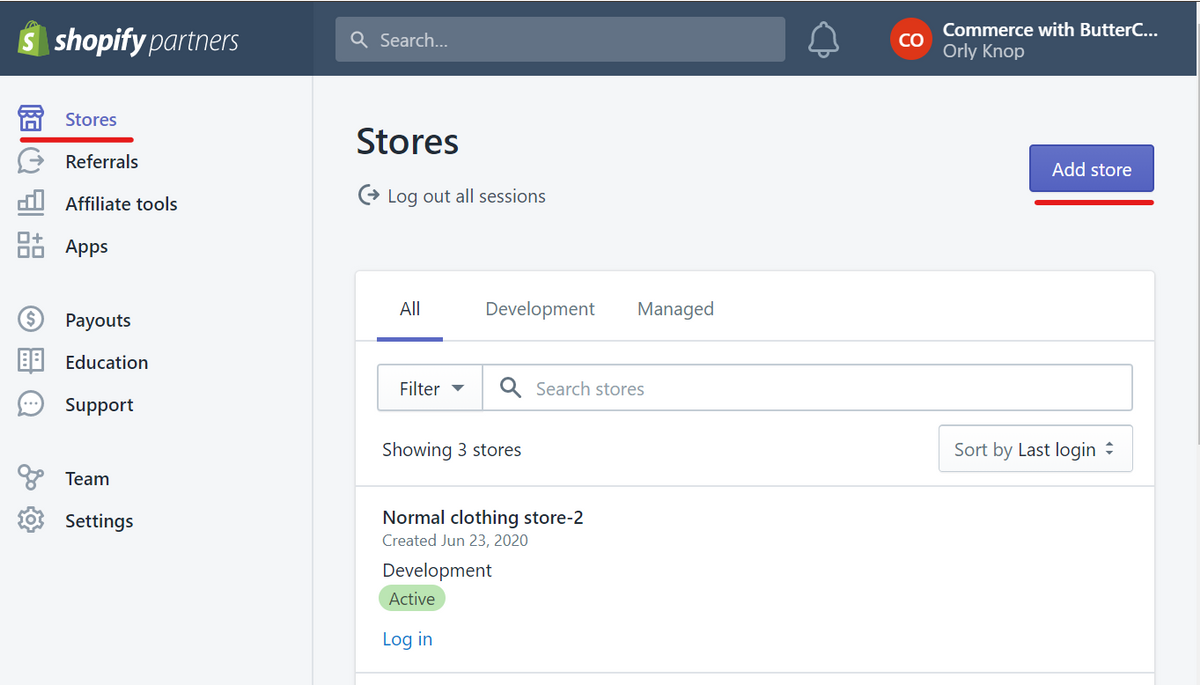
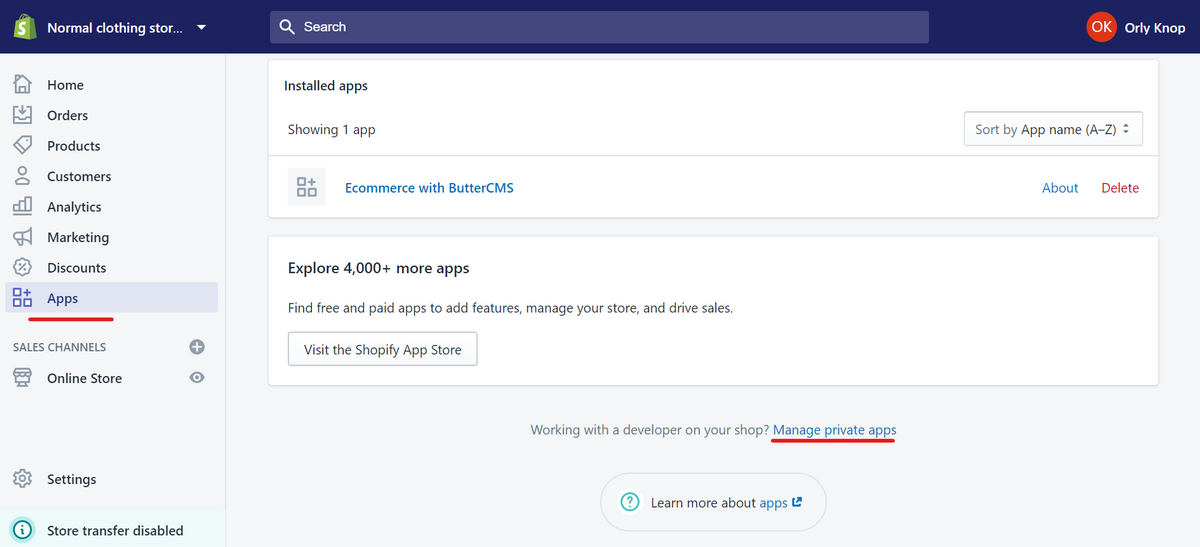
Once the store is created, go to your store’s Apps page and click “Manage private apps”.
Click the “Create new private app” button, and fill the “Private app name” and “Emergency developer email” fields. These are required. In the “Storefront API” section, check the box that says “Allow this app to access your storefront data using the Storefront API”. We will need permissions specified in the first three checkboxes and also “Read and modify checkouts”. Check the checkboxes as shown in the screenshot, click “Save”, and then click “Create App”.

When the app is successfully created, you will see a list of values that might be needed during app development. To use the Shopify Storefront API, we will need a Storefront access token. As noted on our app page, this value is not secret and can be used for our Angular application.
Display store collection products in an Angular application
It’s a good practice to store the Storefront access token and the store URL as environment variables and create a service called, for example, EnvironmentVariablesService, which would return these values.
The Storefront API is available in GraphQL. To make requests to the API from the Angular application, we will use Apollo Angular. Run this command to add Apollo to your app:
ng add apollo-angular
This command will make several changes to the project, including a generation of a module graphql.module.ts. Since we need to add the X-Shopify-Storefront-Access-Token header to requests, and the link for the requests depends on the Shopify store URL, this file should be changed. We will need apollo-link-context, so run this command:
<span style="font-weight: 400;">npm install apollo-link-context </span>
Add EnvironmentVariablesService as a dependency to the APOLLO_OPTIONS provider:
<span style="font-weight: 400;">@NgModule({
</span><span style="font-weight: 400;">  exports: [ApolloModule, HttpLinkModule],</span><span style="font-weight: 400;"></span><span style="font-weight: 400;">
  providers: [</span><span style="font-weight: 400;">
</span><span style="font-weight: 400;">    {</span><span style="font-weight: 400;">
</span><span style="font-weight: 400;">      provide: APOLLO_OPTIONS,</span><span style="font-weight: 400;">
</span><span style="font-weight: 400;">      useFactory: createApollo,</span><span style="font-weight: 400;">
</span><span style="font-weight: 400;">      deps: [HttpLink, EnvironmentVariablesService],</span><span style="font-weight: 400;">
</span><span style="font-weight: 400;">    },</span><span style="font-weight: 400;">
</span><span style="font-weight: 400;">  ],</span><span style="font-weight: 400;">
</span><span style="font-weight: 400;">})</span><span style="font-weight: 400;">
</span><b>export</b> <b>class</b> <b>GraphQLModule</b><span style="font-weight: 400;"> {}</span>
Then, update the createApollo function:
<b>export</b> <b>function</b> <b>createApollo</b><span style="font-weight: 400;">(</span><span style="font-weight: 400;">
</span><span style="font-weight: 400;">  httpLink: HttpLink,</span><span style="font-weight: 400;">
</span><span style="font-weight: 400;">  environmentVariablesService: EnvironmentVariablesService</span><span style="font-weight: 400;">
</span><span style="font-weight: 400;">): {</span><span style="font-weight: 400;">
</span><span style="font-weight: 400;">  link: ApolloLink;</span><span style="font-weight: 400;">
</span><span style="font-weight: 400;">  cache: InMemoryCache;</span><span style="font-weight: 400;">
</span><span style="font-weight: 400;">} {</span><span style="font-weight: 400;">
</span><span style="font-weight: 400;">  </span><b>const</b><span style="font-weight: 400;"> uri = </span><span style="font-weight: 400;">`</span><span style="font-weight: 400;">${environmentVariablesService.storeUrl}</span><span style="font-weight: 400;">/api/graphql.json`</span><span style="font-weight: 400;">;</span><span style="font-weight: 400;">
</span><span style="font-weight: 400;">  </span><b>const</b><span style="font-weight: 400;"> headers = setContext((operation, context) => ({</span><span style="font-weight: 400;">
</span><span style="font-weight: 400;">    headers: {</span><span style="font-weight: 400;">
</span><span style="font-weight: 400;">      </span><span style="font-weight: 400;">'X-Shopify-Storefront-Access-Token'</span><span style="font-weight: 400;">:</span><span style="font-weight: 400;">
</span><span style="font-weight: 400;">        environmentVariablesService.storeFrontToken,</span><span style="font-weight: 400;">
</span><span style="font-weight: 400;">    },</span><span style="font-weight: 400;">
</span><span style="font-weight: 400;">  }));</span><span style="font-weight: 400;">
</span><span style="font-weight: 400;">
</span><span style="font-weight: 400;">  </span><b>const</b><span style="font-weight: 400;"> link = ApolloLink.from([headers, httpLink.create({ uri })]);</span><span style="font-weight: 400;">
</span><span style="font-weight: 400;">  </span><b>const</b><span style="font-weight: 400;"> cache = </span><b>new</b><span style="font-weight: 400;"> InMemoryCache();</span><span style="font-weight: 400;">
</span><span style="font-weight: 400;">
</span><span style="font-weight: 400;">  </span><b>return</b><span style="font-weight: 400;"> {</span><span style="font-weight: 400;">
</span><span style="font-weight: 400;">    link,</span><span style="font-weight: 400;">
</span><span style="font-weight: 400;">    cache,</span><span style="font-weight: 400;">
</span><span style="font-weight: 400;">  };</span><span style="font-weight: 400;">
</span><span style="font-weight: 400;">}</span>
By making this change, we added an X-Shopify-Storefront-Access-Token header to requests and set the request URL as `${environmentVariablesService.storeUrl}/api/graphql.json`
Create ShopifyService with Apollo as a dependency, and add a new method getProducts:
<b>// shopify.service.ts</b>
<span style="font-weight: 400;"></span>

<span style="font-weight: 400;"></span><span style="font-weight: 400;">getProducts(</span><span style="font-weight: 400;">
</span><span style="font-weight: 400;">  collectionHandle: string</span><span style="font-weight: 400;">
</span><span style="font-weight: 400;">): Observable<ApolloQueryResult<CollectionProducts>> {</span><span style="font-weight: 400;">
</span><span style="font-weight: 400;">  </span><b>return</b> <b>this</b><span style="font-weight: 400;">.apollo.query<CollectionProducts>({</span><span style="font-weight: 400;">
</span><span style="font-weight: 400;">    query: gql</span><span style="font-weight: 400;">`</span><span style="font-weight: 400;">
</span><span style="font-weight: 400;">      {</span><span style="font-weight: 400;">
</span><span style="font-weight: 400;">        collectionByHandle(handle: "</span><span style="font-weight: 400;">${collectionHandle}</span><span style="font-weight: 400;">") {</span><span style="font-weight: 400;">
</span><span style="font-weight: 400;">          products(first: 10) {</span><span style="font-weight: 400;">
</span><span style="font-weight: 400;">            edges {</span><span style="font-weight: 400;">
</span><span style="font-weight: 400;">              node {</span><span style="font-weight: 400;">
</span><span style="font-weight: 400;">                id</span><span style="font-weight: 400;">
</span><span style="font-weight: 400;">                title</span><span style="font-weight: 400;">
</span><span style="font-weight: 400;">                description</span><span style="font-weight: 400;">
</span><span style="font-weight: 400;">                handle</span><span style="font-weight: 400;">
</span><span style="font-weight: 400;">              }</span><span style="font-weight: 400;">
</span><span style="font-weight: 400;">            }</span><span style="font-weight: 400;">
</span><span style="font-weight: 400;">          }</span><span style="font-weight: 400;">
</span><span style="font-weight: 400;">        }</span><span style="font-weight: 400;">
</span><span style="font-weight: 400;">      }</span><span style="font-weight: 400;">
</span><span style="font-weight: 400;">    `</span><span style="font-weight: 400;">,</span><span style="font-weight: 400;">
</span><span style="font-weight: 400;">  });</span><span style="font-weight: 400;">
</span><span style="font-weight: 400;">}</span>
In this method, we only retrieve the first 10 collection products. If you want to get all products and don’t know how to do that, read this Shopify Community question. The API provides more product properties such as images, prices, etc.
Create a component to display the products:
<span style="font-weight: 400;">@Component({</span><span style="font-weight: 400;">
</span><span style="font-weight: 400;">  selector: </span><span style="font-weight: 400;">'product-products'</span><span style="font-weight: 400;">,</span><span style="font-weight: 400;">
</span><span style="font-weight: 400;">  templateUrl: </span><span style="font-weight: 400;">'./products.component.html'</span><span style="font-weight: 400;">,</span><span style="font-weight: 400;">
</span><span style="font-weight: 400;">  styleUrls: [</span><span style="font-weight: 400;">'./products.component.scss'</span><span style="font-weight: 400;">],</span><span style="font-weight: 400;">
</span><span style="font-weight: 400;">})</span><span style="font-weight: 400;">
</span><b>export</b> <b>class</b> <b>ProductsComponent</b> <b>implements</b> <b>OnInit</b><span style="font-weight: 400;"> {</span><span style="font-weight: 400;">
</span><span style="font-weight: 400;">  products: Observable<ApolloQueryResult<Products>>;</span><span style="font-weight: 400;">
</span><span style="font-weight: 400;">
</span><span style="font-weight: 400;">  </span><b>constructor</b><span style="font-weight: 400;">(private shopifyService: ShopifyService) {}</span><span style="font-weight: 400;">
</span><span style="font-weight: 400;">
</span><span style="font-weight: 400;">  ngOnInit(): </span><b>void</b><span style="font-weight: 400;"> {</span><span style="font-weight: 400;">
</span><span style="font-weight: 400;">    </span><b>this</b><span style="font-weight: 400;">.products = </span><b>this</b><span style="font-weight: 400;">.shopifyService.getAllProducts();</span><span style="font-weight: 400;">
</span><span style="font-weight: 400;">  }</span><span style="font-weight: 400;">
</span><span style="font-weight: 400;">}</span>
In the component template, products can be displayed by iterating through the (products | async)?.data.products.edges value.
Headless Shopify: Synchronizing Shopify products with a ButterCMS collection
A great looking promotional page will entice customers to view products from your store, therefore linking to specific products tied to the theme of your promotional page is a basic requirement. Shopify has webhooks that are sent every time a product is created or updated. Since we want to store products’ images in a ButterCMS collection, we should use a webhook for product update events. Webhooks for product creation events might not contain the image because it takes longer for the image data to process than it does for the webhook to fire (more info here).
We should decide which product data to store in our collection. The full list of data provided by the webhook is available here. When our route for the webhook is requested, we should verify that it was sent by our Shopify store. This can be done by using shopify-hmac-validation. Verification requires a raw body value, so we should take this into account when creating the route.
If the request is from the store, we should create a new item in the ButterCMS collection by making a POST request to https://api.buttercms.com/v2/content/. We need a write-enabled token to make this request. This token should be kept secret, so store it in the .env file.
Create a collection for store products in ButterCMS
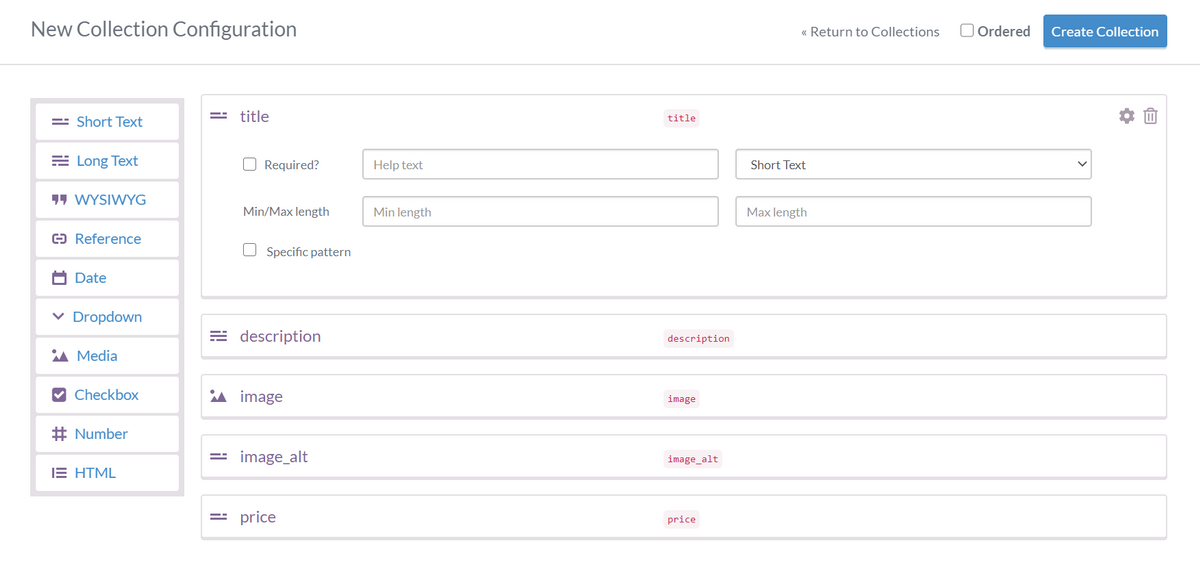
Go to https://buttercms.com/content/collections/create and create a collection with item elements, as shown in the screenshot.
Create a webhook for the headless Shopify store
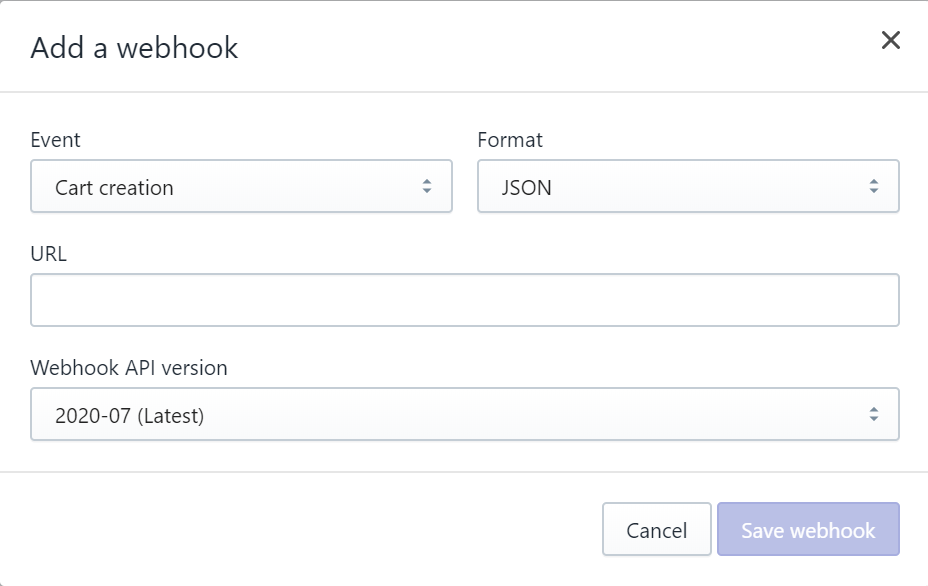
Go to your Shopify store settings and click on “Notifications”.
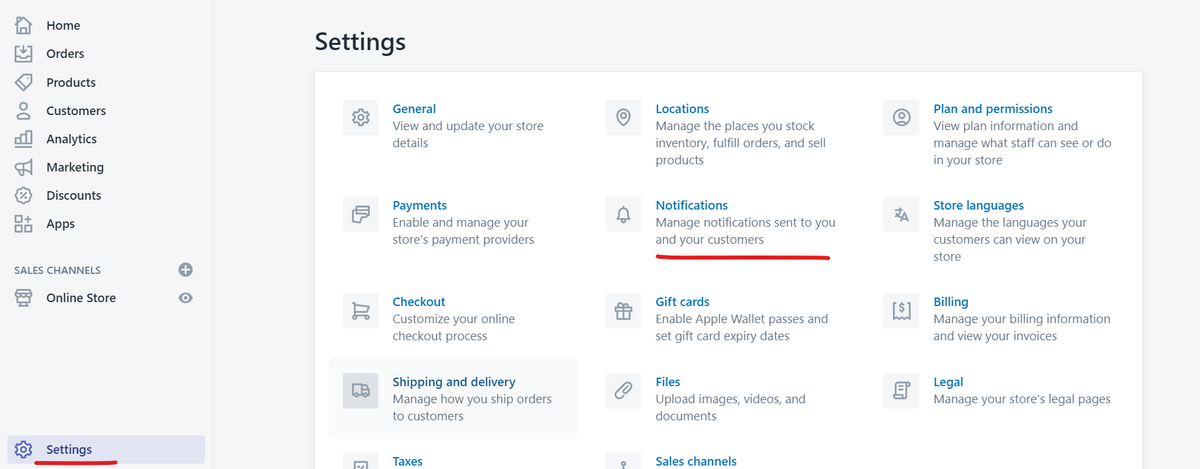
In the webhooks section, click “Create webhook” and in the form, select the event “Product update.” Type in the route for the webhook you want to use and click “Save webhook”. For development, use ngrok to create a tunnel for localhost. When you create your first webhook, you’ll see a note saying “All your webhooks will be signed with XXXXXXX so you can verify their integrity.” Save this value in the .env file as WEBHOOK_SECRET.
Create a route for the created webhook
We will create a server using Node.js and Express. Add the name of the collection you created for the products list to the .env file as the variable
PRODUCTS_COLLECTION_NAME.
We want our product collection to contain the product price. Since products may have variants with different prices, we could make the price be a certain number or have a range, like “from 10 USD”, depending on the variants’ prices. We can calculate the minimum price by going through variants’ prices or by querying the Shopify Storefront API. In this tutorial, we will query the API.
Install packages for the server by running this:
<span style="font-weight: 400;">npm install express body-parser shopify-hmac-validation request-promise graphql-request</span>When this article was written, the latest version of graphql-request caused an error when a request was made. So I used graphql-request@^1.8.2 instead.
Create a file named server.js and copy and paste the following code:
<i><span style="font-weight: 400;">// server.js</span></i><span style="font-weight: 400;">
</span><span style="font-weight: 400;">
</span><b>const</b><span style="font-weight: 400;"> express = </span><span style="font-weight: 400;">require</span><span style="font-weight: 400;">(</span><span style="font-weight: 400;">"express"</span><span style="font-weight: 400;">);</span><span style="font-weight: 400;">
</span><b>const</b><span style="font-weight: 400;"> bodyParser = </span><span style="font-weight: 400;">require</span><span style="font-weight: 400;">(</span><span style="font-weight: 400;">"body-parser"</span><span style="font-weight: 400;">);</span><span style="font-weight: 400;">
</span><b>const</b><span style="font-weight: 400;"> hmacValidity = </span><span style="font-weight: 400;">require</span><span style="font-weight: 400;">(</span><span style="font-weight: 400;">"shopify-hmac-validation"</span><span style="font-weight: 400;">);</span><span style="font-weight: 400;">
</span><span style="font-weight: 400;">
</span><b>const</b><span style="font-weight: 400;"> { ButterCMSService } = </span><span style="font-weight: 400;">require</span><span style="font-weight: 400;">(</span><span style="font-weight: 400;">"./butter-cms-service"</span><span style="font-weight: 400;">);</span><span style="font-weight: 400;">
</span><b>const</b><span style="font-weight: 400;"> { ShopifyService } = </span><span style="font-weight: 400;">require</span><span style="font-weight: 400;">(</span><span style="font-weight: 400;">"./shopify-service"</span><span style="font-weight: 400;">);</span><span style="font-weight: 400;">
</span><span style="font-weight: 400;">
</span><b>const</b><span style="font-weight: 400;"> app = express();</span><span style="font-weight: 400;">
</span><b>const</b><span style="font-weight: 400;"> apiRoute = </span><span style="font-weight: 400;">""</span><span style="font-weight: 400;">;</span><span style="font-weight: 400;">
</span><b>const</b><span style="font-weight: 400;"> butterCMSService = </span><b>new</b><span style="font-weight: 400;"> ButterCMSService();</span><span style="font-weight: 400;">
</span><b>const</b><span style="font-weight: 400;"> shopifyService = </span><b>new</b><span style="font-weight: 400;"> ShopifyService();</span><span style="font-weight: 400;">
</span><span style="font-weight: 400;">
</span><b>function</b> <b>rawBodySaver</b><span style="font-weight: 400;">(req, res, buf, encoding) {</span><span style="font-weight: 400;">
</span><span style="font-weight: 400;">  </span><b>if</b><span style="font-weight: 400;"> (buf && buf.length) {</span><span style="font-weight: 400;">
</span><span style="font-weight: 400;">    req.rawBody = buf.toString(encoding || </span><span style="font-weight: 400;">"utf8"</span><span style="font-weight: 400;">);</span><span style="font-weight: 400;">
</span><span style="font-weight: 400;">  }</span><span style="font-weight: 400;">
</span><span style="font-weight: 400;">}</span><span style="font-weight: 400;">
</span><span style="font-weight: 400;">
</span><b>function</b> <b>verifyWebhookRequest</b><span style="font-weight: 400;">(req, res, next) {</span><span style="font-weight: 400;">
</span><span style="font-weight: 400;">  </span><b>try</b><span style="font-weight: 400;"> {</span><span style="font-weight: 400;">
</span><span style="font-weight: 400;">    </span><b>if</b><span style="font-weight: 400;"> (</span><span style="font-weight: 400;">
</span><span style="font-weight: 400;">      !hmacValidity.checkWebhookHmacValidity(</span><span style="font-weight: 400;">
</span><span style="font-weight: 400;">        process.env.WEBHOOK_SECRET,</span><span style="font-weight: 400;">
</span><span style="font-weight: 400;">        req.rawBody,</span><span style="font-weight: 400;">
</span><span style="font-weight: 400;">        req.headers[</span><span style="font-weight: 400;">"x-shopify-hmac-sha256"</span><span style="font-weight: 400;">]</span><span style="font-weight: 400;">
</span><span style="font-weight: 400;">      )</span><span style="font-weight: 400;">
</span><span style="font-weight: 400;">    ) {</span><span style="font-weight: 400;">
</span><span style="font-weight: 400;">      </span><b>throw</b> <span style="font-weight: 400;">Error</span><span style="font-weight: 400;">(</span><span style="font-weight: 400;">"Unauthorized request"</span><span style="font-weight: 400;">);</span><span style="font-weight: 400;">
</span><span style="font-weight: 400;">    }</span><span style="font-weight: 400;">
</span><span style="font-weight: 400;">    </span><b>return</b><span style="font-weight: 400;"> next();</span><span style="font-weight: 400;">
</span><span style="font-weight: 400;">  } </span><b>catch</b><span style="font-weight: 400;"> (e) {</span><span style="font-weight: 400;">
</span><span style="font-weight: 400;">    </span><span style="font-weight: 400;">console</span><span style="font-weight: 400;">.log(e);</span><span style="font-weight: 400;">
</span><span style="font-weight: 400;">    </span><b>return</b><span style="font-weight: 400;"> res.status(</span><span style="font-weight: 400;">401</span><span style="font-weight: 400;">).json({ message: </span><span style="font-weight: 400;">"Unauthorized request"</span><span style="font-weight: 400;"> });</span><span style="font-weight: 400;">
</span><span style="font-weight: 400;">  }</span><span style="font-weight: 400;">
</span><span style="font-weight: 400;">}</span><span style="font-weight: 400;">
</span><span style="font-weight: 400;">
</span><span style="font-weight: 400;">app.use(</span><span style="font-weight: 400;">
</span><span style="font-weight: 400;">  </span><span style="font-weight: 400;">`</span><span style="font-weight: 400;">${apiRoute}</span><span style="font-weight: 400;">/webhooks/product-update`</span><span style="font-weight: 400;">,</span><span style="font-weight: 400;">
</span><span style="font-weight: 400;">  bodyParser.json({ verify: rawBodySaver })</span><span style="font-weight: 400;">
</span><span style="font-weight: 400;">);</span><span style="font-weight: 400;">
</span><span style="font-weight: 400;">
</span><span style="font-weight: 400;">app.use(bodyParser.urlencoded({ extended: </span><span style="font-weight: 400;">true</span><span style="font-weight: 400;"> }));</span><span style="font-weight: 400;">
</span><span style="font-weight: 400;">app.use(bodyParser.json());</span><span style="font-weight: 400;">
</span><span style="font-weight: 400;">
</span><b>const</b><span style="font-weight: 400;"> router = express.Router();</span><span style="font-weight: 400;">
</span><span style="font-weight: 400;">
</span><span style="font-weight: 400;">router.post(</span><span style="font-weight: 400;">
</span><span style="font-weight: 400;">  </span><span style="font-weight: 400;">"/webhooks/product-update"</span><span style="font-weight: 400;">,</span><span style="font-weight: 400;">
</span><span style="font-weight: 400;">  verifyWebhookRequest,</span><span style="font-weight: 400;">
</span><span style="font-weight: 400;">  </span><b>async</b><span style="font-weight: 400;"> (req, res) => {</span><span style="font-weight: 400;">
</span><span style="font-weight: 400;">    </span><b>try</b><span style="font-weight: 400;"> {</span><span style="font-weight: 400;">
</span><span style="font-weight: 400;">      </span><b>const</b><span style="font-weight: 400;"> priceRange = </span><b>await</b><span style="font-weight: 400;"> shopifyService.getProductPriceRange(</span><span style="font-weight: 400;">
</span><span style="font-weight: 400;">        req.body.handle</span><span style="font-weight: 400;">
</span><span style="font-weight: 400;">      );</span><span style="font-weight: 400;">
</span><span style="font-weight: 400;">      </span><b>const</b><span style="font-weight: 400;"> price = </span><span style="font-weight: 400;">`</span><span style="font-weight: 400;">${</span><span style="font-weight: 400;">
</span><span style="font-weight: 400;">        priceRange.minVariantPrice.amount != priceRange.maxVariantPrice.amount</span><span style="font-weight: 400;">
</span><span style="font-weight: 400;">          ? </span><span style="font-weight: 400;">"from "</span><span style="font-weight: 400;">
</span><span style="font-weight: 400;">          : </span><span style="font-weight: 400;">""</span><span style="font-weight: 400;">
</span><span style="font-weight: 400;">      }</span> <span style="font-weight: 400;">${priceRange.minVariantPrice.amount}</span> <span style="font-weight: 400;">${</span><span style="font-weight: 400;">
</span><span style="font-weight: 400;">        priceRange.minVariantPrice.currencyCode</span><span style="font-weight: 400;">
</span><span style="font-weight: 400;">      }</span><span style="font-weight: 400;">`</span><span style="font-weight: 400;">;</span><span style="font-weight: 400;">
</span><span style="font-weight: 400;">      </span><b>await</b><span style="font-weight: 400;"> butterCMSService.addItemToCollection(</span><span style="font-weight: 400;">
</span><span style="font-weight: 400;">        process.env.PRODUCTS_COLLECTION_NAME,</span><span style="font-weight: 400;">
</span><span style="font-weight: 400;">        {</span><span style="font-weight: 400;">
</span><span style="font-weight: 400;">          title: req.body.title,</span><span style="font-weight: 400;">
</span><span style="font-weight: 400;">          image: req.body.image ? req.body.image.src : </span><span style="font-weight: 400;">""</span><span style="font-weight: 400;">,</span><span style="font-weight: 400;">
</span><span style="font-weight: 400;">          description: req.body.body_html,</span><span style="font-weight: 400;">
</span><span style="font-weight: 400;">          image_alt: req.body.title,</span><span style="font-weight: 400;">
</span><span style="font-weight: 400;">          price,</span><span style="font-weight: 400;">
</span><span style="font-weight: 400;">        }</span><span style="font-weight: 400;">
</span><span style="font-weight: 400;">      );</span><span style="font-weight: 400;">
</span><span style="font-weight: 400;">      </span><b>return</b><span style="font-weight: 400;"> res</span><span style="font-weight: 400;">
</span><span style="font-weight: 400;">        .status(</span><span style="font-weight: 400;">200</span><span style="font-weight: 400;">)</span><span style="font-weight: 400;">
</span><span style="font-weight: 400;">        .json({ message: </span><span style="font-weight: 400;">"Product has been added to collection"</span><span style="font-weight: 400;"> });</span><span style="font-weight: 400;">
</span><span style="font-weight: 400;">    } </span><b>catch</b><span style="font-weight: 400;"> (error) {</span><span style="font-weight: 400;">
</span><span style="font-weight: 400;">      </span><span style="font-weight: 400;">console</span><span style="font-weight: 400;">.log(error);</span><span style="font-weight: 400;">
</span><span style="font-weight: 400;">      </span><b>return</b><span style="font-weight: 400;"> res.status(</span><span style="font-weight: 400;">400</span><span style="font-weight: 400;">).json({ message: </span><span style="font-weight: 400;">"Server error"</span><span style="font-weight: 400;"> });</span><span style="font-weight: 400;">
</span><span style="font-weight: 400;">    }</span><span style="font-weight: 400;">
</span><span style="font-weight: 400;">  }</span><span style="font-weight: 400;">
</span><span style="font-weight: 400;">);</span><span style="font-weight: 400;">
</span><span style="font-weight: 400;">
</span><span style="font-weight: 400;">app.use(apiRoute, router);</span><span style="font-weight: 400;">
</span><span style="font-weight: 400;">
</span><b>const</b><span style="font-weight: 400;"> port = process.PORT || </span><span style="font-weight: 400;">3000</span><span style="font-weight: 400;">;</span><span style="font-weight: 400;">
</span><span style="font-weight: 400;">app.listen(port, () => </span><span style="font-weight: 400;">console</span><span style="font-weight: 400;">.log(</span><span style="font-weight: 400;">`Local app listening on port </span><span style="font-weight: 400;">${port}</span><span style="font-weight: 400;">`</span><span style="font-weight: 400;">));</span>
Note that the addItemToCollection method requires an object with properties that match the collection item structure.
Add your ButterCMS write-enabled token to the .env file as the variable BUTTER_CMS_TOKEN, and create butter-cms-service.js in the same directory as server.js with the following content:
<i><span style="font-weight: 400;">// butter-cms-service.js</span></i><span style="font-weight: 400;">
</span><span style="font-weight: 400;">
</span><b>const</b><span style="font-weight: 400;"> requestPromise = </span><span style="font-weight: 400;">require</span><span style="font-weight: 400;">(</span><span style="font-weight: 400;">"request-promise"</span><span style="font-weight: 400;">);</span><span style="font-weight: 400;">
</span><span style="font-weight: 400;">
</span><b>class</b> <b>ButterCMSService</b><span style="font-weight: 400;"> {</span><span style="font-weight: 400;">
</span><span style="font-weight: 400;">  </span><b>async</b><span style="font-weight: 400;"> addItemToCollection(collectionName, item) {</span><span style="font-weight: 400;">
</span><span style="font-weight: 400;">    </span><b>const</b><span style="font-weight: 400;"> writeToken = process.env.BUTTER_CMS_TOKEN;</span><span style="font-weight: 400;">
</span><span style="font-weight: 400;">    </span><b>if</b><span style="font-weight: 400;"> (!writeToken) {</span><span style="font-weight: 400;">
</span><span style="font-weight: 400;">      </span><b>return</b> <span style="font-weight: 400;">Promise</span><span style="font-weight: 400;">.reject(</span><span style="font-weight: 400;">Error</span><span style="font-weight: 400;">(</span><span style="font-weight: 400;">"No write-enabled token configured"</span><span style="font-weight: 400;">));</span><span style="font-weight: 400;">
</span><span style="font-weight: 400;">    }</span><span style="font-weight: 400;">
</span><span style="font-weight: 400;">    </span><b>const</b><span style="font-weight: 400;"> body = {</span><span style="font-weight: 400;">
</span><span style="font-weight: 400;">      key: collectionName,</span><span style="font-weight: 400;">
</span><span style="font-weight: 400;">      status: </span><span style="font-weight: 400;">"published"</span><span style="font-weight: 400;">,</span><span style="font-weight: 400;">
</span><span style="font-weight: 400;">      fields: [</span><span style="font-weight: 400;">
</span><span style="font-weight: 400;">        {</span><span style="font-weight: 400;">
</span><span style="font-weight: 400;">          en: item,</span><span style="font-weight: 400;">
</span><span style="font-weight: 400;">        },</span><span style="font-weight: 400;">
</span><span style="font-weight: 400;">      ],</span><span style="font-weight: 400;">
</span><span style="font-weight: 400;">    };</span><span style="font-weight: 400;">
</span><span style="font-weight: 400;">    </span><b>const</b><span style="font-weight: 400;"> options = {</span><span style="font-weight: 400;">
</span><span style="font-weight: 400;">      method: </span><span style="font-weight: 400;">"POST"</span><span style="font-weight: 400;">,</span><span style="font-weight: 400;">
</span><span style="font-weight: 400;">      uri: </span><span style="font-weight: 400;">"https://api.buttercms.com/v2/content/"</span><span style="font-weight: 400;">,</span><span style="font-weight: 400;">
</span><span style="font-weight: 400;">      body,</span><span style="font-weight: 400;">
</span><span style="font-weight: 400;">      json: </span><span style="font-weight: 400;">true</span><span style="font-weight: 400;">,</span><span style="font-weight: 400;">
</span><span style="font-weight: 400;">      headers: {</span><span style="font-weight: 400;">
</span><span style="font-weight: 400;">        authorization: </span><span style="font-weight: 400;">`Token </span><span style="font-weight: 400;">${writeToken}</span><span style="font-weight: 400;">`</span><span style="font-weight: 400;">,</span><span style="font-weight: 400;">
</span><span style="font-weight: 400;">      },</span><span style="font-weight: 400;">
</span><span style="font-weight: 400;">    };</span><span style="font-weight: 400;">
</span><span style="font-weight: 400;">    </span><b>return</b><span style="font-weight: 400;"> requestPromise(options);</span><span style="font-weight: 400;">
</span><span style="font-weight: 400;">  }</span><span style="font-weight: 400;">
</span><span style="font-weight: 400;">}</span><span style="font-weight: 400;">
</span><span style="font-weight: 400;">
</span><span style="font-weight: 400;">module</span><span style="font-weight: 400;">.exports = { ButterCMSService };</span>
Add an environment variable named SHOP_URL with the store’s URL and APP_TOKEN with the value of the Storefront access token. Create shopify-service.js in the same directory as server.js with this code:
<i><span style="font-weight: 400;">// shopify-service.js</span></i><span style="font-weight: 400;">
</span><span style="font-weight: 400;">
</span><b>const</b><span style="font-weight: 400;"> { GraphQLClient } = </span><span style="font-weight: 400;">require</span><span style="font-weight: 400;">(</span><span style="font-weight: 400;">"graphql-request"</span><span style="font-weight: 400;">);</span><span style="font-weight: 400;">
</span><span style="font-weight: 400;">
</span><b>class</b> <b>ShopifyService</b><span style="font-weight: 400;"> {</span><span style="font-weight: 400;">
</span><span style="font-weight: 400;">  </span><b>constructor</b><span style="font-weight: 400;">() {</span><span style="font-weight: 400;">
</span><span style="font-weight: 400;">    </span><b>const</b><span style="font-weight: 400;"> endpoint = </span><span style="font-weight: 400;">`</span><span style="font-weight: 400;">${process.env.SHOP_URL}</span><span style="font-weight: 400;">/api/graphql.json`</span><span style="font-weight: 400;">;</span><span style="font-weight: 400;">
</span><span style="font-weight: 400;">
</span><span style="font-weight: 400;">    </span><b>this</b><span style="font-weight: 400;">.graphQLClient = </span><b>new</b><span style="font-weight: 400;"> GraphQLClient(endpoint, {</span><span style="font-weight: 400;">
</span><span style="font-weight: 400;">      headers: {</span><span style="font-weight: 400;">
</span><span style="font-weight: 400;">        </span><span style="font-weight: 400;">"X-Shopify-Storefront-Access-Token"</span><span style="font-weight: 400;">: process.env.APP_TOKEN,</span><span style="font-weight: 400;">
</span><span style="font-weight: 400;">      },</span><span style="font-weight: 400;">
</span><span style="font-weight: 400;">    });</span><span style="font-weight: 400;">
</span><span style="font-weight: 400;">  }</span><span style="font-weight: 400;">
</span><span style="font-weight: 400;">
</span><span style="font-weight: 400;">  </span><b>async</b><span style="font-weight: 400;"> getProductPriceRange(productHandle) {</span><span style="font-weight: 400;">
</span><span style="font-weight: 400;">    </span><b>const</b><span style="font-weight: 400;"> query = </span><span style="font-weight: 400;">`{</span><span style="font-weight: 400;">
</span><span style="font-weight: 400;">      productByHandle(handle: "</span><span style="font-weight: 400;">${productHandle}</span><span style="font-weight: 400;">") {</span><span style="font-weight: 400;">
</span><span style="font-weight: 400;">        priceRange {</span><span style="font-weight: 400;">
</span><span style="font-weight: 400;">          minVariantPrice {</span><span style="font-weight: 400;">
</span><span style="font-weight: 400;">            amount</span><span style="font-weight: 400;">
</span><span style="font-weight: 400;">            currencyCode</span><span style="font-weight: 400;">
</span><span style="font-weight: 400;">          }</span><span style="font-weight: 400;">
</span><span style="font-weight: 400;">          maxVariantPrice {</span><span style="font-weight: 400;">
</span><span style="font-weight: 400;">            amount</span><span style="font-weight: 400;">
</span><span style="font-weight: 400;">            currencyCode</span><span style="font-weight: 400;">
</span><span style="font-weight: 400;">          }</span><span style="font-weight: 400;">
</span><span style="font-weight: 400;">        }</span><span style="font-weight: 400;">
</span><span style="font-weight: 400;">      }</span><span style="font-weight: 400;">
</span><span style="font-weight: 400;">    }`</span><span style="font-weight: 400;">;</span><span style="font-weight: 400;">
</span><span style="font-weight: 400;">    </span><b>const</b><span style="font-weight: 400;"> response = </span><b>await</b> <b>this</b><span style="font-weight: 400;">.graphQLClient.request(query);</span><span style="font-weight: 400;">
</span><span style="font-weight: 400;">    </span><b>if</b><span style="font-weight: 400;"> (response.errors) {</span><span style="font-weight: 400;">
</span><span style="font-weight: 400;">      </span><b>throw</b><span style="font-weight: 400;"> response.error;</span><span style="font-weight: 400;">
</span><span style="font-weight: 400;">    }</span><span style="font-weight: 400;">
</span><span style="font-weight: 400;">    </span><b>return</b><span style="font-weight: 400;"> response.productByHandle.priceRange;</span><span style="font-weight: 400;">
</span><span style="font-weight: 400;">  }</span><span style="font-weight: 400;">
</span><span style="font-weight: 400;">}</span><span style="font-weight: 400;">
</span><span style="font-weight: 400;">
</span><span style="font-weight: 400;">module</span><span style="font-weight: 400;">.exports = { ShopifyService };</span>
To verify that the created webhook works, either click “Send test notification” on the page where we created the webhook in the store, or update any of your products. After several seconds, a new item containing updated product information should be added to your collection.
Integrate ButterCMS pages into your headless Shopify store
We want to easily create promotional pages for our custom storefront: when a page is published in ButterCMS, this page should be available from our store. To do this we need to create in the custom Shopify store a route pages/{slug}, where {slug} is a slug of the ButterCMS page. When a user goes to this route, we need to fetch the page content from ButterCMS and display it. The page content is defined by the promotional page type structure.
Create a ButterCMS page type
We want the page type to have a list of products that are stored in the created products collection. To create a new Page Type, we should go to https://buttercms.com/pages/, click the “New page” button, and then click “Create new page”. You will be redirected to a new page where you can build a page.
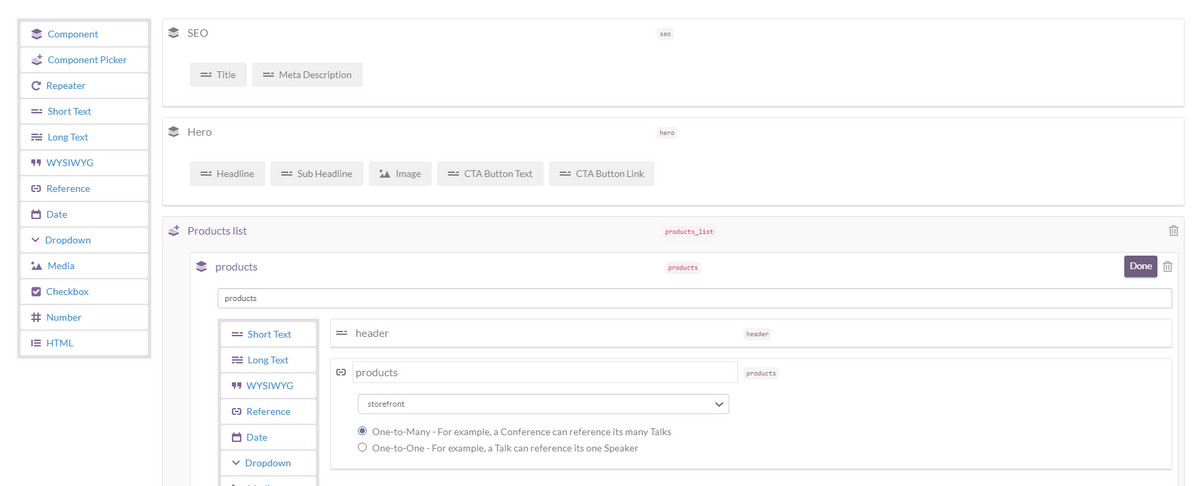
Click “Component” and a new block should appear. Click “Add from Library” and select “SEO” in the list. Add another component named Hero. Add a Short Text element to the Hero component and name it “Image alt”. Then create a custom component “Products” by clicking “Component” and “Create component”. Add a Short Text element named “Header” and a Reference named “Products list” referencing One-to-Many your product collection.
This is what the page structure will look like at the end:
Click “Save”, and after being redirected to another page, click the gear icon and “Configure Page Type”. Then you will be redirected again to a page where you should click “Create page type” and type the name for this page type.
Connect ButterCMS pages to the custom Storefront
Install the ButterCMS npm package to the Angular application by running the following command:
<span style="font-weight: 400;">npm install buttercms</span>
In the Angular application, create a module with routing and add a new component that will be used as a page template for the created page type. Update the module’s routing module by adding this route:
<span style="font-weight: 400;">{</span><span style="font-weight: 400;">
</span><span style="font-weight: 400;">    path: </span><span style="font-weight: 400;">':locale/:slug'</span><span style="font-weight: 400;">,</span><span style="font-weight: 400;">
</span><span style="font-weight: 400;">    component: PromotionalPageComponent,</span><span style="font-weight: 400;">
</span><span style="font-weight: 400;">    resolve: {</span><span style="font-weight: 400;">
</span><span style="font-weight: 400;">      page: PromotionalPageResolverService</span><span style="font-weight: 400;">
</span><span style="font-weight: 400;">    },</span><span style="font-weight: 400;">
</span><span style="font-weight: 400;">  }</span>
Change PromotionalPageComponent to the name of the component you just created. If your ButterCMS account does not have locales, then the path should be just :slug.
We have not yet created PromotionalPageResolverService that is used in this code. So let’s create it. This service should return page content retrieved from ButterCMS by slug and locale (if locales are set up).
First, let’s create a service to interact with ButterCMS:
<span style="font-weight: 400;">@Injectable({</span><span style="font-weight: 400;">
</span><span style="font-weight: 400;">  providedIn: </span><span style="font-weight: 400;">'root'</span><span style="font-weight: 400;">,</span><span style="font-weight: 400;">
</span><span style="font-weight: 400;">})</span><span style="font-weight: 400;">
</span><b>export</b> <b>class</b> <b>ButterCMSService</b><span style="font-weight: 400;"> {</span><span style="font-weight: 400;">
</span><span style="font-weight: 400;">  private butter = Butter(</span><b>this</b><span style="font-weight: 400;">.environmentVariablesService.butterCMSToken);</span><span style="font-weight: 400;">
</span><span style="font-weight: 400;">  private promotionalPageType = </span><span style="font-weight: 400;">'storefront'</span><span style="font-weight: 400;">;</span><span style="font-weight: 400;">
</span><span style="font-weight: 400;">
</span><span style="font-weight: 400;">  </span><b>constructor</b><span style="font-weight: 400;">(</span><span style="font-weight: 400;">
</span><span style="font-weight: 400;">    private environmentVariablesService: EnvironmentVariablesService</span><span style="font-weight: 400;">
</span><span style="font-weight: 400;">  ) {}</span><span style="font-weight: 400;">
</span><span style="font-weight: 400;">
</span><span style="font-weight: 400;">  getPromotionalPageData(</span><span style="font-weight: 400;">
</span><span style="font-weight: 400;">    slug: string,</span><span style="font-weight: 400;">
</span><span style="font-weight: 400;">    locale: string</span><span style="font-weight: 400;">
</span><span style="font-weight: 400;">  ): Observable<PromotionalPage> {</span><span style="font-weight: 400;">
</span><span style="font-weight: 400;">    </span><b>return</b> <b>from</b><span style="font-weight: 400;">(</span><span style="font-weight: 400;">
</span><span style="font-weight: 400;">      </span><b>this</b><span style="font-weight: 400;">.butter.page.retrieve(</span><b>this</b><span style="font-weight: 400;">.promotionalPageType, slug, { locale })</span><span style="font-weight: 400;">
</span><span style="font-weight: 400;">    ).pipe(</span><span style="font-weight: 400;">
</span><span style="font-weight: 400;">      map((response) => {</span><span style="font-weight: 400;">
</span><span style="font-weight: 400;">        </span><b>return</b><span style="font-weight: 400;"> response.data.data;</span><span style="font-weight: 400;">
</span><span style="font-weight: 400;">      })</span><span style="font-weight: 400;">
</span><span style="font-weight: 400;">    );</span><span style="font-weight: 400;">
</span><span style="font-weight: 400;">  }</span><span style="font-weight: 400;">
</span><span style="font-weight: 400;">}</span>
Set the promotionalPageType to the page type name that you created. (Note: Skip locale if they’re not set for your ButterCMS account.) PromotionalPage should match the created page type’s structure.
Now everything is ready for our resolver service:
<span style="font-weight: 400;">@Injectable({</span><span style="font-weight: 400;">
</span><span style="font-weight: 400;">  providedIn: </span><span style="font-weight: 400;">'root'</span><span style="font-weight: 400;">,</span><span style="font-weight: 400;">
</span><span style="font-weight: 400;">})</span><span style="font-weight: 400;">
</span><b>export</b> <b>class</b> <b>PromotionalPageResolverService</b><span style="font-weight: 400;">
</span><span style="font-weight: 400;">  </span><b>implements</b> <b>Resolve</b><span style="font-weight: 400;"><</span><b>PromotionalPage</b><span style="font-weight: 400;">> {</span><span style="font-weight: 400;">
</span><span style="font-weight: 400;">  </span><b>constructor</b><span style="font-weight: 400;">(private butterCMSService: ButterCMSService) {}</span><span style="font-weight: 400;">
</span><span style="font-weight: 400;">
</span><span style="font-weight: 400;">  resolve(</span><span style="font-weight: 400;">
</span><span style="font-weight: 400;">    route: ActivatedRouteSnapshot,</span><span style="font-weight: 400;">
</span><span style="font-weight: 400;">    state: RouterStateSnapshot</span><span style="font-weight: 400;">
</span><span style="font-weight: 400;">  ): Observable<PromotionalPage> {</span><span style="font-weight: 400;">
</span><span style="font-weight: 400;">    </span><b>const</b><span style="font-weight: 400;"> slug = route.paramMap.get(</span><span style="font-weight: 400;">'slug'</span><span style="font-weight: 400;">);</span><span style="font-weight: 400;">
</span><span style="font-weight: 400;">    </span><b>const</b><span style="font-weight: 400;"> locale = route.paramMap.get(</span><span style="font-weight: 400;">'locale'</span><span style="font-weight: 400;">);</span><span style="font-weight: 400;">
</span><span style="font-weight: 400;">    </span><b>return</b> <b>this</b><span style="font-weight: 400;">.butterCMSService.getPromotionalPageData(slug, locale);</span><span style="font-weight: 400;">
</span><span style="font-weight: 400;">  }</span><span style="font-weight: 400;">
</span><span style="font-weight: 400;">}</span>
Update the PromotionalPageComponent component to get the resolved page content:
<span style="font-weight: 400;">@Component({</span><span style="font-weight: 400;">
</span><span style="font-weight: 400;">  templateUrl: </span><span style="font-weight: 400;">'./promotional-page.component.html'</span><span style="font-weight: 400;">,</span><span style="font-weight: 400;">
</span><span style="font-weight: 400;">  styleUrls: [</span><span style="font-weight: 400;">'./promotional-page.component.scss'</span><span style="font-weight: 400;">],</span><span style="font-weight: 400;">
</span><span style="font-weight: 400;">})</span><span style="font-weight: 400;">
</span><b>export</b> <b>class</b> <b>PromotionalPageComponent</b> <b>implements</b> <b>OnInit</b><span style="font-weight: 400;"> {</span><span style="font-weight: 400;">
</span><span style="font-weight: 400;">  page: Observable<PromotionalPage>;</span><span style="font-weight: 400;">
</span><span style="font-weight: 400;">
</span><span style="font-weight: 400;">  </span><b>constructor</b><span style="font-weight: 400;">(private route: ActivatedRoute) {}</span><span style="font-weight: 400;">
</span><span style="font-weight: 400;">
</span><span style="font-weight: 400;">  ngOnInit(): </span><b>void</b><span style="font-weight: 400;"> {</span><span style="font-weight: 400;">
</span><span style="font-weight: 400;">    </span><b>this</b><span style="font-weight: 400;">.page = </span><b>this</b><span style="font-weight: 400;">.route.data.pipe(</span><span style="font-weight: 400;">
</span><span style="font-weight: 400;">      map((data: { page: PromotionalPage }) => {</span><span style="font-weight: 400;">
</span><span style="font-weight: 400;">        </span><b>return</b><span style="font-weight: 400;"> data.page;</span><span style="font-weight: 400;">
</span><span style="font-weight: 400;">      })</span><span style="font-weight: 400;">
</span><span style="font-weight: 400;">    );</span><span style="font-weight: 400;">
</span><span style="font-weight: 400;">  }</span><span style="font-weight: 400;">
</span><span style="font-weight: 400;">}</span>
In the component template, use page | async to display the page content.
That’s it! When we go to the page /pages/{slug} where {slug} is one of the slugs of your promotional pages, you should see the page's content that you set in ButterCMS.
Summary
In this headless Shopify tutorial, we covered how to interact with the Shopify Storefront API to display store collection products, how to synchronize store products with ButterCMS collections, and how to integrate ButterCMS pages into the Shopify storefront. Now you can build your own unique branded promotional pages using ButterCMS! The full code is available in the GitHub repository https://github.com/ButterCMS/headless-shopify, and a fully working demo is available at https://cranky-galileo-d83d7f.netlify.app/.
If you try this demo out, I'd love to hear your feedback and questions about this approach. I would love to write more tutorials to support your headless Shopify projects and would love to hear down below in the comments what else you'd like to see!