Table of contents
Updated by Diego Salinas Gardón
WordPress is an excellent platform for content creation, but what if you don't need the full WordPress CMS experience? What if you just want to create and publish content without all of the extras?
That's where headless WordPress comes in.
Headless WordPress uses WordPress to handle publishing and content management, while your frontend can be anything from a simple static website to a full-blown React app. In this blog post, we'll look at how to set up headless WordPress and some of the pros and cons of using it.
What does headless WordPress mean?
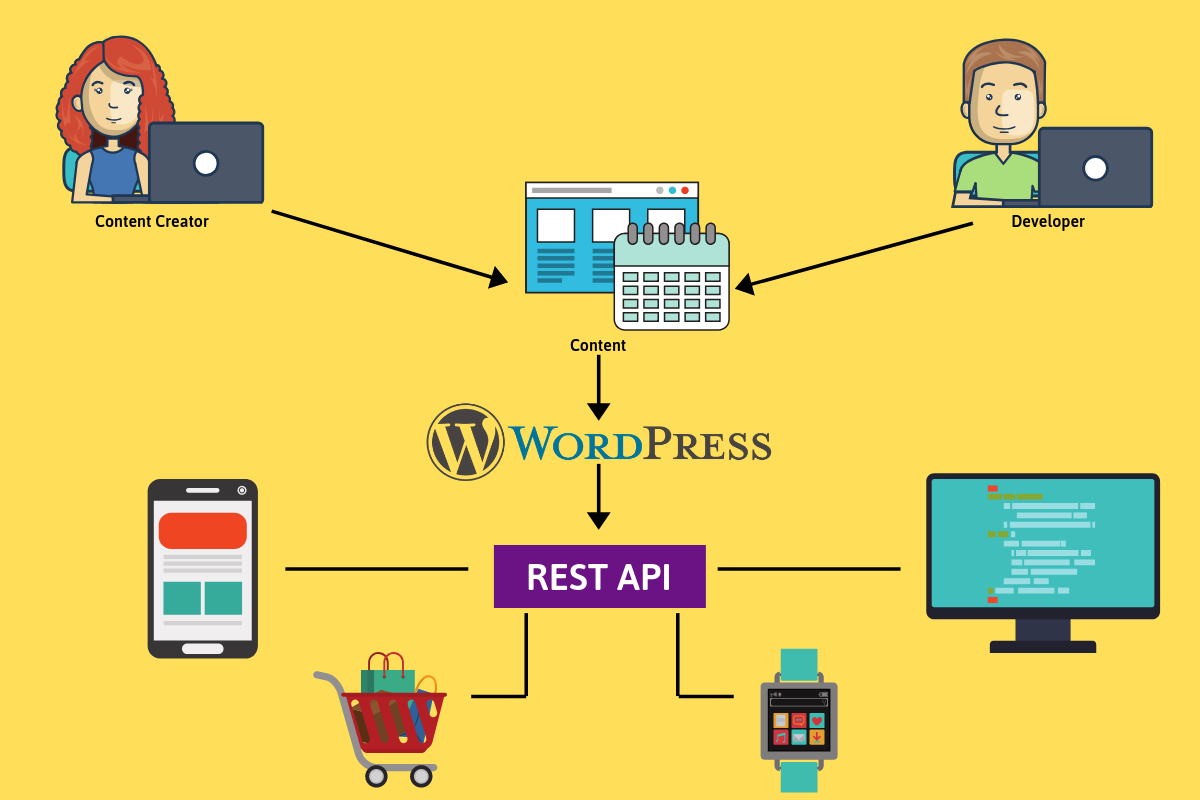
In headless WordPress, just like with any headless CMS, you only use WordPress as a backend to store and deliver content. In essence, it’s WordPress without the theme engine, meaning that you have total control over how to present your content.
Using WordPress REST API enables developers to take advantage of its features and workflows without its PHP-based template and theme system constraints. Headless WordPress enables developers to build digital experiences using a modern tech stack while retaining WordPress’ familiar UI.
Decoupling WordPress is a safe alternative for developers or marketers who want to go headless without the potential complexities of a CMS migration. So let’s keep diving deeper into decoupled WordPress to learn more.
Why headless WordPress?
If you already use WordPress with a theme like Elementor, why would you want to use WordPress’ API instead of publishing directly on their platform?
WordPress is great for content editors and marketers, but it’s not the best CMS for developers. While it’s easy to use and configure, it’s not exactly flexible or extensible. WordPress’ legacy PHP-based infrastructure makes it unwieldy for developers who want extra control over their digital experiences or want to benefit from using modern web development practices.
In that sense, headless WordPress represents an improvement to the traditional WordPress model. Headless architecture unlocks JavaScript frameworks and frontend technologies that give your digital experiences an edge over traditional, WordPress-based and theme driven websites.
For instance, by going headless, you can create omnichannel experiences by taking content from a single source of truth and distributing it across different platforms and devices. Traditional WordPress doesn’t give you the same flexibility, and you would have to maintain different versions of the same content, all for other devices.
Headless vs monolithic WordPress
Though a Headless architecture has a solid set of advantages compared to its monolithic counterpart, it also has a few drawbacks that could swing the pendulum of opinion the other way.
Let’s take a look at them:
| Monolithic WordPress | Headless WordPress | |
| Flexibility |
Only uses PHP-based templates. |
Allows you to use your favorite frontend tools. |
| Learning Curve |
Easy to set up and use. |
Complex setup for non-technical users. |
| Security |
Vulnerable against DDoS and XSS attacks. |
Protected against DDoS, XSS, and brute force attacks. |
| Omnichannel |
Doesn’t allow omnichannel content publishing. |
Allows omnichannel content publishing from a single location. |
| Costs |
Cost is based on hosting costs. |
Expensive as it requires developers. |
| Scalability |
Harder to scale after a certain point. |
More scalable than traditional WordPress. |
| Loading speeds |
Slower due to server-side rendering. |
Headless WordPress pre-caches data and loads faster. |
| Maintenance |
Easy to maintain. |
Can become complicated to maintain. |
Benefits of headless WordPress
Headless WordPress has most of the same benefits as other headless platforms, but with a WordPress twist. Take a peek at them:
Omnichannel content publishing
The ability to deliver content in a generic, standard and unformatted representation (mainly JSON format) allows for whoever is receiving that content to pick and choose how they want to present it. This provides a great deal of flexibility –both for the content author and the publishing party.
With a headless platform, content editors can reach an unlimited number of devices by connecting different frontends to your backend, displaying content to different places from one single source of truth. Essentially, by going headless, you, as an author, can create the content once and have all those channels access your content via APIs allowing you to publish anywhere you’d like.
Lightweight design
One of the main advantages of headless WordPress versus a traditional CMS is that you’re shedding some serious weight when you decouple WordPress. Traditional WordPress is slow and bloated due to its architecture and plugins. A WordPress plugin adds functionalities, but you’re adding more weight and scripts to your website, significantly slowing things down with each feature.
While you can use plugins on a headless WordPress website, you can achieve the same level of extensibility on a headless WordPress site by integrating third-party applications using APIs.
Supports modern tooling
A headless CMS unlocks a new level of technology and enables developers to select their favorite tools. A typical WordPress site restricts you to only working with WordPress’ tools. Nothing more. While this is good for some users, it places serious constraints on developers.
On the other hand, a headless site provides a much better developer experience, translating into performance and security gains for the end-user. The headless model supports JavaScript frameworks and DevOps practices for better control over the products you build.
Full control over the visualization of the content
Headless architecture gives you full control over how content looks and feels. This is a real benefit for designers and frontend developers, as they can provide a better user experience.
In a headless setting, designers gain more control over how they show content and which third-party applications consume the API. A traditional site built on a WP engine uses themes and templates to present content, tying you to only one way to show content.
Do what you want with your content
The headless party is your party. You consume the API, and what you do with it is completely open. Content creators can do whatever they want with a headless WordPress site, from a simple blog to a single page application. Going headless unlocks new devices and channels, meaning brand new worlds and audiences for marketers to connect with.
On the other hand, a traditional WordPress theme like Elementor, while easy to set up, isn’t as great for emerging devices or new channels. You can build a snappy website, but you’ll never be able to create a web application or a single page application.
Rewrite as much WordPress as you want
Maybe this one is not for everyone, but then again, maybe you’re one of those people who hate how WordPress’ admin UI works but are stuck using it. With the API you can rewrite as much of the admin UI as you like/need to improve your admin experience. In a headless installation, not everything is about creating and publishing your content, it can also be about running the site.
After reading the benefits of going headless, you can probably see a common theme with some of these points: freedom. By using the WordPress API and decoupling the platform, you gain freedom over what you do with the content and how you do it.
This is not only true for this WordPress, though. Any headless CMS can help you achieve that level of freedom.
ButterCMS has always been a headless content management system; it’s already headless from the start. No need for extra customization. Butter is also designed for marketers, so you won't likely notice the difference if you’re a content editor coming from WordPress.
Drawbacks of headless WordPress
After seeing the advantages, let’s look at the flip side of the coin. The truth is that using decoupled WordPress doesn’t make it the best headless CMS overnight. There are a handful of important limitations on when to use WordPress as a headless CMS.
I still wanted to cover some minor drawbacks of using a headless version of WordPress.
WordPress wasn’t built to be headless
We’ve been talking about headless WordPress for the better part of 10 minutes, but if we want to get technical for a minute, we’re actually talking about Decoupled WordPress.
The main difference between a headless CMS and decoupled CMS is that while we do have that beautiful API with all the benefits, I mentioned before, the head is still attached to the body. In other words, we have to deal with the UI, at least in the beginning, while installing the main plugins and performing the basic setup.
You have the building blocks, and that’s it
WordPress’ API is great, don’t get me wrong, it provides all you need to do whatever you want with it. But then again, so does the Assembler language, and you don’t see many developers using it.
The same happens here. If you want easy access to a headless CMS that lets you pull data from an API and publish it the way you want, maybe going with this solution is too low.
A headless alternative like ButterCMS lets you build the same with higher-level tools.
These companies create, publish, and maintain SDKs that allow you to avoid thinking about APIs and HTTP requests and simply think about blog posts and pages. All you have to do is tell your code where to render them.
(See how Butter compares to WordPress)
Plugin dependency
Although not a huge issue if you’re running a local version of WordPress, it’s quite a big deal if you’re on their managed platform. Because as I mentioned at the beginning of this article, you have to pay the highest price to be able to install plugins. This might even be a blocker for some who are not planning or willing to spend money on your particular project.
Additionally, even though I wouldn’t consider it a drawback, it’s an inconvenience to have to install plugins to be able to access the API and use a specific authentication method.
These types of features for a headless system are available right out of the box, and what’s even better: they are supported by the group/organization that created the platform (as opposed to being a 3rd party plugin developed by anyone willing to do it).
Who Should Use headless WordPress?
- If you want a future-proof solution
- If you want to publish content on different platforms
- If you’re looking to build custom digital experiences
- If you need to source data from different databases
- If you’re concerned about providing a better developer experience
When to avoid headless WordPress?
- If you can’t handle maintenance
- If you don’t have solid hosting options
- If you’re a beginner who only needs a simple website
- If you don’t have development experience or developers to help you
How to use WordPress as a headless CMS
Now that I’ve covered why you would switch from a traditional WordPress installation (or as you’re about to read any traditional cms) into a headless version, it’s time to show you an example of what that would look like.
1. Install WordPress API and WP-API Basic Auth Handler
first things first. To start using WordPress’ API and the basic auth security scheme (which I’ll be using here for the sake of time and brevity), you’ll need to install a couple of plugins:
They’re both straightforward to install and require no configuration, so it’s just a matter of clicking a few links and reading a couple of bullet points.
I assume you’ve already installed a local copy of WordPress for this article, and you’re using it to test this approach. If instead, you’re using an online version, you’ll have to have a Business level account to be able to install a plugin. The process after that is the same, no matter what kind of installation you’re working with.
Now, back to the point. To show you what an API client would look like, I’ll be using Node.js to create a simple CLI tool that, in turn, will have enough capabilities to list all published posts, create a new basic post in Draft mode, retrieve the content of a single published post, publish a draft post, and finally Delete a single post at a time.
I’m choosing to do a command-line tool to show you how versatile the API approach can be. You could take my JS code and turn it into your own React or Vue SPA, just as easy.
2. Create a CLI tool
To demonstrate what I’m going to be doing, here is a sample sequence of commands and outputs from our CLI tool:
~/wp-client:$ ./bin/run post:list
* ( 7 )  Test post  [ 2019-03-12T05:31:20 ]
* ( 1 )  Hello world!  [ 2019-03-12T05:18:51 ]

~/wp-client:$ ./bin/run post:create --title="Second tests  post" --body="This is the body of the blog post" --username=deleteman --password=xxxx
* NEW POST CREATED WITH ID:  10
* Title:  Second tests post

~/wp-client:$ ./bin/run post:list
* ( 7 )  Test post  [ 2019-03-12T05:31:20 ]
* ( 1 )  Hello world!  [ 2019-03-12T05:18:51 ]

~/wp-client:$ ./bin/run post:publish --postId=10  --username=deleteman --password=xxxx
Your post was published!

~/wp-client:$ ./bin/run post:list
* ( 10 )  Second tests  post  [ 2019-03-12T05:33:39 ]
* ( 7 )  Test post  [ 2019-03-12T05:31:20 ]
* ( 1 )  Hello world!  [ 2019-03-12T05:18:51 ]

~/wp-client:$ ./bin/run post:get --postId=10
Second tests  post
=========
<p>This is the body of the blog post</p>

~/wp-client:$ ./bin/run post:delete --postId=10  --username=deleteman --password=xxxx
Your post was deleted!

~/wp-client:$ ./bin/run post:list
* ( 7 )  Test post  [ 2019-03-12T05:31:20 ]
* ( 1 )  Hello world!  [ 2019-03-12T05:18:51 ]
Essentially, what these commands try to show is:
- The list of all published posts.
- The creation of a new draft – see how, for this action, we need to provide credentials.
- Another list to show how the new draft is not yet showing up on our lists.
- The publish action which is simply an update on the status of the post.
- Getting the actual content of the post.
- Deleting it – again, we need to provide credentials here.
- Finally, the last list to show how the deleted post is no longer available.
The full version of this code is available on GitHub if you want to look at it, but let’s go into a bit more detail, shall we?
3. Leveraging WordPress’ API
WordPress’ API is not that complex, and it has a very detailed handbook online to help developers learn how to use it.
For this particular article, I only used one type of resource: posts
Which means my list of endpoints is limited to the following:
| Verb | Endpoint | Description |
| GET |
/wp/v2/posts |
Returns a list of posts (only the published ones) on the site. |
| GET |
/wp/v2/posts/:id |
Returns the content of one particular post. It must also be published, otherwise nothing will be returned. |
| POST |
/wp/v2/posts/:id |
Partially updates a single post. This one is a bit weird, I have to admit. I would’ve gone with a PATCH or PUT verb instead of POST, but then again, there is nothing saying they can’t do what they did. |
| POST |
/wp/v2/posts |
Creates a brand new draft post. |
| DELETE |
/wp/v2/posts/:id |
Deletes a single post by ID |
As you can see, the list is pretty simple and short. Thankfully the design of the API is quite RESTful, all the way to the point where they use HATEOAS to provide you with related actions on every response and their choice of actions for the HTTP methods (something that’s not always the case).
Since I’m using the config module to keep track of my configuration files, you can see how I added all this data into a single JSON (which stands for JavaScript Object Notation) inside the config folder:
{
    "wp-api": {
   	 "url": "<http://www.example.com/wp-json>",
   	 "endpoints": {
   		 "list": "/wp/v2/posts",
   		 "get": "/wp/v2/posts/:id",
   		 "update": "/wp/v2/posts/:id",
   		 "delete": "/wp/v2/posts/:id",
   		 "create": "/wp/v2/posts"
   	 }
    }
}
I can then access this data with a simple
config.get('wp-api.url')for example, but more on this in a bit.
4. Creating the CLI
To help me with this task of creating the CLI, I used a great little module called OClif, which takes care of all the details regarding command-line interfaces and how to deal with arguments. If you’re not familiar with it, I would suggest checking out this article.
The main project structure, though, will be generated by this module. We’ll only be adding files to it. Particularly the files required for every sub-command shown in the example above.
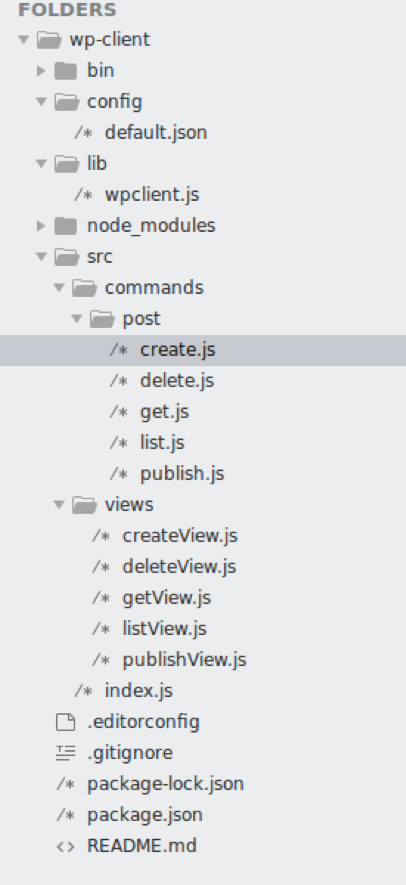
For this CLI, we’ll get with a basic structure where we have a single file per command (meaning, one file for post:create, one for post:publish, and so on), one view file per command as well, and a single API client module, which will centralize the code required to communicate with our API.
In other words, the structure of our project will look like this:
5. Accessing command files
All the command files will be similar in the sense that they will define instances of the Command class. They will implement the run method where we’ll perform some basic validation (especially for those requiring several flags). And then, we’ll just interact with the client module.
Here is an example of one of the commands- the create command:
'use strict'const {Command, flags} = require('@oclif/command')
const config = require("config")
const wpClient = require("../../../lib/wpclient")
const V = require("../../views/createView")

classCreateCommandextendsCommand {
async run() {
const {flags} =this.parse(CreateCommand)

if(!flags.title) {
       		 console.log("Error: Missing post title, please use the --title flag")
return 1
        	}

if(!flags.body) {
       		 console.log("Error: Missing content for the new post, please use the --body flag")
return 1
        	}

if(!flags.username) {
       		 console.log("Error: Missing username, please use the --username flag")
return 1
        	}

if(!flags.password) {
       		 console.log("Error: Missing password, please use the --password flag")
return 1
        	}

let newPost = flags

let C =new wpClient(config.get("wp-api.url"), config.get("wp-api.endpoints"))
   		 C.CreatePost(newPost, (err, resp) => {
if(err)return console.error(err)
const view =new V(resp)
   			 view.run()
   		 })

    	}
}

CreateCommand.flags = {
   	 username: flags.string({
            	description: 'Your username'
    	}),
   	 password: flags.string({
            	description: 'Your password'
    	}),
    	title: flags.string({
            	description: 'The title of the new blog post'
    	}),
    	body: flags.string({
            	description: 'The content of the new blog post'
    	})
}

module.exports = CreateCommand
You can check the full repository to review the other commands, but you’ll see the same pattern repeating over and over. From the design point of view, one could argue that this could’ve all been handled by a single file, but since we’re keeping things simple here, I like to leave room for customization. And having a single file per command allows for that.
As you can see, the code doesn’t do anything special, it basically does four things:
- Define the new command class and its flags –This is useful for OClif, since it can use that information for auto-generating help commands.
- Do some basic flag validation to make sure we’re providing all the required pieces of information. If one of them is missing, we’ll bail out and show the error message.
- Call the API client with the correct method.
- Send the response to the View class, which will take care of outputting this in whatever format we require.
That’s it!
There is no black magic at work. We’re simply interacting with a (very well defined) REST API to deal with our posts without having to go through WordPress’ UI. Neat!
6. Interacting with the view files
These are very basic classes, they’re here for the same reason I created a single file per command, to allow for growth. As you can see in the full repository, these classes don’t really do much right now. But if you wanted to, you could add quite a lot of code to increase the quality of the presentation.
There is a lot you can do in the console to add extra flares and you would do that from within these files, without having to touch any of the main logic behind the client. That’s the only reason why I’ve coded these classes as separate entities.
Here is an example of one of them, in fact, this one is the most complex of the lot:
module.exports =classListView {

    constructor(items) {
this.items = items
    }

async run() {
let posts =this.items.map( i => {
return {
   			 id: i.id,
   			 title: i.title.rendered,
   			 last_modified: i.modified
   		 }
   	 })

   	 posts.forEach( p => {
   		 console.log("* (", p.id, ") ", p.title, " [", p.last_modified, "] ")
   	 })
    }
}
7. Working with the API client
Last, but certainly not least, the API client class is the one that has the responsibility of centralizing all communications with the API. As you’ll see in a bit, that translates into setting up different requests, based on the action at hand, and performing them through the request module. That’s about it.
Here is the full code for you to read:
const R = require("request")

functionBase64(txt) {
returnnew Buffer.from(txt).toString("base64")
}

module.exports =classWordPressClient {

    constructor(url, endpoints) {
this.apiUrl = url
this.endpoints = endpoints
    }

    getSecureHeaders(usr, pwd) {
return {
   		 Authorization: 'Basic ' + Base64(usr + ":" + pwd),
        	'accept': 'application/json'
   	 }
    }

    makeRequest(options, cb) {

   	 options.json = true//force the json data type on all requestsreturn R(options, (err, resp, body) => {
if(err)return cb(err)
if(resp.data && resp.data.status >= 400) {
return cb({
   				 errorMsg: resp.data.message
   			 })
   		 }

if(typeof body == 'string') {
if(body.indexOf("|") == 0) body = body.replace("|", "")
   			 body = JSON.parse(body)

if(body.data && body.data.status >= 400) {
return cb({
   					 errorMsg: body.message
   				 })
   			 }
   		 }
   		 cb(err, body)
   	 })
    }

async DeletePost(data, cb) {
const URL =this.apiUrl +this.endpoints.delete.replace(":id", data.postId)

let headers =this.getSecureHeaders(data.username, data.password)

let options = {
   		 url: URL,
   		 headers: headers,
   		 method: 'DELETE'
   	 }

returnthis.makeRequest(options, cb)
    }

async PublishPost(data, cb) {
const URL =this.apiUrl +this.endpoints.update.replace(":id", data.postId)

let headers =this.getSecureHeaders(data.username, data.password)

let update = {
   		 status: 'publish'
   	 }
let options = {
   		 url: URL,
   		 headers: headers,
   		 body: update,
   		 method: 'POST'
   	 }

returnthis.makeRequest(options, cb)
    }

async CreatePost(data, cb) {
const URL =this.apiUrl +this.endpoints.create

let headers =this.getSecureHeaders(data.username, data.password)

let newPost = {
   		 title: data.title,
   		 content: data.body,
   		 excerpt: data.body
   	 }
let options = {
   		 url: URL,
   		 headers: headers,
   		 body: newPost,
   		 method: 'POST'
   	 }

returnthis.makeRequest(options, cb)
    }

async GetPost(id, cb) {
const URL =this.apiUrl +this.endpoints.get.replace(":id", id)

let options = {
   		 method: 'GET',
   		 url: URL
   	 }
returnthis.makeRequest(options, cb)
    }

async listPosts(cb) {
const URL =this.apiUrl +this.endpoints.list

let options = {
   		 method: 'GET',
   		 url: URL
   	 }
returnthis.makeRequest(options, cb)
    }
}
As you can see the only relevant method here is makeRequest, the rest of them are simply using that one.
And that is it. You should’ve built a WordPress frontend capable of fetching dynamic content by now.
Although it is quite simple, it should be enough to prove the potential a headless WordPress setup provides. Now, we could take this code and turn it into a SPA application. We could also integrate this command-line tool into another desktop tool just as easily, adding extra capabilities without going and logging into WordPress, where you'll be limited by the constraints added by its UI.
Closing thoughts
Regardless of the drawbacks one might find in this headless version of WordPress, the truth is this is an excellent way to test the headless approach.
By leveraging a headless WordPress setup, you have the full power of its REST API at your disposal. You can try to use it however you like, but at the same time, you have the failsafe of WordPress’ UI, where you can log in and do any content management you might need.
Play your cards right and abstract the integration with WordPress’ API correctly. You can then take your content and migrate it into other headless systems for whatever reasons you might have (be it monetary, technical, or even personal reasons).
With the current trend of technology, there are constantly new devices coming up, devices that have the ability to, not only connect to the internet, but to display multimedia content (that is how we old people call images, videos, and text, by the way) in very different ways.
Given that, a headless CMS (such as WordPress’ API and others like ButterCMS) are helping pave the way to the future. Using them simplifies the future work required to be compatible with whatever new medium might appear.
In the end, the choice of platform is up to you. Choosing the best CMS depends on your personal needs and technical mastery. There are dozens of options for headless systems (some of them will be compatible with your tech stack, others might need extra work for you to use them) and quite a lot of traditional CMSs to pick from.
Whatever you do, make sure to leave a comment below and tell us what you think about these headless platforms, and if you’re using or thinking about using one, which one is it?
Do you want your product or marketing team to test Butter CMS? We can set up a live demo to walk your team through the fast, easy-to-use interface.