If you’re not new to Node.js, you can skip this section and go straight to the next one, otherwise, here is the gist of it:
Around Node.js and its interpreter, there is a whole ecosystem of modules(or libraries if you will) where other developers are able to share their code and make it available for use to others.
Node’s package manager is called npm and it comes installed with Node out of the box, so if you have installed Node, you can be sure you already have that command as well.
You can use npm to create init new Node projects, and to install and remove packages:
$ npm init #will create a new package.json file with the data you provide for the current directory$ npm install oclif #will install the oclif package into your current directory$ npm remove config #will remove the config package from your current directory
You can also use npm to publish your own packages.Once you have created your project, added your code and filled in the information for the package.jsonfile, you can simply do:
$ npm publish
And that’ll upload the code and publish it into the NPM registrywhere it will be ready for others to download.
The task at hand:
For this particular article, we’re going to be creating a new module, one that you’ll be able to use as a command line tool(or CLI for short) in order to auto-generate a blog, from scratch, that you can integrate with ButterCMS.
Here is what you can expect to do with the output of this tutorial:
$ buttercms generate:blog --for=express
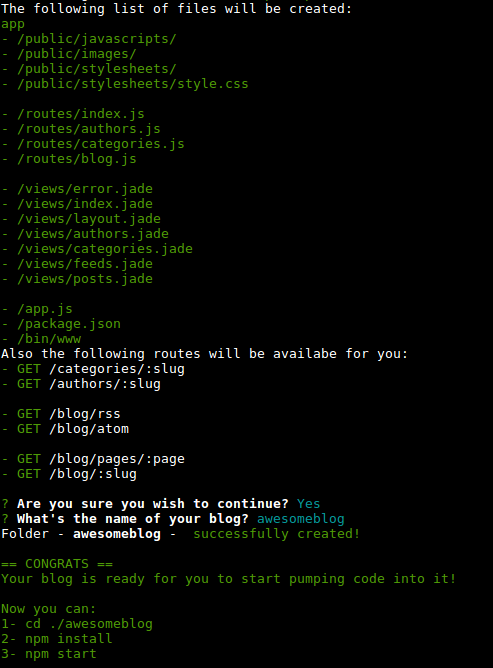
That simple command will show you the output to be generated(meaning the file, folder and routes to be created) and at the same time, it’ll ask you for the name of your new blog. Once you confirm you’d like to continue and add the name of your new blog, you’ll find yourself with a brand new Express.js project created and ready for you to start coding, with all the required boilerplate code already in place. In Figure 1, you can see what the output of our new CLI tool is going to look like.
Figure 1: Expected output from the new ButterCMS tool
Enter OClif
In order to properly achieve this, and to create a Command Line Interface tool, we’ll be using OClif. We will also be using other modules for supporting features, such as prompting the user for their input and coloring the text in the console. These are minor features in comparison, so I’ll only mention the names of these other modules, rather than going into details whenever using them.If you wish to know more about them, you can check out their respective documentation.
We could do this without any extra modules, after all, Node.js is perfectly capable of handling all of the features required, but by using such a complete module as OClif, the job becomes simpler and faster. And because of that, we’ll be able to focus on the actual command to implement instead of working around it, trying to complete features such as argument parsing, error handling, user input, etc.
Installation
Installing OClif is just as easy as installing any other module, you can either get the option to install it locally into your project or install it globally and have it accessible as a CLI tool you can execute from anywhere.
I would recommend using the global installation, as follows:
$ npm install -g oclif
With that, you’ll have that command,“oclif”, available for all new projects from now on.
Note that you’ll need Node.js version 8+ to use OClif though, it shouldn’t be a show stopper, since we’re already on version 10.11. That being said, for this article, I’ll be using version 10.5.
Using it
Once you install OClif, you can start generating new CLI projects. Ironically enough, it provides generators, just like what we’re trying to do in this article.
To start using this OClif, let’s first do a quick overview of what you can generate:
Commands. This is what we’re going to be generating for this particular project. You can generate either single commands, which work similar to what Linux’s“ls” would do, or you can generate more complex or multi-commands, such as the one we’ll be creating, which could potentially have several generators, depending on what you want to generate and the target platform for it(more on this below).
Plugins. You can add plugins into existing OClif projects, in order to extend their functionality.
Hooks. With hooks, you can make your commands and your code react to events, such as“command_not_found” and“init”. You can also create your own custom events, but that’s something we’ll leave for another tutorial.
Today, we’ll be creating commands, or more like, a command, since that’ll be all we need(more on this later). In order to generate a command project, all you need to do is:
$ oclif multi your-command
Once you’ve executed that line, you’ll be asked a few questions. You can complete this information, or leave it to the default values as they’re perfectly functional. Here is the list of options you’ll be prompted to fill:
npm package name: The name of the package. This will be used when you publish your package in npm.
command bin name the CLI will export: The word the user will type to invoke your CLI. You can use whatever you want, just be mindful of existing commands on your target computer. For example, you shouldn’t be creating a command called“ls”, since Linux comes with one out-of-the-box.
description: The package’s description. This is part of your package.json file and as you can imagine, it’ll be shown on the package’s npm page.
author: The author of the package, to be listed in npm.
version: The actual version of your package, which should be incremented everytime you edit it and publish new changes / fixes / features.
license: The licensing model for your package. By default, the MIT License is set.
node version supported: OClif only supports versions of Node greater than 8.0, which is the default set here
github owner of repository(https://github.com/OWNER/repo):The username of the owner of the Github repository where this package's code will be published.
github name of repository(https://github.com/owner/REPO):The name of the Github repository where the code for this package will be published.
As well as a series of enable/disable features that’ll help with the boilerplate code generation:
npm vs yarn: You get a choice to either generate code that will be published with NPM or YARN
TypeScript vs JavaScript: The generator is capable of creating the boilerplate code in either TypeScript or JavaScript. For this particular tutorial, we’ll go with good ol’ JavaScript, but you can use whatever you prefer.
Using ESLint: If you select this option, it’ll create the required boilerplate files and commands for you to use linting in your project. We will not go down this route for this particular project, although you’re welcome to add it on your own if you already know the tool.
Using Mocha: Same as the previous one, if you want this feature, it’ll create the sample test cases and add the required dependencies for you to test your commands using Mocha. And like ESLint, we will not be using it during this tutorial, since Mocha is not our focus today.
CI integration(circleci, appveyor, codecov): Again, it adds the required boilerplate for your code to interact with any of these CI tools.
Once you've filled in the information, OClif will create the new folder and copy the boilerplate files into it. You can test that code by running:
$ ./bin/run hello
The new project will come with a simple code sample, so by running the above command you should get:
$ ./bin/run hello
hello world from ./src/commands/hello.ts!
$ ./bin/run help
USAGE
$ mynewcli [COMMAND]
COMMANDS
hello describe the command here
help display helpfor mynewcli
$ ./bin/run help hello
describe the command here
USAGE
$ mynewcli hello [FILE]
OPTIONS
-f, --force
-n, --name=name name to print
EXAMPLES
$ mynewcli hello
hello world from ./src/hello.ts!
After that, you can go into your files and start coding away, so let’s get into it, shall we?
The implementation
Even though OClif is going to be generating everything for us, and we just need to fill in the important bits, there are still a few decisions we can take regarding the design of our code.
That being said, let’s go step by step.
Generating the boilerplate code:
$ oclif multi buttercms
As for the questions that follow, feel free to add whatever you like.The key options to follow this tutorial are:
Language is JavaScript
No ESLint
No Mocha testing
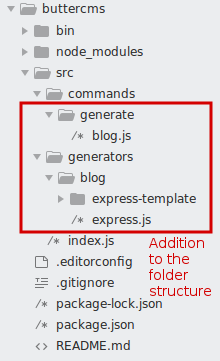
After you’re done with that, you should have a folder structure similar to what you can see below in Figure 2.
Figure 2: Folder structure created by OClif
You can safely go ahead and remove the“hello.js” file you see there, we won’t be using that one.
Now, on to our actual command, we need to generate a command“generate” that takes as a parameter the element we want to generate so that thecommand looks like“generate:blog” or“generate:page” or whatever we might need in the future. Through OClif, you can do that simply by nesting folders inside the“commands” folder. Meaning, we can create a folder“generate” inside“commands”, and in our new directory, we add ourblog.js command source code file.
In particular, we’ll just use this command as a segway to the actual generator code, because we also need to specify the target tech stack(remember it’s not just about writing buttercms generate:blog, we also want to know the framework you’re using). We’re going to be creating a structure that is easy and simple to extend, since this is just the first of many commands we can add to our generator.
Taking advantage of Node’s require mechanics and a very interesting module called require-dir, we’re going to be setting up a folder which will contain all the sub-commands we can possibly have. By adding our command’s files into it, the code will require it automatically and add it as a possible target tech stack generator.
In other words, we’re going to be adding a blog.js file into the commands/generate folder that looks like this:
'use strict'const {Command, flags} = require('@oclif/command')
const requiredir = require("require-dir")
constBlogGenerators = requiredir("../../generators/blog")
classBlogCommandextendsCommand {
asyncrun() {
const {flags} = this.parse(BlogCommand)
const targetGeneration = flags.for.toLowerCase().trim()
//error handlingif(BlogCommand.flags.for.options.indexOf(targetGeneration) == -1) {
returnthis.error (`Target not found '${targetGeneration}', please try one of the valid ones - ${BlogCommand.flags.for.options.join(",")} - `)
}
const gen = newBlogGenerators[targetGeneration]()
gen.run();
}
}
//Adding for auto-documentation purposes thanks to OClifBlogCommand.flags = {
for: flags.string({
description: 'Target destination for the generator command',
options: ['express'] //valid options
})
}
module.exports = BlogCommand
The command you should execute to test this code(it won’t work since I haven’t given you the other class, but just for the sake of simplicity, let’s see the command first, OK?) is:
$ ./bin/run generate:blog --for=express
These two lines from the above code take care of grabbing the value you specified with the“--for” flag:
After that, we’re just making sure that the actual value passed as a parameter exists as a valid option in the command’s documentation, and if it does, it’ll instantiate that class and call it’s run method.
To continue with our generator, we’ll create a new folder structure at the same level as the folder“commands”where we’ll add more specific generators. Figure 3 shows what the new folder structure should look like.
Figure 3: New folder structure
And this is the code for our express.jsgenerator file.
'use strict'const {Command} = require('@oclif/command')
const inquirer = require("inquirer")
const chalk = require("chalk")
const fs = require("fs")
const ncp = require("ncp").ncpconstSOURCEEXPRESSBLOG = __dirname + "/express-template"module.exports = classExpressBlogGeneratorextendsCommand{
prompts() {
this.log(`The following list of files will be created:
${chalk.green(
['app',
'- /public/javascripts/',
'- /public/images/',
'- /public/stylesheets/',
'- /public/stylesheets/style.css',
' ',
'- /routes/index.js',
'- /routes/authors.js',
'- /routes/categories.js',
'- /routes/blog.js',
' ',
'- /views/error.jade',
'- /views/index.jade',
'- /views/layout.jade',
'- /views/authors.jade',
'- /views/categories.jade',
'- /views/feeds.jade',
'- /views/posts.jade',
'- /views/post.jade',
' ',
'- /app.js',
'- /package.json',
'- /bin/www'
].join("\n")
)}
Also the following routes will be availabe for you:
${chalk.green("- GET")} /categories/:slug
${chalk.green("- GET")} /authors/:slug
${chalk.green("- GET")} /blog/rss
${chalk.green("- GET")} /blog/atom
${chalk.green("- GET")} /blog/pages/:page
${chalk.green("- GET")} /blog
${chalk.green("- GET")} /blog/:slug
`)
return inquirer.prompt([{
type: "confirm",
name: "continue",
message: "Are you sure you wish to continue?",
choices: "Y/n",
default: "Y"
},{
when: response => response.continue,
type: "string",
name: "appname",
message: "What's the name of your blog?"
}])
.then( answer => answer)
.catch( err =>false)
}
cleanAppName(appname) {
return appname.trim().toLowerCase().replace(/[^a-zA-Z0-9]/g,"")
}
printSuccessMessage(folderName) {
this.log(chalk.green(`
== CONGRATS ==
Your blog is ready for you to start pumping code into it!
Now you can:
1- cd ./${folderName}
2- npm install
3- npm start
`))
}
/*
Create the destination folder using the application name given,
and copy the blog files into it
*/copyFiles(appname) {
const folderName = this.cleanAppName(appname)
fs.mkdir(folderName, (err) => {
if(err) {
returnthis.log("There was a problem creating your blog's folder: " + chalk.red(err.toString()))
}
this.log("Folder - " + chalk.bold(folderName) + " - " + chalk.green("successfully created!"))
ncp(SOURCEEXPRESSBLOG, folderName, (err) => {
if(err) {
returnthis.log("There was a problem while copying your files: " + chalk.red(err))
}
this.printSuccessMessage(folderName)
})
})
}
execute(answer) {
if(!answer.continue){
returnthis.log("OK then, see you later!")
}
this.copyFiles(answer.appname)
}
asyncrun() {
this
.prompts() //ask the questions
.then(this.execute.bind(this)) //execute the command
}
}
As you can see, the class is just another command. In fact, it extends OClif’s Command class, and with it, we can:
Prompt the user for some information and confirmation of the actions that are about to take place
Create the folder and copy the pre-existing template files if confirmation is provided.
Note that even though they’re not the focus of this article, to provide the functionality of asking the user those questions, we’re using the inquirer module and to format the output we’re using chalk.
The actual generated code for your brand new blog is stored inside the“generators/blog/express-template" folder and we’re just copying the entire content of that folder into the new one.
Finally, to actually have the buttercms command available to you, you can use the following command:
$ npm link
After doing that, you’ll have the CLI tool accessible from within your PATH , so you can run the generator command like you would any other command.
In order to utilize the generated code, you’ll have to go into the config folder and edit the default.json file, inserting your ButterCMS Auth token in the right place. Once you’ve done that, you’re ready to start the server using
And in there, you should see a test post created by default by ButterCMS.
Summary
This generator still needs more work to be a full CLI tool you can use for creating and maintaining real life blogs.
That being said, this is definitely a step in the right direction towards getting a simplified way of creating a quick blog client that’ll work with ButterCMS. In just a few seconds, you can have a working, fully fledged blog, ready to start customizing it, using Jade as a template engine and simple CSS for the styles.
Which is one of the many benefits of this CLI tool: you gain the ability to create a fully customizable blog without having to know how to code. Usually the trade off is: if you want customization, you need to code, if you don’t, you have less control. But with the ButterCMS CLI tool you can to create your blog, and then simply learn some CSS in order to customize it, forget about Node, you don’t need it!
Future improvements
As you can see, OClif provides a very simple and extendable base structure for our command line tool. You could continue to build on this code by creating new commands and adding them into the right folders in order to do things like:
Add pages into existing blog projects.
Add new flags into existing commands, such as one asking for the auth tokens used to interact with ButterCMS(instead of using the current method of having to edit them afterwards).
Thank for reading up to this point.If you want to take a look at the full source code, you can check it out in its Github Repository.
Author
Fernando Doglio has been working as a Web Developer for the past 10 years. In that time, he's come to love the web, and has had the opportunity of working with most of the leading technologies at the time, suchs as PHP, Ruby on Rails, MySQL, Node.js, Angular.js, AJAX, REST APIs and others.
He can be contacted on twitter at: @deleteman123 or you can read more about him and his work at www.fdoglio.com