

- Why Hugo?
- Tutorial prerequisites
- Hugo Tutorial: Building a knowledge base with Hugo and ButterCMS
- Install Hugo
- Create a new site with Hugo
- Setting up the knowledge base content in ButterCMS
- Creating our Hugo Knowledge Base Article page type
- Creating a page with the Hugo Knowledge Base Article page type
- Building our Section Page Collection in ButterCMS
- Building our front-end
- Creating our site layout
- Adding search functionality
- Our final application
- Closing thoughts
In today's fast-paced world, a well-organized knowledge base is incredibly powerful. It serves as a comprehensive reference, answering FAQs and providing valuable information on a specific topic.
Imagine the convenience of a knowledge base website that effortlessly provides the information users seek. With Hugo and ButterCMS, you can create a dynamic, user-friendly knowledge base that meets your audience's needs.
In this Hugo tutorial, we'll guide you step by step in building your own knowledge base website. By leveraging the features of Hugo and ButterCMS, you'll create a robust, easily maintainable knowledge base that enhances user experience.
Table of contents
Why Hugo?
Hugo is a popular static site generator that is known for its speed, simplicity, and flexibility. It generates websites in seconds and is easy to customize using themes. Hugo offers several benefits for building a knowledge base.
First, it allows you to create a website quickly and easily, without the need for a backend database or server-side scripting. Hugo also generates static HTML files, which makes your site load quickly and perform well. Additionally, its modular architecture allows you to create custom layouts and templates for your content, giving you flexibility in how your knowledge base is presented.
Another benefit of using Hugo for a knowledge base is that it is easy to use and learn. Its simple syntax and command-line interface make it easy to create and manage your site, even if you have limited web development experience. This can be especially helpful for businesses or organizations that need to create a knowledge base quickly and efficiently.
Tutorial prerequisites
Here’s what you will need for this tutorial:
-
Basic knowledge of Hugo
-
Git installed on your computer
-
A text editor of your choice
-
A ButterCMS account
All the code for this tutorial can be found in this GitHub repo.
How we'll be using ButterCMS
ButterCMS is a headless content management system (CMS) that allows users to create, edit, and publish content on their website or application without the limitations of a traditional CMS.
It works particularly well with static site generators like Hugo since it makes it simple for users to develop and manage content without worrying about setting up and installing a backend server.
For this Hugo knowledge base tutorial, we'll be using ButterCMS Pages and collections to create the following:
-
Article pages: Each article will have its own page that includes the article content, as well as any related metadata (such as date published).
-
Section collection: The FAQ section will be a collection, referencing all FAQ articles that are related to the section.

Hugo Website Tutorial: Building a knowledge base with Hugo and ButterCMS
Let’s get started with our tutorial. First, we’ll get Hugo up and running. Then, we’ll create our page types in ButterCMS and, lastly, integrate our knowledge base content into Hugo.
Install Hugo
You can download the latest version of Hugo from their official website (https://gohugo.io/).
Once you've downloaded the software, follow the installation instructions for your operating system to get Hugo up and running on your computer.
Create a new site with Hugo
With Hugo installed, it's time to create a new site. To do this, open a terminal or command prompt and run the following command:
hugo new site hugo-kb
This will create a new Hugo site in a directory named hugo-kb. This directory will contain the files and directories required to build your site, including the themes, content, and configuration files.
File structure
Our Hugo landing page structure now looks like this:
hugo-kb/
├── archetypes/
│   └── default.md
├── assets/
├── content/
├── data/
├── layouts/
├── public/
├── static/
├── themes/
└── config.toml
In the layouts folder, create a folder named _default. In the default folder, we’ll add the file baseof.html, and in the folder we’ll have this base layout code for our knowledge base:
<!DOCTYPE html>
<html lang="en">
<head>
    <meta charset="UTF-8">
    <meta http-equiv="X-UA-Compatible" content="IE=edge">
    <link rel="stylesheet" href="/assets/main.css">
    <meta name="viewport" content="width=device-width, initial-scale=1.0">
    <title>Hugo KB</title>
</head>
<body style="margin: 0;">
    <header style="margin: 0; background-color: rgb(33 37 52); display: flex; justify-content: center;">
        <div>
            <h1 style="margin: 0; color: white;">Hugo KB</h1>
            <div>
                <input value="Search the knowledge base">
                <button>Search</button>
            </div>
        </div>
    </header>
    <main class="pb7" role="main">
      {{ block "main" . }}{{ end }}
    </main>

  </body>
</html>
Setting up the knowledge base content in ButterCMS
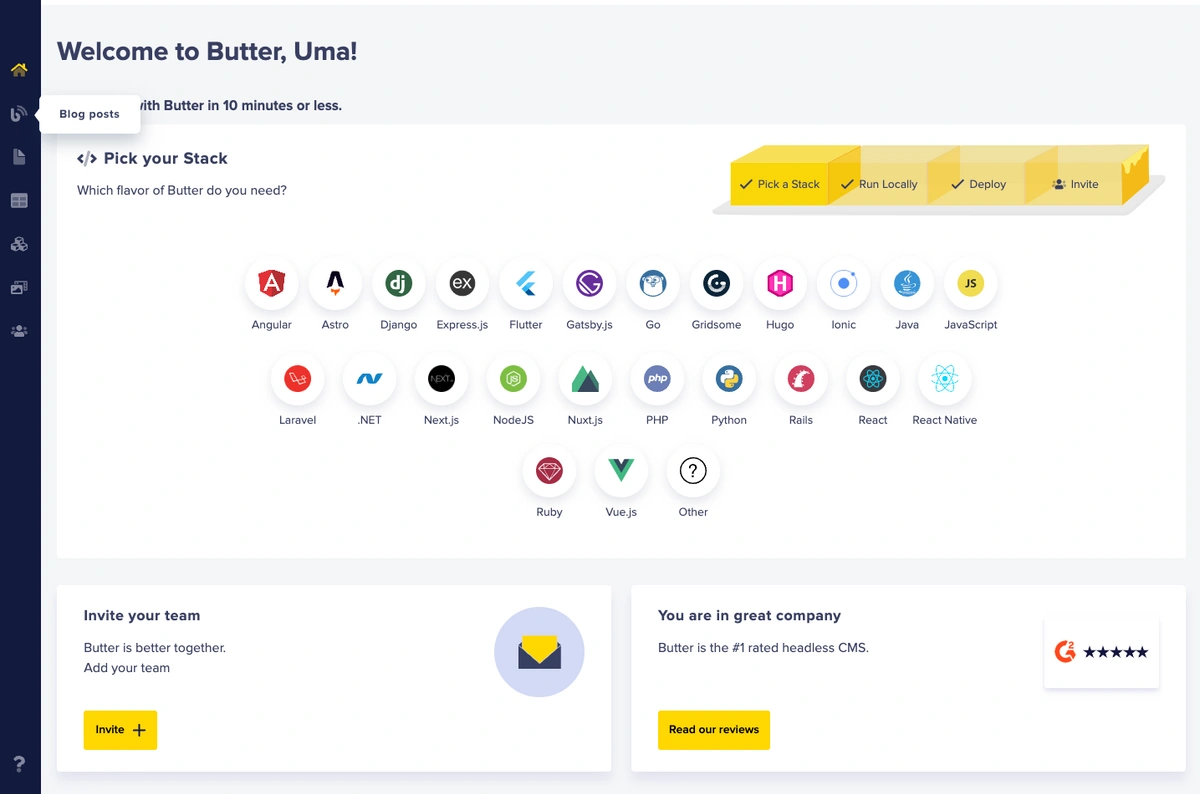
To get started with ButterCMS, you'll need to create an account. You can sign up for a free account on the ButterCMS website. After successfully logging in, you’ll see your home dashboard.
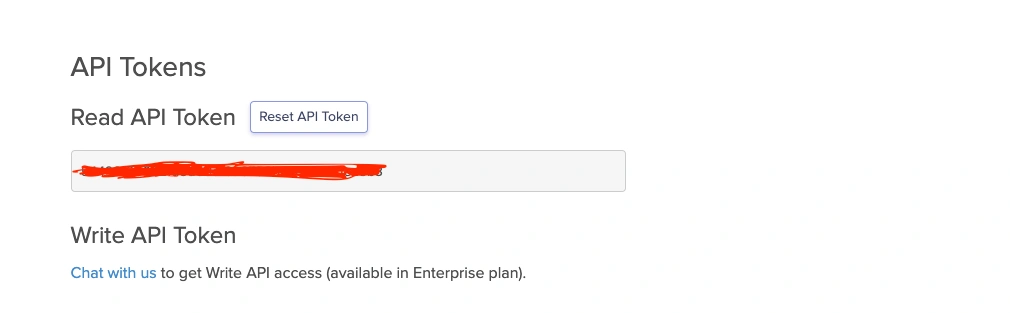
An API key is created for you by ButterCMS, and you can access it by navigating to the Account tab and clicking on Settings
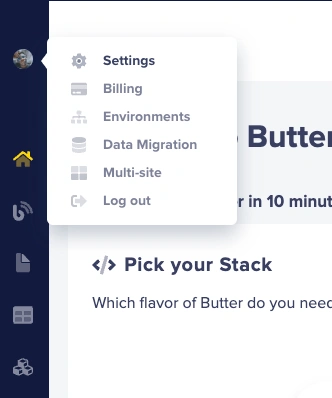
Get your API key and store it securely.
Building the knowledge base page types
This is what we will be building in this tutorial:
From the GIF above, our homepage will have section pages created in ButterCMS and each of the article pages will be our knowledge base page type.
Creating our Hugo Knowledge Base page type
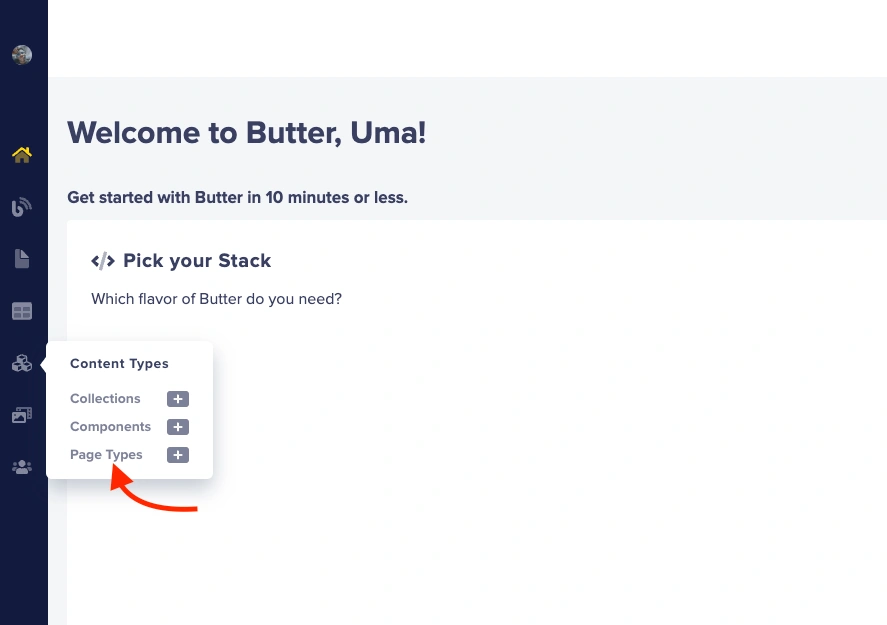
On your ButterCMS navigation tab, click on Content Types, and select Page Types as shown in the image below:
You will be redirected to a page that provides a list of all your page types.
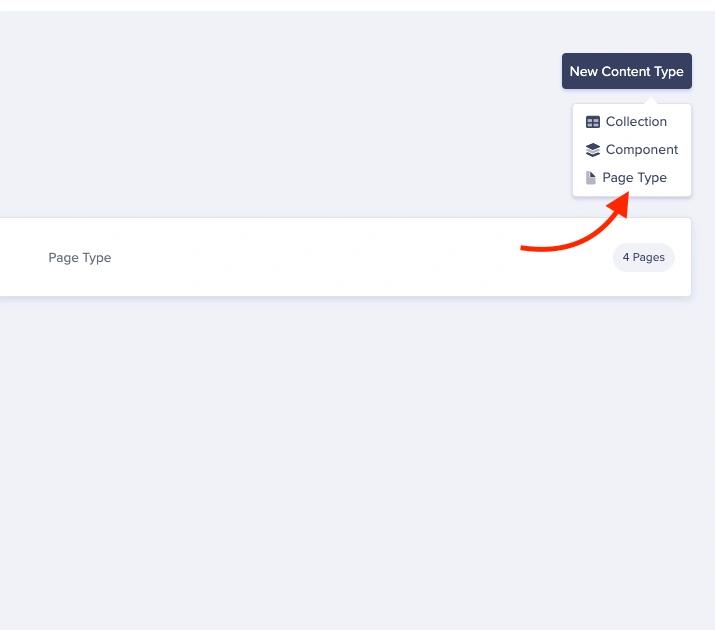
Then, click the New Content Type button in the top right corner and select Page Type from the dropdown and you’ll be redirected to the ButterCMS page configuration page:
On this page, we’ll be defining the schema of the page type we want to create.
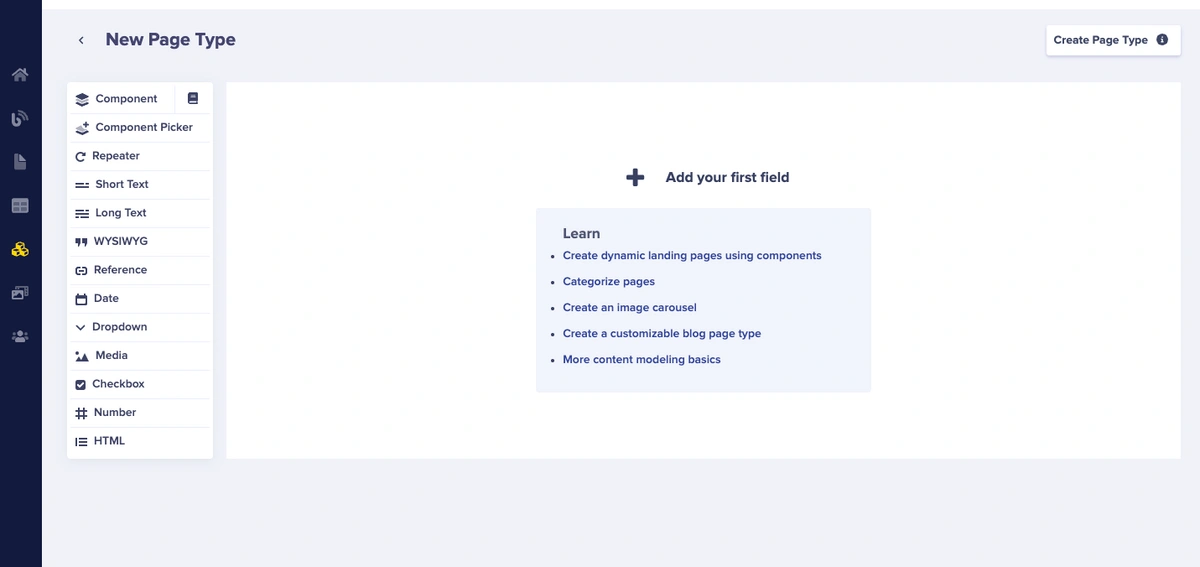
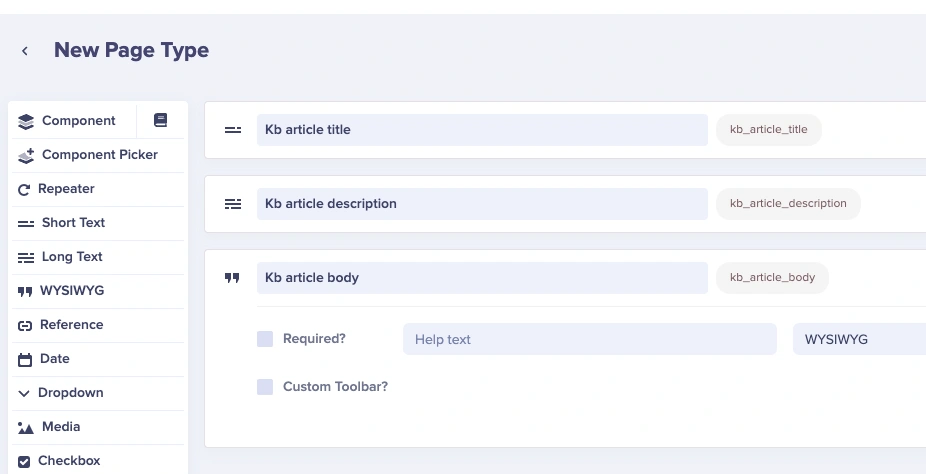
Let’s first select the fields we’ll be using on our page type.
-
Short text for the knowledge base article name (We’ll name ours “Kb article title”)
-
Long text for the knowledge base article description (We’ll name ours “Kb article description”)
-
WYSIWYG (What You See Is What You Get) editor for the article body (We’ll name ours “Kb article body”)
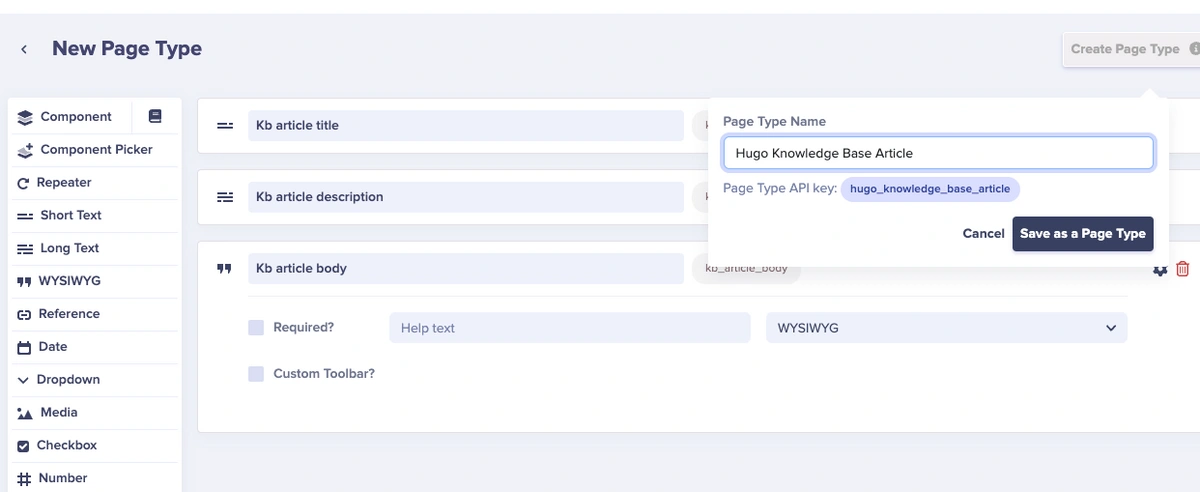
Click on the Create Page Type button and input the name of your page type. In our case, we’ll name it Hugo Knowledge Base Article, then we’ll click on the Save as a Page Type button to save it.
Creating a page with the Hugo Knowledge Base page type
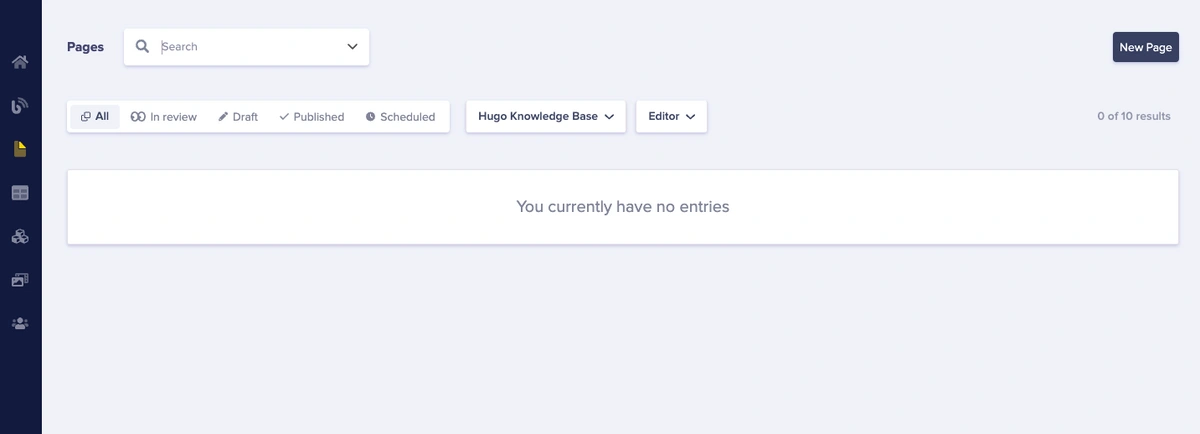
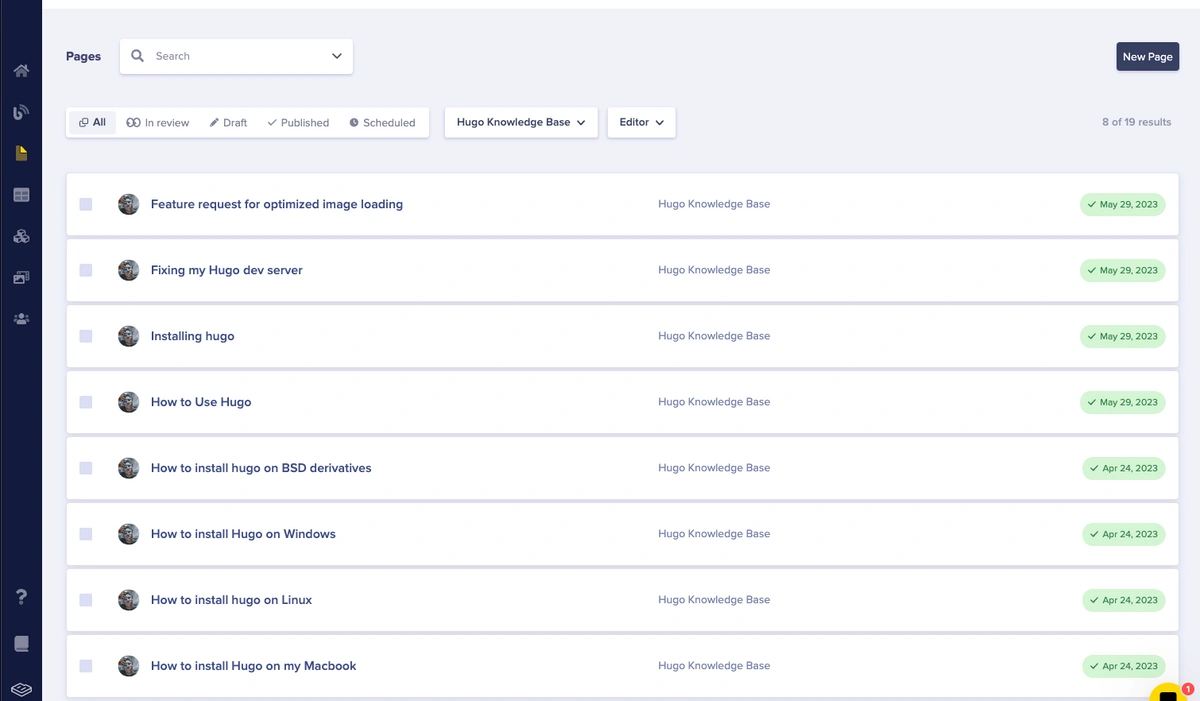
On your ButterCMS navigation tab, click on Pages and select Hugo Knowledge Base Article.

You will then land on the Pages dashboard, which is filtered to only show pages made with the Hugo Knowledge Base Article page type.
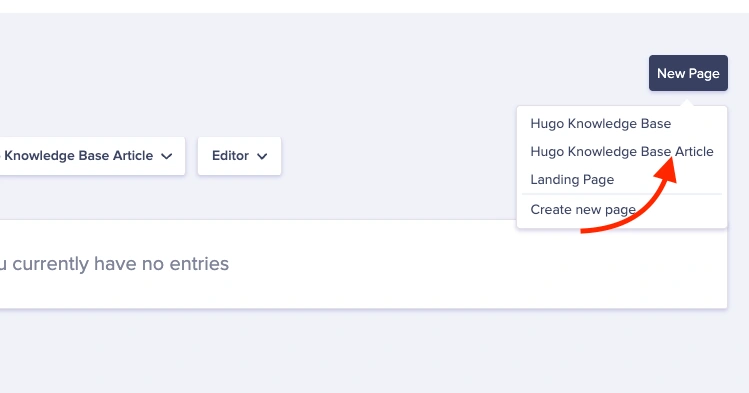
Next, click on the New Page button in the top night corner and select Hugo Knowledge Base Article, and you’ll be directed to the page where you can start creating your new page using the Hugo Knowledge Base page type.
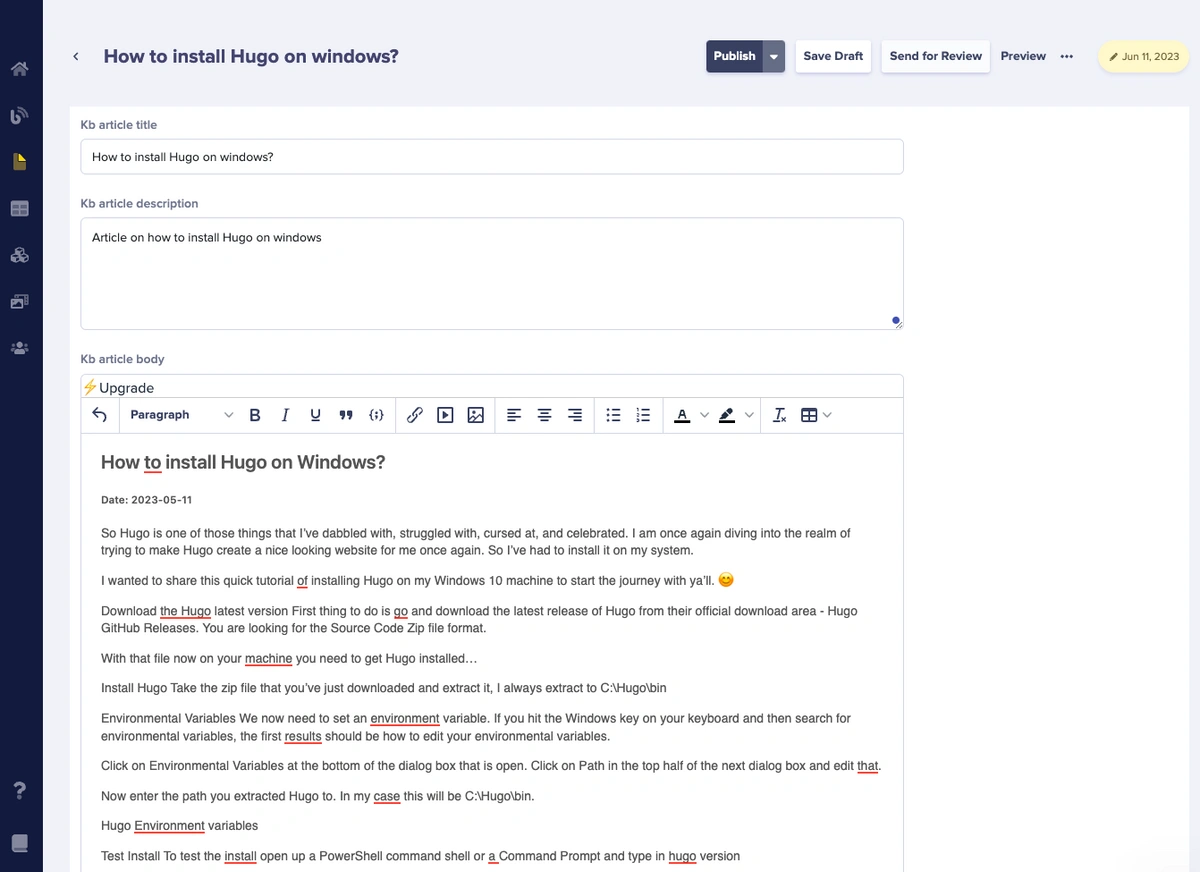
Now, input your article title and save the article page metadata, and you can start filling out the article page.
In our case, we gave the article page the title "How to Install Hugo on Windows?”. The API slug is automatically created by ButterCMS for us, and will be useful in routing to this page in the front-end of our application
After we save the page metadata, we can fill out our article FAQ with the desired information.
After filling up the information for the FAQ article, our page looks like this:
Click on the Publish button when you’re done and repeat for the number of sections and articles you want in the section for your knowledge base site.
Building our Section Page Collection in ButterCMS
So far, we have created our Hugo knowledge base page type, and from our knowledge base page type, we have been able to add one FAQ article from the previous example.
I have added 7 more articles for the sake of this tutorial, which we’ll use as a proof of concept. We want to be able to group these articles into sections, for example:
-
FAQs section
-
Troubleshooting section
-
Feature Request section
-
Linux Troubleshooting section
-
Windows Troubleshooting section
To do this, we need to create collections for our sections and reference the FAQ articles we want to be under those sections. Let’s dive into our dashboard and do that. Please note that you could also do this by creating a page type with the same fields we’re going to add to our collections later on.
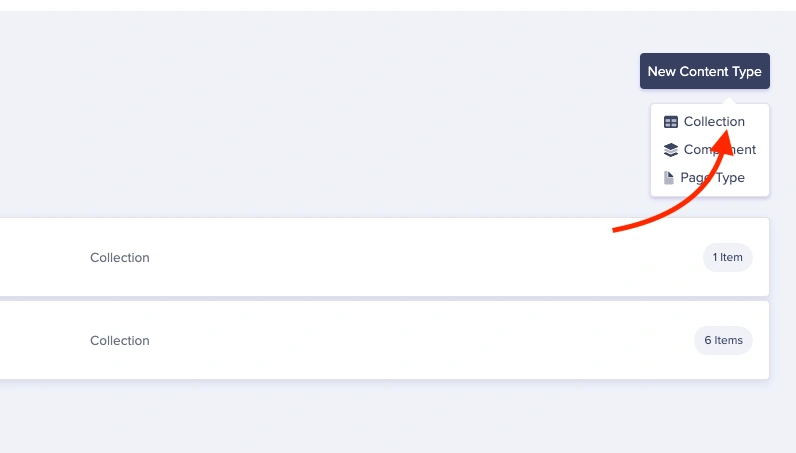
Navigate to the collection type page by clicking on the “+” icon in the Collections option on the Content Types drop-down from the side menu.

Click on the New Content Type button at the top right of the page and select the Collection option.
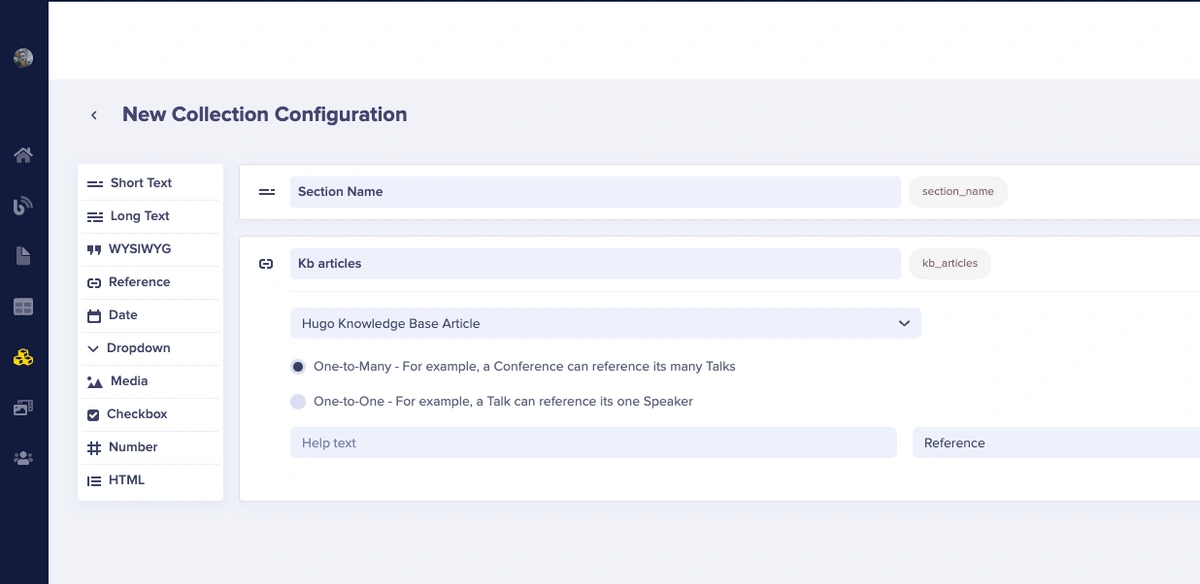
Now, we can create our collection type structure, which includes:
-
A short text field with the name “Section Name” and the attribute:
-
Required
-
-
A reference field with the name “Kb article” and the following attributes:
-
What will this reference - “Hugo Knowledge Base Article”
-
Reference type - One-to-many
With that, we should have something like this:
Now, click on Create Collection to name and save our page type. Here, we’ll name it “Section Category”.
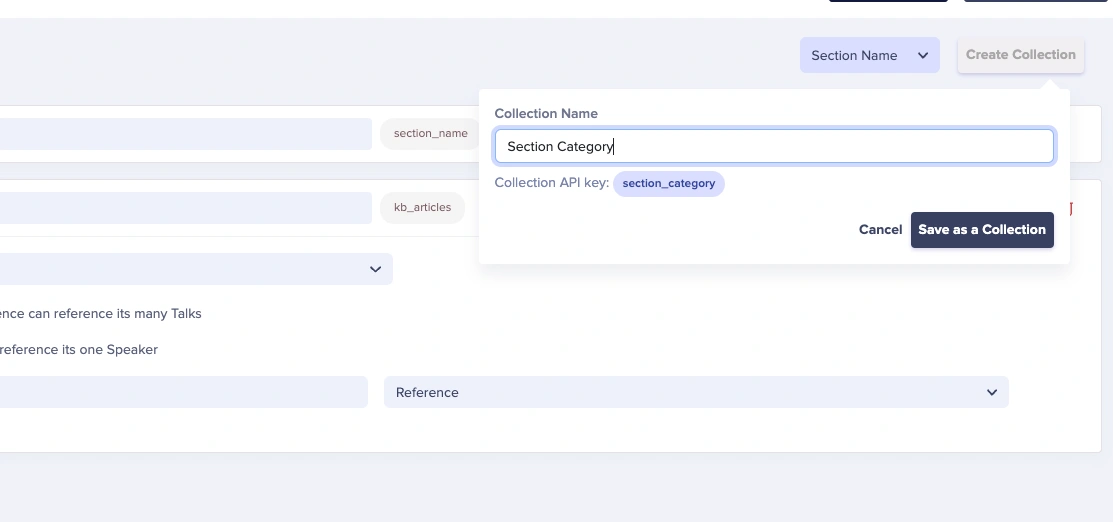
Click on Save as a Collection to save it.
After saving, we can begin creating items for this collection.
Here, we’ll be creating the FAQs section collection item only, but you can go on and add the remaining sections after completing the steps below:
-
Troubleshooting section.
-
Feature Request section.
-
Linux Troubleshooting section.
-
Windows Troubleshooting section.
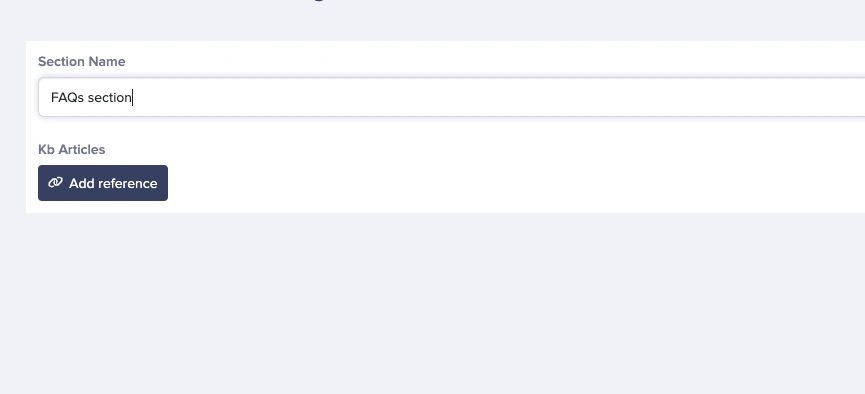
Start by filling in the information for the category, like the name and description of the FAQs section:
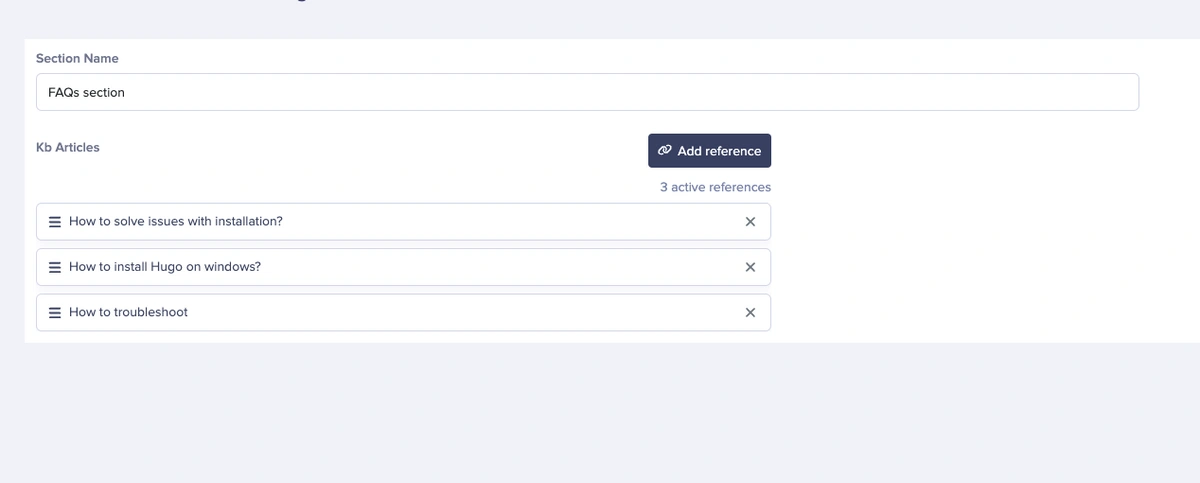
We can add article references to previously created knowledge base articles. To add article references, click on the Add Reference button and select the articles that should belong to the collection:

Once selected, click on Use Selected to add the selected articles to the reference.
Now, click on the Publish button to save and publish the collection. Repeat the steps to create multiple section collections and KB article references.
Building our front-end
We are done with the ButterCMS section. Now, let's flesh out our Hugo front end and integrate with ButterCMS. First, we’ll write some Go code to fetch our content data from ButterCMS. Then, we’ll create a base layout for the site, make it look good, and add search functionality. Let’s get started.
Fetching our ButterCMS content
In this section, we’ll look at how we can fetch our ButterCMS content and integrate it into our Hugo application we just spun up earlier. We are going to be using Hugo's built-in support for JSON data and ButterCMS' JSON API to retrieve and display our content.
First, we’ll write a script in Go that makes a request to our ButterCMS API to retrieve our content. To do this, create a main.go file at the root of your directory, and paste the following code:
package main

import (
    "encoding/json"
    "fmt"
    "net/http"
    "io"
)

func main() {
    url := fmt.Sprintf("<your-ButterCMS-api-token>")

    resp, err := http.Get(url)
    if err != nil {
        fmt.Printf("Error making HTTP request: %s", err)
        return
    }
    defer resp.Body.Close()

    if resp.StatusCode != http.StatusOK {
        fmt.Printf("Error fetching content: %d %s", resp.StatusCode, resp.Status)
        return
    }

    var data struct {
        Data json.RawMessage `json:"data"`
    }

    if err := json.NewDecoder(resp.Body).Decode(&data); err != nil {
        fmt.Printf("Error decoding response: %s", err)
        return
    }

    // Do something with your data here
    fmt.Printf("%s", data.Data)
}
From the code, we are using Go’s built-in net/http package. All you have to do is add your ButterCMS API token to the code in line 11.
For each of the collections, we have run a GETrequest from your Go code with the API string like this:
https://api.buttercms.com/v2/content/section_category/?auth_token=<auth-token-here>
The http.Get() function makes a GET request to the ButterCMS API endpoint for your content type, passing your API key in the URL. The response is returned as an HTTP response object, which you can read from the response body.
In this example, we're using the json package to parse the response body into a struct that has a Data field of type json.RawMessage. This allows you to handle the response data in a more flexible way, without having to define a strict data structure.
Storing our ButterCMS content
Since Hugo allows different data types, JSON included, we’ll be saving our response data we got from the API call to ButterCMS as a JSON file. To do that, add the following code to the above main.go file after the last comment.
In your Go code that makes the GET request to the ButterCMS API endpoint, after parsing the response data, you can write the data to the JSON file using the encoding/json package:
// Assuming `data` is the JSON data fetched from the ButterCMS API

// Open the JSON file for writing, creating it if it doesn't exist
file, err := os.OpenFile("data/my_content_type.json", os.O_WRONLY|os.O_CREATE|os.O_TRUNC, 0644)
if err != nil {
    fmt.Printf("Error opening JSON file: %s", err)
    return
}
defer file.Close()

// Write the JSON data to the file
if err := json.NewEncoder(file).Encode(data); err != nil {
    fmt.Printf("Error writing JSON data to file: %s", err)
    return
}
This code opens the JSON file for writing, creates it if it doesn't exist, and then uses the json.NewEncoder().Encode() method to write the JSON data to the file.
After running your Go code, you should see a new file at data.json containing the JSON data fetched from the ButterCMS API.
To run the Go program, run this:
go run main.go
This will compile and run the main.go script, which will fetch the data from the ButterCMS API and save it to a new file called data.json in your project directory. You should see a message in the terminal indicating that the data has been fetched and saved to the file.
Note that you will need to have the encoding/json and net/http packages imported in your Go script in order to make the HTTP request and parse the response data as JSON. You may also need to import other packages depending on the structure of your code.
Converting our JSON to Markdown
Based on the JSON file we had returned earlier, our content from ButterCMS is a JSON object containing a data array with all the FAQ posts. What we want to do is extract each of the FAQ posts from the Markdown file, convert it into Markdown, and put them into our content folder.
The reason we want to do this is because the content folder is where all the content for our Hugo website is stored. Once we add any content to our content folder, it is automatically made available for us to use.
At the root of our project directory, create a file named conv.go and paste this code:
package main
import (
    "encoding/json"
    "fmt"
    "io/ioutil"
    "os"
    "path/filepath"
    "text/template"
)
func main() {
    // Read the JSON file
    data, err := ioutil.ReadFile("<filePath to your JSON file>")
    if err != nil {
        fmt.Println(err)
        return
    }
    // Unmarshal the JSON data into a map[string]interface{}
    var d map[string]interface{}
    err = json.Unmarshal(data, &d)
    if err != nil {
        fmt.Println(err)
        return
    }
    // Get the data array
    dataArray, ok := d["data"].([]interface{})
    if !ok {
        fmt.Println("Invalid data format")
        return
    }
    // Define a template for the Markdown files
    const templateString = `# {{ .Title }}
{{ range $key, $value := .Data }}
{{ $key }}: {{ $value }}
{{ end }}
`
    // Create the "content" folder if it doesn't exist
    err = os.MkdirAll("content", 0755)
    if err != nil {
        fmt.Println(err)
        return
    }
    // Loop through the data objects and create a Markdown file for each one
    for i, dataObj := range dataArray {
        // Convert the data object to a map[string]interface{}
        dataMap, ok := dataObj.(map[string]interface{})
        if !ok {
            fmt.Printf("Invalid data object format: %v\n", dataObj)
            return
        }
        // Create the Markdown file
        fileName := fmt.Sprintf("data%d.md", i+1)
        filePath := filepath.Join("content", fileName)
        file, err := os.Create(filePath)
        if err != nil {
            fmt.Println(err)
            return
        }
        defer file.Close()
        // Render the Markdown template for the data object
        title := fmt.Sprintf("Data %d", i+1)
        tmpl, err := template.New("markdown").Parse(templateString)
        if err != nil {
            fmt.Println(err)
            return
        }
        err = tmpl.Execute(file, map[string]interface{}{
            "Title": title,
            "Data":  dataMap,
        })
        if err != nil {
            fmt.Println(err)
            return
        }
    }
}
Here is what the code above does:
-
Read the JSON file.
-
Unmarshal the JSON data into a
map[string]interface{} -
Get the
dataarray. -
Define a template for the Markdown files.
-
Create the "content" folder if it doesn't exist.
-
Loop through the data objects and create a Markdown file for each one.
-
Create the Markdown file.
-
Render the Markdown template for the data object.
To run this code, in your terminal run:
go run conv.go
Creating our site layout
In this section, we’ll look at how to create our Hugo site layout and make the ButterCMS content available on our site. First, we’ll create a _default folder in our project layouts folder. Then in our _default folder, we’ll create three files:
-
baseof.html for the default template layout of our site
-
list.html for the list template we’ll be using for our FAQ posts
-
single.html for individual FAQ post answers
Our baseof.html file
In our baseof.html file, we have the following code:
<!DOCTYPE html>
<html lang="en">
  <head>
    <meta charset="UTF-8" />
    <meta http-equiv="X-UA-Compatible" content="IE=edge" />
    <link rel="preconnect" href="https://fonts.googleapis.com" />
    <link rel="preconnect" href="https://fonts.gstatic.com" crossorigin />
    <link
      href="https://fonts.googleapis.com/css2?family=Oleo+Script+Swash+Caps&family=Poppins:ital,wght@0,100;0,200;0,300;0,400;0,500;0,600;0,700;0,800;0,900;1,100;1,200;1,300;1,400;1,500;1,600;1,700;1,800;1,900&display=swap"
      rel="stylesheet"
    />
    <meta name="viewport" content="width=device-width, initial-scale=1.0" />
    <title>Hugo KB</title>
  </head>
  <body
    style="
      margin: 0;
      font-family: 'Oleo Script Swash Caps', cursive;
      font-family: 'Poppins', sans-serif;
    "
  >
    <header
      style="
        margin: 0;
        padding: 3rem;
        margin-bottom: 4rem;
        background-color: rgb(33 37 52);
        display: flex;
        justify-content: center;
      "
    >
      <div>
        <h1
          style="
            margin: 0;
            color: white;
            margin-bottom: 3rem;
            display: flex;
            justify-content: center;
          "
        >
          Hugo KB
        </h1>
        <div>
          <input
            type="text"
            style="padding: 1rem; padding-right: 40rem;"
            placeholder="Search the knowledge base"
            name="search"
          />
          <button
            type="submit"
            style="
              font-size: 20px;
              margin-left: -20px;
              outline: none;
              color: white;
              background-color: rgb(235 89 129);
              text-decoration: none;
              border: none;
              padding: 1.1rem;
            "
          >
            search
          </button>
        </div>
      </div>
    </header>
    <main class="pb7" role="main">
      {{ block "main" . }}{{ end }}
    </main>
  </body>
</html>
This file contains code for the base layout of our Hugo site. The header is going to be made available to all the other pages we have on the site. For the main tag, we specify that whatever page starts by defining main will be displayed here. We will see this in the next section.
Our list.html file
In our list.html file, we have this code:
{{ define "main" }} {{ .Content}}
<div
  style="
    display: flex;
    flex-direction: row;
    flex-wrap: wrap;
    justify-content: space-evenly;
    align-items: center;
    align-content: space-between;
  "
>
  {{ range .Pages }}
  <div
    style="
      background-color: white;
      margin-top: 1rem;
      padding: 3rem;
      border: 2px solid gray;
      width: 30%;
    "
  >
    <a href="{{ .Permalink }}">{{.Title }}</a>
  </div>
  {{end}}
</div>
{{end}}
This is a code block in the Hugo templates language, which is used to generate the HTML for our Hugo website.
Here's a breakdown of the code:
-
{{ define "main" }}: This line defines a new template block named "main". Blocks are used in Hugo templates to define reusable sections of HTML code. -
{{ .Content}}: This code outputs the content of the current page. The period(.)is used to access the current page's data. -
{{ range .Pages }}: This line starts a loop that iterates over all the pages in the website. -
<a href="{{ .Permalink }}">{{.Title }}</a>: This code creates an HTML link (<a>element) to the current page's permalink ({{ .Permalink }}) and displays the page's title ({{ .Title }}) as the link text. -
{{end}}: This ends the range loop. -
{{end}}: This ends the define block for the "main" template.
The code defines a reusable "main" HTML template block that displays the content of the current page and also creates a loop that iterates over all the pages on the website, creating a link to each page's permalink with the page's title as the link text. The <div> elements in the loop have inline styles defined to control their appearance.
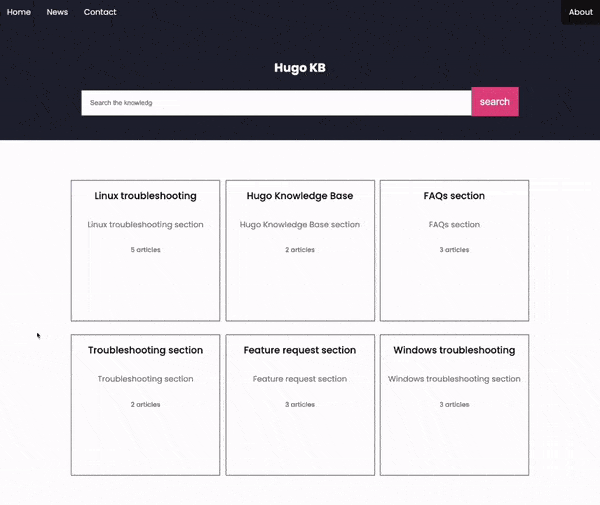
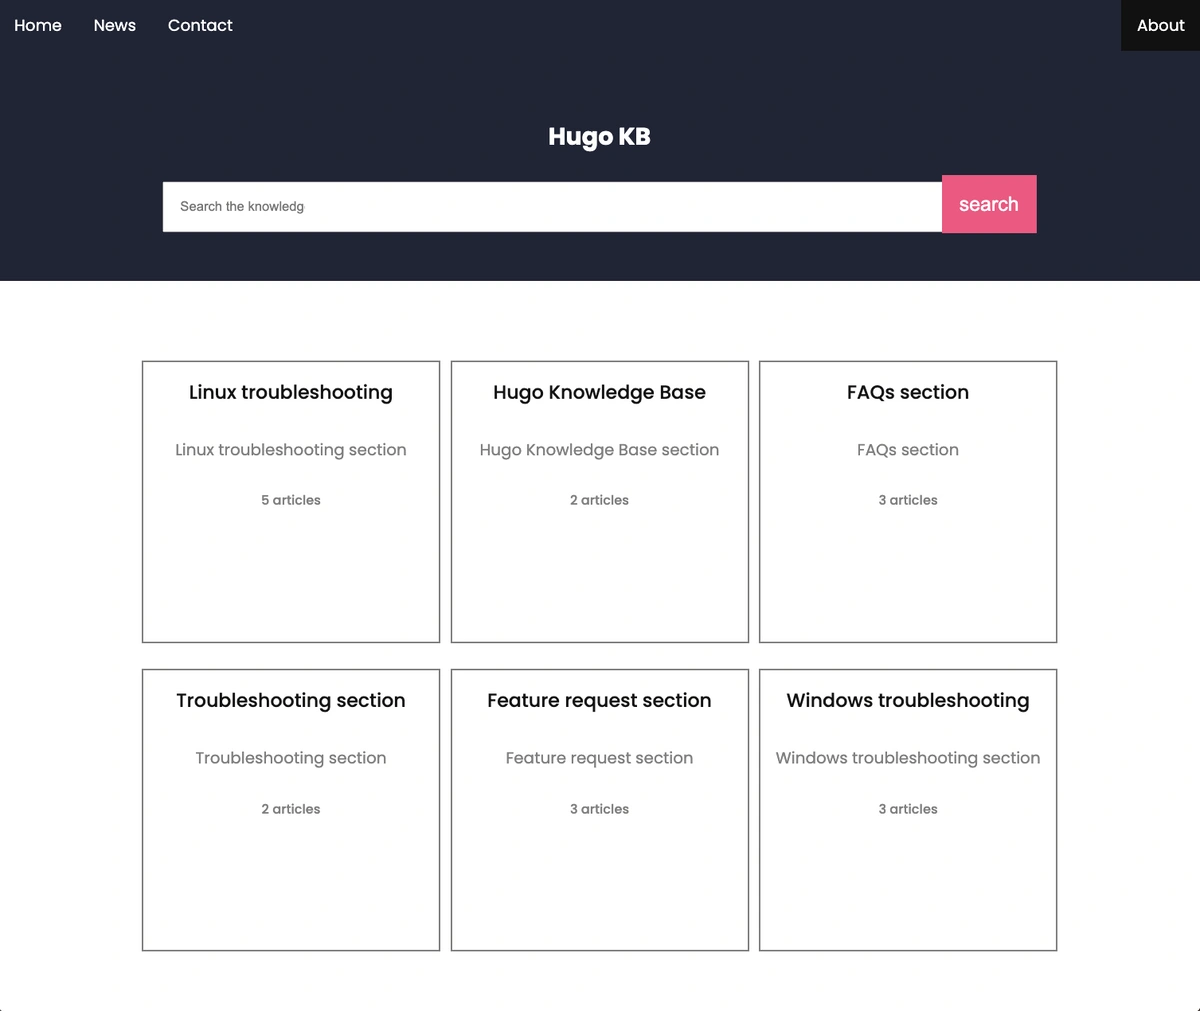
Here is what our page looks like now:
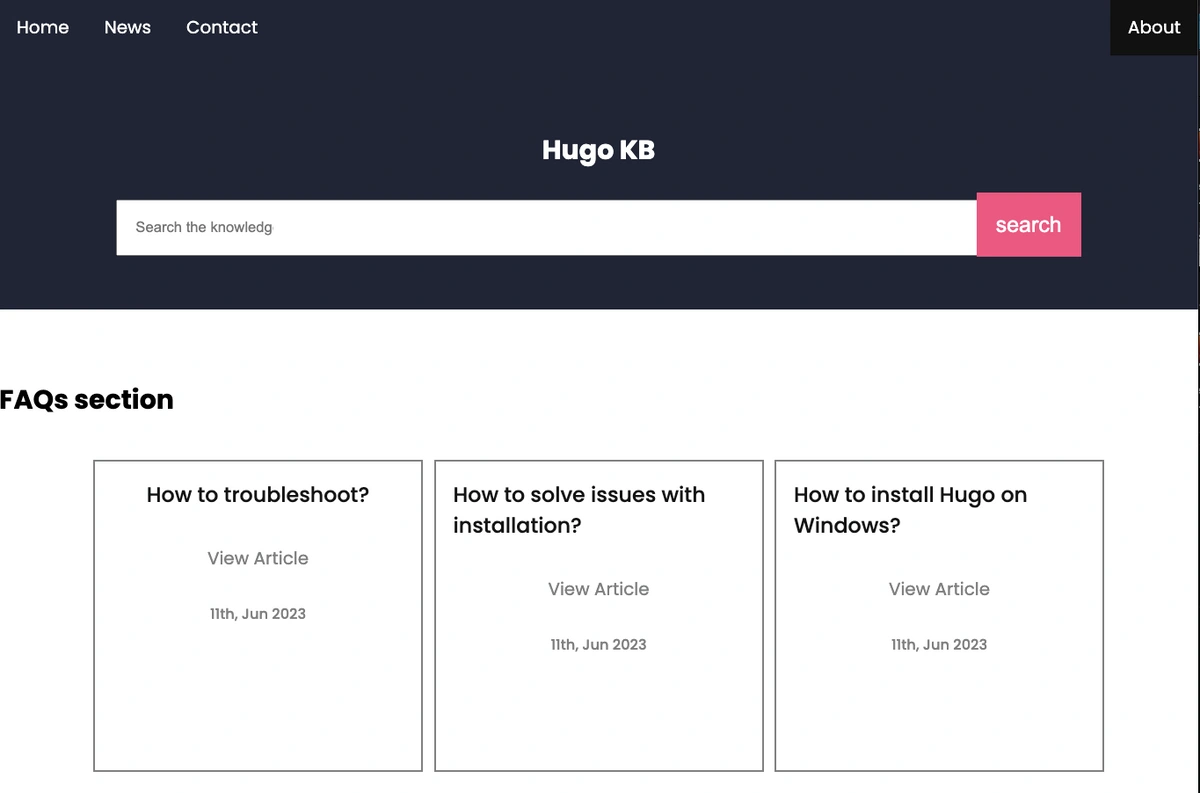
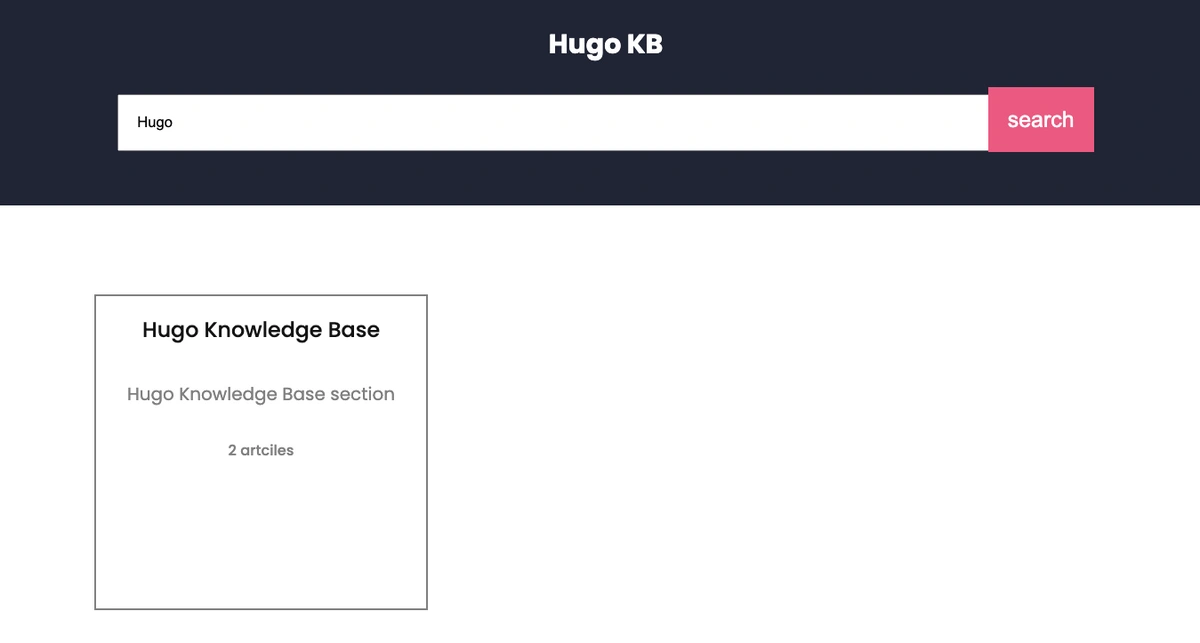
If we click on the FAQs page section, our section page will look like this:
Next, we need to create a single page template so we can view the FAQ answers.
Our single.html file
In our single.html file, we have the code:
{{ define "main" }}
<div
  style="
    display: flex;
    justify-content: center;
    background-color: white;
    padding: 3rem;
    border: 2px solid gray;
    width: 70%;
    margin: auto;
  "
>
  <div>
    {{.Content}}
  </div>
</div>
{{end}}
This code block defines a partial template named "main" which will be used in the Hugo layout to display the main content of the page.
The template itself is a simple HTML structure that contains a centered div with some styling.
Inside the div, there is another div that contains the actual content which is our FAQ answer. The content is inserted using the .Content variable, which is provided by Hugo and contains the rendered HTML of the page's content.
This template is used to display the FAQ answers of the page in a centered container with a clean layout.
Adding search functionality
To add search functionality to a Hugo site, you can use a pre-built search plugin like Lunr.js. The Lunr plugin allows you to index your content and provide a search interface for users to search through your website's content. All you need to do is add the plugin to your Hugo site and configure it to index your content. You can then add a search bar to your website's layout and hook it up to the plugin to enable search functionality.
Install Lunr.js via npm:
npm install lunr --save
Create a new JavaScript file in your Hugo site's assets/js directory. For example, search.js:
(function() {
  var searchTerm = '',
      searchResults = document.getElementById('search-results'),
      searchInput = document.getElementById('search-input');

  function search() {
    if (searchTerm && searchTerm.length > 0) {
      // Initialize the lunr index
      var index = lunr(function () {
        this.field('title', { boost: 10 });
        this.field('tags', { boost: 5 });
        this.field('content');
        this.ref('id');
      });

      // Add your content to the index
      {{ range where .Site.RegularPages "Type" "not in" .Site.Params.ExcludeFromSearch }}
        index.add({
          title: {{ .Title | jsonify }},
          tags: {{ .Params.tags | jsonify }},
          content: {{ .Plain | jsonify }},
          id: {{ .Permalink | jsonify }}
        });
      {{ end }}

      // Perform the search
      var results = index.search(searchTerm);

      // Display the results
      if (results.length > 0) {
        searchResults.innerHTML = '';
        results.forEach(function(result) {
          var item = document.createElement('li');
          item.innerHTML = '<a href="' + result.ref + '">' + result.doc.title + '</a>';
          searchResults.appendChild(item);
        });
      } else {
        searchResults.innerHTML = '<li>No results found</li>';
      }
    } else {
      searchResults.innerHTML = '';
    }
  }

  searchInput.addEventListener('keyup', function(e) {
    searchTerm = e.target.value.trim();
    clearTimeout(searchTimeout);
    searchTimeout = setTimeout(search, 100);
  });

})();
Add the search bar to your website's layout:
<input
  style="padding: 1rem; padding-right: 40rem;"
  placeholder="Search the knowledge base"
  name="search"
type="search" id="search-input"
/>
<ul id="search-results"></ul>
<button>
  search
</button>
And we have a working search bar:
Our final application
So far, we are done building our knowledge base site with ButterCMS' robust content management features. We have a homepage, a section page, and an article page.
The homepage:
Our section pages look like this:
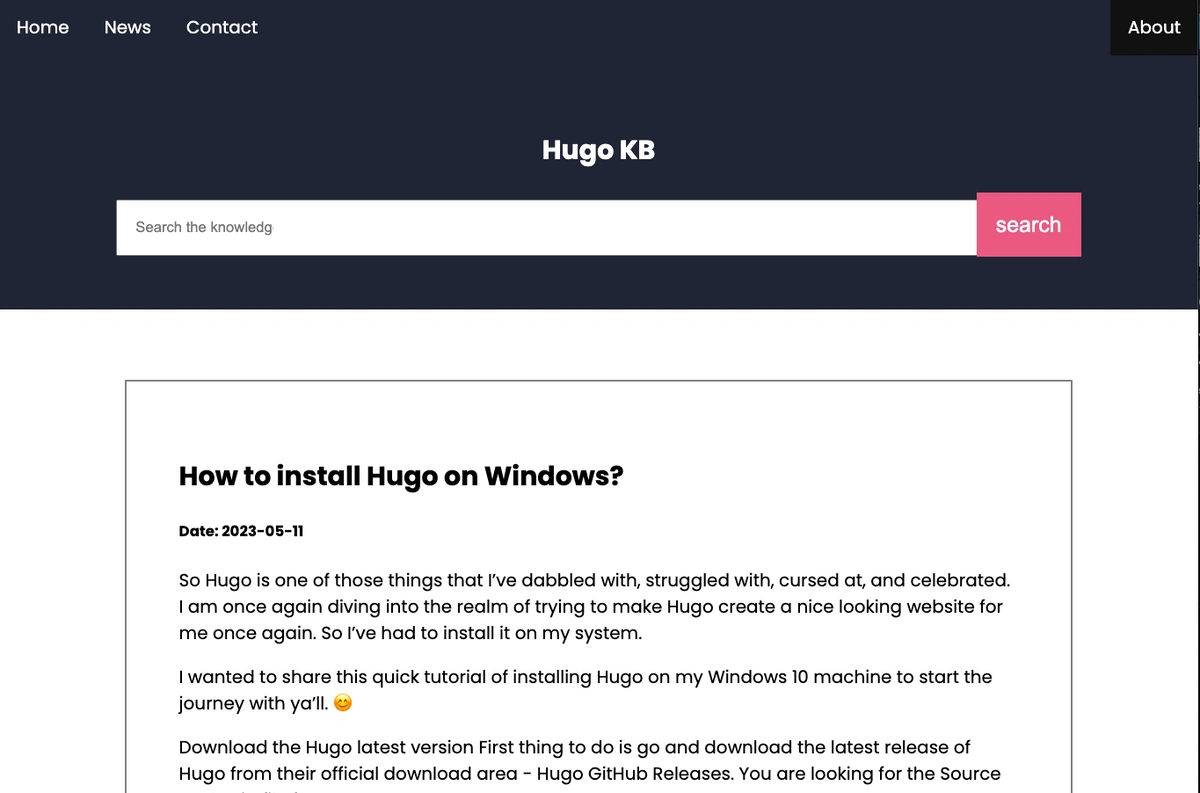
The individual article pages should look like the image below. Here is the page for the FAQ answer on how to install Hugo on Windows:
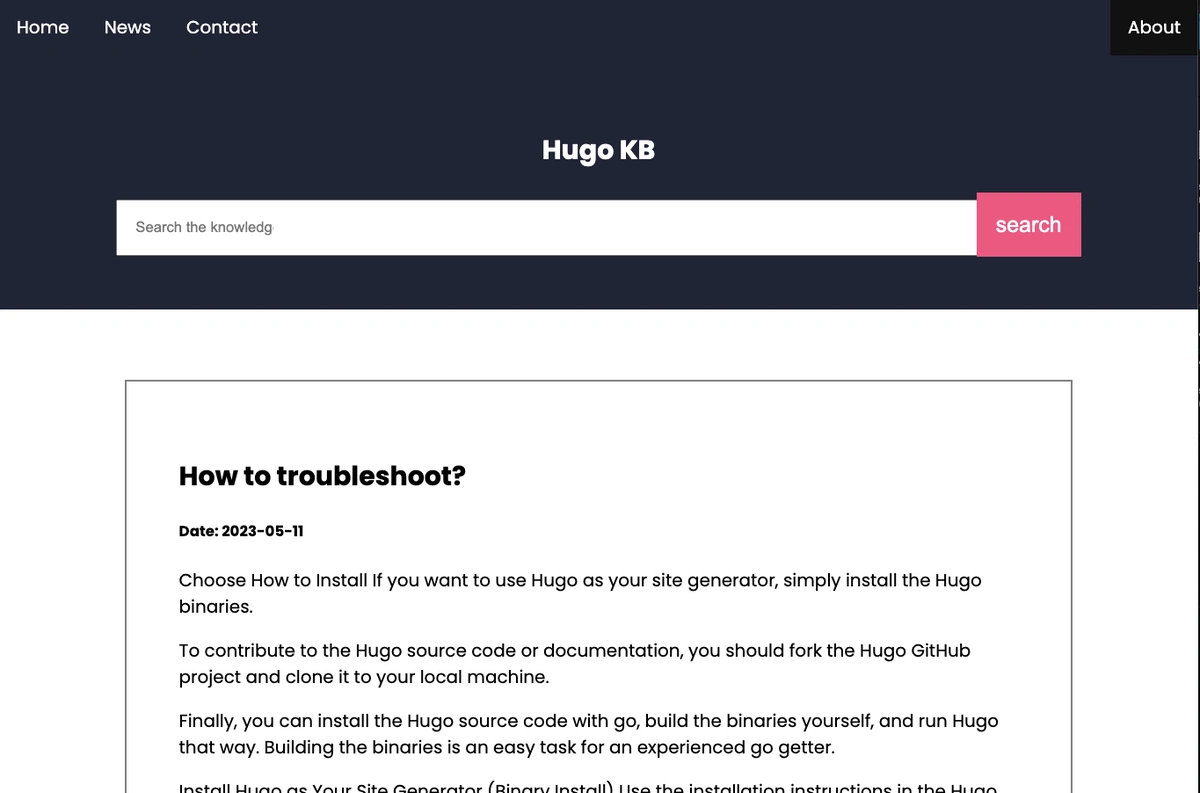
Here is the article page for the FAQ answer on how to troubleshoot:
Closing thoughts
Congratulations on making it to the end of this Hugo knowledge base tutorial! By using Hugo and ButterCMS, we can create a dynamic website that is not only easy to manage and maintain but also offers a fast and reliable user experience. The combination of Hugo's speed and flexibility, along with ButterCMS' content management capabilities, make for a powerful toolset that can help you create high-performing websites.
Moreover, learning how to use these technologies can be an excellent investment in your career. As more and more businesses move online, the demand for developers who can create fast, dynamic, and easy-to-manage websites will continue to grow.
Continue exploring both Hugo and ButterCMS and experiment with creating your own dynamic websites by checking out the following tutorials:

