- What is a knowledge base?
- Does my business need a knowledge base?
- Factors to consider when building a knowledge base
- Challenges of creating a knowledge base
- Powering your knowledge base with ButterCMS
- Tutorial: Building a knowledge base
- Preparing the ButterCMS resources
- Content modeling the knowledge base
- Creating the knowledge base pages on ButterCMS
- Building a Next.js application for the knowledge base
- Testing the Next.js knowledge base
- Final thoughts
For businesses, a customer service department contributes to customer retention as they interact with customers and provide help when needed. The 2022 Salesforce State of Connected Customer report showed that 96% of consumers will build trust with a brand due to excellent customer service and over four-fifths of the customers will recommend the brand to others.
Despite the juicy rewards of having customer service in place, there are several challenges in setting up and managing a customer service department. A common challenge for smaller organizations is the lack of funds to set up a dedicated customer service team and scale the amount of staff to handle the rapidly increasing amount of customers. Providing assistance to customers could also be repetitive, and the time could be better allocated to other productive activities.
The concept of a knowledge base was developed to reduce the burden on customer service teams by providing customers with a self-service approach. Within this article, you will learn more about what a knowledge base entails and build one for yourself. The knowledge base you are about to build will be powered by ButterCMS and use the Next.js framework to render the pages.
Table of contents
What is a knowledge base?
A knowledge base is an online library containing all the needed information and notable resources on a product, service, organization, or business. A knowledge base is built around the idea of self-service by providing individuals with an online library that allows them to search for and find the specific information they need all by themselves.
Although most knowledge bases consist of text, a knowledge base might also contain self-explanatory images, diagrams, and videos created with the common goal of passing information down to the user. This information could vary from legal documents such as Service Level Agreements (SLAs) to service documents such as manuals.
Does my business need a knowledge base?
While your business model plays a key role in influencing the decision to implement a knowledge base, two important rhetorical questions to ask yourself before deciding whether your business needs a knowledge base are:
- Does my team frequently need to interact with customers as they use the product(s) or service(s) they have purchased?
- Do I already have the need for a customer service or a support department within my business?
If you had an affirmative answer to either of the questions above, then you have more than enough reason to consider creating a knowledge base for your business. Over the years, a knowledge base has proven to be beneficial to businesses that have the need for frequent customer interactions such as financial institutions, healthcare providers, and call centers, amongst others.
Outlined below are three benefits that a knowledge base holds for your customer service:
- Increased Customer Confidence – When issues arise from using a service, customers have the desire to get an instant fix and 68% of them will get frustrated from having to endure long holds before speaking to a customer service agent. A Customer Trend Report from Zendesk showed that 69% of customers have a do-it-yourself (DIY) mentality and would thereby rather attempt to resolve any issues with your product by themselves before contacting customer service. Before making the purchase of a technical product, DIY-minded customers often check if a product has sufficient information and documentation online that will explain how it operates and give them the confidence that it can be self-repaired, should an issue come up.
- Reduced Costs, Increased Productivity – Live chat and ticketing platforms use the Pay-As-You-Go (PAYG) pricing model. Since knowledge bases are created to reduce the reliance on customer support for help and information, you may have fewer costs from your chat and ticketing platform. This is due to customers being able to get the help they need from your knowledge base without reaching out to customer service. In addition to assisting users, having a knowledge base will also improve ticket resolution times as your customer service can quickly resolve an issue by consulting the knowledge base for how similar issues were resolved in the past.
- Central Source of Information – A knowledge base provides customers with the ability to find all the information they need in a single domain.
Having all the needed information in a central location is vital to new hires during the onboarding process. Rather than having to ask older employees, a new hire will have the ability to search through the knowledge base and find whatever information is needed to perform a task. The Salesforce State of Service showed that 66% of customer service teams consult a knowledge base frequently while resolving an issue.

Factors to consider when building a knowledge base
At this point, you now know that a knowledge base holds a lot of potential for your business. However, a poorly planned knowledge base could frustrate your customers and cause more harm to your business. Before you begin the actual development of your knowledge base, it is important that you develop a mental picture of the knowledge base, considering certain factors along the way.
Type of knowledge base
A factor to consider is the knowledge base you need. A knowledge base could either be public (for your customers), private (for your employees), or hybrid (for both your customers and employees). Take some time to research and analyze the customer service data you have to determine the kind of knowledge base you need.
Core elements of your knowledge base
Based on the kind of knowledge base you need, you need to define further the elements you want to add to the knowledge base. A customer knowledge base should contain sections with information related to how a customer uses the product, such as tutorials, user guides, FAQs, or a troubleshooting section.
Knowledge base structure
Next, you need to consider how you want to structure your knowledge base. Structuring the knowledge base will better help you to define the layout containing core elements and also plan the navigation. Consistency in the structure of your knowledge base is important in order for your customers to have a good user experience as they make use of the knowledge base.
Consider your content strategy
Also, you need to consider the content strategy you want to adopt for your knowledge base. Alongside your content team, it is recommended to have a subject matter expert (SME) onboard to create clear and accurate information. Remember that you need to update your knowledge base as new features or products are developed. Stale content defeats the purpose of having a knowledge base as customers will eventually have to contact customer service after being unable to use the knowledge base.
Factoring what kind of data is also important, certain data such as pricing information might need to be updated in real-time.
Challenges of creating a knowledge base
Due to the size of a knowledge base, developing one for your business is not a small feat and you are prone to face several challenges over time. Let’s consider three challenges that others have faced while developing an mainintaing a knowledge base.
Data Management
Data—either text, visual, or audio—accounts for the major percentage of a knowledge base. While the data is clearly important, building the infrastructure for it is a humongous and resource-intensive task. An additional server-side application and a database have to be created to handle the data for the knowledge base.
Although a content management system (CMS) solves the data management challenge, businesses that rely on a CMS to power their knowledge base have to cope with the huge costs of using a CMS platform.
Knowledge Silos
The term “knowledge silo” describes a situation where key information is not being effectively shared across team members or departments within an organization due to certain factors. Knowledge silos make the process of creating a knowledge base difficult as the information that is expected to be stored within the knowledge base is only known to the team.
Developing a knowledge silo after the knowledge base has been put in place will also lead to outdated information within the knowledge base as information for new products or features developed will not be added to it.
Knowledge Verification and Updating
Although important for ensuring reliability, verifying the information being stored and displayed within a knowledge base is often a difficult task due to its sheer size of it. A quality assurance (QA) process has to be put in place to check the knowledge base at intervals and whenever there is a change.
Also, with the lack of technical skills by the domain experts managing the knowledge base, updating the information within the knowledge base could be a challenge. For example, a wrong piece of information could be detected or existing information could become outdated over time.
Powering your knowledge base with ButterCMS
ButterCMS is a headless content management system (CMS) built to serve the needs of content managers and developers. ButterCMS is self-hosted, meaning that you do not have to worry about the underlying infrastructure that powers the CMS platform. As a headless CMS, it has a separate user-friendly dashboard for the members of your content team without the technical knowledge to create content for the knowledge base via text editors.
The Flexible Content Model, Media Libary, and Content API are features that make ButterCMS suitable for a knowledge base. The Page Types within the Content Model allow your content team to create a reusable data structure for sections within your knowledge base. With the Content API, your developers are given the power to fetch data within the ButterCMS and display it using whatever frontend library or framework is desired.
The built-in media library feature allows you to store blob files such as images, audio, and video files. At the same time, the Content API provides you with a Read endpoint for retrieving data and a Write endpoint for creating and modifying existing data within ButterCMS.
Now that you know some of the features that ButterCMS offers, let’s proceed to build a knowledge base that fetches data from ButterCMS and renders the data in pages built with the Next.js framework.
Tutorial: Building a knowledge base
Let’s build a simplified clone of the ButterCMS knowledge base. For this scenario, the clone will serve as an external knowledge base for ButterCMS users to find information about the features of ButterCMS.
The knowledge base will have all of its data stored within ButterCMS pages. Multiple related pages will be grouped into sections and all the sections will be displayed on the default page of the knowledge base. The code for this tutorial can be found in this Github Repo.
The steps outlined within this section are hands-on. To follow along, it is expected that you have the following:
- Node.js to allow you to develop and run Next.js locally.
- A ButterCMS account. ButterCMS provides you with a 30-day free trial period if you do not have an account.
- Basic knowledge of JavaScript and the Next.js framework.
Preparing the ButterCMS resources
Using your web browser, navigate to the dashboard for your ButterCMS account. You will perform the next steps within this section via the ButterCMS dashboard.
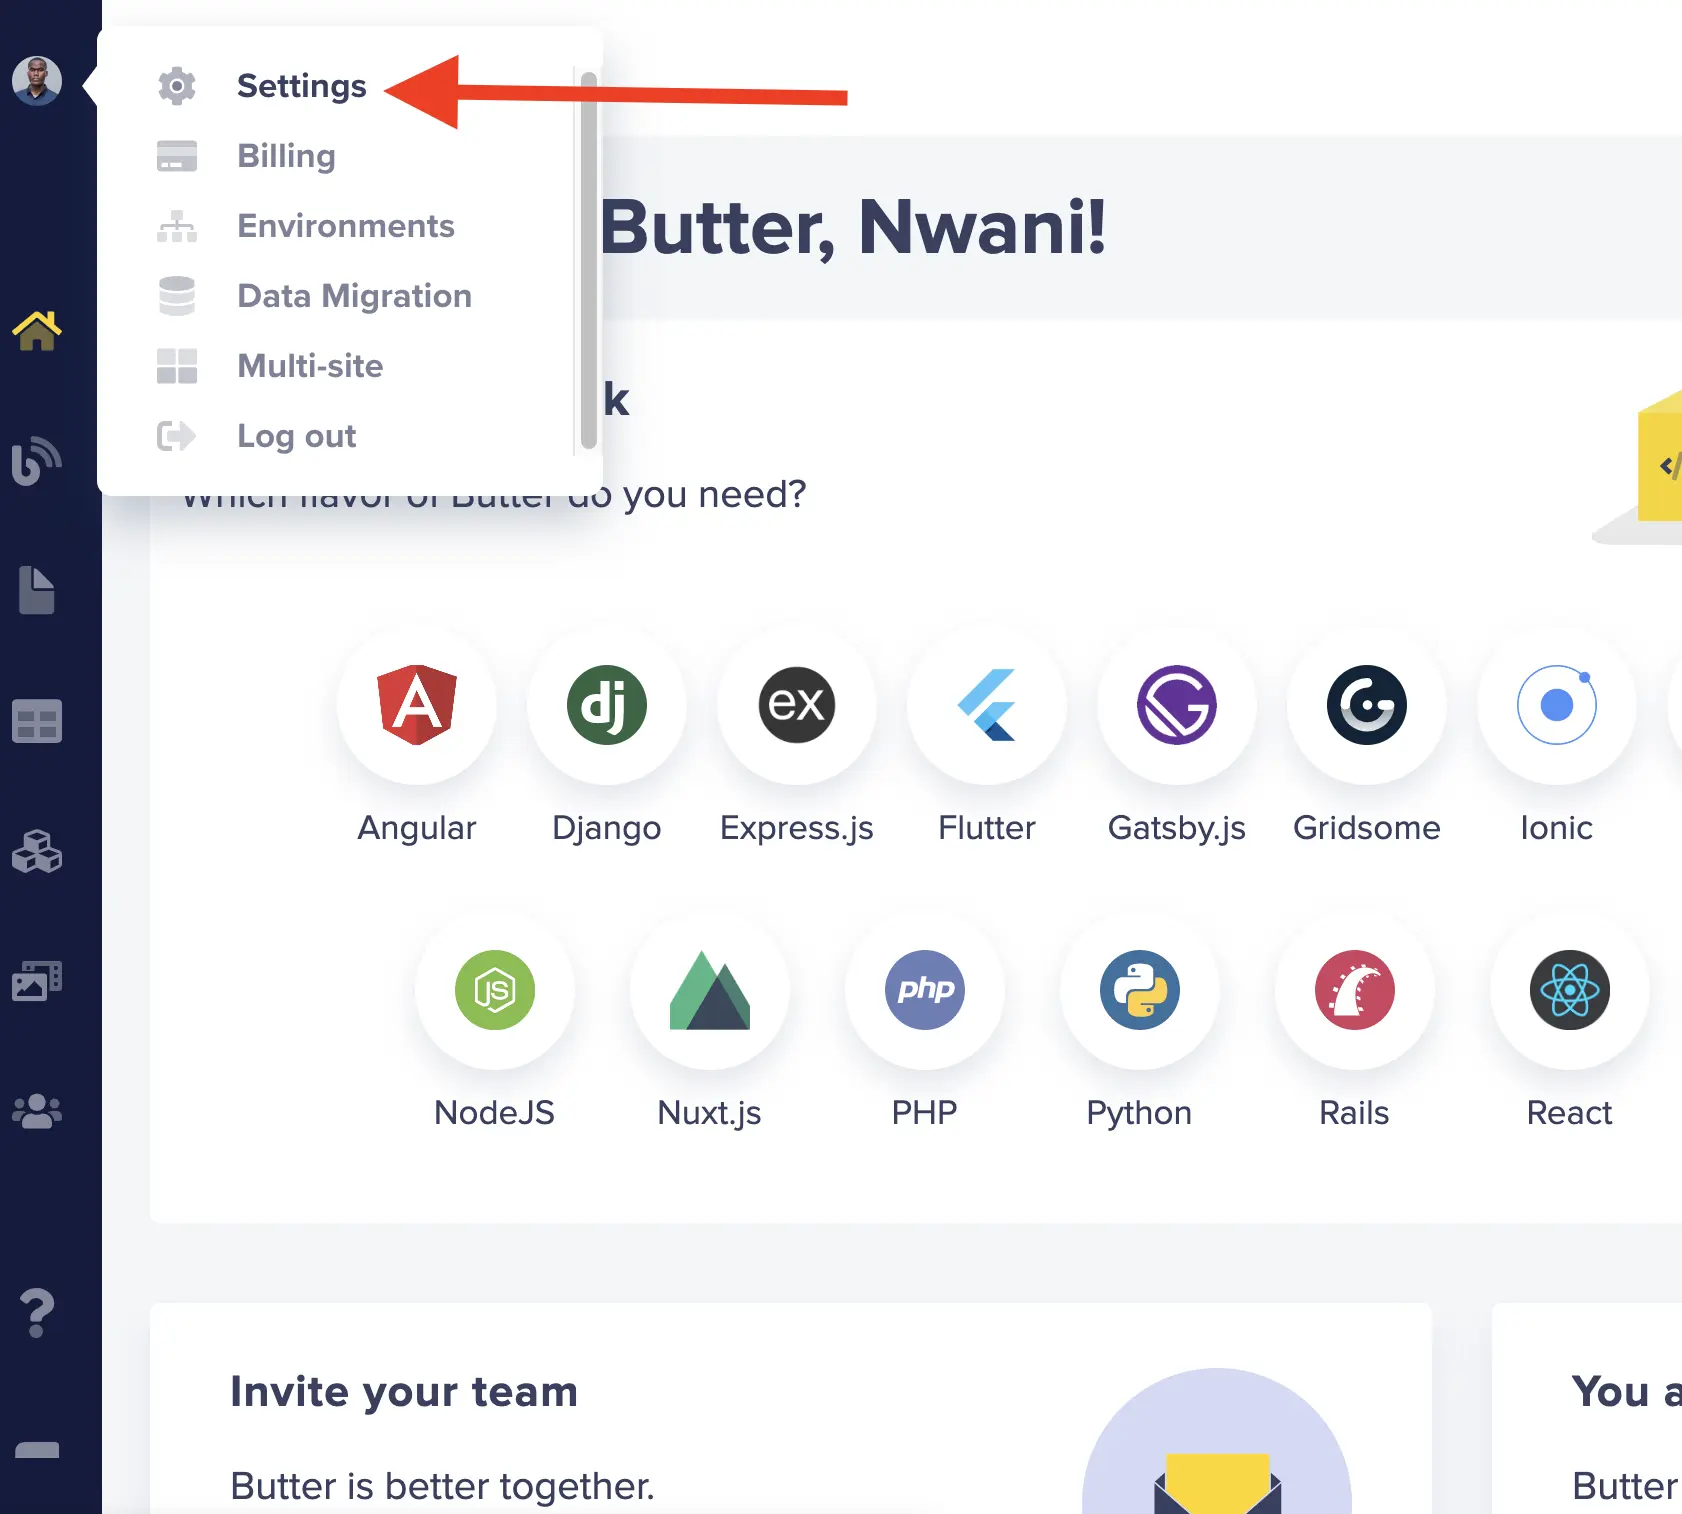
Click your Profile Avatar in the sidebar to reveal more navigation options, then click the Settings item.
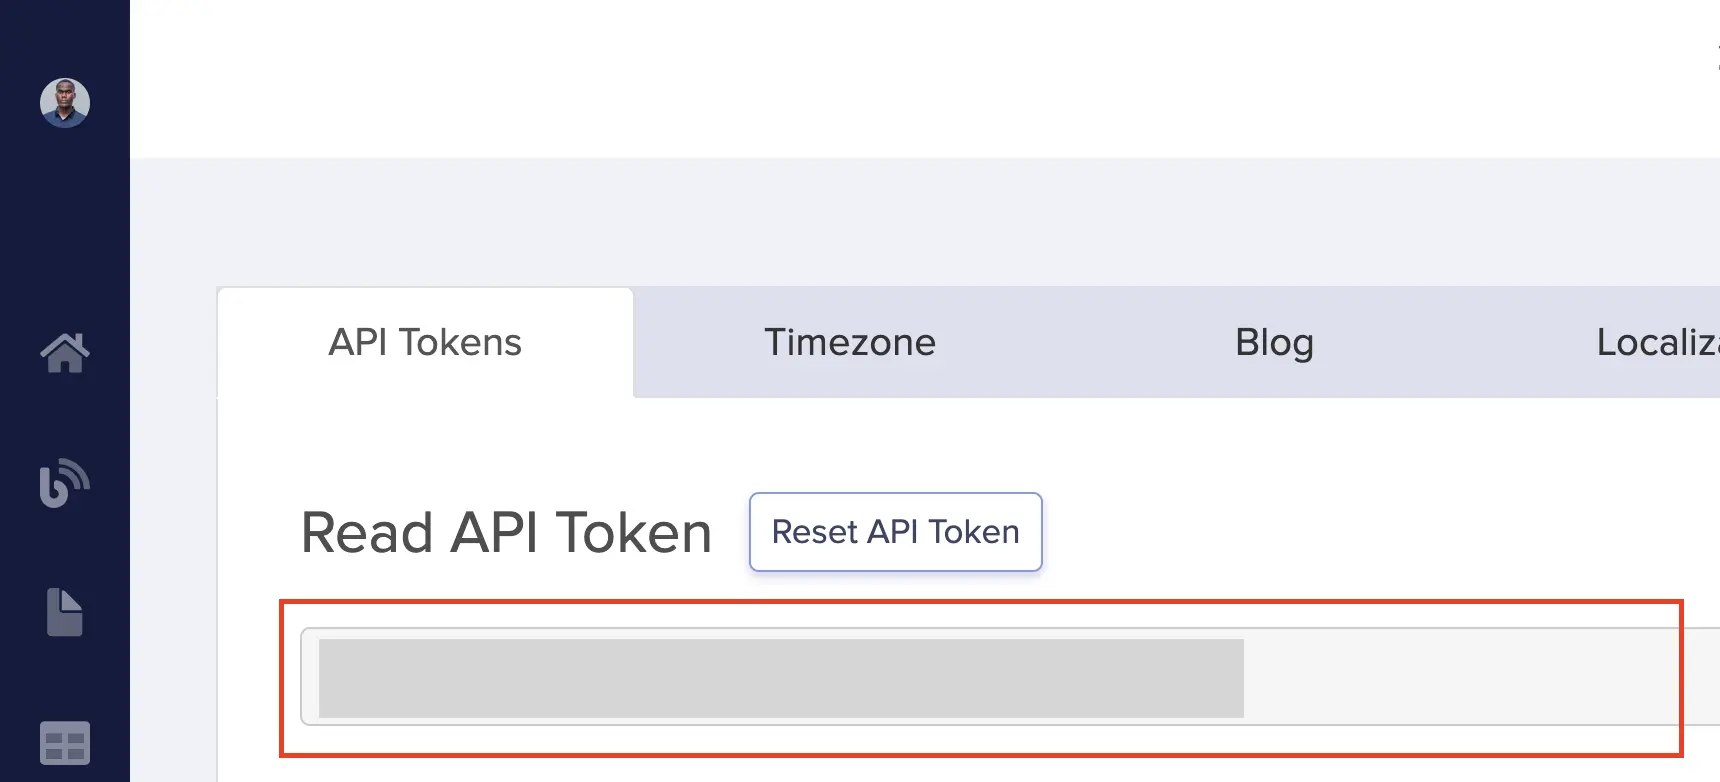
Copy the value of the Read API Token as you will need it to authenticate the connection from your Next.js knowledge base to ButterCMS through the Content API.
Content modeling the knowledge base
Within this section, you will create page types for the article, section, and default pages of the knowledge base.
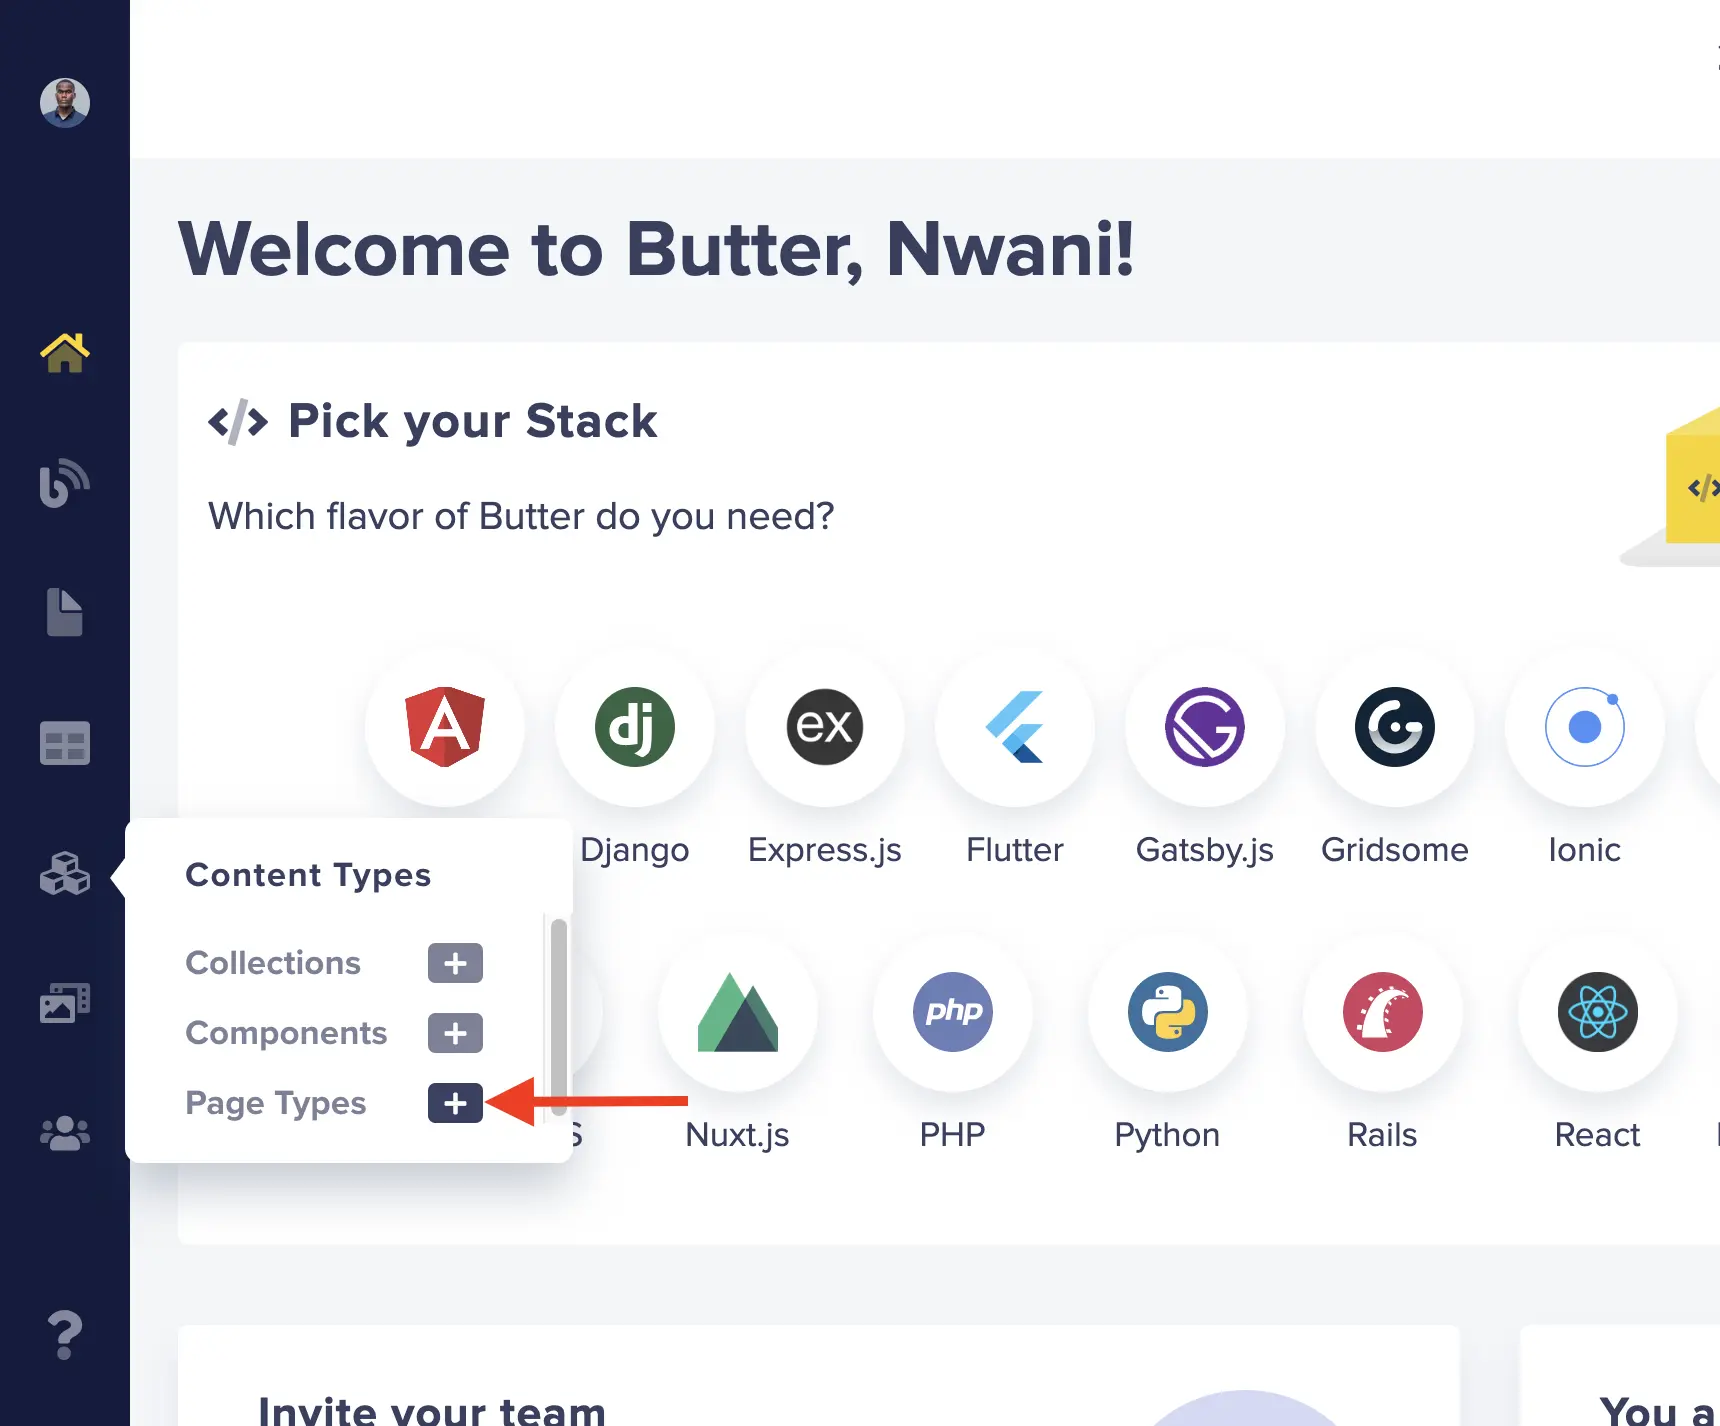
As highlighted in the image below, click the Content Types icon in the sidebar, then click the plus ( + ) icon beside Page Types to navigate to the ButterCMS page editor.
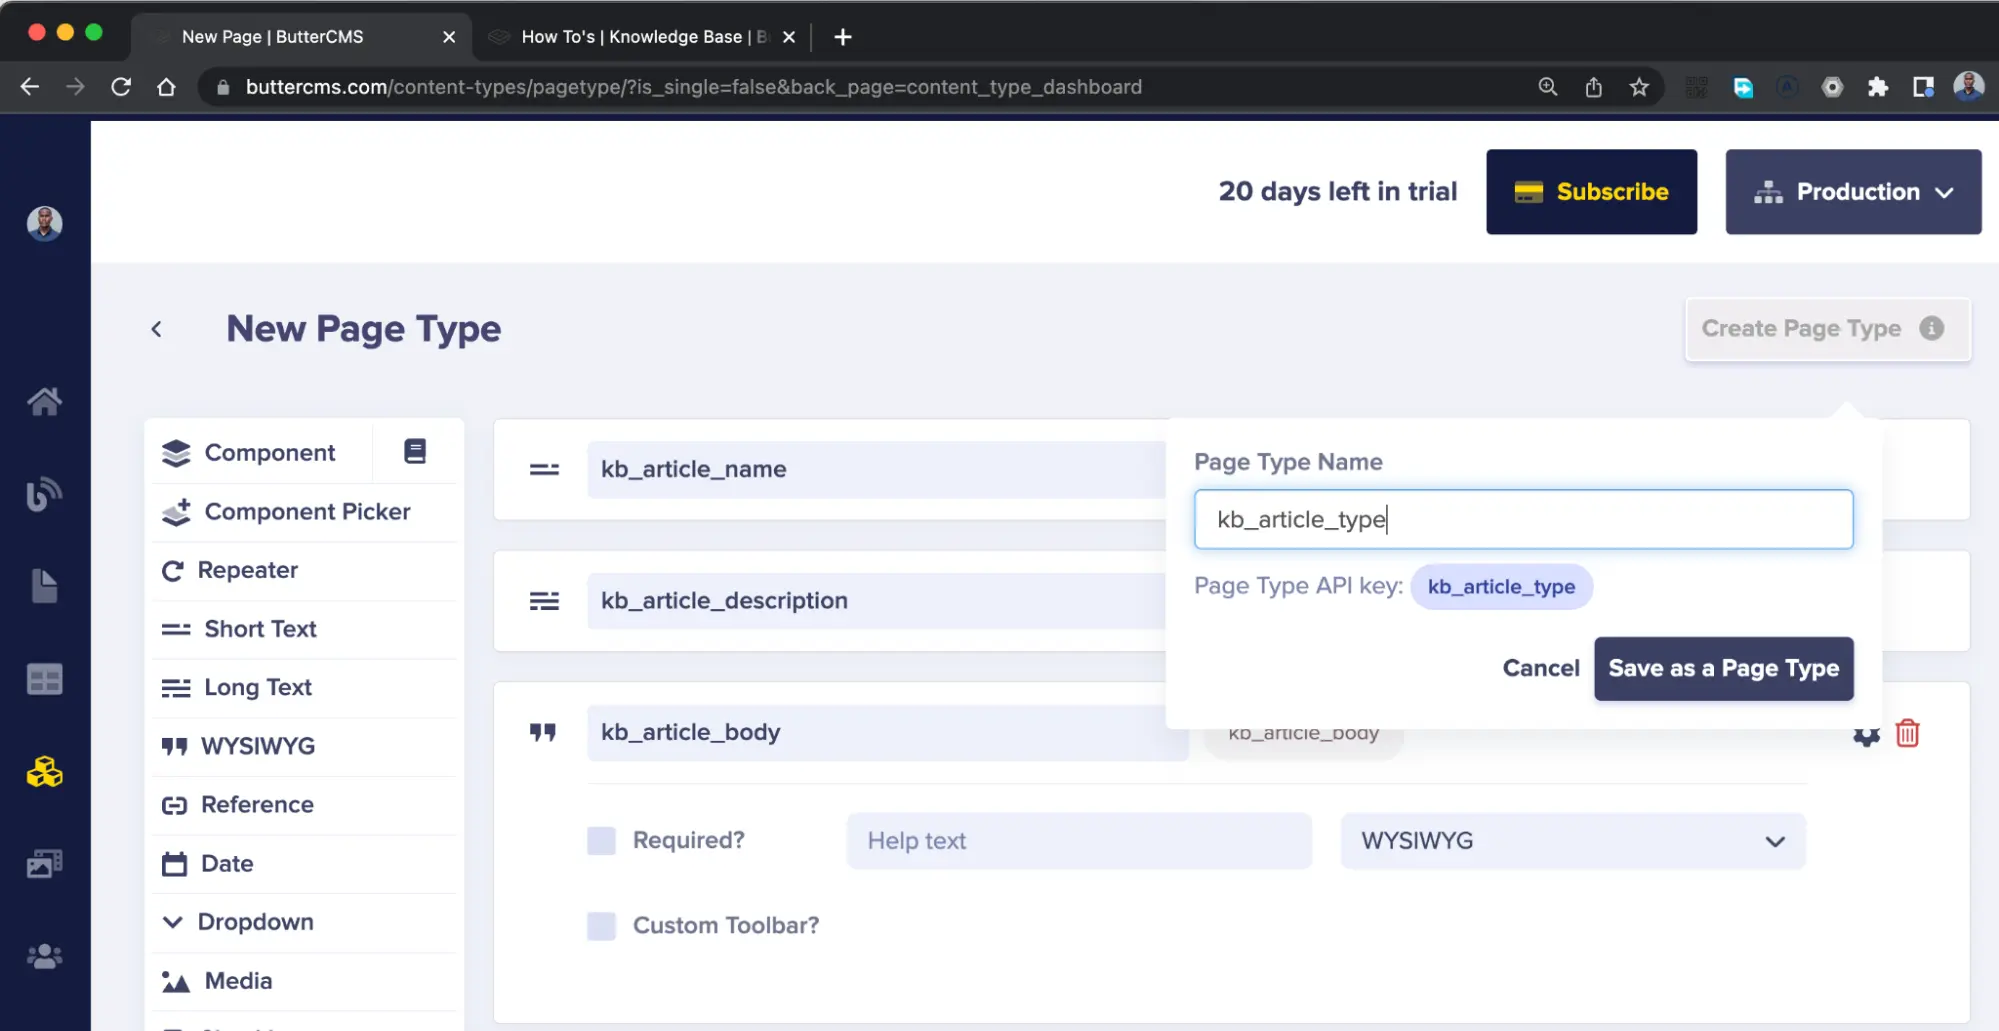
On the next page, add the following content fields to the page:
- A Short Text field and name it
kb_article_name - A Long Text field and name it
kb_article_description - A WYSIWYG field and name it
kb_article_body
Click the Create Page Type button to open a modal where you will name the page type.
Specify kb_article_type in the Page Type Name field and click the Save as a Page Type button to save and continue.
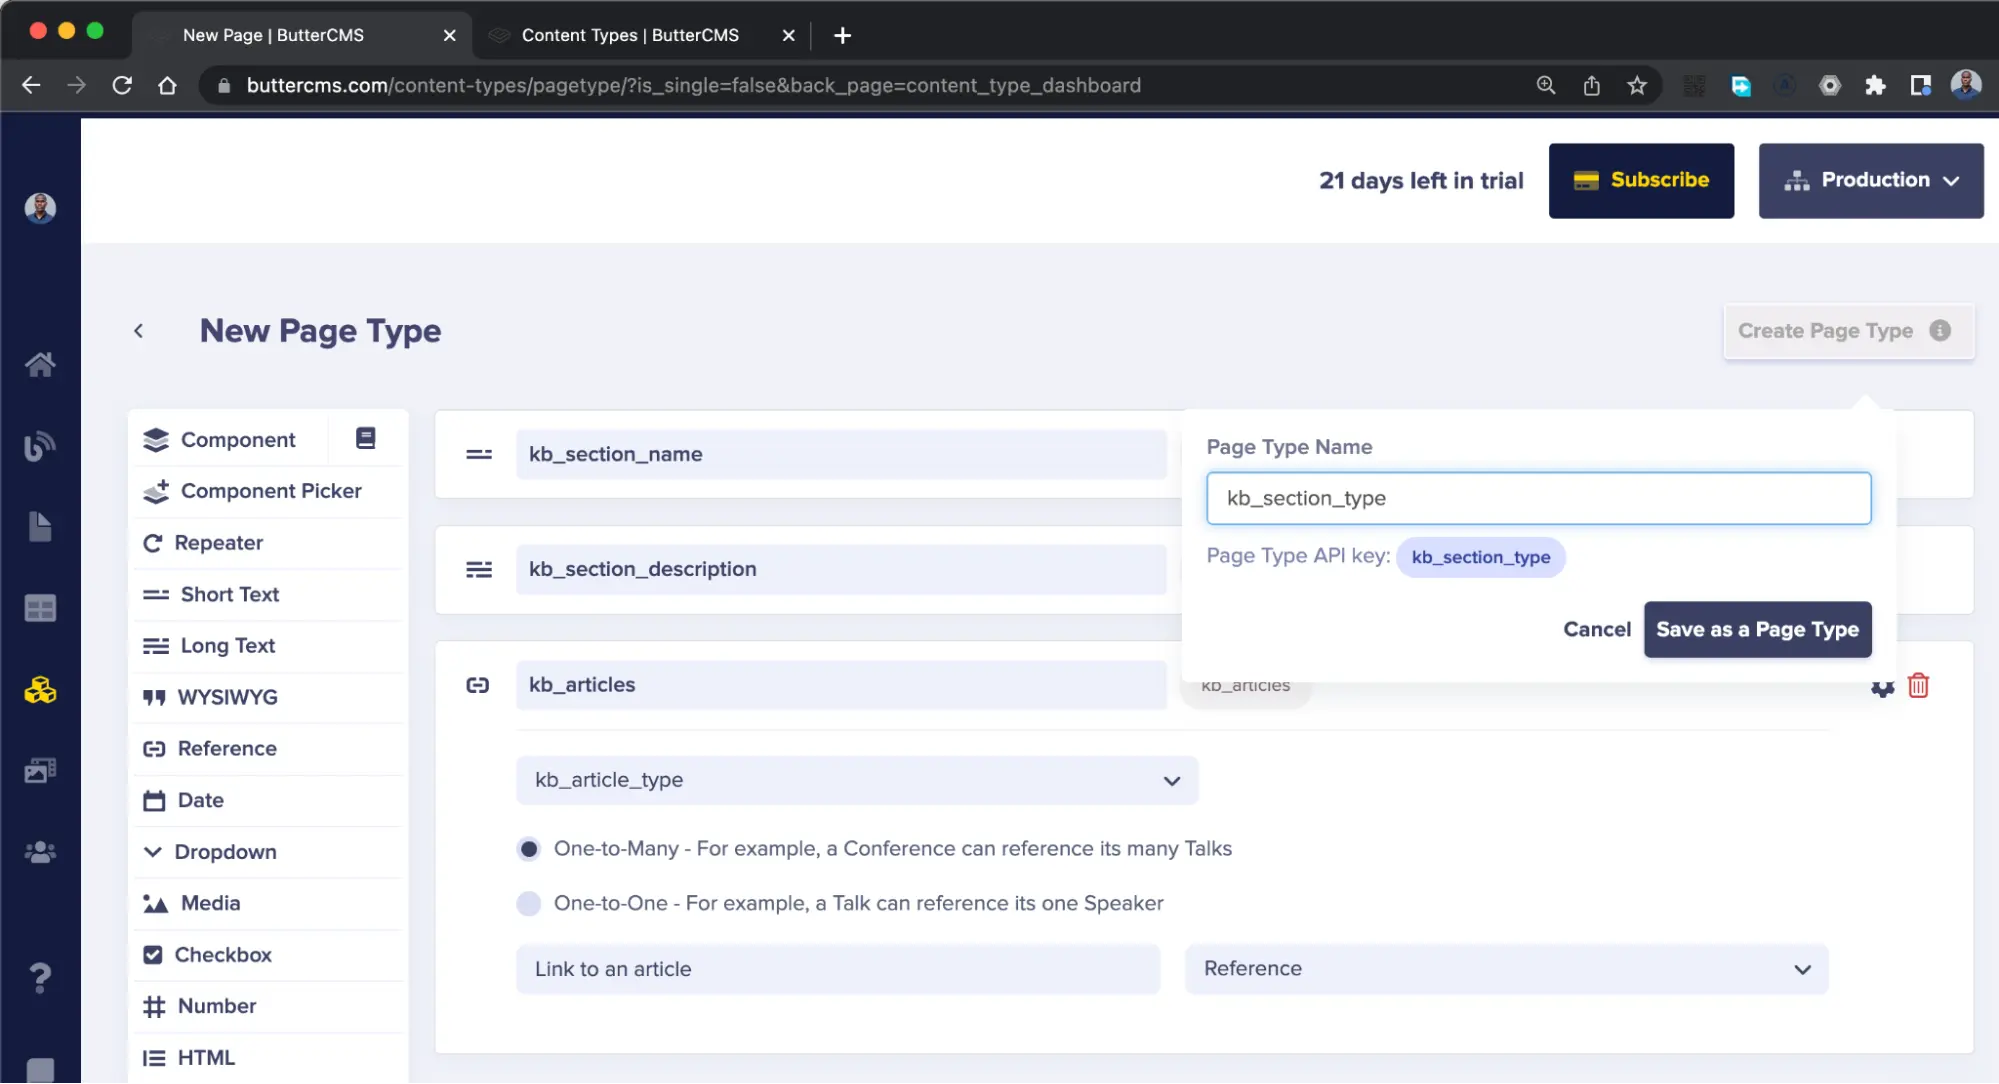
Next, navigate to the New Page Type section again to define the content model of sections within the knowledge base.
Add the following content fields to the page:
- A Short Text field and name it
kb_section_name - A Short Text field and name it
kb_section_description - A reference field and name it
kb_article_typeand select the One-to-Many option for the reference field
Click the Create Page Type button, specify kb_section_type in the Page Type Name field, and click the Save as a Page Type button to save the page type.
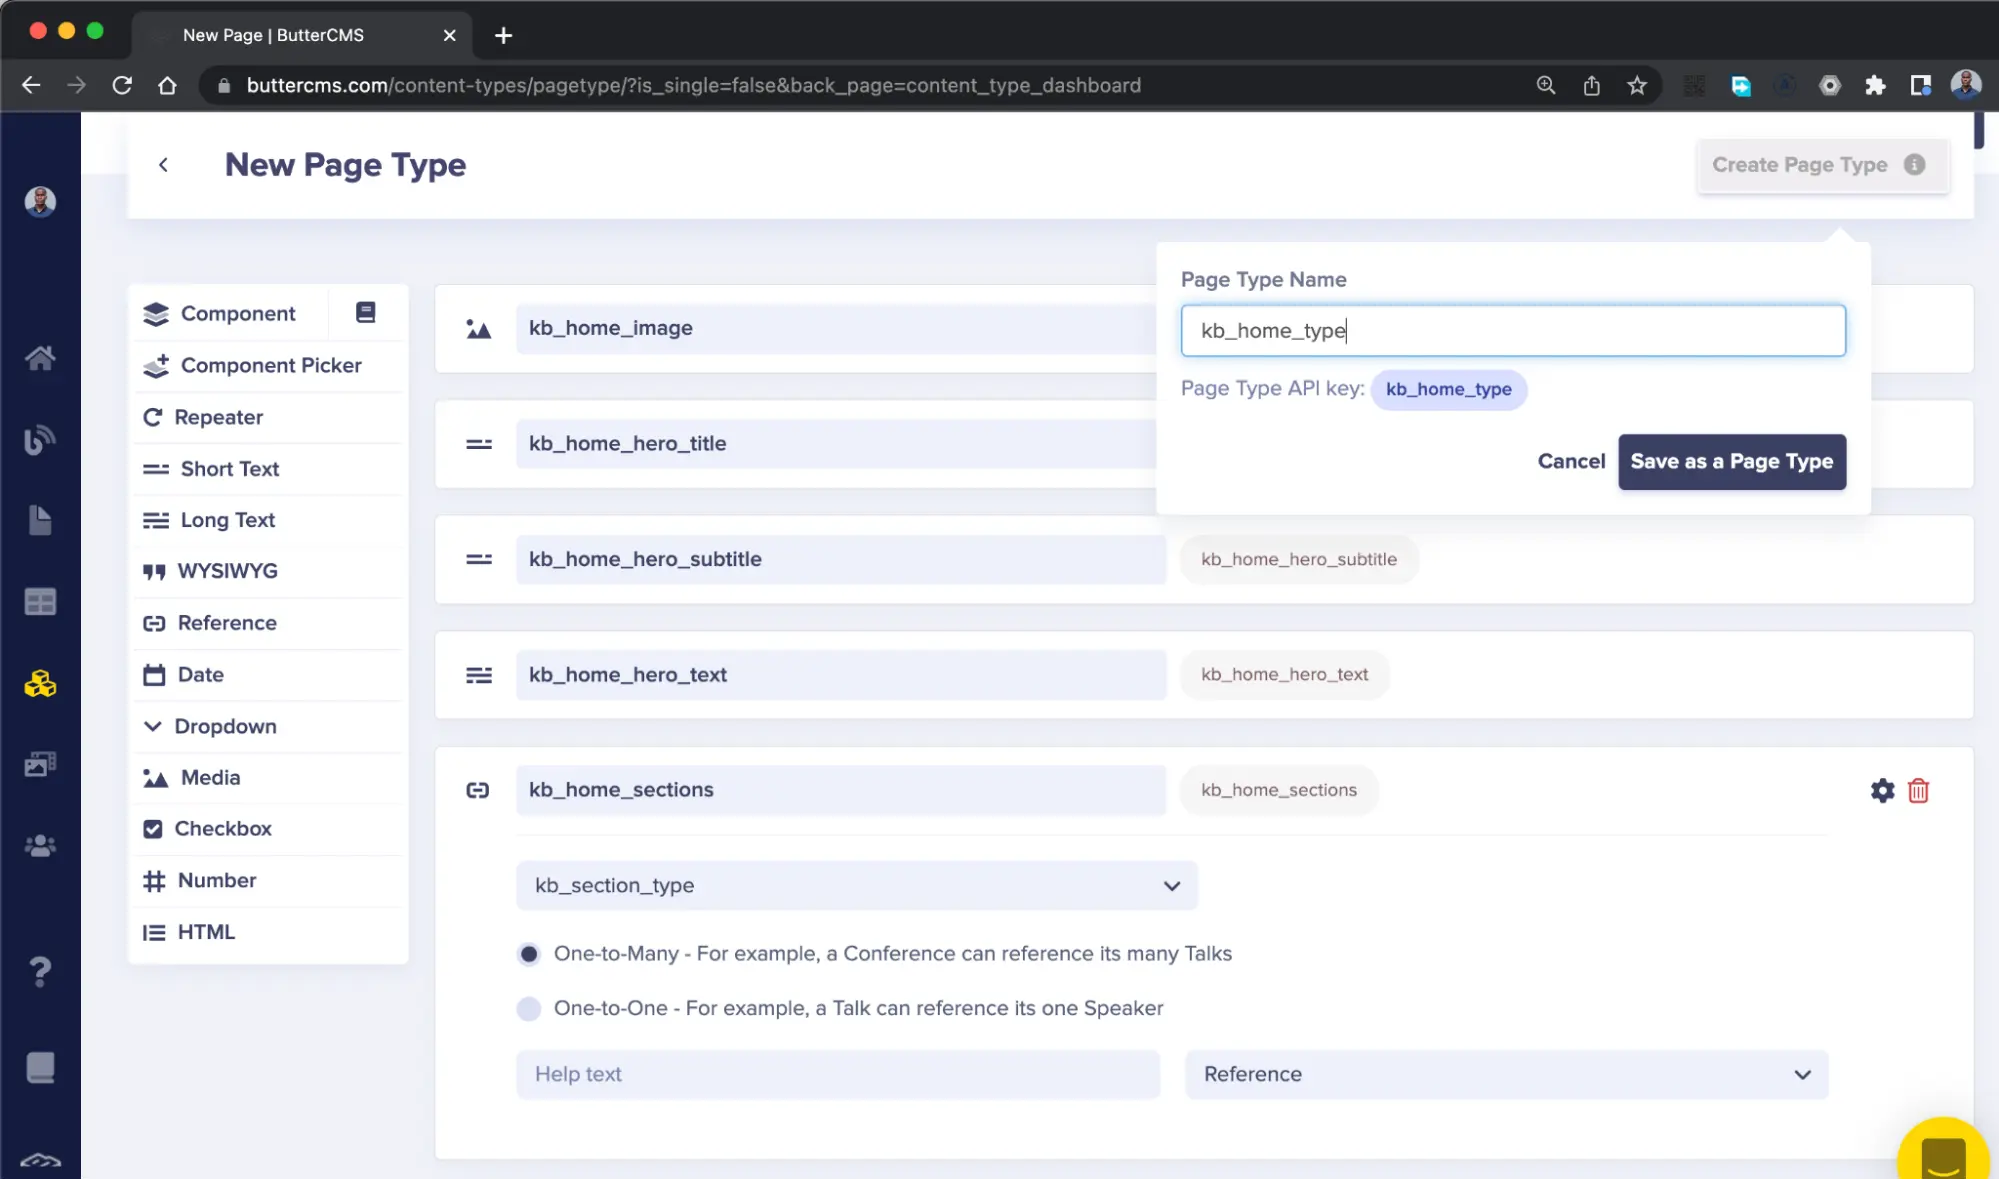
For the last time, navigate to the New Page Type page to define the content model of the default page of the knowledge base.
Add the following content fields to the page type:
- A Media field and name it
kb_home_image - A Short Text field and name it
kb_home_hero_title - A Short Text field and name it
kb_home_hero_subtitle - A Short Text field and name it
kb_home_hero_text - A reference field and name it
kb_home_sectionsand select the One-to-Many option for the reference field
At this point, you have modeled the article, section, and homepage parts of your knowledge base using the Page Types feature from ButterCMS.
Creating the knowledge base pages on ButterCMS
With the content model for the knowledge base created from the previous section, you will now focus on creating pages using the page type models you defined. Let’s get started by creating an article.
Creating a knowledge base article
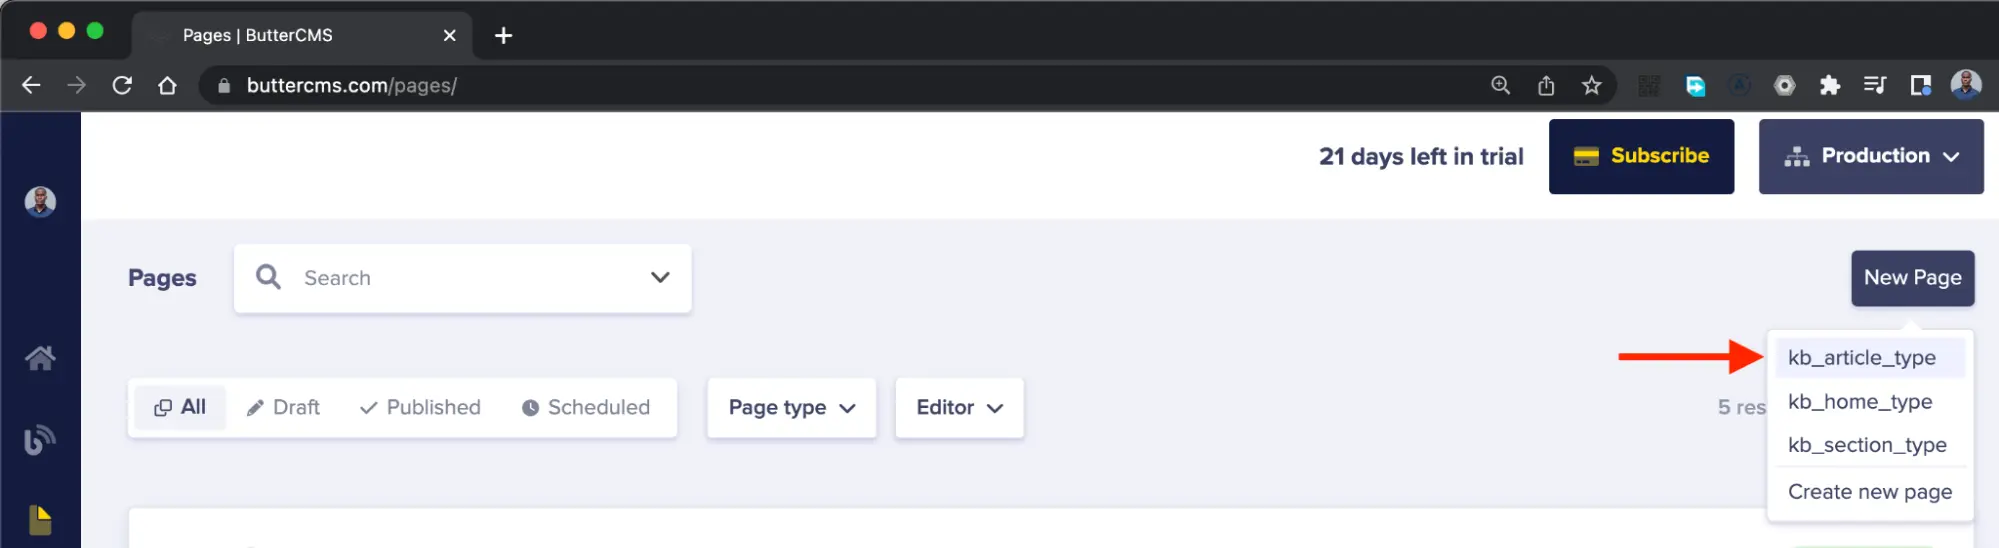
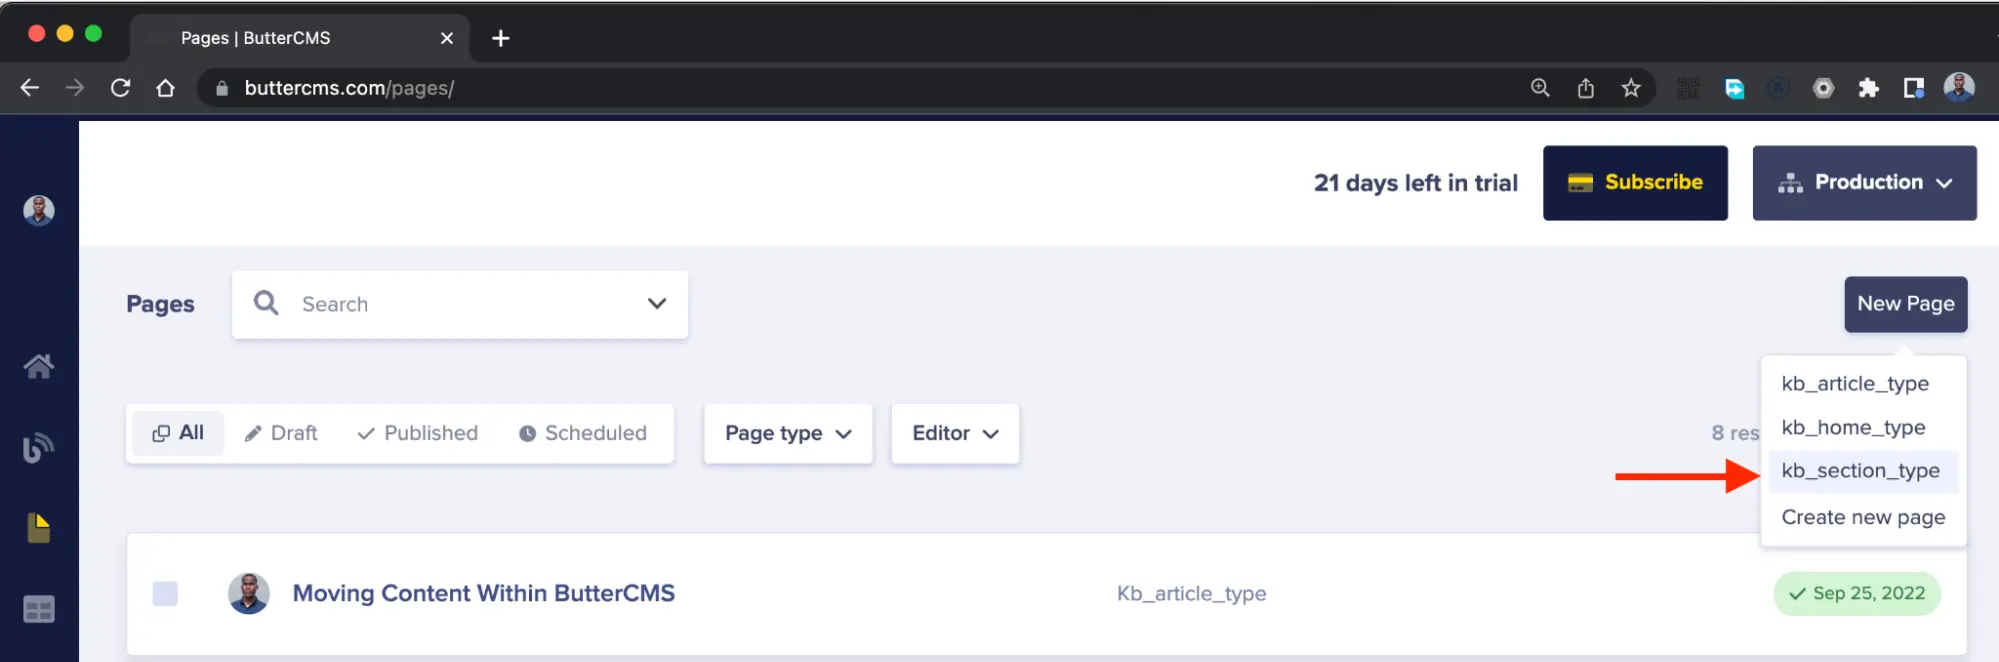
At the Pages section of the ButterCMS console, click the New Page button and select kb_article_type from the dropdown.
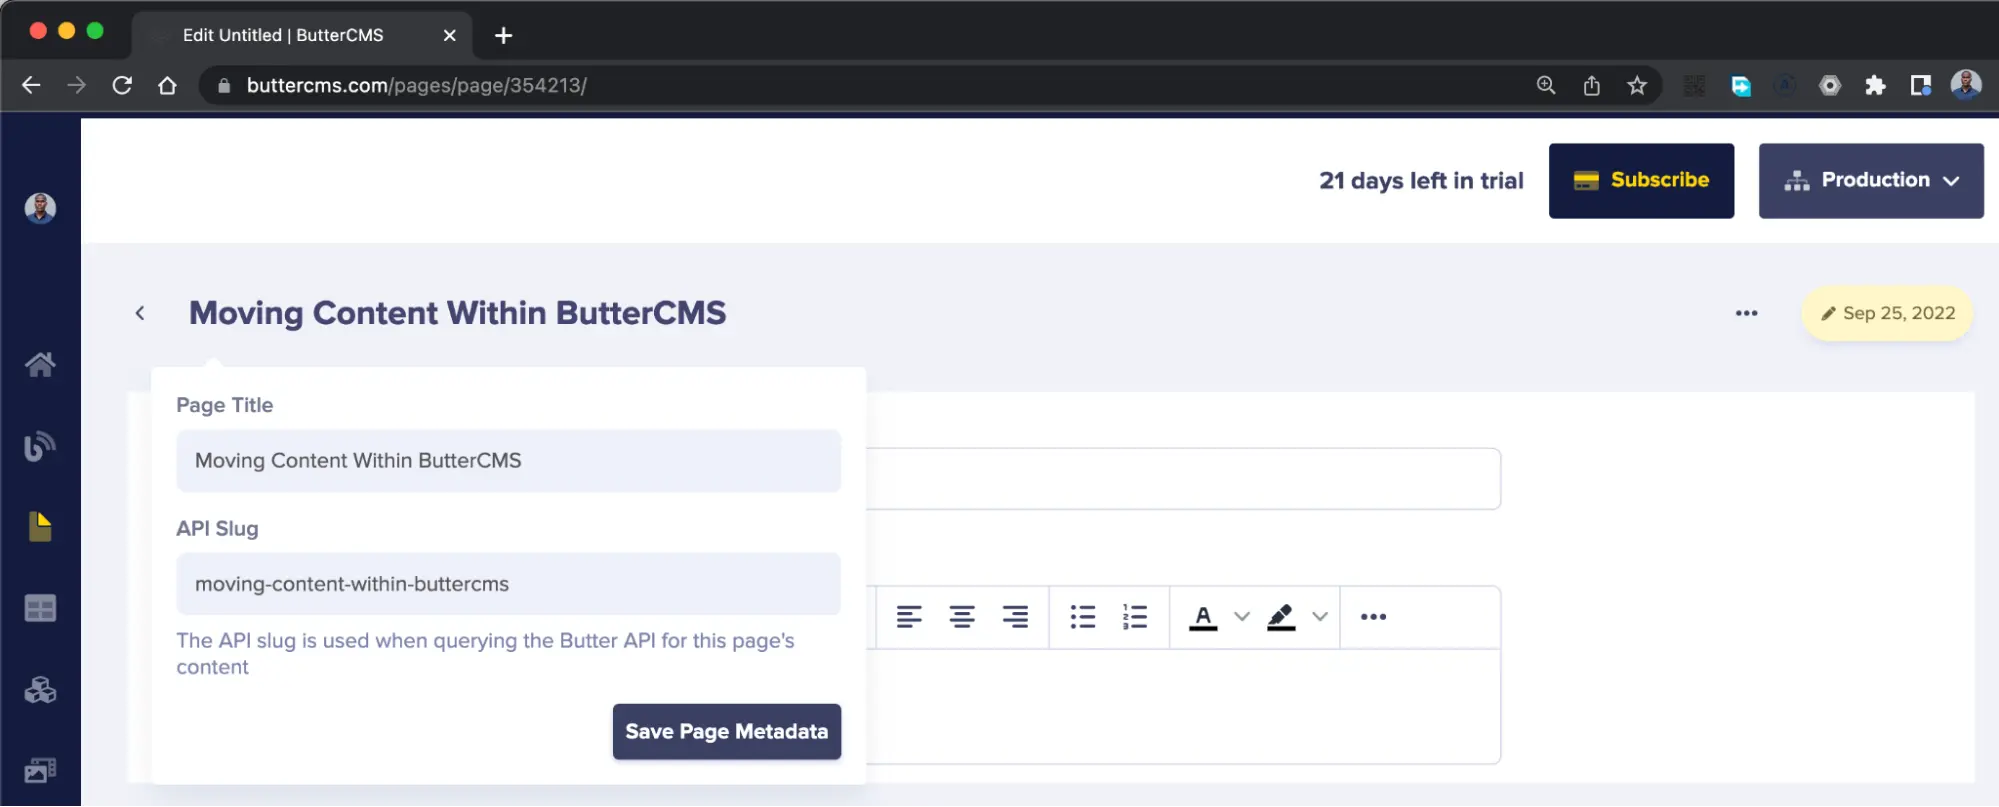
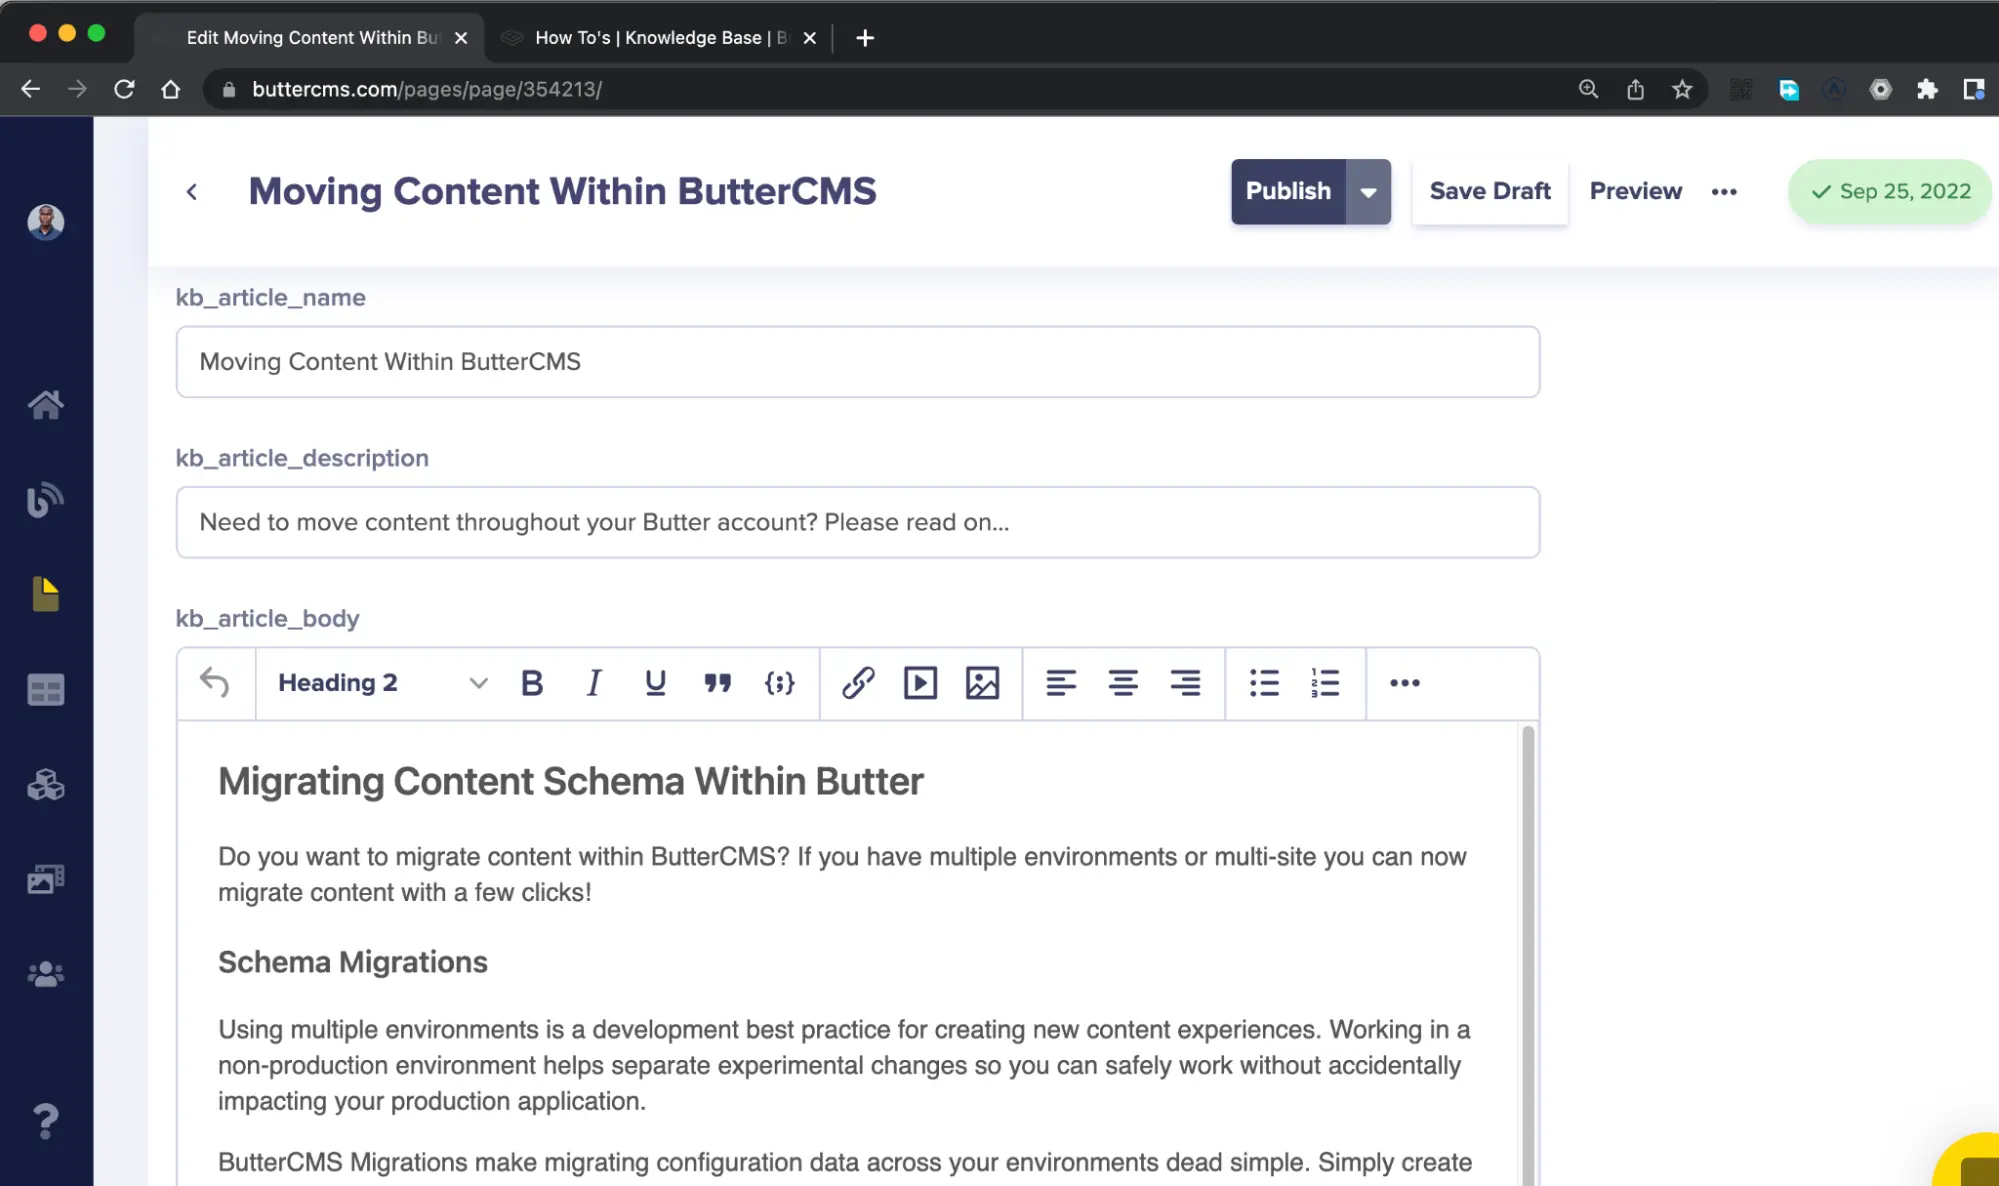
On the next page, you will use the content from the Moving Content Within ButterCMS article as your first demo article.
Specify Moving Content Within ButterCMS in the Page Title field and click the Save Page Metadata button to create a draft and proceed to the text editor.
Fill in the kb_article_name and kb_article_description fields with the name and description of the article and paste its content into the kb_article_body rich text editor.
Click the Publish button to save the content within the field and publish the article.
Repeat the process of creating an article page multiple times to have different articles within the section.
Next, let’s proceed to create a section for the knowledge base that will have the Moving Content Within ButterCMS article as a reference.
Creating the knowledge base sections
Navigate back to the Pages section of the ButterCMS console, then click the New Page button and select kb_section_type from the dropdown.
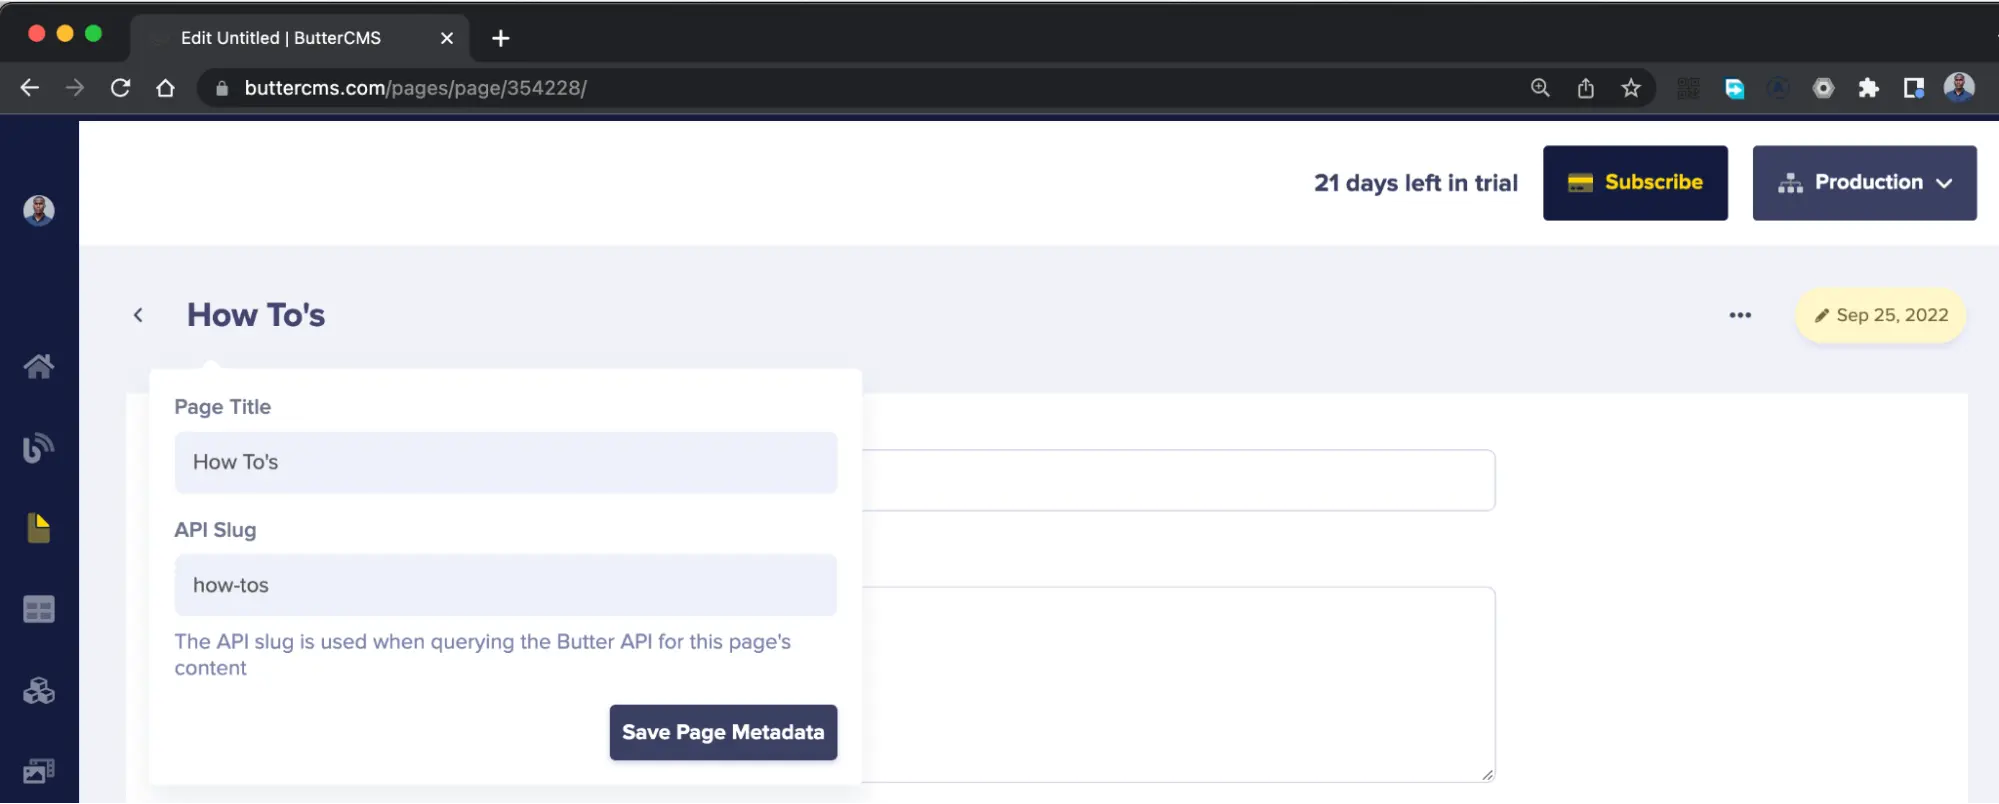
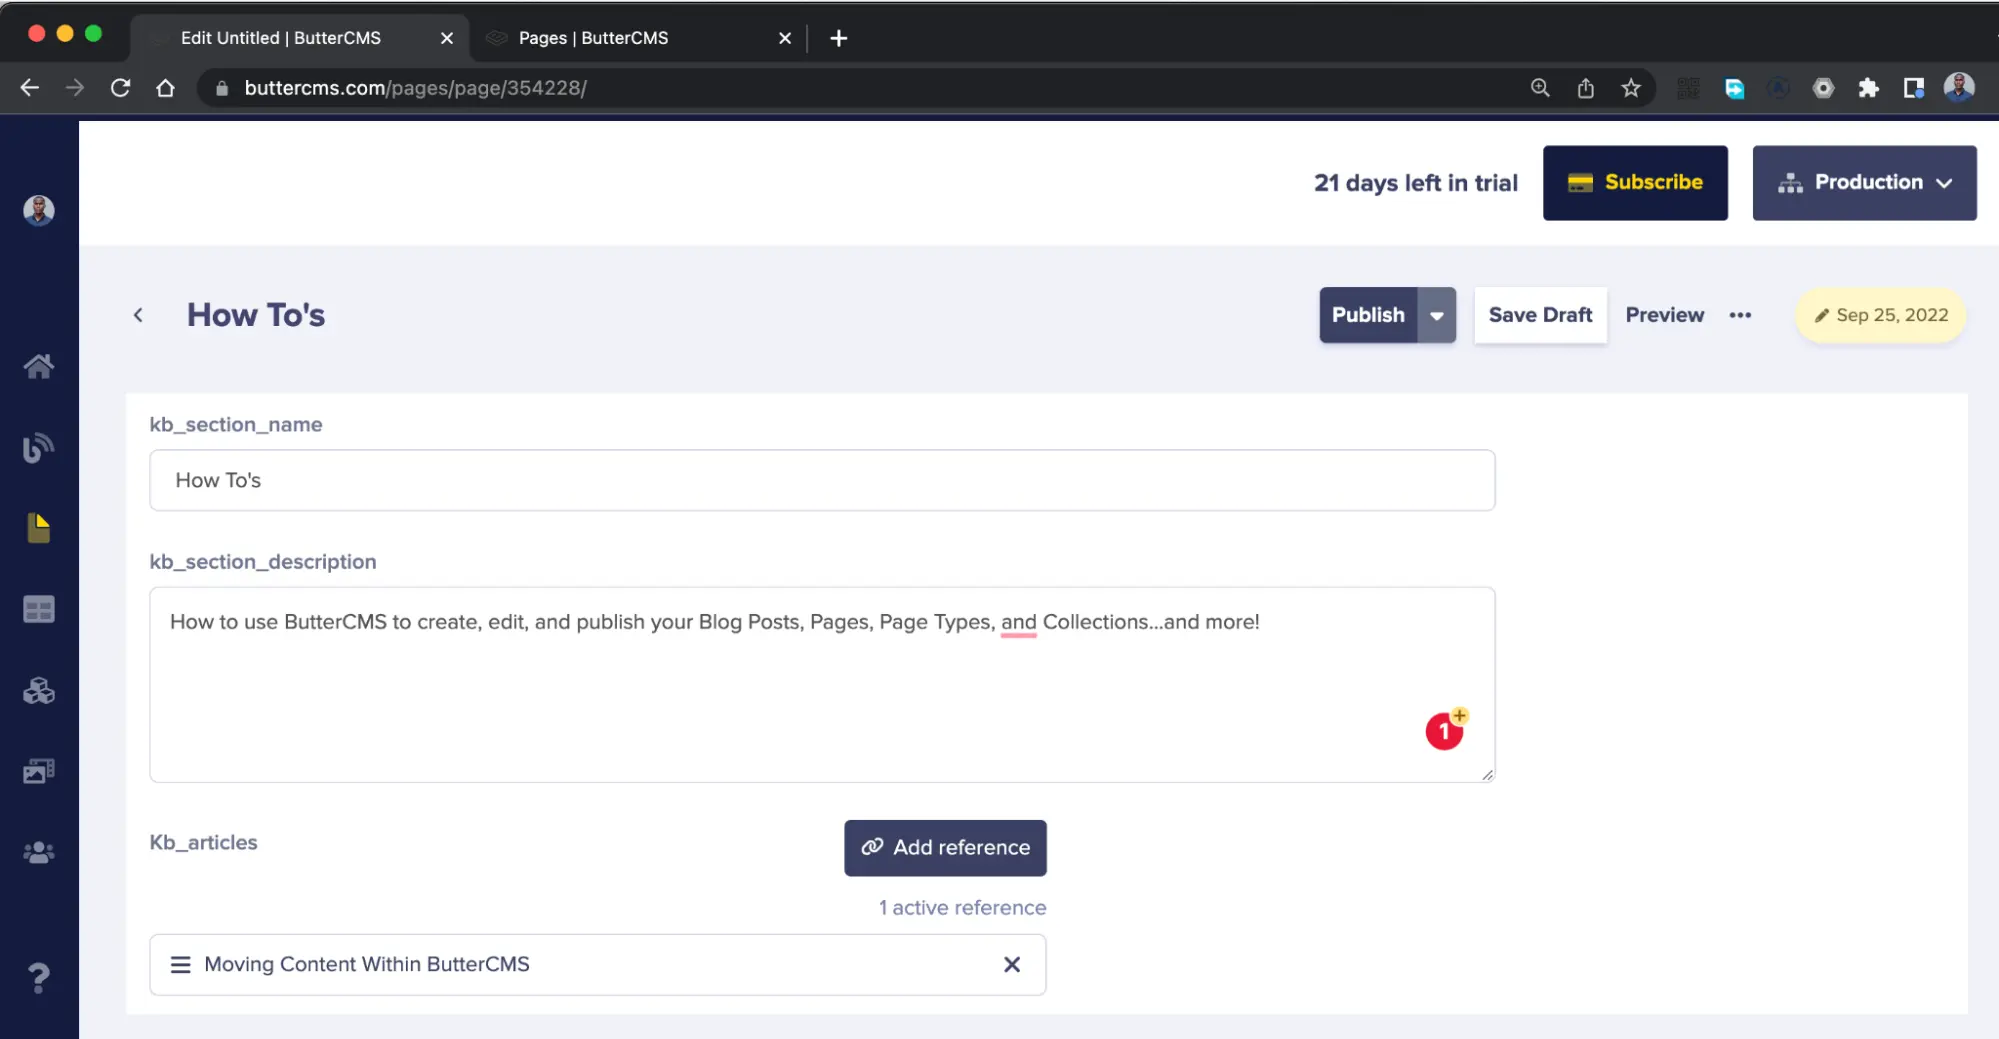
Specify How To’s in the Page Title field and click the Save Page Metadata field to create a draft and proceed to the text editor.
Fill in the kb_section_name and kb_section_description fields with your preferred content or use the content within the How To’s section of the ButterCMS knowledge base.
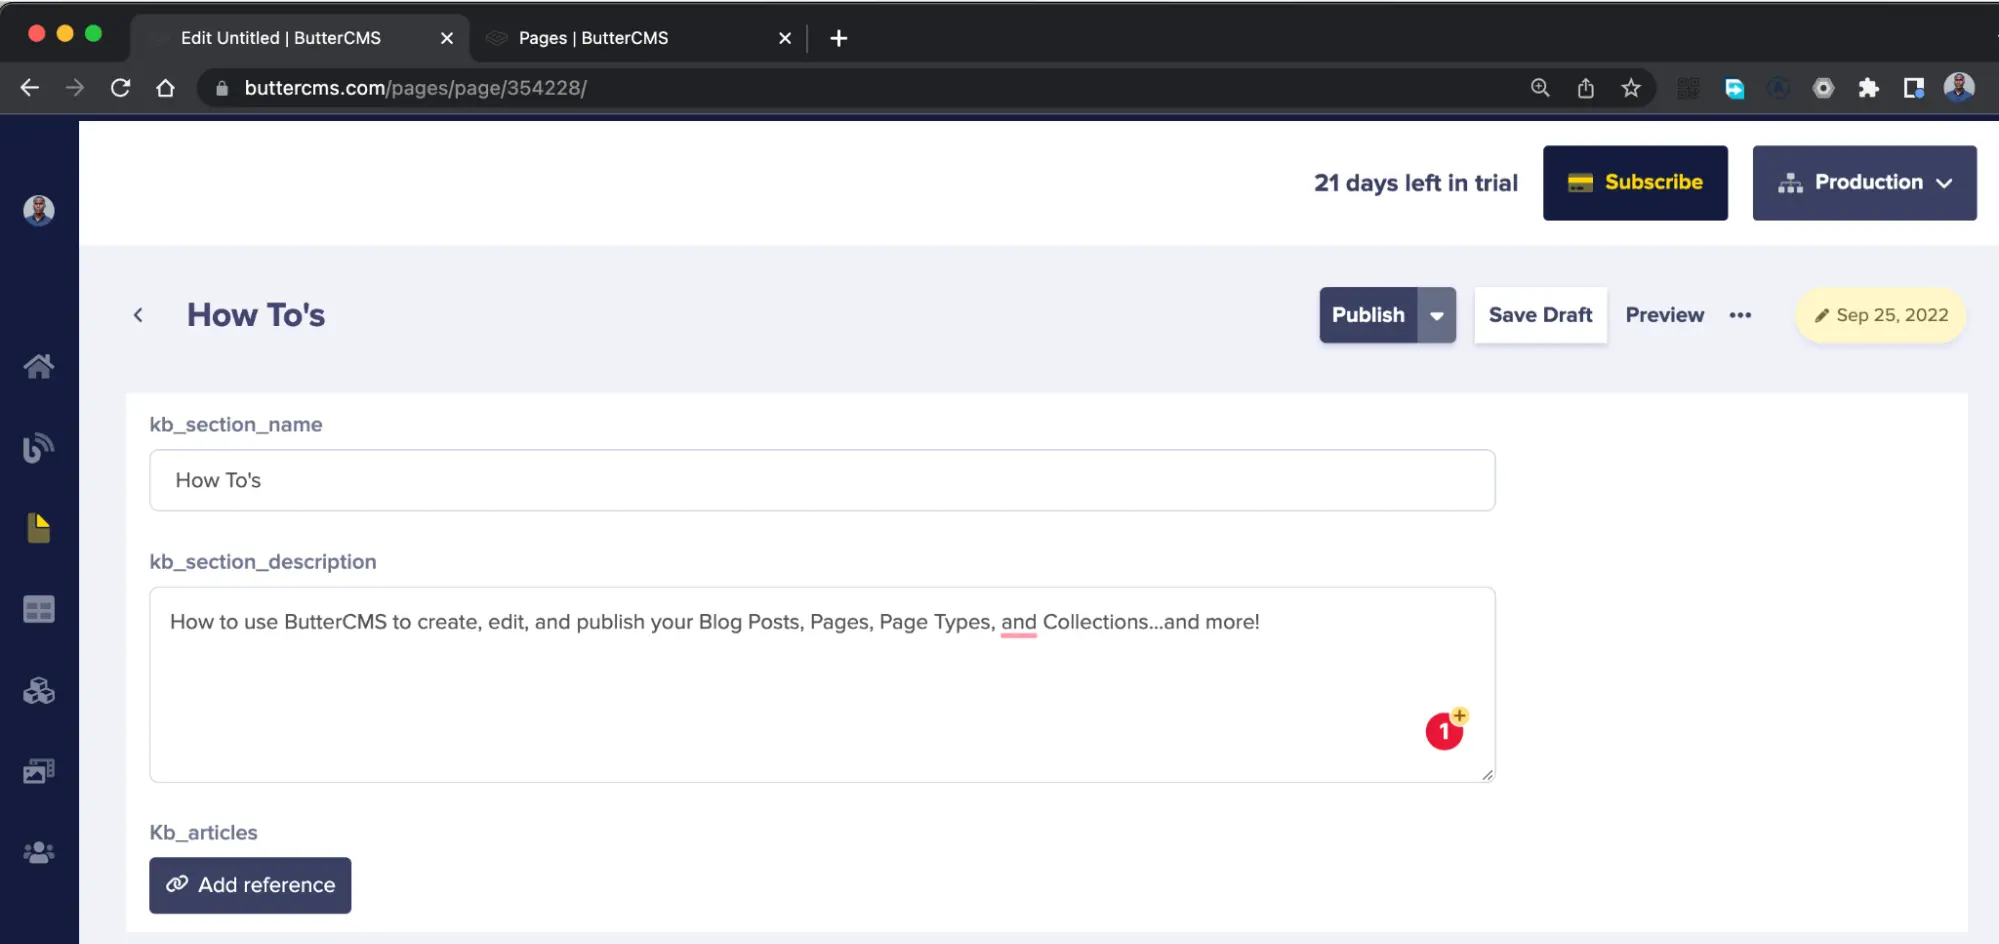
Click the Add reference button within the Kb_articles section to open a modal where you will select the pages you want to link.
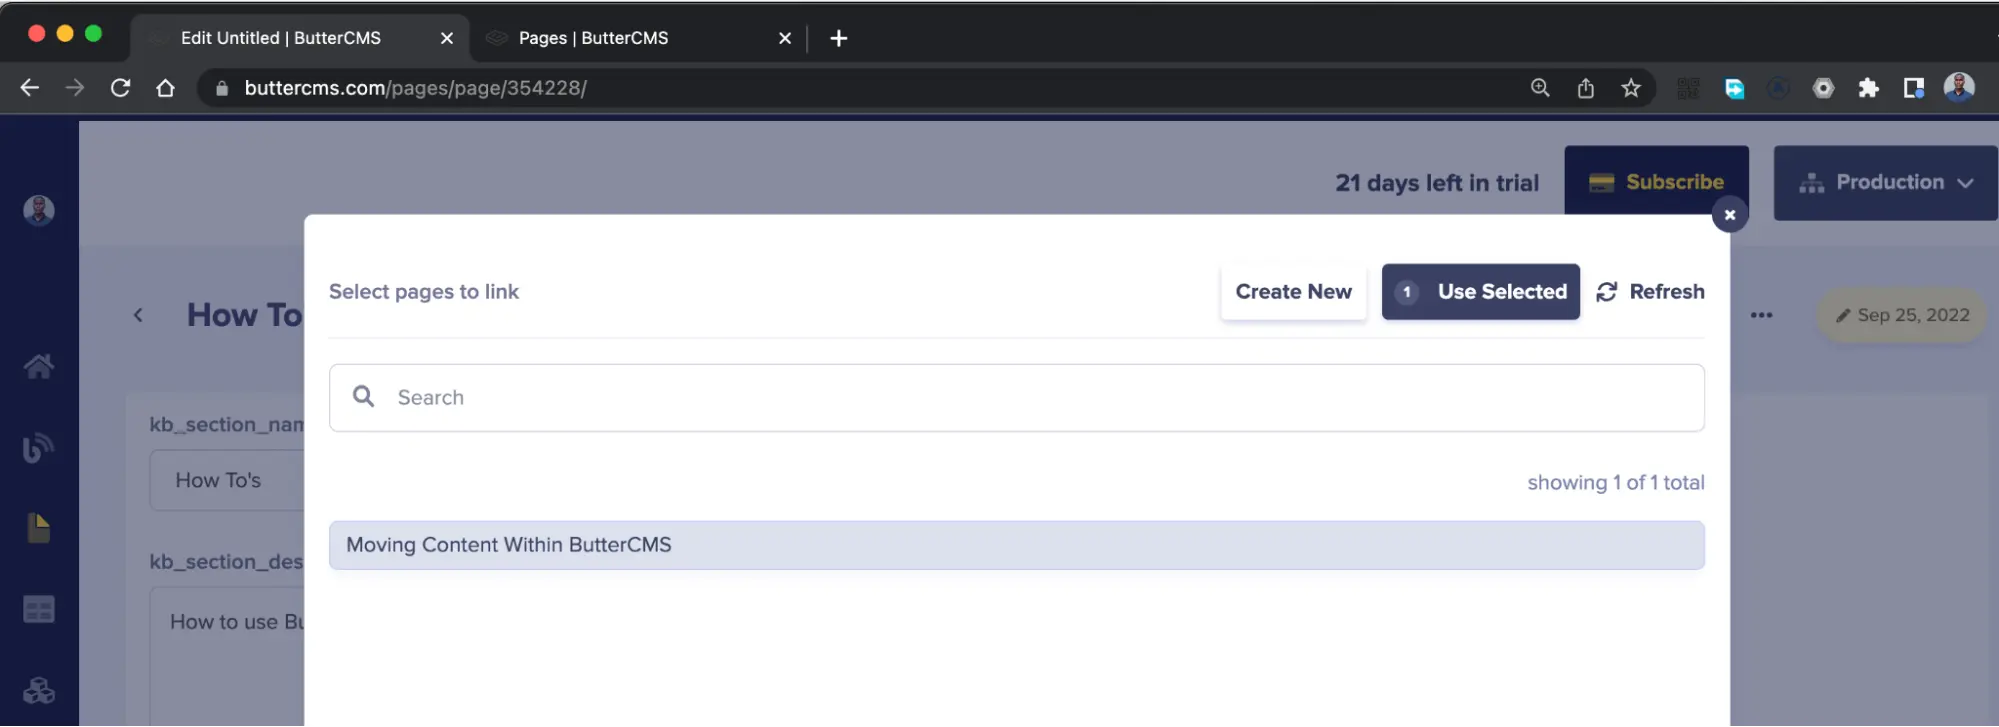
Select the Moving Content Within ButterCMS and any other articles you created and click the Use Selected button to save the reference(s).
Click the Publish button to save and publish all the changes you have made.
At this point, you are left with creating the home page to be displayed when the knowledge base is opened.
Creating the knowledge base homepage
Navigate back to the Pages section of the ButterCMS console, then click the New Page button and select kb_section_type from the dropdown.

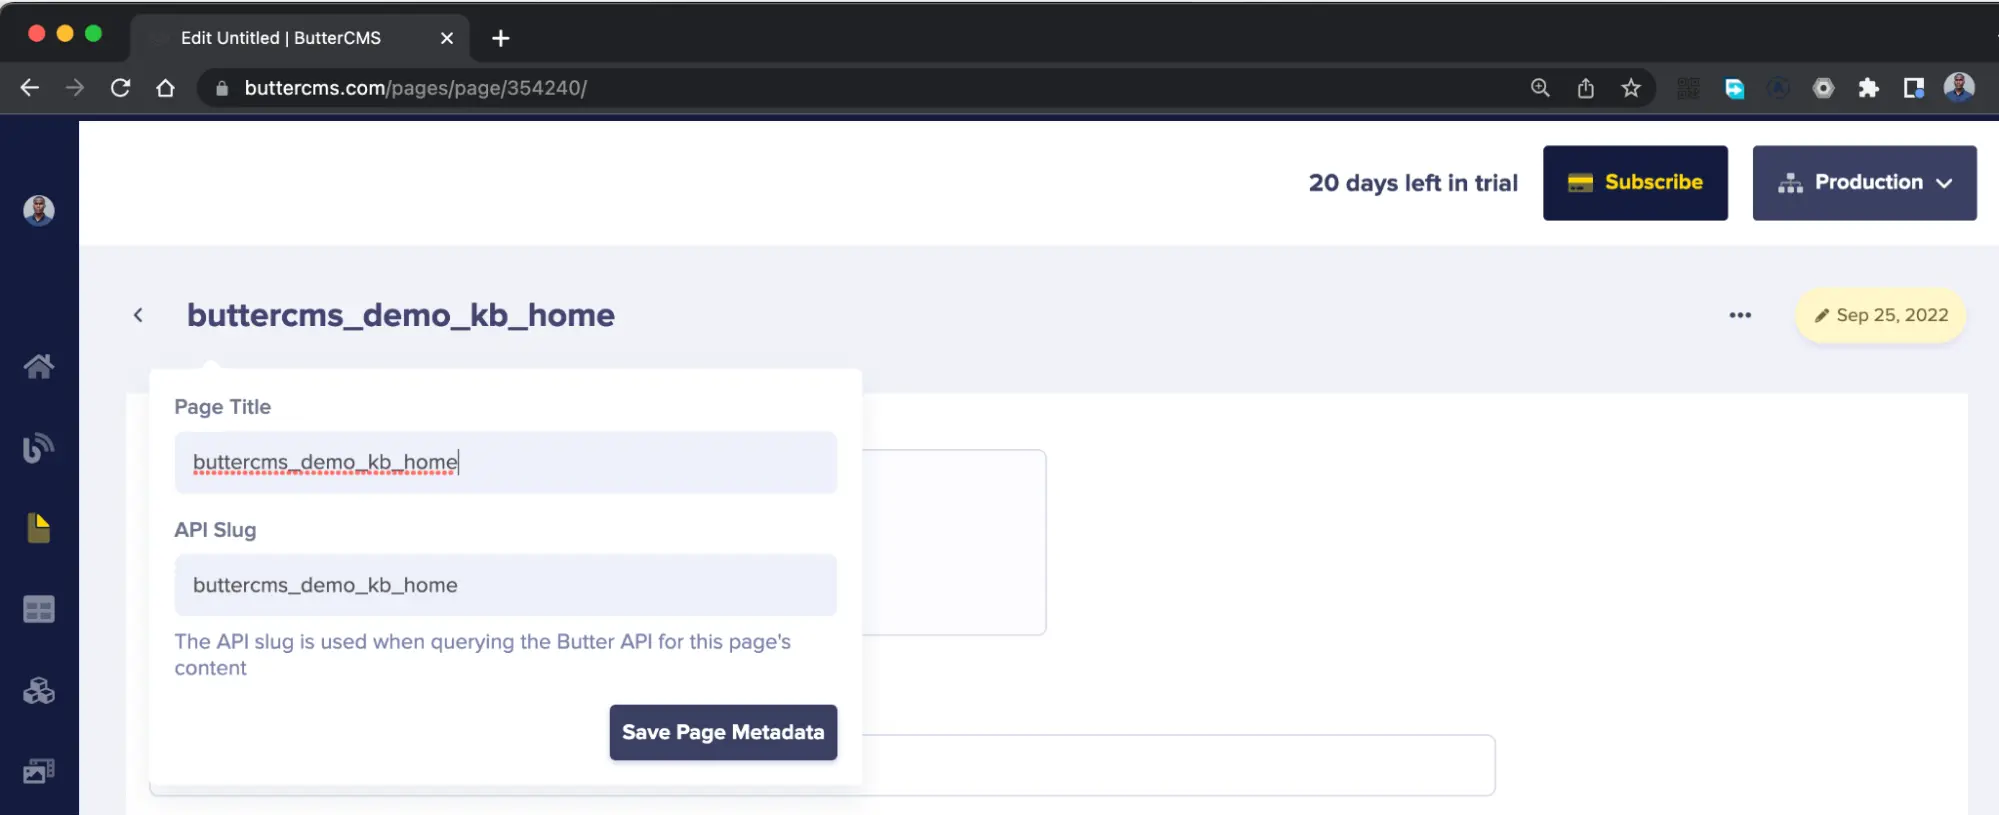
At the page editor, specify buttercms_demo_kb_home in the Page Title field and click the Save Page Metadata button to proceed.
Fill in the kb_home_hero_title, kb_home_hero_subtitle, and kb_home_hero_text fields with your preferred content, or use content from the homepage of the ButterCMS knowledge base.
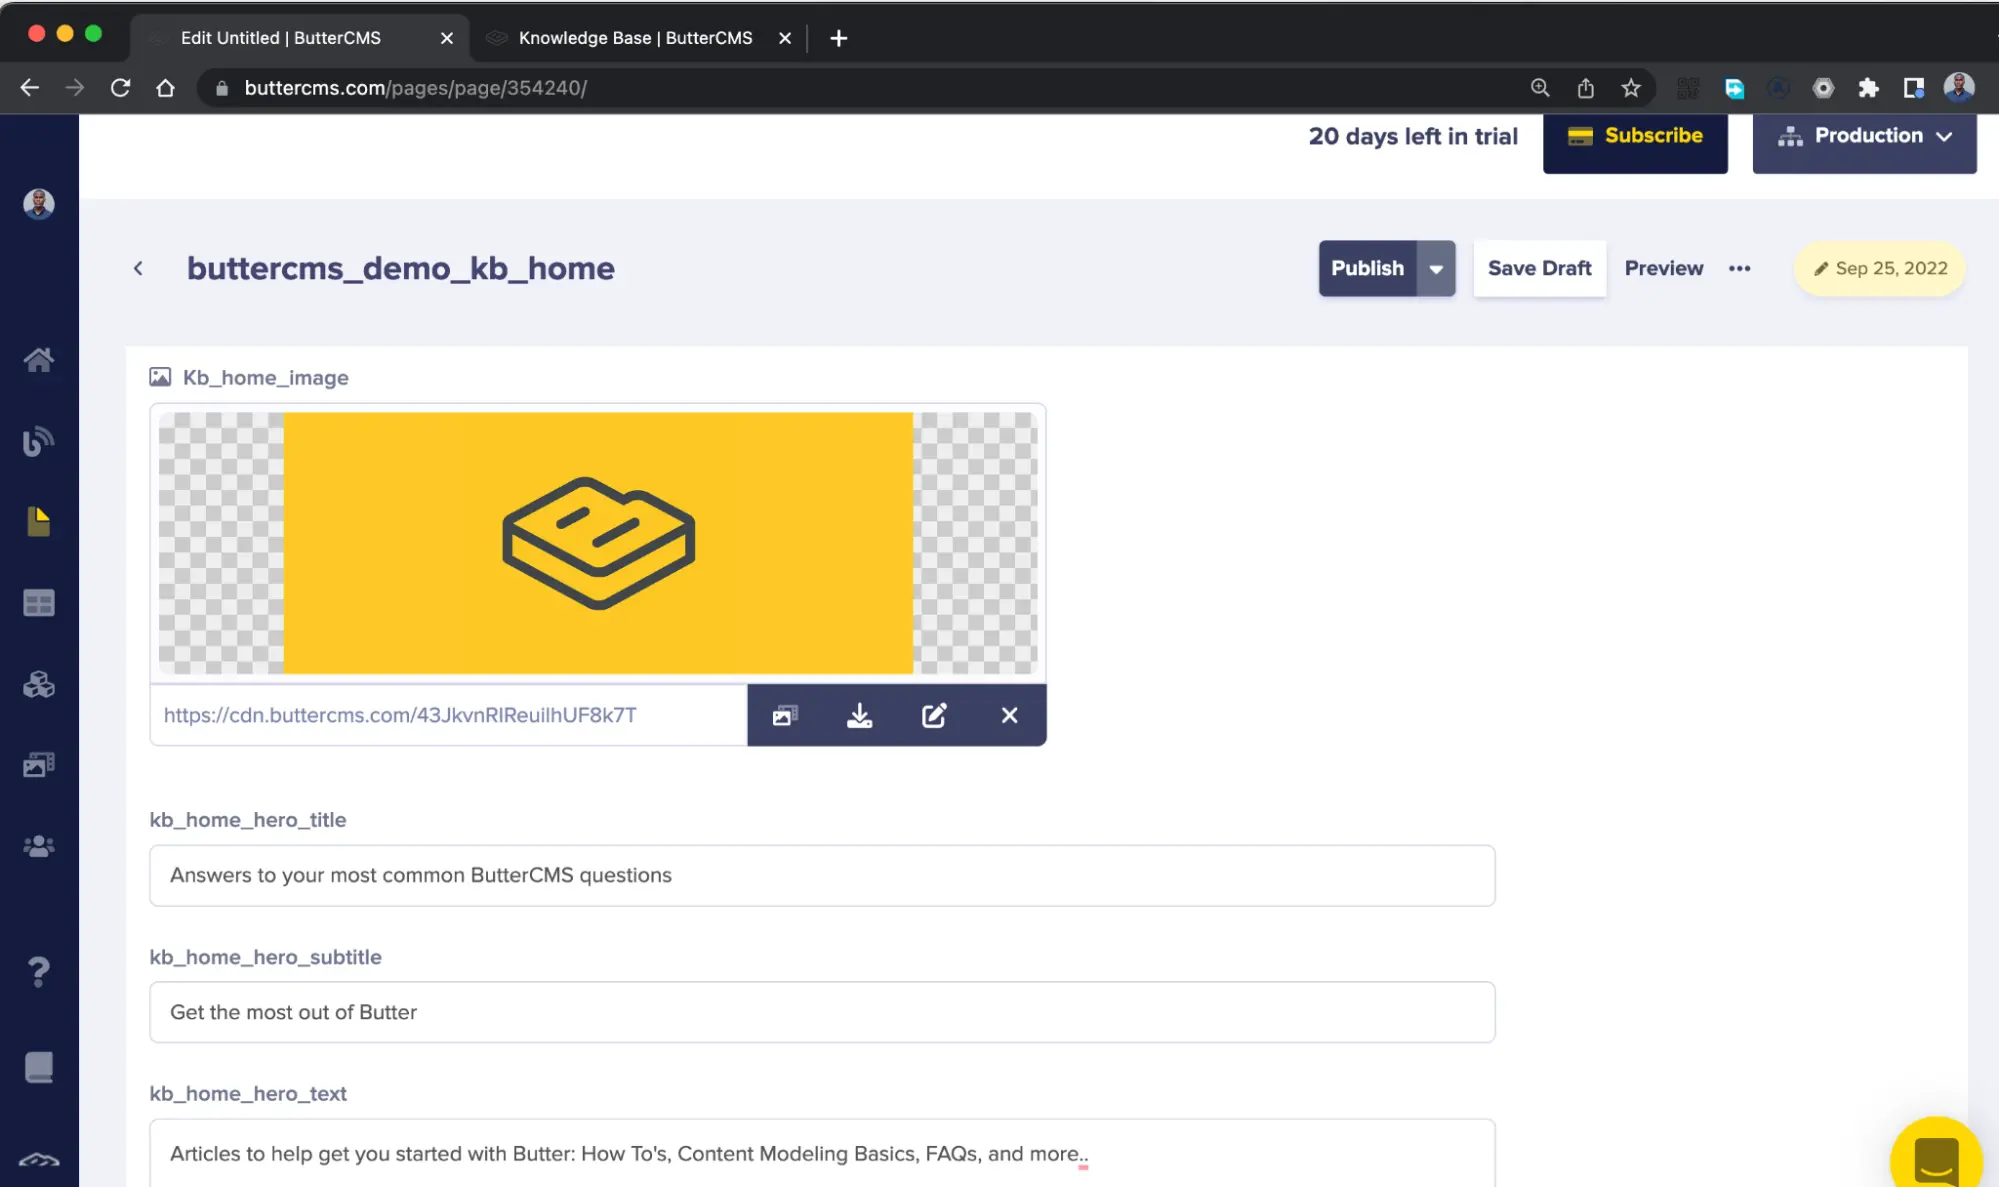
At the Kb_home_sections part of the editor, click the Add reference button to open the reference modal and select all the pages you created using the kb_section_type.
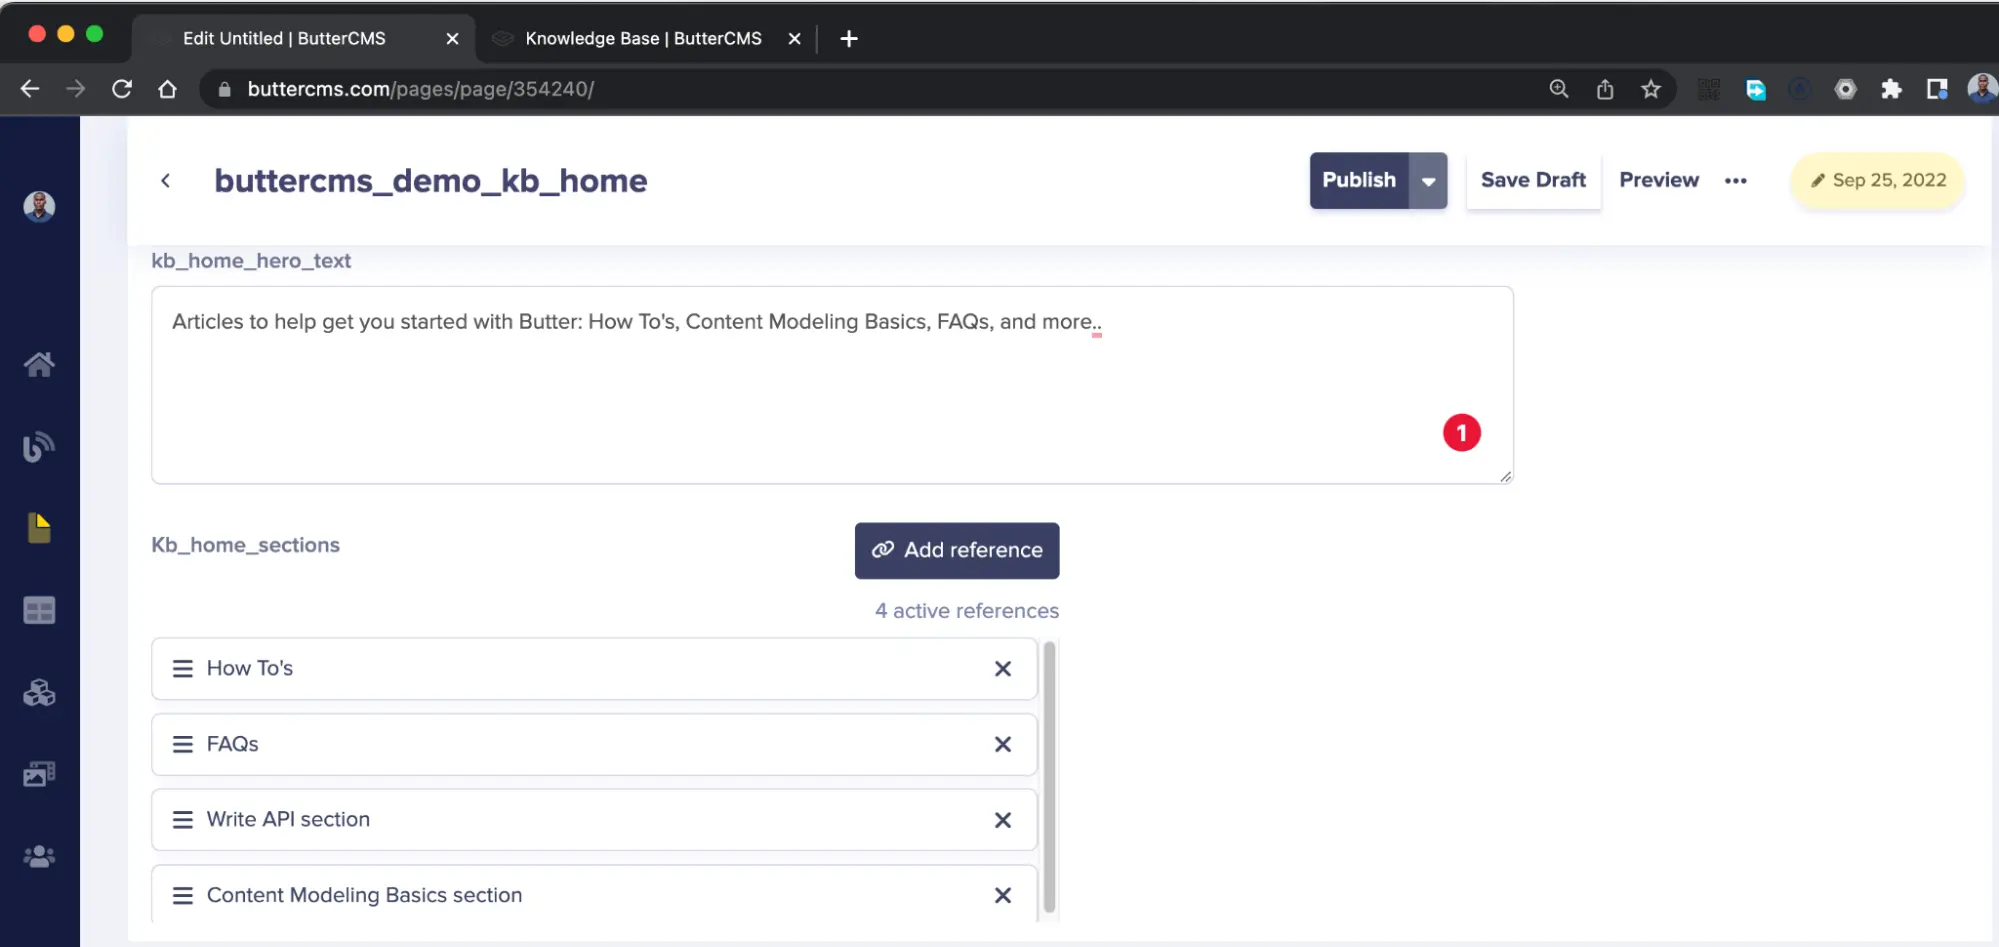
Click the Publish button to save the values within the fields of the text editor.
At this point, you have created the data for the knowledge base on ButterCMS. You are left with building a Next.js application that will fetch the knowledge base content via the ButterCMS Content API and display it.
Building a Next.js application for the knowledge base
Execute the command below to bootstrap a Next.js application that has TailwindCSS setup for styling. TailwindCSS is a CSS utility framework that uses the inline styling approach.
npx create-next-app --example with-tailwindcss buttercms-kb-clone
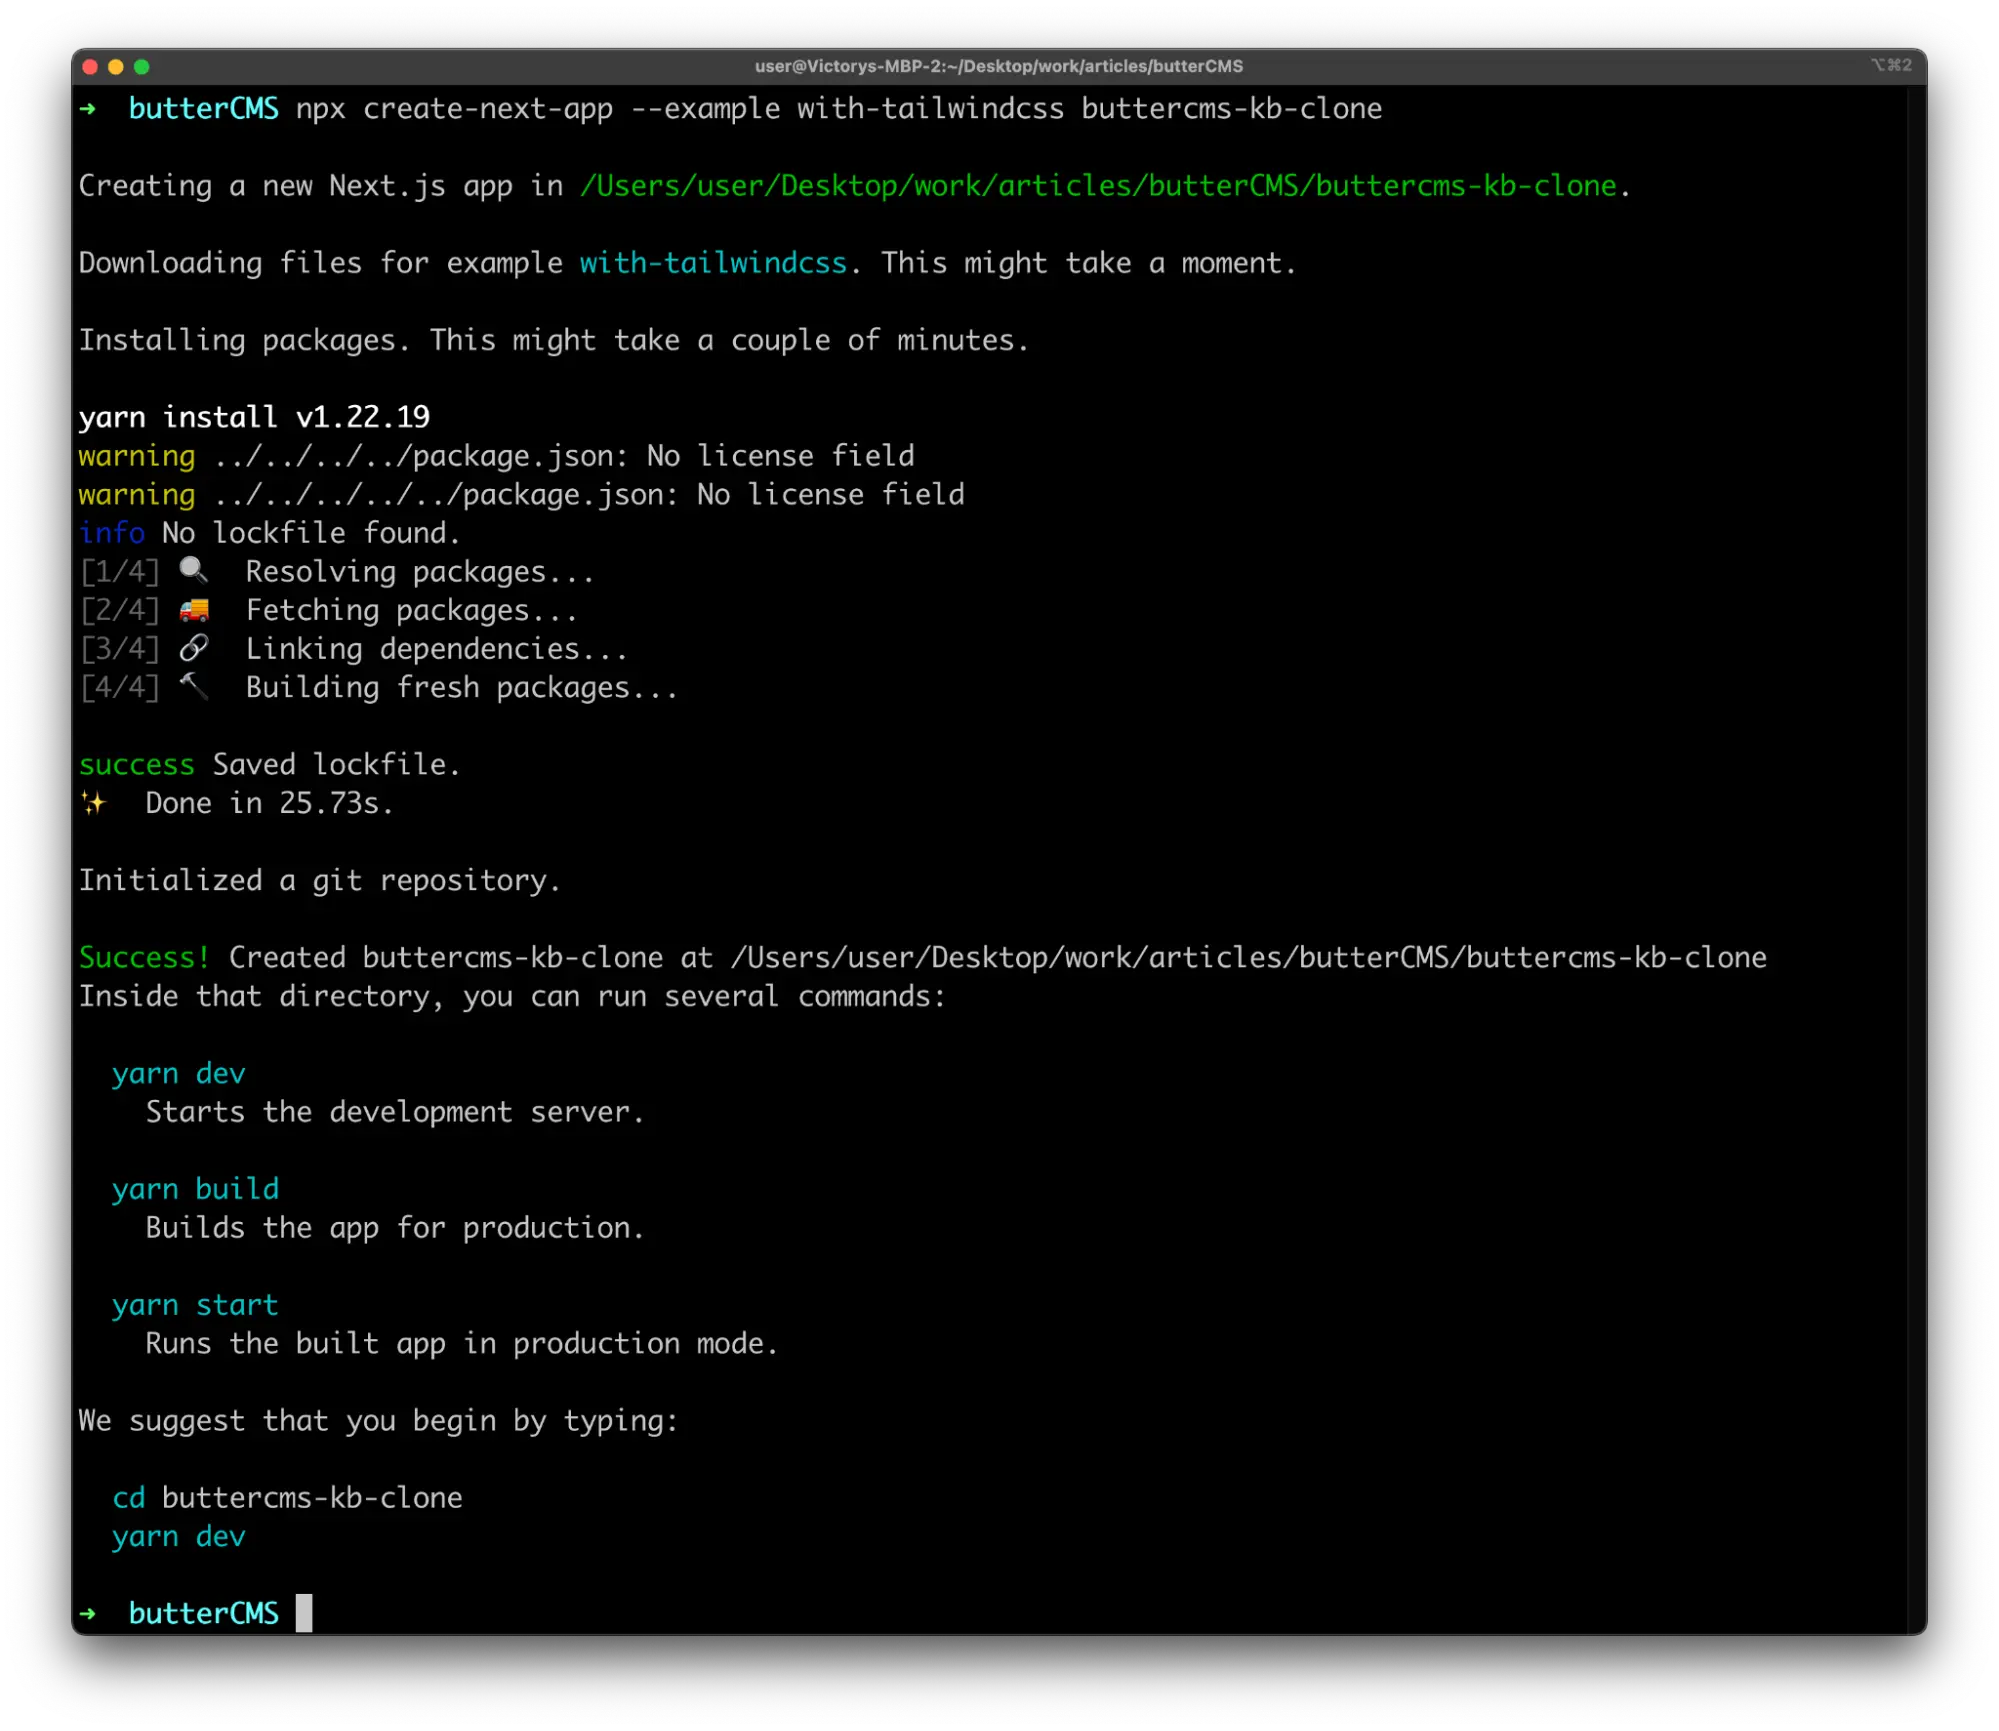
Open the generated buttercms-kb-clone directory project with your preferred code editor as you will create and modify existing files within the next steps as you build the interface for the knowledge base.
Create a .env.local file within the project root directory to securely store your ButterCMS API key as an environment variable. Replace the API_KEY placeholder with your ButterCMS API key and add the code to the .env.local file.
Note: You viewed your ButterCMS Read API key in the Preparing ButterCMS Resources section of this tutorial.
#  buttercms-kb-clone/.env.local
BUTTERCMS_API_KEY="API_KEY"
Creating the knowledge base default page
The default page, or home page, is the first page that is displayed when a web application is opened. As mentioned earlier, the default page of a knowledge base should display a quick overview of the knowledge base, alongside elements that a user can click on to navigate around.
To get a better understanding, the following steps will gradually take you through the process of putting together the React components that are rendered within the default page.
First, replace the entire boilerplate code in the pages/index.tsx file with the code below;
import Head from 'next/head'
import Image from 'next/image'
import { useRouter } from 'next/router'

export async function getStaticProps() {
const API_KEY = process.env.BUTTERCMS_API_KEY

const req = await fetch(`https://api.buttercms.com/v2/pages/*/buttercms_demo_kb_home/?auth_token=${API_KEY}`)

const { data: pageData } = await req.json()
 return {
   props: {
     pageData,
   }
 }
}
The asynchronous getStaticProps function above is a special function used by Next.js for fetching external data during build time as a part of its server-side generation (SSG) process.
For the application, the external data being fetched is from the buttercms_demo_kb_home page which you created during the early parts of this tutorial. The data returned will be injected into the React component as a prop.
Next, add the code below to create a card component for the default page. The Card component will display the details of each section.
const Card = ({ description, name, slug }) => {
 const router = useRouter()

 return (
   <div
     onClick={() => router.push(`/sections/${slug}`)}
     className="bg-white shadow-lg h-60 text-center flex justify-center items-center m-10 rounded-lg w-96 cursor-pointer"
   >
     <div className="p-10" >
       <h2 className="text-3xl font-semibold mb-5"  > {name} </h2>
       <p> {description} </p>
     </div>
   </div>
 )
}
Next, add the code below to create a custom image loader that will be used by the Next.js Image component to construct the URL of images stored with ButterCMS.
export const handleImageLoad = ({ src, width }) => {
 const splits = src.split('/')
 const img_hash = splits[splits.length - 1]

 return `https://cdn.buttercms.com/resize=width:${width}/${img_hash}`
}
To optimize an image, the Image component will generate a srcset containing multiple URLs of the remote image with varying sizes. The closest image size to the device resolution will be displayed.
Finally, add the code below to create the Index component that will display the default page and use the Card component.
const Home = ({ pageData }) => {
 const [searchText, setSearchText] = React.useState('')
 const [searchResult, setSearchResult] = React.useState(null)

 const handleSearch = async () => {}

 return (
   <div>
     <Head>
       <title>ButterCMS Knowledge Base</title>
     </Head>

     <main>
       <div
         style={{
           backgroundColor: "#121A3E",
           color: "white"
         }}
         className="py-10 flex text-center align-center justify-center items-center"
       >
         <div>
           <Image
             layout="fixed"
             width={200}
             loader={handleImageLoad}
             height={150}
             className="rounded-3xl"
             src={pageData.fields.kb_home_image}
           />
           <h1 className="mb-3 text-4xl font-bold" > {pageData.fields.kb_home_hero_title} </h1>
           <h1 className="mb-3 text-2xl font-bold" > {pageData.fields.kb_home_hero_subtitle} </h1>

           <form
             onSubmit={(e) => {
               e.preventDefault()

               handleSearch()
             }}
             className="flex my-8" >
             <input
		  value={searchText}
               onChange={(e) => setSearchText(e.target.value)}
               className="shadow appearance-none border rounded w-full py-2 px-3 text-gray-700 leading-tight focus:outline-none focus:shadow-outline"
               id="knowledge-base-query"
               type="text"
               placeholder="Search through our knowledge base"
             />

             <button
               disabled={searchText.length < 2}
       onClick={() => handleSearch()}
               className="ml-4 bg-blue-500 hover:bg-blue-700 text-white font-bold py-2 px-4 rounded focus:outline-none focus:shadow-outline"
               type="button"
             >
               Search
             </button>

		 {
               searchResult && (
                 <button
                   onClick={() => {
                     setSearchResult(null)
                     setSearchText('')
                   }}
                   className="ml-4 bg-gray-500 hover:bg-gray-700 text-white font-bold py-2 px-4 rounded focus:outline-none focus:shadow-outline"
                   type="button"
                 >
                   Cancel
                 </button>
               )
             }

           </form>
         </div>
       </div>

       <div className="bg-gray-100 h-full" >


         {
           searchResult ? <SearchResult result={searchResult} /> : (
             <div>
               <div className="flex justify-center mb-10" >
                 <p className="max-w-3xl text-xl text-center hover:text-underline" > {pageData.fields.kb_home_hero_text} </p>
               </div>
               <ul
                 className="mt-6 flex flex-wrap items-center justify-around sm:w-full"
               >
                 {
                   pageData.fields.kb_home_sections.map(({ fields, slug }, index) => (
                     <li key={index}>
                       <Card
                         name={fields.kb_section_name}
                         slug={slug}
                         description={fields.kb_section_description}
                       />
                     </li>
                   ))
                 }
               </ul>
             </div>
           )
         }

       </div>
     </main>
   </div>
 )
}

export default Home
The Home component above receives a pageData object containing the ButterCMS Page Object response from the getStaticProps function and displays the data across elements within the component.
Implementing search functionality
Having search functionality implemented makes it easier for individuals to make use of a knowledge base. By typing keywords into a search field, users will be able to find specific resources where the keywords are contained without having to manually navigate through the entire knowledge base.
To add search, replace the empty handleSearch function within the Home component of the pages/index.tsx file with the code below. The function below will make a GET request that contains the text from the search bar to the search endpoint of the Pages route.
const handleSearch = async () => {
   try {
     const req = await fetch(`${BASE_API_ENDPOINT}search?query=${searchText}&auth_token=${API_KEY
}`)

     const { data } = await req.json()
     setSearchResult(data)
   } catch (e) {
     console.log(e)
   }
 }
The search result from ButterCMS will be stored in the Home component state and displayed using a SearchResult component that you will create next.
Add the SearchResult component below into the pages/index.tsx file that renders the default page of the knowledge base. The SearchResult component will list out the page results obtained from ButterCMS using an unordered list (ul) element. When clicked, each search result will navigate the user to the relevant section or article.
const SearchResult = ({ result }) => {
 const router = useRouter()

 return (
   <div className="flex justify-center" >
     <div className="max-w-5xl w-3xl w-full">
       <p className="text-2xl mb-2" > All Search Results </p>
       <hr />

       <ul>
         {result.map(({ page_type, name, fields, slug }, idx) => (
           <li className="my-8 hover:bg-gray-100" key={idx} >
             {page_type === "kb_section_type" && (
               <div className="rounded cursor-pointer overflow-hidden shadow-lg bg-white w-full">
                 <div className="px-6 py-4">
                   <div className=" pt-4 pb-2">
                     <span className="inline-block bg-gray-200 rounded-full px-3 py-1 text-sm font-semibold text-gray-700 mr-2 mb-2">SECTION</span>
                   </div>

                   <div className="font-bold text-xl mb-2 hover:text-underline" onClick={() => router.push(`/sections/${slug}`)} >{name}</div>
                   <p className="text-gray-700 text-base"> {fields.kb_section_description} </p>
                 </div>
               </div>
             )}

             {page_type === "kb_article_type" && (
               <div className="rounded cursor-pointer shadow-lg overflow-hidden bg-white w-full">
                 <div className="px-6 py-4">
                   <div className=" pt-4 pb-2">
                     <span className="inline-block bg-gray-200 rounded-full px-3 py-1 text-sm font-semibold text-gray-700 mr-2 mb-2">ARTICLE</span>
                   </div>

                   <div className="font-bold text-xl mb-2 hover:text-underline" onClick={() => router.push(`/articles/${slug}`)} >{name}</div>
                   <p className="text-gray-700 text-base"> {fields.kb_article_description} </p>
                 </div>
               </div>
             )}
           </li>
         ))}
       </ul>
     </div>
   </div>
 )
}
Creating the sections page
Following the structure of the knowledge base, the content for each section is contained on a separate page. Next.js provides the functionality to generate dynamic pages for each section. First, you generate dynamic routes for each of the sections using the getStaticPaths function, then you generate content for each of the routes using the getStaticProps function.
Within the pages directory, create a directory named sections to create a /sections route and store the dynamic pages generated for the section pages within the knowledge base.
Create a file named [name].jsx within the pages/sections directory. The [name].jsx file will serve as a template for each section within the knowledge base.
Add the code below to the [name].jsx file to build both the getStaticPaths and getStaticProps functions. The two functions will both fetch all pages generated using the kb_section_type page type on ButterCMS. The getStaticPaths function is responsible for generating the section pages while getStaticProps feeds the pages with data.
import { useRouter } from 'next/router'
import React from 'react'
import Header from '../../src/components/header'

export const getStaticPaths = async () => {
   const req = await fetch(`https://api.buttercms.com/v2/pages/kb_section_type/?auth_token=${process.env.BUTTERCMS_API_KEY}`)
   const { data: sectionData } = await req.json()

   return {
       fallback: false,
       paths: sectionData.map(({ slug }) => ({
           params: {
               name: slug,
           }
       }))
   }
}

export const getStaticProps = async ({ params }) => {
   const req = await fetch(`https://api.buttercms.com/v2/pages/kb_section_type/${params?.name}/?auth_token=${process.env.BUTTERCMS_API_KEY}`)
   const { data: pageData } = await req.json()

   return {
       props: {
           pageData
       }
   }
}
Add the content of the code block below to the existing code within the [name].jsx file to build out the Index component that renders the content of a section.
const Index = ({ pageData }) => {
   const router = useRouter()

   return (
       <div>
		<header>
               <nav>
                   <div className="h-24 flex items-center justify-center" >
                       <p onClick={() => router.push('/')} className="text-2xl text-center cursor-pointer" > ButterCMS Knowledge Base </p>
                   </div>
               </nav>
           </header>

           <main className="bg-gray-100 w-full h-screen flex justify-center py-16 px-16"  >
               <div className="bg-white w-full p-10" >
                   <h1 className="text-5xl font-bold" > {pageData.fields.kb_section_name} </h1>

                   <div className="my-10" >
                       <p className="text-2xl" > {pageData.fields.kb_section_description} </p>
                   </div>
                   <hr />

                   <div className="mt-14" >
                       <p className="text-2xl mb-6 font-semibold" > Available Articles For {pageData.fields.kb_section_name} section : </p>

                       {
                           pageData?.fields?.kb_articles.length < 1 ? (
                               <div>
                                   <p> There are currently no articles within {pageData.fields.kb_section_name} section </p>
                               </div>
                           ) : (
                               <div>
                                   <ul>
                                       {pageData?.fields?.kb_articles.map(({ slug, name, fields }, index) => (
                                           <li
							key={index}
                                               className="border-solid border-2 p-5 border-gray-300
                                                rounded-lg cursor-pointer"
                                               onClick={() => router.push(`/articles/${slug}`)}
                                           >
                                               <p className="text-3xl" > {name} </p>
                                               <p className="text-gray-500 mt-4" > {fields.kb_article_description} </p>
                                           </li>
                                       ))}
                                   </ul>
                               </div>
                           )
                       }
                   </div>
               </div>
           </main>
       </div>
   )
}

export default Index
Creating the article page
Similar to the sections page, you will also dynamically generate the pages of each article within the knowledge base.
Create a directory named articles within the pages directory to store the pages for each article.
Create a file named [slug].jsx within the pages/articles directory and add the code below into the file. The code contains the article’s template component, alongside the getStaticProps and getStaticPaths functions.
import React from 'react'

const Index = ({ pageData }) => {
   return (
       <div>
          <header>
               <nav>
                   <div className="h-24 flex items-center justify-center" >
                       <p onClick={() => router.push('/')} className="text-2xl text-center cursor-pointer" > ButterCMS Knowledge Base </p>
                   </div>
               </nav>
           </header>

           <main>
               <div className="bg-gray-100 flex justify-center" >
                   <div className="mt-10 max-w-5xl bg-white p-10" >
                       <h1 className="text-4xl mb-10" > {pageData.fields.kb_article_name} </h1>

                       <div dangerouslySetInnerHTML={{ __html: pageData.fields.kb_article_body }} >
                       </div>
                   </div>
               </div>
           </main>
       </div>
   )
}

export const getStaticPaths = async () => {
   const req = await fetch(`https://api.buttercms.com/v2/pages/kb_article_type/?auth_token=${process.env.BUTTERCMS_API_KEY}`)
   const { data: articleData } = await req.json()

   return {
       fallback: false,
       paths: articleData.map(({ slug }) => ({
           params: {
               slug,
           }
       }))
   }
}

export const getStaticProps = async ({ params }) => {
   const req = await fetch(`https://api.buttercms.com/v2/pages/kb_article_type/${params?.slug}/?auth_token=${process.env.BUTTERCMS_API_KEY}`)
   const { data: pageData } = await req.json()

   return {
       props: {
           pageData
       }
   }
}

export default Index
Testing the Next.js knowledge base
At this point, you have completed all the steps outlined in this tutorial to guide you through the process of building a basic knowledge base. Let’s proceed to run the application and observe how it functions.
Using a terminal that is within the buttercms-kb-clone project directory, execute the command below to run the development server for the Next.js application.
yarn serve
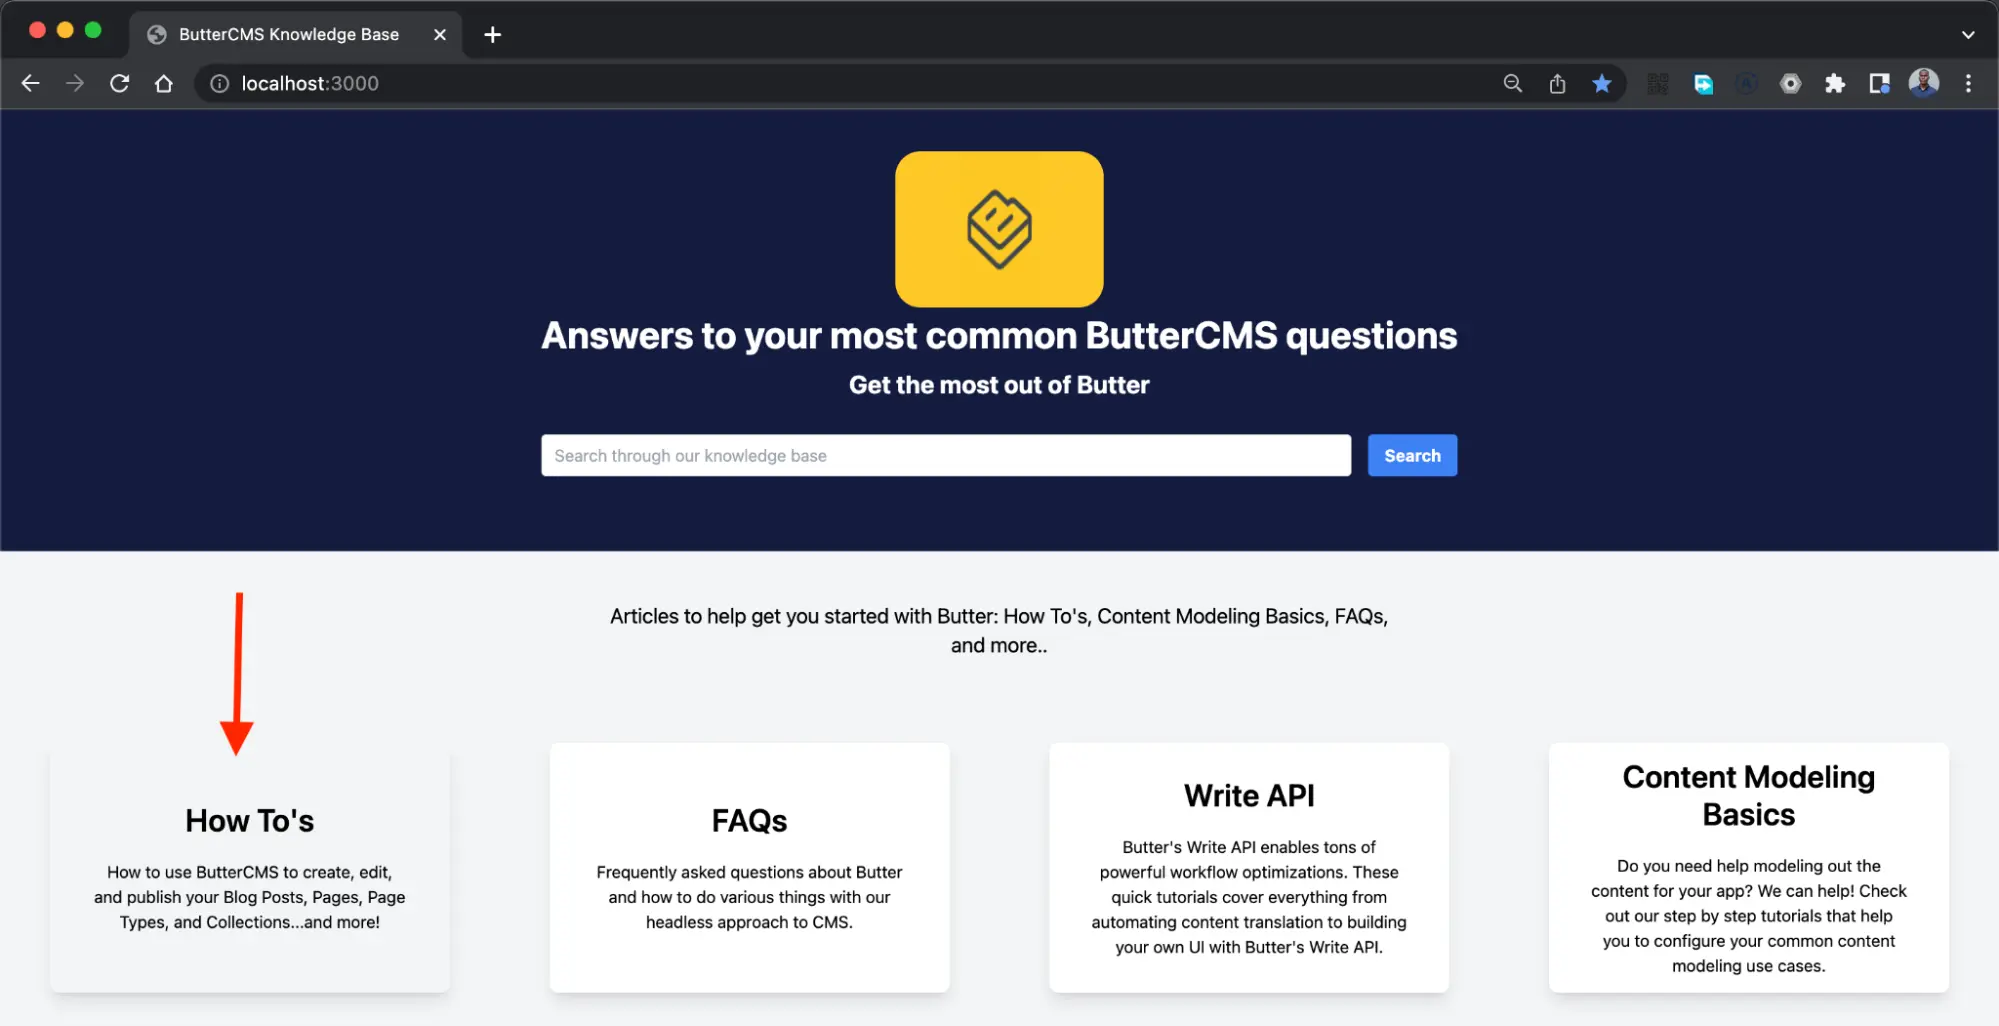
Using your browser, navigate to http://localhost:3000 to view the default page of the knowledge base.
You will see a quick description of the knowledge base and the section cards with the name of each section and a quick description of what the section contains.
The search bar provides you with the ability to find any section or article within the knowledge base by typing a word within the content.
Type in “FAQ” in the search bar to search for any section or article containing the FAQ word. Click the Search button to trigger the search against the knowledge base.
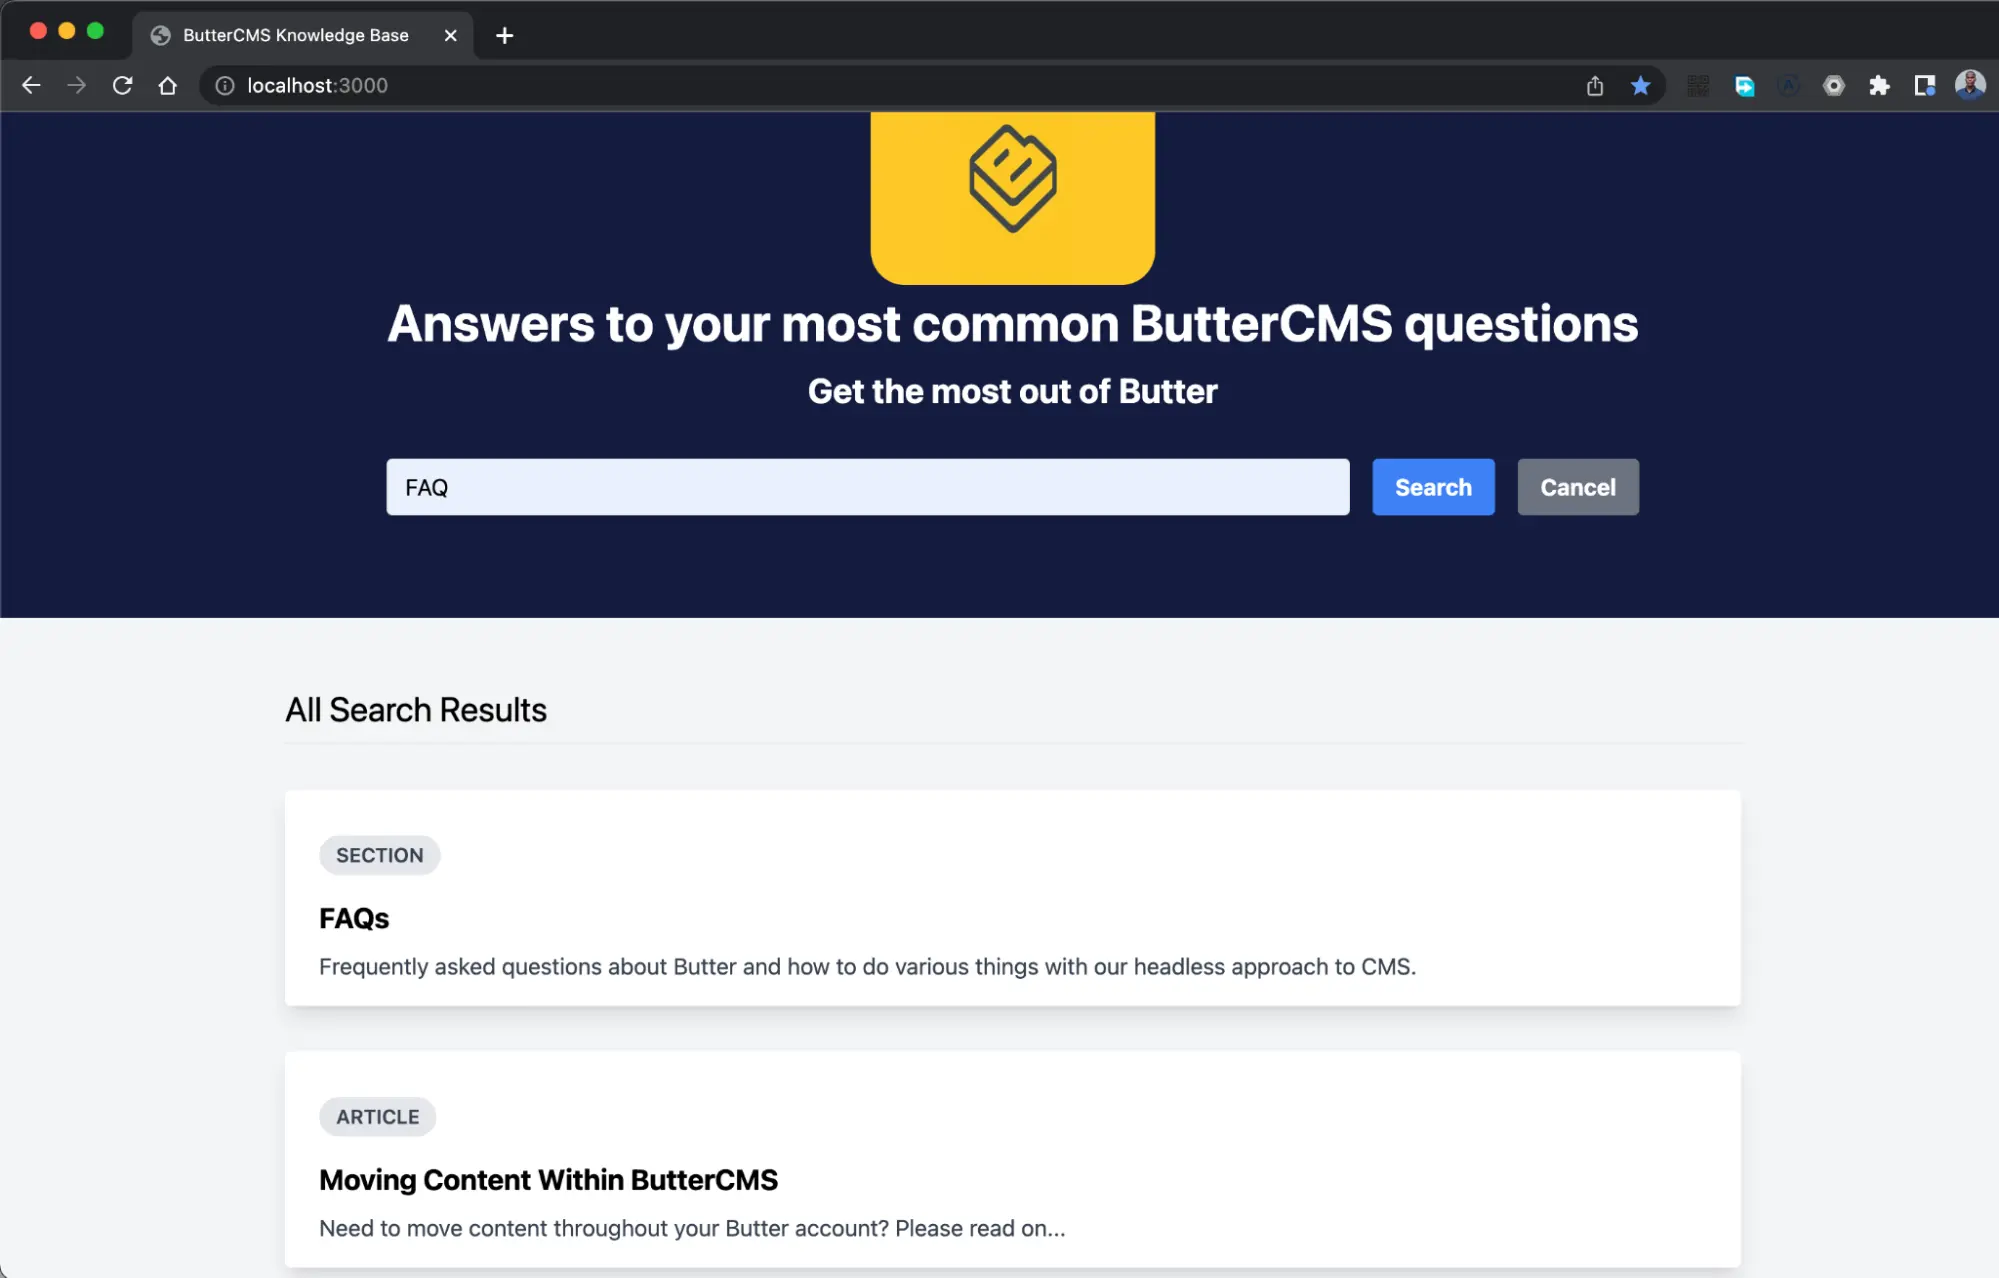
Next, click the Cancel button to dismiss the search results and display the section cards.
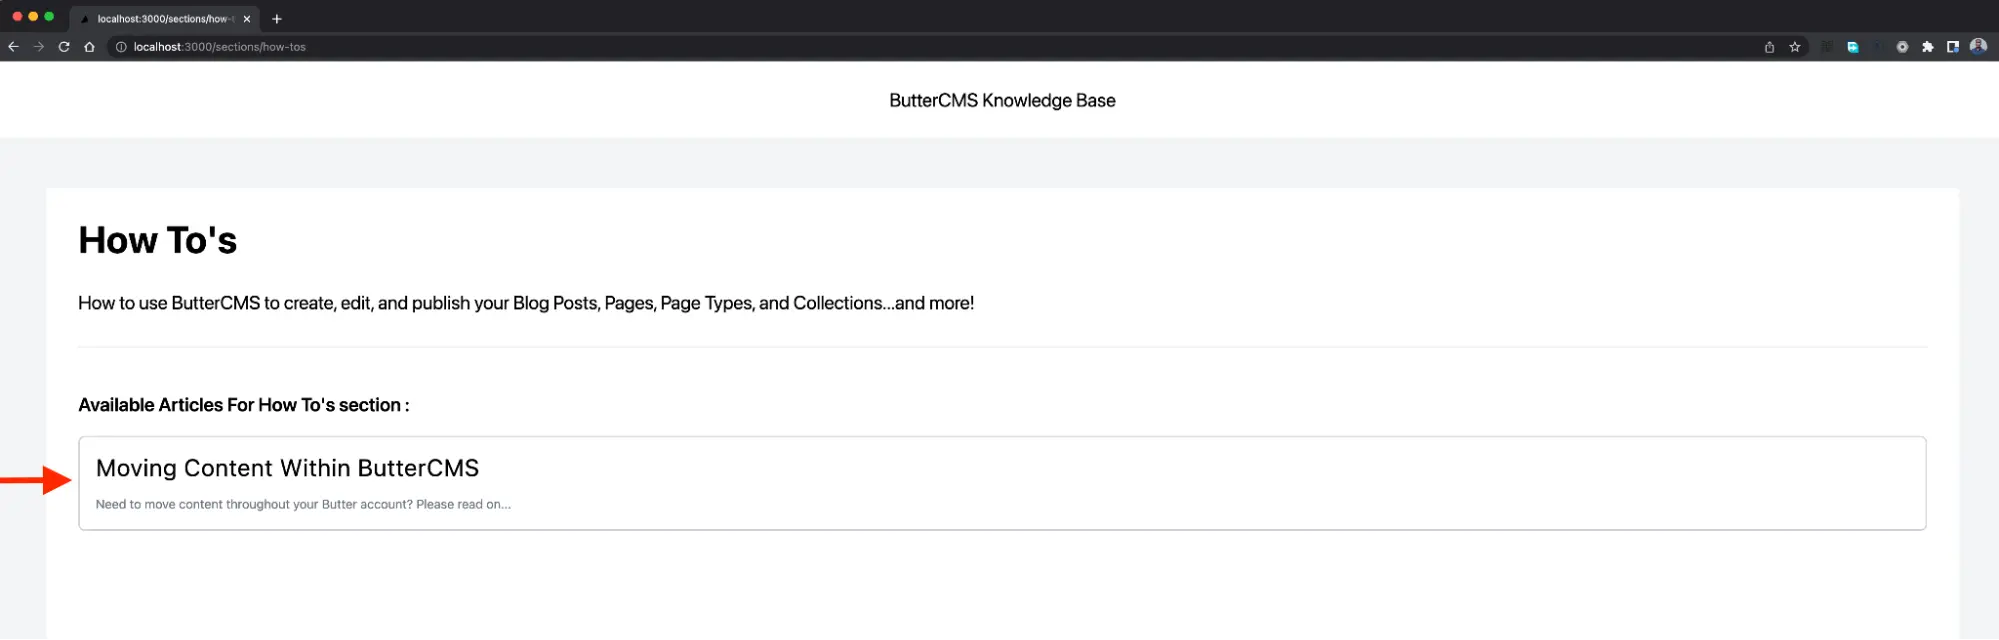
Click the How To’s card to navigate to the dynamic page for that section. On ButterCMS, it was the only section that was linked to an article, hence it will display the article.
Knowledge base homepage
Similar to how it was designed at the original ButterCMS knowledge base, you will see the name, description, and articles available listed within the section page.
Click the Moving Content Within ButterCMS title to navigate to the dynamic page for the article.
Knowledge base section page
As shown in the image below, the page will display the article title and the content that was added to the WYSIWYG field editor on ButterCMS.
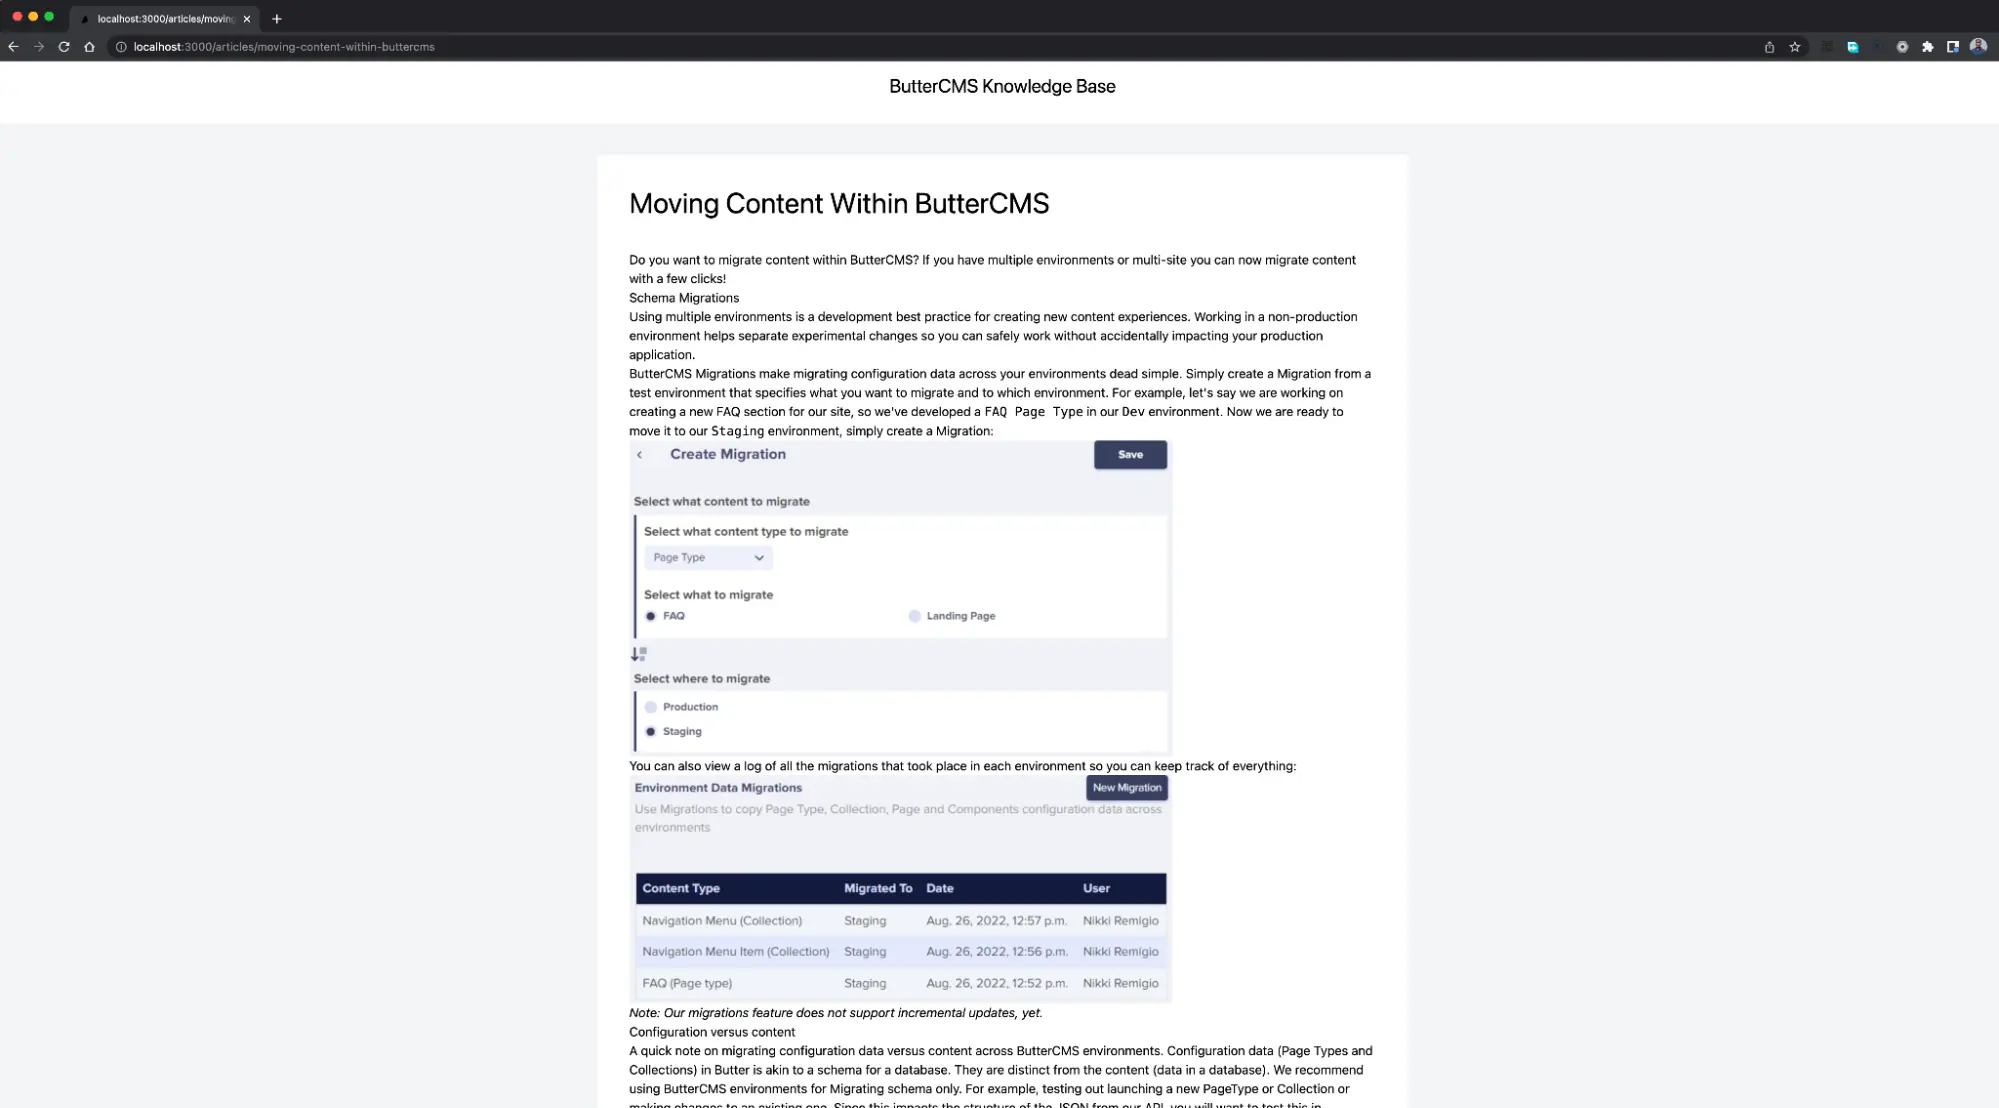
Knowledge base article
That’s it!
Your basic knowledge base application has been completed.
If you want to have more content, you will need to go back to your ButterCMS console and create more pages with different content.
Final thoughts
Congratulations to you on getting this far!
To recap, you started off with learning about a knowledge base, its value proposition to a business, its pain points, and how ButterCMS fits perfectly into the tech stack of a knowledge base. Then, you proceeded to the hands-on tutorial where you built a basic knowledge base powered by ButterCMS using the Next.js framework.
While Next.js provides several built-in features that make a knowledge base better, you can also build a knowledge base using an HTML application. Read the How to Add a CMS to an HTML Website article and see how you can rebuild it to serve as a simplified knowledge base.