- What is Lerna?
- Get Started Building with Next.js, Storybook, and Lerna
- Creating the Front-end Package
- Creating the Components Package
- Running Our Packages
- Connecting Our Front-end Packages With Our Components Package
- Integrating Storybook With Our Components Package
- Importing Button From Our Components Package
- Adding Styles to Our Components
- Starting Your Own Monorepo Project
Using a monorepo structure for your app can be very advantageous. A monorepo structure makes it much easier to manage multiple dependent applications or packages.
A monorepo structure also makes developing, deploying, and sharing code much simpler since updating and restarting your apps become unnecessary. When structuring an app as a dependent package on separate repositories, the opposite is true. There are many more steps to manage.
This problem compounds when you are managing multiple apps on multiple frameworks. If you have a Next.js CMS for your website and blog, alongside a React Native app, maintenance grows more complex with each new variable.
In this tutorial, you'll learn how to build a monorepo using Lerna. We’ll be building a Next.js application which will import components from a separate package. We’ll also be using Storybook to showcase those components.
Table of contents
What is Lerna?
Lerna is a tool for managing projects which contain multiple JavaScript projects. It’s similar to yarn workspace as it helps us manage a monorepo while making it easy to build all the packages separately.
Get Started Building with Next.js, Storybook, and Lerna
We can bootstrap our Lerna project by globally installing it:
npm install --global lernaNext, we need to create a new git repository:
git init building-monorepos-using-lerna && cd building-monorepos-using-lernaNow, we can run the init command which will create a new Lerna repo or upgrade an existing repo to the current version of Lerna:
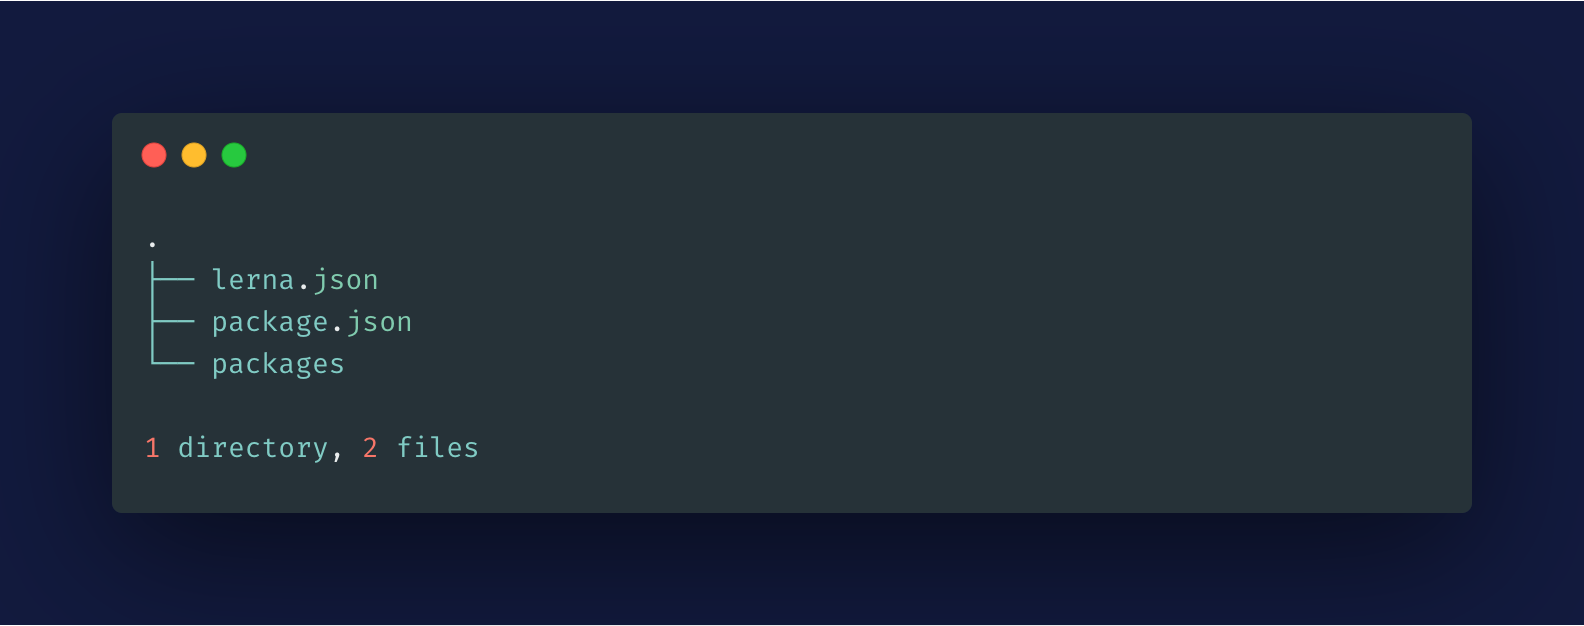
lerna init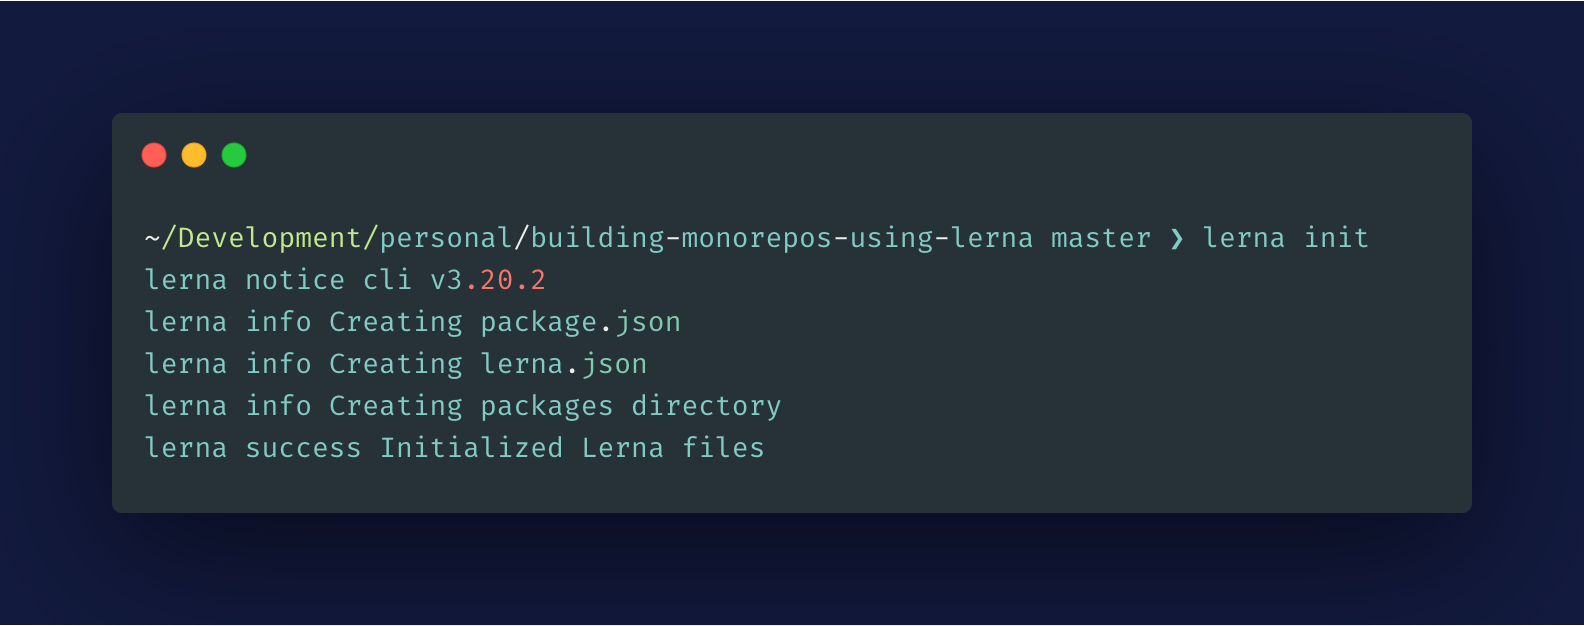
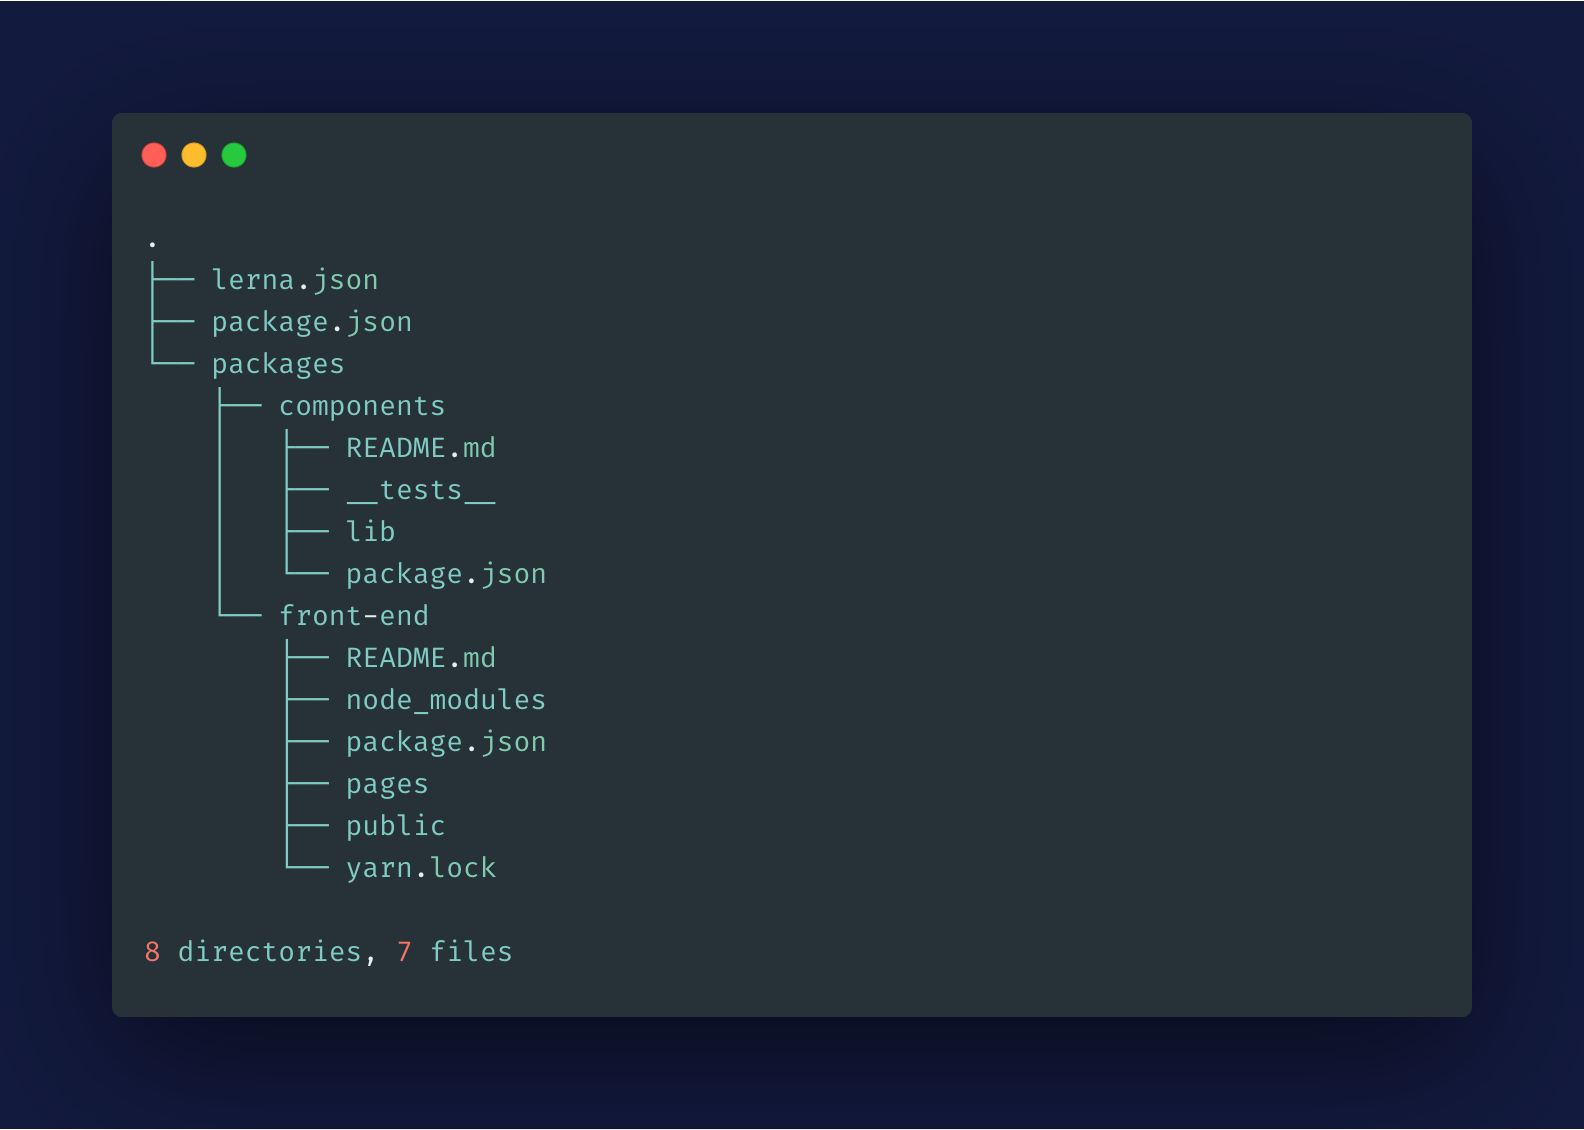
This will generate the following monorepo structure:
Creating the Front-end Package
We’ll be creating the front-end package inside the packages directory. So, let’s change our directory and install the Next.js application:
cd packages && yarn create next-appThis will generate the following structure:
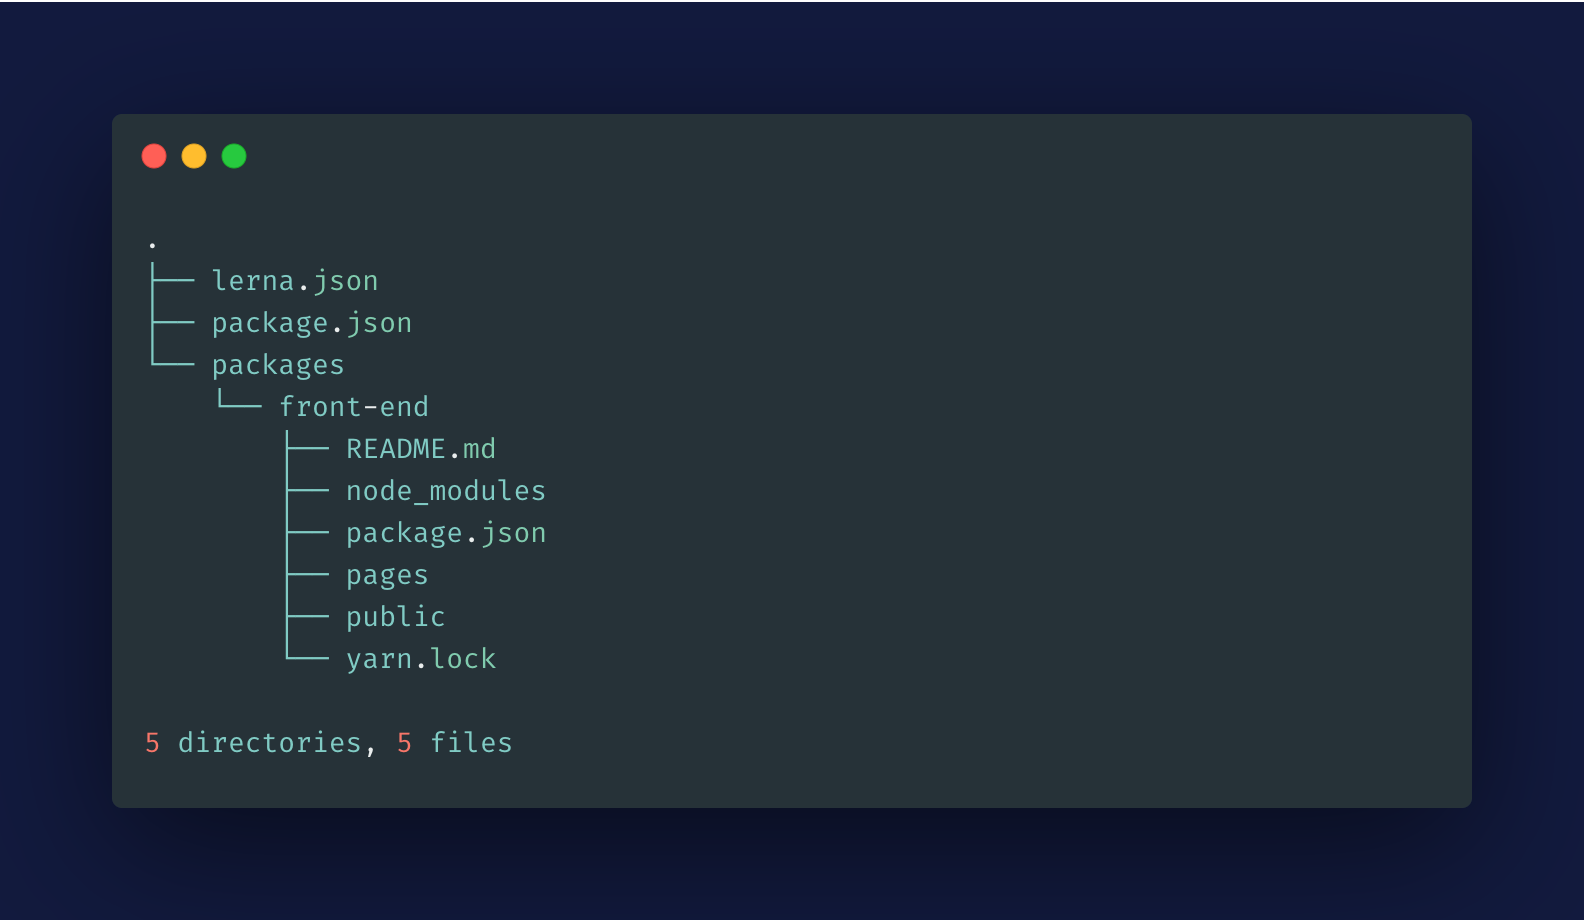
Please note that while creating the Next.js application, I chose the name front-end. Hence, all the files were installed inside that directory. If you choose a different name for your Next.js application, you’ll see that directory instead.
Creating the Components Package
We’ll be creating the components package inside the packages directory. In this monorepo package, we’ll be building React components which will be consumed by our Next.js application (front-end package).
We’ll also use Microbundle for bundling our modules. Let’s create the package using Lerna:
lerna create components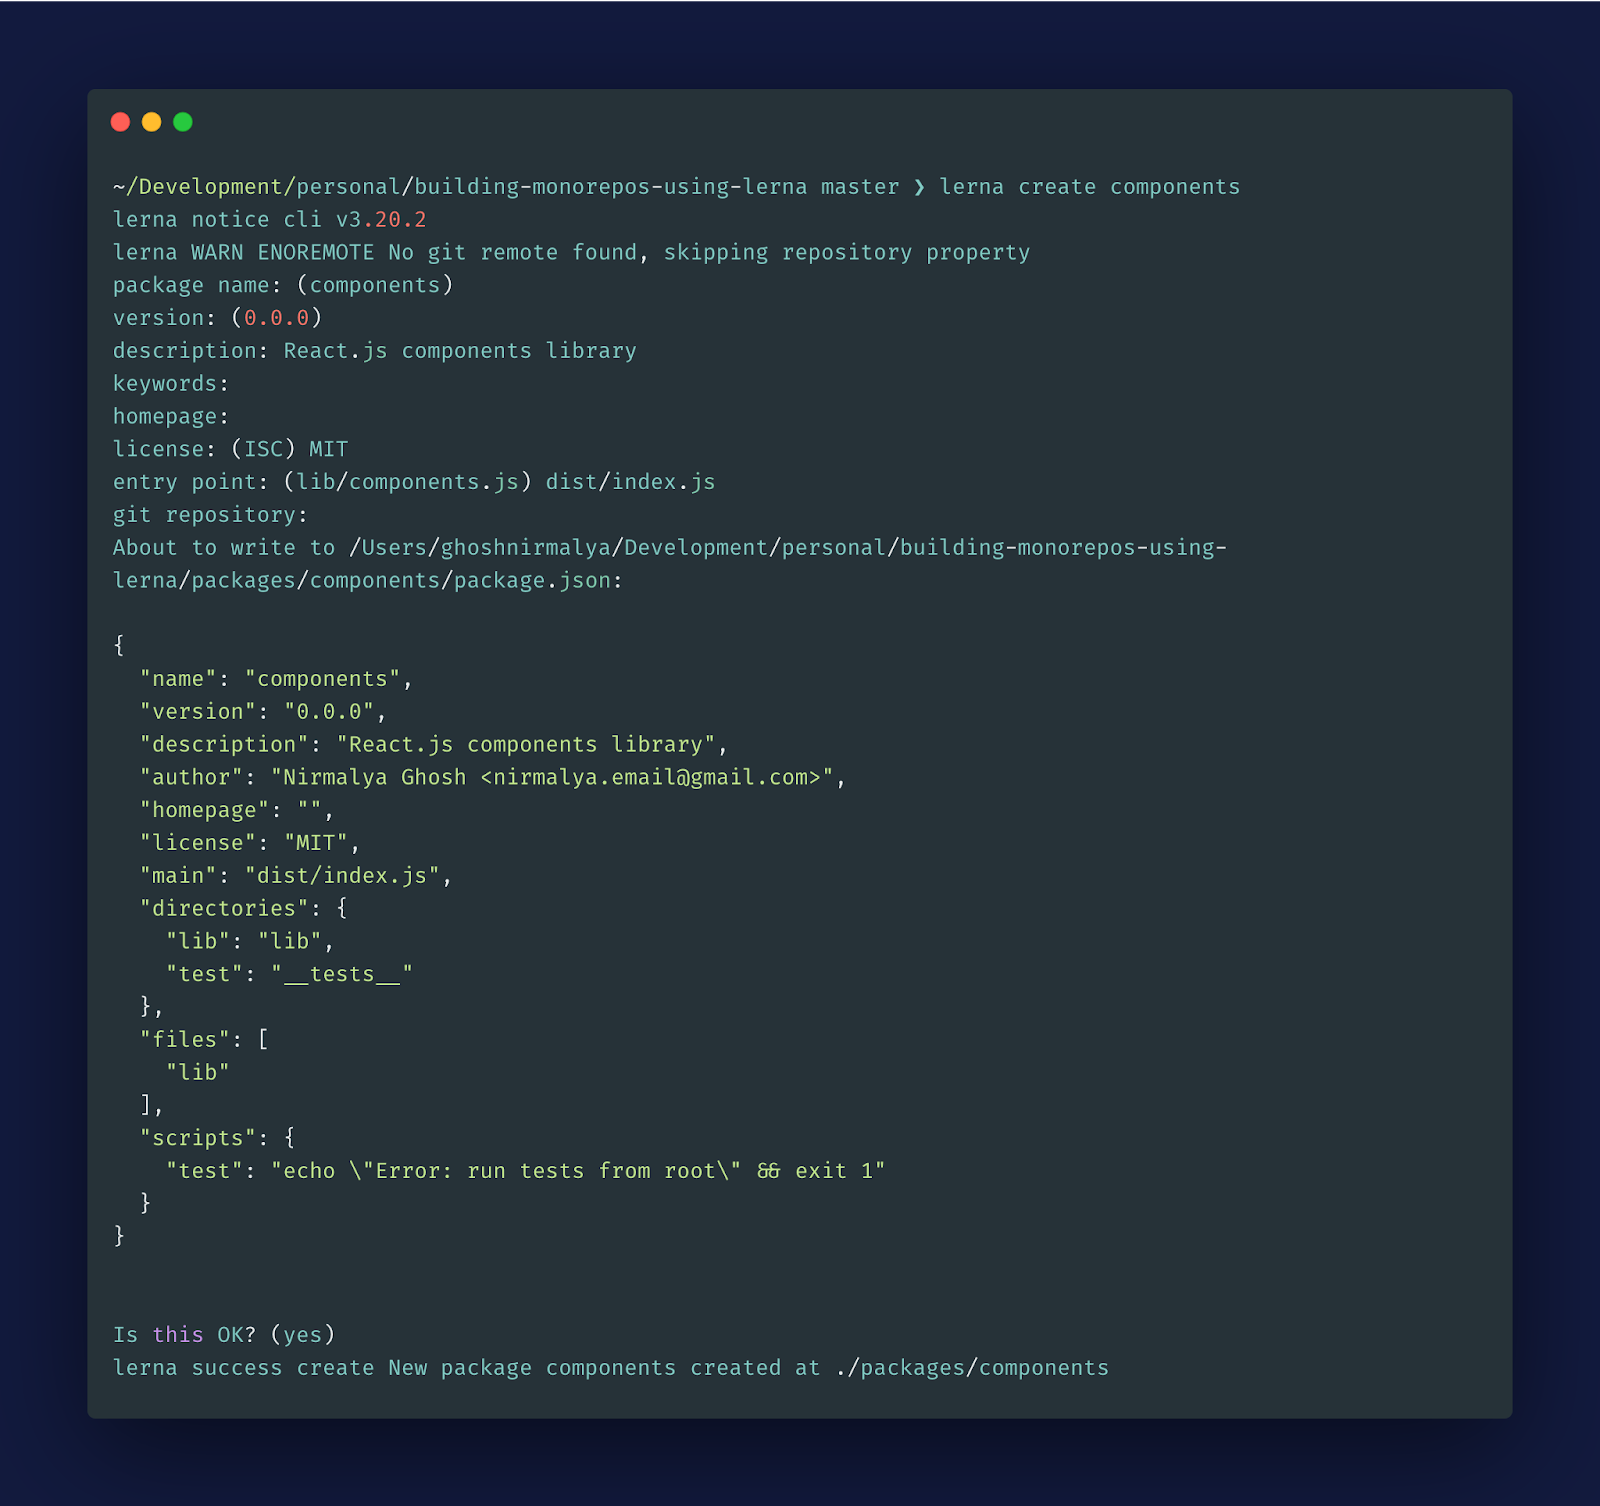
Now, the structure of our application should be like the following:
Let’s add microbundle to our components package:
cd packages/components && yarn add microbundle -DThe above command will add microbundle as a dev-dependency.
Expand Your Reach: Learn to Build a Multilingual Website with Next.js!
Read the tutorial!Let’s add one script inside our components package’s package.json file:
// packages/components/package.json

"scripts": {
   ..
   "dev": "microbundle watch --jsx React.createElement"
 }
Also, we need to add a source to the package.json file:
// packages/components/package.json

"source": "lib/index.js",
Let’s create one file called index.js inside our packages/components/lib directory.
Running Our Packages
Until now, we’ve created two packages: front-end and components. Both of them have a dev script defined in their respective package.json files:
// packages/components/package.json

"scripts": {
   ..
   "dev": "microbundle watch --jsx React.createElement lib/*.js"
},// packages/front-end/package.json
"scripts": {
..
"dev": "next dev",
},We can run both these scripts from the root using the following command:
lerna run dev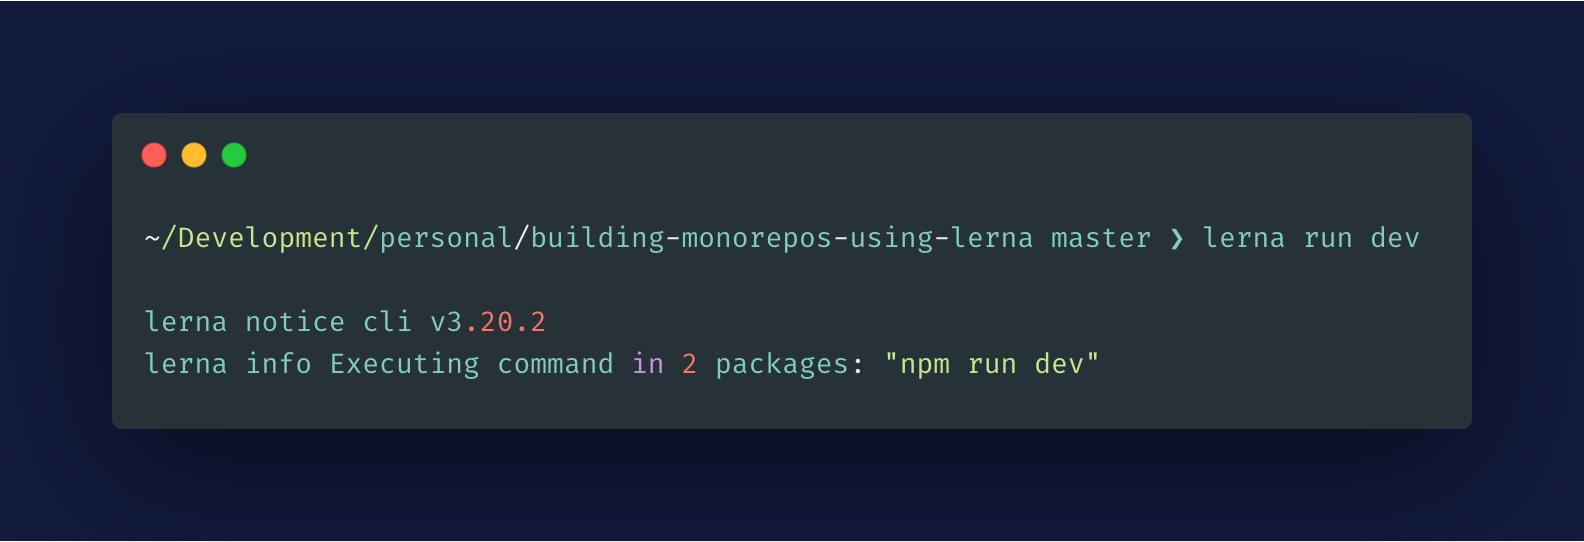
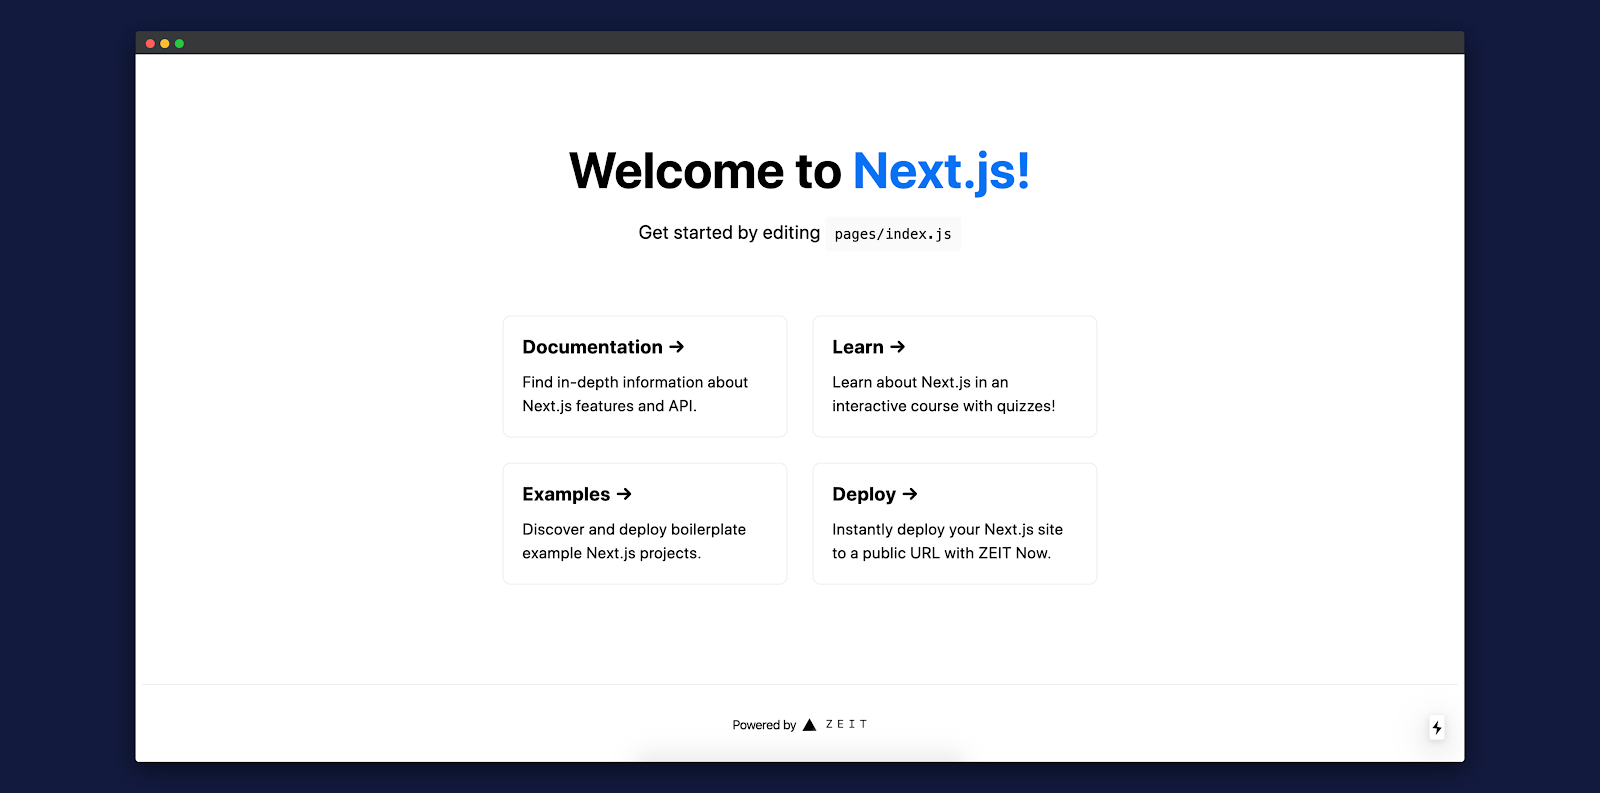
We can now view our Next.js application running on http://localhost:3000/.
More information regarding lerna run command is available here.
We can also run the following command to get the logs about our server:
lerna run dev --parallel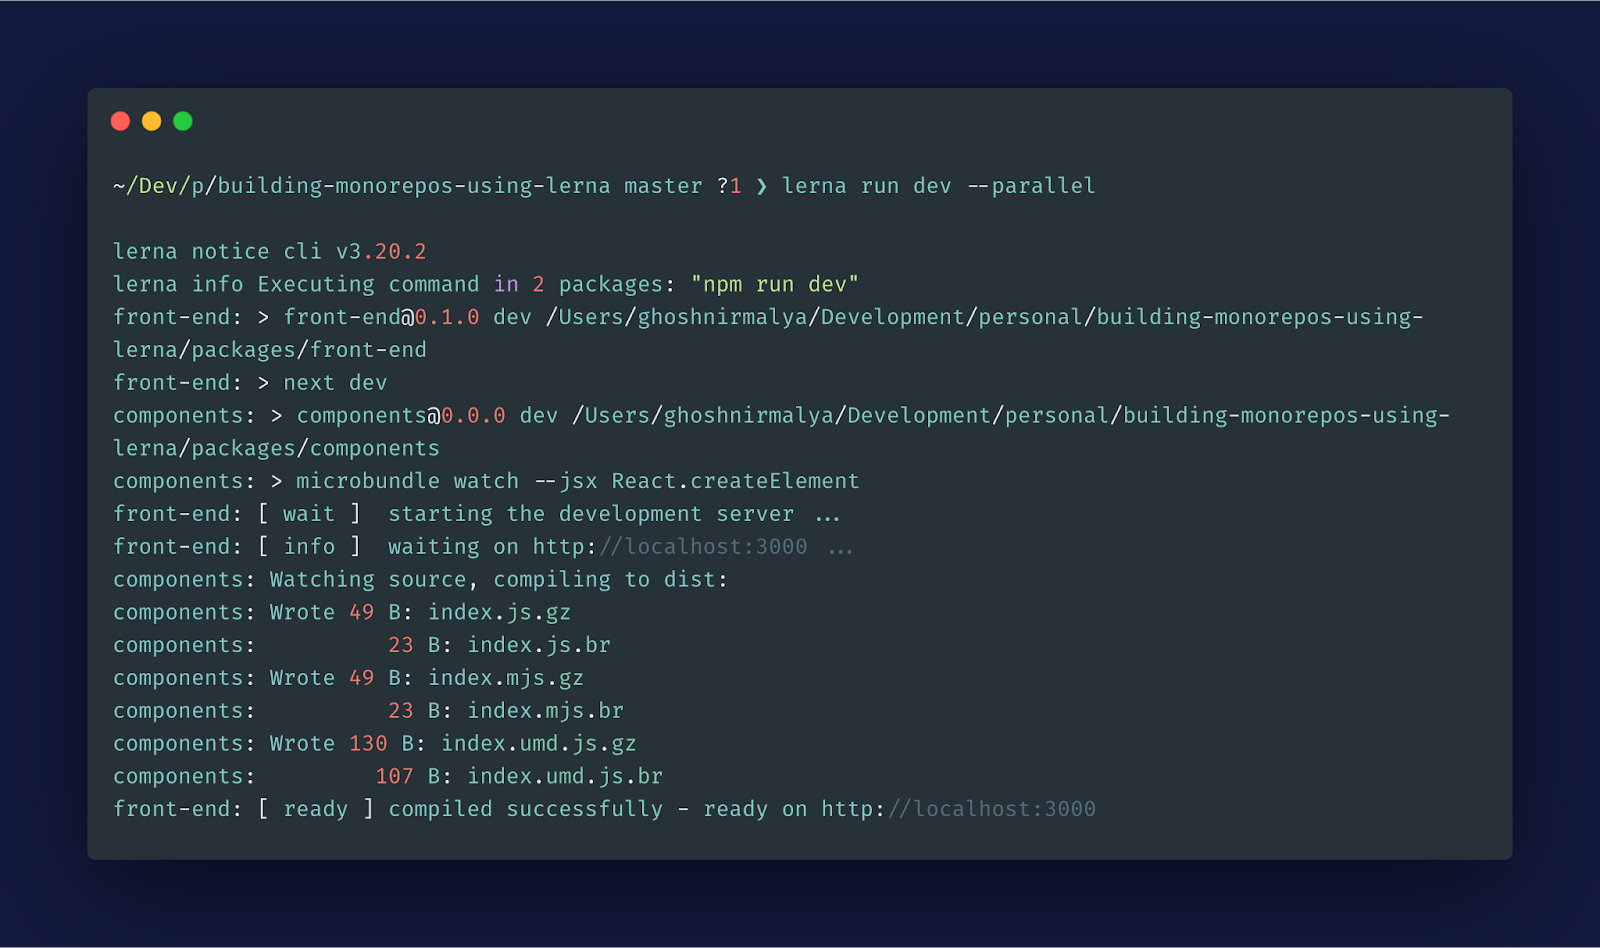
If we want to run a command for only one package we use the following command:
lerna run dev --scope front-end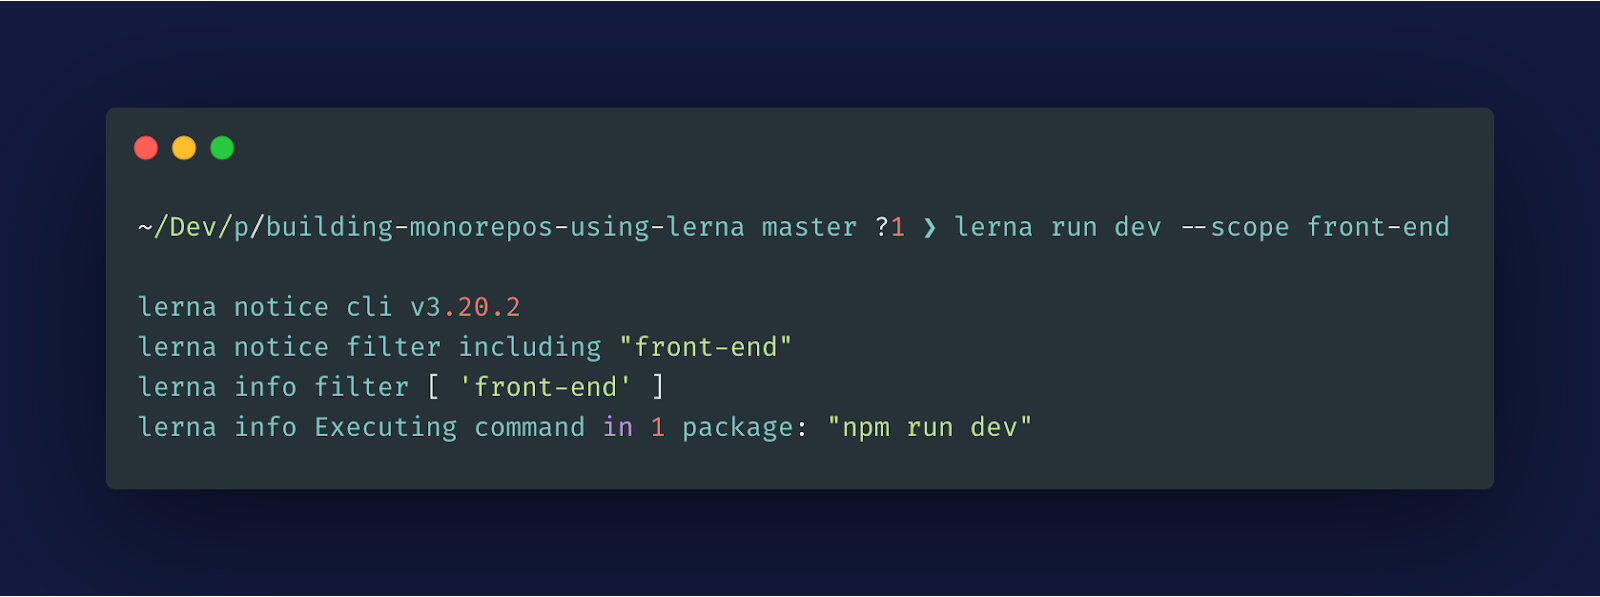
Connecting Our Front-end Package with Our Components Package
Let’s now connect our front-end package with our components package. To do that, we can simply add the components package in the front-end package’s package.json file:
// packages/front-end/package.json

"dependencies": {
   ..
   "components": "0.0.0"
 }
We’ve defined the version 0.0.0 as that’s the version defined in the components package’s package.json file:
// packages/components/package.json

{
 "name": "components",
 "version": "0.0.0",
 ..
}
Let’s import a dummy function from the components package into our front-end application:
// packages/front-end/pages/index.js

import Head from "next/head";
import dummy from "components";

dummy(); // function log something from components package

const Home = () => (
  ..
)
Let’s update our component package’s lib/index.js file to ensure that the dummy function that we imported from it is working fine:
// packages/components/lib/index.js

"use strict";

module.exports = components;

function components() {
 console.log("Front components package!");
}
We can immediately see that our packages compiled:
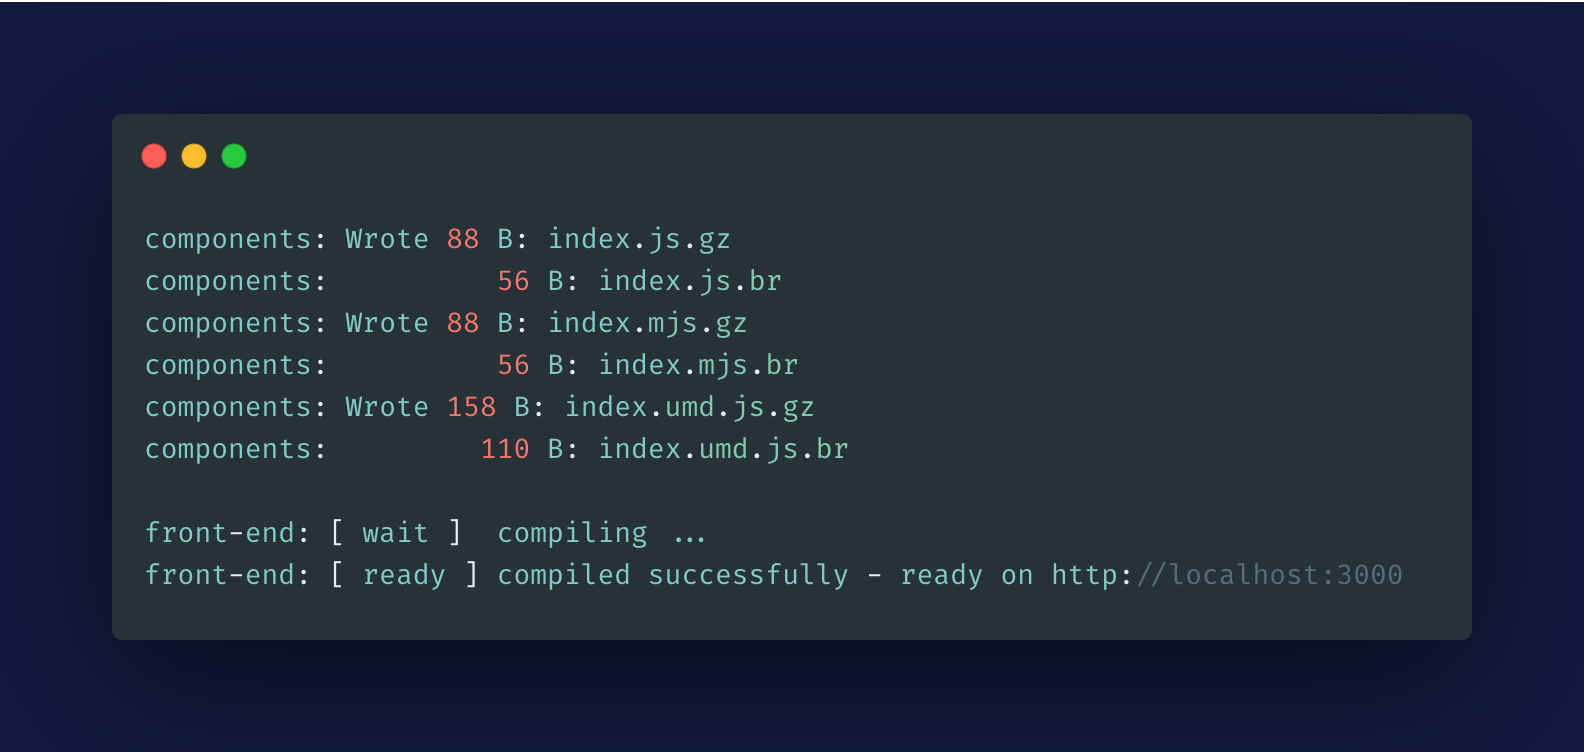
Now, if we visit http://localhost:3000/, we should be able to see the console.log output on the browser’s console:
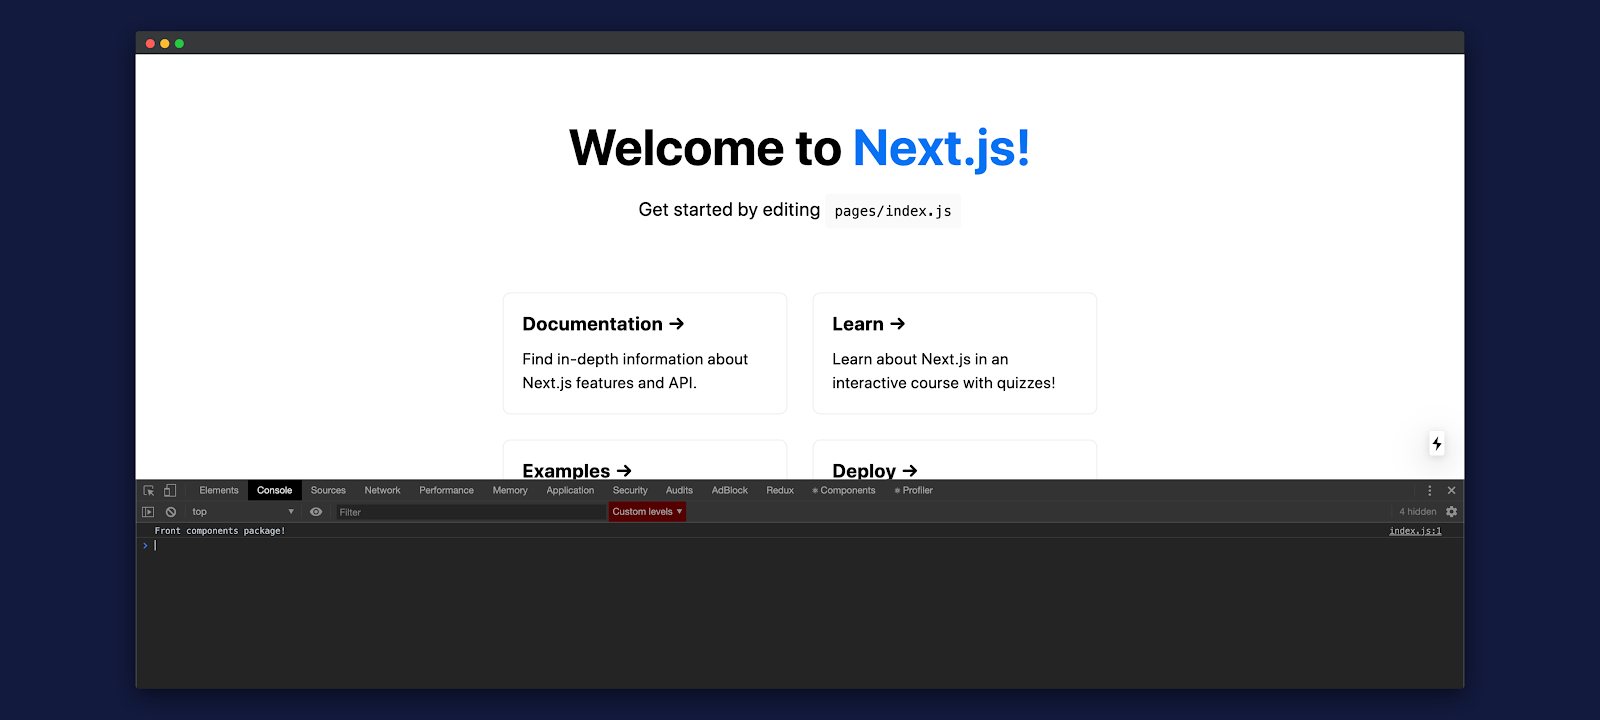
So, we’ve successfully connected our Next.js application with our components package. Next, we’ll build a few React components using Storybook. Then, we’ll import them in our Next.js application.
Integrating Storybook With Our Components Package
We’ll now install Storybook and build our React components with it.
cd packages/components && npx -p @storybook/cli sb init --type reactThe above command will do the following:
- Adds the Storybook dependencies
- Generates example stories
- Adds two storybook scripts
"scripts": {
   ..
   "storybook": "start-storybook -p 6006",
   "build-storybook": "build-storybook"
 },
Our monorepo application structure will now look like the following:
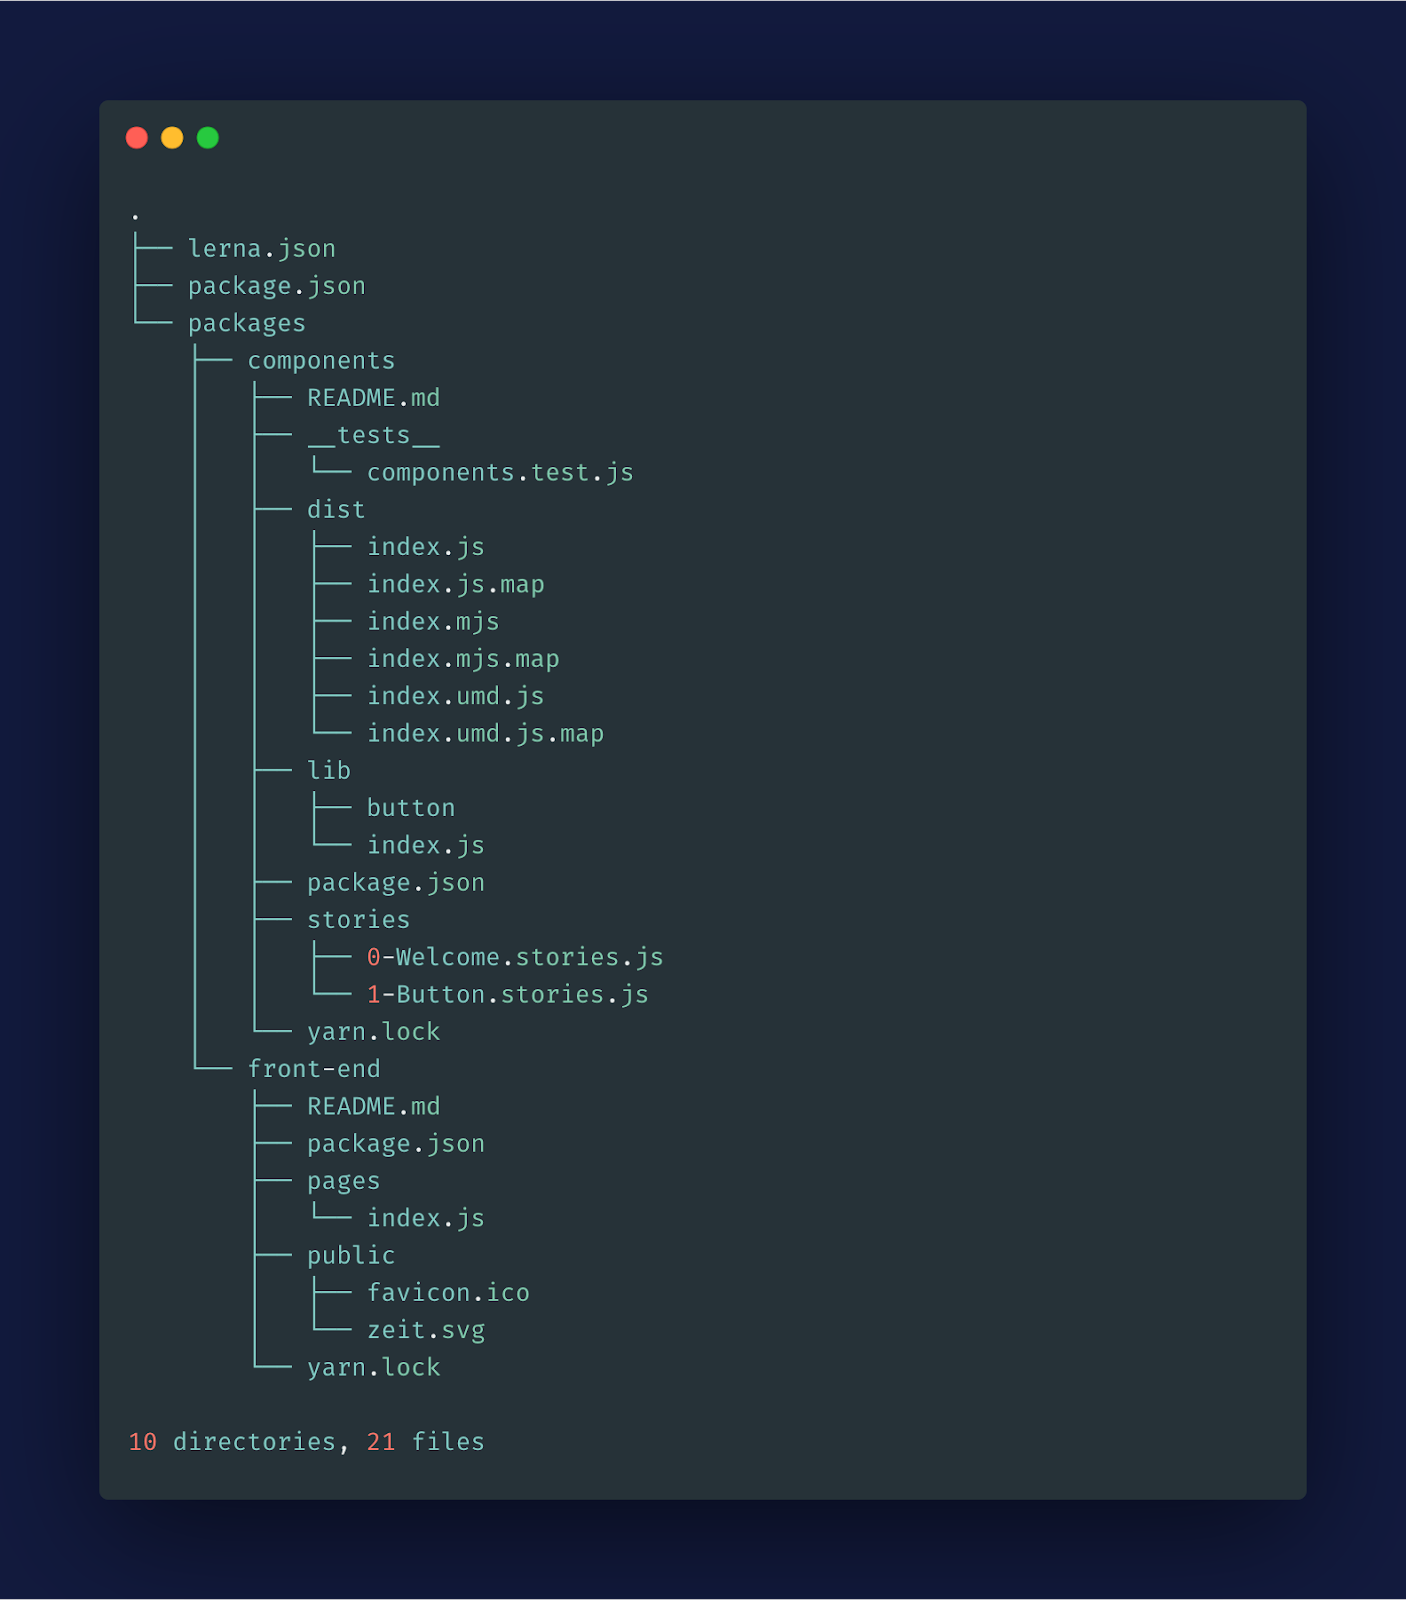
Now, we’ll create a Button component and import it in our Storybook application. Let’s create a simple Button component in our components package:
// packages/components/lib/button/index.js

import React from "react";

const Button = ({ onClick, children }) => {
 return <button onClick={onClick}>{children}</button>;
};

export default Button;
Now, we can import this in our Button story. We already have an example Button story. We just need to replace the Button component present in that story with our Button component:
// packages/components/stories/1-Button.stories.js
import React from "react";
import { action } from "@storybook/addon-actions";
import Button from "../lib/button";
export default {
title: "Button",
component: Button
};
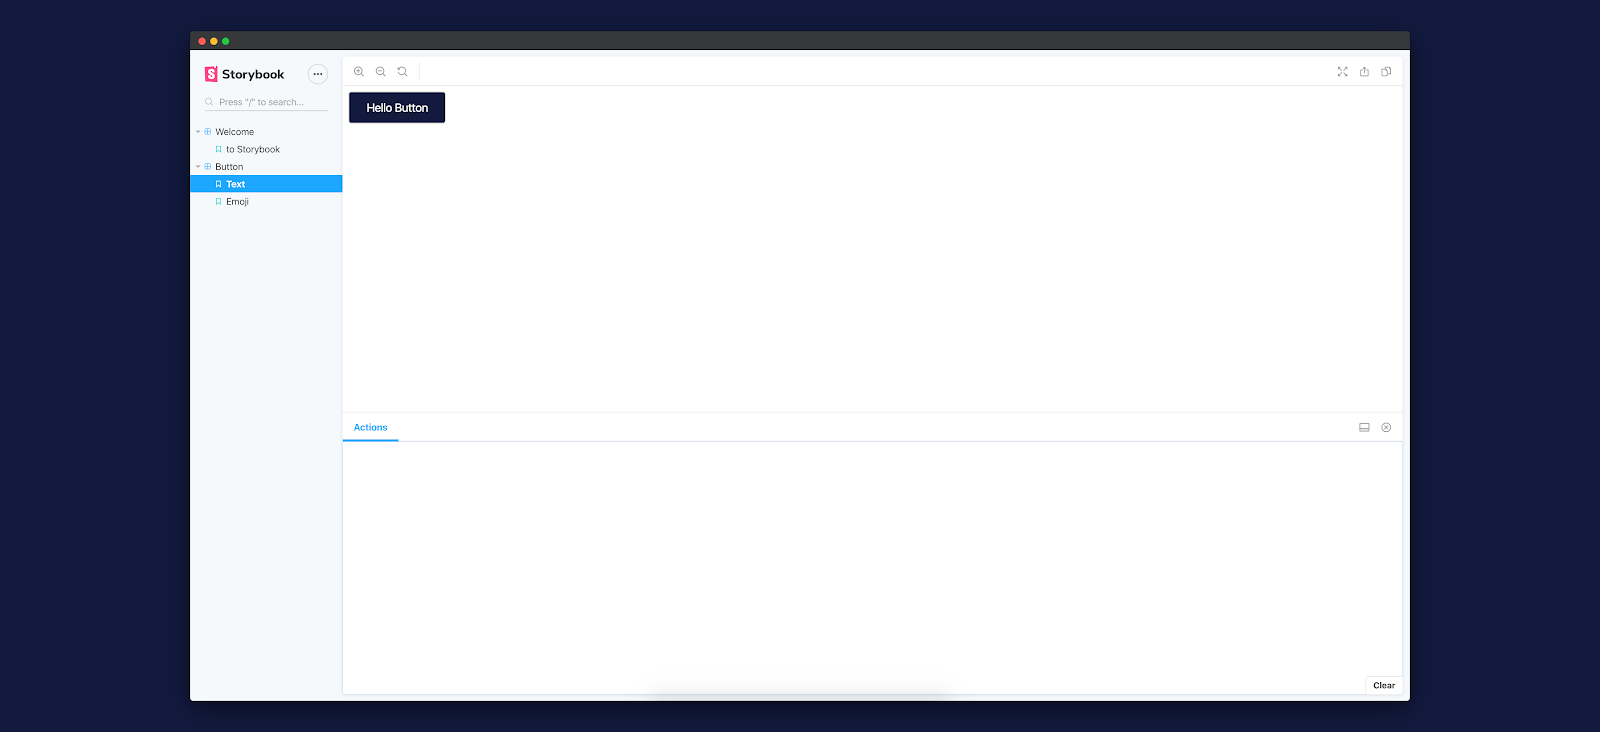
export const Text = () => (
<Button onClick={action("clicked")}>Hello Button</Button>
);
export const Emoji = () => (
<Button onClick={action("clicked")}>
<span role="img" aria-label="so cool">
😀 😎 👍 💯
</span>
</Button>
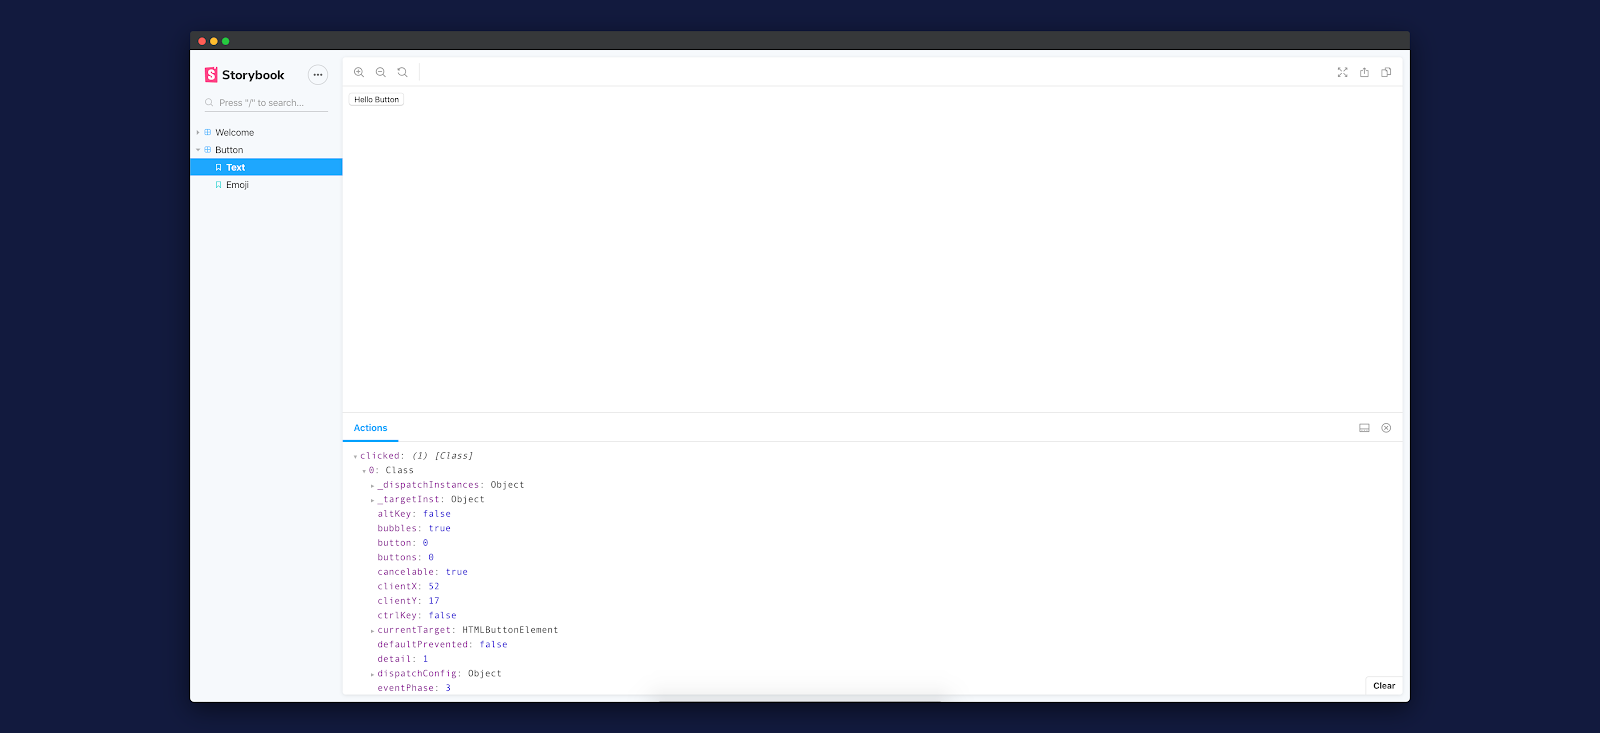
);We can now run our Storybook application and check our Button component:
cd packages/components && yarn storybook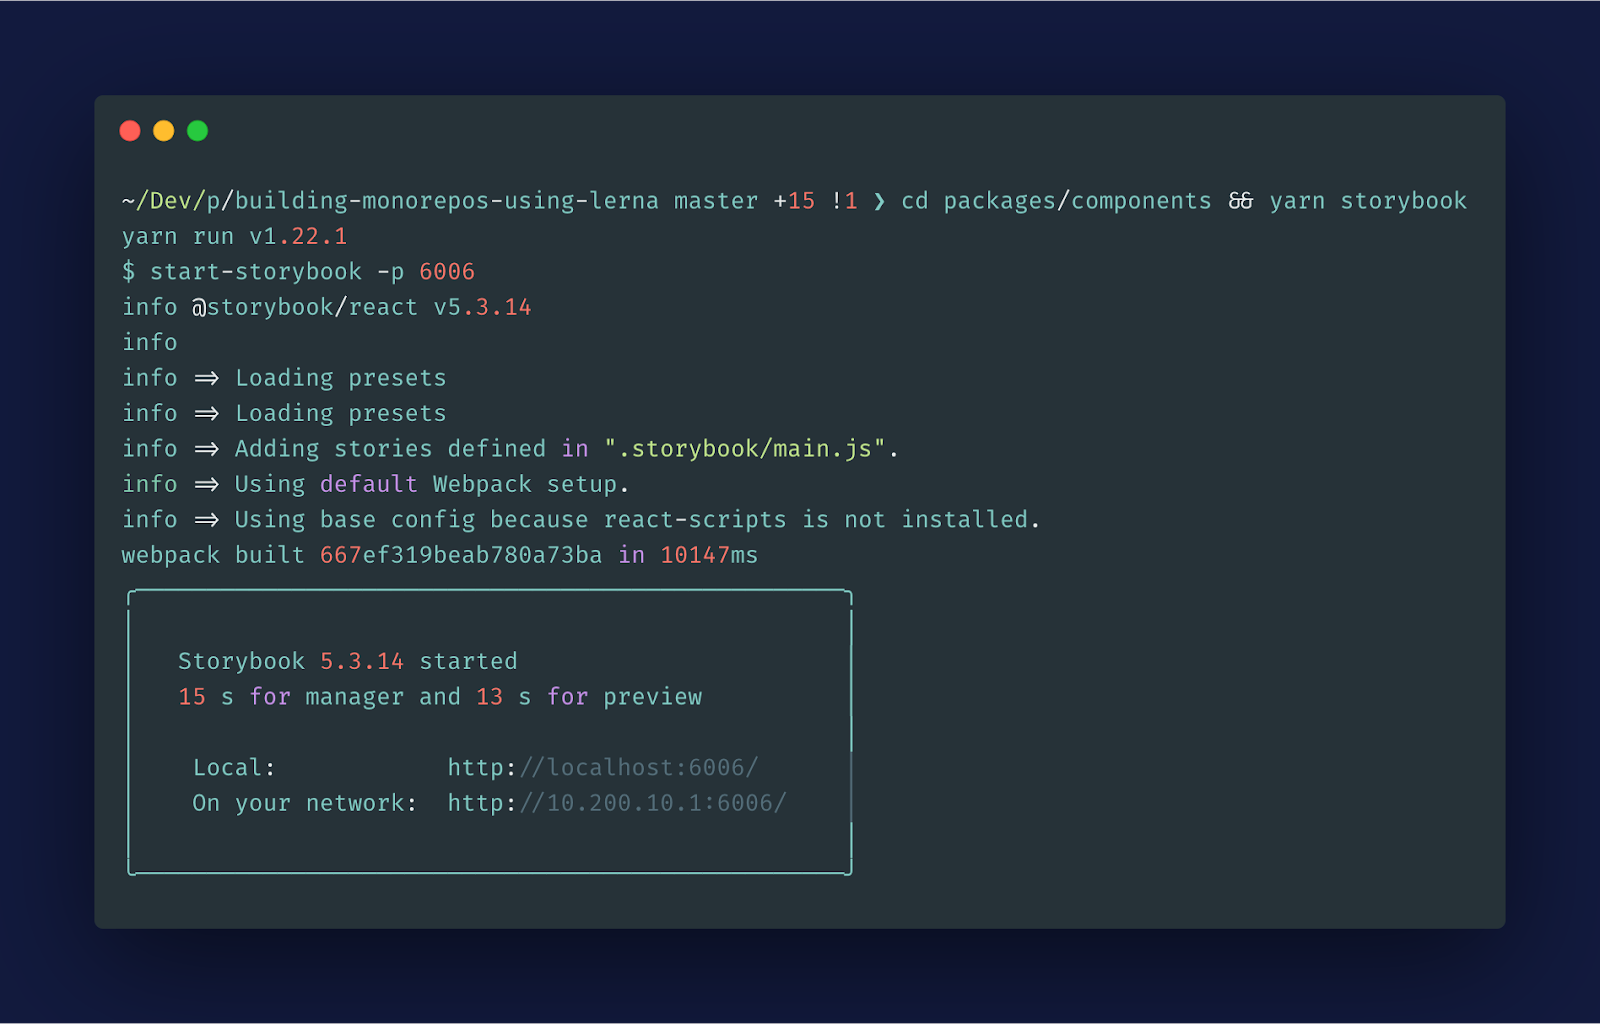
Our Storybook application will now be up and running at http://localhost:6006/. We can also view our Button component there:
Expand Your Reach: Learn to Build a Multilingual Website with Next.js!
Read the tutorial!Importing Button From Our Components Package
Until now, we have created a Button component in our components package. Let’s export that component from our package:
// packages/components/lib/index.js

"use strict";

import Button from "./button";

module.exports = {
 Button
};
Now, we can import this component in our front-end package:
// packages/front-end/pages/index.js

import Head from "next/head";
import { Button } from "components";

const Home = () => (
 <div className="container">
     ..
     <Button
       onClick={() => console.log("button clicked!")}
     >
       Click me
     </Button>
     ..
 </div>
);

export default Home;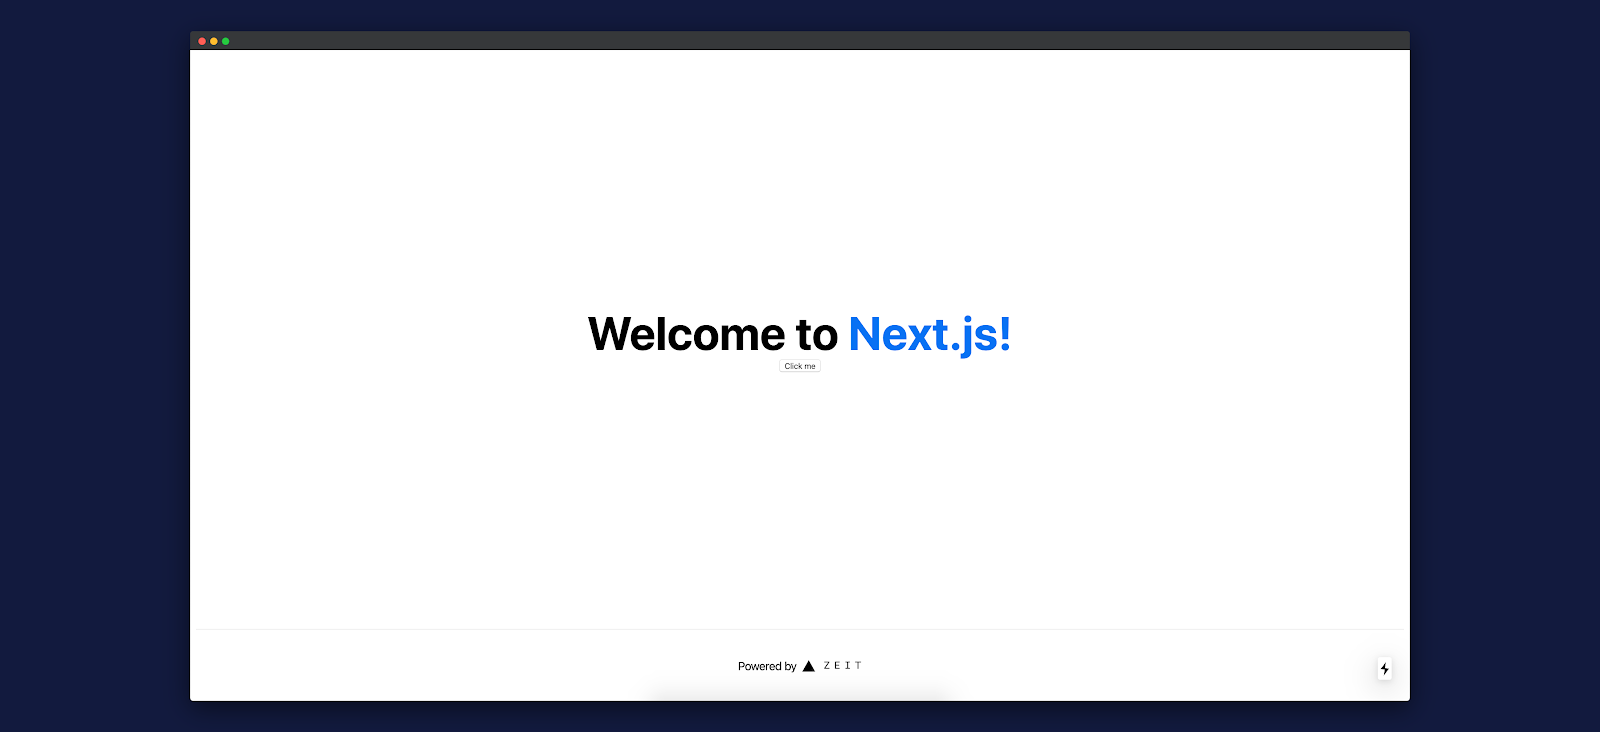
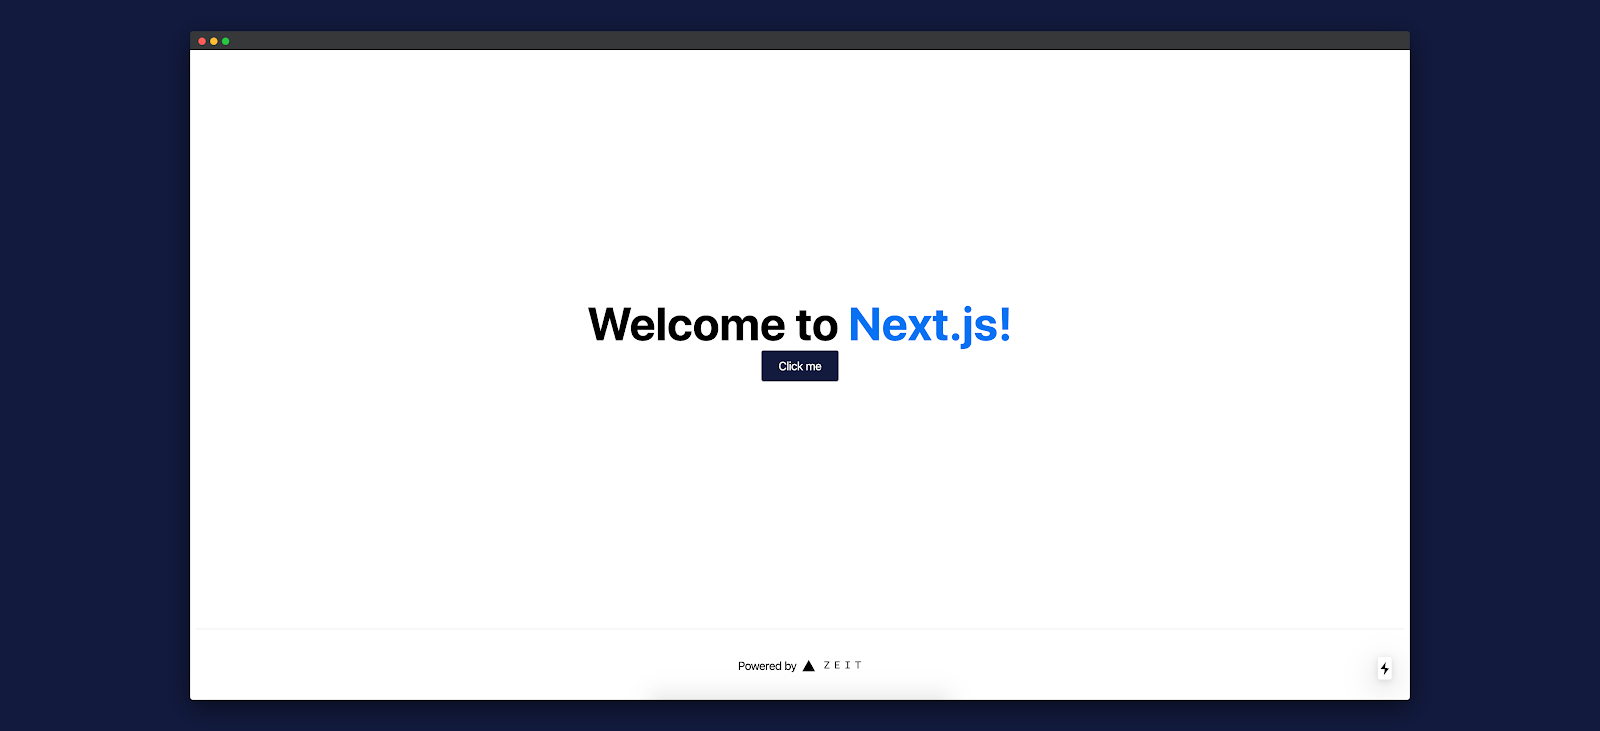
We can see our Button component appearing below the Welcome to Next.js! text. If we click on the button, we can also see that it’s logging “button clicked!” in the browser’s console:

Adding Styles to Our Components
Let’s add styles to our Button component. We’ll be using emotion for styling. First, let’s install the necessary dependencies:
cd packages/components && yarn add @emotion/styled @emotion/coreNow, let’s update our Button component:
// packages/components/lib/button/index.js

import React from "react";
import styled from "@emotion/styled";

const Button = styled.button`
 padding: 12px 24px;
 background-color: #121a3e;
 font-size: 16px;
 border-radius: 4px;
 color: #fff;
 cursor: pointer;
`;

const _Button = ({ onClick, children }) => {
 return <Button onClick={onClick}>{children}</Button>;
};

export default _Button;
If we visit our Next.js application on http://localhost:3000/, we can see the updated Button component:
Our Storybook application should also show the new Button component as well:
Starting Your Own Monorepo Project
We’ve seen how easy it is to create a monorepo application with a design system using Lerna. If you need a Next.js CMS for any of your future projects, be sure to consider ButterCMS - it works with any tech stack.
The code for this project is available on Github. This repository can be the starting point for your next monorepo project.
I hope this tutorial helps you in your future projects. Please feel free to share your feedback in the comments section below.