
Often, as a backend developer, I struggle to find a simple and fast GUI that allows users to insert content to be processed.
Fortunately, I got in touch with ButterCMS, a managed, API-first headless CMS with a nice web GUI. This means that users can write content that I can read in JSON through HTTP. All of this occurs without the issues that come with installing and maintaining another system.
In this tutorial, I’m going to write a simple event ticketing application to show the power of this approach. The application will allow clients to buy tickets for events added by editors. In this respect, Butter will be the interface for editors through which they can add all the data for events, while the backend will process all the clients’ requests. It will expose a REST API and have responsive web pages. We’ll use Java with Quarkus as the framework to write it. We’ll write the backend in a reactive way using Mutiny, which is the reactive library that Quarkus uses. We’ll utilize Qute and Bulma to build responsive web pages. And we’ll interact with the database using R2DBC, which exposes a minimal reactive API.
Table of contents
Why use ButterCMS?
ButterCMS impressed me with its component model, its simplicity, and its performance. But after I started to use it, it amazed me most with its support team. They’re always available to help in a fast, professional, and detailed way.
From a technical point of view, their API is fast, simple, and easy to integrate. You’ll see what I mean in the Java snippets below. They also provide SDKs for many programming languages. Furthermore, Butter uses a low-latency CDN to store multimedia assets.
Additionally, a headless CMS offloads many of our tasks, allowing us to focus on business requirements. For instance, we can rely on its dashboard to provide editors with a powerful tool to write content. A neat feature is that editors can schedule content publication. In this way, they can write in advance and then rely on the CMS for publication. As well, we can also utilize the admin interface to configure CMS roles and users.
Why use Quarkus?
Quarkus introduces itself as “Supersonic Subatomic Java”. What it means with this tagline is that it’s a framework built with speed, fun, and cloud-native systems in mind. It’s blazingly fast and supports live reload and continuous testing. It also can build native Java executables using GraalVM. This improves startup and response time, and it also reduces RAM consumption. This means improved efficiency, so there is less waste of computational resources.
Furthermore, Quarkus provides an environment where you can program in an imperative or reactive way. You’re free to choose and they support both ways seamlessly. I appreciate this a lot and I think it's a killer feature because it reduces the migration barrier from a more traditional (i.e., imperative) framework like Spring.
Ticketing application requirements
Before anything else, let’s state the requirements of this demo application, which are:
- Editors need to publish events
- Clients need to see all upcoming events
- Clients need to book event tickets
We’ll implement the first one with Butter and the last two with the Java backend.
Broadly, we’ll satisfy the first requirement by using ButterCMS features (e.g., content modeling features). While we’ll satisfy the clients requirements in multiple steps. Firstly, we’ll integrate Butter with the backend using webhook. Then, we’ll expose the backend REST API. Finally, we’ll write Qute templates that the backend will render as web pages.
ButterCMS content model and validation rules
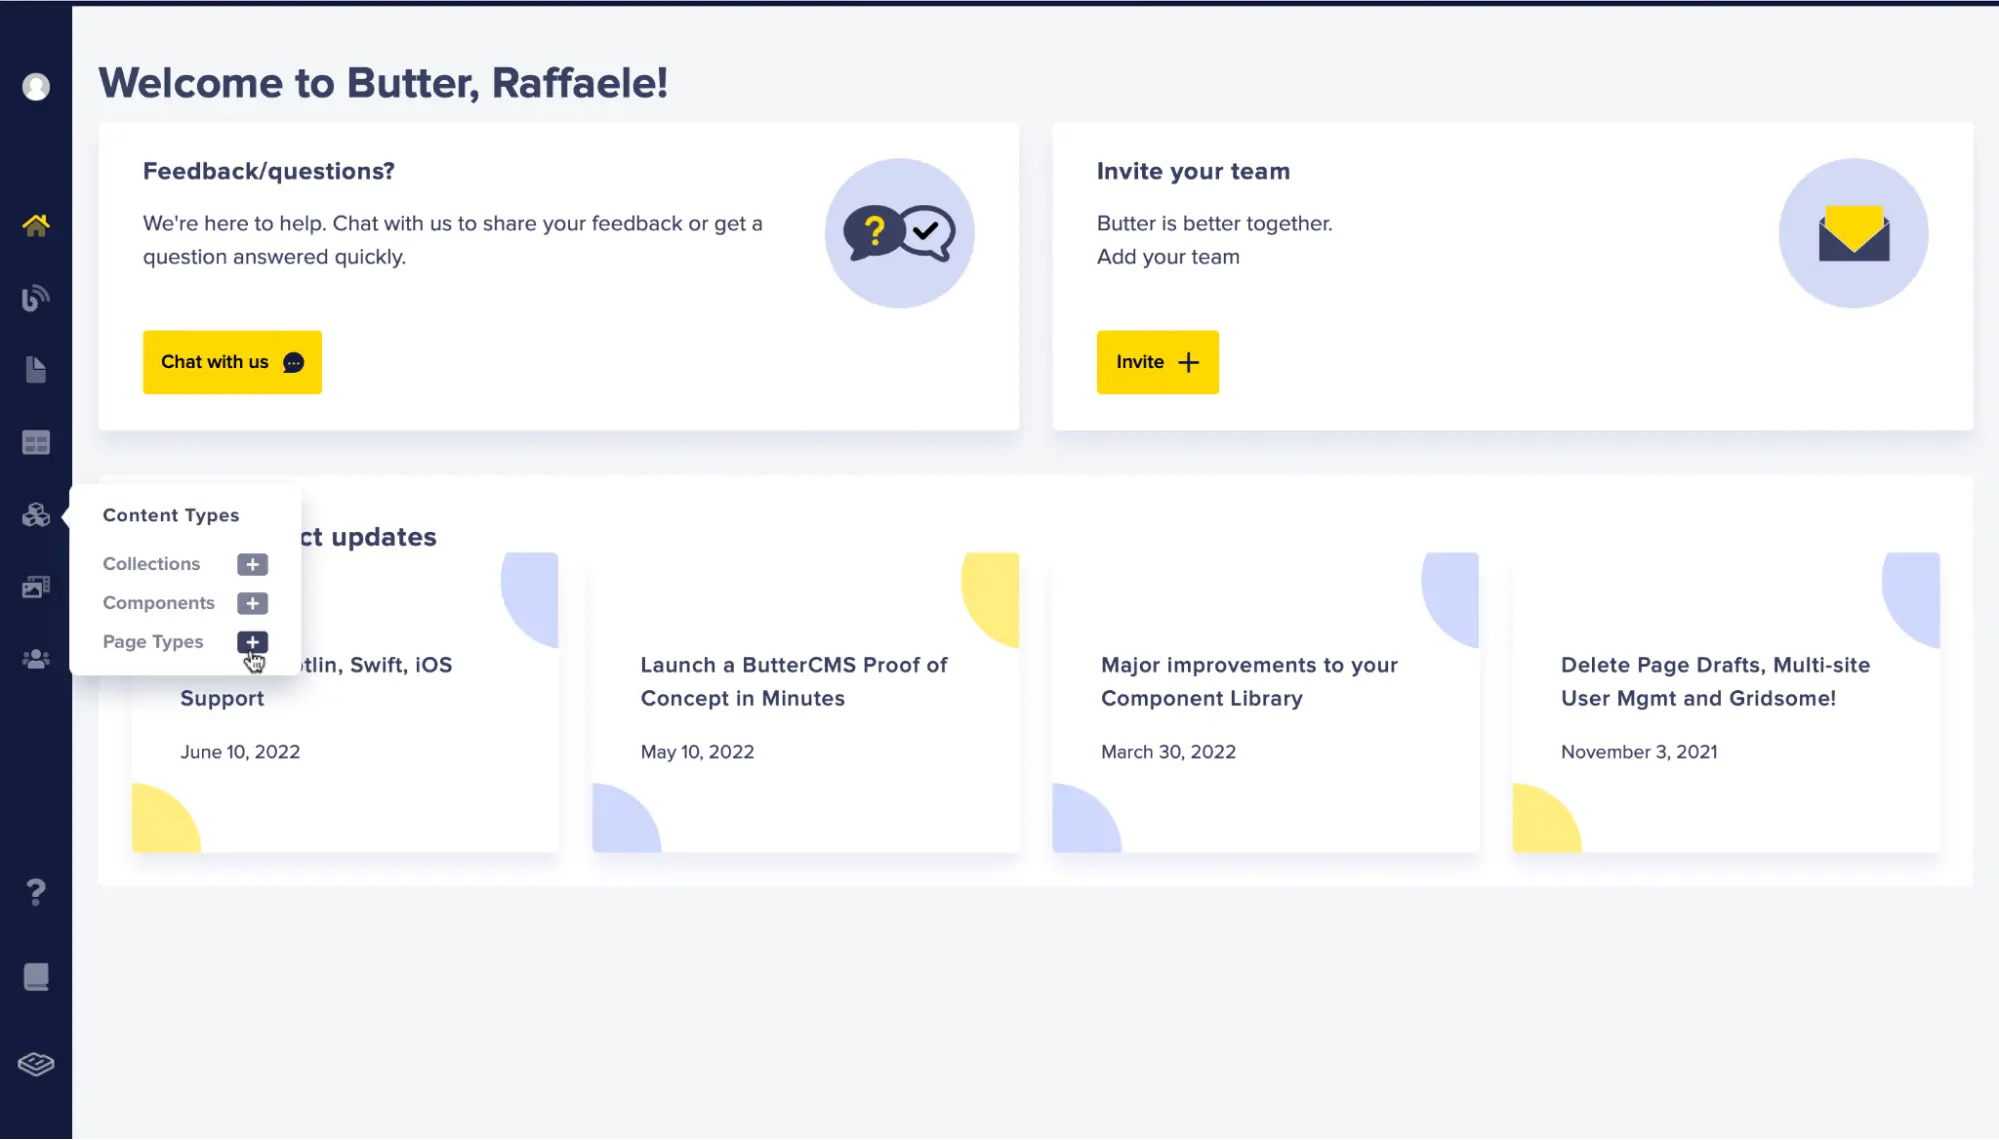
ButterCMS provides us with many options to model content. For our requirements, we’ll use two of its features to represent events: page types and pages. The page type allows us to define a common page structure. In our case, the event structure. Instead, the page, which is shaped according to a page type, will represent a single event. We’ll receive in the backend a single page as a JSON object from Butter. To create a page type we need to go to Content Types -> Page Types through the dashboard menu:
Then, Butter will show us this page:

Event page type
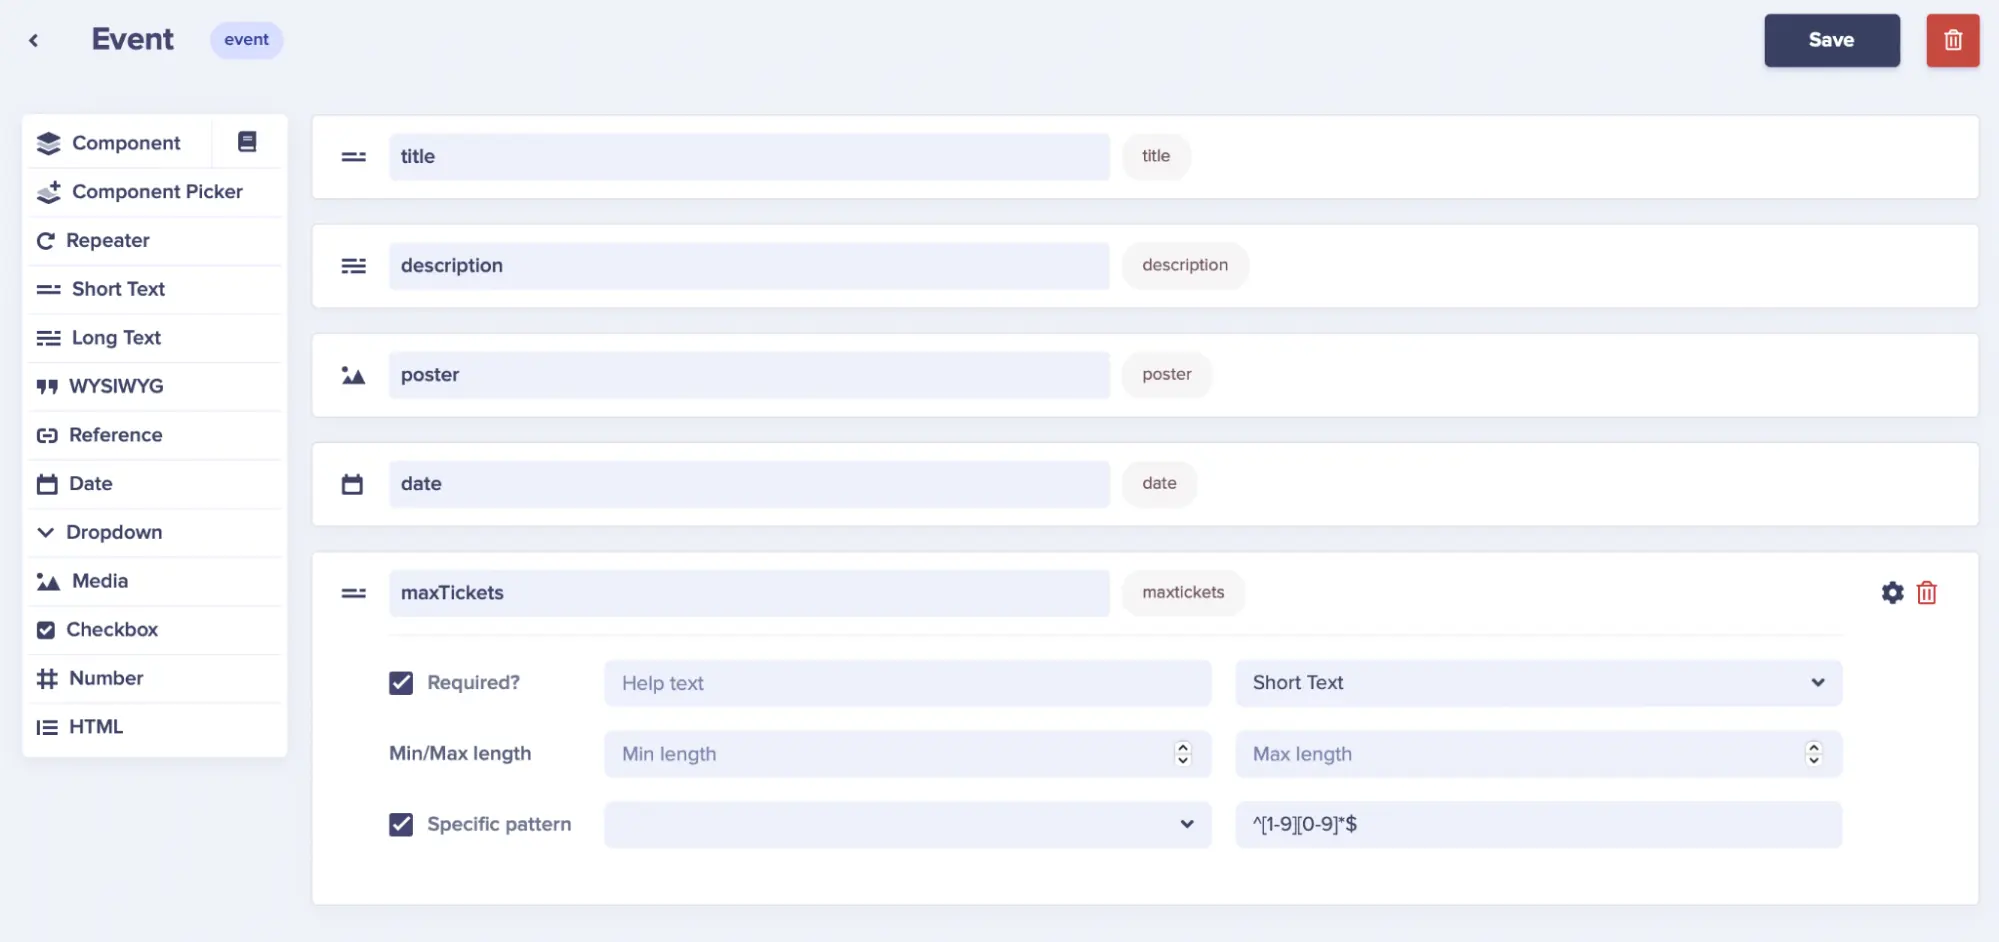
Each page type you create is composed of a set of content fields. Each content field represents a different type of content, some of which allow us to define specific constraints. For example, we can attach a regex to a text field to validate itself.
Next, we can add all the fields to represent the event page type. These are all the required fields with their related type:
- The event title as short text
- The event description as long text
- The event poster as media
- The event date as date
- The maximum available tickets as short text (We’ll add this regex for the Specific Pattern: ^[1-9][0-9]*$ to allow only positive numbers.)
Finally, we can save the page type with the name Event. At the end, this will be the Event page type:
At this point, ButterCMS allows editors to create an event through its dashboard:
Great, we already satisfied the first requirement.

Quarkus integration
Now we can focus on the client requirements, specifically:
- The clients need to see all upcoming events
- The clients need to book event tickets
Since ButterCMS wasn’t built with ticket booking in mind specifically, we’ll need a backend with which clients can interact, and this backend needs to communicate with Butter to know available events.
ButterCMS, because of its headless nature, exposes its content through an HTTP API. So, we can retrieve events. But how can the backend be up to date about available events? In other words, once an editor publishes an event, how can the backend know it? For this, we have two options: polling and webhooks.
Retrieving events with polling
Polling is a technique used in computer science to know the status of a resource at regular intervals. In this demo, the backend should ask Butter for all available events at regular intervals (e.g., five minutes). This is a simple and effective technique, but it has various drawbacks.
It’s inefficient because the backend always asks Butter for all events, while its interest is only about new events. This means the backend needs to filter out the majority of them to retain only the new ones. With a lot of events, this will be a resource-intensive operation. Another drawback is having to define the interval of the update—Too fast and we’ll stress Butter and the backend because they’ll waste computer resources; too slow and the backend will be out of date.
Nonetheless, polling is a valid technique in other circumstances. And, sometimes, it could be the only viable technique to know the status of another system. Fortunately, Butter supports another neat feature: webhooks.
Retrieving events with webhooks
A webhook is a technique used to signal to a system through HTTP that an event occurred. In this demo, Butter signals the backend that it has published a new event. As you can see, the way the systems interact is the opposite. And, in my humble opinion, it’s more natural. Indeed, it’s the system holding the state that signals others when something changes, while the system interested in the event exposes a URL. It also needs to authenticate the notifier because the URL is reachable on the Internet. While there are many authentication mechanisms available, the simplest and the one used by Butter is to write a shared secret in an HTTP header and send the request through HTTPS.
To add a webhook, we should configure ButterCMS. We need to state which event interests us and the URL to which it can signal it has happened. Furthermore, we need to configure the shared secret.
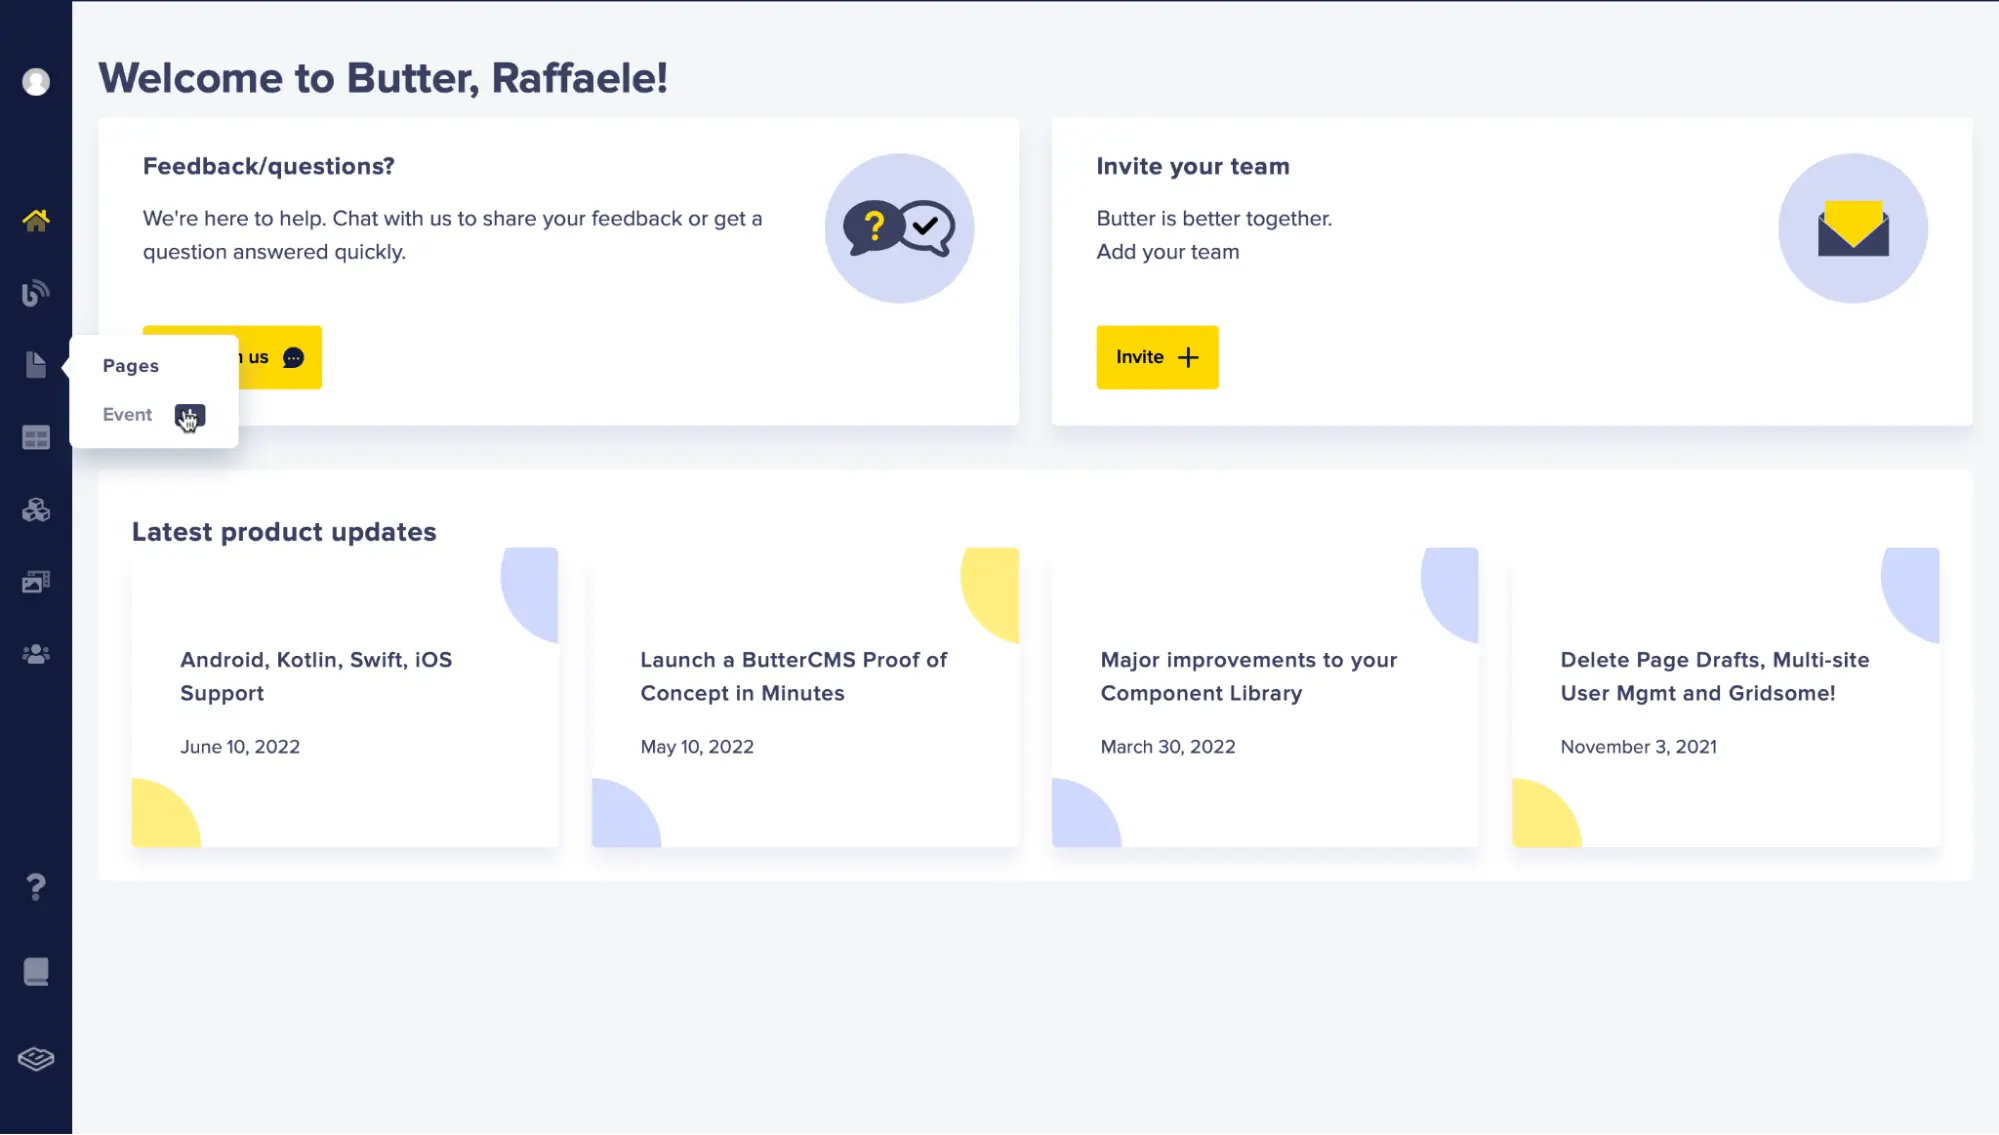
To do this we need to go to the Settings page through the dashboard menu:
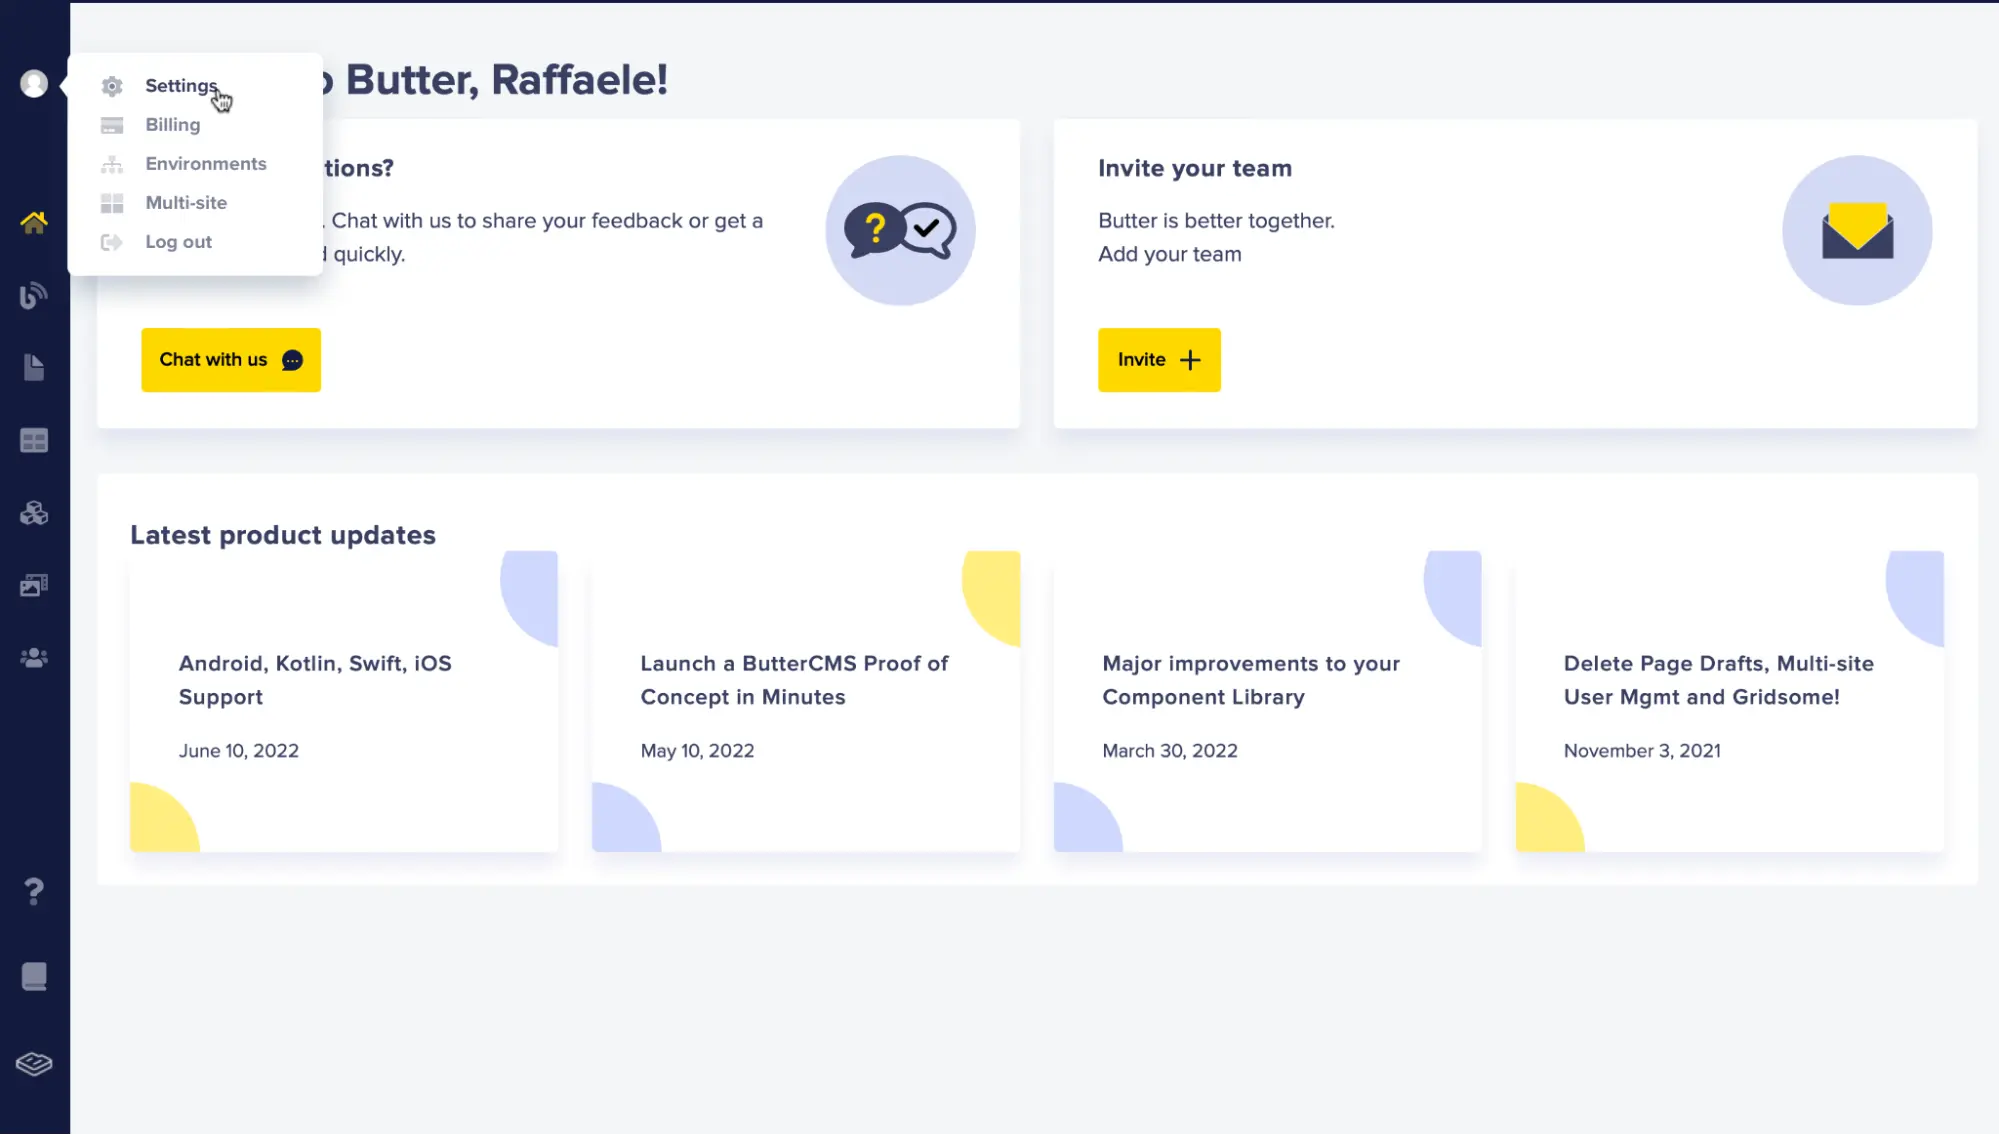
Then we need to go to the Webhooks tab:
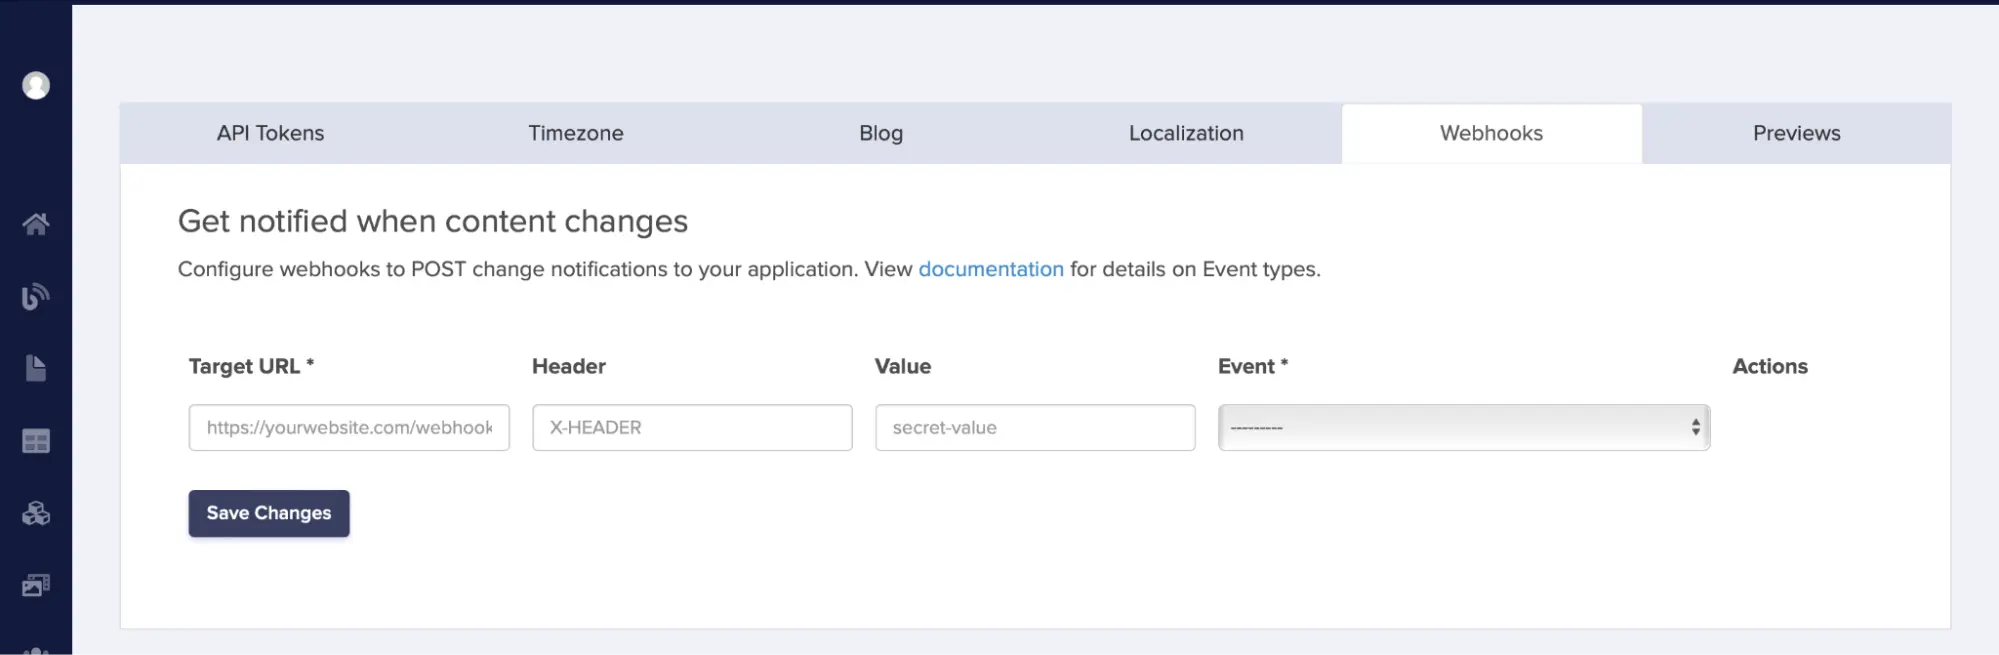
The fields to complete are:
- Target URL, to which Butter can signal that an event occurred
- Header, where Butter will put the shared secret
- Value, that is the shared secret between the backend and Butter
- Event, which is what interests us
However, to be able to compile this, we need first to build the backend.
Backend architecture
Given all the aforesaid reflections, this is the initial system architecture we’re going to implement:
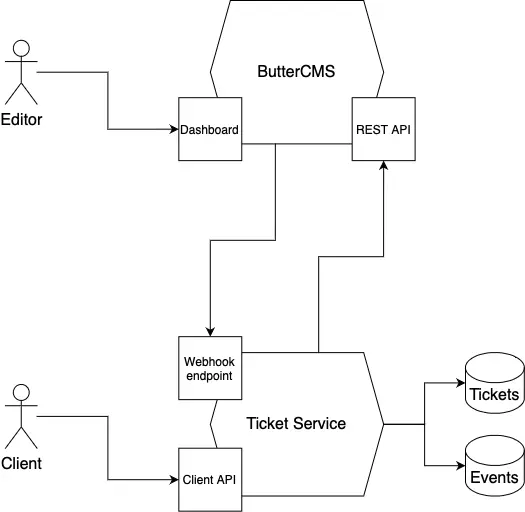
The two hexagons represent the services comprising the application: ButterCMS and Ticket Service.
ButterCMS exposes two interfaces:
Dashboard, used byEditorsto publish eventsREST API, used byTicket Serviceto retrieve events data
Ticket Service also exposes two interfaces:
Webhook endpoint, used byButterCMSto notify a published eventClient API, used byClientsto see events and book tickets
Furthermore, Ticket Service persists data in a relational database. It will consist of two database tables: one related to events data, and one related to tickets data.
To interact with the database we have many options. However, given the database’s simplicity, we’ll use R2DBC. It has a minimal reactive API that allows us to interact with the database by writing SQL statements. Thanks to its reactive nature, it fits nicely with Quarkus.
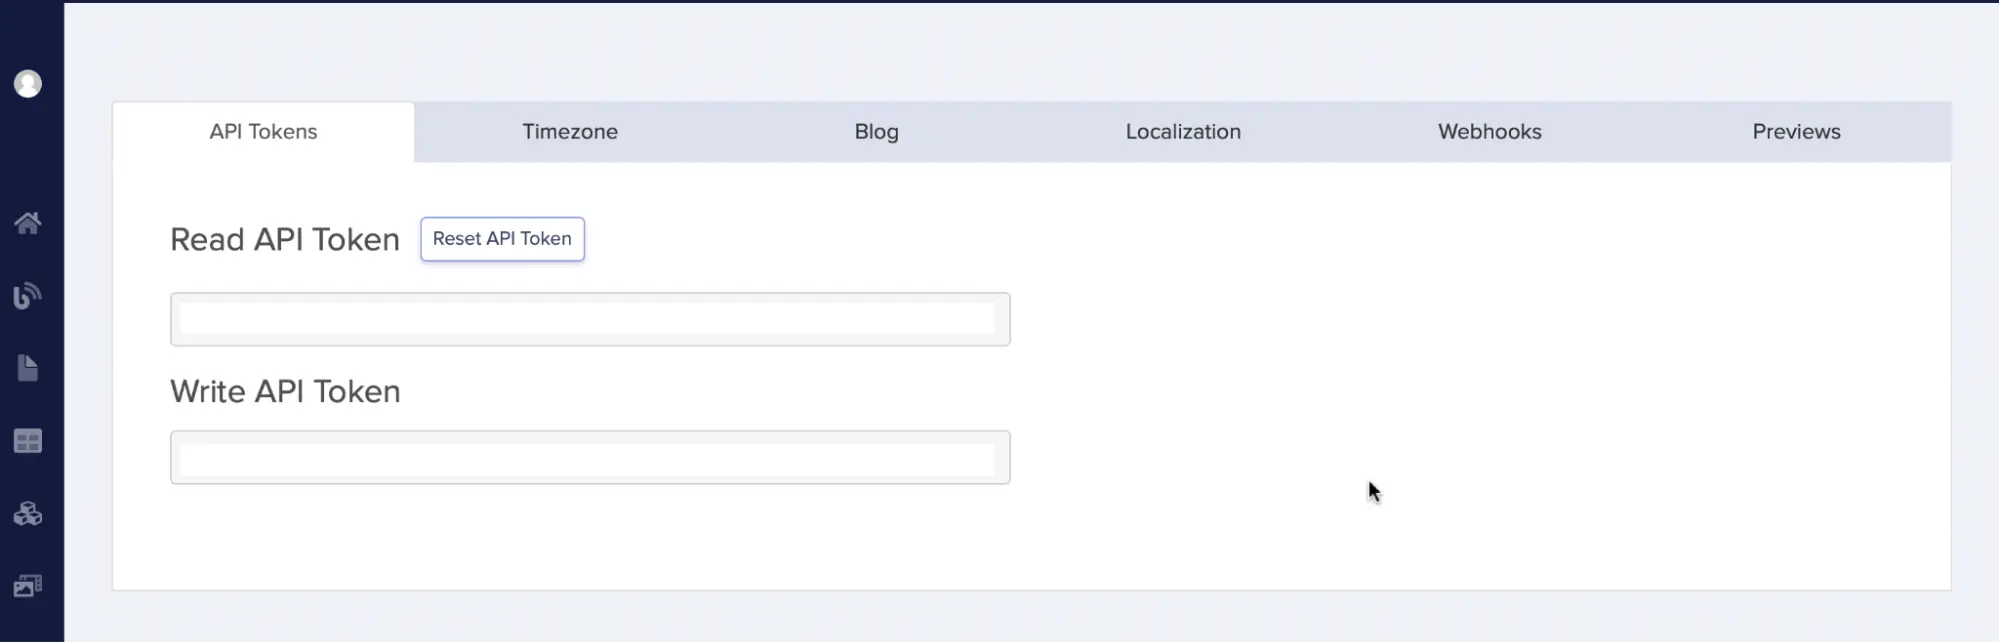
ButterCMS REST API
Butter divides its API between a Read API and a Write API and provides us with read and write tokens for security reasons. The second one allows us to change the content of the CMS, beyond just reading it. For this reason, frontend applications can use the read token, while only backend applications should use the write token.
We can send both tokens using the Authorization header. We can also send the read token using a query parameter.
To read both tokens, we need to go to the Settings page:
Contacting Butter REST endpoints
In the backend, we need to access Butter’s endpoints to read the details about a single event page.
To get a single page, we need to GET this URL: https://api.buttercms.com/v2/pages/<page_type_slug>/<page_slug>/. The page_type_slug identifies the page type (an event in this case) and the page_slug identifies the single page.
Because we need to contact Butter, we must have the token available in the backend. We just need the read token, and we can access it by writing it in an environment variable like BUTTERCMS_API_TOKEN.
We can reference the environment variable value in the Quarkus configuration file. It’s the application.properties file and it contains key-value configuration pairs.
In this case, we add a property called buttercms-api.token. It will take its value from the aforesaid environment variable. This means we need to write this to the configuration file:
buttercms-api.token=${BUTTERCMS_API_TOKEN}
Then we need to write an HTTP client to contact Butter. Quarkus simplifies this process, requiring us only to declare a Java interface. It needs to reflect the HTTP methods and URL of the interested endpoints, in our case:
@RegisterRestClient(baseUri = "https://api.buttercms.com/v2")
@RegisterClientHeaders(ApiTokenHeadersFactory.class)
@Consumes("application/json")
@Produces("application/json")
interface Butter {

  @GET
  @Path("/pages/{page_type_slug}/{page_slug}/")
  Uni<JsonObject> getSinglePage(@PathParam("page_type_slug") String pageTypeSlug, @PathParam("page_slug") String pageSlug);
}
The second line injects the ApiTokenHeadersFactory object. It writes the buttercms-api.token in the Authorization header for each request.
The Uni object comes from Mutiny, the reactive library used by Quarkus. Mutiny provides two reactive objects: Uni and Multi. In summary, the first one can only emit either a single item or an error. The second one can emit zero or more (potentially infinite) items, an error, or a completion event.
So, given the above interface, we have everything in place to contact Butter from the backend. At this point, we can focus on the other side of the communication process. That is, the webhook endpoint provided by the backend to Butter to receive events.
Exposing the webhook endpoint
Setting up the events table
Before we are able to receive events from Butter, we need to create the database table to save them. This table is EVENTS and it mirrors, for the most part, the structure of the event page type.
Here is the DDL statement to create it:
CREATE TABLE EVENTS(
 ID UUID NOT NULL,
 EXTERNAL_ID VARCHAR(64) NOT NULL,
 ORIGIN VARCHAR(16) NOT NULL,
 TITLE VARCHAR(32) NOT NULL,
 DESCRIPTION VARCHAR(1024) NOT NULL,
 POSTER VARCHAR(255) NOT NULL,
 EVENT_TIMESTAMP TIMESTAMP WITH TIME ZONE NOT NULL,
 MAX_TICKETS INTEGER NOT NULL,
 SOLD_TICKETS INTEGER NOT NULL DEFAULT 0,
 CREATION_TIMESTAMP TIMESTAMP WITH TIME ZONE NOT NULL,
 PRIMARY KEY(ID),
 UNIQUE (EXTERNAL_ID, ORIGIN)
);
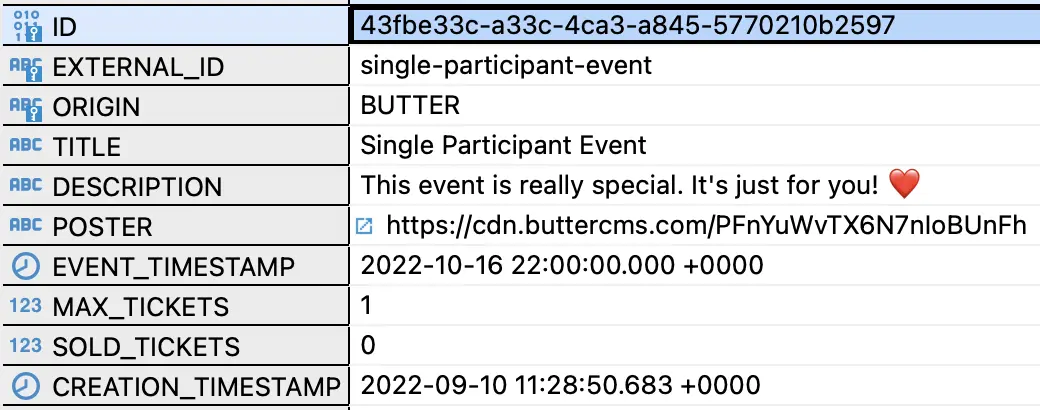
And here is the table as seen from DBeaver:
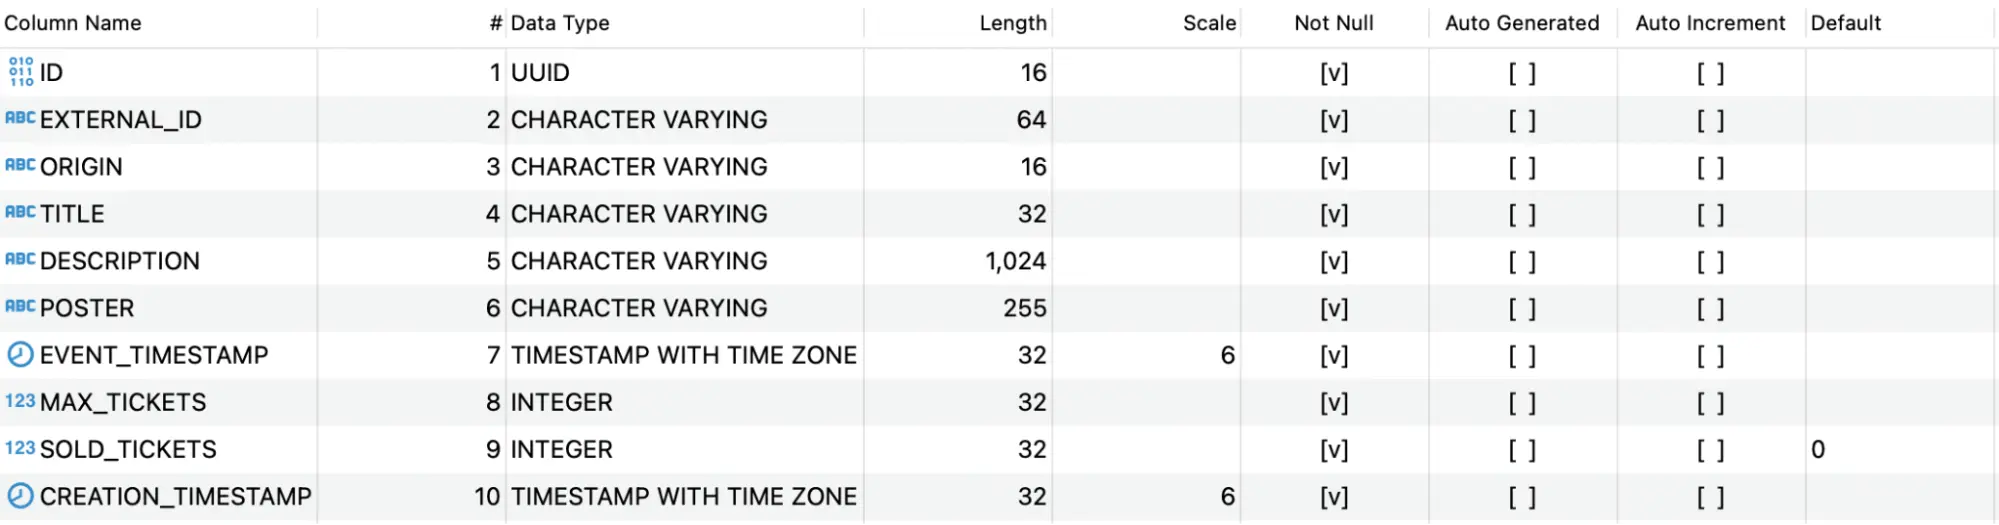
Two columns deserve further explanation: ORIGIN and EXTERNAL_ID. We use them to identify who created an event and what ID it uses to identify the event. The UNIQUE constraint they have is to avoid duplicated events per origin. This means that an origin (e.g., Butter) cannot add the same event twice.
Implementing authentication
As the next step, we can implement webhook authentication in the backend.
We can start by generating a shared secret. We can do this using openssl through the command line:
$ openssl rand -hex 32
The number 32 represents the number of random bytes to generate. More bytes means more entropy, so a more secure secret against a brute force attack.
Next, we need to use this random value in the backend to authenticate Butter. As we did with the write token, we can use an environment variable referenced in the application.properties file:
buttercms-webhook.secret=${BUTTERCMS_WEBHOOK_SECRET}
At this point, we can code the authentication objects. In our case, we need to compare the aforesaid secret with the value contained in a header (e.g., X-BUTTER-KEY). To do this, we need to implement three objects that jointly authenticate a client. They are HttpAuthenticationMechanism, AuthenticationRequest, and IdentityProvider. The former builds the second one according to an HTTP request. In the end, the IdentityProvider will authenticate or deny the previously built request. In case of success, it will set the roles and the identity of the client. Here are the code snippets:
@ApplicationScoped
final class XButterKeyAuthenticationMechanism implements HttpAuthenticationMechanism {

  @Override
  public Uni<SecurityIdentity> authenticate(
    final RoutingContext context,
    final IdentityProviderManager identityProviderManager
  ) {
    if (context.request().headers().contains("X-BUTTER-KEY")) {
      var request = new XButterKeyAuthenticationRequest(context.request().getHeader("X-BUTTER-KEY"));
      return identityProviderManager.authenticate(request);
    }
    return Uni.createFrom().nullItem();
  }

  ...
}

final class XButterKeyAuthenticationRequest extends BaseAuthenticationRequest {

  private final String value;

  XButterKeyAuthenticationRequest(final String value) {
    this.value = value;
  }

  Boolean verify(final Predicate<String> predicate) {
    return predicate.test(this.value);
  }
}

@ApplicationScoped
final class XButterKeyIdentityProvider implements IdentityProvider<XButterKeyAuthenticationRequest> {

  private final String secret;

  XButterKeyIdentityProvider(@ConfigProperty(name = "buttercms-webhook.secret") final String secret) {
    this.secret = secret;
  }


  @Override
  public Uni<SecurityIdentity> authenticate(
    final XButterKeyAuthenticationRequest xButterKeyAuthenticationRequest,
    final AuthenticationRequestContext authenticationRequestContext
  ) {
    if (xButterKeyAuthenticationRequest.verify(request -> request.equals(this.secret))) {
      return this.butterSecurityIdentity();
    }
    return Uni.createFrom().nullItem();
  }

  private Uni<SecurityIdentity> butterSecurityIdentity() {
    return Uni.createFrom().item(
      QuarkusSecurityIdentity.builder()
        .setPrincipal(() -> "butter")
        .addRole("BUTTER")
        .build()
    );
  }

  ...
}
Implementing the endpoint. Finally, we can add the secured endpoint through a REST resource. That is:
@Path("/butter/events")
public final class ButterEventsResource {
  ...

  @POST
  @RolesAllowed("BUTTER")
  public Uni<Void> addEvent(final JsonObject eventPage) {
    return this.newEventFn.apply(eventPage).update(this.events);
  }

  ...
}
The RolesAllowed annotation specifies that the allowed role can contact the endpoint (i.e., BUTTER), while the update method will insert the new event in the aforesaid EVENTS table. The full source code is available in the GitHub repo.
Finally, we can configure Butter’s webhooks settings:

The target URL should be something like https://IP_OR_DOMAIN_REACHABLE_ON_INTERNET/events. To generate a URL reachable on the Internet, we can use ngrok. That allows the creation of a tunnel to a localhost service, exposing it on the Internet.
The header should be what we choose to authenticate Butter: the X-BUTTER-KEY.
The value should contain the generated secret value. In this case, the value generated through openssl.
The event should state the event type we are interested in receiving. For this demo, we need to know when Butter publishes a page.
Exposing client endpoints
Setting up the tickets table
Before we are able to save clients’ tickets, we need to create the related database table. That is TICKETS and here is the DDL statement to create it:
CREATE TABLE TICKETS(
 ID UUID NOT NULL,
 EVENT_ID UUID NOT NULL,
 PARTICIPANT_ID UUID NOT NULL,
 CREATION_TIMESTAMP TIMESTAMP WITH TIME ZONE NOT NULL,
 PRIMARY KEY(ID),
 UNIQUE (PARTICIPANT_ID, EVENT_ID),
 FOREIGN KEY(EVENT_ID) REFERENCES EVENTS(ID)
);
The UNIQUE constraint is to avoid duplicate participants per event. This is the table as seen from DBeaver:

Implementing endpoints
To meet the client requirements, we need to create a REST resource with two endpoints: one to retrieve all upcoming events and one to book a ticket. That is:
@Path("/events")
public final class EventsResource {
...

@GET
public Uni<JsonObject> upcomingEvents() {
  return this.events.upcoming().asJsonObject();
}

@POST
@Path("/{id}/tickets")
public Uni<RestResponse<Void>> bookTicket(
  @PathParam("id") final UUID id,
  @HeaderParam("participant") final UUID participant
) {
  return this.events.upcoming().event(id)
    .onItem().transformToUniAndMerge(event -> event.book(participant))
    .onItem().transform(ticketId -> RestResponse.<Void>accepted())
    .onFailure().recoverWithItem(() -> RestResponse.status(409))
    .onCompletion().ifEmpty().continueWith(RestResponse.notFound())
    .toUni();
}

...
}
In the upcomingEvents method, we’ll return only upcoming events.
In the bookTicket method, we’ll handle three cases: event unavailability, success, and failure.
In the first case, we’ll return 404 (not found).
In case of success, we’ll return 202 (accepted). We’ll also update the EVENTS and TICKETS table.
Further, to support concurrent bookings, we’ll use this DML statement:
UPDATE EVENTS
SET SOLD_TICKETS = SOLD_TICKETS + 1
WHERE ID = ? AND SOLD_TICKETS < MAX_TICKETS AND EVENT_TIMESTAMP >= NOW()
This means we can update SOLD_TICKETS only when the event is not sold out and it’s upcoming. If one of these conditions fails, the booking will fail.
Lastly, in case of failure, we’ll return 409 (conflict) to express that the event is sold out.
Building the client’s frontend
At this point, we are missing an important piece to completing the application. I’m referring to some sort of frontend through which clients can interact.
In this realm, we have two options. We can use client-side technologies or we can use server-side technologies. Being a backend developer, I prefer the second approach when I’m coding demo projects or an MVP (minimum viable product).
The main server-side technologies are template engines through which we build web pages. Quarkus has an extension called Qute, which is just that.
Furthermore, to build responsive web pages, I’ll use Bulma, a minimal and simple CSS framework.
So, to expose web pages, we need to write Qute templates and render them through HTTP endpoints.
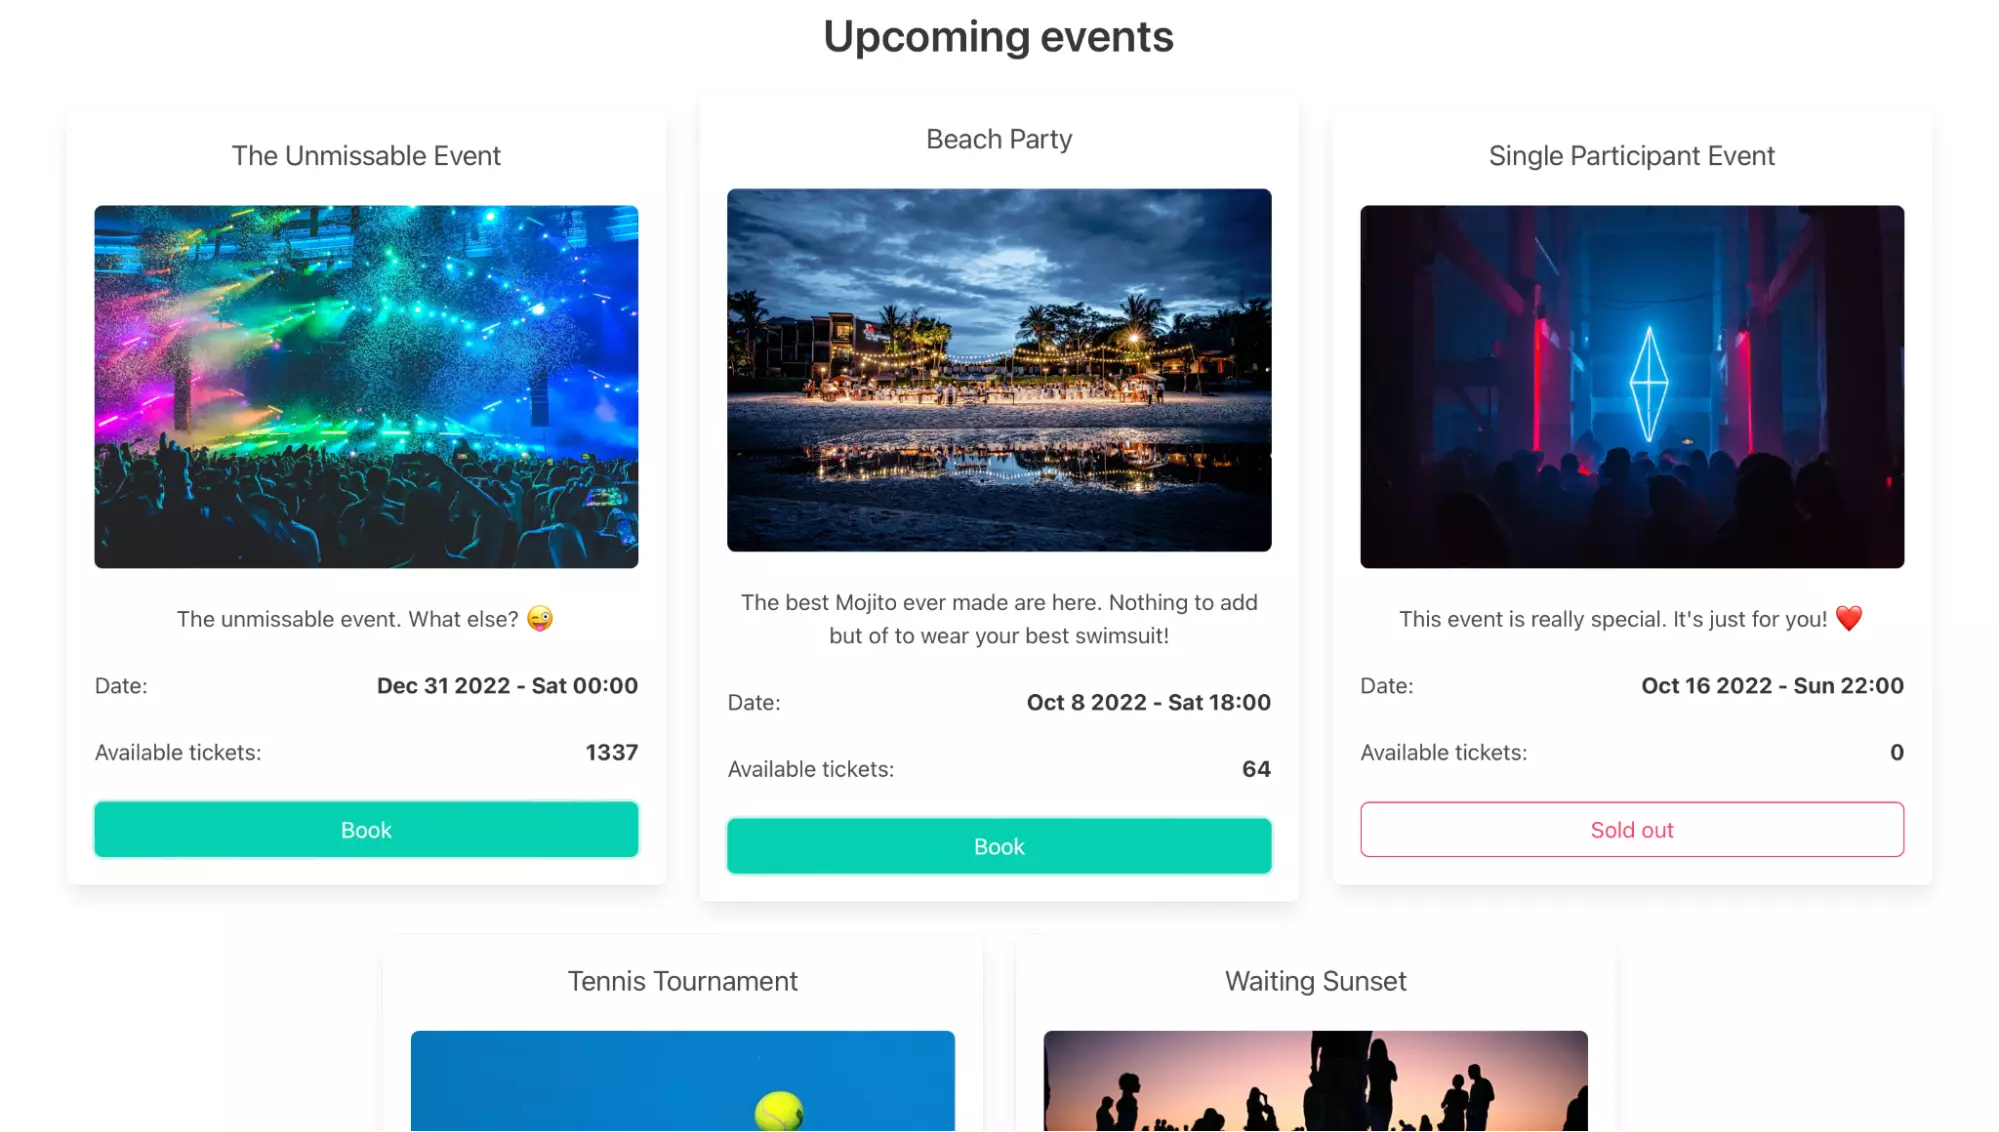
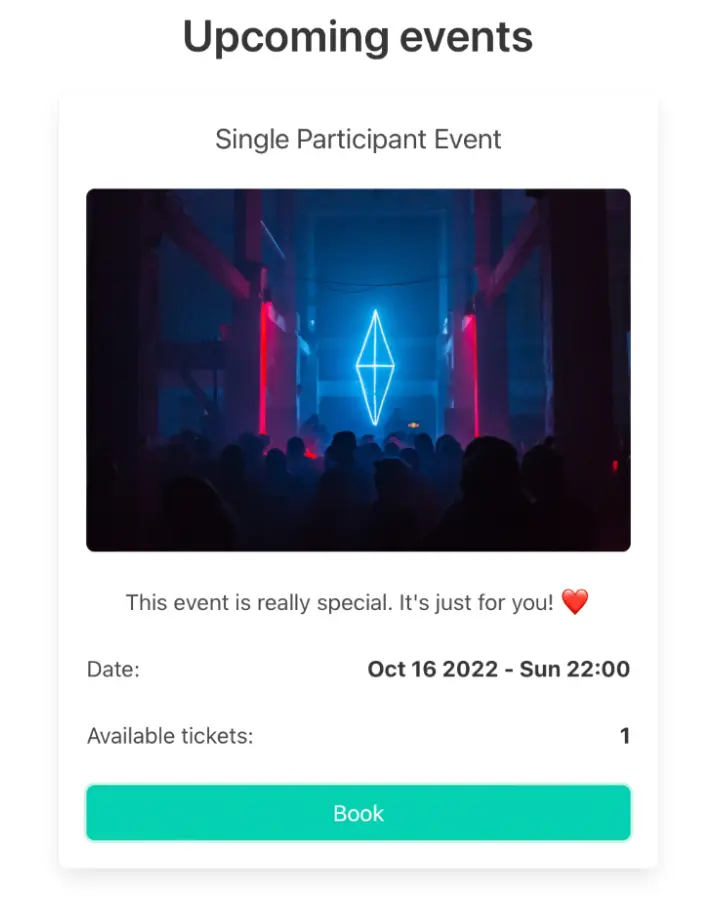
The final result will be pretty minimal, but it’s useful for our purposes:
Writing templates
We need to write templates in the src/main/resources/templates directory, customizing them according to Qute tags. We can also define custom tags in src/main/resources/templates/tags. They are useful when called from other templates.
In our case, we need to show upcoming events. We can write the template like this:
<!DOCTYPE html>
<html lang="en">
<head>
 <meta charset="UTF-8"/>
 <meta name="viewport" content="width=device-width, initial-scale=1"/>
 {#event_css _isolated/}
 {#event_script _isolated/}
 <title>Upcoming events</title>
</head>
<body class="px-6 py-3 has-text-centered">
<h1 class="title">Upcoming events</h1>
<main class="columns is-centered is-vcentered is-multiline">
 {#for event in events}
 {#event_html event _isolated/}
 {#else}
 <article class="column">
   Whoops, we don’t have any upcoming events yet! ☹️
 </article>
 {/for}
</main>
</body>
</html>
The event_css, event_script, and event_html tags are custom. They’ll include, respectively, the stylesheets, the scripts, and the HTML for an event. Furthermore, the latter is a custom tag that also accepts the current event as an argument. When called, it will include the below template:
<article id="event-{it getString 'id'}" class="column is-one-third-desktop is-half-tablet">
 <div class="box">
   <header class="block">
     <h2 class="subtitle">{it getString 'title'}</h2>
     <figure class="image is-3by2">
       <img src="{it getString 'poster'}" alt="The event poster"/>
     </figure>
   </header>
   <section class="block">
     <div class="content">
       <p>{it getString 'description'}</p>
     </div>
     <div class="level is-mobile">
       <div class="level-left">
         <span class="level-item">Date:</span>
       </div>
       <div class="level-right">
         <time class="level-item" datetime="{it getOffsetDateTime 'date'}">
           <strong>{it getOffsetDateTime 'date' format 'MMM d yyyy - E HH:mm'}</strong>
         </time>
       </div>
     </div>
     <div class="level is-mobile">
       <div class="level-left">
         <span class="level-item">Available tickets:</span>
       </div>
       <div class="level-right">
         <span class="level-item"><strong>{it getInt 'availableTickets'}</strong></span>
       </div>
     </div>
     <div class="block">
       {#if it.getInt('availableTickets') > 0}
       <button data-event="{it getString 'id'}" class="button is-primary is-focused is-fullwidth js-book-button">Book
       </button>
       {#else}
       <button class="button is-danger is-outlined is-fullwidth is-static">Sold out</button>
       {/if}
     </div>
   </section>
 </div>
</article>
The event_css will include:
<link rel="stylesheet" href="/webjars/bulma/css/bulma.min.css"/>
<link rel="stylesheet" href="/event.css"/>
And as you can see, we are importing Bulma as a WebJar. A WebJar is a client-side web library packaged as a jar. This means two things: we can manage them with maven like any backend library and we can reference them in our code using the webjars path.
Last, but not least, the event_script will include an ES module:
<script type="module" src="/event.js"></script>
This module is of particular interest because it will allow us to book a ticket. Specifically, it will add a listener to the book button. And, using the Fetch API, it will update asynchronously the DOM to reflect the available tickets. This requires exposing a web page to a single event. So, we need to add another template. But it can be really minimal:
<!DOCTYPE html>
<html lang="en">
<head>
 <meta charset="UTF-8"/>
 <title>Event {getString('id')}</title>
</head>
<body>
<main>
 {#event_html this _isolated /}
</main>
</body>
</html>
Exposing web pages
The last step to showing web pages is to expose them to the clients through HTTP endpoints. But we already received them when we exposed the REST API through EventsResource. We just need to support the JSON and HTML representations for the same resource. In this regard, we can modify the EventsResource to return the correct representation according to the Accept header. In Quarkus, we just need to indicate the supported representation through the @Produces annotation:
@Path("/events")
public final class EventsResource {
 ...

 @GET
 @Produces(MediaType.APPLICATION_JSON)
 public Uni<JsonObject> upcomingEventsAsJson() {
   return this.events.upcoming().asJsonObject();
 }

 @GET
 @Produces(MediaType.TEXT_HTML)
 public Uni<TemplateInstance> upcomingEventsAsHtml() {
   return this.events.upcoming().asJsonObject()
     .onItem().transform(this.eventsHTMLTemplate::data);
 }

 ...
}
So, a client asking for HTML (like a browser) will be served by the upcomingEventsAsHtml method while a client asking for JSON will be served by the upcomingEventsAsJson method.
Lastly, we need to add the endpoint used by the JavaScript module to get a single event. This time, we need to support just HTML:
@Path("/events")
public final class EventsResource {
 ...

 @GET
 @Path("{id}")
 @Produces(MediaType.TEXT_HTML)
 public Uni<RestResponse<TemplateInstance>> eventAsHtmlFragment(@PathParam("id") final UUID id) {
   return this.events.event(id)
     .onItem().transformToUniAndMerge(Event::asJsonObject)
     .onItem().transform(this.eventHTMLTemplate::data)
     .onItem().transform(RestResponse::ok)
     .onCompletion().ifEmpty().continueWith(RestResponse.notFound())
     .toUni();
 }

 ...
}
Let's checkout our demos
Here we go! It’s demo time! In the two subsections below we’re going to cover all the application requirements. The first is how an editor publishes an event and the second is how a client books a ticket.
For the backend client, we’ll use HTTPie and a browser. With the former, we’ll retrieve JSON responses. With the latter, we’ll retrieve HTML responses.
Event publishing demo
In this demo, we’re going to see how an editor publishes an event. So, we’ll see how Butter will synchronize the backend through webhook communications.
Firstly, we’ll request all upcoming events to the backend. That will return a JSON object with an empty list:
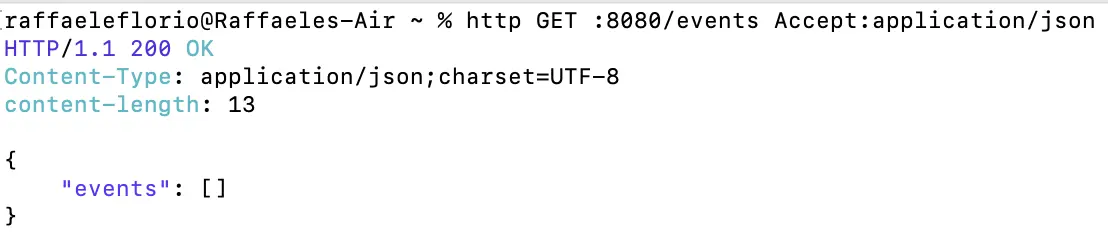
The analogous web page will display that there aren’t any upcoming events:

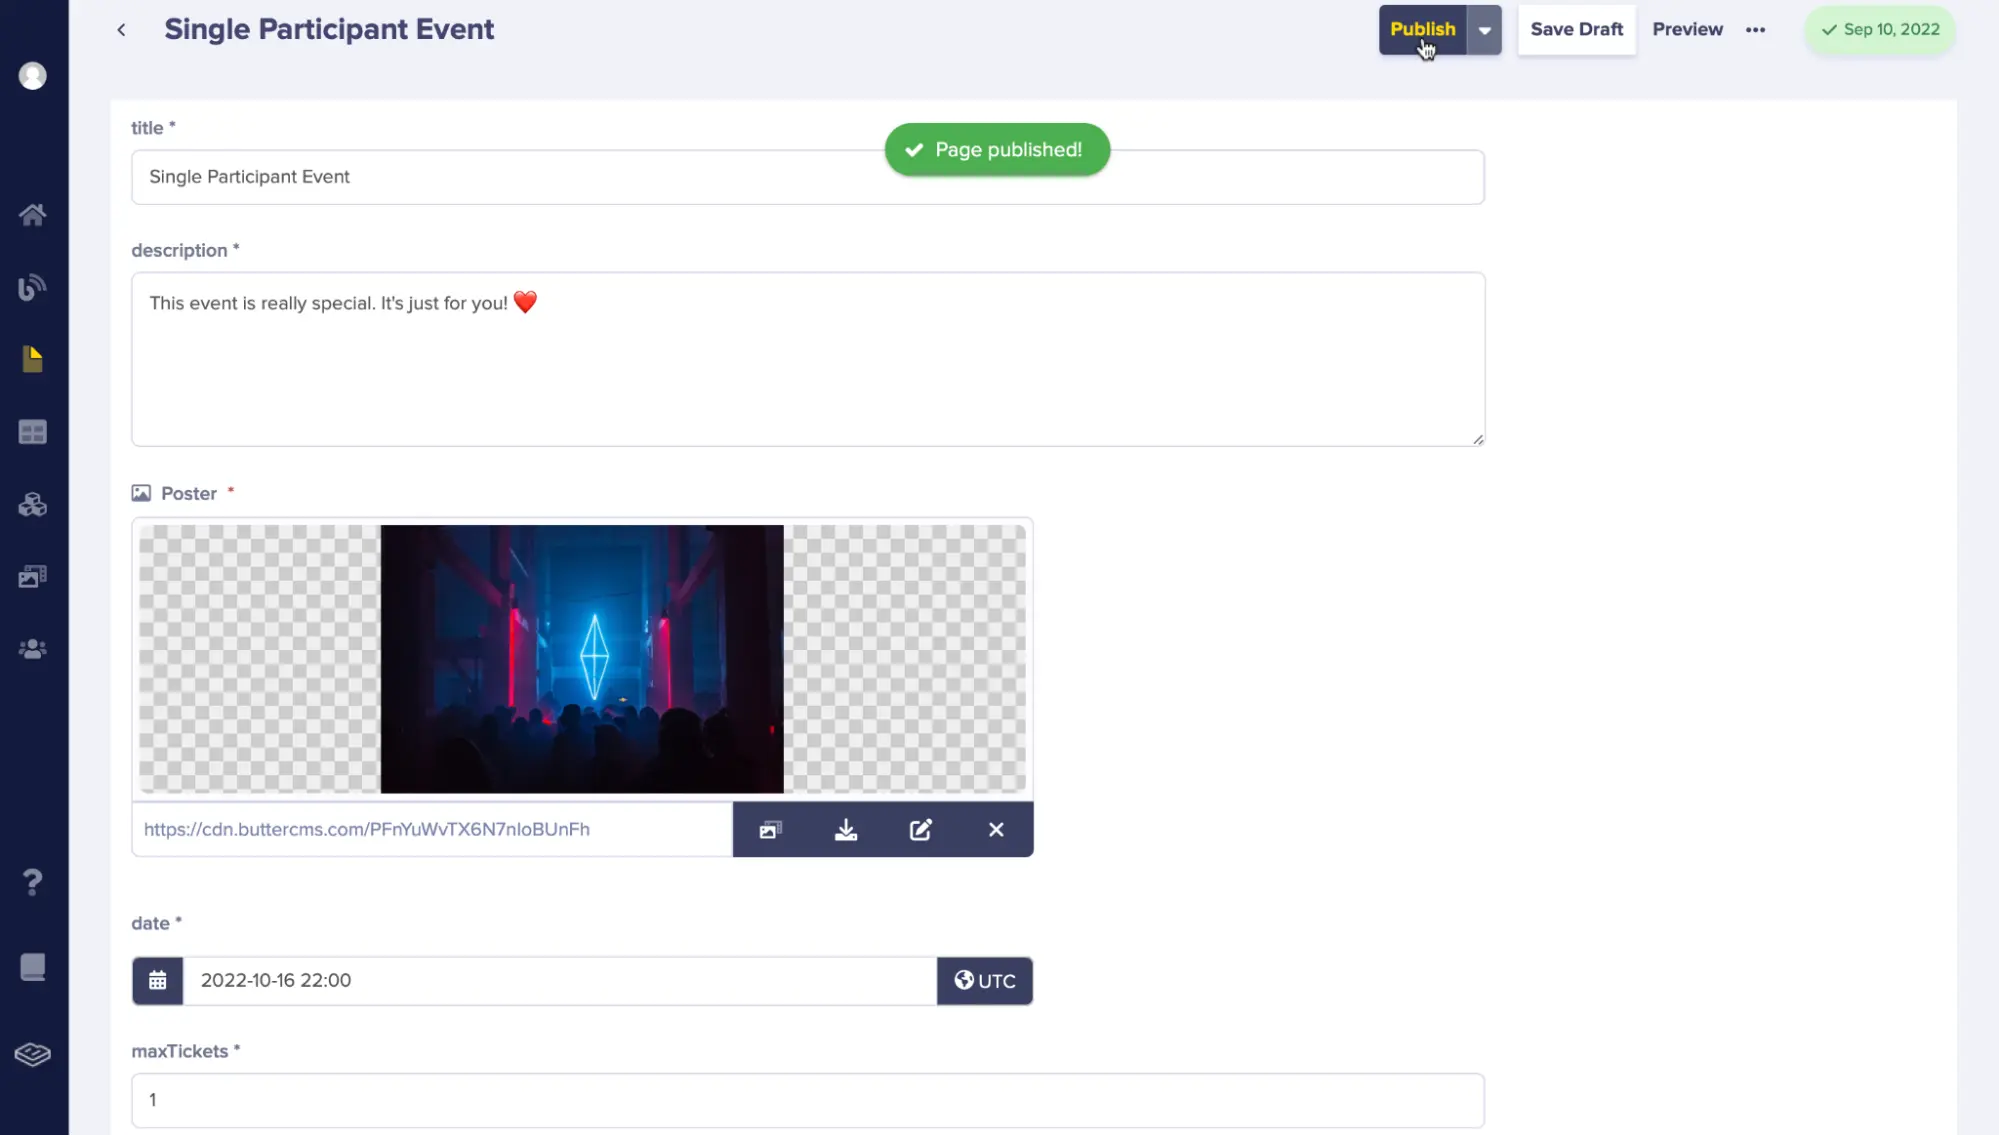
Then, we’ll publish an event through Butter’s dashboard, as any editor could do. At this step, Butter will contact the backend through a webhook:
Finally, we’ll again request all upcoming events. This time, the backend will return a JSON with a list containing the newly published event:

The backend will answer to a browser as an analogous HTML page:
Finally, in the EVENTS table we can see the added event:
Ticket booking demo
In this demo, we’re going to see how a client can book a ticket. As before, we’ll demo with both a browser and HTTPie.
Firstly, we’ll request upcoming events:
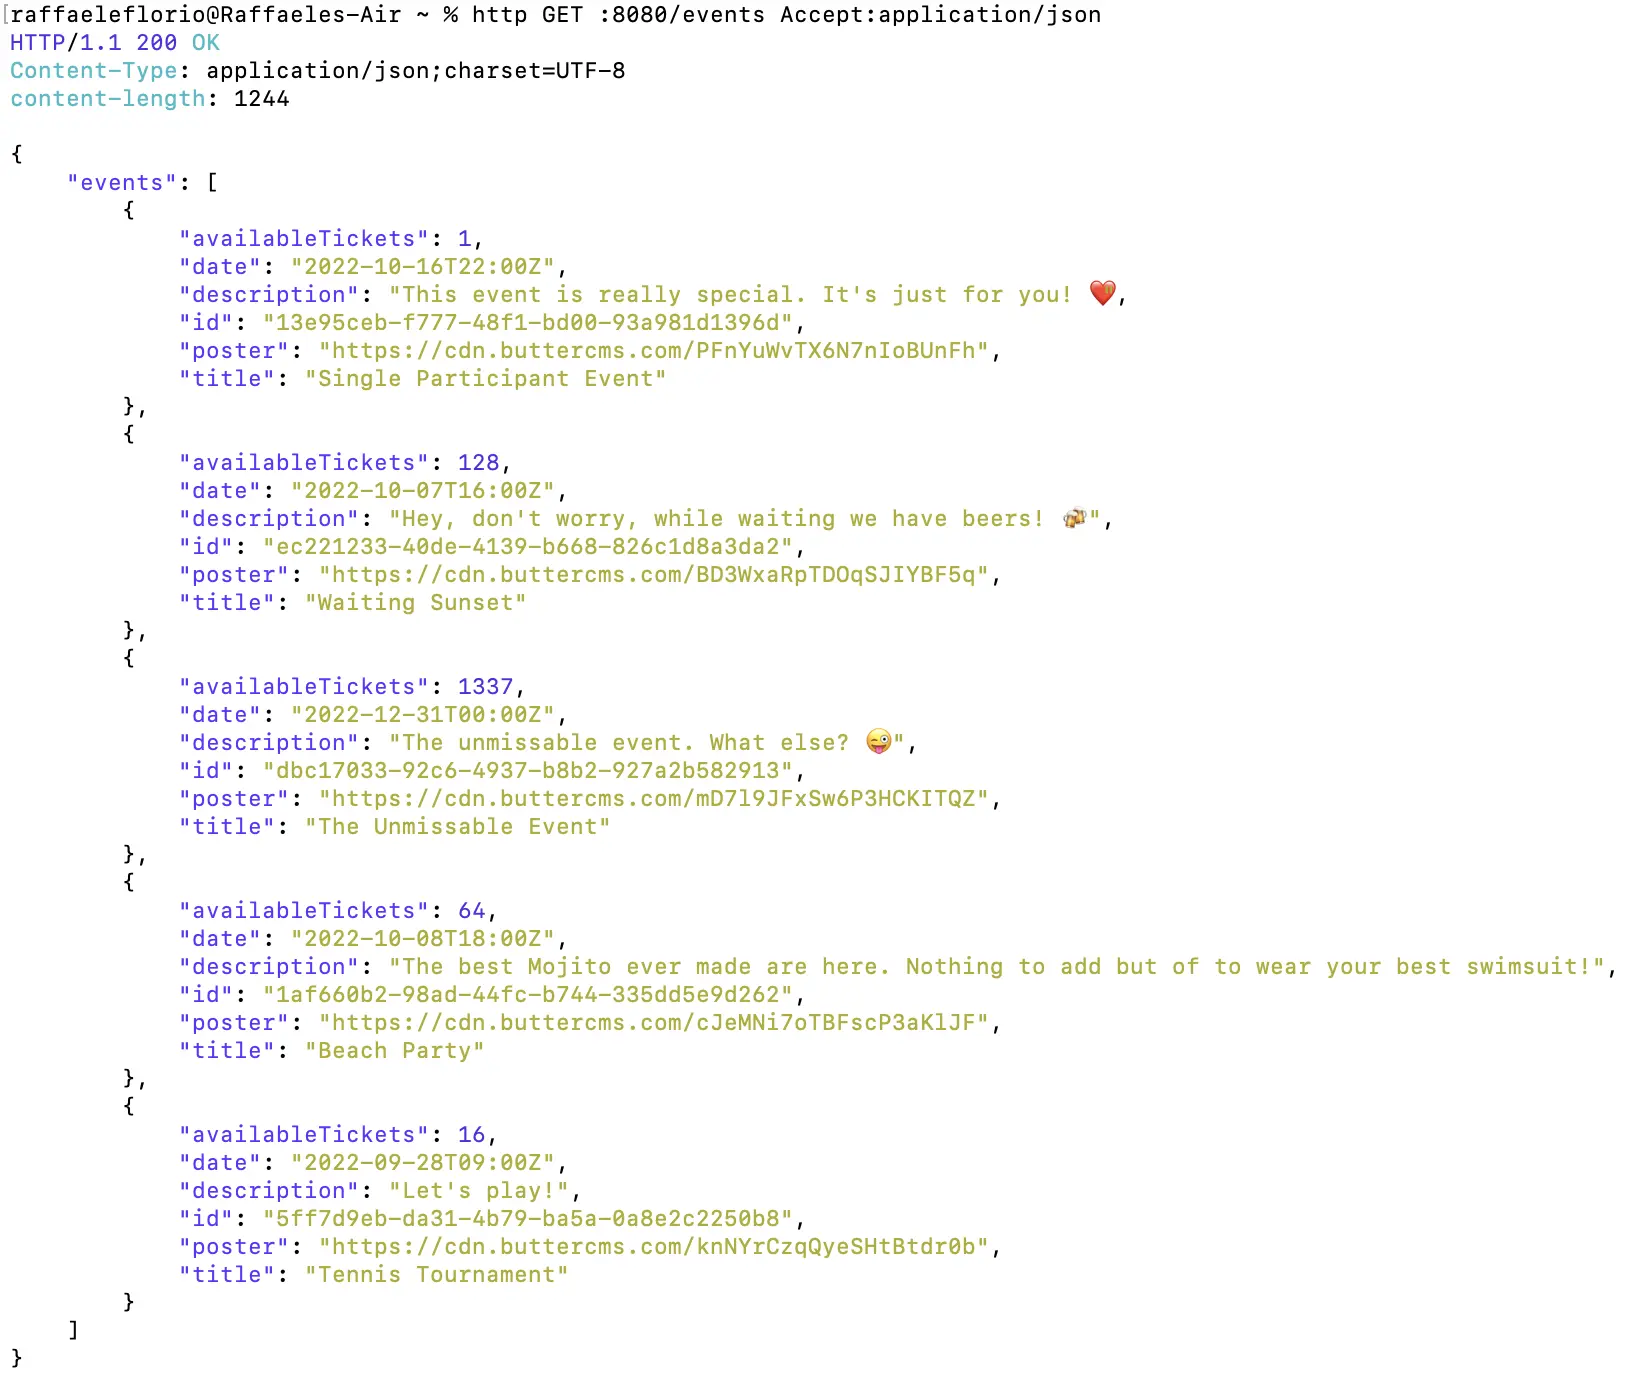
Then, we’ll book a ticket for the second event in the JSON data above. We’ll book it as a random participant by randomly generating its ID with the uuidgen command-line utility:

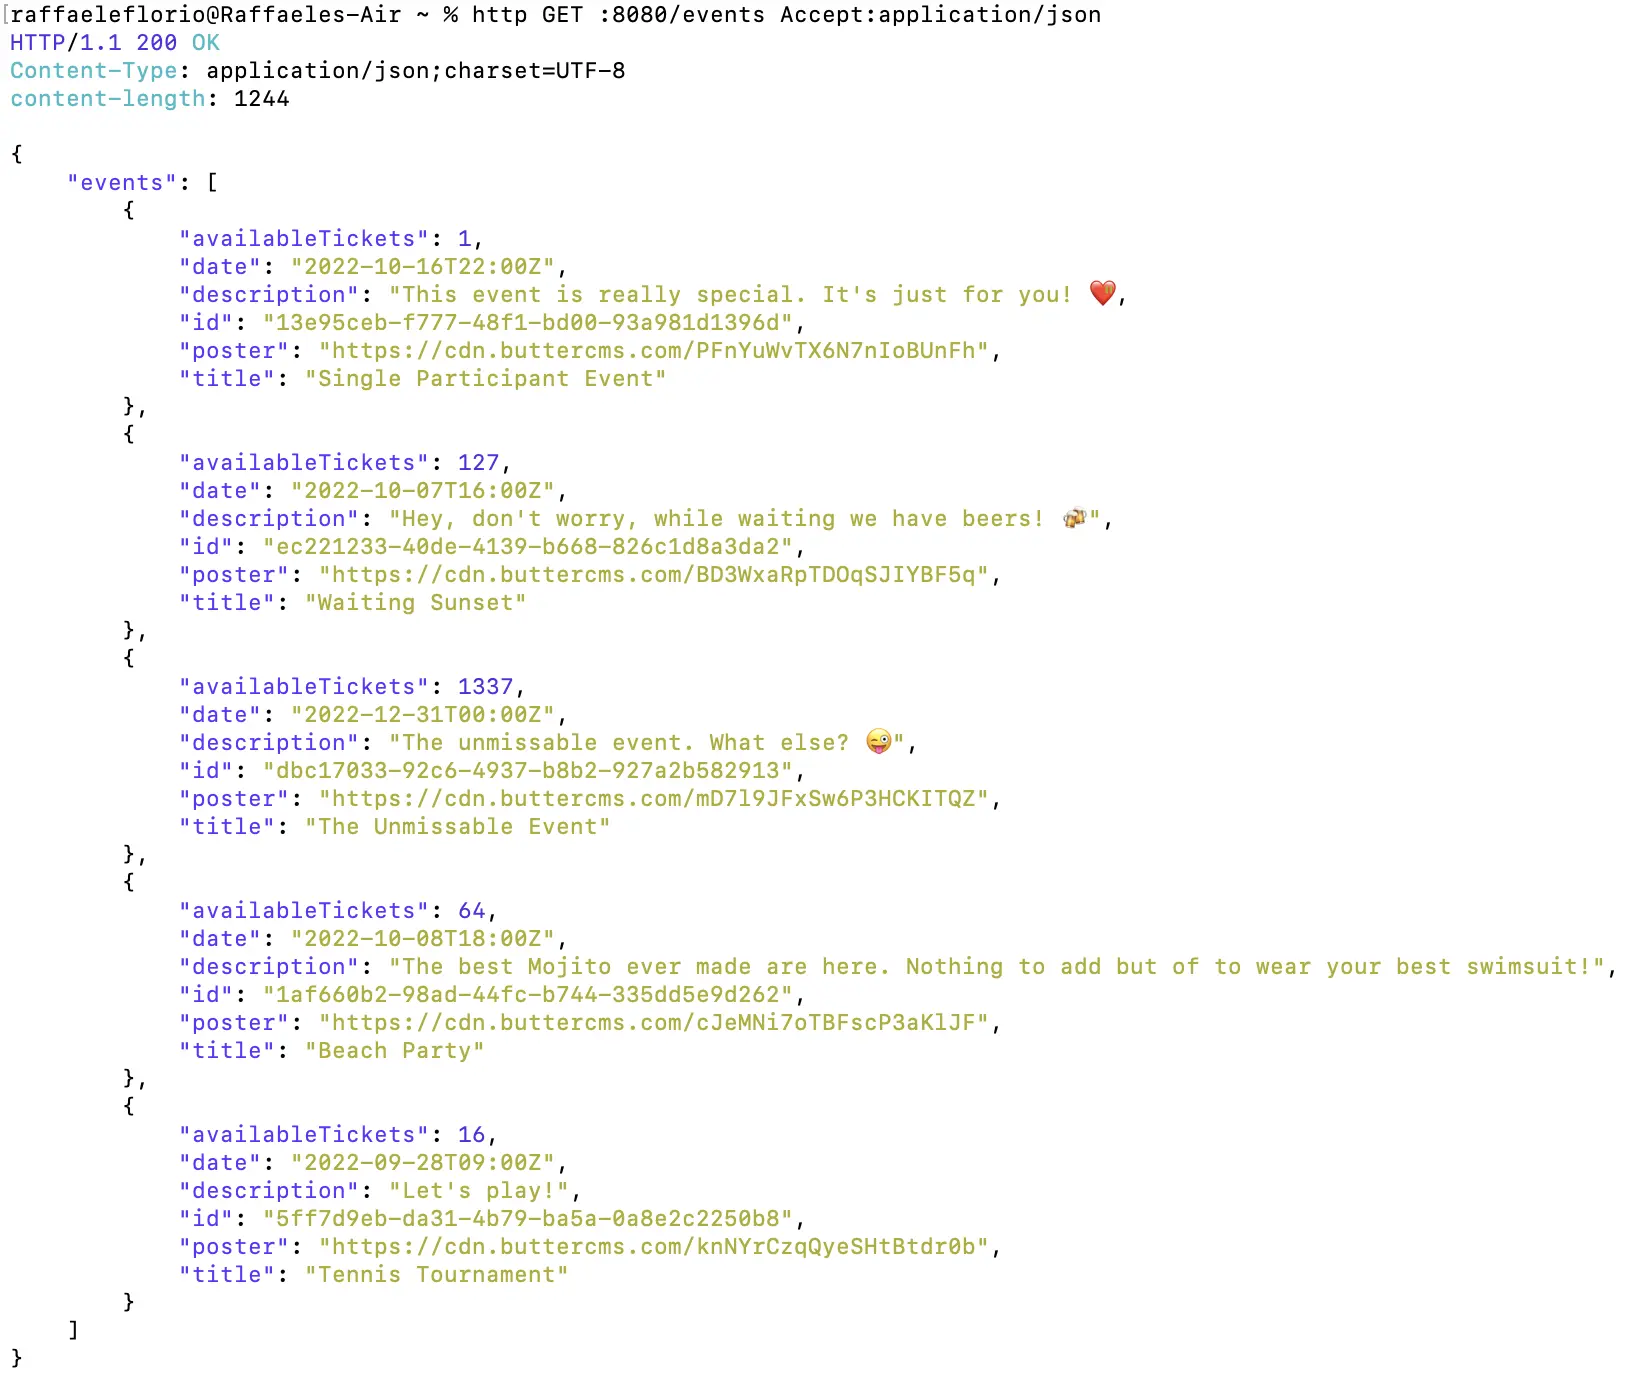
At this point, we’ll request the upcoming events again. This time the availableTickets will have one less ticket:
We can do the same thing through a browser more easily.
We’ll go to the upcoming events page:

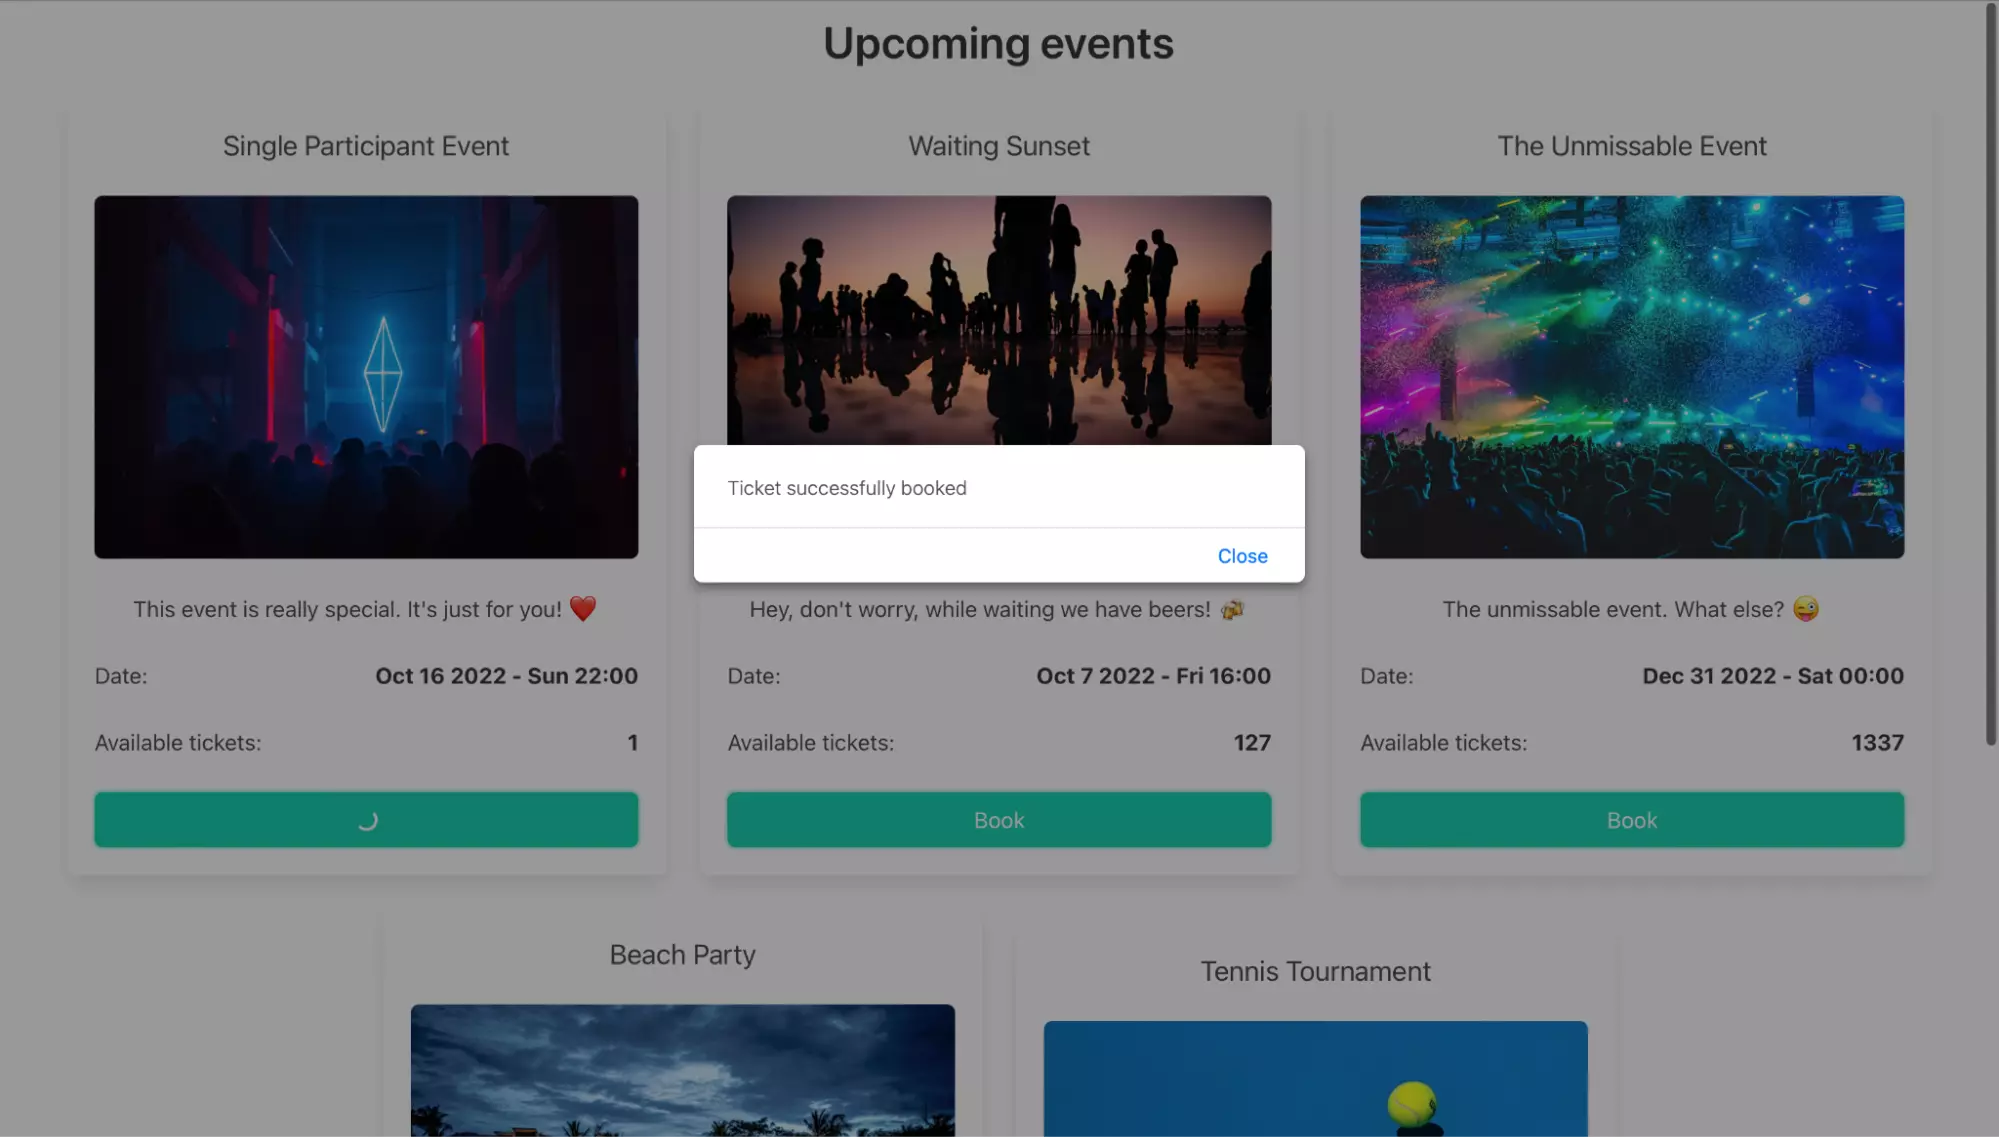
This time we’ll book the first event, the Single Participant Event, by clicking on the Book button. In the case of a successful booking, the browser will print a success message:
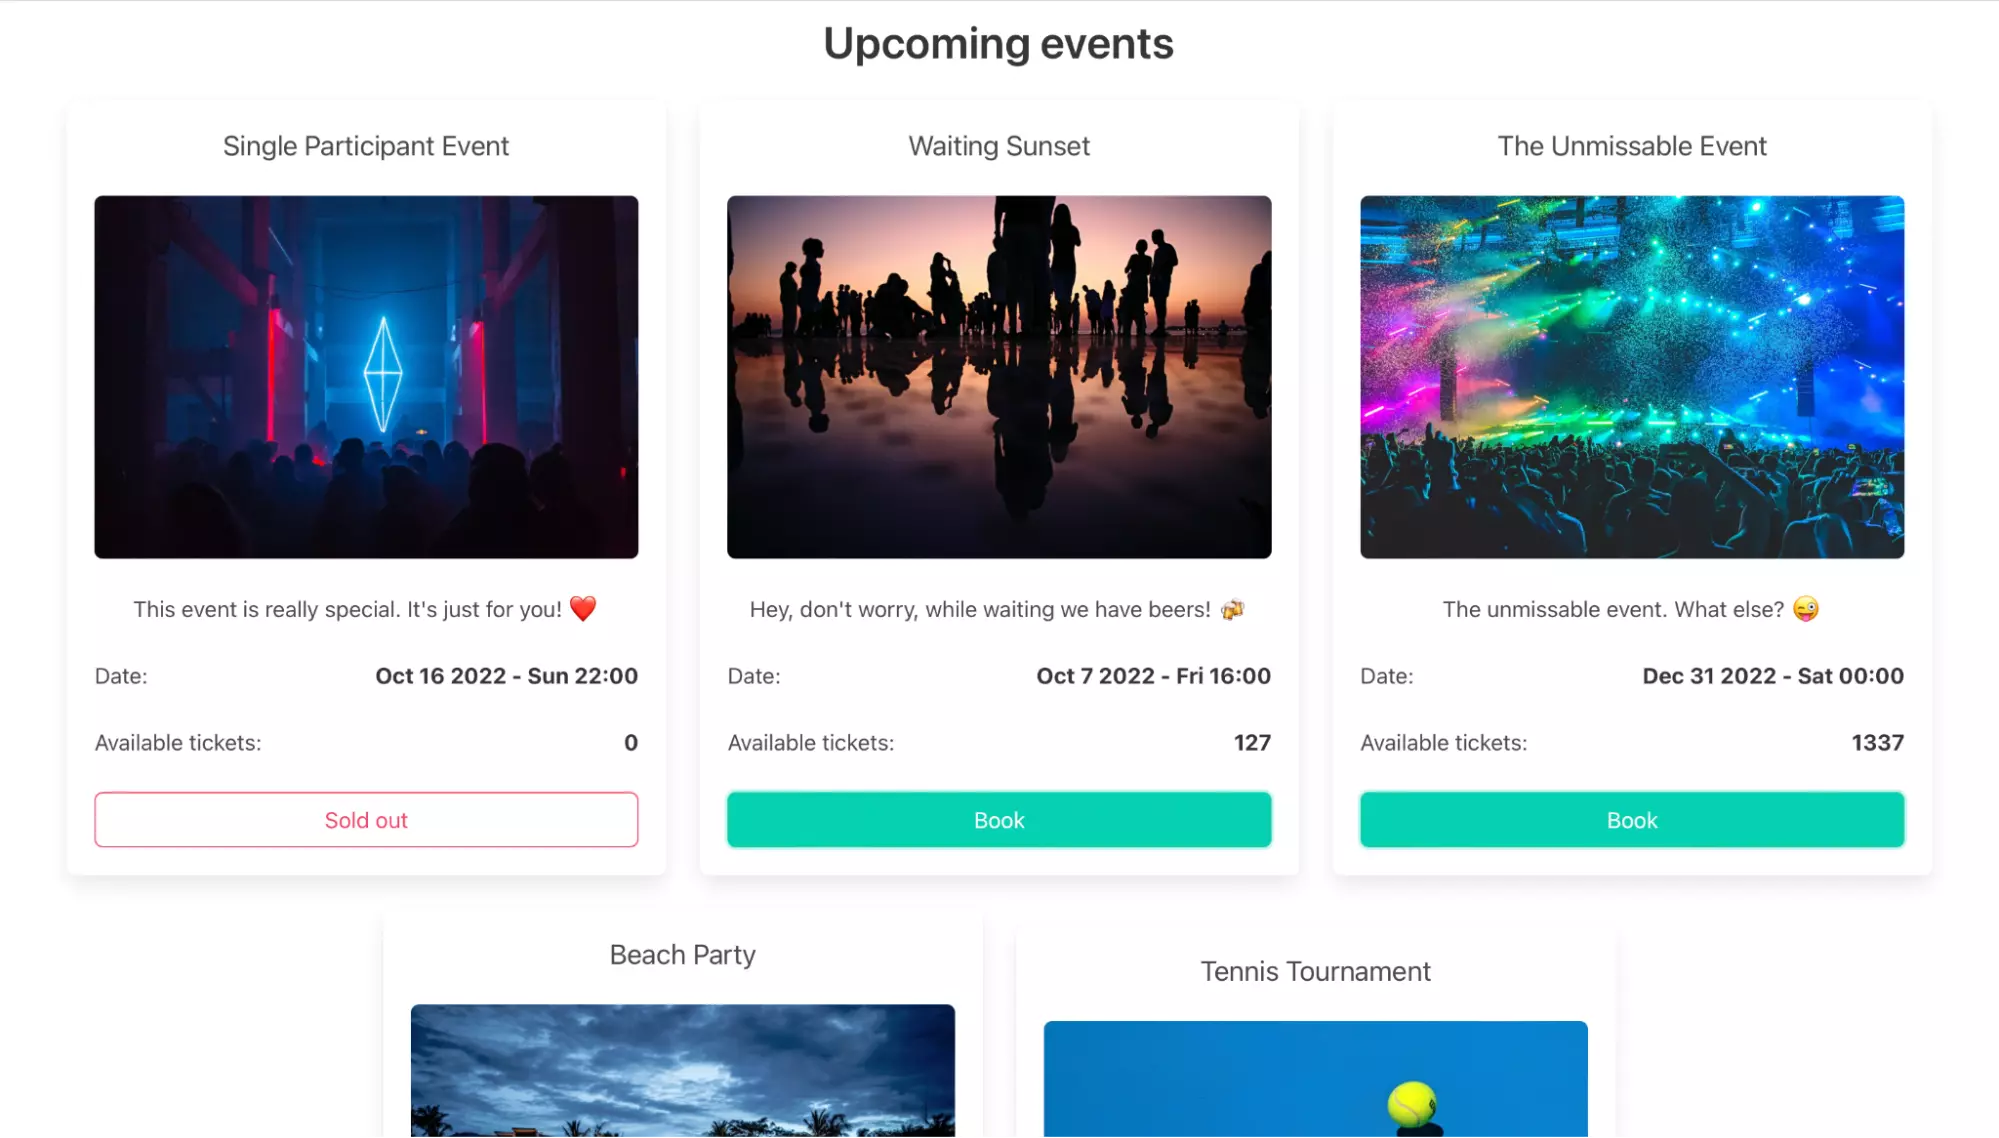
Then, without reloading the page, the Single Participant Event will be updated. In this case, it became sold out:
Finally, in the TICKETS table, we can see the two tickets:

Closing thoughts
In this blog post, we covered many topics, from the benefits of ButterCMS to a detailed implementation of a Quarkus backend.
To recap:
- We modeled Butter’s content using content validation rules
- We highlighted two techniques to synchronize systems: polling and webhooks
- We integrated securely with Butter and an object-oriented and reactive Quarkus backend
- We exposed client web pages, building them with the Qute template engine
As you can see, these steps covered many topics, and there could have been even more. All of this knowledge is useful while implementing real-life systems. About that, I advise you to explore and experiment more with backends. We built this focusing on integration with Butter to show the power and simplicity of this technology. Of course, we can improve and add many more features. But as we know, “Well begun is half done.”

