
Table of contents
According to Shopify, there are currently over 1 million online stores powered by their eCommerce platform. Shopify provides a great way for small businesses to get started selling online quickly and it scales well to support even the larger online brands. In order for Shopify powered stores to gain that growth, it’s imperative that their marketing efforts and SEO optimization of their stores take a front seat. If you love your Shopify store but are looking to supercharge your marketing pages with more complex layouts and dynamic content then this tutorial is for you! We will show you how to connect your Shopify store with headless CMS ButterCMS to handle the content!
Tutorial roadmap
In order to add more complex content into your Shopify landing pages, this tutorial will explain in-depth how to add your Shopify products into ButterCMS collections, how to create ButterCMS Page Types and pass those Pages from ButterCMS through a template to produce fully rendered HTML for that landing page in your Shopify app.
By the end of this tutorial, your Shopify store will have the following functionality:
- Add new product data automatically from your Shopify store to ButterCMS
- Display a list of ButterCMS promotional pages in your Shopify App
- Create a promotional page built with the template and data fetched from ButterCMS that will include your products’ detailed information.
For the sake of simplicity, this guide won’t have any usage of databases. But of course, for production, there will be a need to store Shopify and ButterCMS tokens.
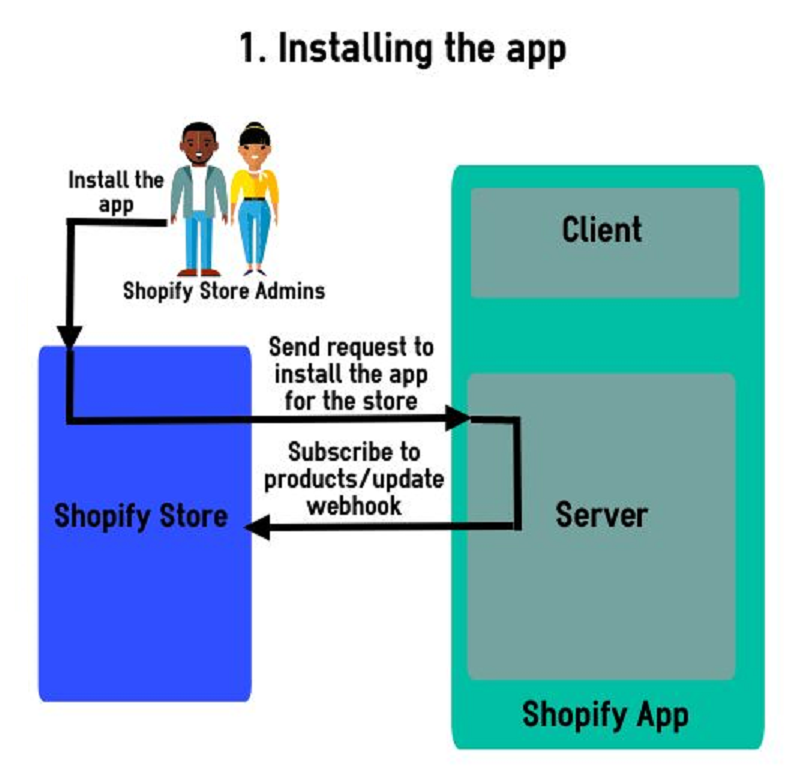
Create basic Shopify app
The first step to integrating your Shopify store to headless ButterCMS will require you to build a Shopify App. For this tutorial, we will build it with Node.js.
Set up dummy service
In the project directory run commands:
<span style="font-weight: 400;">npm init -y
npm install express</span>
Create index.js file with this content:
<strong>const</strong> express = require('express');
<strong>const</strong> app = express();
<strong>const</strong> port = 3000;

app.get('/', (req, res) => res.send('Hello World!'));

</code><code>app.listen(port, () => console.log(`Example app listening at http://localhost:${port}`));
This code creates a server on port 3000.
Update package.json file by adding a start script:
<span style="font-weight: 400;">"scripts": {
    "start": "node index.js"
},</span>
Install ngrok to create secure introspectable tunnels to localhost:
<span>npm <strong>install</strong> ngrok -g
ngrok <strong>http</strong> 3000</span>
The second command didn’t work for me on Windows so I used:
ngrok.cmd http 3000
Create .env file and set a new variable APP_URL with ngrok https forwarding url. Note that it should have https and not http protocol. Add this file and node_modules to .gitignore.

Create app and store in Shopify
Register or login to https://partners.shopify.com/. Create a new App by clicking “Apps” in the main menu and “Create App”. Set app type to be “Public app”, fill app name, and set app url to ngrok https forwarding url. As redirection URLs put:
{forwarding-url}/
{forwarding-url}/shopify/callback,
Where {forwarding URL} is ngrok https forwarding url.
Note, that when you stop ngrok command, the forwarding URLs will stop being viable, so you will have to change these values and app URL as well.
Click “Create App”. You will be redirected to a new page where you could find your API key and API secret key. Save these values to the .env file. Name variables SHOPIFY_API_KEY and SHOPIFY_API_SECRET.
To test our application we need to create a store. Click “Stores” in the main menu and then click “Add Store”, pick “Development store”. Fill store name, store URL, passwords, and hit “Save”.
Add installation routes for the app
We need to create routes to allow merchants to install the app: GET "/shopify" and GET "/shopify/callback".
Create a new folder named services with a js file named shopify-service. This is going to be a service to interact with Shopify. Run command to install shopify-node-api and shopify-api-node:
npm i shopify-<strong>node-api</strong> shopify-api-<strong>node</strong>Paste this code into shopify-service.js file:
<span style="font-weight: 400;">class <b>ShopifyService </b>{
  constructor() {
    this.<b>shops </b>= {};
  }

  <b>install(shopOptions) </b>{
    let <b>shop </b>= this.<b>shops[shopOptions.shop];</b><b>
</b>
    if (!<b>shop) </b>{
      <b>shop </b>= new <b>ShopifyAuthAPI({</b><b>
</b>        shop: <b>shopOptions.shop,</b><b>
</b>        shopify_api_key: <b>shopOptions.shopify_api_key,</b><b>
</b>        shopify_shared_secret: <b>shopOptions.shopify_shared_secret,</b><b>
</b>        shopify_scope: <b>shopOptions.shopify_scope,</b><b>
</b>        redirect_uri: <b>shopOptions.redirect_uri,</b><b>
</b>        nonce: <b>shopOptions.nonce,</b><b>
</b>        verbose: false
      });
      this.<b>shops[shopOptions.shop] </b>= <b>shop;</b><b>
</b>    }

    return <b>shop;</b><b>
</b>  }

  getShop(shopName) {
    return this.shops[shopName];
  }

  uninstall(<b>shopName) </b>{
    delete this.<b>shops[shopName];</b><b>
</b>  }

  static exchangeTemporaryToken(<b>shop, </b>query) {
    return new Promise((resolve, reject) => {
      <b>shop.exchange_temporary_token(query, </b>(err, data) => {
        if (err) {
          return reject(Error(err));
        }
        return resolve(data);
      });
    });
  }


  static <b>subscribeToUninstallWebHook(shop, address) </b>{
    const params = {
      topic: "app/uninstalled",
      <b>address,</b><b>
</b>      format: "json"
    };
    const <b>shopify </b>= new <b>ShopifyAPI({</b><b>
</b>      shopName: <b>shop.config.shop,</b><b>
</b>      accessToken: <b>shop.config.access_token</b><b>
</b>    });
    return <b>shopify.webhook.create(params);</b><b>
</b>  }
}

module.exports = { <b>ShopifyService </b>};</span></code>
<span style="font-weight: 400;"></span></pre>
<p><span style="font-weight: 400;">This service now has a method to install the app and to exchange a temporary store token to a constant one.</span></p>
<p><span style="font-weight: 400;">Now run command to install other dependencies:</span></p>
<pre><span style="font-weight: 400;"><code>npm <b>i</b> dotenv nonce shopify-hmac-validation</code></span><span style="font-weight: 400;"></span></pre>
<p>
Update index.js file by adding this code to the top:</p>
<pre><code><span style="font-weight: 400;">require</span><span style="font-weight: 400;">(</span><span style="font-weight: 400;">"dotenv"</span><span style="font-weight: 400;">).config();</span><span style="font-weight: 400;">
</span><b>const</b><span style="font-weight: 400;"> nonce = </span><span style="font-weight: 400;">require</span><span style="font-weight: 400;">(</span><span style="font-weight: 400;">"nonce"</span><span style="font-weight: 400;">)();</span><span style="font-weight: 400;">
</span><b>const</b><span style="font-weight: 400;"> bodyParser = </span><span style="font-weight: 400;">require</span><span style="font-weight: 400;">(</span><span style="font-weight: 400;">"body-parser"</span><span style="font-weight: 400;">);</span><span style="font-weight: 400;">
</span><b>const</b><span style="font-weight: 400;"> hmacValidity = </span><span style="font-weight: 400;">require</span><span style="font-weight: 400;">(</span><span style="font-weight: 400;">"shopify-hmac-validation"</span><span style="font-weight: 400;">);</span><span style="font-weight: 400;">
</span><span style="font-weight: 400;">
</span><b>const</b><span style="font-weight: 400;"> { ShopifyService } = </span><span style="font-weight: 400;">require</span><span style="font-weight: 400;">(</span><span style="font-weight: 400;">"./services/shopify-service"</span><span style="font-weight: 400;">);</span><span style="font-weight: 400;">
</span><span style="font-weight: 400;">
</span><b>const</b><span style="font-weight: 400;"> shopifyService = </span><b>new</b><span style="font-weight: 400;"> ShopifyService();</span><span style="font-weight: 400;">
</span><span style="font-weight: 400;">
</span><b>const</b><span style="font-weight: 400;"> forwardingAddress = process.env.APP_URL;</span><span style="font-weight: 400;">
</span><b>const</b><span style="font-weight: 400;"> appConfig = {</span><span style="font-weight: 400;">
</span><span style="font-weight: 400;">  apiKey: process.env.SHOPIFY_API_KEY,</span><span style="font-weight: 400;">
</span><span style="font-weight: 400;">  apiSecret: process.env.SHOPIFY_API_SECRET,</span><span style="font-weight: 400;">
</span><span style="font-weight: 400;">  scopes: </span><span style="font-weight: 400;">"read_products,read_product_listings,write_content"</span><span style="font-weight: 400;">
</span><span style="font-weight: 400;">};</span><span style="font-weight: 400;">
</span><span style="font-weight: 400;">
</span><span style="font-weight: 400;">
</span><b>function</b><b>verifyWebhookRequest</b><span style="font-weight: 400;">(req, res, next) {</span><span style="font-weight: 400;">
</span><b>try</b><span style="font-weight: 400;"> {</span><span style="font-weight: 400;">
</span><b>if</b><span style="font-weight: 400;"> (</span><span style="font-weight: 400;">
</span><span style="font-weight: 400;">      !hmacValidity.checkWebhookHmacValidity(</span><span style="font-weight: 400;">
</span><span style="font-weight: 400;">        appConfig.apiSecret,</span><span style="font-weight: 400;">
</span><span style="font-weight: 400;">        req.rawBody,</span><span style="font-weight: 400;">
</span><span style="font-weight: 400;">        req.headers[</span><span style="font-weight: 400;">"x-shopify-hmac-sha256"</span><span style="font-weight: 400;">]</span><span style="font-weight: 400;">
</span><span style="font-weight: 400;">      )</span><span style="font-weight: 400;">
</span><span style="font-weight: 400;">    ) {</span><span style="font-weight: 400;">
</span><b>throw</b><span style="font-weight: 400;">Error</span><span style="font-weight: 400;">(</span><span style="font-weight: 400;">"Unauthorized"</span><span style="font-weight: 400;">);</span><span style="font-weight: 400;">
</span><span style="font-weight: 400;">    }</span><span style="font-weight: 400;">
</span><b>return</b><span style="font-weight: 400;"> next();</span><span style="font-weight: 400;">
</span><span style="font-weight: 400;">  } </span><b>catch</b><span style="font-weight: 400;"> (e) {</span><span style="font-weight: 400;">
</span><span style="font-weight: 400;">console</span><span style="font-weight: 400;">.log(e);</span><span style="font-weight: 400;">
</span><b>return</b><span style="font-weight: 400;"> res.status(</span><span style="font-weight: 400;">401</span><span style="font-weight: 400;">).json({ message: </span><span style="font-weight: 400;">"Unauthorized"</span><span style="font-weight: 400;"> });</span><span style="font-weight: 400;">
</span><span style="font-weight: 400;">  }</span><span style="font-weight: 400;">
</span><span style="font-weight: 400;">}


</span><span style="font-weight: 400;">function rawBodySaver(req, res, buf, encoding) {
  if (buf && buf.length) {
    req.rawBody = buf.toString(encoding || "utf8");
  }
}</span>
Add the following code to index.js file after const app = express();:
<span style="font-weight: 400;"></span><span style="font-weight: 400;">app.use(
  "/app/webhooks/app-uninstalled",
  bodyParser.json({ verify: rawBodySaver })
);

app.use(bodyParser.urlencoded({ extended: true }));
app.use(bodyParser.json());

app.get("/shopify", <b>async</b> (req, res) => {
  <b>try</b> {
    <b>const</b> shop = shopifyService.install({
      shop: req.query.shop,
      shopify_api_key: appConfig.apiKey,
      shopify_shared_secret: appConfig.apiSecret,
      shopify_scope: appConfig.scopes,
      redirect_uri: `${forwardingAddress}/shopify/callback`,
      nonce: nonce().toString()
    });

    <b>const</b> authURL = shop.buildAuthURL();
    <b>return</b> res.redirect(authURL);
  } <b>catch</b> (e) {
    console.log(e);
    <b>return</b> res.status(500).json({ message: "Server error" });
  }
});

app.get(</span><span style="font-weight: 400;">"/shopify/callback"</span><span style="font-weight: 400;">, </span><b>async</b><span style="font-weight: 400;"> (req, res) => {</span><span style="font-weight: 400;">
</span><b>try</b><span style="font-weight: 400;"> {</span><span style="font-weight: 400;">
</span><b>const</b><span style="font-weight: 400;"> shop = shopifyService.getShop(req.query.shop);</span><span style="font-weight: 400;">
</span><b>if</b><span style="font-weight: 400;"> (!shop) {</span><span style="font-weight: 400;">
</span><b>throw</b><b>new</b><span style="font-weight: 400;">Error</span><span style="font-weight: 400;">(</span><span style="font-weight: 400;">"No shop provided"</span><span style="font-weight: 400;">);</span><span style="font-weight: 400;">
</span><span style="font-weight: 400;">    }</span><span style="font-weight: 400;">
</span><b>await</b><span style="font-weight: 400;"> ShopifyService.exchangeTemporaryToken(shop, req.query);</span><span style="font-weight: 400;">
</span><b>await</b><span style="font-weight: 400;"> ShopifyService.subscribeToUninstallWebHook(</span><span style="font-weight: 400;">
</span><span style="font-weight: 400;">      shop,</span><span style="font-weight: 400;">
</span><span style="font-weight: 400;">`</span><span style="font-weight: 400;">${forwardingAddress}</span><span style="font-weight: 400;">/app/webhooks/app-uninstalled`</span><span style="font-weight: 400;">
</span><span style="font-weight: 400;">    );</span><span style="font-weight: 400;">
</span><b>return</b><span style="font-weight: 400;"> res.redirect(</span><span style="font-weight: 400;">
</span><span style="font-weight: 400;">`https://</span><span style="font-weight: 400;">${shop.config.shop}</span><span style="font-weight: 400;">/admin/apps/</span><span style="font-weight: 400;">${appConfig.apiKey}</span><span style="font-weight: 400;">`</span><span style="font-weight: 400;">
</span><span style="font-weight: 400;">    );</span><span style="font-weight: 400;">
</span><span style="font-weight: 400;">  } </span><b>catch</b><span style="font-weight: 400;"> (e) {</span><span style="font-weight: 400;">
</span><span style="font-weight: 400;">console</span><span style="font-weight: 400;">.log(e);</span><span style="font-weight: 400;">
</span><b>return</b><span style="font-weight: 400;"> res.status(</span><span style="font-weight: 400;">500</span><span style="font-weight: 400;">).json({ message: </span><span style="font-weight: 400;">"Server error"</span><span style="font-weight: 400;"> });</span><span style="font-weight: 400;">
</span><span style="font-weight: 400;">  }</span><span style="font-weight: 400;">
</span><span style="font-weight: 400;">});</span><span style="font-weight: 400;">
</span><span style="font-weight: 400;">
</span><span style="font-weight: 400;">app.post(</span><span style="font-weight: 400;">"/app/webhooks/app-uninstalled"</span><span style="font-weight: 400;">, verifyWebhookRequest, (req, res) => {</span><span style="font-weight: 400;">
</span><b>try</b><span style="font-weight: 400;"> {</span><span style="font-weight: 400;">
</span><b>const</b><span style="font-weight: 400;"> shopName = req.headers[</span><span style="font-weight: 400;">"x-shopify-shop-domain"</span><span style="font-weight: 400;">];</span><span style="font-weight: 400;">
</span><span style="font-weight: 400;">    shopifyService.uninstall(shopName);</span><span style="font-weight: 400;">
</span><b>return</b><span style="font-weight: 400;"> res.status(</span><span style="font-weight: 400;">200</span><span style="font-weight: 400;">).json({ message: </span><span style="font-weight: 400;">"Successfully deleted all shop data"</span><span style="font-weight: 400;"> });</span><span style="font-weight: 400;">
</span><span style="font-weight: 400;">  } </span><b>catch</b><span style="font-weight: 400;"> (error) {</span><span style="font-weight: 400;">
</span><span style="font-weight: 400;">console</span><span style="font-weight: 400;">.log(error);</span><span style="font-weight: 400;">
</span><b>return</b><span style="font-weight: 400;"> res.status(</span><span style="font-weight: 400;">400</span><span style="font-weight: 400;">).send(</span><span style="font-weight: 400;">"Server error"</span><span style="font-weight: 400;">);</span><span style="font-weight: 400;">
</span><span style="font-weight: 400;">  }</span><span style="font-weight: 400;">
</span><span style="font-weight: 400;">});</span></code><span style="font-weight: 400;"></span></pre>
<p></p>
<p><span style="font-weight: 400;">Now when a merchant will click the install button for our application (or goes to {app-url}/shopify?shop={shop-url}, an example URL might look like this: </span><a href="https://94b32975b89c.ngrok.io/shopify?shop=normal-clothing-store-1.myshopify.com/" rel="nofollow noopener" target="_blank"><span style="font-weight: 400;">https://94b32975b89c.ngrok.io/shopify?shop=normal-clothing-store-1.myshopify.com/</span></a><span style="font-weight: 400;">) the following will happen:</span></p>
<ul>
<li style="font-weight: 400;"><span style="font-weight: 400;">The server will save the shop’ data if it has not been already saved in ShopifyService shops variable;</span></li>
<li style="font-weight: 400;"><span style="font-weight: 400;">Merchant will be redirected to the page where he will give the app permission to everything that is set in </span><code><span style="font-weight: 400;">appConfig.scopes</span></code> <span style="font-weight: 400;">if these permissions are not already granted;</span></li>
<li style="font-weight: 400;"><span style="font-weight: 400;">Merchant will be redirected to </span><b>/shopify/callback</b><span style="font-weight: 400;"> page where server will exchange store’s temporary token to the constant one;</span></li>
<li style="font-weight: 400;"><span style="font-weight: 400;">Merchant will be redirected to the Shopify app.</span></li>
</ul>
<p><span style="font-weight: 400;">When the merchant uninstalls the application Shopify will send a request to </span><b>/app/webhooks/app-uninstalled</b><span style="font-weight: 400;">. The server will verify that the request was sent by Shopify and will remove the shop from saved shops. To verify the request we used </span><a href="https://www.npmjs.com/package/shopify-hmac-validation" rel="follow noopener" target="_blank"><span style="font-weight: 400;">shopify-hmac-validation</span></a><span style="font-weight: 400;"> method. To make it work we needed to save the requested raw body value for the webhook request.</span></p>
<p></p>
<p><span style="font-weight: 400;">Note 1: if your forwarding url has http protocol, you will get an error when app/uninstall webhook event fires.</span></p>
<p><span style="font-weight: 400;">Note 2: created code does not verify if there is already a subscription to the app/uninstall webhook, so when a store installs the app the second time, Shopify will return an error. To get rid of this error, delete the app from the store and install the app again.</span></p>
<p><a class="anchor_text_cta" href="/nodejs-cms/" rel="follow noopener"><img src="https://cdn.buttercms.com/DDpkzo5dSOGVXa5MENaI" alt="banner-cta-node-blue.webp"></a></p>
<h2 id="createui"><span style="font-weight: 400;">Create UI in Shopify app to save ButterCMS token</span></h2>
<p><span style="font-weight: 400;">To add items to a collection in ButterCMS we need merchants’ write-enabled token. This means that our Shopify app should have a configuration page with a form containing a single input field for this token. This form will be submitted to our API route </span><b>/butter-cms/config</b><span style="font-weight: 400;"> which will save provided token.</span></p>
<p><img src="https://cdn.buttercms.com/SqP2UxyQGOwtajzjeAWg" alt="install-2.png"></p>
<p></p>
<h3><span style="font-weight: 400;">Back end of Shopify app</span></h3>
<p><span style="font-weight: 400;">Run this command to install all needed dependencies:</span></p>
<pre><span style="font-weight: 400;"><code>npm <b>i</b> buttercms request request-promise</code></span></pre>
<p>
Create file butter-cms-service.js in services folder and add the following code:</p>
<pre><code><b>import</b><span style="font-weight: 400;"> Butter </span><b>from</b> <span style="font-weight: 400;">"buttercms"</span><span style="font-weight: 400;">;</span><span style="font-weight: 400;">
</span><b>import</b><span style="font-weight: 400;"> requestPromise </span><b>from</b> <span style="font-weight: 400;">"request-promise"</span><span style="font-weight: 400;">;</span><span style="font-weight: 400;">
</span><span style="font-weight: 400;">
</span><b>class</b> <b>ButterCMSService</b><span style="font-weight: 400;"> {</span><span style="font-weight: 400;">
</span><span style="font-weight: 400;">  </span><b>constructor</b><span style="font-weight: 400;">() {</span><span style="font-weight: 400;">
</span><span style="font-weight: 400;">    </span><b>this</b><span style="font-weight: 400;">.configs = {};</span><span style="font-weight: 400;">
</span><span style="font-weight: 400;">  }</span><span style="font-weight: 400;">
</span><span style="font-weight: 400;">
</span><span style="font-weight: 400;">  connect(shopName, configs) {</span><span style="font-weight: 400;">
</span><span style="font-weight: 400;">    </span><b>this</b><span style="font-weight: 400;">.configs[shopName] = configs;</span><span style="font-weight: 400;">
</span><span style="font-weight: 400;">  }</span><span style="font-weight: 400;">
</span><span style="font-weight: 400;">
</span><span style="font-weight: 400;">  disconnect(shopName) {</span><span style="font-weight: 400;">
</span><span style="font-weight: 400;">    </span><b>delete</b> <b>this</b><span style="font-weight: 400;">.configs[shopName];</span><span style="font-weight: 400;">
</span><span style="font-weight: 400;">  }</span><span style="font-weight: 400;">
</span><span style="font-weight: 400;">}</span><span style="font-weight: 400;">
</span><span style="font-weight: 400;">
</span><b>export</b> <b>default</b><span style="font-weight: 400;"> { ButterCMSService };</span>
Add function to be used as middleware to verify that request was sent from the Shopify, by adding this code to index.js:
<b>function</b> <b>verifyRequest</b><span style="font-weight: 400;">(req, res, </span><b>next</b><span style="font-weight: 400;">) {</span><span style="font-weight: 400;">
</span><span style="font-weight: 400;">  </span><b>try</b><span style="font-weight: 400;"> {</span><span style="font-weight: 400;">
</span><span style="font-weight: 400;">    </span><b>if</b><span style="font-weight: 400;"> (!hmacValidity.checkHmacValidity(appConfig.apiSecret, req.query)) {</span><span style="font-weight: 400;">
</span><span style="font-weight: 400;">      </span><b>throw</b> <span style="font-weight: 400;">Error</span><span style="font-weight: 400;">(</span><span style="font-weight: 400;">"Unauthorized"</span><span style="font-weight: 400;">);</span><span style="font-weight: 400;">
</span><span style="font-weight: 400;">    }</span><span style="font-weight: 400;">
</span><span style="font-weight: 400;">
</span><span style="font-weight: 400;">    </span><b>const</b><span style="font-weight: 400;"> shop = shopifyService.getShop(req.query.shop);</span><span style="font-weight: 400;">
</span><span style="font-weight: 400;">    </span><b>if</b><span style="font-weight: 400;"> (!shop) {</span><span style="font-weight: 400;">
</span><span style="font-weight: 400;">      </span><b>throw</b> <b>new</b> <span style="font-weight: 400;">Error</span><span style="font-weight: 400;">(</span><span style="font-weight: 400;">"Shop not found"</span><span style="font-weight: 400;">);</span><span style="font-weight: 400;">
</span><span style="font-weight: 400;">    }</span><span style="font-weight: 400;">
</span><span style="font-weight: 400;">    res.locals.shop = shop;</span><span style="font-weight: 400;">
</span><span style="font-weight: 400;">    </span><b>return</b> <b>next</b><span style="font-weight: 400;">();</span><span style="font-weight: 400;">
</span><span style="font-weight: 400;">  } </span><b>catch</b><span style="font-weight: 400;"> (e) {</span><span style="font-weight: 400;">
</span><span style="font-weight: 400;">    console.</span><span style="font-weight: 400;">log</span><span style="font-weight: 400;">(e);</span><span style="font-weight: 400;">
</span><span style="font-weight: 400;">    </span><b>return</b><span style="font-weight: 400;"> res.status(</span><span style="font-weight: 400;">401</span><span style="font-weight: 400;">).json({ message: </span><span style="font-weight: 400;">"Unauthorized"</span><span style="font-weight: 400;"> });</span><span style="font-weight: 400;">
</span><span style="font-weight: 400;">  }</span><span style="font-weight: 400;">
</span><span style="font-weight: 400;">}</span>
This middleware also adds a shop instance to the res.locals.
Import butterCMSService and create instance in index.js:
const { ButterCMSService } = require("./services/butter-cms-service");

const butterCMSService = new ButterCMSService();
And finally, add the route:
<span style="font-weight: 400;">app.post(</span><span style="font-weight: 400;">"/app/butter-cms/config"</span><span style="font-weight: 400;">, verifyRequest, (req, res) => {</span><span style="font-weight: 400;">
</span><span style="font-weight: 400;">  try {</span><span style="font-weight: 400;">
</span><span style="font-weight: 400;">    const writeToken = req.</span><b>body.config.butterCMSWriteToken;</b><b>
</b><span style="font-weight: 400;">
</span><span style="font-weight: 400;">    if (!writeToken) {</span><span style="font-weight: 400;">
</span><span style="font-weight: 400;">      return res</span><span style="font-weight: 400;">
</span><span style="font-weight: 400;">        .status(</span><span style="font-weight: 400;">404</span><span style="font-weight: 400;">)</span><span style="font-weight: 400;">
</span><span style="font-weight: 400;">        .</span><b>json({ </b><span style="font-weight: 400;">message: </span><span style="font-weight: 400;">"butterCMSWriteToken is missing"</span><span style="font-weight: 400;"> })</span><span style="font-weight: 400;">;</span><span style="font-weight: 400;">
</span><span style="font-weight: 400;">    }</span><span style="font-weight: 400;">
</span><span style="font-weight: 400;">    </span><b>butterCMSService.connect(res.locals.shop.config.shop, </b><span style="font-weight: 400;">{</span><span style="font-weight: 400;">
</span><span style="font-weight: 400;">      writeToken</span><span style="font-weight: 400;">
</span><span style="font-weight: 400;">    })</span><span style="font-weight: 400;">;</span><span style="font-weight: 400;">
</span><span style="font-weight: 400;">    return res</span><span style="font-weight: 400;">
</span><span style="font-weight: 400;">      .status(</span><span style="font-weight: 400;">200</span><span style="font-weight: 400;">)</span><span style="font-weight: 400;">
</span><span style="font-weight: 400;">      .</span><b>json({ </b><span style="font-weight: 400;">message: </span><span style="font-weight: 400;">"Configurations have been successfully saved"</span><span style="font-weight: 400;"> })</span><span style="font-weight: 400;">;</span><span style="font-weight: 400;">
</span><span style="font-weight: 400;">  } catch (e) {</span><span style="font-weight: 400;">
</span><span style="font-weight: 400;">    console.log(e)</span><span style="font-weight: 400;">;</span><span style="font-weight: 400;">
</span><span style="font-weight: 400;">    return res.status(</span><span style="font-weight: 400;">400</span><span style="font-weight: 400;">).</span><b>json({ </b><span style="font-weight: 400;">message: </span><span style="font-weight: 400;">"Something went wrong"</span><span style="font-weight: 400;"> })</span><span style="font-weight: 400;">;</span><span style="font-weight: 400;">
</span><span style="font-weight: 400;">  }</span><span style="font-weight: 400;">
</span><span style="font-weight: 400;">})</span><span style="font-weight: 400;">;</span>
Also we should update /app/webhooks/app-uninstalled route to forget token when app is uninstalled by adding butterCMSService.disconnect(shopName); after shopifyService.uninstall(shopName);
Front end of Shopify app
The API route is ready, so we need to create the UI. To create an Angular application named app-ui with Material and FlexLayout run following command:
npm install -g @angular/cli
ng <strong>new</strong> app-ui --routing=true --style=scss
cd app-ui
ng add @angular/material
npm install @angular/flex-layout
ng serve
The app should be available at localhost on port 4200. If you stumble upon an unexpected error related to flex-layout, try using version 9.0.0-beta.31.
Update outputPath in angular.json file so the build files would go to the root directory
<span style="font-weight: 400;">"architect": {
        "build": {
          "builder": "@angular-devkit/build-angular:browser",
          "options": {
            "outputPath": "../dist/app-ui",</span>
Remove following code from index.js file app.get("/", (req, res) => res.send("Hello World!"));
And add the following to serve angular build files:
const path = require("path");
...

app.use(express.static(path.<strong>join(__dirname,</strong> "/dist/app-ui")));

<span style="font-weight: 400;">And add the following to serve angular build files:
  res.sendFile(path.<strong>join(__dirname,</strong> "/dist/app-ui/index.html"));
});</span>
Create module and component for the config page:
ng g module config --module app --routing
ng g component config/config-form --skipSelector
Update app-routing.module.ts by adding routes:
<span style="font-weight: 400;">{ </span><b>path</b><span style="font-weight: 400;">: </span><span style="font-weight: 400;">'config'</span><span style="font-weight: 400;">, component: ConfigFormComponent },</span><span style="font-weight: 400;">
</span><span style="font-weight: 400;">{</span><span style="font-weight: 400;">
</span><span style="font-weight: 400;">    </span><b>path</b><span style="font-weight: 400;">: </span><span style="font-weight: 400;">''</span><span style="font-weight: 400;">,</span><span style="font-weight: 400;">
</span><span style="font-weight: 400;">    pathMatch: </span><span style="font-weight: 400;">'full'</span><span style="font-weight: 400;">,</span><span style="font-weight: 400;">
</span><span style="font-weight: 400;">    redirectTo: </span><span style="font-weight: 400;">'config'</span><span style="font-weight: 400;">,</span><span style="font-weight: 400;">
</span><span style="font-weight: 400;">}</span>
Update app.component.html to display link to config page:
<a [routerLink]="['/config']" queryParamsHandling="preserve">
Configurations
</a>
<router-outlet></router-outlet>
We use queryParamsHandling="preserve" because we need to keep query parameters that are used to verify request calls.
Create service to make http requests to the server:
ng g service core/api
Update service to create method configApp to send request to backend:
import { Injectable } from '@angular/core';
import { HttpClient } from '@angular/common/http';
import { Observable } from 'rxjs';

@Injectable({
  providedIn: 'root',
})
export class ApiService {
  private apiUrl = 'app';
  writeToken: string;

  constructor(private http: HttpClient) {}

  configApp(config: { butterCMSWriteToken: string }): Observable<void> {
    this.writeToken = config.butterCMSWriteToken;
    return this.http.post<void>(`${this.apiUrl}/butter-cms/config`, {
      config,
    });
  }
}
Add HttpClientModule to imports in app.module.
Create interceptor to add verification query parameters to all http requests, by running the command:
ng g interceptor core/url-query
Update created interceptor to add needed functionality:
<strong>import</strong> { Injectable } <strong>from</strong> '@angular/core';
<strong>import</strong> {
  HttpRequest,
  HttpHandler,
  HttpEvent,
  HttpInterceptor,
} <strong>from</strong> '@angular/common/http';
<strong>import</strong> { Observable } <strong>from</strong> 'rxjs';
<strong>import</strong> { ActivatedRoute } <strong>from</strong> '@angular/router';

@Injectable()
<strong>export class</strong> UrlQueryInterceptor <strong>implements</strong> HttpInterceptor {
  <strong>constructor</strong>(<strong>private</strong> route: ActivatedRoute) {}

  intercept<T>(
    request: HttpRequest<T>,
    next: HttpHandler
  ): Observable<HttpEvent<T>> {
    <strong>const</strong> params = <strong>this</strong>.route.snapshot.queryParams;
    <strong>const</strong> queryString = Object.keys(params)
      .map((key) => key + '=' + params[key])
      .join('&');

    <strong>const</strong> req = request.clone({
      url:
        request.url.indexOf('?') > -1
          ? `${request.url}&${queryString}`
          : `${request.url}?${queryString}`,
    });
    return next.handle(req);
  }
}</code><span style="font-weight: 400;">Include the interceptor in app.module providers by adding:</span></pre>
<pre><span style="font-weight: 400;"><code>providers: [
    { provide: HTTP_INTERCEPTORS, useClass: UrlQueryInterceptor, multi: true },
]</code></span></pre>
<p>
<span style="font-weight: 400;">Update config-form.component.ts file:</span></p>
<pre><span style="font-weight: 400;"><code><b>import</b> { Component, OnInit } from '@angular/core';
<b>import</b> { FormGroup, FormControl, Validators } from '@angular/forms';
<b>import</b> { MatSnackBar } from '@angular/material/snack-bar';

@Component({
  templateUrl: './config-form.component.html',
  styleUrls: ['./config-form.component.scss'],
})
export <b>class</b> <b>ConfigFormComponent</b> <b>implements</b> <b>OnInit</b> {
  form: FormGroup;
  submittingForm = false;
  errorMessage: string;
  tokenLength = 40;

  <b>constructor</b>(<b>private</b> apiService: ApiService, <b>private</b> snackbar: MatSnackBar) {}

  ngOnInit(): void {
    <b>this</b>.form = new FormGroup({
      butterCMSWriteToken: new FormControl('', [
        Validators.required,
        Validators.minLength(<b>this</b>.tokenLength),
        Validators.maxLength(<b>this</b>.tokenLength),
      ]),
    });
  }

  <b>get</b> butterCMSWriteToken() {
    <b>return</b> <b>this</b>.form.<b>get</b>('butterCMSWriteToken');
  }

  submitForm() {
    <b>if</b> (!<b>this</b>.form.valid) {
      <b>this</b>.form.markAsTouched();
      <b>return</b>;
    }
    <b>this</b>.submittingForm = true;
    <b>this</b>.errorMessage = '';
    <b>this</b>.apiService.configApp(<b>this</b>.form.value).subscribe(
      () => {
        <b>this</b>.snackbar.<b>open</b>('Token has been saved', null, {
          duration: 3000,
          panelClass: 'notification_success',
        });
        <b>this</b>.submittingForm = false;
      },
      (error) => {
        console.log(error);
        <b>this</b>.submittingForm = false;
        <b>this</b>.errorMessage =
          error.message && error.error.message
            ? error.error.message
            : error.message;
      }
    );
  }
}</code>
</span></pre>
<p>
<span style="font-weight: 400;">Update config-form.component.html:</span></p>
<pre><span style="font-weight: 400;"><code><h1 <b>class</b>="mat-h1">Configure ButterCMS</h1>
<<b>form</b> [formGroup]="form" (ngSubmit)="submitForm()">
  <<b>mat</b>-<b>form</b>-field appearance="outline" <b>class</b>="multi-line-error">
    <<b>mat</b>-<b>label</b>>Write-enabled <b>Token</b></<b>mat</b>-<b>label</b>>
    <<b>input</b>
      <b>type</b>="text"
      required
      matInput
      cdkFocusInitial
      formControlName="butterCMSWriteToken"
      name="write-token"
      maxlength="40"
    />
    <<b>mat</b>-hint align="end">
      {{ butterCMSWriteToken.value.length }} / {{ tokenLength }}
    </<b>mat</b>-hint>
    <<b>mat</b>-<b>error</b> *ngIf="butterCMSWriteToken.hasError('required')">
      Provide <b>token</b>
    </<b>mat</b>-<b>error</b>>
    <<b>mat</b>-<b>error</b>
      *ngIf="
        butterCMSWriteToken.hasError('minlength') ||
        butterCMSWriteToken.hasError('maxlength')
      "
    >
      <b>Token</b> must be 40 characters
    </<b>mat</b>-<b>error</b>>
  </<b>mat</b>-<b>form</b>-field>
  <div fxLayout="column" fxLayoutAlign="center center">
    <div <b>class</b>="error-message" *ngIf="errorMessage">
      {{ errorMessage }}
    </div>
    <<b>mat</b>-spinner *ngIf="submittingForm" [diameter]="30" color="primary">
    </<b>mat</b>-spinner>
    <button
      <b>mat</b>-raised-button
      <b>class</b>="button_submit"
      color="accent"
      <b>type</b>="submit"
    >
      <b>Save</b>
    </button>
  </div>
</<b>form</b>></code></span></pre>
<p>
<span style="font-weight: 400;">Update config.module.ts file:</span></p>
<pre><span style="font-weight: 400;"><code><b>import</b> { NgModule } <b>from</b> '@angular/core';
<b>import</b> { CommonModule } <b>from</b> '@angular/common';
<b>import</b> { MatProgressSpinnerModule } <b>from</b> '@angular/material/progress-spinner';
<b>import</b> { MatInputModule } <b>from</b> '@angular/material/input';
<b>import</b> { MatButtonModule } <b>from</b> '@angular/material/button';
<b>import</b> { FlexLayoutModule } <b>from</b> '@angular/flex-layout';

<b>import</b> { ConfigFormComponent } <b>from</b> './config-form/config-form.component';
<b>import</b> { ReactiveFormsModule } <b>from</b> '@angular/forms';
<b>import</b> { MatFormFieldModule } <b>from</b> '@angular/material/form-field';
<b>import</b> { MatSnackBarModule } <b>from</b> '@angular/material/snack-bar';

@NgModule({
  declarations: [ConfigFormComponent],
  imports: [
    CommonModule,
    MatProgressSpinnerModule,
    ReactiveFormsModule,
    FlexLayoutModule,
    MatFormFieldModule,
    MatInputModule,
    MatButtonModule,
    MatSnackBarModule,
  ],
  exports: [ConfigFormComponent],
})
<b>export</b> <b>class</b> <b>ConfigModule</b> {}</code></span></pre>
<p>
<span style="font-weight: 400;">The form that was created has very simple token validation: its length should be 40 characters. It could be a better practice to add pattern validation. The backend does not validate the token.</span></p>
<p><img src="https://cdn.buttercms.com/YgPa0vBtSMKEao5R9pOn" alt="undefined" width="401" height="227">

</p>
<p><span style="font-weight: 400;">This is a screenshot of the configuration page. Look at the repository for the full code to see the implementation of the layout and styles.</span></p>
<h2 id="connectshopify"><span style="font-weight: 400;">Connect Shopify products to ButterCMS products collection</span></h2>
<p><span style="font-weight: 400;">Every time you add a new product to your Shopify store, we want its data to be added to the ButterCMS collection automatically.  We will do this using the ButterCMS Write API.</span></p>
<p><img src="https://cdn.buttercms.com/9GbeeJwMQZCv3fl9g8TN" alt="install-3.png">

</p>
<p><span style="font-weight: 400;">First, let’s create a collection named Products in ButterCMS. Click “Collections” and “New Collection”. We need to store three attributes for each product: Name, Image and Description. To configure this collection we will configure the collection with three field types: “Short Text”, “Media” and “Long Text”. Click “Create Collection” and name it “Products.”</span></p>
<p><img src="https://cdn.buttercms.com/BfKX9J3vRlma7Sf0qN0w" alt="undefined" width="650" height="305">

</p>
<p><span style="font-weight: 400;">The ideal solution to add this functionality would be to subscribe to </span><b>products/create</b><span style="font-weight: 400;"> webhook, however, this event might fire before the product’s image has been loaded and saved. Because of this, we have to subscribe to </span><b>products/update</b><span style="font-weight: 400;"> webhook.</span></p>
<p></p>
<p><span style="font-weight: 400;">Add </span><b>addItemToCollection</b><span style="font-weight: 400;"> method to butterCMSService:</span></p>
<pre><span style="font-weight: 400;"><code><b>async</b> addItemToCollection(shopName, collectionName, item) {
    <b>if</b> (!<b>this</b>.configs[shopName] || !<b>this</b>.configs[shopName].writeToken) {
      <b>return</b> Promise.reject(Error("No write-enabled token configured"));
    }
    <b>const</b> butter = Butter(<b>this</b>.configs[shopName].writeToken);
    <b>const</b> collectionData = <b>await</b> butter.content.retrieve([collectionName]);

    <b>if</b> (collectionData.data) {
      <b>const</b> body = {
        key: collectionName,
        status: "published",
        fields: [
          {
            en: item
          }
        ]
      };
      <b>const</b> options = {
        method: "POST",
        uri: "https://api.buttercms.com/v2/content/",
        body,
        json: true,
        headers: {
          authorization: `Token ${<b>this</b>.configs[shopName].writeToken}`
        }
      };
      <b>return</b> requestPromise(options);
    }
    <b>return</b> Promise.reject(Error(`Collection ${collectionName}was not found.`));
  }</code></span></pre>
<p><span style="font-weight: 400;">This method verifies that the collection exists and adds a new item. This setup assumes that the English locale (en) is set in ButterCMS.</span></p>
<p></p>
<p><span style="font-weight: 400;">Add </span><b>subscribeToProductUpdateWebhook</b><span style="font-weight: 400;"> method to ShopifyService:</span></p>
<pre><span style="font-weight: 400;"><code>static <b>subscribeToProductUpdateWebhook(shop, address) </b>{
    const params = {
      topic: "products/update",
      <b>address,</b><b>
</b>      format: "json"
    };

    const <b>shopify </b>= new <b>ShopifyAPI({</b><b>
</b>      shopName: <b>shop.config.shop,</b><b>
</b>      accessToken: <b>shop.config.access_token</b><b>
</b>    });
    return <b>shopify.webhook.create(params);</b><b>
</b>}</code></span></pre>
<p><span style="font-weight: 400;"></span></p>
<p><span style="font-weight: 400;">Add route to the server for the webhook:</span></p>
<pre><span style="font-weight: 400;"><code>app.post("/app/webhooks/product-update", verifyWebhookRequest, async (req, res) => {
  try {
    const <b>shopName </b>= req.headers["x-shopify-shop-domain"];
    await <b>butterCMSService</b><b>
</b>      .<b>addItemToCollection(shopName, </b>"products", {
        name: req.<b>body.title,</b><b>
</b>        image: req.<b>body.image.src,</b><b>
</b>        description: req.<b>body.body_html</b><b>
</b>      });
    return res
      .status(200)
      .<b>json({ </b>message: "Product has been added to collection" });
  } catch (error) {
    console.log(error);
    return res.status(400).<b>json({ </b>message: "Server error" });
  }
});</code></span></pre>
<p><span></span></p>
<p><span>We again use </span><b>verifyWebhookRequest </b><span>verifyWebhookRequest middleware to verify the request. Of course, we could have added more layers to the verification.</span></p>
<p></p>
<p><span style="font-weight: 400;">Add raw body to that route by adding the following:</span></p>
<pre><span style="font-weight: 400;"><code><b>app</b>.use(
  "/app/webhooks/product-update",
  bodyParser.json({ <b>verify</b>: rawBodySaver })
);</code></span></pre>
<p>
<span style="font-weight: 400;">Now we should update </span><b>/shopify/callback</b><span style="font-weight: 400;"> route to add another subscription to the webhooks:</span></p>
<pre><span style="font-weight: 400;"><code>await Promise.all([
    ShopifyService.subscribeToProductUpdateWebhook(
      shop,
      `${forwardingAddress}/app/webhooks/product-update`
    ),
    ShopifyService.subscribeToUninstallWebHook(
      shop,
      `${forwardingAddress}/app/webhooks/app-uninstalled`
    )
]);</code></span></pre>
<p><span style="font-weight: 400;"></span></p>
<p><span style="font-weight: 400;">The work is done. To check that it works we should build for production the Angular app, start the server, install the app, specify write-enabled token in the UI, update or create any product in the Shopify shop and go to </span><a href="/content/collections/l/en" rel="follow noopener" target="_blank"><span style="font-weight: 400;">https://buttercms.com/content/collections/l/en</span></a><span style="font-weight: 400;"> to verify that Products collection now has the same data as we provided in the Shopify store. Note, that subscription and collection update may take some time while Shopify sends the notification of update and new data updates.</span></p>
<h2 id="createpage"><span style="font-weight: 400;">Create page type in ButterCMS</span></h2>
<p><span style="font-weight: 400;">We need to create a promotional page structure that will allow us to showcase shop products.  For this tutorial, we will keep things simple with configuring the page with some of the example custom Components that are provided by ButterCMS. This structure will influence the whole process of page creation on our server.</span></p>
<p><span style="font-weight: 400;">Page structure will be stored as a promotional_type Page Type in ButterCMS. </span></p>
<p><span style="font-weight: 400;">To create a new Page Type we should go to </span><a href="/pages/" rel="follow noopener" target="_blank"><span style="font-weight: 400;">https://buttercms.com/pages/</span></a><span style="font-weight: 400;">, click the “New page” button, and then click “Create new page”. You will be redirected to a new page where you can build a page. Click “Component” and a new block should appear. Click “Add from Library” and on “SEO” in the list. Add another component named Twitter Card. Then add a Reference “Product Promo Banner” One-to-Many Products collection.</span></p>
<p></p>
<p><span style="font-weight: 400;">This is how the page structure should look like:</span></p>
<p><img src="https://cdn.buttercms.com/EfYKJ9OcRxmns7q9YFxw" alt="undefined" width="651" height="304"></p>
<p><span style="font-weight: 400;">Click “Save”, and after redirection to another page click gear icon and “Configure Page Type”. Then you will be redirected again on a page where you should click “Create page type” and type name “promotional_page”.</span></p>
<p></p>
<p><span style="font-weight: 400;">If you have any problems creating this page type, read this article: </span><a href="/kb/creating-editing-and-deleting-pages-and-page-types#creatingapagetype" rel="follow noopener" target="_blank"><span style="font-weight: 400;">https://buttercms.com/kb/creating-editing-and-deleting-pages-and-page-types#creatingapagetype</span></a><span style="font-weight: 400;">.</span></p>
<h2 id="publishpages"><span style="font-weight: 400;">Publish pages from ButterCMS to Shopify store</span></h2>
<p><span style="font-weight: 400;">We want to allow the Shopify app to create pages for the shop using data from promotional pages stored in ButterCMS. We also want to allow merchants to specify which template they want to use to display the data. So our app should have a page with a list of promotional pages stored in ButterCMS each with a button to select a template and publish this page.</span></p>
<p><img src="https://cdn.buttercms.com/plh7Lh7RPqxOgKSxGFow" alt="promotional-pages-1.png"></p>
<p></p>
<p><img src="https://cdn.buttercms.com/WCm1rOCdSE2VuikOS4wt" alt="promotional-pages-2.png"></p>
<h3><span style="font-weight: 400;">Back end</span></h3>
<p><span style="font-weight: 400;">For this functionality backend should have two routes: </span></p>
<ul>
<li style="font-weight: 400;"><span style="font-weight: 400;">Get a list of promotional pages</span></li>
<li style="font-weight: 400;"><span style="font-weight: 400;">Create a new page in the Shopify shop with data related to a selected page by slug </span></li>
</ul>
<p><span style="font-weight: 400;">We will use </span><a href="https://www.npmjs.com/package/mustache" rel="follow noopener" target="_blank"><span style="font-weight: 400;">mustache </span></a><span style="font-weight: 400;">to fill templates with data:</span></p>
<pre><code>npm i mustache
Require it in index.js:
const mustache = require("mustache");
Add to ButterCMSService methods to fetch all promotional pages and only a specific one:
getPromotionalPages(shopName, pageNumber) {
    if (!this.configs[shopName] || !this.configs[shopName].writeToken) {
      console.log("not configured");
      return Promise.reject(Error("No write-enabled token configured"));
    }
    const butter = Butter(this.configs[shopName].writeToken);
    const params = {
      preview: 1,
      page: pageNumber,
      page_size: 10,
      locale: "en",
      levels: 2
    };

    return butter.page.list("promotional_page", params);
  }

getPromotionalPage(shopName, slug) {
    if (!this.configs[shopName] || !this.configs[shopName].writeToken) {
      return Promise.reject(Error("No write-enabled token configured"));
    }
    const butter = Butter(this.configs[shopName].writeToken);
    return butter.page.retrieve("promotional_page", slug, {
      locale: "en",
      preview: 1
    });
}
Update ShopifyService by adding new static method:
static createPage(shop, pageOptions) {
  const shopify = new ShopifyAPI({
    shopName: shop.config.shop,
    accessToken: shop.config.access_token
  });
  return shopify.page.create(pageOptions);
}
Add new routes to the server:
app.get(
  "/app/butter-cms/promotional-pages/page/:page",
  verifyRequest,
  async (req, res) => {
    try {
      const { shop } = res.locals;
      const shopName = shop.config.shop;
      const pages = await butterCMSService.getPromotionalPages(
        shopName,
        req.params.page || 1
      );
      return res.status(200).json(pages.data);
    } catch (e) {
      console.log("catch error here", e);
      return res.status(500).json({ message: "Server error" });
    }
  }
);

app.post(
  "/app/butter-cms/promotional-page",
  verifyRequest,
  async (req, res) => {
    try {
      const { slug, template } = req.body;
      if (!slug) {
        return res.status(400).json({ message: "slug is missing" });
      }
      if (!template) {
        return res.status(400).json({ message: "template is missing" });
      }
      const { shop } = res.locals;
      const shopName = shop.config.shop;
      const response = await butterCMSService.getPromotionalPage(
        shopName,
        slug
      );
      const page = response.data;
      const pageHtml = mustache.render(template, page.data);
      await ShopifyService.createPage(shop, {
        title: page.data.fields.seo.title,
        body_html: pageHtml,
        slug: page.data.slug
      });
      return res.status(200).json({ message: "Page has been successfully created" });
    } catch (e) {
      console.log(e);
      return res.status(500).json({ message: "Server error" });
    }
  }
);
Front end
Create types.ts file with the following content:
export interface PromotionalPage {
  slug: string;
  page_type: 'promotional_page';
  fields: {
    seo: { title: string; meta_description: string };
    twitter_card: {
      title: string;
      Description: string;
      image: string;
    };
    products: [
      {
        product_name: string;
        product_image: string;
        product_description: string;
      }
    ];
  };
}
Add two methods to ApiService:
<span style="font-weight: 400;">getPromotionalPages(
  pageNumber: number
): Observable<{
  meta: {
    next_page: number | null;
    previous_page: number | null;
    count: number;
  };
  data: PromotionalPage[];
}> {
  return this.http.get<{
    meta: {
      next_page: number | null;
      previous_page: number | null;
      count: number;
    };
    data: PromotionalPage[];
  }>(`${this.apiUrl}/butter-cms/promotional-pages/page/${pageNumber}`);
}

createPageFromButterCMSPage(
  slug: string,
  template: string
): Observable<void> {
  return this.http.post<void>(`${this.apiUrl}/butter-cms/promotional-page/`, {
    slug,
    template,
  });
}</span>
Create a new module:
ng g module promotional-pages --module app --route promotional-pages
Add to app.component a link to promotional pages list:
<a [routerLink]="['/promotional-pages']" queryParamsHandling="preserve">
  Promotional pages
</a>
Update promotional-pages.component.ts:
<b>import</b><span style="font-weight: 400;"> { Component, OnInit } </span><b>from</b> <span style="font-weight: 400;">'@angular/core'</span><span style="font-weight: 400;">;</span><span style="font-weight: 400;">
</span><b>import</b><span style="font-weight: 400;"> { ApiService } </span><b>from</b> <span style="font-weight: 400;">'../core/api.service'</span><span style="font-weight: 400;">;</span><span style="font-weight: 400;">
</span><b>import</b><span style="font-weight: 400;"> { Observable, throwError } </span><b>from</b> <span style="font-weight: 400;">'rxjs'</span><span style="font-weight: 400;">;</span><span style="font-weight: 400;">
</span><b>import</b><span style="font-weight: 400;"> { catchError } </span><b>from</b> <span style="font-weight: 400;">'rxjs/operators'</span><span style="font-weight: 400;">;</span><span style="font-weight: 400;">
</span><b>import</b><span style="font-weight: 400;"> { MatDialog } </span><b>from</b> <span style="font-weight: 400;">'@angular/material/dialog'</span><span style="font-weight: 400;">;</span><span style="font-weight: 400;">
</span><span style="font-weight: 400;">
</span><b>import</b><span style="font-weight: 400;"> { PromotionalPage } </span><b>from</b> <span style="font-weight: 400;">'../types'</span><span style="font-weight: 400;">;</span><span style="font-weight: 400;">
</span><b>import</b><span style="font-weight: 400;"> { TemplateDialogComponent } </span><b>from</b> <span style="font-weight: 400;">'./template-dialog/template-dialog.component'</span><span style="font-weight: 400;">;</span><span style="font-weight: 400;">
</span><span style="font-weight: 400;">
</span><span style="font-weight: 400;">@Component</span><span style="font-weight: 400;">({</span><span style="font-weight: 400;">
</span><span style="font-weight: 400;">  selector: </span><span style="font-weight: 400;">'app-promotional-pages'</span><span style="font-weight: 400;">,</span><span style="font-weight: 400;">
</span><span style="font-weight: 400;">  templateUrl: </span><span style="font-weight: 400;">'./promotional-pages.component.html'</span><span style="font-weight: 400;">,</span><span style="font-weight: 400;">
</span><span style="font-weight: 400;">  styleUrls: [</span><span style="font-weight: 400;">'./promotional-pages.component.scss'</span><span style="font-weight: 400;">],</span><span style="font-weight: 400;">
</span><span style="font-weight: 400;">})</span><span style="font-weight: 400;">
</span><b>export</b> <b>class</b><span style="font-weight: 400;"> PromotionalPagesComponent </span><b>implements</b><span style="font-weight: 400;"> OnInit {</span><span style="font-weight: 400;">
</span><span style="font-weight: 400;">  pages: Observable<{</span><span style="font-weight: 400;">
</span><span style="font-weight: 400;">    meta: {</span><span style="font-weight: 400;">
</span><span style="font-weight: 400;">      next_page: </span><span style="font-weight: 400;">number</span><span style="font-weight: 400;"> | </span><span style="font-weight: 400;">null</span><span style="font-weight: 400;">;</span><span style="font-weight: 400;">
</span><span style="font-weight: 400;">      previous_page: </span><span style="font-weight: 400;">number</span><span style="font-weight: 400;"> | </span><span style="font-weight: 400;">null</span><span style="font-weight: 400;">;</span><span style="font-weight: 400;">
</span><span style="font-weight: 400;">      count: </span><span style="font-weight: 400;">number</span><span style="font-weight: 400;">;</span><span style="font-weight: 400;">
</span><span style="font-weight: 400;">    };</span><span style="font-weight: 400;">
</span><span style="font-weight: 400;">    data: PromotionalPage[];</span><span style="font-weight: 400;">
</span><span style="font-weight: 400;">  }>;</span><span style="font-weight: 400;">
</span><span style="font-weight: 400;">  displayedColumns = [</span><span style="font-weight: 400;">'image'</span><span style="font-weight: 400;">, </span><span style="font-weight: 400;">'title'</span><span style="font-weight: 400;">, </span><span style="font-weight: 400;">'description'</span><span style="font-weight: 400;">, </span><span style="font-weight: 400;">'actions'</span><span style="font-weight: 400;">];</span><span style="font-weight: 400;">
</span><span style="font-weight: 400;">  errorMessage: </span><span style="font-weight: 400;">string</span><span style="font-weight: 400;">;</span><span style="font-weight: 400;">
</span><span style="font-weight: 400;">
</span><span style="font-weight: 400;">  </span><b>constructor</b><span style="font-weight: 400;">(</span><b>private</b><span style="font-weight: 400;"> apiService: ApiService, </span><b>private</b><span style="font-weight: 400;"> dialog: MatDialog) {}</span><span style="font-weight: 400;">
</span><span style="font-weight: 400;">
</span><span style="font-weight: 400;">  ngOnInit(): </span><span style="font-weight: 400;">void</span><span style="font-weight: 400;"> {</span><span style="font-weight: 400;">
</span><span style="font-weight: 400;">    </span><b>this</b><span style="font-weight: 400;">.pages = </span><b>this</b><span style="font-weight: 400;">.apiService.getPromotionalPages(</span><span style="font-weight: 400;">1</span><span style="font-weight: 400;">).pipe(</span><span style="font-weight: 400;">
</span><span style="font-weight: 400;">      catchError((error) => {</span><span style="font-weight: 400;">
</span><span style="font-weight: 400;">        </span><span style="font-weight: 400;">console</span><span style="font-weight: 400;">.log(error);</span><span style="font-weight: 400;">
</span><span style="font-weight: 400;">        </span><b>this</b><span style="font-weight: 400;">.errorMessage =</span><span style="font-weight: 400;">
</span><span style="font-weight: 400;">          error.message && error.error.message</span><span style="font-weight: 400;">
</span><span style="font-weight: 400;">            ? error.error.message</span><span style="font-weight: 400;">
</span><span style="font-weight: 400;">            : error.message;</span><span style="font-weight: 400;">
</span><span style="font-weight: 400;">        </span><b>return</b><span style="font-weight: 400;"> throwError(error);</span><span style="font-weight: 400;">
</span><span style="font-weight: 400;">      })</span><span style="font-weight: 400;">
</span><span style="font-weight: 400;">    );</span><span style="font-weight: 400;">
</span><span style="font-weight: 400;">  }</span><span style="font-weight: 400;">
</span><span style="font-weight: 400;">
</span><span style="font-weight: 400;">  createPage(page: PromotionalPage) {</span><span style="font-weight: 400;">
</span><span style="font-weight: 400;">    </span><b>this</b><span style="font-weight: 400;">.dialog.open(TemplateDialogComponent, {</span><span style="font-weight: 400;">
</span><span style="font-weight: 400;">      width: </span><span style="font-weight: 400;">'800px'</span><span style="font-weight: 400;">,</span><span style="font-weight: 400;">
</span><span style="font-weight: 400;">      maxWidth: </span><span style="font-weight: 400;">'80%'</span><span style="font-weight: 400;">,</span><span style="font-weight: 400;">
</span><span style="font-weight: 400;">      data: { slug: page.slug },</span><span style="font-weight: 400;">
</span><span style="font-weight: 400;">    });</span><span style="font-weight: 400;">
</span><span style="font-weight: 400;">  }</span><span style="font-weight: 400;">
</span><span style="font-weight: 400;">}</span>
Update promotional-pages.component.html:
<span style="font-weight: 400;"><</span><b>div</b><span style="font-weight: 400;">></span><span style="font-weight: 400;">
</span><span style="font-weight: 400;">  <</span><b>h1</b><span style="font-weight: 400;">>Promotional pages in ButterCMS</</span><b>h1</b><span style="font-weight: 400;">></span><span style="font-weight: 400;">
</span><span style="font-weight: 400;">  <</span><b>div</b><span style="font-weight: 400;">
</span><span style="font-weight: 400;">    *ngIf=</span><span style="font-weight: 400;">"pages | async as pagesList; else loadingOrError"</span><span style="font-weight: 400;">
</span><span style="font-weight: 400;">    class=</span><span style="font-weight: 400;">"table__wrapper"</span><span style="font-weight: 400;">
</span><span style="font-weight: 400;">  ></span><span style="font-weight: 400;">
</span><span style="font-weight: 400;">    <</span><b>table</b><span style="font-weight: 400;"> mat-table [dataSource]=</span><span style="font-weight: 400;">"pagesList.data"</span><span style="font-weight: 400;"> class=</span><span style="font-weight: 400;">"mat-elevation-z8"</span><span style="font-weight: 400;">></span><span style="font-weight: 400;">
</span><span style="font-weight: 400;">      <</span><b>ng-container</b><span style="font-weight: 400;"> matColumnDef=</span><span style="font-weight: 400;">"image"</span><span style="font-weight: 400;">></span><span style="font-weight: 400;">
</span><span style="font-weight: 400;">        <</span><b>th</b><span style="font-weight: 400;"> mat-header-cell *matHeaderCellDef>Image</</span><b>th</b><span style="font-weight: 400;">></span><span style="font-weight: 400;">
</span><span style="font-weight: 400;">        <</span><b>td</b><span style="font-weight: 400;"> mat-cell *matCellDef=</span><span style="font-weight: 400;">"let element"</span><span style="font-weight: 400;">></span><span style="font-weight: 400;">
</span><span style="font-weight: 400;">          <</span><b>img</b><span style="font-weight: 400;">
</span><span style="font-weight: 400;">            mat-card-image</span><span style="font-weight: 400;">
</span><span style="font-weight: 400;">            [src]=</span><span style="font-weight: 400;">"element.fields.twitter_card.image"</span><span style="font-weight: 400;">
</span><span style="font-weight: 400;">            alt=</span><span style="font-weight: 400;">"Promotional page image"</span><span style="font-weight: 400;">
</span><span style="font-weight: 400;">            class=</span><span style="font-weight: 400;">"page__image"</span><span style="font-weight: 400;">
</span><span style="font-weight: 400;">          /></span><span style="font-weight: 400;">
</span><span style="font-weight: 400;">        </</span><b>td</b><span style="font-weight: 400;">></span><span style="font-weight: 400;">
</span><span style="font-weight: 400;">      </</span><b>ng-container</b><span style="font-weight: 400;">></span><span style="font-weight: 400;">
</span><span style="font-weight: 400;">
</span><span style="font-weight: 400;">      <</span><b>ng-container</b><span style="font-weight: 400;"> matColumnDef=</span><span style="font-weight: 400;">"title"</span><span style="font-weight: 400;">></span><span style="font-weight: 400;">
</span><span style="font-weight: 400;">        <</span><b>th</b><span style="font-weight: 400;"> mat-header-cell *matHeaderCellDef>Title</</span><b>th</b><span style="font-weight: 400;">></span><span style="font-weight: 400;">
</span><span style="font-weight: 400;">        <</span><b>td</b><span style="font-weight: 400;"> mat-cell *matCellDef=</span><span style="font-weight: 400;">"let element"</span><span style="font-weight: 400;">></span><span style="font-weight: 400;">
</span><span style="font-weight: 400;">          </span><span style="font-weight: 400;">{{ element.fields.seo.title }}</span><span style="font-weight: 400;">
</span><span style="font-weight: 400;">        </</span><b>td</b><span style="font-weight: 400;">></span><span style="font-weight: 400;">
</span><span style="font-weight: 400;">      </</span><b>ng-container</b><span style="font-weight: 400;">></span><span style="font-weight: 400;">
</span><span style="font-weight: 400;">
</span><span style="font-weight: 400;">      <</span><b>ng-container</b><span style="font-weight: 400;"> matColumnDef=</span><span style="font-weight: 400;">"description"</span><span style="font-weight: 400;">></span><span style="font-weight: 400;">
</span><span style="font-weight: 400;">        <</span><b>th</b><span style="font-weight: 400;"> mat-header-cell *matHeaderCellDef>Description</</span><b>th</b><span style="font-weight: 400;">></span><span style="font-weight: 400;">
</span><span style="font-weight: 400;">        <</span><b>td</b><span style="font-weight: 400;"> mat-cell *matCellDef=</span><span style="font-weight: 400;">"let element"</span><span style="font-weight: 400;">></span><span style="font-weight: 400;">
</span><span style="font-weight: 400;">          <</span><b>div</b><span style="font-weight: 400;"> [innerHTML]=</span><span style="font-weight: 400;">"element.fields.twitter_card.Description"</span><span style="font-weight: 400;">></</span><b>div</b><span style="font-weight: 400;">></span><span style="font-weight: 400;">
</span><span style="font-weight: 400;">        </</span><b>td</b><span style="font-weight: 400;">></span><span style="font-weight: 400;">
</span><span style="font-weight: 400;">      </</span><b>ng-container</b><span style="font-weight: 400;">></span><span style="font-weight: 400;">
</span><span style="font-weight: 400;">
</span><span style="font-weight: 400;">      <</span><b>ng-container</b><span style="font-weight: 400;"> matColumnDef=</span><span style="font-weight: 400;">"actions"</span><span style="font-weight: 400;">></span><span style="font-weight: 400;">
</span><span style="font-weight: 400;">        <</span><b>th</b><span style="font-weight: 400;"> mat-header-cell *matHeaderCellDef>Actions</</span><b>th</b><span style="font-weight: 400;">></span><span style="font-weight: 400;">
</span><span style="font-weight: 400;">        <</span><b>td</b><span style="font-weight: 400;"> mat-cell *matCellDef=</span><span style="font-weight: 400;">"let element"</span><span style="font-weight: 400;">></span><span style="font-weight: 400;">
</span><span style="font-weight: 400;">          <</span><b>div</b><span style="font-weight: 400;">></span><span style="font-weight: 400;">
</span><span style="font-weight: 400;">            <</span><b>button</b><span style="font-weight: 400;"> mat-raised-button (click)=</span><span style="font-weight: 400;">"createPage(element)"</span><span style="font-weight: 400;">></span><span style="font-weight: 400;">
</span><span style="font-weight: 400;">              Create page</span><span style="font-weight: 400;">
</span><span style="font-weight: 400;">            </</span><b>button</b><span style="font-weight: 400;">></span><span style="font-weight: 400;">
</span><span style="font-weight: 400;">          </</span><b>div</b><span style="font-weight: 400;">></span><span style="font-weight: 400;">
</span><span style="font-weight: 400;">        </</span><b>td</b><span style="font-weight: 400;">></span><span style="font-weight: 400;">
</span><span style="font-weight: 400;">      </</span><b>ng-container</b><span style="font-weight: 400;">></span><span style="font-weight: 400;">
</span><span style="font-weight: 400;">
</span><span style="font-weight: 400;">      <</span><b>tr</b><span style="font-weight: 400;"> mat-header-row *matHeaderRowDef=</span><span style="font-weight: 400;">"displayedColumns"</span><span style="font-weight: 400;">></</span><b>tr</b><span style="font-weight: 400;">></span><span style="font-weight: 400;">
</span><span style="font-weight: 400;">      <</span><b>tr</b><span style="font-weight: 400;"> mat-row *matRowDef=</span><span style="font-weight: 400;">"let row; columns: displayedColumns"</span><span style="font-weight: 400;">></</span><b>tr</b><span style="font-weight: 400;">></span><span style="font-weight: 400;">
</span><span style="font-weight: 400;">    </</span><b>table</b><span style="font-weight: 400;">></span><span style="font-weight: 400;">
</span><span style="font-weight: 400;">  </</span><b>div</b><span style="font-weight: 400;">></span><span style="font-weight: 400;">
</span><span style="font-weight: 400;">  <</span><b>ng-template</b><span style="font-weight: 400;"> #loadingOrError></span><span style="font-weight: 400;">
</span><span style="font-weight: 400;">    <</span><b>div</b><span style="font-weight: 400;">
</span><span style="font-weight: 400;">      *ngIf=</span><span style="font-weight: 400;">"!errorMessage; else errorLoading"</span><span style="font-weight: 400;">
</span><span style="font-weight: 400;">      fxLayout=</span><span style="font-weight: 400;">"row"</span><span style="font-weight: 400;">
</span><span style="font-weight: 400;">      fxLayoutAlign=</span><span style="font-weight: 400;">"center center"</span><span style="font-weight: 400;">
</span><span style="font-weight: 400;">    ></span><span style="font-weight: 400;">
</span><span style="font-weight: 400;">      <</span><b>mat-spinner</b><span style="font-weight: 400;"> color=</span><span style="font-weight: 400;">"primary"</span><span style="font-weight: 400;">></</span><b>mat-spinner</b><span style="font-weight: 400;">></span><span style="font-weight: 400;">
</span><span style="font-weight: 400;">    </</span><b>div</b><span style="font-weight: 400;">></span><span style="font-weight: 400;">
</span><span style="font-weight: 400;">  </</span><b>ng-template</b><span style="font-weight: 400;">></span><span style="font-weight: 400;">
</span><span style="font-weight: 400;">  <</span><b>ng-template</b><span style="font-weight: 400;"> #errorLoading></span><span style="font-weight: 400;">
</span><span style="font-weight: 400;">    <</span><b>div</b><span style="font-weight: 400;"> class=</span><span style="font-weight: 400;">"error-message"</span><span style="font-weight: 400;">></span><span style="font-weight: 400;">
</span><span style="font-weight: 400;">      </span><span style="font-weight: 400;">{{ errorMessage }}</span><span style="font-weight: 400;">
</span><span style="font-weight: 400;">    </</span><b>div</b><span style="font-weight: 400;">></span><span style="font-weight: 400;">
</span><span style="font-weight: 400;">  </</span><b>ng-template</b><span style="font-weight: 400;">></span><span style="font-weight: 400;">
</span><span style="font-weight: 400;"></</span><b>div</b><span style="font-weight: 400;">></span>
Update promotional-components.module.ts:
import { NgModule } from '@angular/core';
import { CommonModule } from '@angular/common';
import { HTMLEscapeUnescapeModule } from 'html-escape-unescape';
import { ReactiveFormsModule } from '@angular/forms';
import { FlexLayoutModule } from '@angular/flex-layout';
import { MatFormFieldModule } from '@angular/material/form-field';
import { MatInputModule } from '@angular/material/input';
import { MatDialogModule } from '@angular/material/dialog';
import { MatTableModule } from '@angular/material/table';
import { MatButtonModule } from '@angular/material/button';
import { MatIconModule } from '@angular/material/icon';
import { MatProgressSpinnerModule } from '@angular/material/progress-spinner';
import { ClipboardModule } from '@angular/cdk/clipboard';
import { MatSnackBarModule, MatSnackBar } from '@angular/material/snack-bar';

import { PromotionalPagesRoutingModule } from './promotional-pages-routing.module';
import { PromotionalPagesComponent } from './promotional-pages.component';
import { TemplateDialogComponent } from './template-dialog/template-dialog.component';
import { TemplateDialogFormComponent } from './template-dialog-form/template-dialog-form.component';

@NgModule({
  declarations: [
    PromotionalPagesComponent,
    TemplateDialogComponent,
    TemplateDialogFormComponent,
  ],
  imports: [
    CommonModule,
    PromotionalPagesRoutingModule,
    MatDialogModule,
    MatTableModule,
    MatButtonModule,
    MatProgressSpinnerModule,
    ReactiveFormsModule,
    FlexLayoutModule,
    MatIconModule,
    FlexLayoutModule,
    MatFormFieldModule,
    MatInputModule,
    MatButtonModule,
    ClipboardModule,
    HTMLEscapeUnescapeModule,
    MatSnackBarModule,
  ],
  entryComponents: [TemplateDialogComponent],
})
export class PromotionalPagesModule {}
Create dialog component and form component:
ng g component promotional-pages/template-dialog --skipSelector
ng g component promotional-pages/template-dialog-form
Set template-dialog.component.ts:
<strong>import</strong> { Component, OnInit, Inject } from '@angular/core';
<strong>import</strong> { MatDialogRef, MAT_DIALOG_DATA } from '@angular/material/dialog';
<strong>import</strong> { MatSnackBar } from '@angular/material/snack-bar';
<strong>import</strong> { ApiService } from 'src/app/core/api.service';

@Component({
  templateUrl: './template-dialog.component.html',
  styleUrls: ['./template-dialog.component.scss'],
})
export <strong>class TemplateDialogComponent implements OnInit</strong> {
  errorMessage: string;
  isSubmitting = false;

  <strong>constructor</strong>(
    <strong>private</strong> dialogRef: MatDialogRef<TemplateDialogComponent>,
    <strong>private</strong> snackBar: MatSnackBar,
    <strong>private</strong> apiService: ApiService,
    @Inject(MAT_DIALOG_DATA) <strong>private</strong> pageData: { slug: string }
  ) {}
  ngOnInit() {}

  onSubmitForm(template: string) {
    <strong>this</strong>.errorMessage = '';
    <strong>this</strong>.isSubmitting = true;
    <strong>this</strong>.apiService
      .createPageFromButterCMSPage(this.pageData.slug, template)
      .subscribe(
        (res) => {
          <strong>this</strong>.isSubmitting = false;
          <strong>this</strong>.dialogRef.close();
          <strong>this</strong>.snackBar.<strong>open</strong>(
            'Page was successfully created. Check your shop pages.',
            null,
            { duration: 3000, panelClass: 'notification_success' }
          );
        },
        (error) => {
          <strong>this</strong>.errorMessage =
            error.error && error.error.message
              ? error.error.message
              : error.statusText;
          <strong>this</strong>.isSubmitting = false;
          console.log(error);
        }
      );
  }
}
Set content of template-dialog.component.html:
<h1 mat-dialog-title>Set page template</h1>
<mat-dialog-content class="mat-typography">
  <promotional-pages-template-dialog-form
    (formSubmitted)="onSubmitForm($event)"
    [errorMessage]="errorMessage"
    [isSubmitting]="isSubmitting"
  ></promotional-pages-template-dialog-form>
</mat-dialog-content>
We will allow to read template from doc/docx file with mammoth, so run:
<span style="font-weight: 400;">npm <strong>i</strong> mammoth</span>
Update template-dialog-form.component.ts:
import { Component, OnInit, Input, Output, EventEmitter } from '@angular/core';
import { FormGroup, Validators, FormControl } from '@angular/forms';
import * as mammoth from 'mammoth/mammoth.browser';

@Component({
  selector: 'promotional-pages-template-dialog-form',
  templateUrl: './template-dialog-form.component.html',
  styleUrls: ['./template-dialog-form.component.scss'],
})
export class TemplateDialogFormComponent implements OnInit {
  @Input() errorMessage: string;
  @Input() isSubmitting: boolean;

  @Output() formSubmitted = new EventEmitter<void>();

  form: FormGroup;
  hasExamples = false;
  exampleTemplate = `<h1>{{fields.twitter_card.title}}</h1>
<img style="max=width: 100%" src="{{fields.twitter_card.image}}"/>
<p>{{fields.twitter_card.Description}}</p>
<h2>{{fields.product_promo_banner.headline}}</h2>
<div style="display: flex; flex-wrap: wrap; justify-content: space-between">
{{#fields.product_promo_banner.product}}
  <div style="flex:1; padding: 10px">
    <a href="/collections/all/products/{{name}}">{{name}}</a>
    <img style="width: 100%" src="{{image}}"/>
    <p>{{description}}</p>
  </div>
{{/fields.product_promo_banner.product}}
</div>`;
  templateError: string;

  constructor() {}

  ngOnInit(): void {
    this.form = new FormGroup({
      template: new FormControl('', Validators.required),
    });
  }

  get template() {
    return this.form.get('template');
  }

  submitForm() {
    if (!this.form.valid) {
      this.form.markAsTouched();
      return;
    }
    this.formSubmitted.emit(this.template.value);
  }

  onFileChange(event: Event) {
    const file = (event.target as HTMLInputElement).files[0];
    if (!file) {
      return;
    }
    const type = file.name.split('.').pop();
    if (type === 'txt') {
      this.readTxtFile(file);
    } else if (type === 'doc' || type === 'docx') {
      this.readDocFile(file);
    } else {
      this.templateError =
        'Invalid file format. Only .txt, .doc and .docx are supported';
    }
  }

  private readDocFile(file: File) {
    const reader = new FileReader();
    reader.onloadend = () => {
      const arrayBuffer = reader.result;

      mammoth.extractRawText({ arrayBuffer }).then((resultObject) => {
        this.template.setValue(resultObject.value);
      });
    };
    reader.readAsArrayBuffer(file);
  }

  private readTxtFile(file: File) {
    const reader = new FileReader();
    reader.onload = (event) => {
      const contents = event.target.result;
      this.template.setValue(contents);
    };

    reader.readAsText(file);
  }
}
To display example template run npm i html-escape-unescape
Set template-dialog-form.component.html:
<div fxLayout="row" fxLayoutAlign="start center">
  <mat-icon>help</mat-icon>
  <div class="template__help" (click)="hasExamples = !hasExamples">
    {{ hasExamples ? "Hide" : "Show" }} example template
  </div>
</div>
<div *ngIf="hasExamples" class="example">
  <button
    mat-icon-button
    class="example__copy-button"
    [cdkCopyToClipboard]="exampleTemplate"
  >
    <mat-icon>content_copy</mat-icon>
  </button>
  <div class="example__text">
    {{ exampleTemplate | unescape }}
  </div>
</div>
<form class="template__form" [formGroup]="form" (ngSubmit)="submitForm()">
  <div class="file-loader">
    <input
      class="file-loader__input"
      type="file"
      (change)="onFileChange($event)"
      accept=".doc,.docx,.txt"
      #file
    />
    <button
      mat-raised-button
      color="primary"
      (click)="file.click()"
      type="button"
    >
      Load template from doc/docx/txt file
    </button>
  </div>
  <mat-form-field appearance="outline" class="multi-line-error">
    <mat-label>Template for the page</mat-label>
    <textarea
      required
      matInput
      cdkFocusInitial
      formControlName="template"
      rows="10"
      name="page-template"
    ></textarea>
    <mat-error *ngIf="template.hasError('required')">
      Set template
    </mat-error>
  </mat-form-field>
  <div fxLayout="column" fxLayoutAlign="center center">
    <div class="error-message" *ngIf="errorMessage || templateError">
      {{ errorMessage || templateError }}
    </div>
    <mat-spinner *ngIf="isSubmitting" [diameter]="20"></mat-spinner>
    <button
      mat-raised-button
      class="button_submit"
      color="accent"
      type="submit"
    >
      Set template
    </button>
  </div>
</form>
Now on the promotional page, we will get a list of promotional pages fetched from ButterCMS with functionality to create a Shopify page using the template set in textarea and page data from ButterCMS.
App screenshots:
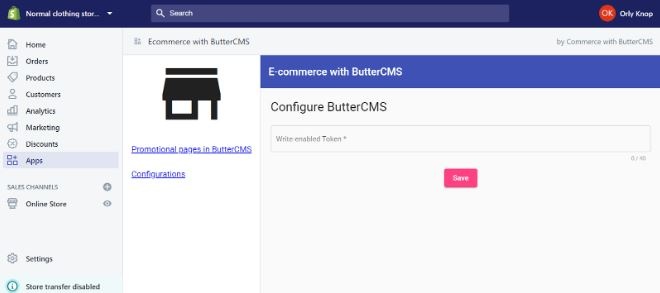
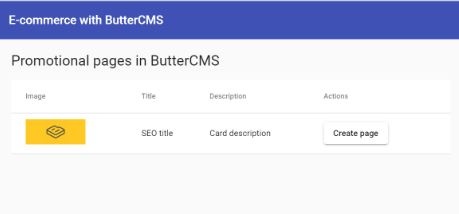

Full project code including scss files is available at GitHub repo at https://github.com/ButterCMS/shopify-buttercms.
Summary
In this tutorial, we created a Shopify application that allowed us to create promotional pages easier and faster. Using this application you will not spend time copying and pasting data which is already in your shop to create great pages. Now you can concentrate on making these pages more amazing.