

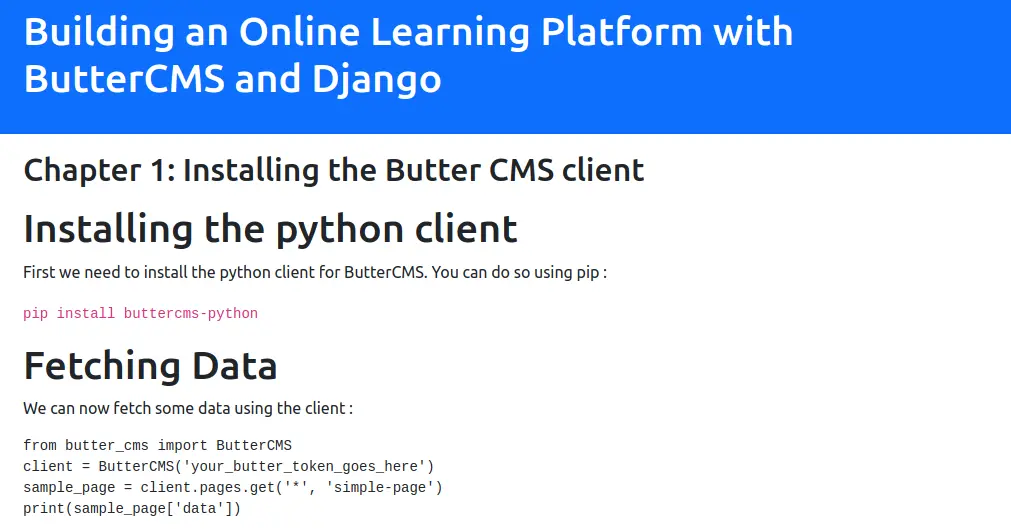
Building a learning platform is a great endeavor, but it might prove challenging, even for experienced developers. If you’re already familiar with Django, and unsure how to undertake such a project, this article is for you!
In this tutorial, I’ll demonstrate how to combine the power of ButterCMS and Django to painlessly build a collaborative learning platform. What is ButterCMS? Butter is an API-based CMS, aka headless CMS, that hosts and maintains your entire CMS platform comprised of a CMS dashboard and content API. You can find more details explaining how it differs from a traditional CMS here.
Here’s what we’ll be building today:
- A collection of courses divided into chapters
- A cover page for each course
- A way for students to enroll in a course
- A way for students to save their progress
Let’s get to it!
Table of contents
How to build an online learning platform?
Validate your idea
As with all things, your online learning platform will start with an idea. However, simply having an idea is not enough, you also need to validate your idea. And with an increasingly competitive e-learning landscape that’s predicted to reach $645 Billion USD by 2030, doing your research isn’t a step you can afford to skip.
Regardless of your niche, your aim should be to provide an effective, affordable, and differentiated product for your target audience. This means you’ll need to dive into the data to really understand if what you plan to offer aligns with current market pains and what the best way to package it is.
Define and study your niche
Being able to pinpoint and define the problem you aim to solve is a critical step when creating an online learning platform. So take a moment (or more than a moment really) to not only think about but also research, who your core demographic of learners are. What’s their age? Educational background? Social economic status? Learning preferences? Goals for taking your courses? Etc.
Next, look inward and ask yourself, what were the challenges you faced when it comes to education or online learning? How do you want to address them?
Finally, consider your niche at large. Are there any opportunities that haven’t been addressed? Problems that your competitors seem to gloss over? What about topics they just aren’t covering?
Asking these questions will help you solidify your business idea and offerings.
Decide on a business model
So you’ve got your idea and you’ve validated that there is indeed a market need for it. Great! Time to move on to the next step: deciding on a business model. After all, in addition to solving a problem, you do want to make a living right?
To keep things simple there are three main ways to monetize your platform:
- Corporate collaboration - you collaborate with business partners to offer certain courses.
- Going freemium- You offer free courses on your site but charge a fee for advanced features and support such as tutoring, certain extra learning materials, etc.
- Paid courses and/ or certificates - your users will pay for either the course or a platform-verified certificate after the completion of a set of courses
- Advertising - You’ll display relevant ads on your website or mobile app
- Affiliates - You’ll integrate links to relevant products and equipment that might be needed or helpful to students taking the courses on your platform
Implement your must-have features
Every e-learning platform is made up of a set of core features. In fact, before you go ahead and add as many interesting features as you can from the get-go, try building and minimum viable product with only the necessities to test the validity of your product.
So take a moment and jot down the core features you think your platform should have (and take a peek at your competition and note what features you see across platforms).
To set you off on the right foot, here are some feature ideas that might satisfy your future users:
- Profiles for students, admin, and teachers
- Tracking, reports, and evaluation
- User-friendly UI/UX design
- Social learning tools (e.g., group discussions, forums, personal blogs)
- Easy payments options and gateways
- Course creation and update capabilities
- Dashboards for students and instructors
Decide on a development approach
Next, you need to pick your tech stack. Keep in mind that the tech stack and development approach you choose will impact what features you may be able to implement.
Some things to keep in mind when deciding on a tech stack include the following:
- Platform functionality
- The anticipated API usage of your platform
- Whether you’ll be mobile (will you be ios, mobile, or both), desktop, or cross-platform
- Etc.
Generally, your development approach will be one of two options: 1. From scratch/ Custom development or 2. Ready-made products like Canvas or Moodle.
After you’ve developed your project you or your QA team should test it for bugs and/or errors. Typically you’ll need to go through multiple rounds of testing to catch everything. Some tests you’ll need to run may include the following:
- Unit testing,
- Integration testing,
- System testing,
- Regression testing
- Etc.
Test your idea on real users (and get their feedback)
Now that you’ve developed your MVP, you must test your project on users. To do this your first need to market your project so they’re aware that it exists, so take some time to think about how you’re going to attract them to your platform. Will you use social media, newsletter ads, or word of mouth?
Once you’ve garnered your first few users make sure you collect their feedback. Not only will their feedback help you pinpoint missed flaws within your platform but will also give you a clearer idea of what new features need to be added and if any current features are worth removing.
Wait, why can’t we manage the content directly with Django?
One of the best features of Django is the admin site that is generated automatically based on the models. Knowing this, you could be tempted to use it to create and manage the course content without any external dependencies. However, this approach doesn’t scale very well.
First, while the admin website is a great utility for performing CRUD operations, it is bound by the models as defined in the codebase. This means each time a member of your team will want to create a new field or a new type of data, they will have to wait for you to implement the corresponding migrations. ButterCMS solves this by providing a flexible content modeling system that allows your content team to work in complete autonomy.
Second, to be efficient your team will probably need additional features that exceed django-admin capabilities. Here are a few examples:
- Rich WYSIWYG editing
- Content versioning
- Collaboration features
ButterCMS provides all of these features and more, which means it will scale with your needs. You can find the code for this tutorial in this Github repo.
Modeling the courses in Butter
First things first, we need some content! We’ll start by creating a few courses in ButterCMS. I want to divide each course into successive chapters so everything is properly organized and we can track a student's progress by checking which chapter they have completed. This means we need a one-to-many relationship between a course and its related chapters.
ButterCMS makes modeling these relationships easy through collections. A collection doesn’t directly map to a page or blog post as you might see in a traditional CMS. Rather, it’s a way to create a database of related facts and information without having to write a single line of code. We’ll create two collections:
- Courses: The course our students will be able to follow
- Chapters: The chapters making up the courses
Creating the chapters collection
We need to create the Chapters collection first so that we can reference it later in the Courses collection.
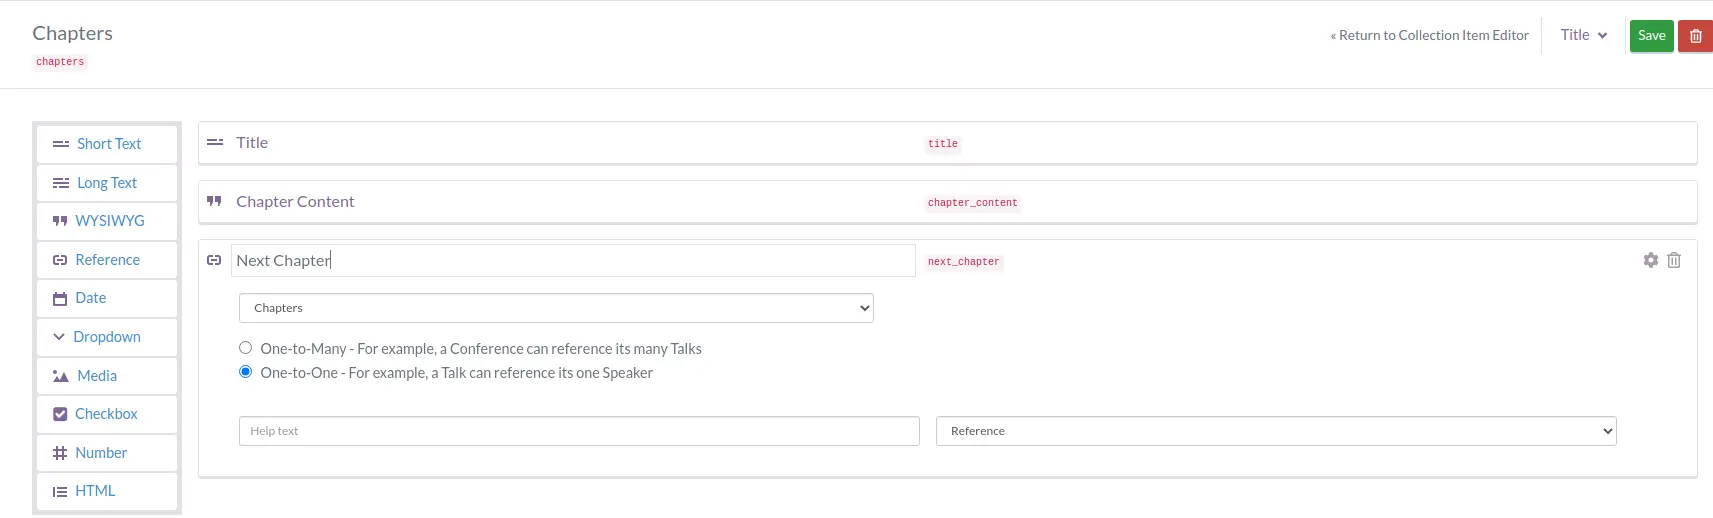
We’re using a single field to store the chapter’s content with a WYSIWYG editor. This way we can easily vary the type of content we insert in each chapter depending on the need for the course.
We’re also using a self-reference to the Chapter collection to store a link to the next chapter. This will greatly help when saving a student’s progress and gives a bit more control over the organization of the course
Creating the courses collection
Now that we have a Chapters collection to reference, let’s create the Courses collection. Here’s the schema I’m using:
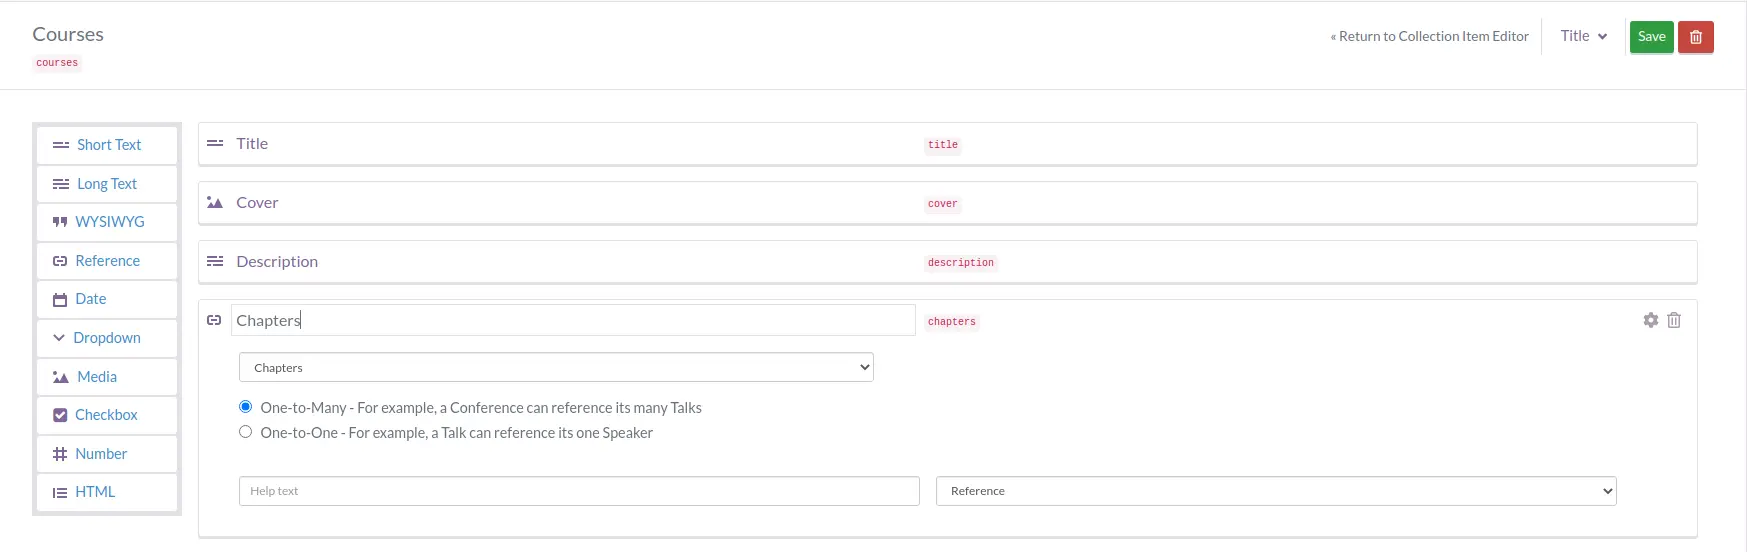
We’ve got a few basic fields to describe our course:
- Title: The title of the course
- Cover: A cover image
- Description: A brief description of the content of the course
I’ve also added a one-to-many reference to the Chapters collection. This will allow us to access all the chapters related to a course from the Courses collection.
Creating a cover page for our courses
To advertise the courses that the students will be able to follow on our platform, we need a cover page for each course. Each cover will have the same structure—only the content will differ. This is a perfect use case for page types. Page types are a feature of ButterCMS that works as a template for creating pages. We can query Butter’s API to retrieve a specific page based on its slug.
Here’s a little diagram to help you picture how Django and Butter’s page types fit together:
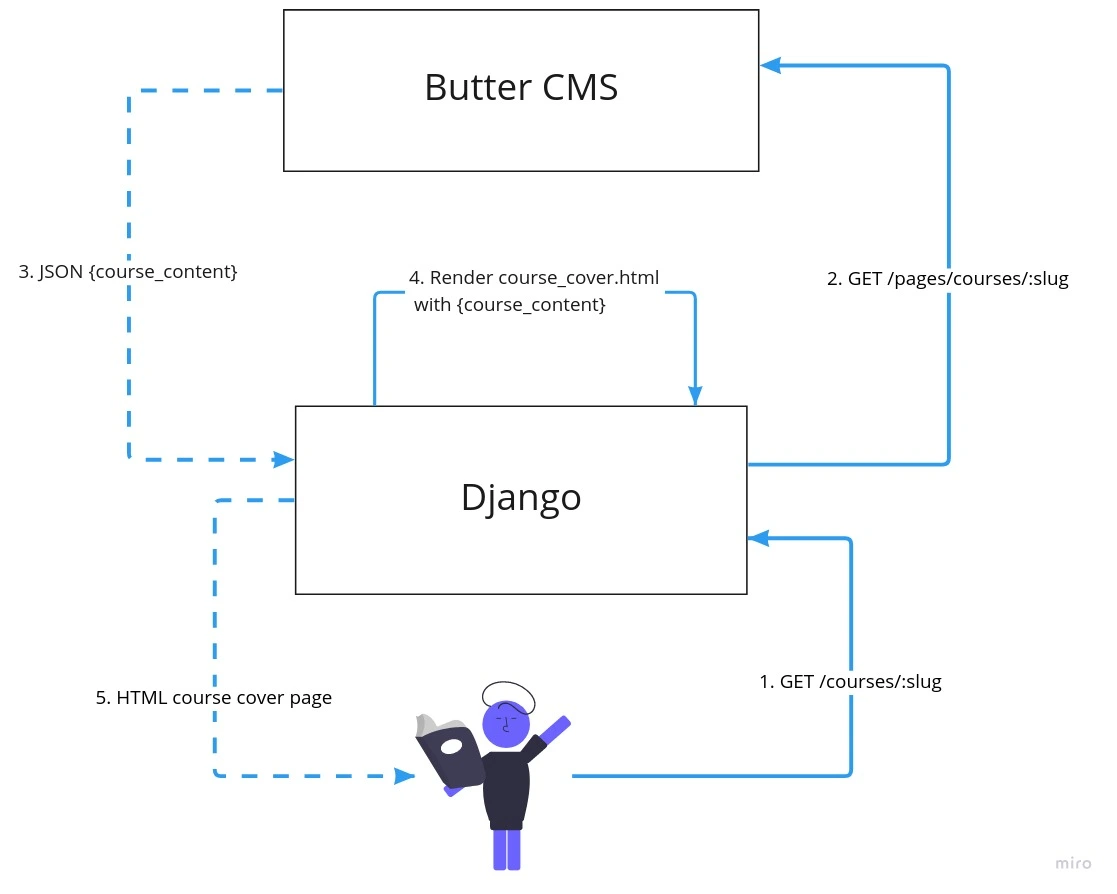
Architecture Diagram For Displaying the Cover Pages
It’s pretty straightforward, actually. When a user accesses a course’s cover page, we simply forward its slug to Butter’s Page Type API. Butter responds with the course content, and we display it with HTML using Django’s built-in rendering engine!
Creating the cover page page type
Here’s the schema I’m using for the course’s cover page:
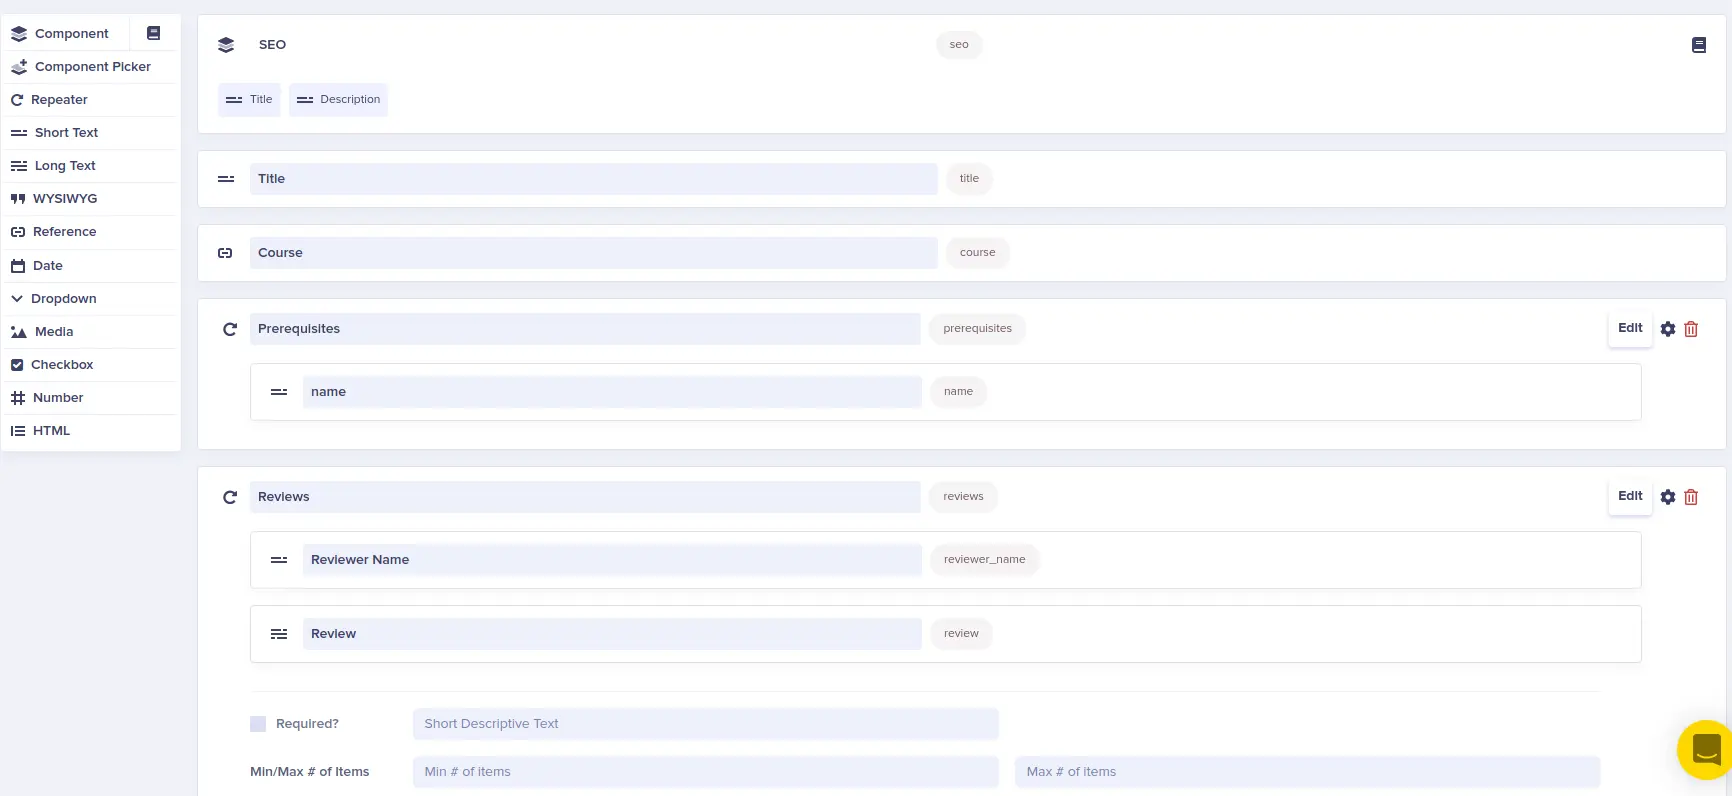
Every cover page will have the following fields:
- SEO title and description: For populating the meta tag
- Title: The title of the page. It might be different from the title of the course itself
- Pre-requisites: A repeater field listing concept that needs to be understood before taking the course
- Reviews: Another repeater field to display reviews made by former students.
The cover pages hold content related to promoting the course, not the course material itself. Instead, it references the Course collection. This way we can access the content of the course without duplicating the data.
Rendering the cover page in Django
Now let’s render these cover pages in Django. Time to type some code!
We need a way to query the ButterCMS API. Luckily, Butter provides a python client for retrieving data from their API. You can initialize it like so:
from butter_cms import ButterCMS
from django.conf import settings

from .exceptions import MissingButterCMSToken

if settings.BUTTER_CMS_TOKEN is None:
    raise MissingButterCMSToken("BUTTER_CMS_TOKEN must be set")

client = ButterCMS(settings.BUTTER_CMS_TOKEN)
Then we can create a small Mixin to retrieve any page type we need using this client:
class PageTypeMixin(SingleObjectMixin):
    def get_object(self):
        slug = self.kwargs.get("slug")
        return client.pages.get(self.page_type, slug, {"levels": 3})
This PageTypeMixin inherits from SingleObjectMixin so the object is injected into the context automatically. Using a mixin means we can reuse this logic in multiple class-based views. This will come in handy later.
Here’s how to use it with a DetailView to display our cover pages:
class GetCourseCover(PageTypeMixin, DetailView):
    page_type = "course_cover"
    template_name = "courses/course_cover.html"
Now it’s just a matter of hooking up the view into the UrlConf and doing some rendering as you would in any Django App. For instance, you can render the prerequisites for the course like this:
<!-- Loop through the repeater prerequisite field -->
 <ul class="list-group">
  {% for prerequisite in object.data.fields.prerequisites %}
    <li class="list-group-item"> {{ prerequisite.name }} </li>
  {% endfor %}
 </ul>
The fields defined in our schema are available in the context.
Here’s an example of a fully rendered cover page using all the fields of the schema and styled with Bootstrap:
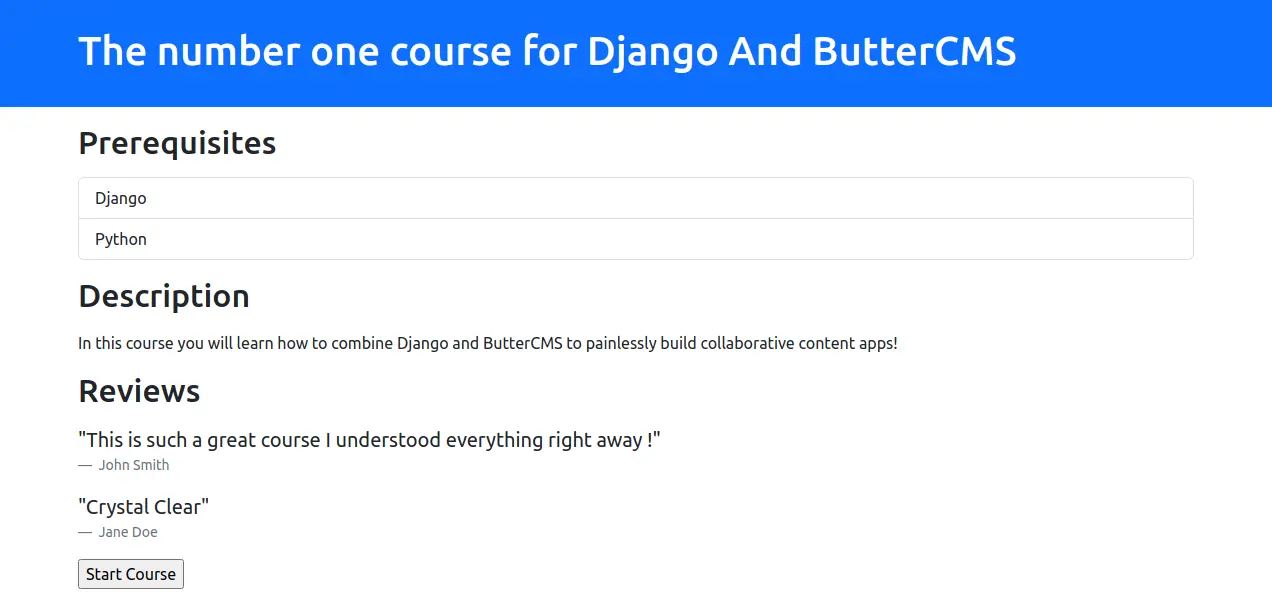
You can find the complete code for this page on GitHub.
Enrolling in a course
Displaying stuff is great, but the students will also need to enroll in specific courses. Here’s what we want to achieve:
- The students can enroll by clicking a “Start course” button at the bottom of the cover page
- The students can retrieve all their courses on an index page
To accomplish this, we’ll store the courses started by the students inside a database. Then we’ll be able to filter our “Courses” collection to show students all the courses they’re currently enrolled in.
Here’s a little diagram summarizing how this will work:
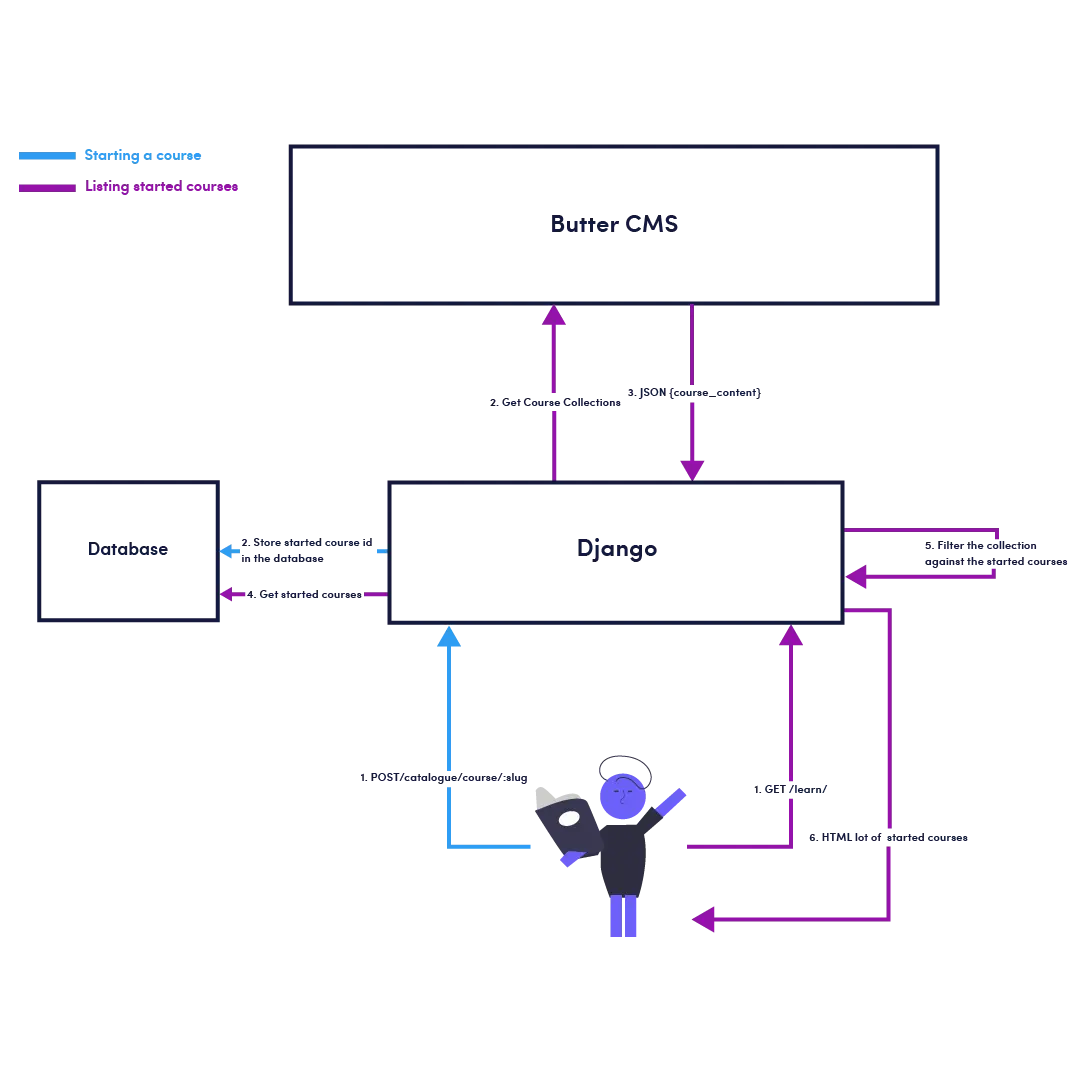
Architecture Diagram for Enrolling in a Course
Setting up the models
In Django, everything flows from the models. Let’s define some to store the courses a student wants to follow.
class Student(models.Model):
    user = models.OneToOneField(User, on_delete=models.PROTECT)


class Course(models.Model):
    student = models.ForeignKey(
        Student, on_delete=models.PROTECT, related_name="courses"
    )
    butter_id = models.IntegerField()
    current_chapter = models.IntegerField()

    class Meta:
        constraints = [
            UniqueConstraint(
                name="a_student_can_only_start_a_course_once",
                fields=["student", "butter_id"],
            )
        ]
I like to extend Django's user model to have a better separation of concerns. We can store data specific to a student on the Student model, without interfering with Django’s built-in User model.
In the Course model, I’ve added a few interesting fields:
student: A foreign key to the student model. We have a one-to-many between a student and the courses they’re studying.butter_id: The corresponding course ID in ButterCMScurrent_chapter: The chapter the student is currently studying. This will be used to track the progress
You can use whichever database engine you like the most to store your models. I usually use Postgres.
Now that we have some models we can populate them using a Django Form!
Creating the Start Course form
Let’s create a Start Course button on the course cover page. When a student clicks the button, the course will be linked to them in the database. To accomplish this, we’ll use Django’s ModelForm and a slightly modified form view.
The form looks like this:
class StartCourseForm(forms.ModelForm):
    class Meta:
        model = Course
        fields = ["student", "butter_id", "current_chapter"]
It’s a simple ModelForm that uses all the fields from our Course model.
The view is a bit more interesting:
class StartCourse(LoginRequiredMixin, PageTypeMixin, FormView):
    page_type = "course_cover"
    template_name = "courses/course_cover.html"
    form_class = StartCourseForm


    # The courses chosen by the student will be displayed here
    success_url = "/learn/"

    def post(self, request, *args, **kwargs):
        self.object = self.get_object()
        return super().post(request, *args, **kwargs)

    def form_valid(self, form):
        form.save()
        return super().form_valid(form)
You’ll note that I’m using Django’s LoginRequiredMixin. Indeed, the student will need a user account so we have something to link the course with. You can use Django’s built-in authentication views to create a login and a registration form. LoginRequiredMixin will take care of redirecting the user to the login form while preserving the initial URL. This way, the user will automatically be redirected to the page they wanted to access upon successful authentication.
You might also be wondering why we’re using our PageTypeMixin combined with a FormView rather than the higher-level CreateView. This is because I want the URL to be the same when GETting the cover page or when POSTing the StartCourse form. This is accomplished by combining our GetCourseCover from before with our new StartCourse view like so:
class CourseCover(View):
    def get(self, request, *args, **kwargs):
        view = GetCourseCover.as_view()
        return view(request, *args, **kwargs)

    def post(self, request, *args, **kwargs):
        view = StartCourse.as_view()
        return view(request, *args, **kwargs)
This means the StartCourse view must render the same template as GetCourseCover to be able to redisplay the form in case of errors. (If the student has already started the course, for example.) To achieve this, we’re simply reusing our PageTypeMixin to make the course cover data available in the context. As the CreateView generics write to self.object, we’re using FormView instead to avoid buggy interactions.
This also means that GetCourseCover must make the form available to the template. We can do so by adding some extra context to the GetCourseCover view:
    def get_context_data(self, **kwargs):
        context = super().get_context_data(**kwargs)
        context["form"] = StartCourseForm()
        return context
Render the form in your template with a Start Course button and the following hidden fields:
student_id: We could use request.user instead but it’s easier to have all the fields coming from the POST datacurrent_chapter: We initialize the current chapter with the first chapter of the coursebutter_id: The butter id for the course.
All that’s left to do is adding a view to list a student’s courses:
class MyCourses(LoginRequiredMixin, TemplateView):
    template_name = "courses/my-courses.html"

    def get_context_data(self):
        context = super().get_context_data()
        courses = client.content_fields.get(["courses"])["data"]["courses"]
        user_courses_id = [
            user_course.butter_id
            for user_course in self.request.user.student.courses.all()
        ]

        user_courses = [
            course for course in courses if course["meta"]["id"] in user_courses_id
        ]
        context["user_courses"] = user_courses
        return context
Let’s have a look at the end result!
Accessing a course’s chapters
Now that our students can enroll in any course they want, let’s give them access to the content! We’ll create a page for each course, which will display the current chapter, and a button to mark it as complete.
Here’s a container diagram detailing how this will happen:
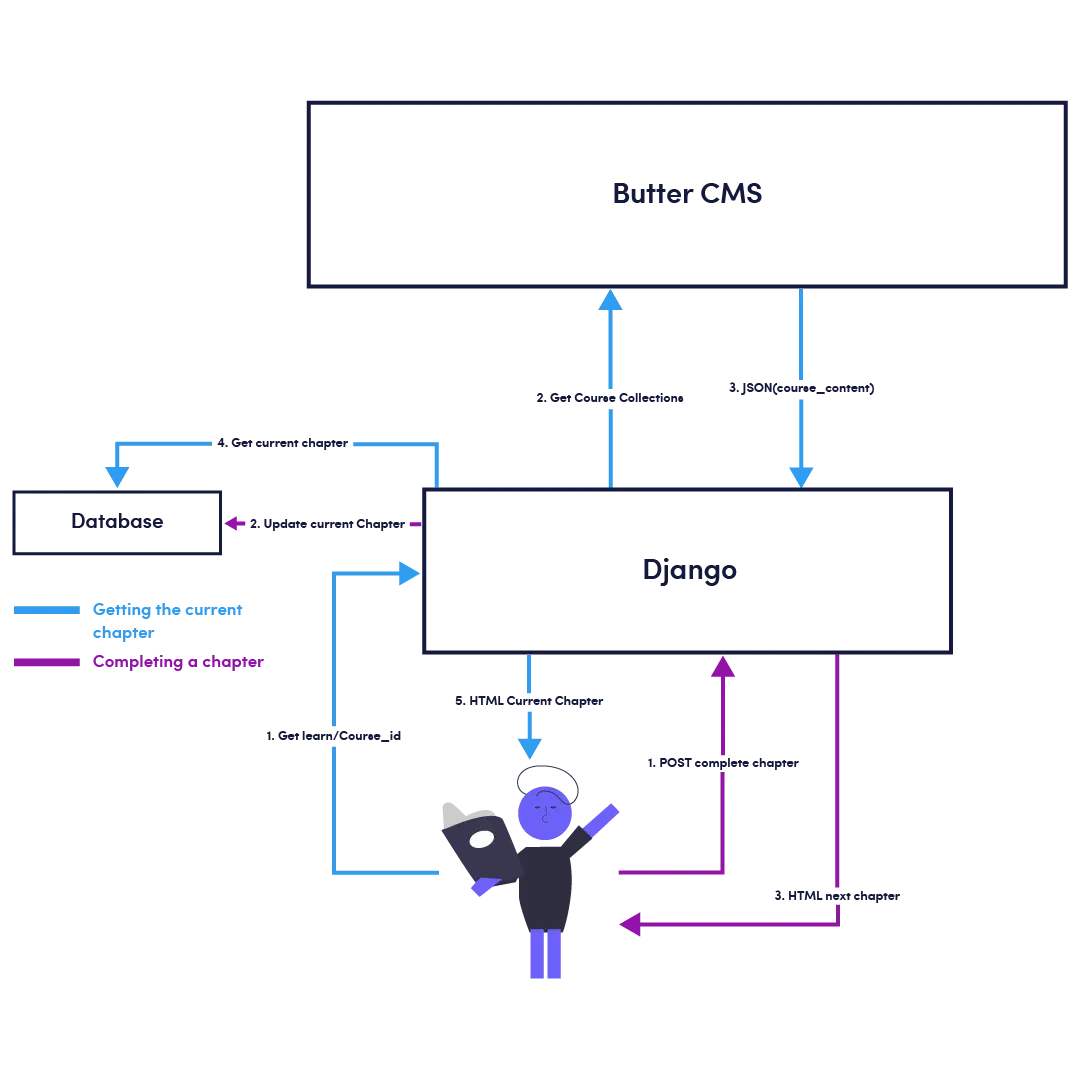
Upon accessing the course page in Django, we’ll find the chapter that matches the current chapter for the logged-in student. Clicking the Complete Chapter button will POST the form to update the current chapter for the course and display it to the user. We’ll use the same URL for displaying the chapter and posting the form. We’ll achieve this by combining the two as we did for the cover page.
Displaying the current chapter
Let’s start by creating a mixin for retrieving the current chapter from the ButterCMS API:
class SingleCourseMixin(SingleObjectMixin):
    def get_object(self):
        return self.get_queryset().get(butter_id=self.kwargs.get("butter_id"))

    def get_context_data(self, **kwargs):
        context = super().get_context_data(**kwargs)
        courses = client.content_fields.get(["courses"], {"levels": 3})["data"][
            "courses"
        ]
        selected_course = next(
            (
                course
                for course in courses
                if course["meta"]["id"] == self.object.butter_id
            )
        )
        context["course"] = selected_course

        context["current_chapter"] = next(
            (
                chapter
                for chapter in selected_course["chapters"]
                if chapter["meta"]["id"] == self.object.current_chapter
            )
        )

        return context
This mixin fetches the course matching the butter_id of the user it is accessing and extracts the current chapter from the chapters list referenced by the course collection.
Then we simply use the mixin with a DetailView to render the template to the user:
class CourseDetail(LoginRequiredMixin, SingleCourseMixin, DetailView):
    model = Course
    template_name = "courses/chapter.html"

    def get_queryset(self):
        return self.request.user.student.courses.all()

    def get_context_data(self, **kwargs):
        context = super().get_context_data(**kwargs)
        context["form"] = CompleteChapterForm()

        return context
The LoginRequiredMixin ensures the request.user exists. Therefore, we can use the related object manager to get all the courses the user is enrolled in. The mixin does the rest of the work, and the current chapter is displayed to the user.
Here’s what it looks like :
The “content_chapter” form the WYSIWYG editor contains HTML, which is rendered using the safe Django filter. This means most of the rendering is provided by Butter. Pretty handy!
Completing a chapter
To mark a chapter as completed, we’ll use the exact same strategy as the Start Course form. We’ll combine a form view with the CourseDetail view we’ve just created to have a common URL between the POST and GET requests.
Here’s the form view:
class CompleteChapter(LoginRequiredMixin, SingleCourseMixin, UpdateView):
    model = Course
    fields = ["current_chapter"]
    template_name = "courses/chapter.html"

    def get_success_url(self):
        return self.request.path

    def form_valid(self, form):
        return super().form_valid(form)
And the combined view :
class Course(View):
    def get(self, request, *args, **kwargs):
        view = CourseDetail.as_view()
        return view(request, *args, **kwargs)

    def post(self, request, *args, **kwargs):
        view = CompleteChapter.as_view()
        return view(request, *args, **kwargs)
We’re using UpdateView which updates the current_chapter attribute of the course the user is accessing. The new value for current_chapter is embedded in the HTML template using the context data from SingleCourseMixin. Remember the next_chapter reference we added to our Chapters collection schema? This is where it shines :
<form method="post">
  {{ form.errors }}
  {% csrf_token %}

  <input  type="hidden" name="{{ form.current_chapter.html_name }}" value="{{ current_chapter.next_chapter.meta.id }}">
  <input class="btn btn-primary" type="submit" value="Complete Chapter">
</form>
That’s it! Let’s admire the end result:

Closing thoughts
In this tutorial, we combined the flexibility of ButterCMS with the robust models of Django to build a learning platform. Thanks to Butter’s collections and page types, managing the course's material is a breeze. Implementing authentication, rendering the courses, and tracking progress is a perfect use case for Django.
The platform we’ve just built could easily be extended with a ton of cool features. Here are a few examples:
- The ability to navigate the history of completed chapters
- Quizzes that could be managed in Butter and taken at the end of a chapter
- Receiving updates from ButterCMS with webhooks to notify students if a course is updated while they’re in the process of completing it
That’s all for today, I hope this article helped you understand how ButterCMS and Django can help you meet the needs of your team!

