
In today's ever-evolving digital landscape, landing pages have become fundamental across a majority of online platforms, one example being software-as-a-service (SaaS) platforms. As the initial interaction point for visitors, SaaS landing pages serve as a virtual storefront of sorts, enabling SaaS companies to establish a commanding online presence and capture the attention of potential customers. In light of its soaring necessity, the significance of crafting a well-designed landing page has reached paramount levels.
Fortunately, developers can now access many powerful tools to create visually appealing SaaS landing pages with a seamlessly optimized user experience. Among these tools are Python's Django framework and ButterCMS, which stand out for their flexibility and rich functionality. By leveraging Django's robust web development capabilities and ButterCMS's headless content management features, developers can effortlessly design and deploy SaaS-themed Django landing pages that captivate users, drive conversions, and propel business growth.
Table of contents
Why should you use Django?
Django has become a go-to solution for web developers worldwide as one of the most popular web frameworks for the Python programming language. It is ideal for creating landing pages for a variety of reasons, which include:
-
Templating engine: Django comes with a powerful templating engine that makes it easier to create dynamic and interactive landing pages. The templating engine enables developers to separate presentation logic from business logic, allowing them to customize the appearance of the landing page more easily. It allows developers to create visually appealing and consistent landing pages by supporting template inheritance, reusable components, and template tags.
-
Security and scalability: Django includes security measures to guarantee that the landing page is safe and secure. Furthermore, the scalability of Django allows landing pages to handle increased traffic and user interactions without sacrificing performance.
-
CMS integration: Django's framework supports API-based CMS integration, allowing developers to manage and organize data on their landing pages easily.
-
Faster development time: Django's development process is streamlined and efficient, allowing developers to create landing pages quickly and efficiently. It provides a high-level abstraction for everyday web development tasks like URL routing, database integration, and form handling. This speeds up the development process and reduces the time and effort required to build a landing page from the ground up.

Why should you use ButterCMS?
The ability of headless CMS platforms to separate content management from the presentation layer provides a significant advantage, allowing developers to create highly flexible and customized interfaces for their applications. ButterCMS excels in this category, providing many tools for developing secure, powerful, and customizable content models.
By leveraging ButterCMS's features, developers can easily create landing pages that meet the diverse needs of their users.
ButterCMS provides the following features:
-
Content types: ButterCMS supports flexible content types—pages, components, and collections—to suit your modeling needs. These content types allow you to create, organize easily, and model complex content structures for your landing pages.
-
Powerful field types: ButterCMS provides a variety of field types, including short text, long text, repeater, dropdown, media, checkbox, and number. These field types enable efficient content modeling by allowing you to capture and structure different types of information for your landing pages.
-
In-app image editing: ButterCMS provides a convenient solution for performing image editing tasks within the platform, eliminating the need for external tools and streamlining your workflow.
-
Comprehensive media management solution: ButterCMS offers a comprehensive image solution, efficient image compression, reliable storage, and fast media content delivery capabilities for a seamless media management experience.
-
SEO optimizations: ButterCMS offers fields that can help with SEO optimization. These fields can be custom-built, or you can use the built-in ButterCMS SEO feature.
Tutorial: Building an engaging Django landing page using ButterCMS
This comprehensive tutorial teaches you how to build a captivating software-as-a-service (SaaS) themed landing page with Django and ButterCMS. You'll be guided through the essential steps and best practices to ensure your landing page stands out.
What we’ll be building
Inspired by the exceptional design work of "Solutions Page - Couponic" by Zaini Achmad, the goal is to create an engaging online presence that highlights the unique value and features of our SaaS offering.
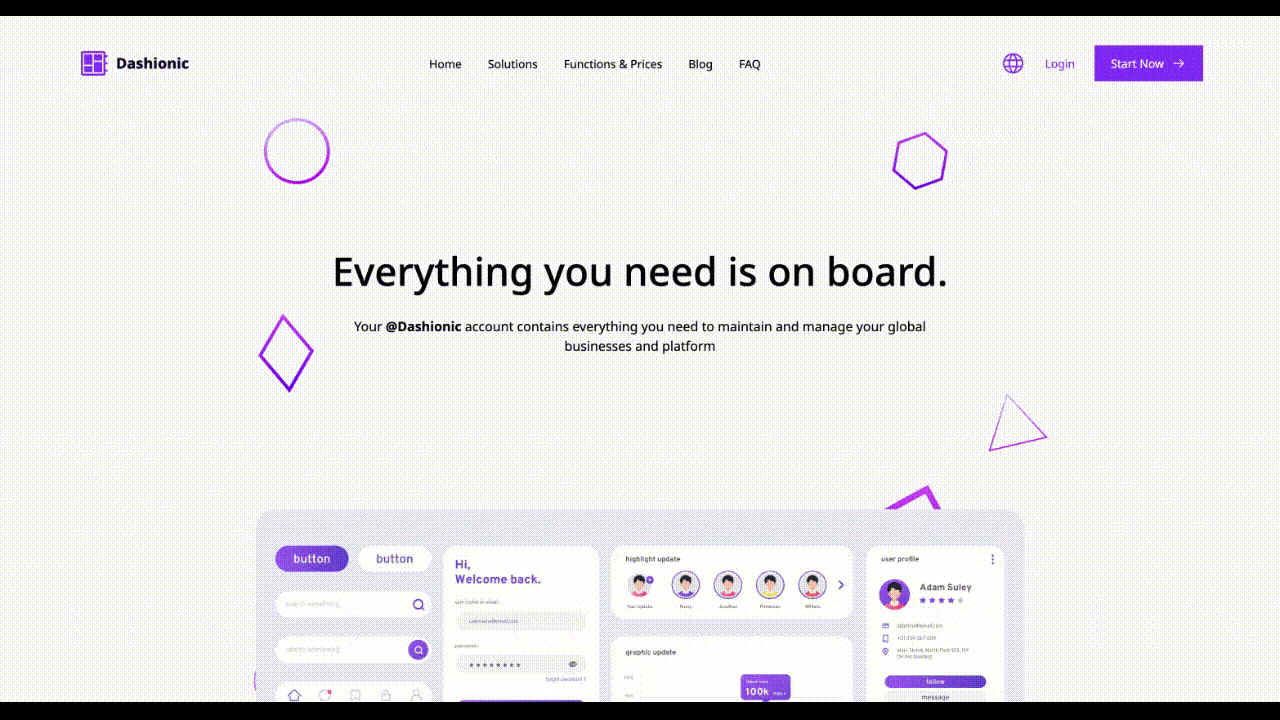
Take a look at the image below for a sample of this page:
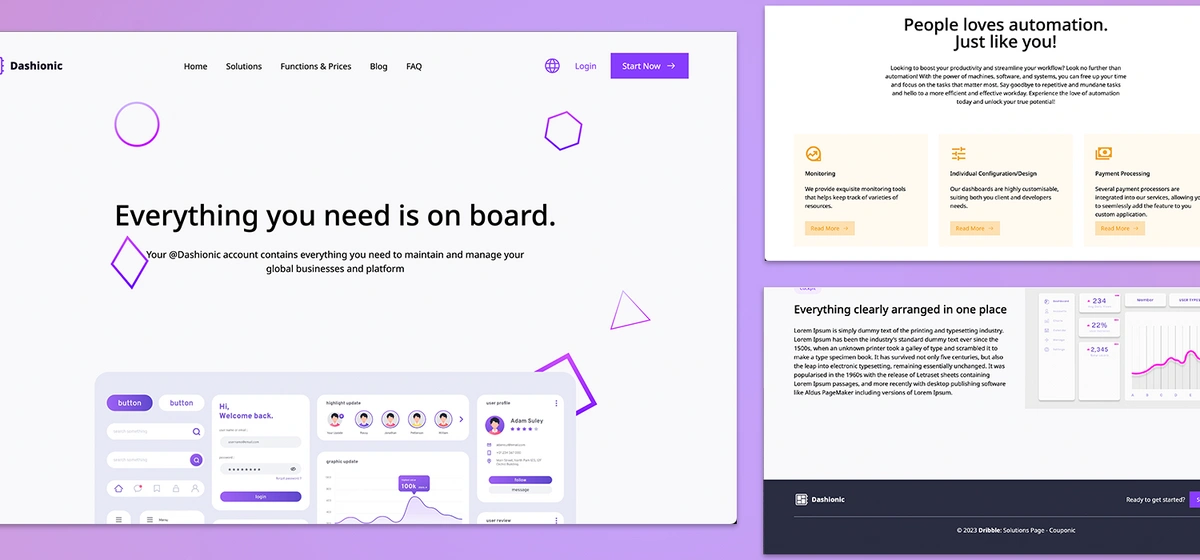
An image showing what you are going to be creating
In this project, you will create a captivating hero section to capture visitors' attention. You'll also highlight key features and sections and strategically place call-to-action buttons to create a solid user experience.
Throughout the process, we acknowledge and appreciate Zaini Achmad's outstanding design work, which influenced the aesthetics and layout of our landing page. All the code for this tutorial can be found in this GitHub repo.
Prerequisites
To ensure a smooth learning experience and active participation in this tutorial, please have the following readily available:
-
An account on ButterCMS
-
Python 3: Install the Python programming language version 3. This provides the PIP package manager for Python
-
VS Code: Install VS code. You can still use other code editors, too.
-
Terminal access
Setting up our Django project
Creating the Python virtual environment
To set up your Django project, first, you’ll have to set up a virtual environment to run your code. This is so that dependencies can be managed properly. Run the command:
pip3 install virtualenv
This will install the package virtualenv, which will be used to set up the virtual environment.
Then, run the command below in your terminal to set up your very own environment:
python3 -m venv butter-venv
Once the command’s execution is complete, you can switch environments using the following command:
source ./butter-venv/bin/activate

The activated virtual environment
Then, proceed to install Django in the environment.
To install Django, you will utilize the pip installer provided by the virtual environment. Before that, it is recommended to upgrade the pip installer using the following command:
pip install --upgrade pip
Then, run the command below to install Django:
pip install django
After Django is successfully installed, you can run the following command to set up the project. Run the following commands:
cd butter-venv
django-admin startproject landing_page
Then, you can proceed to open your landing_page Django project in your editor (VS Code). You can do this by running the command below if you’ve set up the code command:
cd landing_page
code .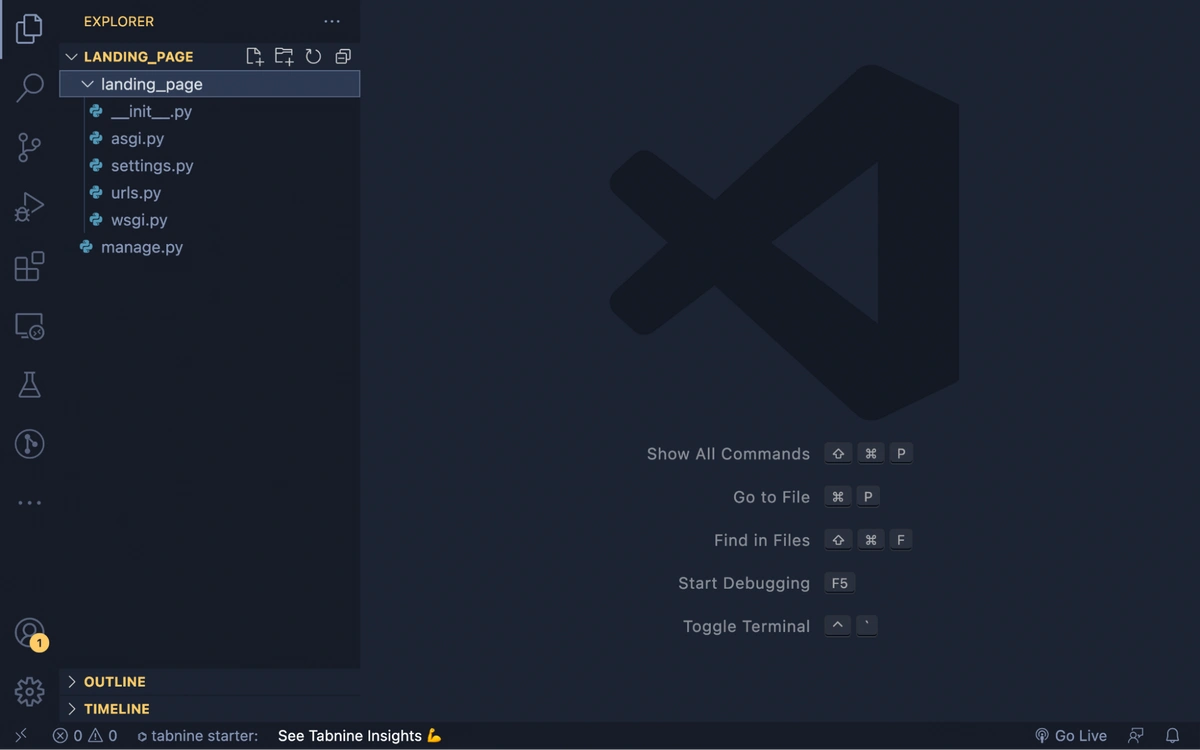
Django project in Visual Studio Code
Next, you’ll install project dependencies.
Install the Django project dependencies
For this project, we have the following dependencies:
-
Dotenv
-
ButterCMS SDK
To install them, you’ll need to run the following command:
pip install python-dotenv buttercms-python
Then, you’ll need to freeze your dependencies by running the command:
pip freeze > ../requirements.txt
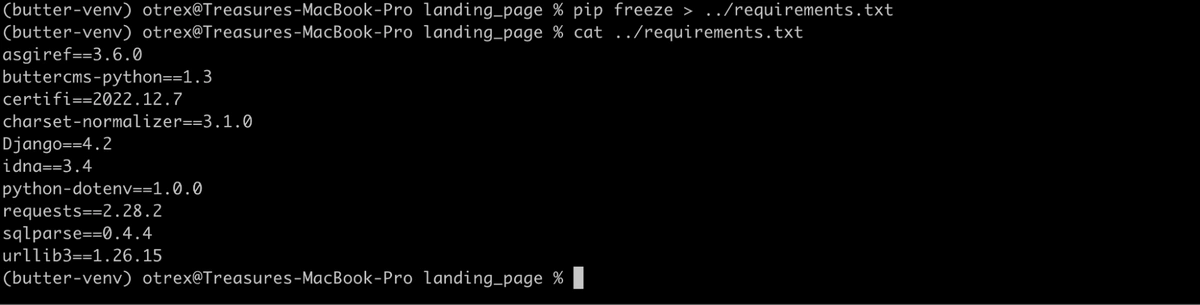
The content of your requirements.txt file
Using pip freeze lets you capture a snapshot of all the currently installed packages and their corresponding versions in a Python environment. This helps you create a requirements.txt file that lists all the dependencies of your project, making it easy to recreate the same Python environment on another machine or for another user.
Adding your Django app
To add your landing page app, use the Django command:
python manage.py startapp pages
This creates a folder, pages, in the Django project directory.
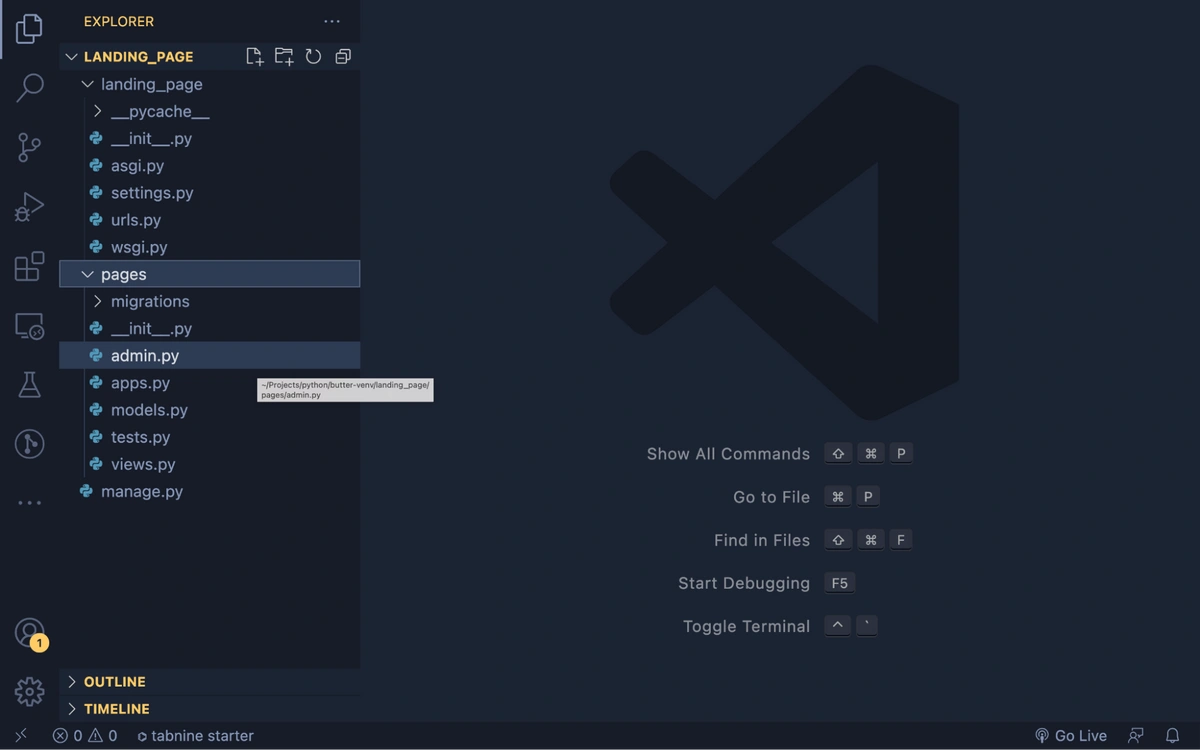
The pages folder created by manage.py
Then, you can add the handlers that serve the landing page to the browser.
After you've correctly configured the app, you'll need to add the templates and the view functions that render the pages. To accomplish this, add the following code snippet to the pages/views.py file:
from django.shortcuts import render
from django.shortcuts import redirect
from django.http import HttpResponse
from butter_cms import ButterCMS
from os import environ

client = ButterCMS(environ.get("BUTTER_CMS_KEY"))

def to_home(request):
  return redirect("/saas-landing-page")

def handler(request, slug):
  page = client.pages.get("*", slug)
  menu = client.content_fields.get(['menu'], {
    "fields.name": "landing_page"
  })
  return render(request, "index.html", {
    "data": page["data"]["fields"],
    "menu": menu["data"]["menu"][0]["menu_items"],
  })
In the code snippet, two view handlers are defined. The to_home() handler redirects requests to /saas-landing-page, which in turn retrieves data from ButterCMS. On the other hand, the handler() function processes page requests by extracting the slug from the URL parameters, fetching the corresponding page and menu from ButterCMS, and rendering the pages/index.html template to the browser.
To register the URL path with the Django project, you create a urls.py file in the pages directory and add the code snippet below.
from django.urls import path

from . import views

urlpatterns = [
    path("", views.to_home, name="home"),
    path('<slug>', views.handler, name="handler"),
]
The path("", views.to_home, name="home") part adds the root route / that redirects requests to the /<slug> route.
Then, in the landing_page/urls.py file, add the appropriate routes to register the URLs for the landing page. This ensures that requests to the landing page are routed to the appropriate pages handlers.
To accomplish this, replace the content of the file with the following:
from django.contrib import admin
from django.urls import path, include
from django.conf import settings
from django.conf.urls.static import static

urlpatterns = [
    path('admin/', admin.site.urls),
    path("", include("pages.urls")),
] + static(settings.MEDIA_URL, document_root=settings.MEDIA_ROOT)
This code defines the URL routing for a Django project. It sets up a list of URL patterns, which map incoming requests to the appropriate view functions.
The first two lines import the necessary modules: admin from django.contrib for the Django admin interface, path and include from django.urls for defining URL patterns, and settings and static from django.conf for handling media files.
The urlpatterns list is where the URL patterns are defined. In this case, there are two patterns:
-
The first pattern maps requests to the /admin/ URL to the Django admin interface. This is a built-in feature of Django that provides a web-based interface for managing the project's data.
-
The second pattern maps requests to the root URL ("") to the pages app's URL patterns. This means that requests to the root URL will be handled by the urls.py file in the pages app.
Finally, in the landing_page/settings.py file, ensure that the static() function is configured to serve media files during development. This is important to guarantee that media files, such as images or videos, are properly loaded in the browser.
The MEDIA_URL and MEDIA_ROOT settings, defined within the same file, are passed as arguments to the static() function. These settings play a crucial role in specifying the URL and root directory for serving media files.
By default, the static() function assumes that there is a static folder present within the pages app folder. This static folder serves as the designated location for storing the static files used in the project.
To set this up, follow these steps:
-
Create a new directory called static inside the pages folder. This directory will be used to store all the static files required for your project.
-
Copy and place the files from the provided repo into the newly created static directory.
Next, navigate to the landing_page/settings.py file and add the pages to the INSTALLED_APPS list. This ensures that the Django app you created, named pages, is properly integrated into your Django project.
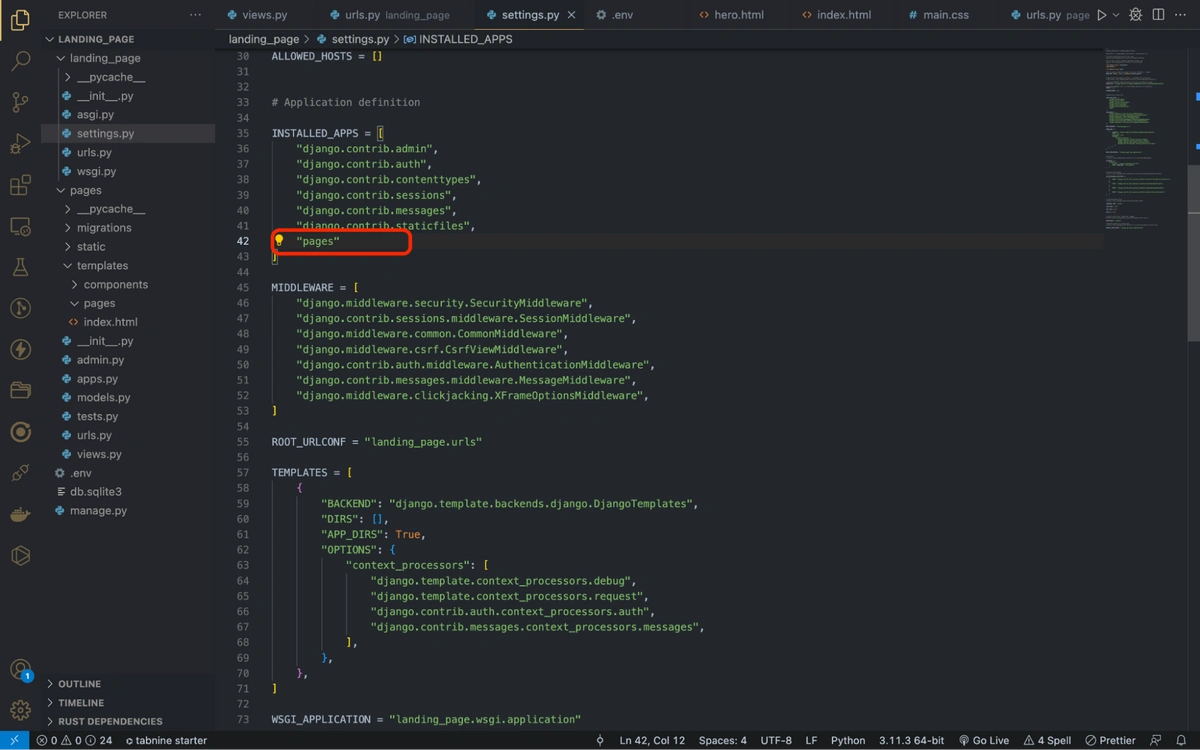
The pages added to the INSTALLED_APPS
Next, you’ll be adding the environment variables to our project in a highly secure way.
Adding the environment variable
Since you’ve already installed the dotenv package, we can create a .env file in the root directory of our project. Then, add the following to the file:
BUTTER_CMS_KEY=xxxxxxxxxxxxxxxx
The BUTTER_CMS_KEY (read key) can be found in the ButterCMS dashboard.
To retrieve your key, navigate to your ButterCMS dashboard and click on the Settings menu:

The Settings menu
Copy the Read API Token:
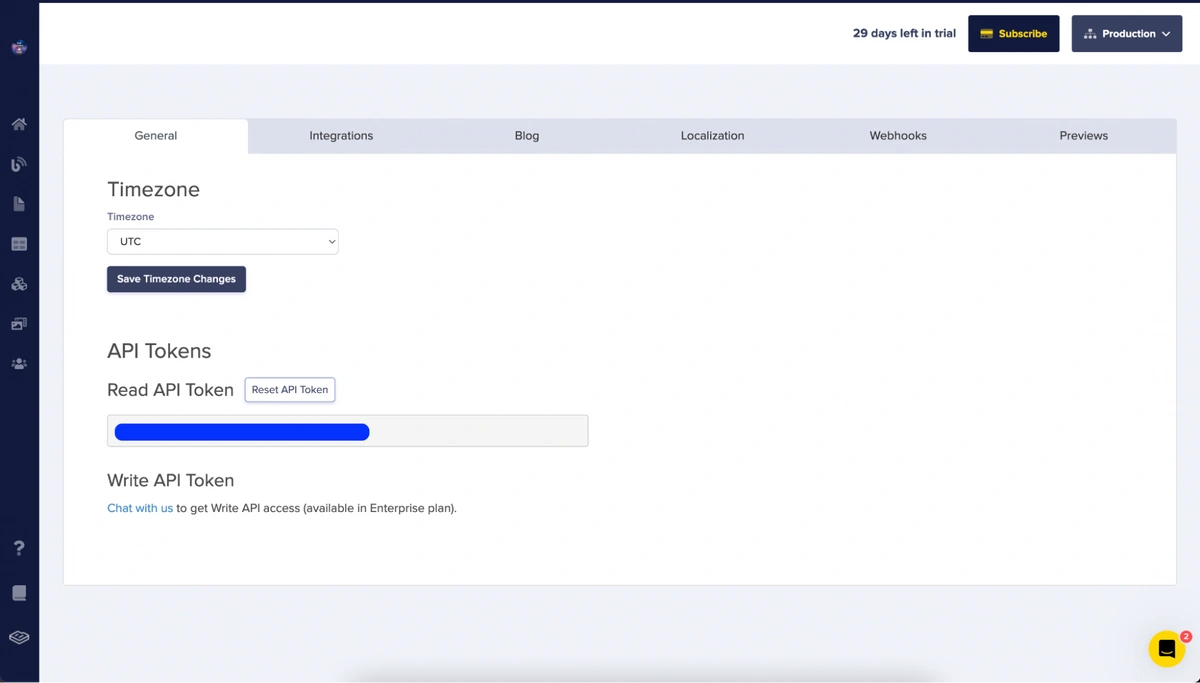
The read token
Replace the value of the BUTTER_CMS_KEY with the actual token in the .env file.
Then, in your landing_page/settings.py file, add the following to load the environment variable:
 . . . . .

from dotenv import load_dotenv
load_dotenv()

 . . . . .
# other settings.py content goes next
This will load up the .env variables.
Adding the template
You can create new pages by combining pre-built components, such as the hero, section, footer, navigation, features, and header, using a component-based templating system. This technique facilitates a much more adaptable and reusable approach.
For this, you’ll be using Django's default templating engine, Jinja. As a result, no template configurations are required because they have already been configured on the boilerplate.
To build these reusable templates, first, create the folders pages/templates and pages/templates/components, then add the following files and the corresponding code snippets in the components folder:
hero.html
<header class="hero">
  <div class="max-w">
    <h1> {{ data.headline }} </h1>
    <p> {{ data.sub_headline }} </p>
  </div>
</header>
<div class="hero-image">
  <div>
    <img src='{{ data.image }}' alt='{{ data.image_alt }}'>
  </div>
</div>
In the snippet above, the hero component takes in the hero headline, sub_headline, and image and renders them when added to the main page.
seo.html
<head>
  <title> {{ data.title }} </title>
  <meta name="description" content="{{ data.description }}">
  <meta name="robots" content="{{ data.robots }}">
  <meta property="image" content="{{ data.image }}">
  <link rel="icon" sizes="192x192" href="{{ data.image }}">
</head>
This snippet consists of the SEO meta tags. It receives the title, image, description, and robot from ButterCMS to improve the SEO of the page when served
nav.html
{% load static %}
<nav>
  <div class="max-w">
    <div class="logo">
      <img src="{% static 'img/logo.png' %}" alt="logo" />
      <span>Dashionic</span>
    </div>
    <ul>
      {% for menu_item in data %}
        <li><a href="{{ menu_item.href }}" class="px-4 text-sm">{{ menu_item.label }}</a></li>
      {% endfor %}
    </ul>

    <div class="action">
      <img src="{% static 'img/globe.png' %}" alt="login" />
      <a class="">
        Login
      </a>
      <a class="btn">
        <span>Start Now</span>
        <svg xmlns="http://www.w3.org/2000/svg" class="fill-white" height="20" viewbox="0 96 960 960" width="20"><path d="m561 814-43-42 168-168H160v-60h526L517 375l43-42 241 241-240 240Z"></path></svg>
      </a>
    </div>

  </div>
</nav>
This snippet consists of both the navigation menu, the app logo, and some other action buttons. It receives the menu items and renders them. The {% load static %} loads the static assets to be used in the template
two-columns.html
{% for column in data %}
<section class="two-column" position="{{ column.image_position }}">
  <div class="max-w">
    <div class="image">
      <img src="{{ column.image }}" al="{{ column.image_alt }}">
    </div>
    <div class="text">
      <span class="tag"> {{ column.tag }} </span>
      <h1> {{ column.headline }} </h1>
      <p> {{ column.sub_headline }}</p>
    </div>
  </div>
</section>
{% endfor %}
This template snippet iterates over the list of two_columns coming from ButterCMS. For each iteration, it generates a section with the class two-column and sets the position attribute dynamically based on the value of column.image_position. The position attribute indicates if the image comes before the text or not. Within the section, there is a container <div> with the class "max-w". Inside this container, an image is displayed with the source and alternate text taken from the column.image and column.image_alt variables, respectively. Also, there is a text container <div> that displays the tag, headline, and sub-headline, all obtained from ButterCMS.
features.html
<section class="features">
  <div class="max-w">
    <div class="c">
      <h1>
        <hr />
        <div>{{ data.headline }}</div>
      </h1>
      <p class="sub">{{ data.sub_headline }}</p>
    </div>
    <div class="feature-items">
      {% for item in data.feature_items %}
      <div>
        <div>
          <div><img src="{{ item.icon }}" /> </div>
          <h3> {{ item.title }} </h3>
          <div>{{ item.sub_title }}</div>
        </div>
        <div>
          <a class="action" href="{{ item.button_link }}">
            Read More
            <svg xmlns="http://www.w3.org/2000/svg" class="fill-emphasis" height="20" viewbox="0 96 960 960" width="20"><path d="m561 814-43-42 168-168H160v-60h526L517 375l43-42 241 241-240 240Z"></path></svg>
          </a>
        </div>
      </div>
      {% endfor %}
    </div>
  </div>
</section>
The features template component is responsible for rendering the headline, sub-headline, and feature-items fetched from ButterCMS. Within the template, the feature-items are iterated through, and each item is rendered with an icon representing the feature, a title, a sub-title, and a link for further information about the feature.
footer.html
<footer >
<div class="max-w">
<div class="p1">
<div class="logo">
<svg xmlns="http://www.w3.org/2000/svg" class="fill-white" height="40" viewbox="0 96 960 960" width="40"><path d="M220 836h240V656H220v180Zm0-220h240V316H220v300Zm280 220h240V536H500v300Zm0-340h240V316H500v180ZM180 936q-24 0-42-18t-18-42V276q0-24 18-42t42-18h600q24 0 42 18t18 42v60h60v60h-60v150h60v60h-60v150h60v60h-60v60q0 24-18 42t-42 18H180Zm0-60h600V276H180v600Zm0-600v600-600Z"></path></svg>
<span class="text-lg font-extrabold">Dashionic</span>
</div>
<div class="action">
Ready to get started?
<a class="btn">
<span class="text-sm">Start Now</span>
<svg xmlns="http://www.w3.org/2000/svg" class="fill-white" height="20" viewbox="0 96 960 960" width="20"><path d="m561 814-43-42 168-168H160v-60h526L517 375l43-42 241 241-240 240Z"></path></svg>
</a>
</div>
</div>
<div class="center">
© <span id="date"></span> <a href="https://dribbble.com/shots/19822088-Solutions-Page-Couponic"><b>Dribble</b>: Solutions Page - Couponic</a>
</div>
<script>document.getElementById("date").innerHTML = new Date().getFullYear();</script>
</div>
</footer>The footer.html file contains templates that are rendered at the bottom of the landing page. It has a call-to-action button.
index.html
After successfully configuring the component templates, you can then create the page index.html, which will serve as a port for the construction of the landing page. In this file, you'll write several template conditional statements that will determine which component is rendered based on ButterCMS data.
To proceed, create a file called index.html in the pages/templates directory and add the following:
{% load static %}
<!doctype html>
<html>
<head>
  <meta charset="UTF-8">
  <meta name="viewport" content="width=device-width, initial-scale=1.0">
  {% include 'components/seo.html' with data=data.seo %}
  <link rel="preconnect" href="https://fonts.googleapis.com">
  <link rel="preconnect" href="https://fonts.gstatic.com" crossorigin="">
  <link href="https://fonts.googleapis.com/css2?family=Anton&family=Caveat:wght@700&family=Noto+Sans:ital,wght@0,100;0,200;0,300;0,400;0,500;0,600;0,700;0,800;0,900;1,100;1,200;1,300;1,400;1,500;1,600;1,700;1,800;1,900&display=swap" rel="stylesheet">
  <link href="{% static 'main.css' %}" rel="stylesheet">
</head>
<body>
  {% include 'components/nav.html' with data=menu %}
  {% for key, value in data.items %}
    {% if key == 'hero' %}
      {% include 'components/hero.html' with data=value %}
    {% elif key == 'features' %}
      {% include 'components/features.html' with data=value %}
    {% elif key == 'two_columns' %}
      {% include 'components/two-columns.html' with data=value %}
    {% else %}
      Component Not Found
    {% endif %}
  {% endfor %}
  {% include 'components/footer.html' %}
</body>
</html>
In the snippet above, {% load static %} tells the templating engine that the static file should be loaded. Then, the SEO data is injected into the head tag.
The code also contains a for loop that iterates through a dictionary called data and checks the keys for specific values. Depending on the key, a different component template will be rendered.
For example, if the key is hero, it includes a hero component using the components/hero.html file with the value value.menu passed in as a parameter.
Similarly, for other keys, the code includes different components like hero, two-columns, features, and seo using their respective HTML template files, passing in the appropriate values.
If the key doesn't match any of the above values, it displays a default message, "Component Not Found," in a <div> element.
Configuring our landing page in ButterCMS
To set up your page in ButterCMS, you’ll be utilizing pages. Pages allow you to create pages in ButterCMS by utilizing a combination of components, collections, and content fields to build your desired page structure.
To proceed, begin with the page's navigation section. The navigation is a consistent component across all pages that make up or are linked to the landing page. For this, you’ll be using the collections content type.
The collections content type is a structured set of data that can be referenced by other content types.
Creating the landing page navigation menu
To create the navigation section, proceed to the ButterCMS navigation menu and select the Collections menu button.
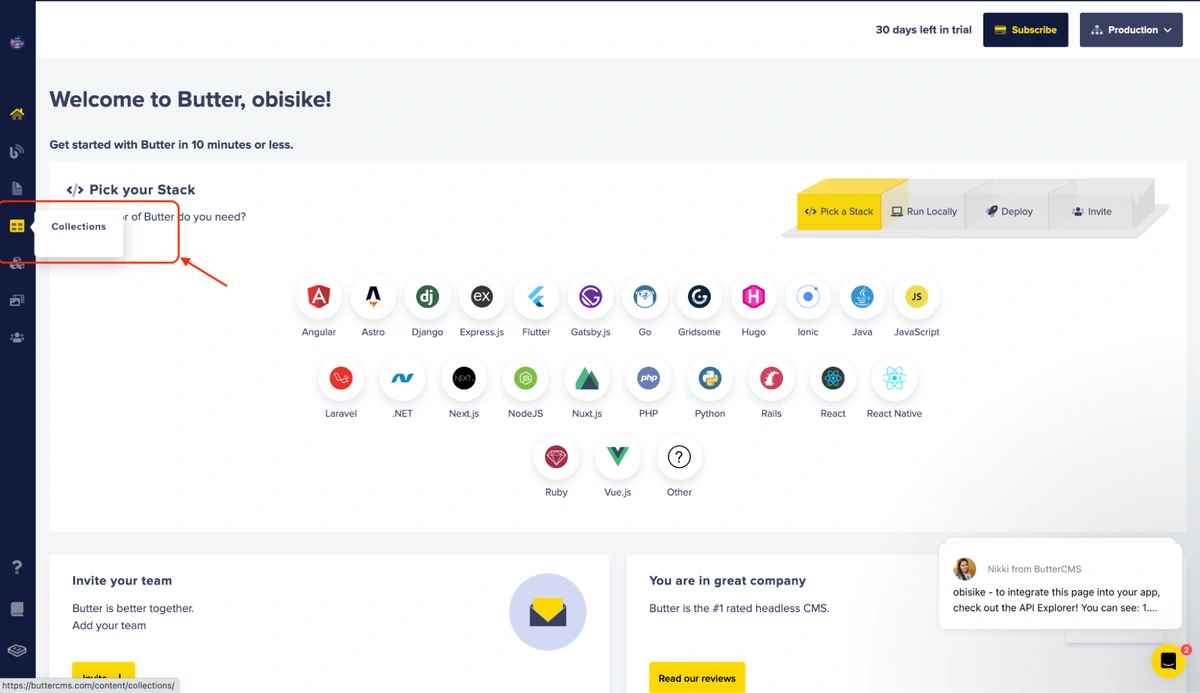
The Collections menu button in the ButterCMS navigation menu bar
This will navigate to an interface displaying a list of already existing collections. Then click on New Item and select Create New Collection to create the collection:
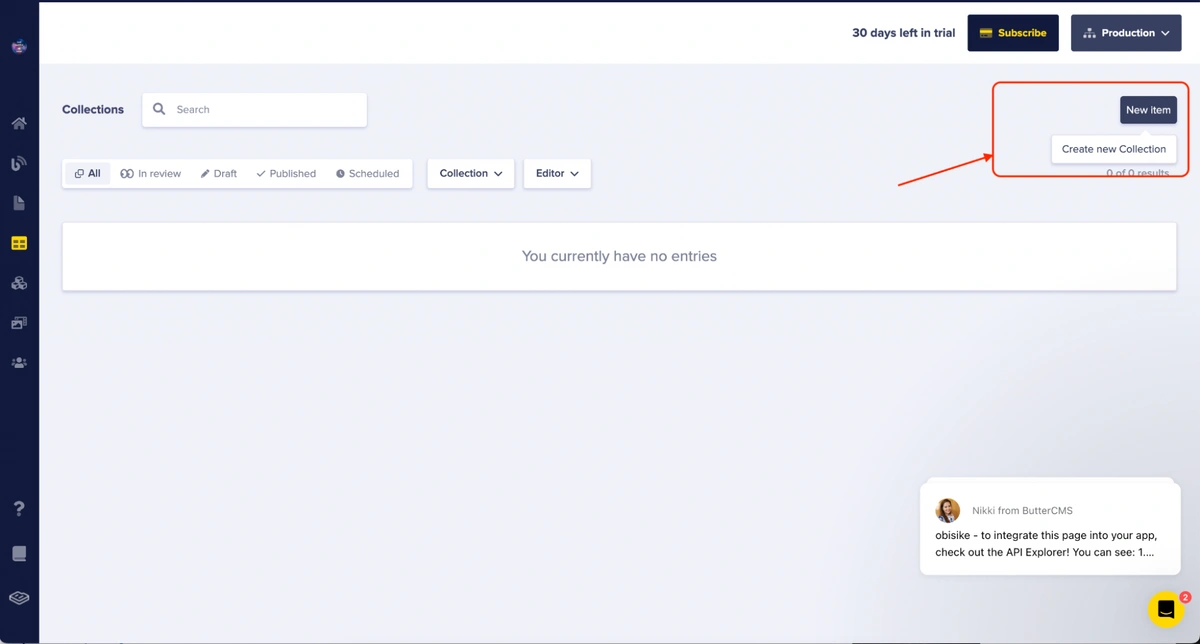
The New Item button
This will display a New Collection Configuration screen to add the collection fields.
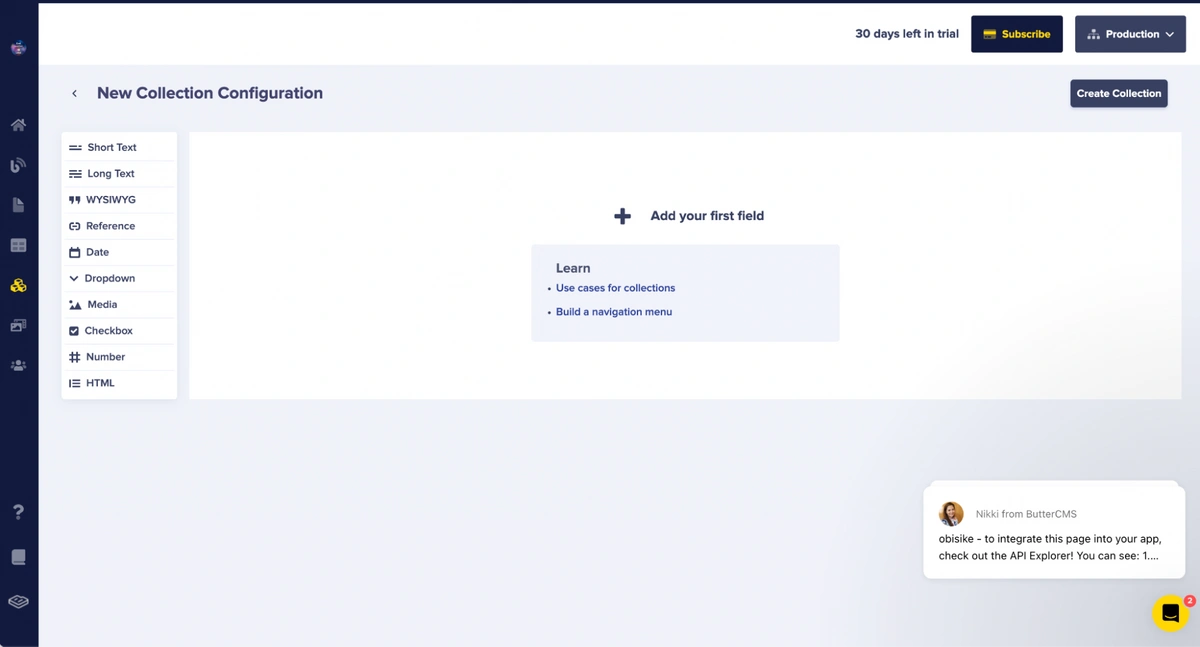
The Create Collection interface
Select the following fields and add the content defined here:
-
Short text field: label
-
Short text field: href
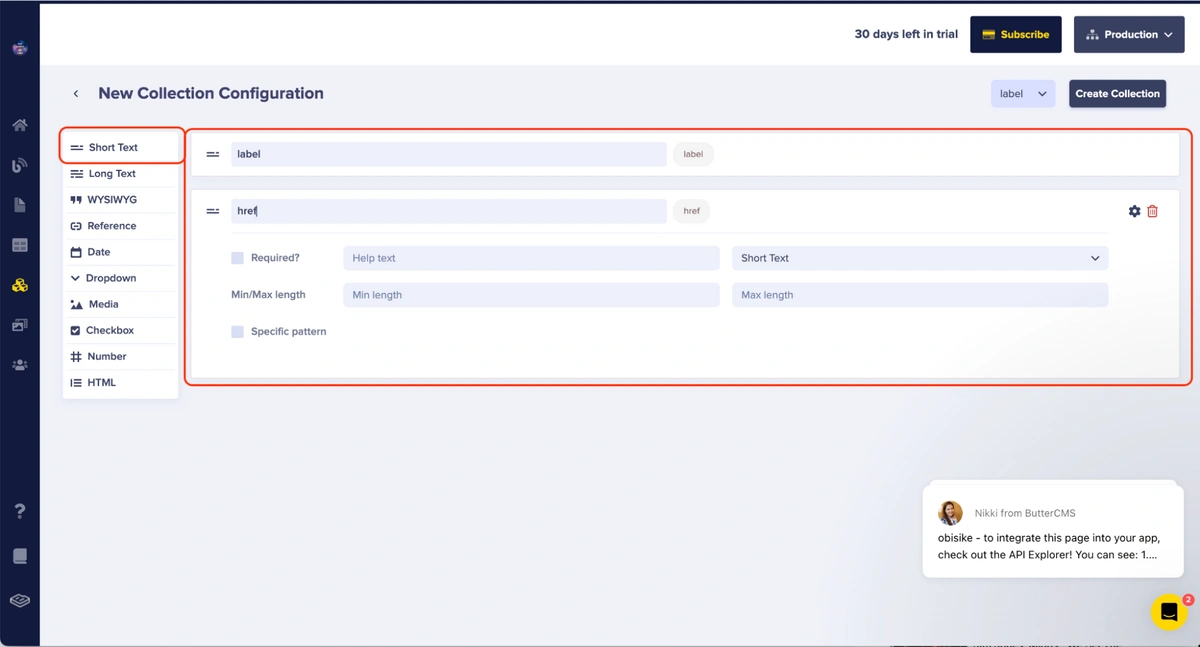
The short text field menu and an interface to add the contents
After that, click on Create Collection.
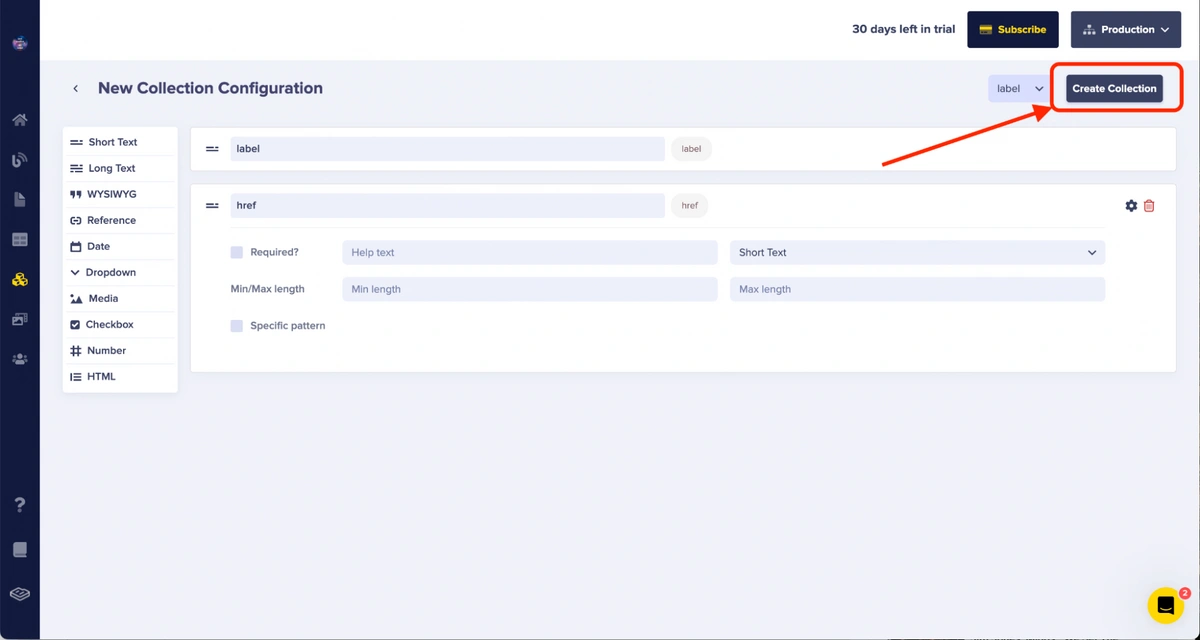
The Create Collection button
This will provide an input to enter the name of the collection. In this case, enter menu-item as the collection's name.
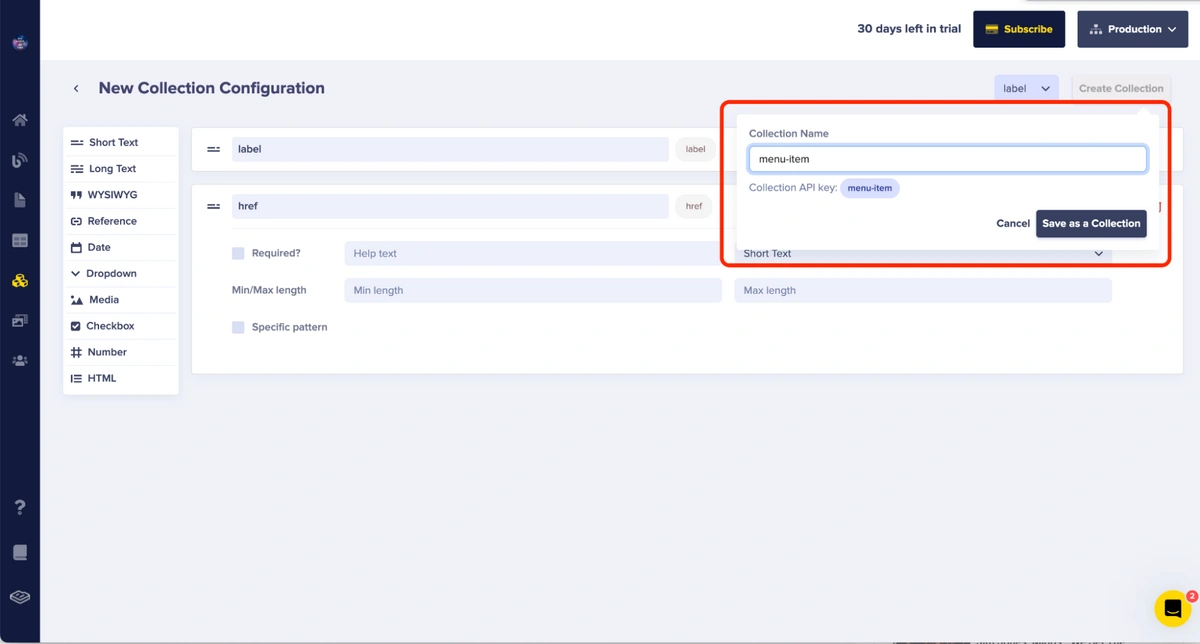
The form to enter the collection’s name
Then, to save the collection, click Save as a Collection. This action takes you to the interface where you can enter the collection data.
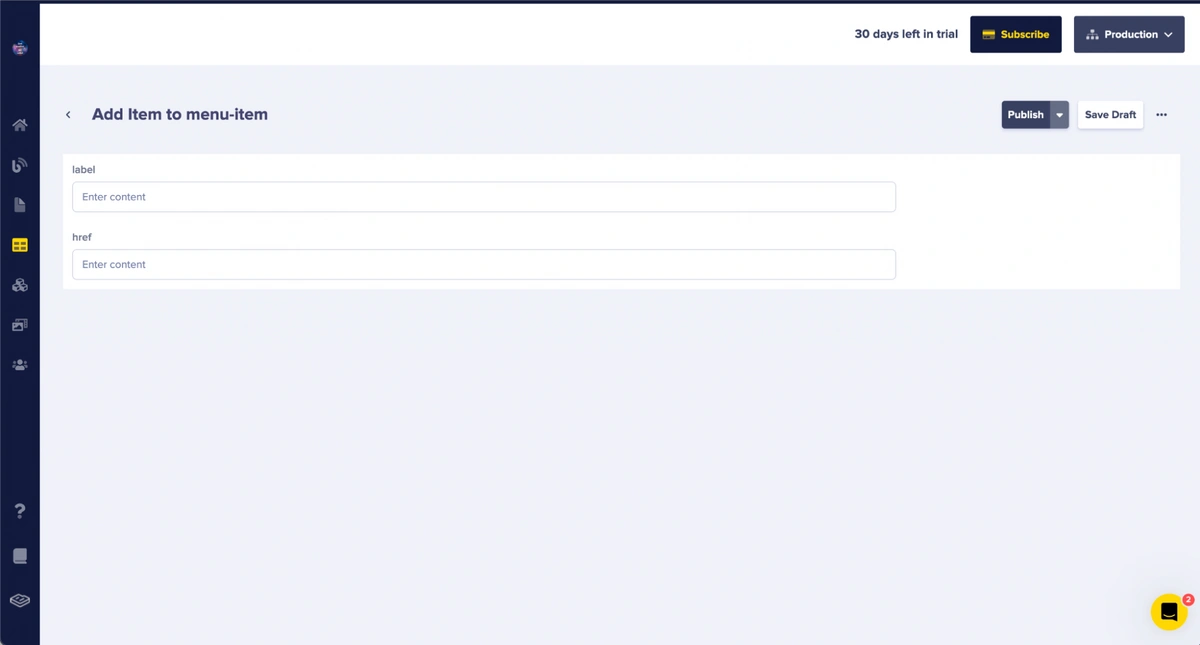
The interface to enter the data for the collection item
Enter the values Home for the label and home for the href, then click Publish to publish the data entry.
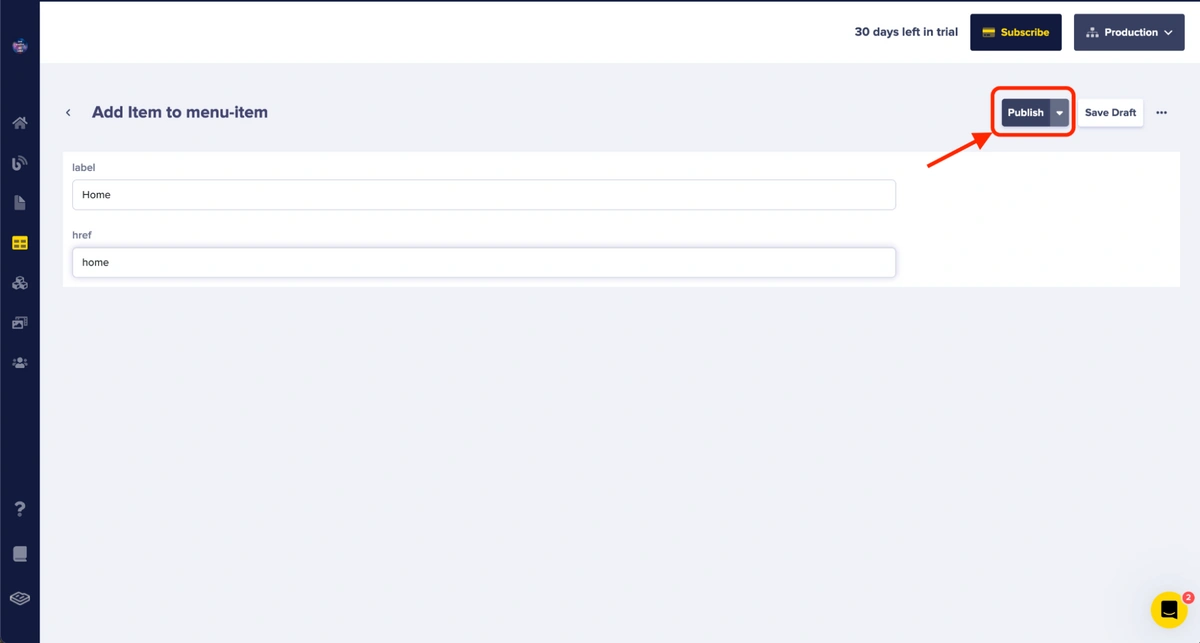
The data entered and the Publish button
After saving is successful, this will take you to a screen to edit the content previously entered.
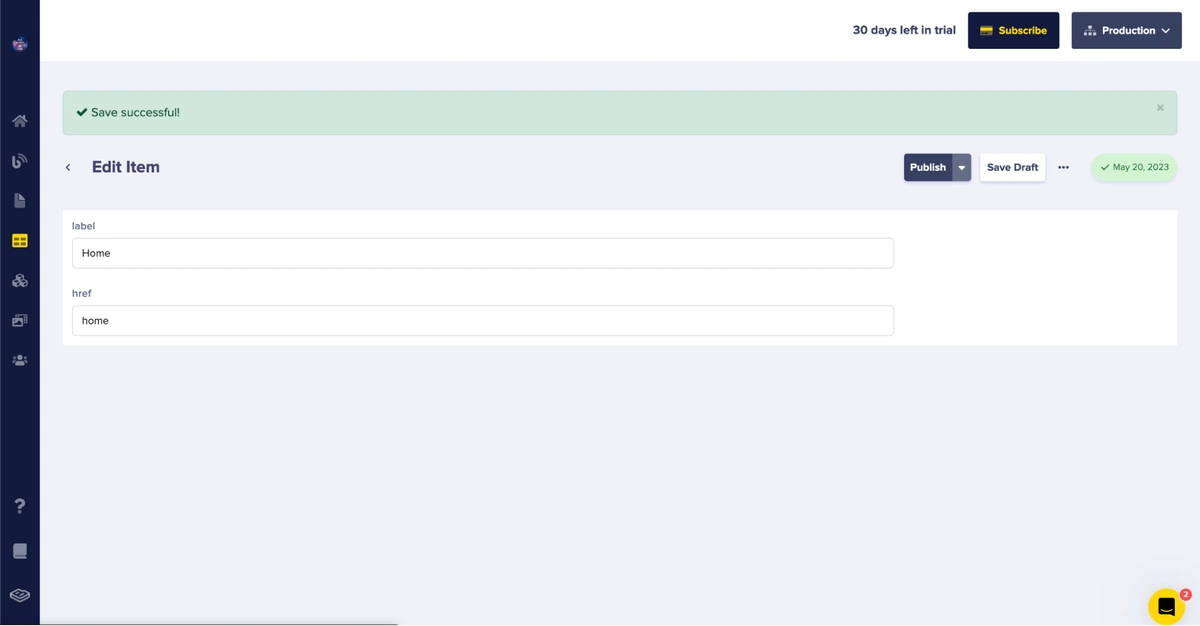
A “saved successfully” alert and the edit screen
Then, in the navigation bar, hover over the Collections menu button; this will display the menu-item collection we created. To add more menus, click the + icon next to the menu item.
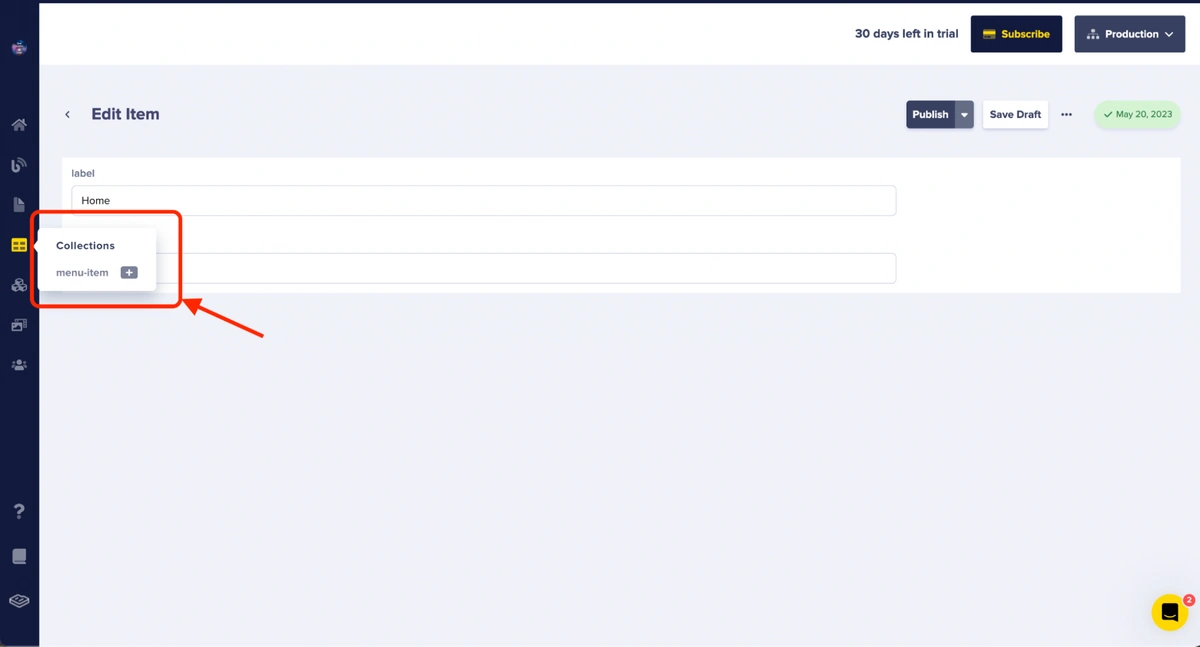
The + button next to a menu item
Then, enter Solution for the label field and Solution for the href field.
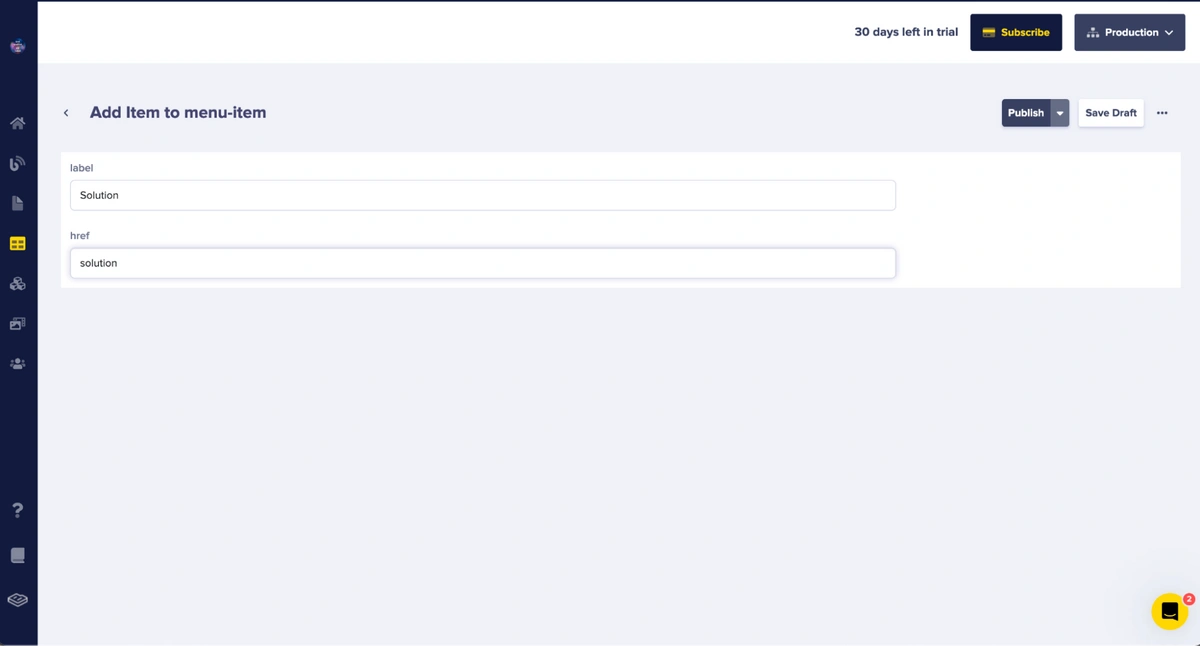
The data entered for the Solutions menu
Click on Publish to publish this item.
Repeat these steps to add the following:
|
Label |
Href |
|
Functions & Prices |
functions-and-prices |
|
FAQ |
faq |
|
Blog |
blog |
Following that, you can create a new collection named menu that will reference the items with the menu-item collection, effectively grouping them together.
To create the menu collection, repeat the process of creating a new collection.
The menu collection should include two fields:
-
name — short text
-
menu-items — Reference field
To create a reference field, click on the Reference field from the list of fields.
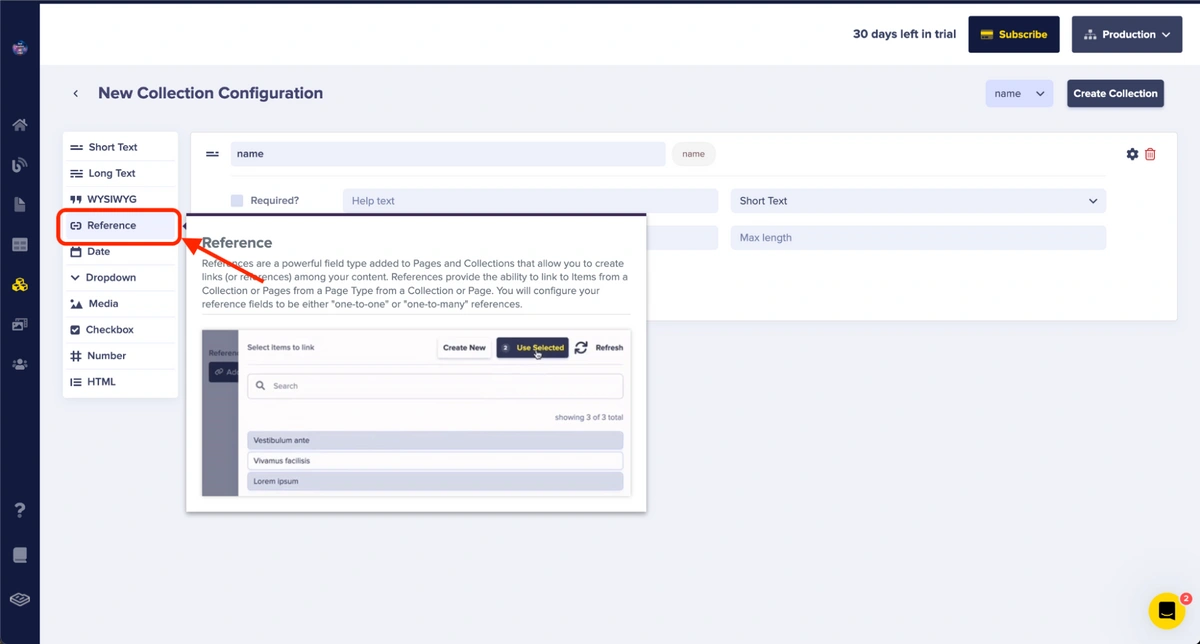
The Reference button for adding the reference field
Enter menu_items as the name of this field, then select the menu-item collection from the What will this reference? dropdown. Because this field is required for multiple menu items, set the next option to One-to-many.
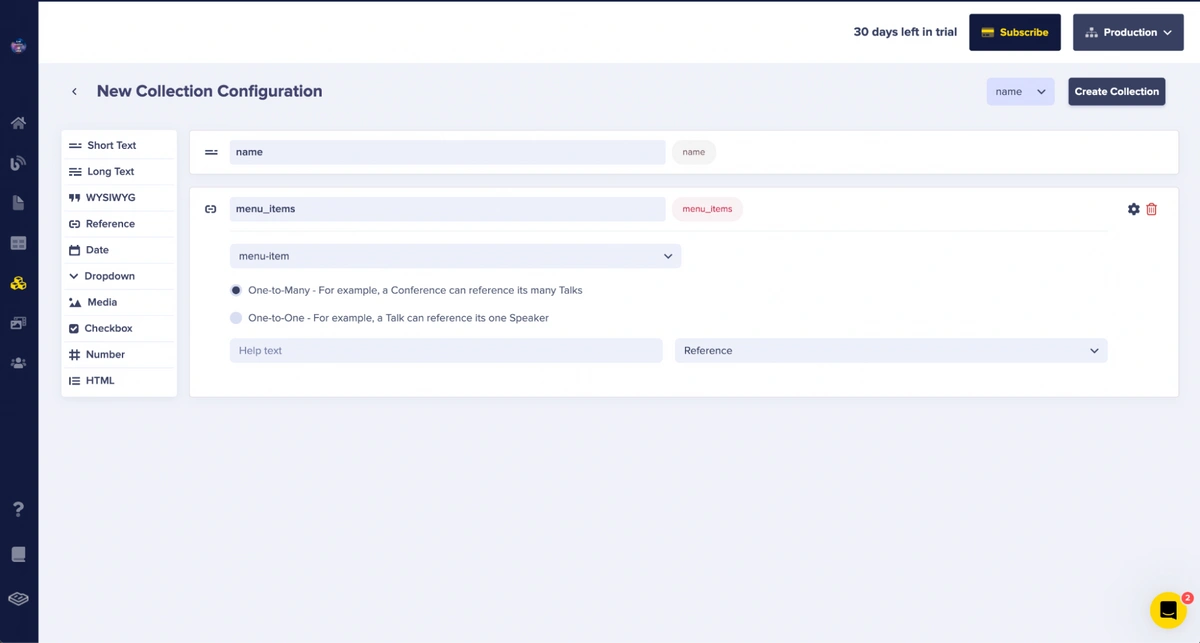
The entered configuration for the menu reference field
Create the collection and then proceed to add entries to it.
To add the menu items, enter the value landing_page for the name and click the Add Reference button.
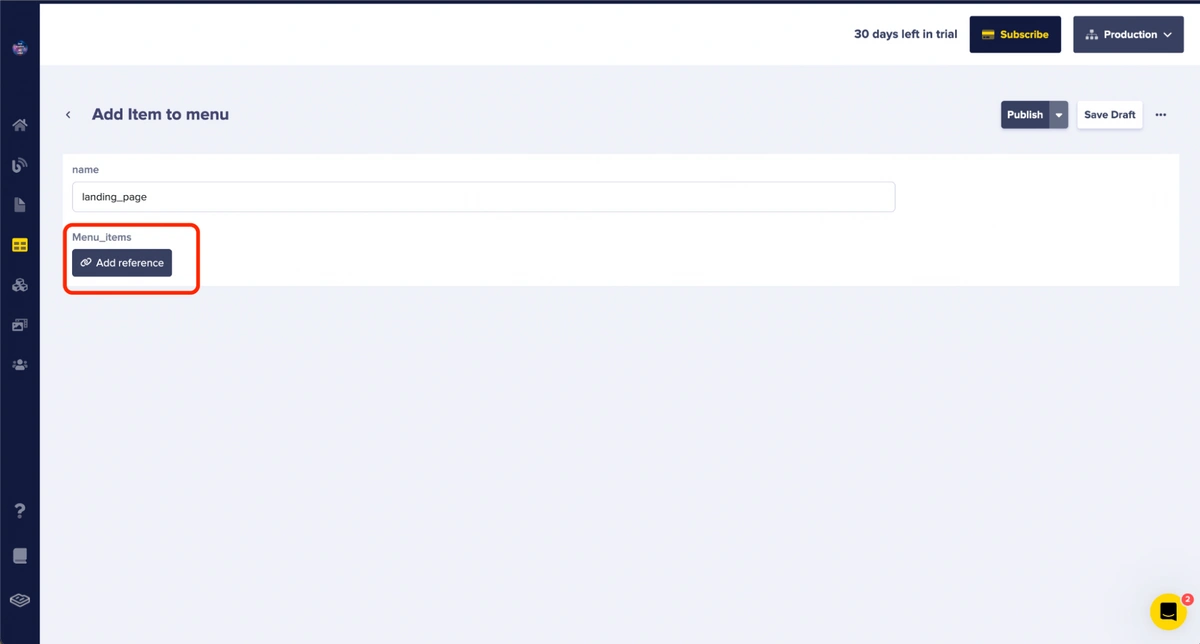
Then, from the list of menu items displayed, select the items from the menu items collection that you'd like to add to this menu.
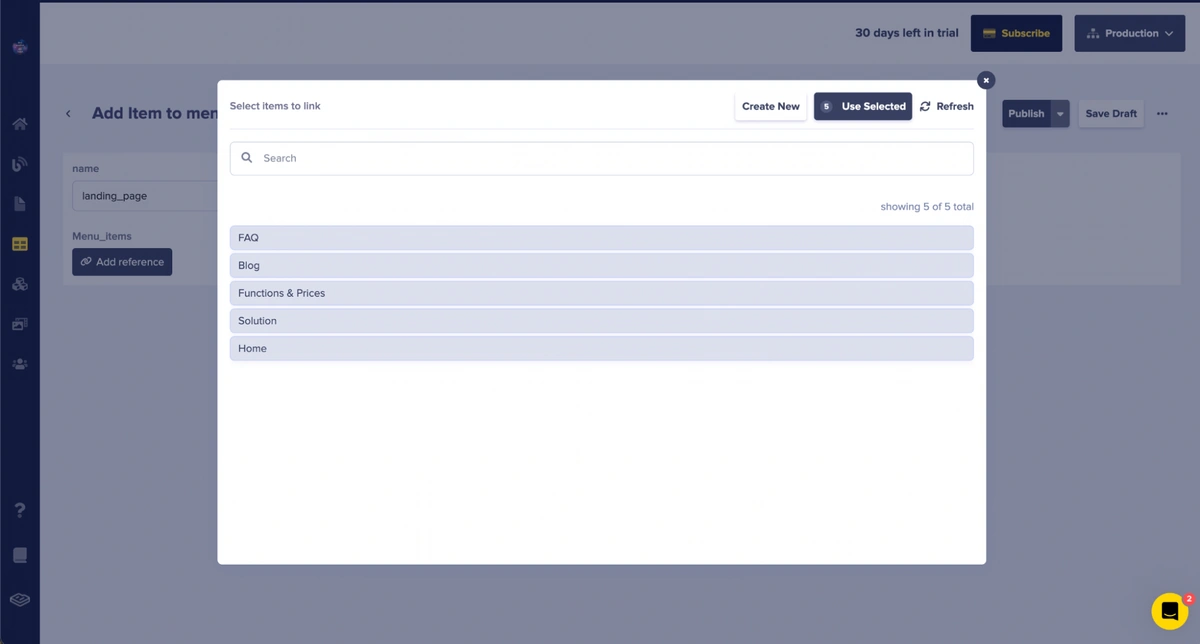
The list of menu-items
Click Use Selected to add them to the menu.
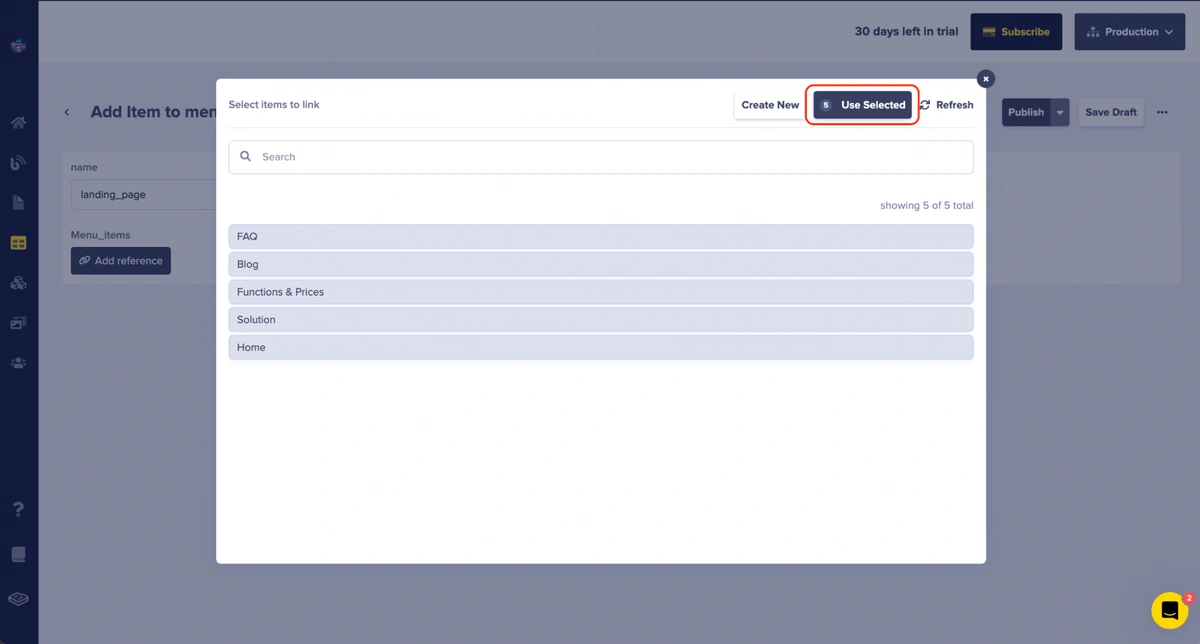
Once the items have been added, you can then click on Publish to save the menu data.
Next, you’ll proceed to create the landing page content.
Creating different components for the landing page
To create the page, click on the Pages menu in the ButterCMS dashboard navigation bar.
The pages menu
Then, after clicking the New Page button, select the Create New Page option from the dialog that appears after clicking the New Page button.
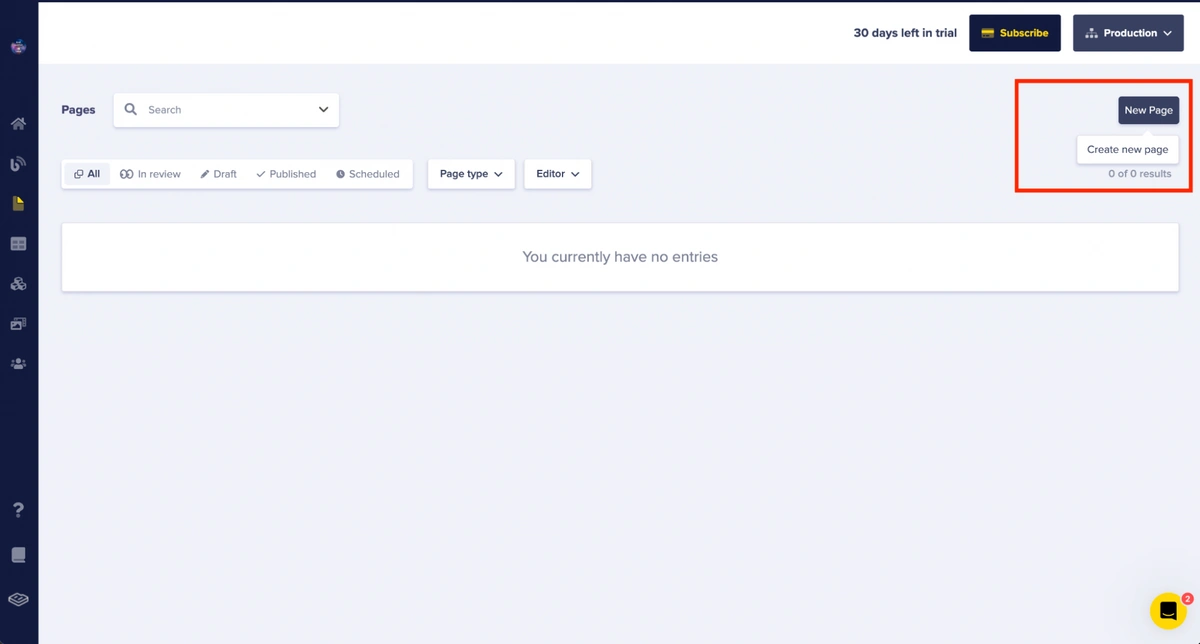
The New Page button and the dialog to select the Create New Page option
Given that we want our landing page to contain different sections, we will need the component field type. The component field options allow you to create reusable components. This is excellent for categorizing sections on our landing page.
Hero section
For the first section, the Hero section, click on the component field type:

Then, click on the Create Component button.
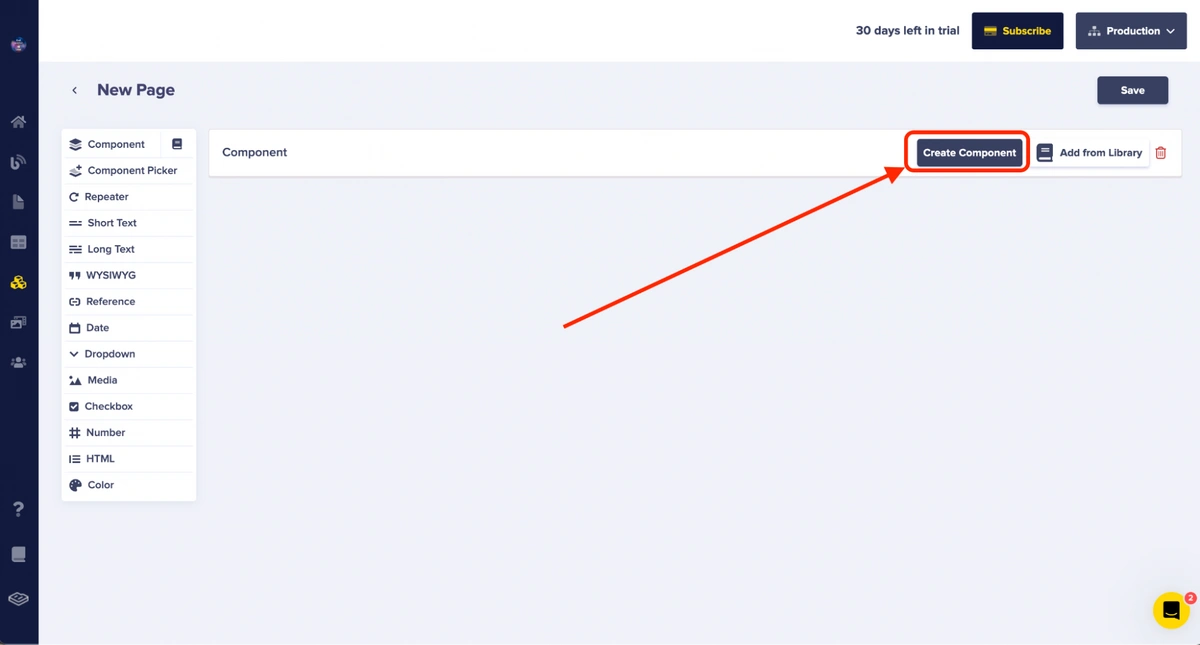
The Create Component button
Enter "hero" as the component name, followed by "This is the hero section of the page" as the description. Then, in the Component Creation interface, add the fields using the inner field option tab.
Create the following fields:
-
Short text — headline
-
Long text — sub_headline
-
Short text — image_alt
-
Media — image
To create the media field (image), click on the Media field type.
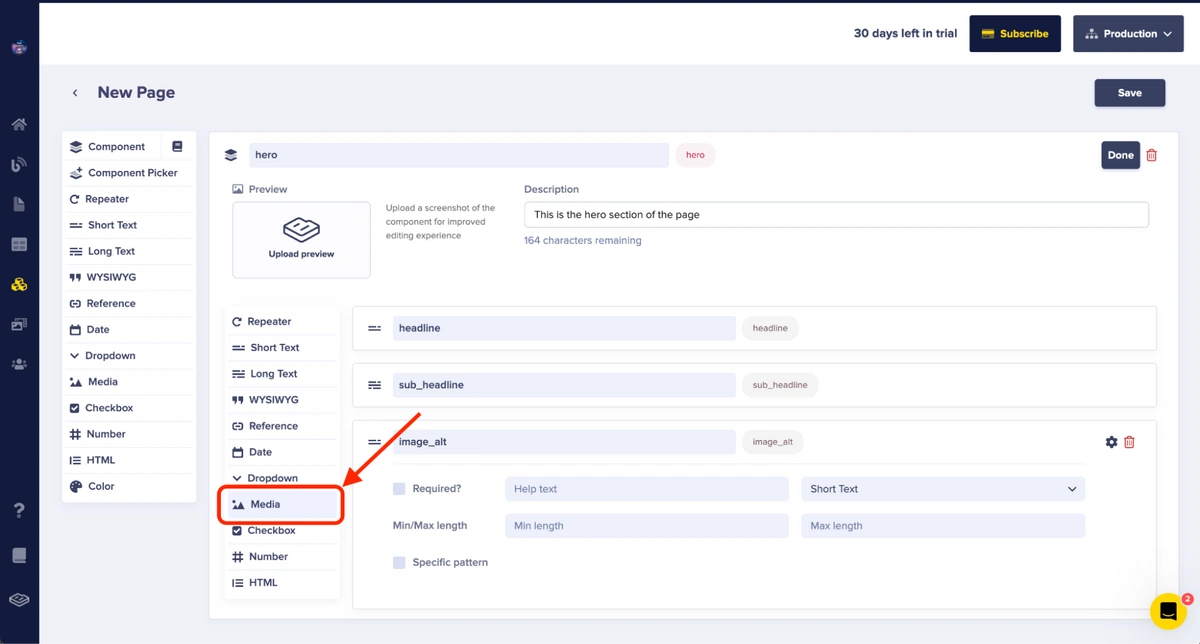
The Media field type option
Then, enter the field's name as image. After that, click Done.
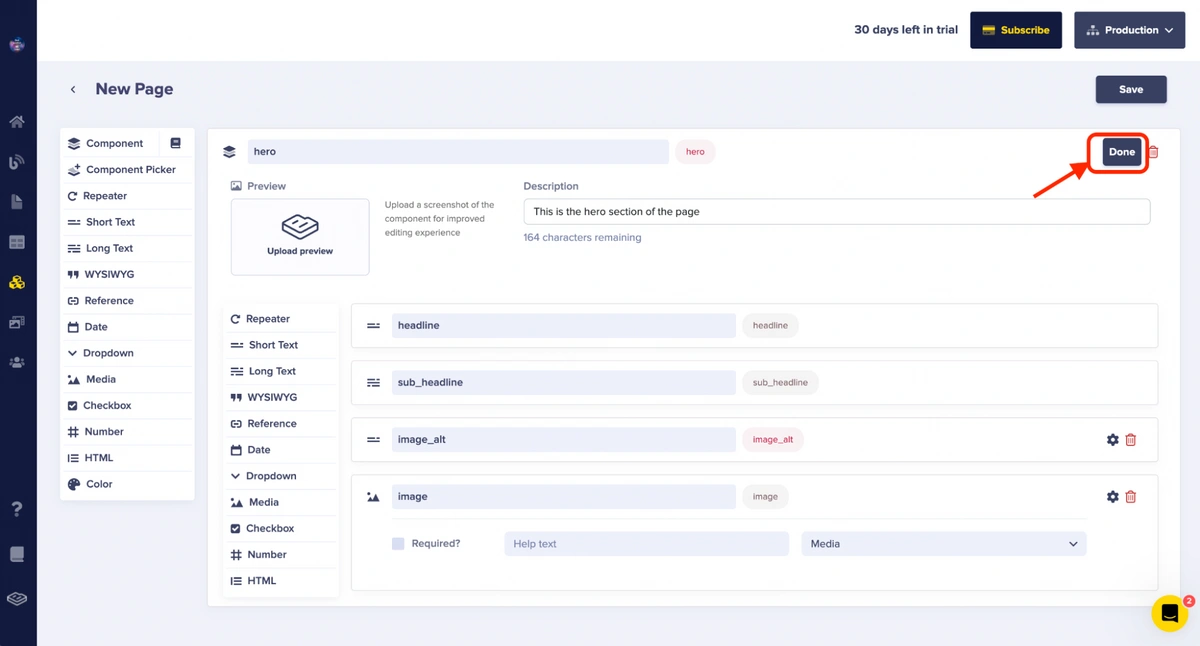
The Done button
Features section
Following that, you add the Feature component. Repeat the steps used to create the Hero section, but this time set the field name to Feature, the description to “This is the Features Section”, and add the following fields:
-
Short text — headline
-
Long text — sub_headline
-
Repeater — feature_items
To create the repeater field, click on the Repeater field type.
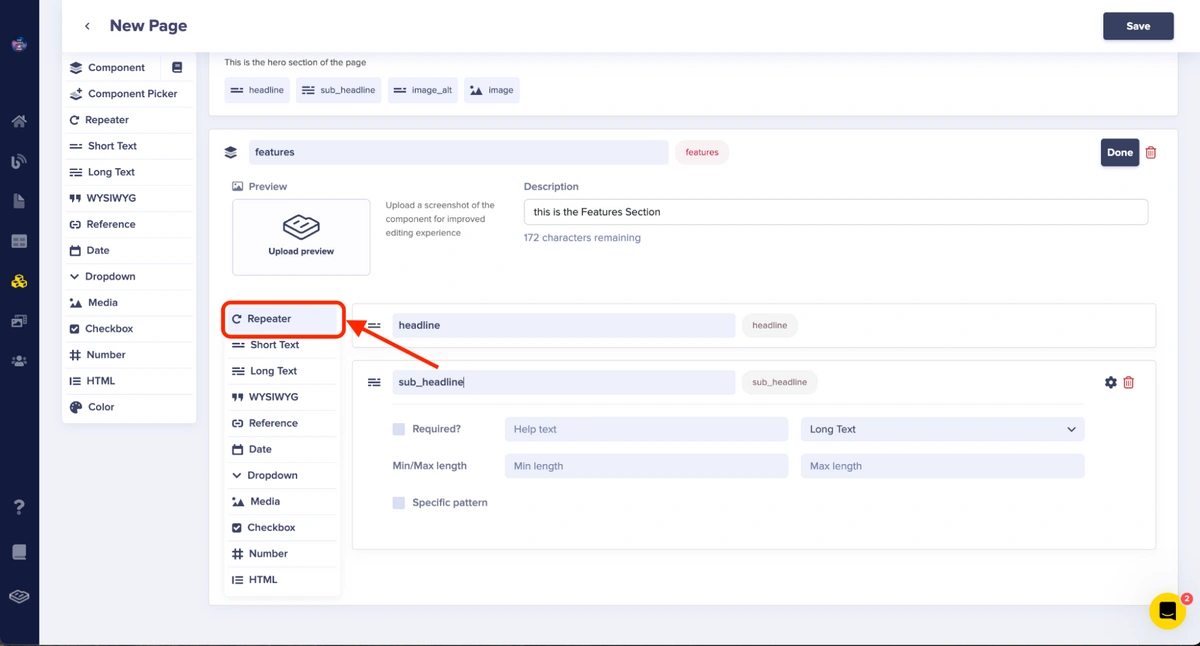
The Repeater field type option
The repeater field type allows you to create a set of fields that can be grouped.
Create the following fields using the field options provided by the repeater field type:
-
Short text — title
-
Short text — sub_title
-
Short text — button_link
-
Media — icon
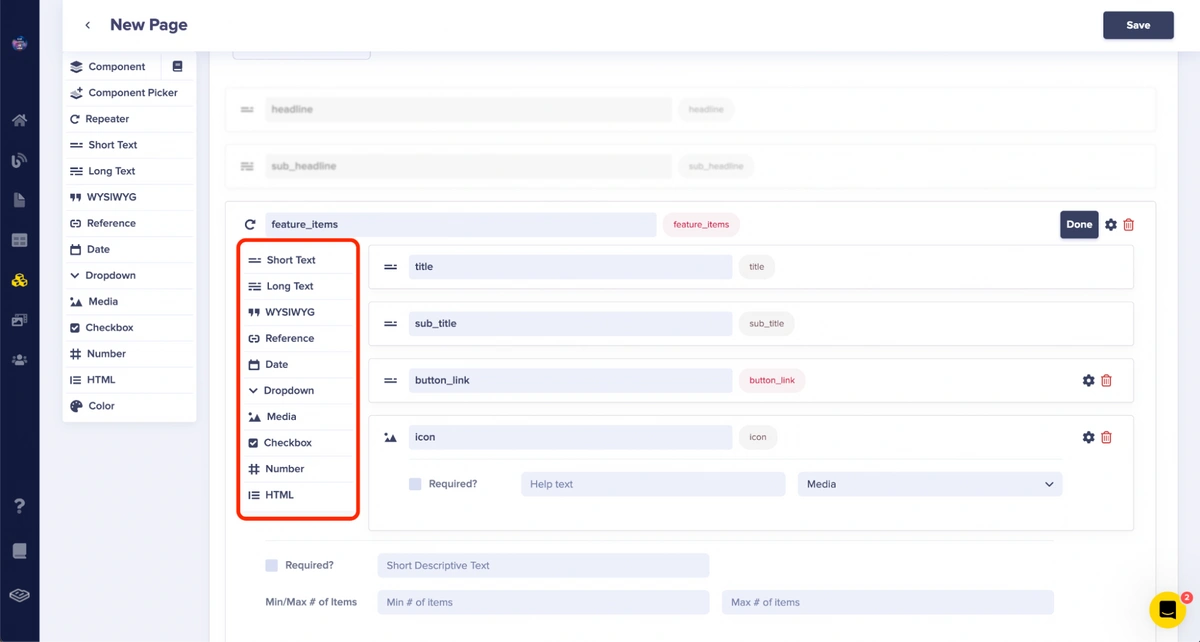
The repeater’s field options
Then, click Done to save the repeater field. Click Done to save the Features component.
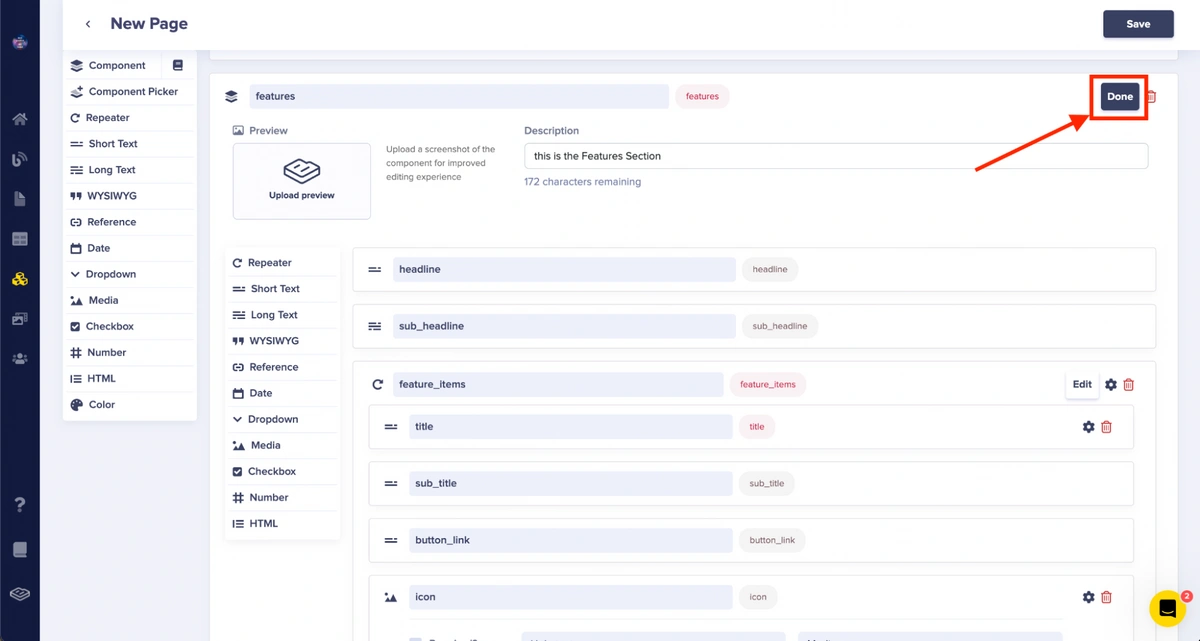
The Done button for the Features component
Two-column layout sections
This section is divided into multiple two-column sections. You will use the repeater field type instead of the component field type to accomplish this. This decision is based on the landing page's requirements, which require a series of two-column sections.
You can quickly generate a list of grouped fields by using the repeater field.
Click on the Repeater field option with the name two_columns, then create the fields:
-
Short text — tag
-
Short text — headline
-
Long text — sub_headline
-
Media — image
-
Short text — image_alt
-
Dropdown — image_position
To create the dropdown field, choose the Dropdown field type and enter "image_position" as the name in the designated field for the dropdown field's name.
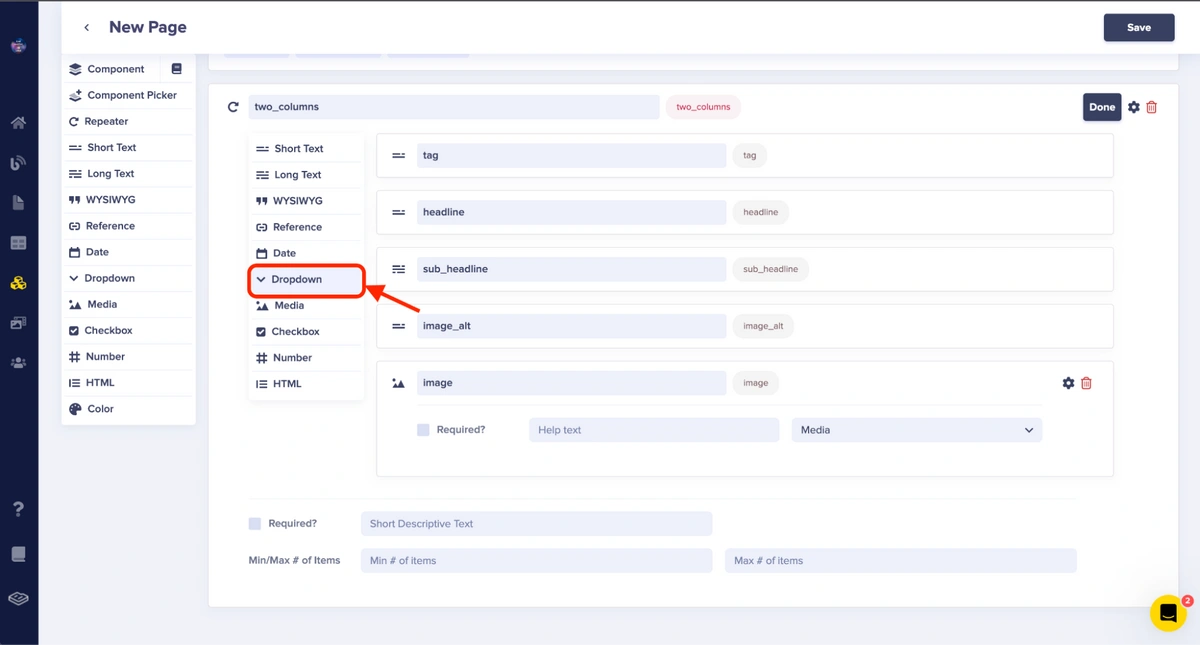
The Dropdown field type option
Next, in the "Enter choice" input, type "Right" and press the Enter or Return key on your keyboard. This action will generate additional input for entering more options. For the next option, type "Left".
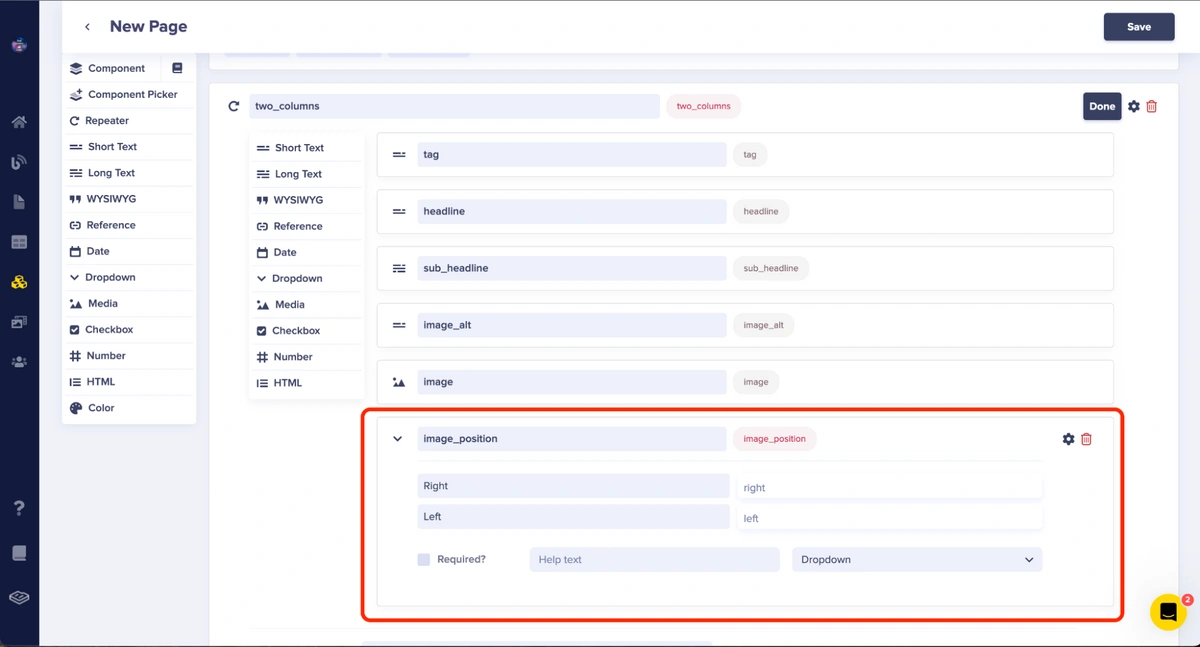
A screenshot showing the Dropdown field
Then click Done.
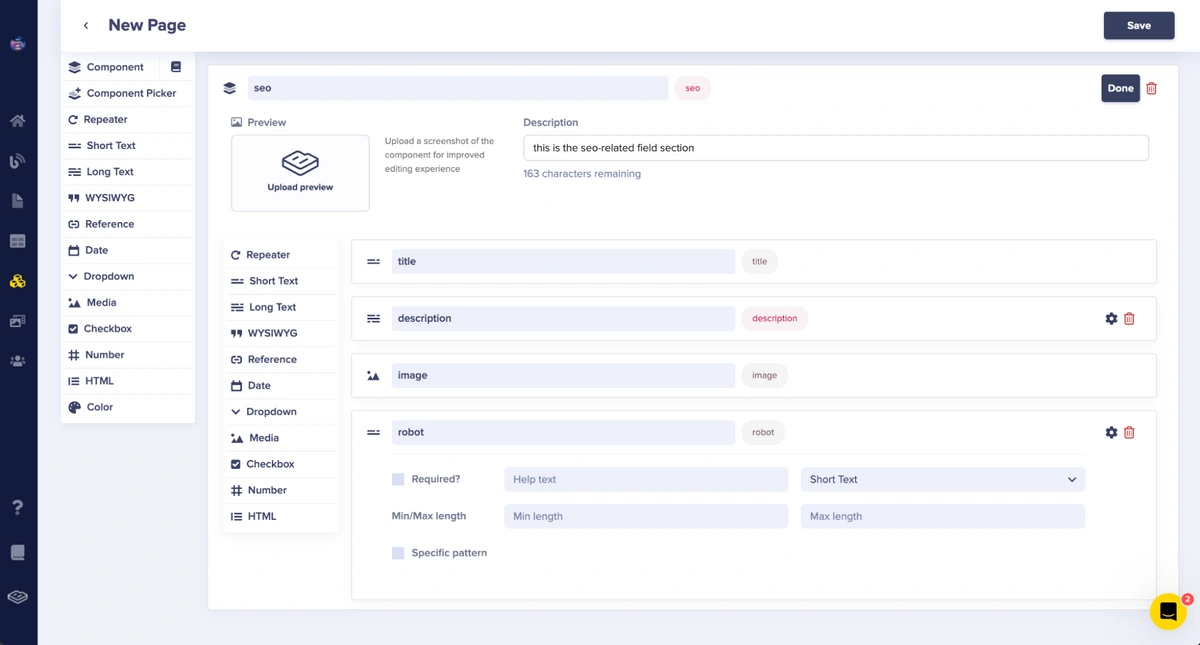
SEO section
Next, you’ll add the SEO section for the landing page. This will contain the fields required for the meta tags of the landing page.
For this, create the component using the steps used when creating the Hero section.
Set the name of the field to seo, then the description to “this is the SEO-related field”.
Create the following fields for this component:
-
Long text — description
-
Short text — title
-
Short text — robot
-
Media — image
The SEO component configuration
After these steps have been completed, click Save.
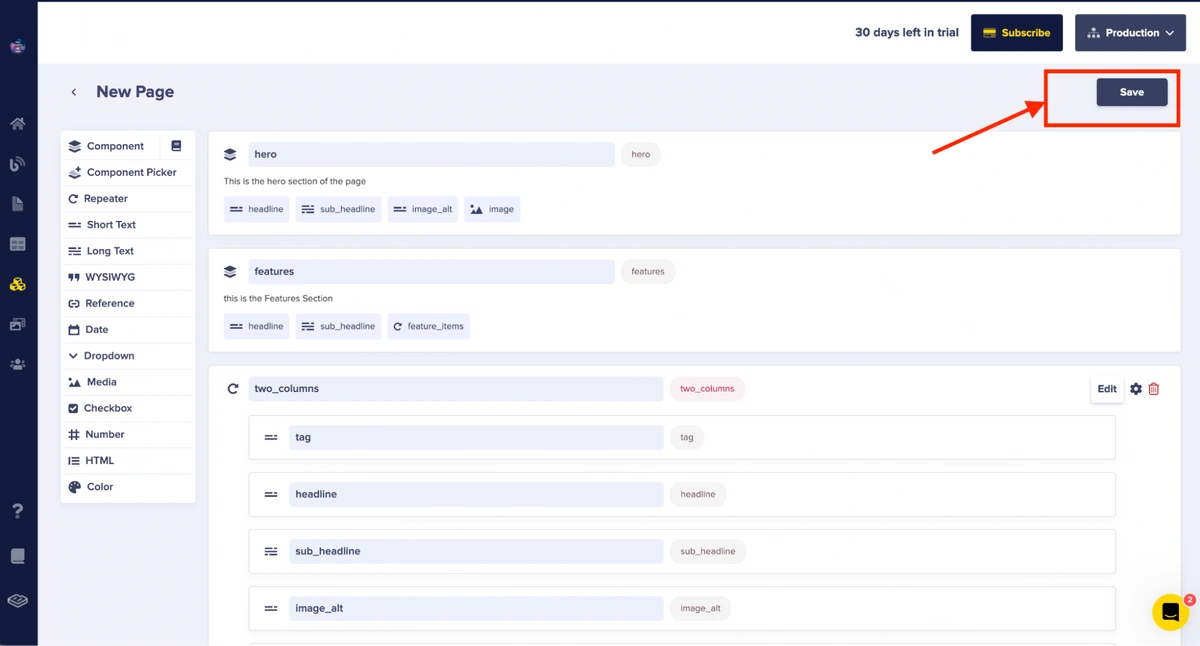
Select the Save button
Next, enter the page title as SaaS Landing Page, then click Save Page Metadata.
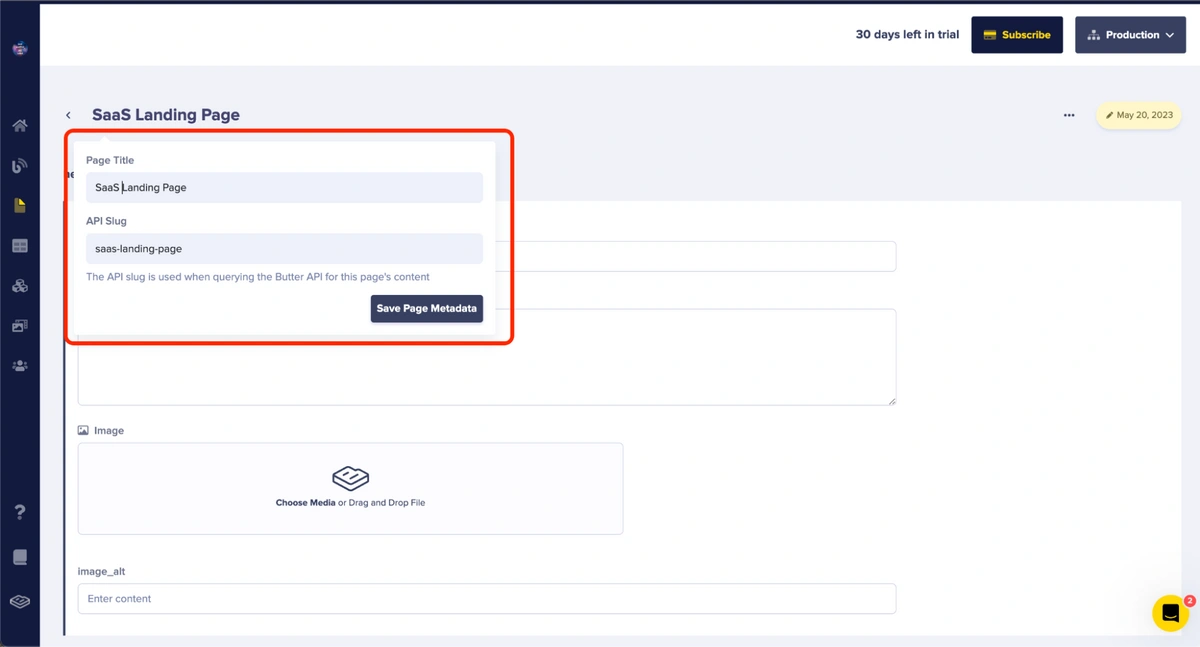
Page metadata section
Entering the landing page content
At this step, the page content type has been successfully created. Now, you can proceed with entering the content for each of the sections.
For the Hero section:
-
headline — Everything you need is on board.
-
sub_headline — Your <b>@Dashionic</b> account contains everything you need to maintain and manage your global businesses and platform.
-
image_alt — cool dashboard
-
image
To add an image, click the Choose Media or Drag and Drop form field.
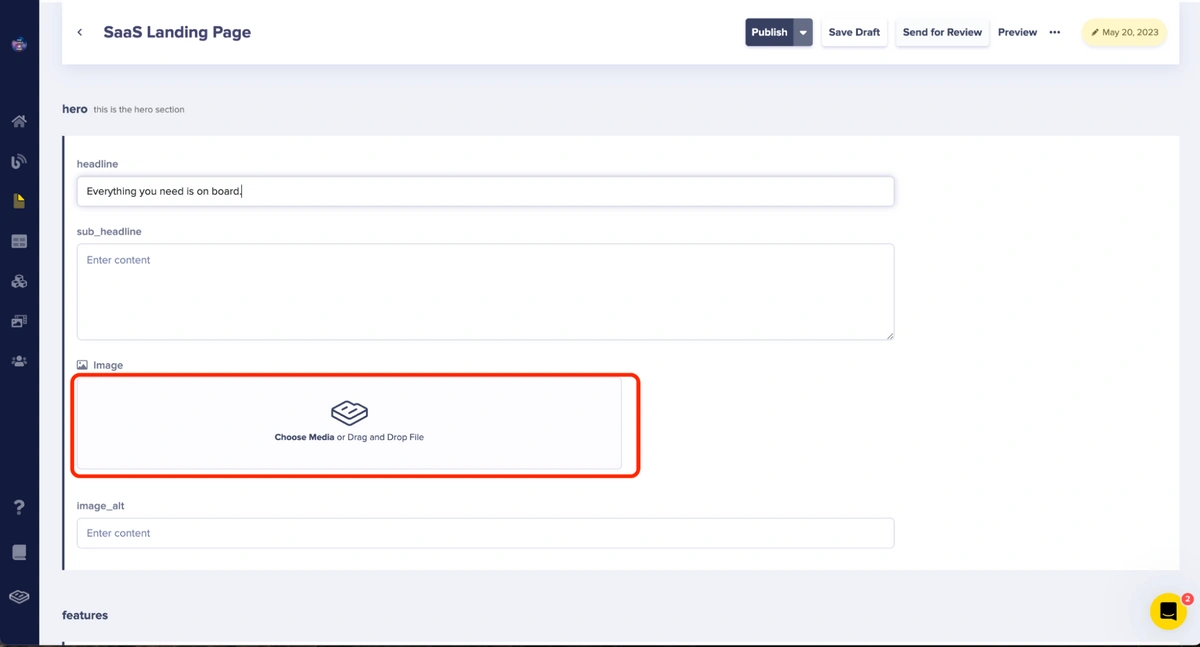
The form field where you can click to add an image
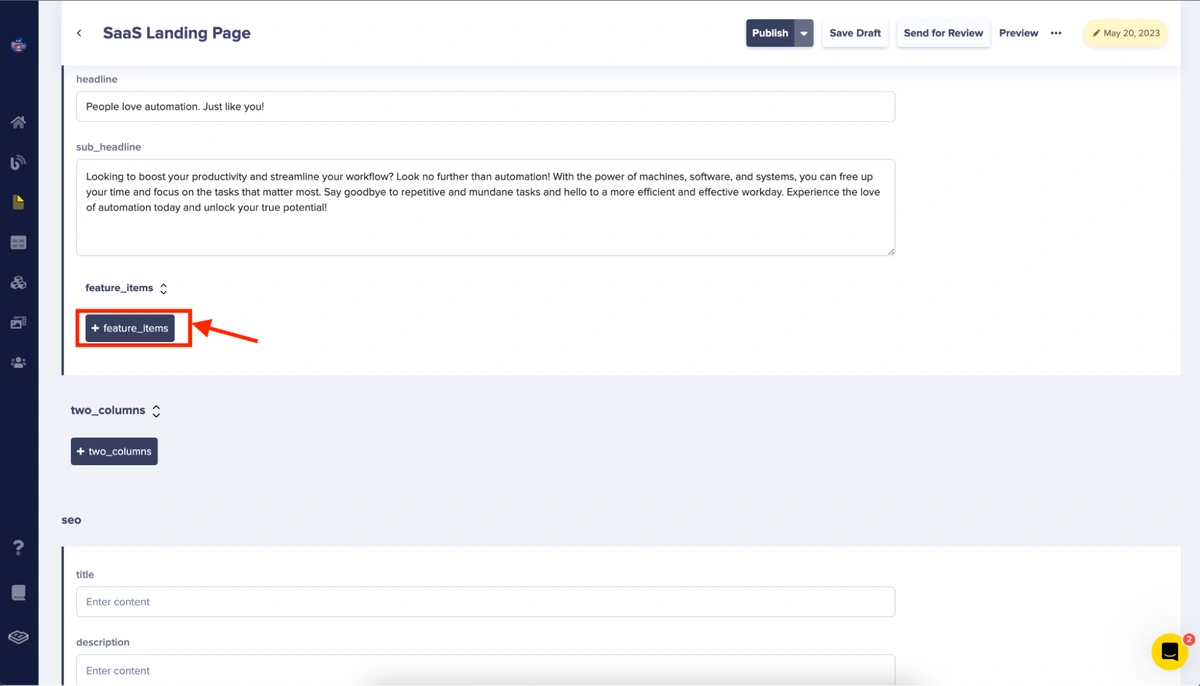
Next, add the features. Enter the content for the headline and sub_headline as indicated by the screenshot below, then click on the + feature_items button to add the features.
The feature_item button and the added content
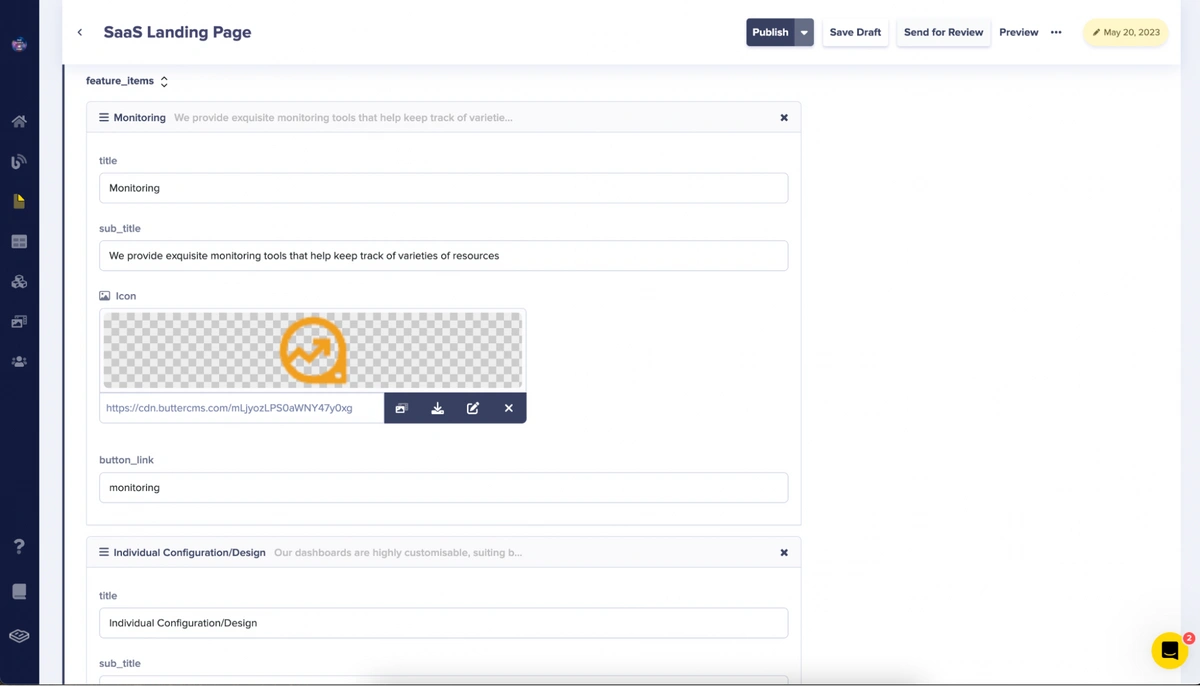
Then, as shown in the image below, enter the content for the feature_item fields: title, sub_title, icon, and button_link.
The added feature-item
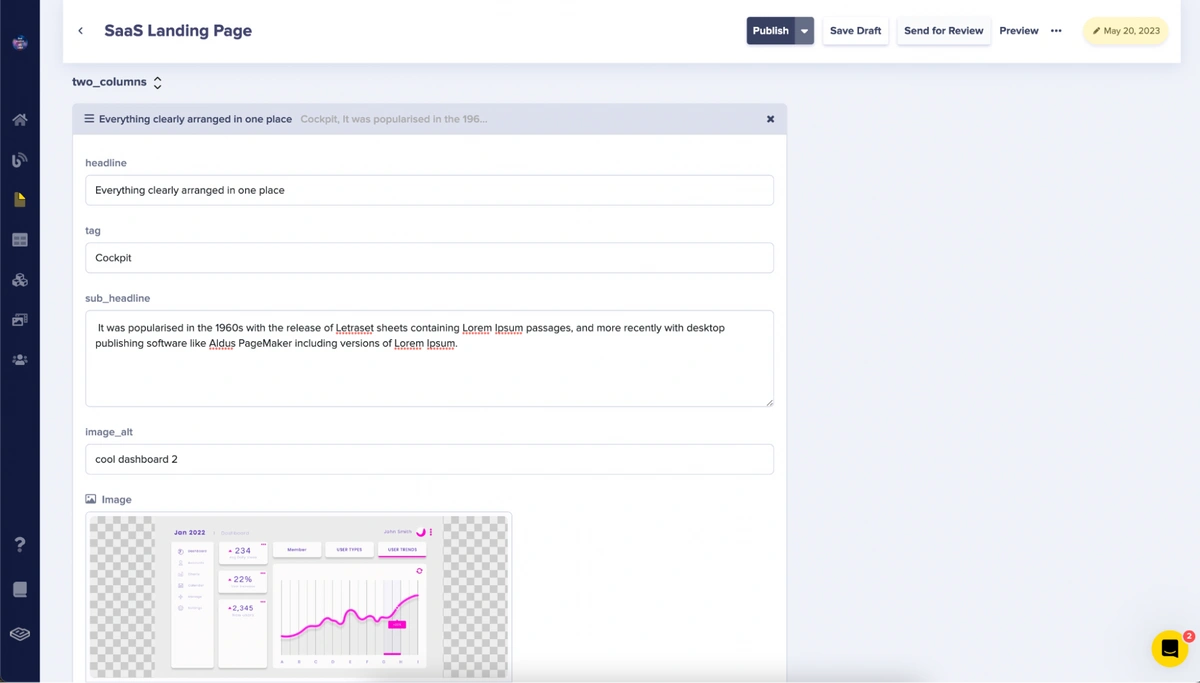
Following that, enter the content for the repeater field in the Two-columns section. As shown in the screenshot, enter the headline, tag, sub_headline, image, and image_alt content.
The added Two-columns section
Repeat these steps to add more Two-column sections.
Then enter the SEO content for the title, description, image, and robot as shown in the image below:
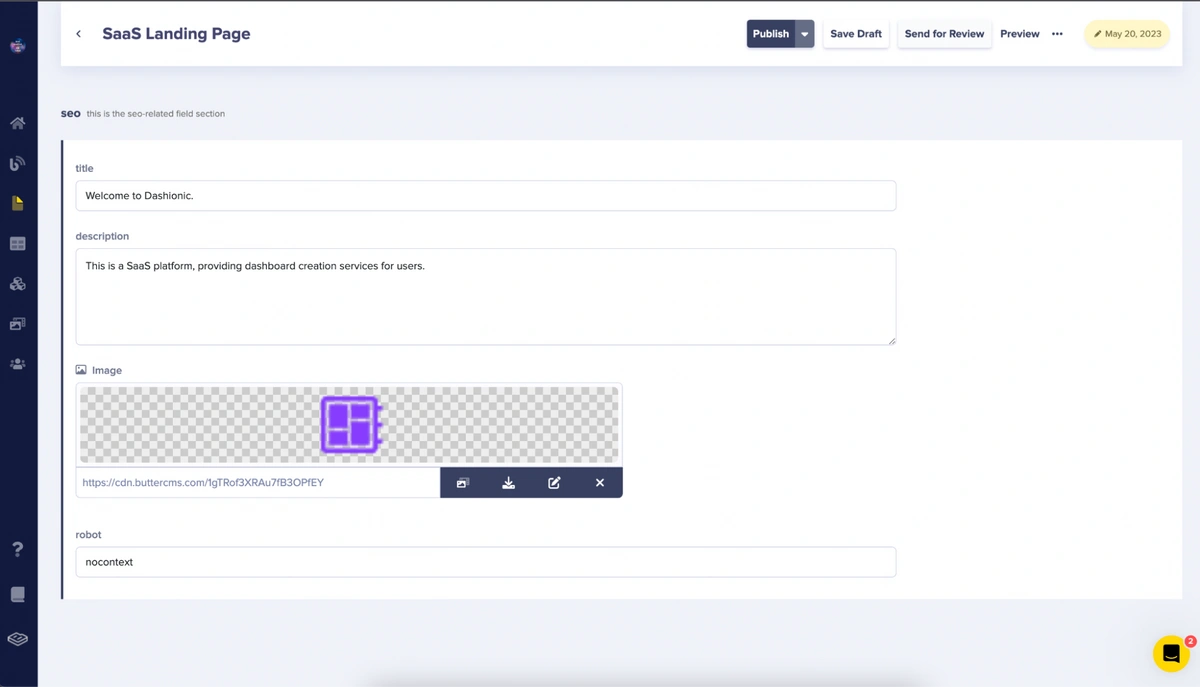
The added SEO content
In the image above, you’ve entered content for the fields title, sub_title, description, image, and robot.
Then, click Publish.
Next, you’ll run the landing page Django project to preview what you’ve been creating.
Serving our landing page
For this, you’ll navigate to the root directory of your project on the terminal and run the following command:
python manage.py runserver
This will start up the Django server, and then you can visit http://127.0.0.1:8000/ with your browser.
The created Django landing page
Final thoughts
Congrats! You've made it to the end end of this tutorial! By now you've learned a lot about the advantages of using ButterCMS with Django, as well as how you can use the power of ButterCMS to streamline your development process and improve the user experience of your website. By combining the flexibility of ButterCMS components with the robustness of Django, you now have the tools to easily create custom Saas-themed Django landing pages.
Whether you're creating a blog, landing page, or a complex web application, building with ButterCMS and Django will help you stand out from the crowd. Both of these technologies enable you to deliver dynamic and captivating pages that are simple to maintain and update, all while ensuring optimal performance and security.
To learn more about how you can use ButterCMS with Django, we sincerely recommend that you check out the following tutorials:

