With the introduction of no-code builders and traditional CMSs like WordPress, building a blog has become much easier—but this ease hasn’t come without its costs. One major limitation that comes with using these tools is the limited customizability for creating your desired interface. This isn’t the case with a headless CMS like ButterCMS which includes a plug-and-play blog engine that simplifies the process of building blogs.
Astro is a modern javascript framework that supports both static site generation (SSG) and server-side rendering (SSR). It is designed for building performant and content-focused applications such as marketing sites, documentation sites, blogs, etc while keeping the developer experience in mind.
In this tutorial, we will learn how to build a blog with Astro and ButterCMS.
Table of contents
Why use Astro?
As stated earlier Astro is a powerful web framework that offers support for both static site generation and server-side rendering, enabling users to create incredibly fast websites. However, that's not all Astro has to offer, here are a few other reasons why you should use Astro:
-
Flexibility: Astro’s featured set can be extended with over 100+ integrations which can be easily added to your project to fulfill your specific needs. It seamlessly supports popular frameworks like React, Vue, and Svelte, allowing you to utilize your existing expertise without the need for additional learning. For adding dynamic capabilities like rendering updated data from an API and personalizing a page for users, it includes the option to enable SSR.
-
Easy to use: Astro’s component language draws heavily from HTML, and any valid HTML snippet can be used as an Astro component. It incorporates some of the favorite features from other component languages, such as JSX expressions and CSS scoping. That makes it easy to learn and use.
-
Fully featured: Astro is a comprehensive web framework that provides all the necessary tools to create a website. It includes component syntax, file-based routing, asset management, a build process, bundling, optimization, and data retrieval, among other features. By leveraging Astro's core capabilities, it is possible to develop excellent websites without the need to rely on external resources.

Why use ButterCMS?
ButterCMS is a headless content management system (CMS) that provides an intuitive and feature-rich platform for us to create and manage dynamic content for our websites. It includes a range of content types—such as components, collections, and page types—and a robust blog engine. It’s all designed to help us build better websites fast. For building a blog in this tutorial, we will be using the blog engine.
The ButterCMS blog engine allows us to create and manage blog posts using a ready-to-use, user-friendly interface. It provides a range of features and benefits that make it an ideal choice for developers and businesses looking to create a high-quality blog that is easy to manage and customize. Below are a few features of ButterCMS:
-
SEO friendly: The blog engine is designed for creating SEO-friendly blog posts. Key SEO variables such as page title, meta description, URL slug, and image ALT tags are built into the default post template which can be optimized to improve search engine rankings.
-
User-friendly interface: The blog engine has an intuitive interface that can be used to easily create, edit, filter, and search blog posts.
-
Developer friendly: The blog engine is designed with developers in mind, having a simple content API and drop-in SDKs that make it easy to integrate with your own UI framework.
Tutorial prerequisites
To follow along with this tutorial, you need the following:
-
Knowledge of Astro
-
Node.js >= v16.12.0 installed
-
An active ButterCMS account
Building a blog with Astro and ButterCMS
We will start by setting up ButterCMS and adding a few blog posts to it. After that, we will integrate it into our app, fetching and displaying all added blog posts. Here is what we will be building in this tutorial:
Setting up the ButterCMS blog engine
Navigate to the ButterCMS site and create an account if you don’t have one already. After logging in, we will be directed to our dashboard where we can navigate to the blog engine by clicking on the Blog posts icon in the sidebar.

After clicking the Blog posts icon, we will be taken to the Blog Posts page where we can access all created blogs, including those published, scheduled, and saved as drafts. We can also filter and search through the page to find specific posts.
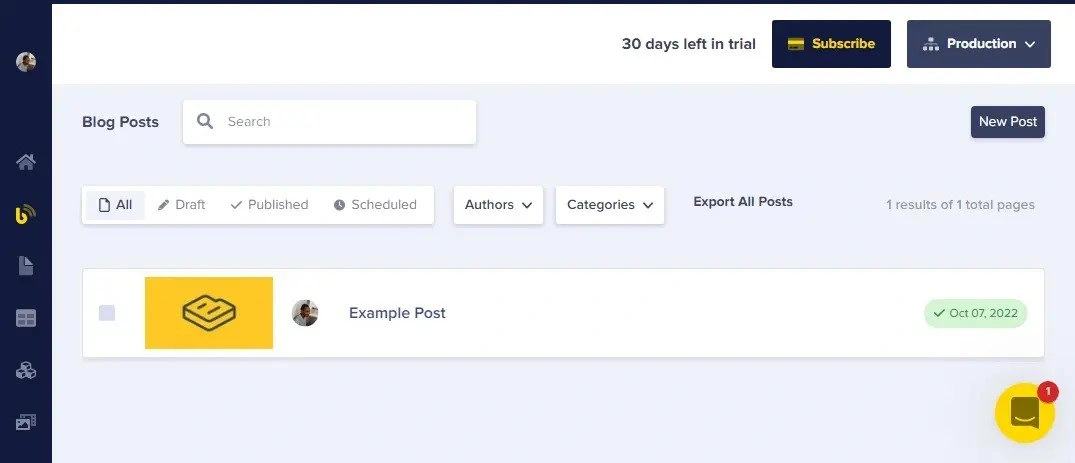
Here, an example post has already been created for us, but we will create others for building our Astro blog website. We will be using the data in the repo to fill out the fields when creating the blog post.
To add a new blog post, click the New Post button at the top-right of the page. As an example, we will be adding Getting started with Astro in the above GitHub repo.
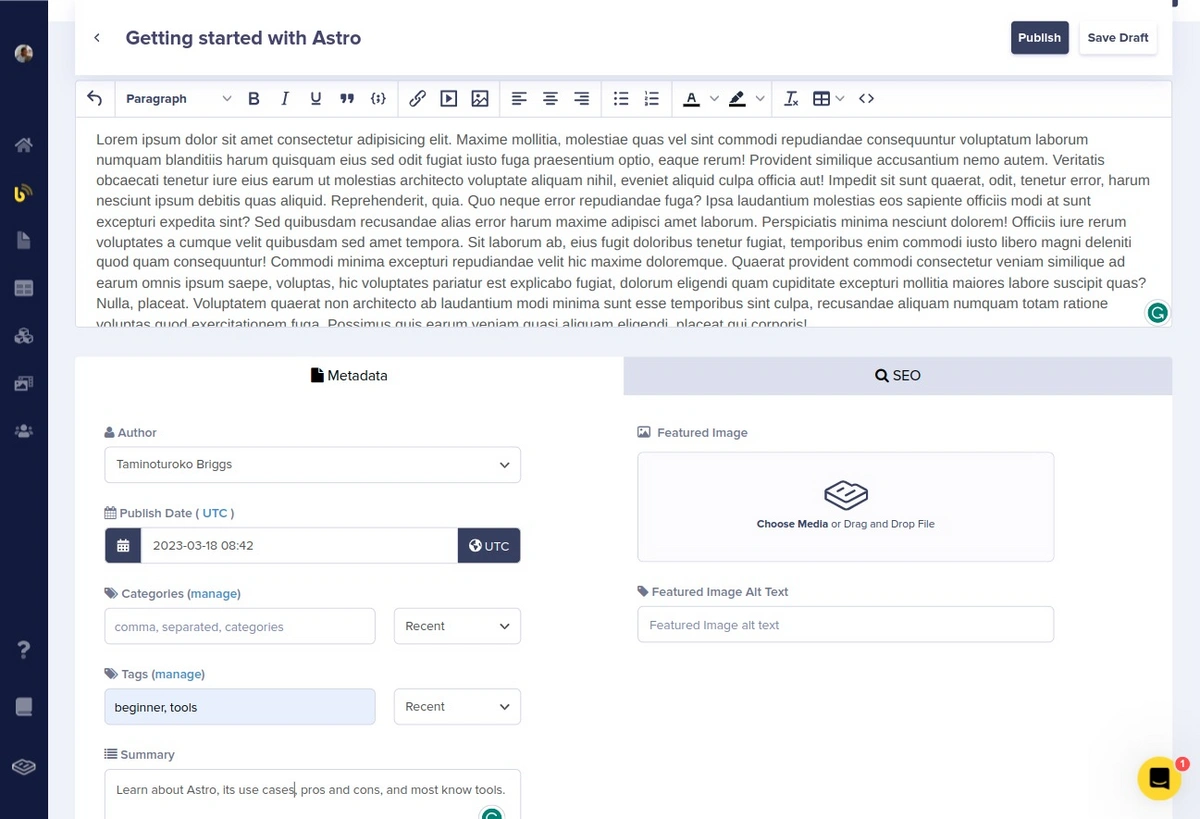
On the New Post page, fill out the following:
-
Title: Getting started with Astro
-
WYSIWYG editor: For this, we will use the “Lorem ipsum” dummy text
-
Tags: beginner, tools
-
Summary: Learn about Astro, its use cases, pros and cons, and most well-known tools.
Next, to add the Featured Image, click the dropzone, and in the modal that opens, click the Upload Media button at the top-right and we will see the following:
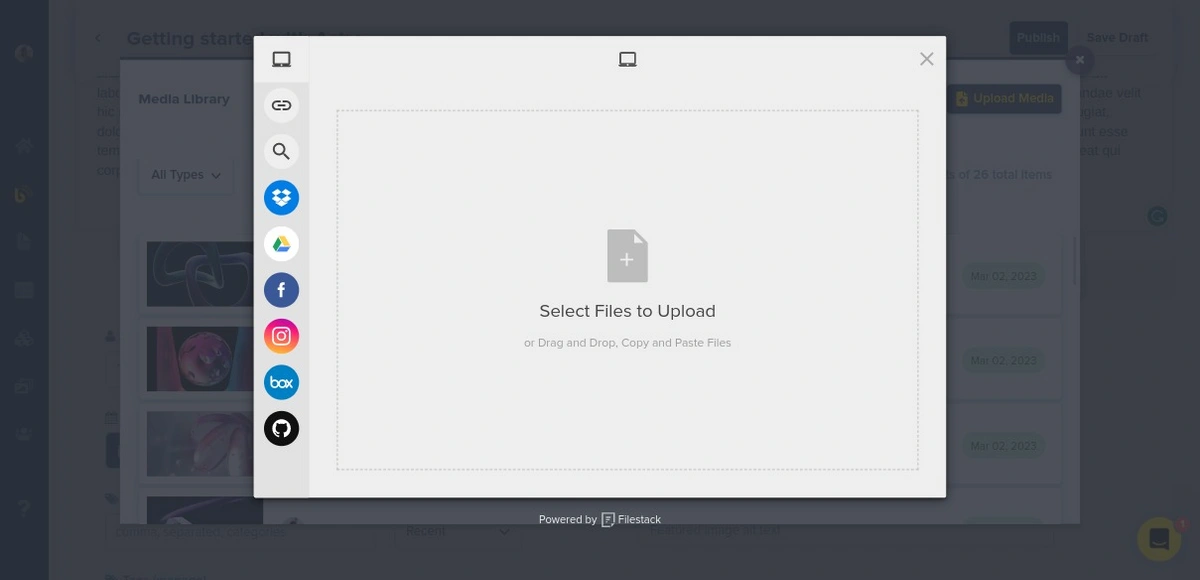
Click the link icon and upload your featured image.
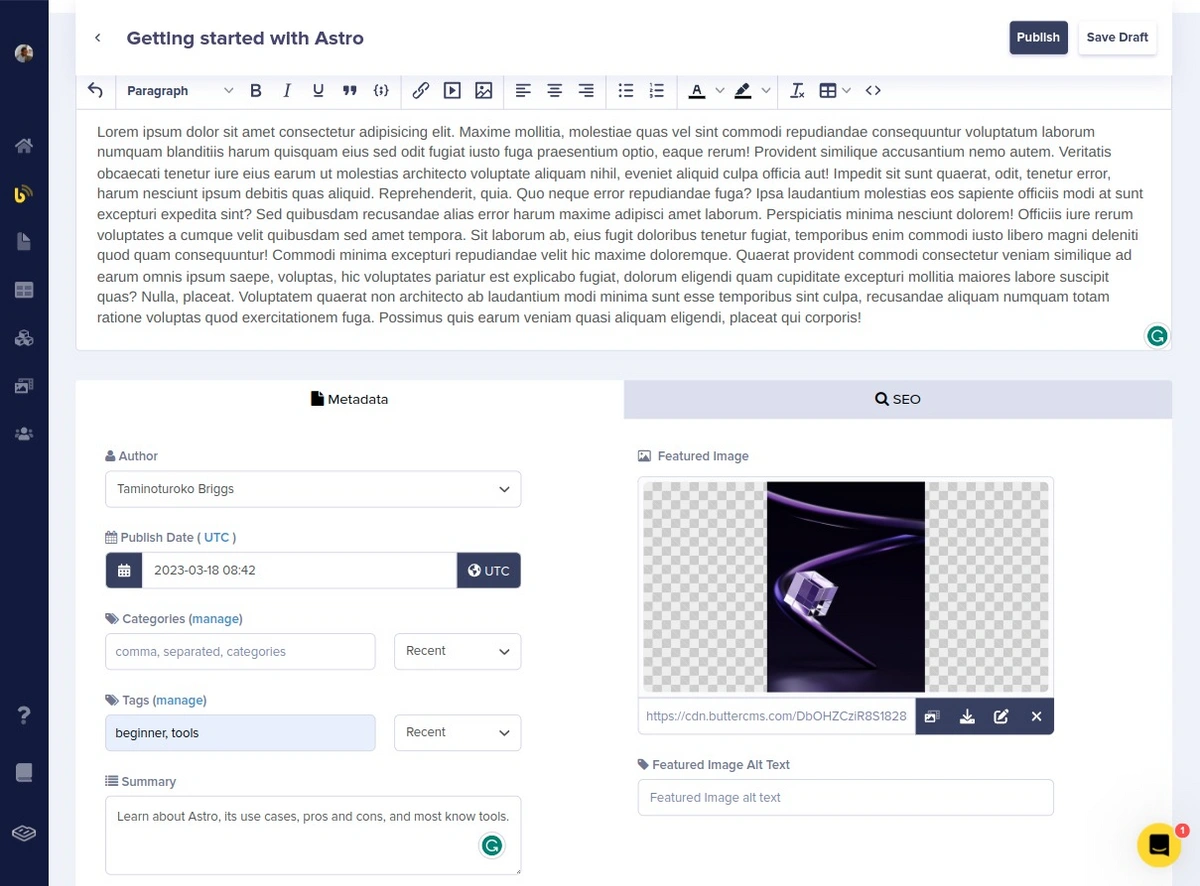
To optimize this post to be SEO-friendly, you can navigate to the SEO section seen to the right of Metadata in the image above and fill out or modify the fields. After that, click the Publish button at the top-right of the page. With that our blog post will be created and published. Using the above step, we can add the rest of the posts.
Setting up an Astro project
To create a new Astro project, we will be using the create astro CLI wizard. Enter the following command in the terminal:
npm create astro@latest
After running the command, when asked:
-
“How would you like to start your new project?” Select Empty.
-
“Install dependencies?” Select Yes.
-
“Do you plan to write TypeScript?” Select No.
After the Astro project has been created, open it in your code editor and start the app using the npm start command.
Below is the folder structure of how the src directory of our app will look after we are done. Create the missing folder and file now to make things simple and straightforward.
src
 ┣ components
 ┃ ┗ Post.astro
 ┣ layouts
 ┃ ┗ layout.astro
 ┣ pages
 ┃ ┣ blog
 ┃ ┃ ┗ [slug]
 ┃ ┃ ┃ ┗ index.astro
 ┃ ┣ index.astro
 ┃ ┗ search.astro
 ┗ env.d.ts
Creating a layout component
Let’s create the basic HTML structure consisting of the head, meta, links, and title tag which we will use to wrap our components and pages so that we don’t have to duplicate them.
Head over to layouts/layout.astro and add the following lines of code:
---
const { title = 'Astro blog' } = Astro.props;
---

<!DOCTYPE html>
<html lang="en">
  <head>
    <meta charset="UTF-8" />
    <meta name="viewport" content="width=device-width, initial-scale=1.0" />
    <script src="https://code.iconify.design/iconify-icon/1.0.7/iconify-icon.min.js"></script>
    <title>{title}</title>
  </head>

  <body>
    <slot />
  </body>

</html>

<style is:global>
* {
  margin: 0;
  padding: 0;
  box-sizing: border-box;
}

.wrapper {
  max-width: 1100px;
  margin: 0 auto;
}

.tags {
  display: flex;
  gap: 5px;
  margin-top: 5px;
  flex-wrap: wrap;
}

.tags span {
  border: 1px solid gainsboro;
  padding: 2px 10px;
  border-radius: 10px;
}

.search {
  height: 40px;
  border: 1px solid rgb(186, 187, 189);
  border-radius: 5px;
  margin-top: 20px;
  max-width: 400px;
  display: flex;
  align-items: center;
}

.search button {
  border: none;
  background-color: rgb(47, 27, 89);
  padding: 0 10px;
  cursor: pointer;
  border-radius: 5px;
  margin-right: 5px;
}
</style>
Integrate ButterCMS with Astro
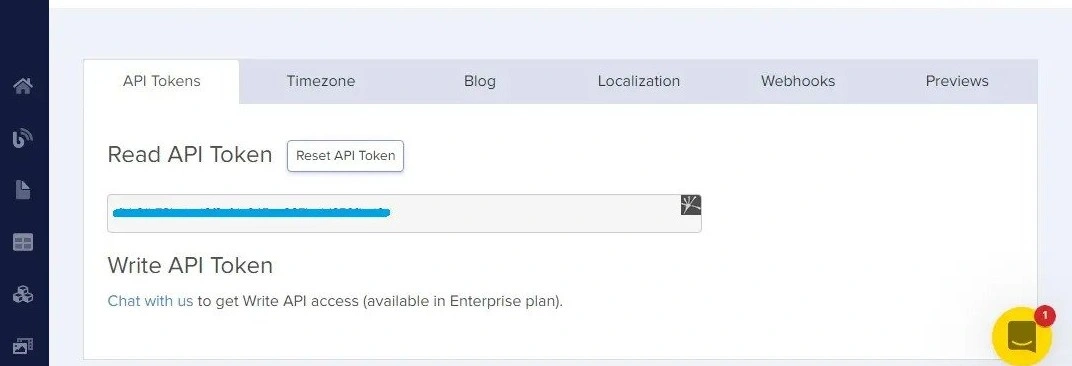
To start working with ButterCMS in our Astro project, we need our Read API Token which is required to be attached to the request URL.
Head over to your ButterCMS dashboard, hover over your image at the top on the sidebar, and in the dropdown that appears, click on Settings. We will be taken to the following page where we will see the token:
Copy the Read token and head over to the Astro project. In the root directory, create a .env file and paste the token like the following:
BUTTERCMS_READ_API = <your-read-api-token-here>
Displaying all blog posts
We will be displaying all blog posts on the home page. To create a home page, let’s first create a card component that will display our blog posts.
Head over to the src/components/Post.astro file and add the following lines of code:
---
import { Icon } from 'astro-icon'
const {img, title, summary, tags = [], author, slug, rotate} = Astro.props
---

<div class={`post ${rotate && 'postRotate'}`}>
  <div class="post__img" style={`background-image: url(${img});`}>
  </div>
  <div class="post__info">
    <div>
      <div class="tags">
        {tags.map((tag) => (
          <span>#{tag}</span>
        ))}
      </div>
      <h2>{title}</h2>
      <p>{summary}</p>
      <span><strong>By</strong> {author}</span>
    </div>
    <a href={slug}>
      Read more
      <Icon name="ph:arrow-circle-up-right-thin" />
    </a>
  </div>
</div>

<style>
.post {
  display: flex;
  flex-direction: column;
  gap: 5px;
}

.post .post__img {
  width: 100%;
  height: 250px;
  object-fit: cover;
  background-repeat: no-repeat;
  background-size: cover;
  background-position: center;
  border-radius: 10px;
}

.post p {
  margin: 5px 0;
}

.post .post__info {
  flex: 1;
  justify-content: space-between;
  display: flex;
  flex-direction: column;
}

.post a {
  padding: 5px 10px;
  color: white;
  background-color: rgb(47, 27, 89);
  width: fit-content;
  border-radius: 4px;
  text-decoration: none;
  margin-left: auto;
  margin-top: 20px;
}

.post a svg {
  width: 25px;
  vertical-align: middle;
  margin-left: 5px;
}

.postRotate {
  flex-direction: row;
}

.postRotate .post__img {
  width: 50%;
  max-width: 400px;
  height: unset;
}

.postRotate .post__info {
  width: 50%;
}

.postRotate .post__info > div {
  gap: 5px;
  display: flex;
  flex-direction: column;
}

.postRotate a {
  margin-top: 20px;
  display: block;
}

@media (min-width: 768px) {
  .postRotate .post__info h2 {
    font-size: 32px;
  }

  .postRotate .post__info p {
    font-size: 18px;
  }
}
</style>
Next, head over to the src/pages/index.astro file and add the following lines of code:
---
import { Icon } from 'astro-icon'
import Post from '../components/Post.astro';
import Layout from '../layouts/layout.astro';
const response = await fetch(`https://api.buttercms.com/v2/posts/?exclude_body=true&auth_token=${import.meta.env.BUTTERCMS_READ_API}`)
const posts = (await response.json()).data
---
<Layout>
<div class="hero wrapper">
<div class="hero__left">
<h2>
Tutorials, Stories, & Ideas about Astro and its eco-system
</h2>
<form class="search">
<input type="text" placeholder="find a post" name="search" />
<button>
<Icon name="ic:baseline-search" />
</button>
</form>
</div>
<div class="hero__right" style={`background-image: url(${posts[0].featured_image});`}>
<span>latest</span>
<a href={posts[0].slug} class="right-arrow">→</a>
<div>
<h2>{posts[0].title}</h2>
<div class="hero__rightPostInfo">
<span>{posts[0].author.first_name + " " + posts[0].author.last_name}</span>
<span>{new Date(posts[0].created).toISOString().split('T')[0]}</span>
</div>
<div class="tags">
{posts[0].tags.map(tag =>
<span>{tag.name}</span>
)}
</div>
</div>
</div>
</div>
<div class="posts wrapper">
<div class="post__list">
{posts.slice(1).map(post => (
<Post
img={post.featured_image}
tags={post.tags.map(tag => tag.name)}
title={post.title}
summary={post.summary}
author={post.author.first_name + "" + post.author.last_name}
slug={post.slug}
/>
))}
</div>
</div>
</Layout>
<style>
.hero__left {
padding: 20px;
}
.hero__left h2 {
font-size: 48px;
}
.hero__right {
width: 100%;
height: 350px;
background-repeat: no-repeat;
background-position: center;
background-size: cover;
padding: 20px;
color: white;
position: relative;
display: flex;
flex-direction: column;
justify-content: space-between;
}
.hero__right > span:nth-child(1) {
width: fit-content;
align-self: end;
border: 1px solid gainsboro;
padding: 3px 10px;
border-radius: 10px;
}
.hero__right h2 {
font-size: 38px;
}
.hero__rightPostInfo {
display: flex;
position: relative;
}
.hero__rightPostInfo span:first-child {
margin-right: 10px;
}
.hero__rightPostInfo span:first-child::after {
border-radius: 100%;
content: "";
border: 2px solid gainsboro;
bottom: 8px;
margin-left: 3px;
position: absolute;
}
.right-arrow {
position: absolute;
font-size: 25px;
border: 1px solid gainsboro;
border-radius: 100%;
height: 40px;
width: 40px;
display: flex;
align-items: center;
right: 0;
top: 40%;
margin-right: 15px;
justify-content: center;
text-decoration: none;
color: white;
}
.right-arrow:hover {
background-color: #3f434c;
}
.posts {
margin-top: 50px;
width: 95%;
margin-bottom: 20px;
}
.posts h2 {
margin-bottom: 20px;
}
.post__list {
display: grid;
gap: 20px;
}
@media (min-width: 500px) {
.post__list {
grid-template-columns: 1fr 1fr;
gap: 10px;
}
}
@media (min-width: 620px) {
.hero {
display: flex;
}
.hero__left h2 {
font-size: 8vw;
}
.hero__left {
width: 50%;
}
.hero__right {
height: unset;
min-height: 400px;
width: 50%;
border-bottom-left-radius: 10px;
}
.right-arrow {
width: 50px;
height: 50px;
}
}
@media (min-width: 768px) {
.hero__left h2 {
font-size: 7vw;
}
.post__list {
grid-template-columns: 1fr 1fr 1fr;
}
.right-arrow {
width: 70px;
height: 70px;
}
}
@media (min-width: 1024px) {
.hero__left h2 {
font-size: 68px;
}
}
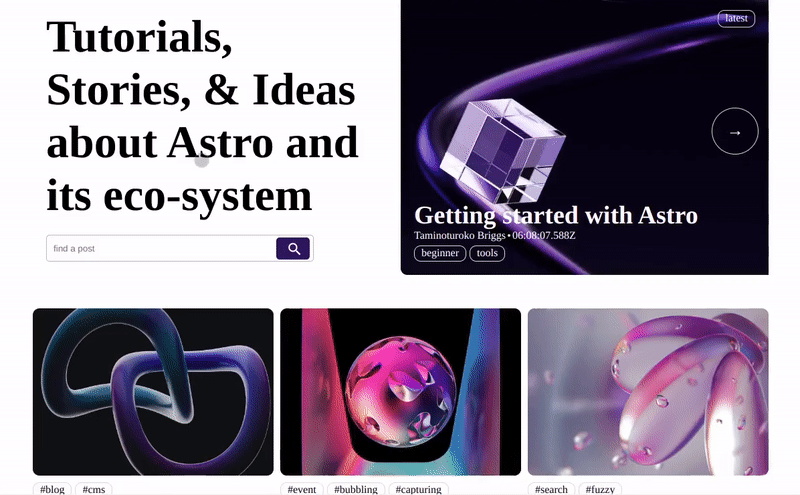
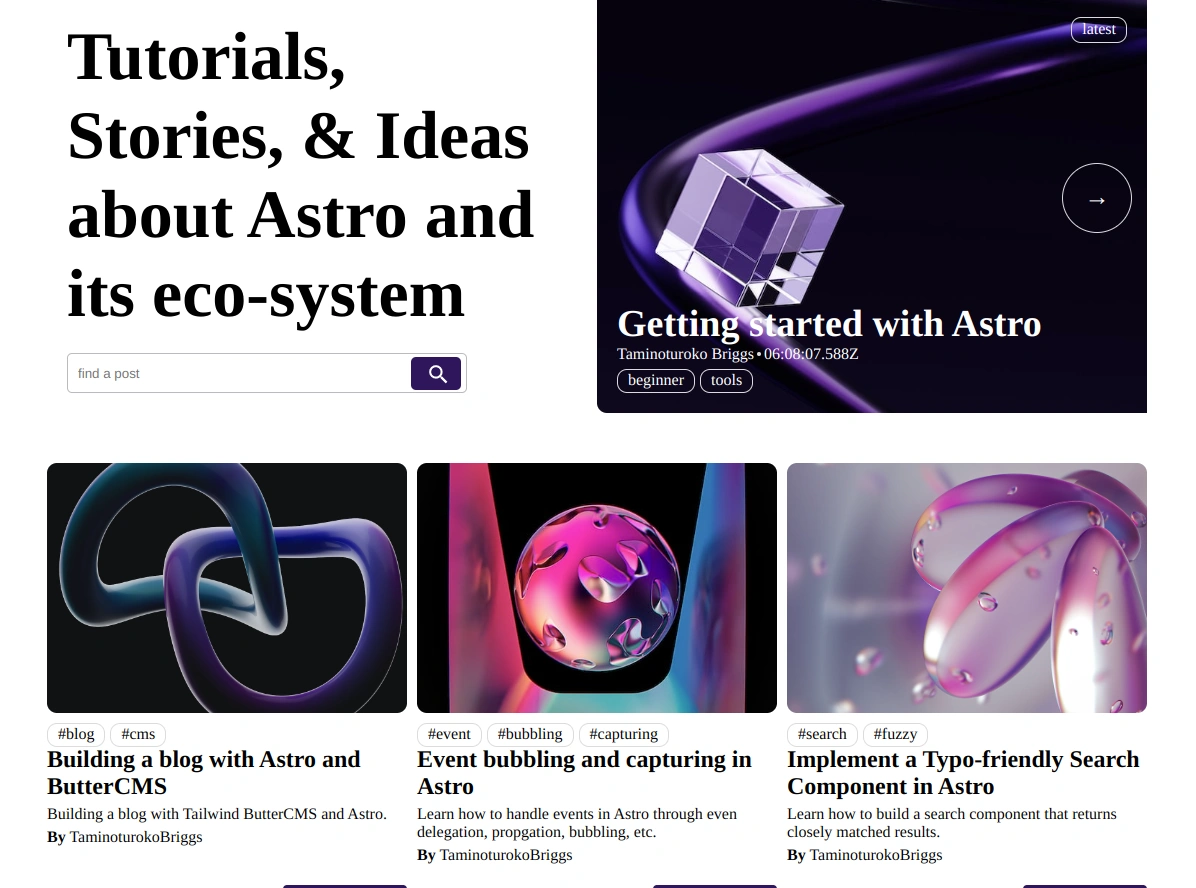
</style>Above, we are fetching all our posts from ButterCMS and displaying the latest post in the hero section and the others with the Post component we created earlier.
Now, when we open http://localhost:3000/ in our browser, we will see the following:
Displaying an individual blog post
For this, we will be creating a blog page. Before doing that, let’s first enable SSR in our Astro project. Astro is by default an SSG, so when deployed it will create all our pages at build-time and render only static pages. But since we are working with a CMS and when we update a blog post in ButterCMS we want it to reflect on our site when it has been deployed, we need to enable SSR.
To enable SSR, head over to the astro.config.mjs file and modify defineConfig({}) to the following:
export default defineConfig({
  output: 'server',
});
Note: The configuration above enables SSR features in development mode. When it’s time to deploy, you also need to add an adapter. You can read about that here.
Now to work on the blog page, head over to the src/pages/blog/[slug]/index.astro file and add the following lines of code:
---
import Layout from "../../layouts/layout.astro";
const {slug} = Astro.params
const response = await fetch(`https://api.buttercms.com/v2/posts/${slug}/?auth_token=${import.meta.env.BUTTERCMS_READ_API}`)
const post = (await response.json()).data
---
<Layout>
<div class="blog wrapper">
<div class="blog__detail">
<img src={post.featured_image}/>
<div>
<h1>{post.title}</h1>
<div>
<span><strong>By </strong>{post.author.first_name + " " + post.author.last__name}</span>
</div>
<div class="tags">
{post.tags.map(tag => (
<span>{tag.name}</span>
))}
</div>
</div>
</div>
<div class="blog__body" set:html={post.body}></div>
</div>
</Layout>
<style is:global>
.blog__detail {
display: flex;
flex-direction: column;
gap: 10px;
}
.blog__detail img {
width: 100%;
height: 250px;
object-fit: cover;
}
.blog__detail > div {
padding: 10px;
display: flex;
flex-direction: column;
gap: 5px;
}
.blog__detail > div h1 {
font-size: 48px;
}
.blog__body {
padding: 0 20px;
font-size: 18px;
margin-top: 30px;
}
.blog__body img {
width: 100%;
}
.blog__body h2 {
margin-top: 30px;
margin-bottom: 10px;
}
.blog__body h3 {
margin-top: 20px;
margin-bottom: 5px;
}
.blog__body a {
color: black;
}
.blog__body video,
iframe {
margin: 10px 0;
}
@media (min-width: 500px) {
.blog__detail {
flex-direction: row-reverse;
padding: 10px 20px;
background-color: rgb(239 232 249);
}
.blog__detail img {
border-radius: 10px;
min-height: 300px;
width: 50%;
max-height: 450px;
}
.blog__detail > div {
width: 50%;
justify-content: center;
}
}
@media (min-width: 1115px) {
.blog__detail {
margin-top: 20px;
border-radius: 10px;
}
}
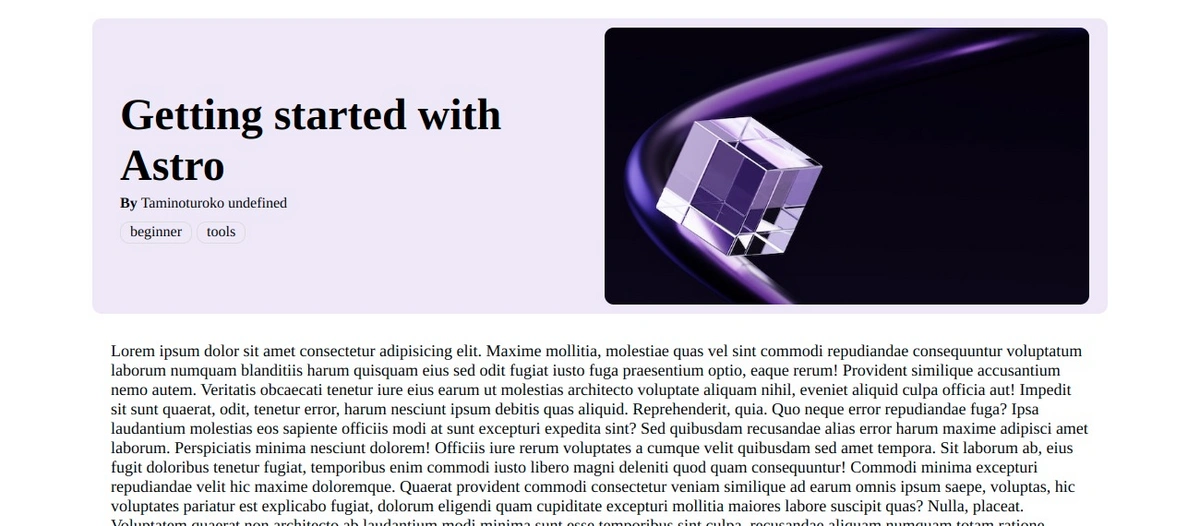
</style>Above, when we click on a post on the home page using the slug attached to the URL, we are fetching an individual post from ButterCMS and displaying it:
Now, when we click on a post on the home page, we see its full content like the following:
Implementing search functionality
For the search functionality, we will create a page that when navigated to will use the query parameter passed to its URL to fetch the matching results from ButterCMS.
To do this, we first modify the search form to send a GET request to the search page attaching the search query as a query parameter to the URL.
Head over to the src/pages/index.astro file and modify the opening tag of the search form to the following:
<form class="search" action="search" method="get">
Next, head over to the src/pages/search.astro file and add the following lines of code:
---
import { Icon } from 'astro-icon'
import Post from '../components/Post.astro';
import Layout from '../layouts/layout.astro';

const searchValue = Astro.url.searchParams.get('search')

const response = await fetch(`https://api.buttercms.com/v2/posts/search/?query=${searchValue}&auth_token=${import.meta.env.BUTTERCMS_READ_API}`)
const posts = (await response.json()).data
---

<Layout>
  <div class="searchPage wrapper">
    <form class="search" action="search" method="get">
      <input type="text" placeholder="find a post" name="search"/>
      <button>
        <Icon name="ic:baseline-search" />
      </button>
    </form>

    <div class="searchPage__results">
      <h2>Results for: {searchValue}</h2>
      <div class="searchPage__resultsList">
        {posts.map(post => (
          <Post
            img={post.featured_image}
            tags={post.tags.map(tag => tag.name)}
            title={post.title}
            summary={post.summary}
            author={post.author.first_name + "" + post.author.last_name}
            slug={post.slug}
            rotate={true}
          />
        ))}
      </div>
    </div>
  </div>
</Layout>

<style>
.searchPage {
  padding: 0 20px;
}

.search {
  margin: 0 auto;
  margin-top: 20px;
  height: 40px;
}

.searchPage__results h2 {
  font-size: 32px;
}

.searchPage__results {
  margin-top: 20px;
}

.searchPage__resultsList {
  margin-top: 20px;
  display: flex;
  flex-direction: column;
  gap: 10px;
}
</style>
With this, the search functionality should now be working:
Congrats! You've made it to the end of the tutorial. If you've been following along, you should now have a simple but powerful blog built with Astro and ButterCMS. If you'd like to see for yourself how you can use ButterCMS for another Astro project, get your hands dirty our Astro starter.
Final thoughts
An expertly crafted and well-executed blog can be an incredibly effective marketing tool, enabling brands to meet their marketing and sales objectives. But how can you ensure that your blog is top-notch without requiring a lot of technical know-how?
The solution is ButterCMS, a headless CMS that handles all the background work and provides you with a user-friendly blog engine that streamlines the creation and management of SEO-friendly blog posts. When combined with the versatile Astro framework, you can quickly create truly remarkable content experiences. Isn't that amazing?