- What is Flutter?
- Why use ButterCMS?
- Create a Flutter landing page with ButterCMS: Tutorial prerequisites
- Creating a Page in ButterCMS
- Configuring the Hero component
- Create the Item List component
- Add the created components to the landing page
- Add content to the components
- Reading content from ButterCMS
- Setup Flutter
- Display the landing page
- Final thoughts
In the early nineties, despite the web growing and gaining more traction, the content it served was mostly static. However, as we all know, content (i.e., static content) routinely becomes outdated and in need of a refresh. To add more complexity, this content was also often scattered.
This eventually led to having content in a place that could be served to the frontend via an API. During this period, content management systems (CMSs) like Plethora and Documentum were created, which were closed-source products. It was not until the early 2000s that open-source alternatives like WordPress, Drupal, and Joomla presented themselves.
In this article, we shall talk about an even more advanced CMS known as a headless CMS. We will learn how to use it to build a Flutter landing page that can be edited with just a few clicks of your mouse.
Table of contents
What is Flutter?
Flutter is an open-source framework created by the Google team and is used to create cross-platform apps. According to Statista, a survey was carried out by Jetbrains in 2021 which states that Flutter is the most used cross-platform framework globally. According to this study, roughly 42 percent of developers use Flutter for developing mobile applications. Below we will discuss the benefits of using Flutter.
Cross-platform
With Flutter, you can write one piece of code and it can be used to build for different platforms like Android, iOS, macOS, Windows, and the web. Dart, the underlying structure of Flutter, can compile natively, which promises good performance on every app. This means that the code is translated into machine-readable instructions that can be executed directly by the device's processor, resulting in better performance and faster loading times for the app. Additionally, Flutter's use of widgets, which are pre-built elements that can be assembled to create an app's user interface, also contributes to the performance of the app by reducing the amount of code that needs to be executed.
Costs
Building two different versions of the same application can be costly. You’d have to first look for engineers with the appropriate skill set to get your product built—and this has to be for each platform you plan to support. Not only would this make it hard to build the application but it would also be difficult to maintain as every single change you make in one application would need to be replicated in the other. With Flutter, you can simply build one application that supports both platforms—cutting costs and labor in half.
Community
Flutter has a great community that works tirelessly to improve its usability. The community creates useful packages that can help users build their projects without having to start building from scratch. Bloc and Riverpod are just two of the many state management tools created by the Flutter community that provide easy ways to manage the state. Furthermore, there are thousands of packages created and published in pub.dev every week for Dart and Flutter.
Graphics
Flutter uses a graphics engine called SKIA, a fast, open-source graphics library that renders user interfaces (UI) at a speed of 60 frames per second. This produces a fast and smooth experience that is almost like a native application.
Great developer experience
Unlike other cross-platform SDKs that require you to learn different technologies like HTML, CSS, and JavaScript to build a single app, Flutter only requires you to know one technology. With Dart, you can write both your logic and UI. The learning curve for Flutter isn't steep as you get to only focus on one technology at a time. Best of all, Flutter is written in pure English, so you will not find it hard to understand which widget is which and what particular job it does.

Why use ButterCMS?
ButterCMS is an API-based headless CMS and blog engine that can integrate with any front-end technology of your choice and be used to manage and deliver content to build any website, mobile application, or front-end you prefer. ButterCMS gives you plenty of flexibility to manage your content with ease. For instance, within the confines of this tutorial, features such as page types and components enable us to exercise a great deal of customization.
Cloud-based storage
ButterCMS has a cloud-based headless architecture. All your content is getting deployed from and stored on the cloud. This makes it easy to update your content from anywhere and at any time.
Digital asset management (DAM)
Seamlessly upload and serve your images from one central media library and utilize ButterCMS’s image API. Additionally, the image API can help generate a wide array of responsive images for your website or mobile applications. Furthermore, ButterCMS asset management compresses images by default, leaving your applications at maximum performance and with quick load times.
You can also edit pictures on the ButterCMS platform. You can transform your images with modern editing tools, add filters, crop, resize, and so on.
Ease of use
While creating the demo for this article, I was able to start sending content over an API within minutes. With its intuitive design, I could navigate the CMS without needing any directions.
Creating a Flutter landing page with ButterCMS: Tutorial prerequisites
To follow along with this tutorial, you need the following:
-
Knowledge of Flutter
-
Knowledge of how to integrate APIs with Flutter
-
An active ButterCMS account
Before we get started, we have to set up ButterCMS to hold the content we will be needing in our Starbucks app.
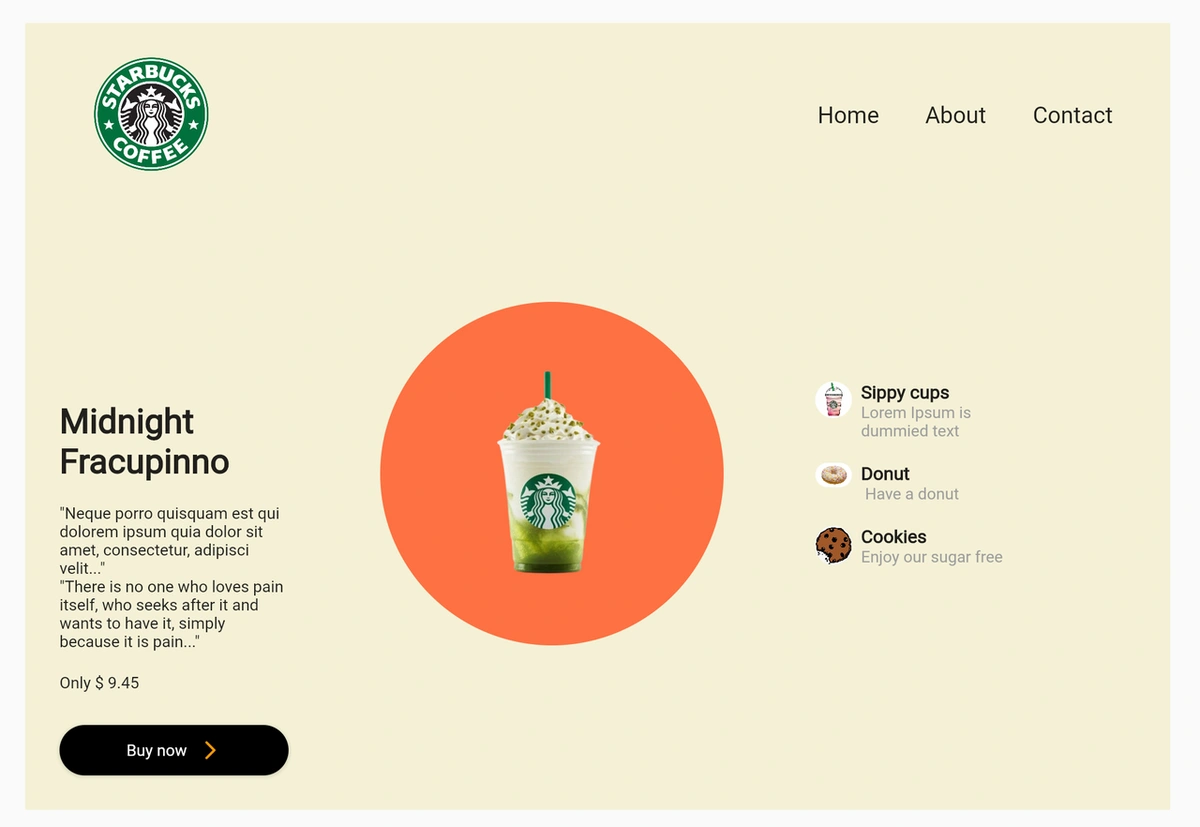
Here is what we will be building:
Creating a Page in ButterCMS
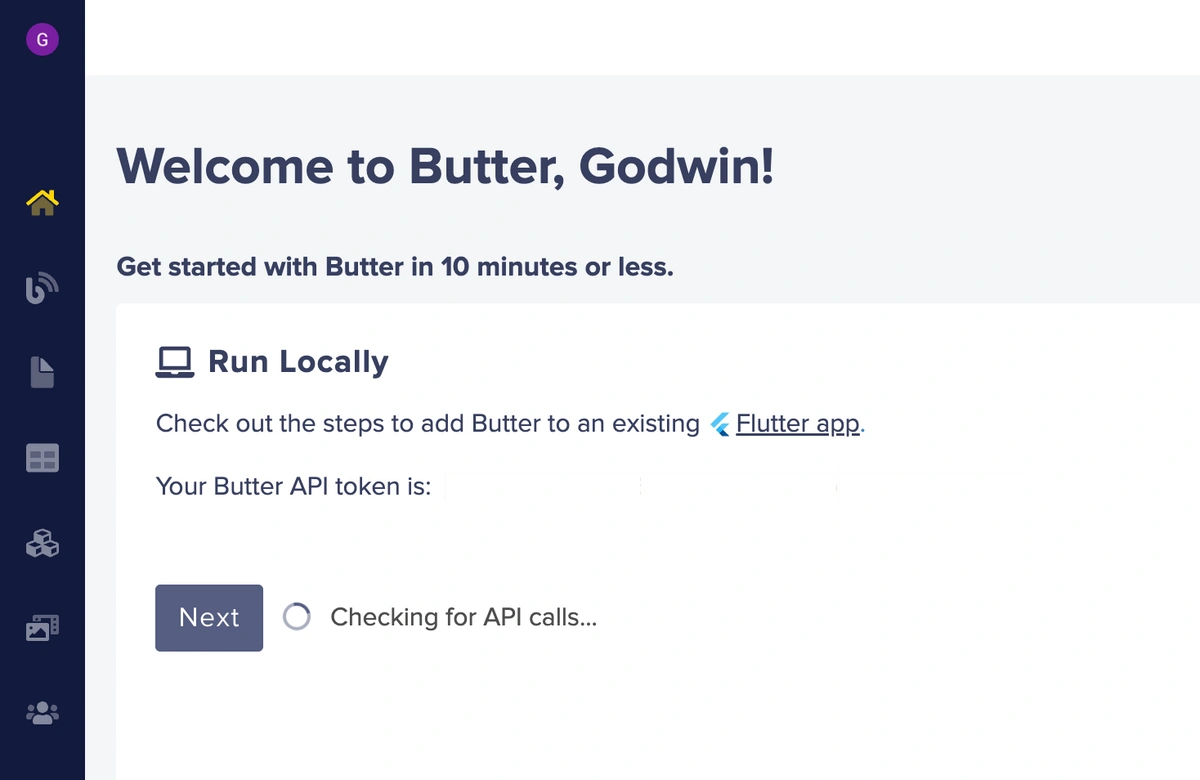
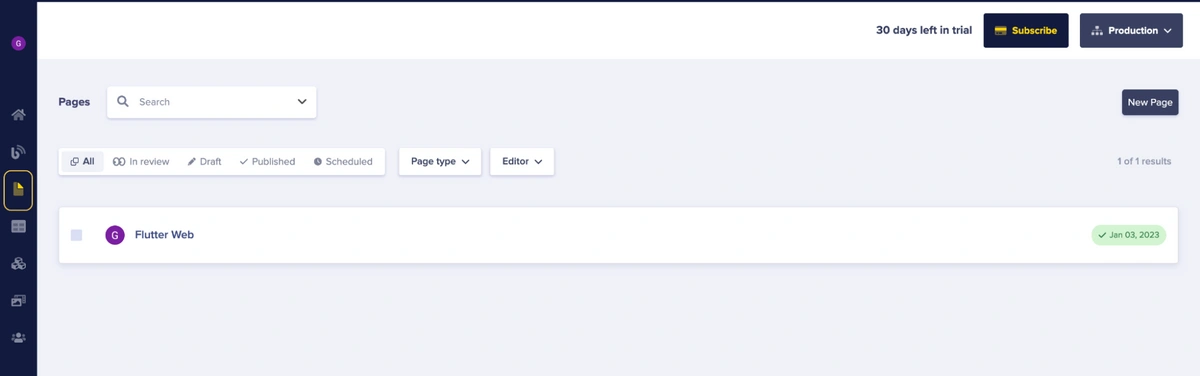
To get started, you need your very own ButterCMS account if you do not already have one. After successfully creating an account, you will be directed to your dashboard. We will use the page builder tool to create a new landing page for our Flutter app by clicking on the Pages tab in the navigation pane.
After clicking on the Pages tab, we need to click on the New Page button at the top right of the screen, like below:

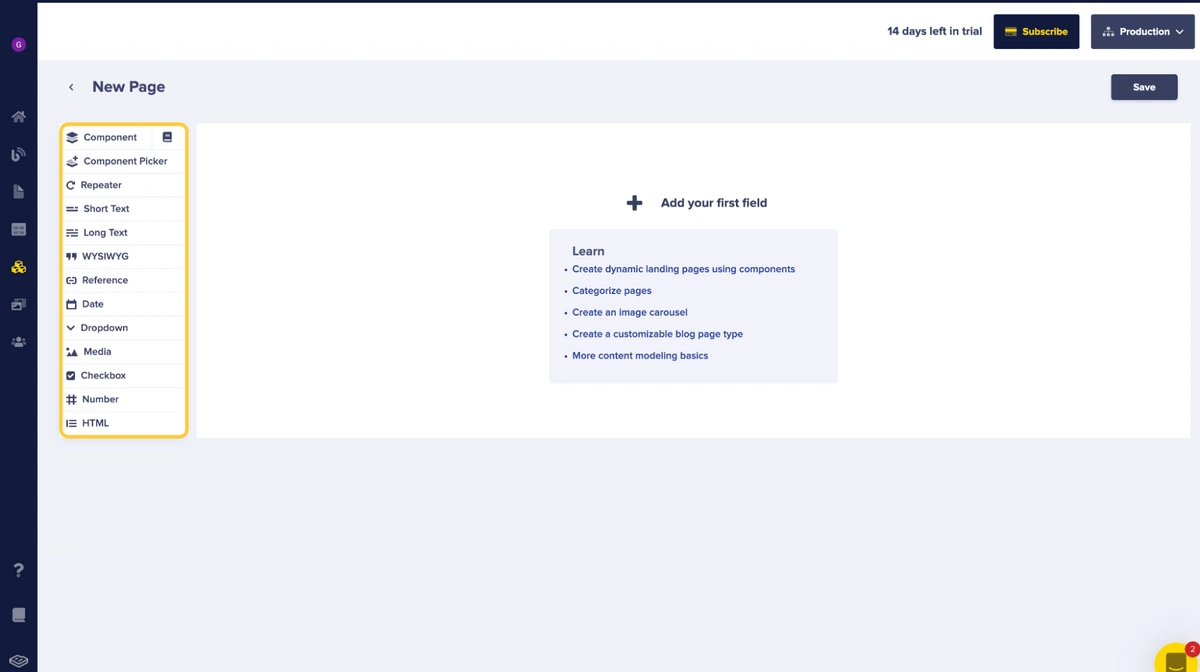
After clicking on the New Page button, you will be taken to a page with content fields. These content fields are needed to create a custom page for our app.
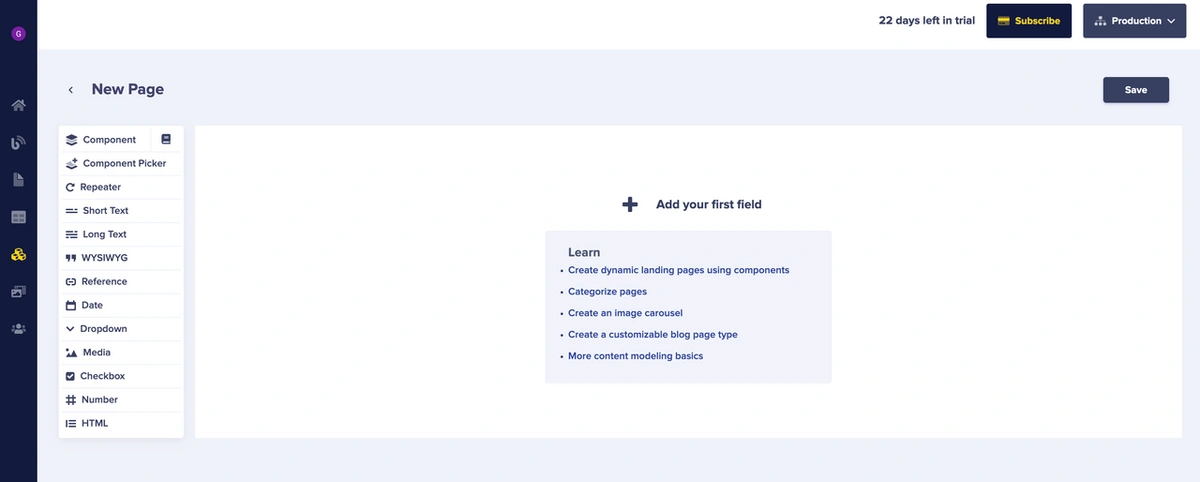
After navigating to this new configuration page, we will start creating new components. (You can also create components by clicking the Content Types tab on the left-side navigation bar.) We are creating components so we can use them from the component library if needed to build other parts of our application later.
To create new components, click on the Component field. When you click the Component field, you should see the following below:

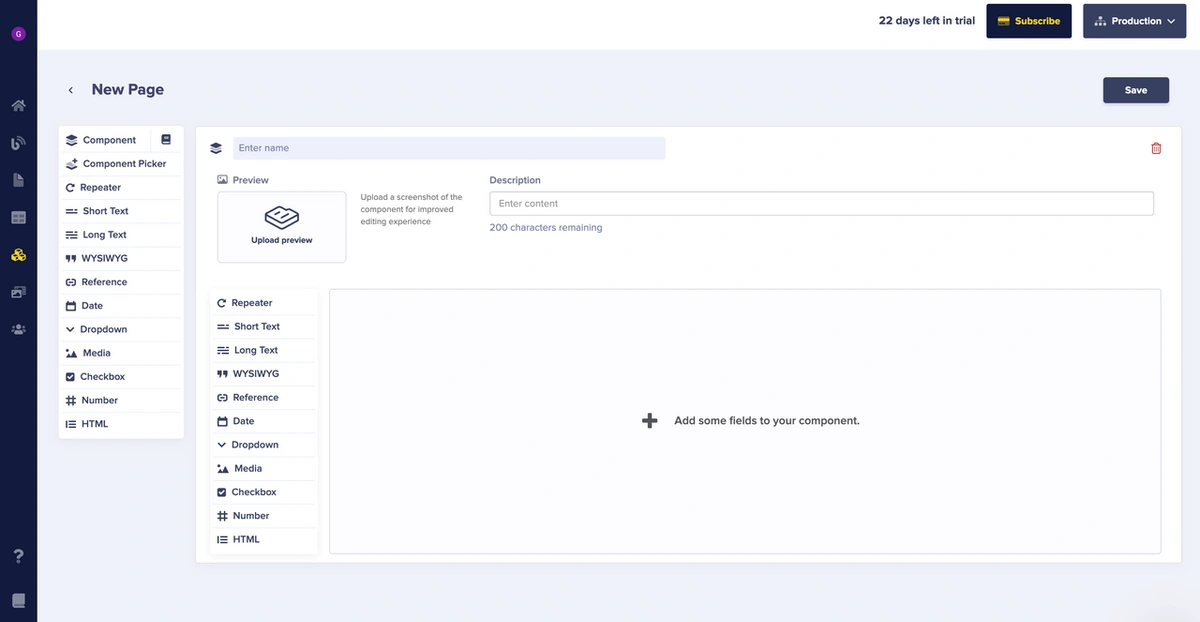
On the left, click the Create Component button and you should see a new section on our dashboard like the one below where you can define your new component with various fields.
Configuring the Hero component
To complete our component setup, we need to give our component a name, a description, and some fields.
For this tutorial, we will name our component “landingpagehero” because this component will handle the hero section of our landing page. You can add an image to identify the component easily.
Our component should have the following fields:
-
A
short textfield named Hero Text -
A
long textfield named Sub-hero text -
A
mediafield named hero image
It should look like below:
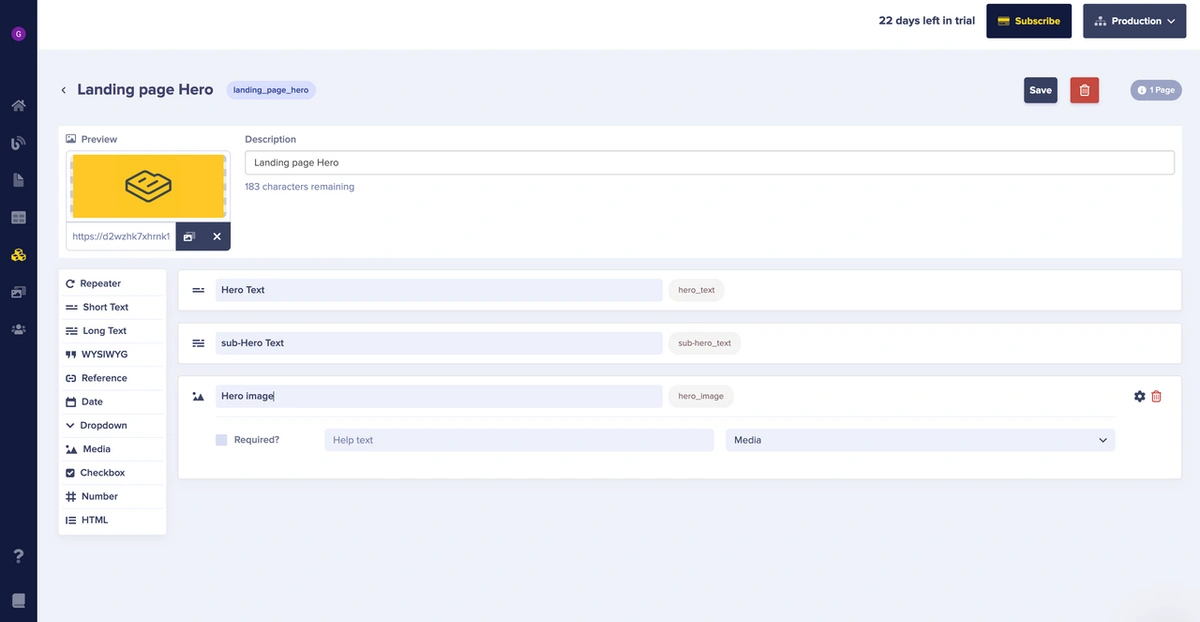
After creating the landingpagehero, click the Save button at the top right of your screen.
In this section, we created our first component called landingpagehero. In the following sections, we will continue creating other necessary components for our Starbucks app.
Create the Item List component
This component displays the products on the landing page. It contains the following fields:
-
Three
mediafields (image1,image2,image3) -
A
long textand twoshort textfields for the item description (item description1, item description2, item description3) -
A
short textfield for the product name (item name1, item name2, item name3).
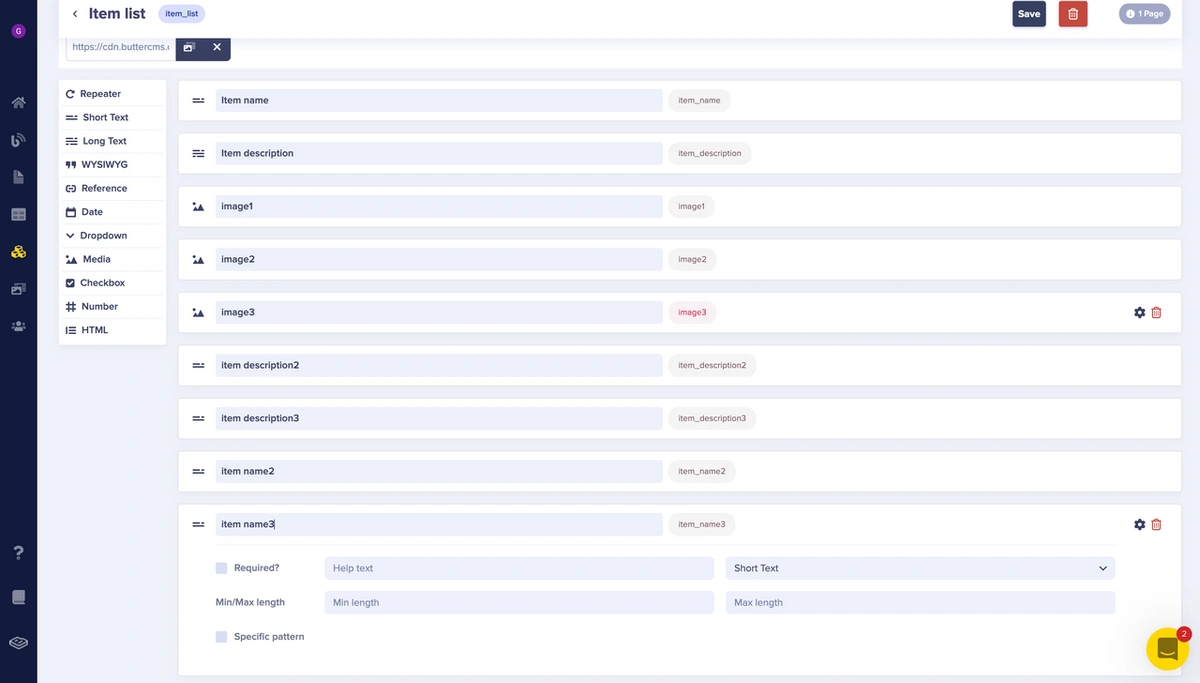
After selecting all the necessary fields, be sure to save the component, as well.
Add the created components to the landing page
To add components to our landing page, click the Page Builder icon on the navigation bar, like below:

Then, click on the New Page button.
After clicking on the Create New Page text, a content field table (highlighted in the image above) shows on the new page instance and has all the content fields you need when configuring your new page.
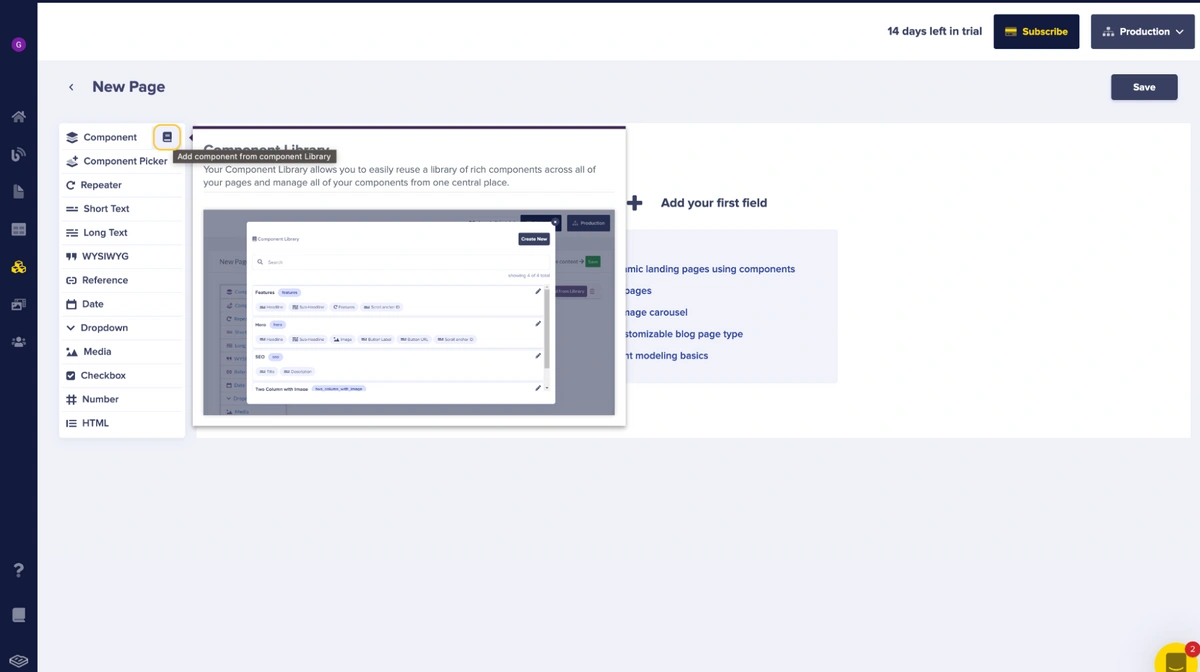
To add components to our new page, click on the book icon right beside the component field to access the component library. The component library will allow us to choose from our already created and saved components.
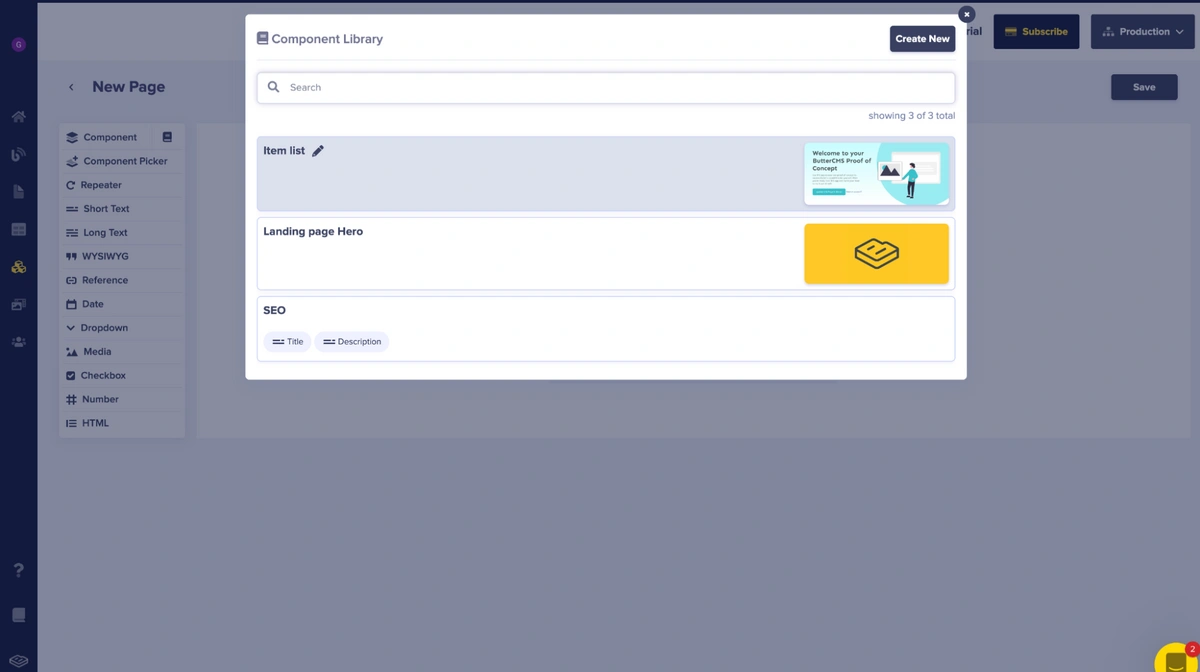
Select the components you need, as shown above.
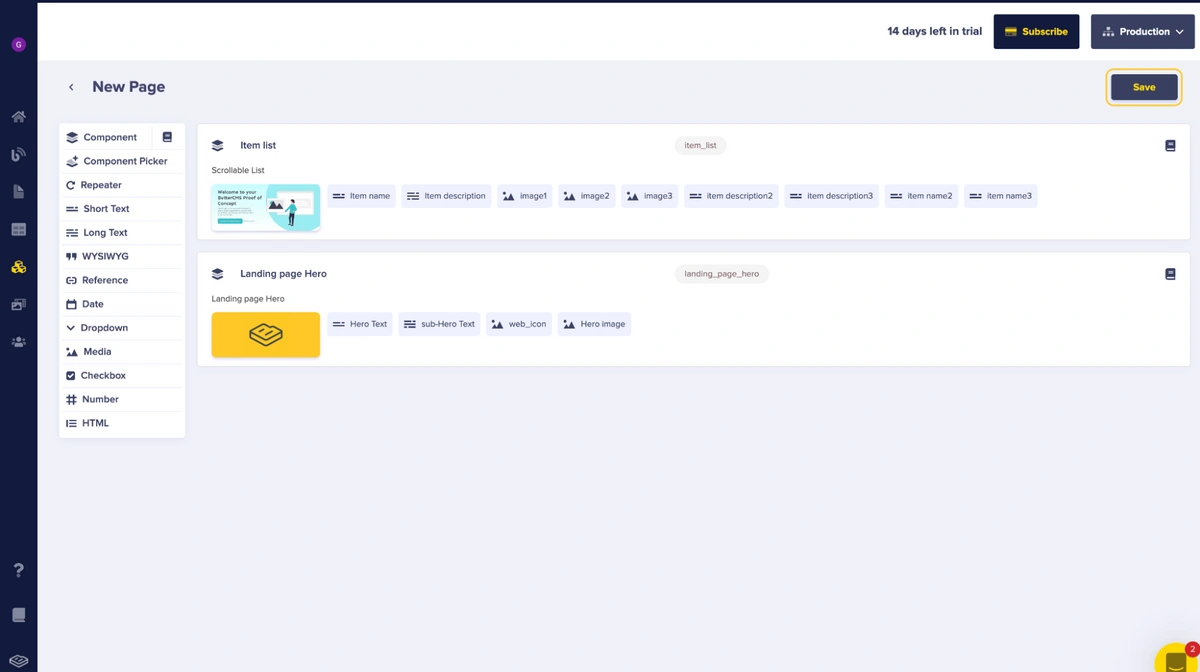
Click on the Save button at the right top of the screen.
Add content to the components
After clicking the Save button, we get a prompt to name our new page title. See the image below:
Click on the Save button at the right top of the screen.
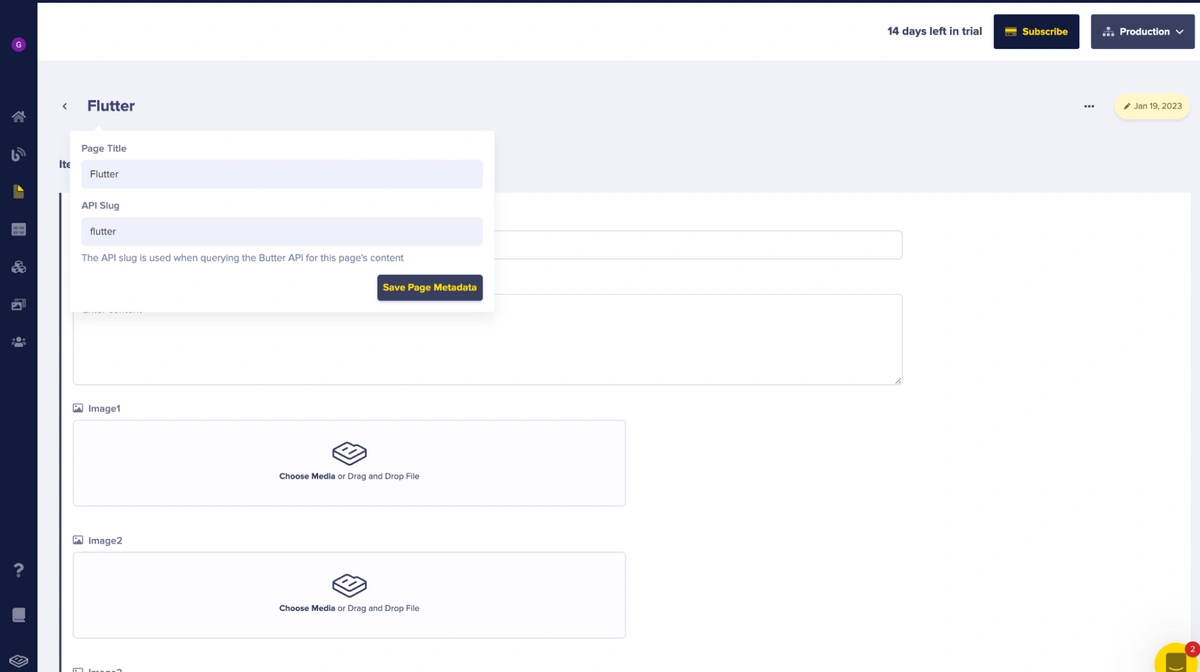
After giving the page a title, we are now ready to start adding content.
Reading content from ButterCMS
To be able to read content from ButterCMS, we can use its built-in API explorer. With the API explorer, we can find the API to read our content from ButterCMS and see what our API responses would look like. With this display, we can use the response to create a Dart model to serialize JSON data in Flutter. This will help us easily access any data we need from our API response.
To see the explorer, follow the instructions below:
-
Click on the three-dotted button after the preview button on the new page we created in the previous section.
-
See the gif below:
You should see a dropdown like in the video above. Click on API Explorer and you should get access to the API explorer. We will be using the response from the API explorer in our Flutter app.
Setup Flutter
We will start by creating a new Flutter project.
flutter create buttercmslandingpage
We can go ahead and replace the content of pubspec.yaml:
name: buttercmslandingpage
description: A new Flutter project.


publish_to: 'none'
version: 1.0.0+1
environment:
  sdk: '>=2.18.4 <3.0.0'

dependencies:
  flutter:
    sdk: flutter
  dio: ^4.0.6
  http: ^0.13.5
  chopper: ^5.1.0
  flutter_dotenv: ^5.0.2

  cupertino_icons: ^1.0.2
dev_dependencies:
  flutter_test:
    sdk: flutter


  flutter_lints: ^2.0.0

flutter:
  uses-material-design: true
  assets:
   - .env
After replacing the dependencies in pubspec.yaml, run the pub command to install dependencies in our Flutter project:
flutter pub getProject Structure
├─ lib
│ ├─ widgets
│ │ └─ star_bucks_list.dart
│ ├─ api_request.dart
│ ├─ api_service.dart
│ ├─ const.dart
│ └─ main.dart
├─ pubspec.lock
└─ pubspec.yaml This structure is created to improve the readability of our code and to separate custom-made widgets.
Rest API
For this example, we will be using the Butter Rest API to fetch our content for our Flutter app.
https://api.buttercms.com/v2/pages/*/flutter-web/?auth_token=$yourtoken
API response
This is what our response looks like after an API request to our endpoint.
{
   "data": {
      "slug": "flutter-web",
      "name": "Flutter Web",
      "published": "2022-11-22T11:13:28.312593Z",
      "updated": "2022-11-24T16:48:51.604974Z",
      "page_type": null,
      "fields": {
         "landing_page_hero": {
            "hero_text": "Midnight Fracupinno",
            "sub-hero_text": "\"Neque porro quisquam est qui dolorem ipsum quia dolor sit amet, consectetur, adipisci velit...\"\n\"There is no one who loves pain itself, who seeks after it and wants to have it, simply because it is pain...\"",
            "hero_image": "https://cdn.buttercms.com/N7ac7VgRm2Ke2Yavw6gT"
         },
         "item_list": {
            "item_name": "Sippy cups",
            "item_description": "Lorem Ipsum is\ndummied text",
            "image1": "https://cdn.buttercms.com/bqCWz9CRuWZeE03p8hOX",
            "image2": "https://cdn.buttercms.com/WlK88BttQWyU9mTyQu4C",
            "image3": "https://cdn.buttercms.com/QzxTC5D6S02cizX0X6Xt",
            "item_description2": "Enjoy our sugar free",
            "item_description3": "Have a donut",
            "item_name2": "Cookies",
            "item_name3": "Donut"
         }
      }
   }
}
Now that we know what our response looks like, let's write a model for it.
Data model
We can easily generate models for our response using the online model generator, quicktype. This (de)serializer reads our API response and generates a model.
class Welcome {
  Welcome({
    this.data,
  });
  final Data? data;
  factory Welcome.fromJson(String str) => Welcome.fromMap(json.decode(str));
  String toJson() => json.encode(toMap());
  factory Welcome.fromMap(Map<String, dynamic> json) => Welcome(
        data: json["data"] == null ? null : Data.fromMap(json["data"]),
      );
  Map<String, dynamic> toMap() => {
        // ignore: prefer_null_aware_operators
        "data": data == null ? null : data?.toMap(),
      };
  @override
  String toString() => 'Welcome(data: $data)';
}
Now that we have our data model, let’s create logic to make a request to the Butter API:
class ApiService {
  Welcome welcome = Welcome();
  String? image;
  Future<Welcome?> getData() async {
    try {
      var url = Uri.parse(ApiConstants.baseUrl);
      var response = await http.get(url);
      if (response.statusCode == 200) {
        final responseData = Welcome.fromJson(response.body);
        welcome = responseData;
        return welcome;
      }
    } catch (e) {
      log(e.toString());
    }
    return null;
  }
}
In the code above, we are using the HTTP client to get data from the Butter API and when the status is 200, the data should be returned and stored in our model. That way, we can populate our UI with live data.
Populating our UI
To populate our UI, we will initialize the API service so we can access the getData() function that makes the request to our Butter API.
class MyHomePage extends StatefulWidget {
  const MyHomePage({super.key, required this.title});
  final String title;
  @override
  State<MyHomePage> createState() => _MyHomePageState();
}
class _MyHomePageState extends State<MyHomePage> {
  final apiservice = ApiService();
  @override
  void initState() {
    super.initState();
    getData();
  }
  getData() async {
    await apiservice.getData();
    setState(() {});
  }
...
}
From the code above, we called the getData() function in an initState. The getData() function will be fired onBuild; this makes our data available before the UI completely builds.
Create the navigation bar
In our navigation bar, we have an icon and the navigation items. To achieve this, we need to create a custom widget.
class NavigationItem extends StatelessWidget {
  final String title;
  const NavigationItem({super.key, required this.title});
  @override
  Widget build(BuildContext context) {
    return Padding(
      padding: const EdgeInsets.symmetric(horizontal: 20.0),
      child: Text(
        title,
        style: const TextStyle(fontSize: 20.0),
      ),
    );
  }
}
From the code above, we created a widget named NavigationItem which has a field called title. This field will allow us to name our navigation items by reusing the widgets.
Let us now display our custom navigation bar and populate it with our icon from ButterCMS.
class CustomNavigationBar extends StatefulWidget {
  const CustomNavigationBar({super.key});
  @override
  State<CustomNavigationBar> createState() => _CustomNavigationBarState();
}
class _CustomNavigationBarState extends State<CustomNavigationBar> {
  final apiservice = ApiService();
  @override
  void initState() {
    super.initState();
    getData();
  }
  getData() async {
    await apiservice.getData();
    setState(() {});
  }
  @override
  Widget build(BuildContext context) {
    return SizedBox(
      height: 100.0,
      child: Row(
        mainAxisAlignment: MainAxisAlignment.spaceEvenly,
        children: [
          Image.network(
            '${apiservice.welcome.data?.fields?.landingPageHero?.webIcon}',
            loadingBuilder: (BuildContext context, Widget child,
                ImageChunkEvent? loadingProgress) {
              if (loadingProgress == null) {
                return child;
              }
              return Center(
                child: CircularProgressIndicator(
                  value: loadingProgress.expectedTotalBytes != null
                      ? loadingProgress.cumulativeBytesLoaded /
                          loadingProgress.expectedTotalBytes!
                      : null,
                ),
              );
            },
          ),
          const Spacer(),
          const NavigationItem(title: 'Home'),
          const NavigationItem(title: 'About'),
          const NavigationItem(title: 'Contact'),
        ],
      ),
    );
  }
}
In the code above, we created a sized box with a height of 100. This gives us a restrained container for our navigation bar. The child of our sized box widget should be a row that will contain our image and the navigation item. We will use the spacer widget to evenly separate the row children at both ends.
Display the landing page
The content of our landing page is contained in a row as the parent widget and a column as the children.
Inside the column, we will display the hero title, sub-hero text, price, and button, like below. You can copy the code into your editor.
Column(
                          crossAxisAlignment: CrossAxisAlignment.center,
                          mainAxisSize: MainAxisSize.max,
                          children: [
                            const SizedBox(height: 200),
                            SizedBox(
                              width: 200,
                              child: Wrap(
                                runSpacing: 20,
                                children: [
                                  Text(
                                      '${apiservice.welcome.data?.fields?.landingPageHero?.heroText}',
                                      style: const TextStyle(
                                          fontWeight: FontWeight.w700,
                                          fontSize: 30)),
                                  const SizedBox(height: 20),
                                  Text(
                                      '${apiservice.welcome.data?.fields?.landingPageHero?.subHeroText}'),
                                  const SizedBox(height: 15),
                                  const Text('Only \$ 9.45'),
                                  const SizedBox(height: 25),
                                  ElevatedButton(
                                    style: ElevatedButton.styleFrom(
                                      backgroundColor: Colors.black,
                                      shape: RoundedRectangleBorder(
                                          borderRadius:
                                              BorderRadiusDirectional.circular(
                                                  30)),
                                      padding: const EdgeInsets.symmetric(
                                          vertical: 20),
                                    ),
                                    onPressed: () {},
                                    child: Row(
                                      mainAxisAlignment:
                                          MainAxisAlignment.center,
                                      children: const [
                                        Text('Buy now'),
                                        SizedBox(
                                          width: 10,
                                        ),
                                        Icon(
                                          Icons.arrow_forward_ios_rounded,
                                          color: Colors.orange,
                                          size: 20,
                                        ),
                                      ],
                                    ),
                                  ),
                                ],
                              ),
                            ),
        ],
                        ),
To display the image after the text and the buttons, you can add the following lines of code:
CircleAvatar(
                          radius: 150,
                          backgroundColor: const Color(0xffFF7043),
                          child: Image.network(
                            '${apiservice.welcome.data?.fields?.landingPageHero?.heroImage}',
                            loadingBuilder: (BuildContext context, Widget child,
                                ImageChunkEvent? loadingProgress) {
                              if (loadingProgress == null) {
                                return child;
                              }
                              return Center(
                                child: CircularProgressIndicator(
                                  value: loadingProgress.expectedTotalBytes !=
                                          null
                                      ? loadingProgress.cumulativeBytesLoaded /
                                          loadingProgress.expectedTotalBytes!
                                      : null,
                                ),
                              );
                            },
                          ),
                        ),
Note: The image from ButterCMS needs to be loaded before it is rendered. If the image.network image provider is used without a builder, the image won’t be rendered correctly, This is because we did not wait for the image to download completely before rendering.
In the above code, we used the loadingBuilder property to determine which widget to show while the image is being downloaded. In our case, we displayed the CircularProgressiveIndicator, and once the image is downloaded, the image is rendered.
Next, to display the featured items on our landing page, we need to create a custom widget that takes in the item’s image source, the item’s name, and the item’s description. To do this, you can use the following line of code:
class DisplayFeaturedItem extends StatelessWidget {
  const DisplayFeaturedItem(
      {Key? key,
      required this.apiservice,
      required this.description,
      required this.imgSrc,
      required this.title})
      : super(key: key);
  final ApiService apiservice;
  final String imgSrc;
  final String description;
  final String title;
  @override
  Widget build(BuildContext context) {
    return Row(
      crossAxisAlignment: CrossAxisAlignment.start,
      mainAxisSize: MainAxisSize.min,
      children: [
        ClipRRect(
          borderRadius: BorderRadius.circular(200),
          child: Image.network(
            imgSrc,
            width: 32,
            loadingBuilder: (BuildContext context, Widget child,
                ImageChunkEvent? loadingProgress) {
              if (loadingProgress == null) {
                return child;
              }
              return Center(
                child: CircularProgressIndicator(
                  value: loadingProgress.expectedTotalBytes != null
                      ? loadingProgress.cumulativeBytesLoaded /
                          loadingProgress.expectedTotalBytes!
                      : null,
                ),
              );
            },
          ),
        ),
        const SizedBox(
          width: 8,
        ),
        Column(
          crossAxisAlignment: CrossAxisAlignment.start,
          children: [
            Text(
              title,
              style: const TextStyle(fontWeight: FontWeight.w700, fontSize: 16),
            ),
            Text(
              description,
              style: const TextStyle(color: Colors.grey),
            ),
          ],
        )
      ],
    );
  }
}
Note: The API service field is added, so we can access responses from our API calls.
Now that we have created a custom widget, we can reuse the component for different featured items, like those below
DisplayFeaturedItem(
     apiservice: apiservice,
      title:
                            '${apiservice.welcome.data?.fields?.itemList?.itemName}',
    description:
                                    '${apiservice.welcome.data?.fields?.itemList?.itemDescription}',
                                imgSrc:
                                    '${apiservice.welcome.data?.fields?.itemList?.image1}',
                              ),                              ),
Furthermore, these featured items were wrapped in a wrap widget, which allows us to create a layout. The wrap layout is horizontal, but we can use the sized box to constrain the space. This means that images try to display horizontally, but due to the constraint, they break and render on the next available space.
Now, without further ado, here is our rendered landing page:
Final thoughts
ButterCMS is an all-around power tool that has all it takes to build content for your business. It allows your content to be published across different platforms and scale easily. With ButterCMS, you can literally set up functional Flutter landing pages with rich content all centered in one place, which makes it easy to update content seamlessly. When using Butter, you can break your content down into components that you can then use to compose whatever landing page you may need.