
In a crowded market, businesses can often succeed by providing excellent customer support, which helps improve customer satisfaction and loyalty. However, handling repetitive customer support questions can be time-consuming and result in long wait times for other customers in need of assistance.
A self-service knowledge base is a valuable solution that can automate common customer support questions and provide instant answers through well-organized and easily accessible content. This saves time for the customer support team and provides customers with a quick and convenient way to find answers to their questions. Therefore, creating a knowledge base that meets your organization's specific requirements while providing a seamless experience for your customers is critical.
This guide is intended to be a resource for creating a knowledge base that allows readers to search for a specific article of relevance and read it in its entirety using Flutter and ButterCMS.
Table of contents
Understanding Flutter
Flutter is an open-source mobile application development framework created by Google. It is used to build natively-compiled mobile, web, and desktop applications from a single codebase. Flutter is written in the Dart programming language and uses the Skia graphics engine to render high-performance, visually attractive applications on a variety of platforms.
Flutter is known for its fast development cycle, expressive and flexible user interface, and excellent performance. It also has a large and active community of developers, which makes it a popular choice for building mobile apps.
Several technical aspects of Flutter make it well-suited for building a knowledge base:
-
Cross-platform development: Flutter allows you to build apps for multiple platforms (such as iOS, Android, and the web) from a single codebase, which can be more efficient than building separate apps for each platform.
-
Fast development cycle: Flutter has a hot reload feature that allows you to see code changes in real time, which can significantly speed up the development process.
-
Expressive and flexible user interface: Flutter's built-in widget library and declarative programming style make it easy to build beautiful and responsive user interfaces.
-
Excellent performance: Flutter apps are compiled into native code, meaning they can run smoothly and efficiently on various devices.
-
Large and active community: Flutter has a large and active community of developers, which means a wealth of knowledge and resources are available to help you build your app.
Overall, these technical aspects of Flutter make it an ideal choice for building a knowledge base or other types of applications.
Why ButterCMS?
ButterCMS is a headless content management system (CMS) that allows developers to manage and deliver content to their websites and applications through a RESTful API. A headless CMS is a content management system whose architecture designed to be decoupled from the presentation layer of a website or application, allowing for greater flexibility and customization in how the content is displayed and internally structured.
Here are a few reasons you might consider using ButterCMS to power your knowledge base:
-
Content modeling: ButterCMS allows developers to create and model content using a simple and intuitive interface. Content modeling involves defining the structure of the content and its relationships. For example, users can create models for articles, categories, tags, and authors when building a knowledge base.
-
Content types: When building a knowledge base application, users can leverage ButterCMS content types to create models for the home page. Using page types, collections, components, and pages.
-
Content API: ButterCMS provides a content API that users can use to fetch content from their CMS and use it in their applications. The API is RESTful and can be integrated into any programming language or framework, including Flutter.
-
Rich text editor: ButterCMS provides a WYSIWYG (what you see is what you get) editor that allows content creators to add and format text, images, videos, and other media in their articles. The editor supports markdown, HTML, and other formats.
-
Image management: ButterCMS provides an image management system that allows developers to upload, store, and resize images in their CMS. This can be useful when building a knowledge base with images or screenshots.

Flutter App Tutorial: Prerequisites
The following prerequisites are needed to follow along with this tutorial:
-
Flutter SDK installed on your machine
-
Knowledge of Flutter and Dart
The code for this tutorial can be found in this GitHub repo.
Setting up our Pages in ButterCMS
Let’s start with setting up our ButterCMS content. Head to ButterCMS and sign up for a trial account if you don't have one. This section will set up the How To page types for our knowledge base application.
Page types are different templates or structures that can be used to define the layout and design of the pages on a website. In this tutorial, we’ll be using them as templates for our How To articles, promoting reusability when creating new How To articles.
In this article, we’ll set up two page-types, namely:
-
The How To page: This will provide a template for our How To content.
-
The Home Introduction page: This page type will provide a template for our Home screen contents.
Building the How To page types
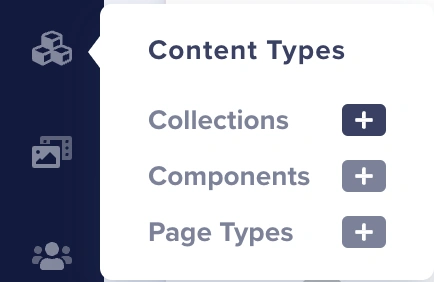
On the ButterCMS dashboard, hover over to the Content Types tab and click on the “+” button next to Page Types.
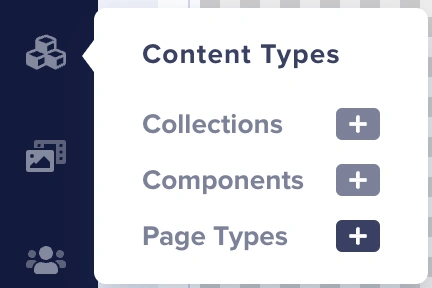
This will lead you to an area where we can define and configure our page type.

In the Page Configuration editor, add the following fields:
-
A short text for the article name, naming it “HowTo title”
-
A WYSIWYG editor for the article body, naming it “HowTo body”
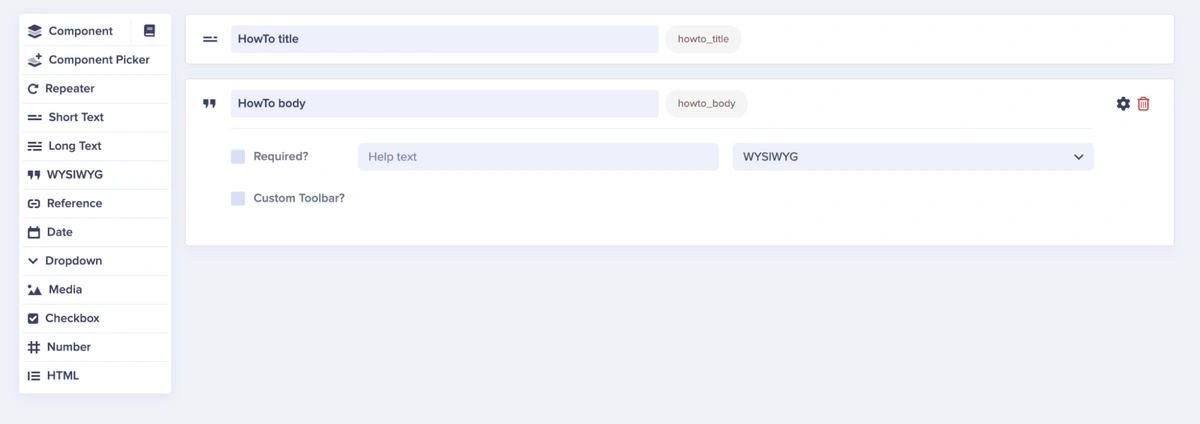
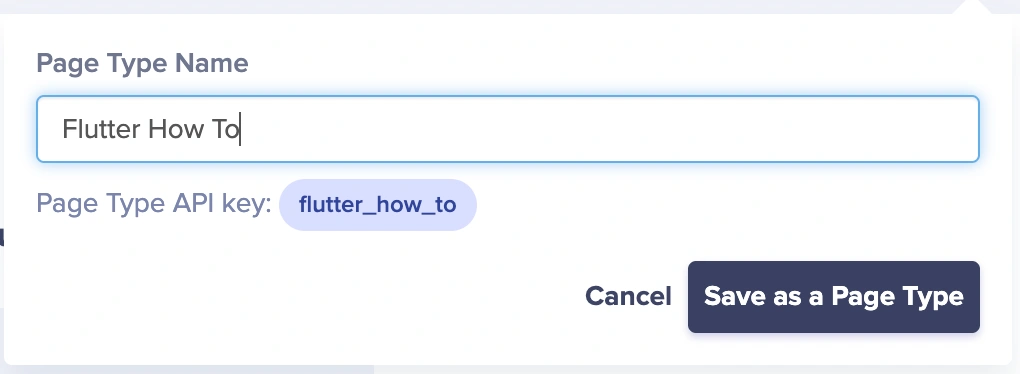
Save the page type as “Flutter How To”.
With the complete Flutter How To page type configuration, let’s populate our page with some content. To achieve this, hover over the Pages tab and click the “+” button attached to Flutter How To.
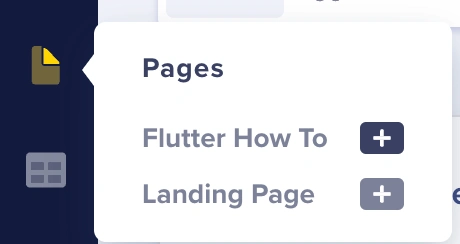
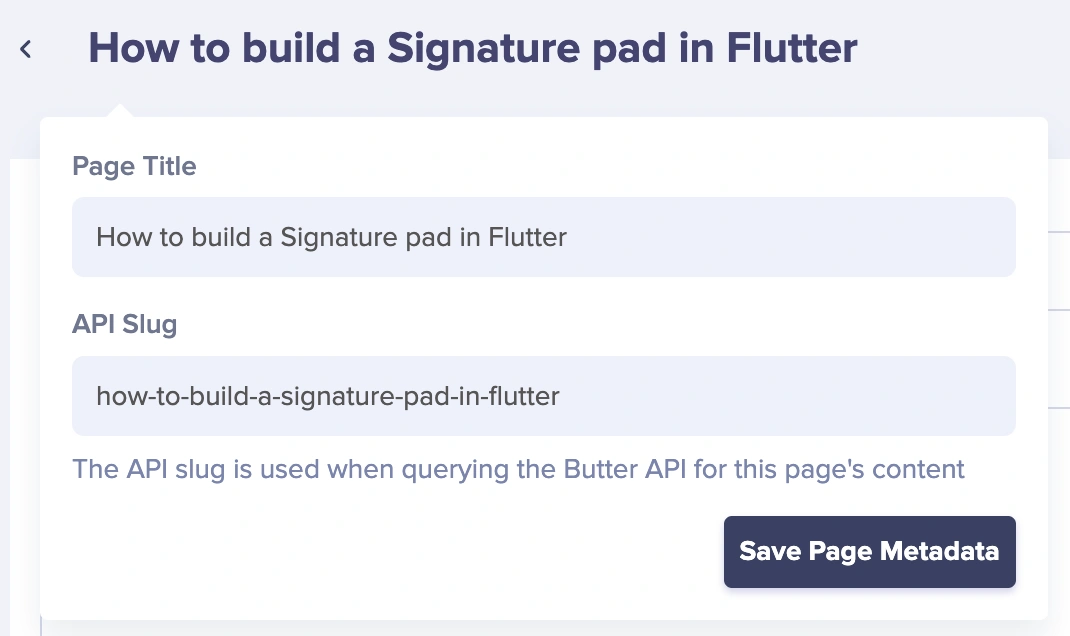
Once on the new Flutter How To page, add the Page metadata with a name of your choice:
Next, populate the various fields with your content.
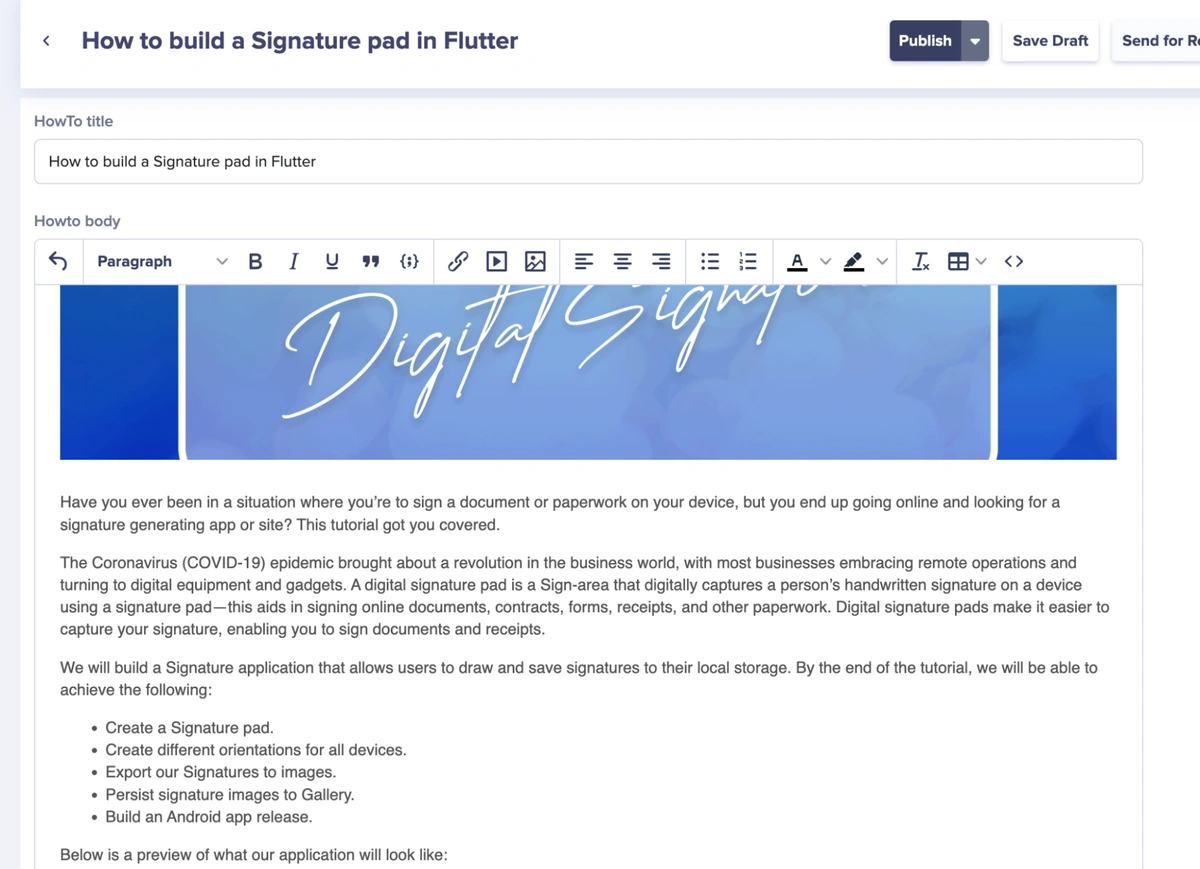
We’ve populated our knowledge base with custom content in the image above. Click on the Publish button to publish the post.
Creating the home page in ButterCMS
Every knowledge base application requires a nice introduction page. In this section, we’ll build an introduction page with ButterCMS, which will be used later when building our Flutter application.
In this section, we’ll be using two ButterCMS content types to create our home page, namely:
-
Page Types: As discussed earlier, page types are different templates or structures that can be used to define the layout and design of the pages on a website. We’ll be using this to create the skeleton for our home page.
-
Collections: Collections are a powerful feature of ButterCMS that allow you to group related content items in a structured way. Each collection is essentially a set of items with a similar structure, which can be displayed consistently on a website or application. For example, if you're creating a knowledge base with different types of content (e.g., FAQs, how-to articles), you can use collections to create a template for each type of content.
Configuring the home page content types
To get started, head over to Content Types and click on the plus sign (+) beside Collections.
This will lead you to the Collections Editor.
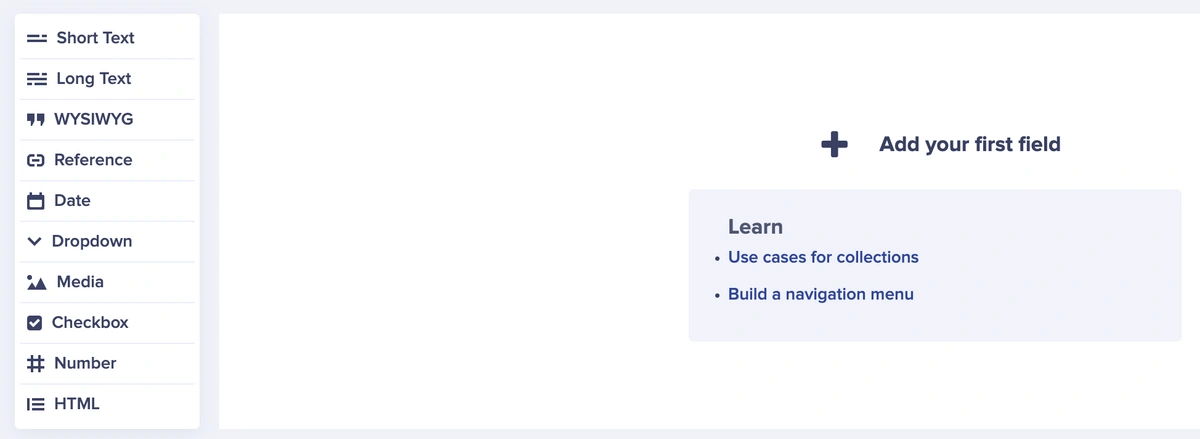
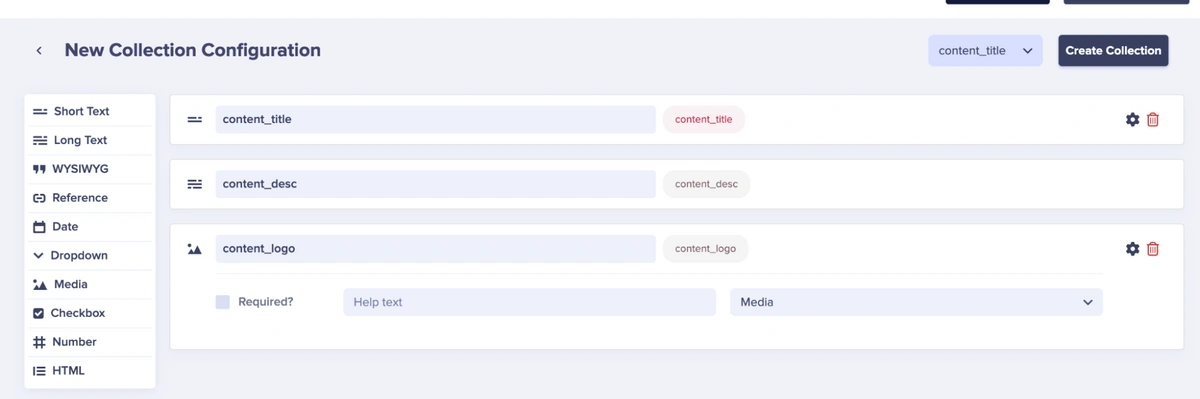
In the Collections Editor, add the following fields.
-
Short Text → content_title
-
Long Text → content_desc
-
Media → content_logo
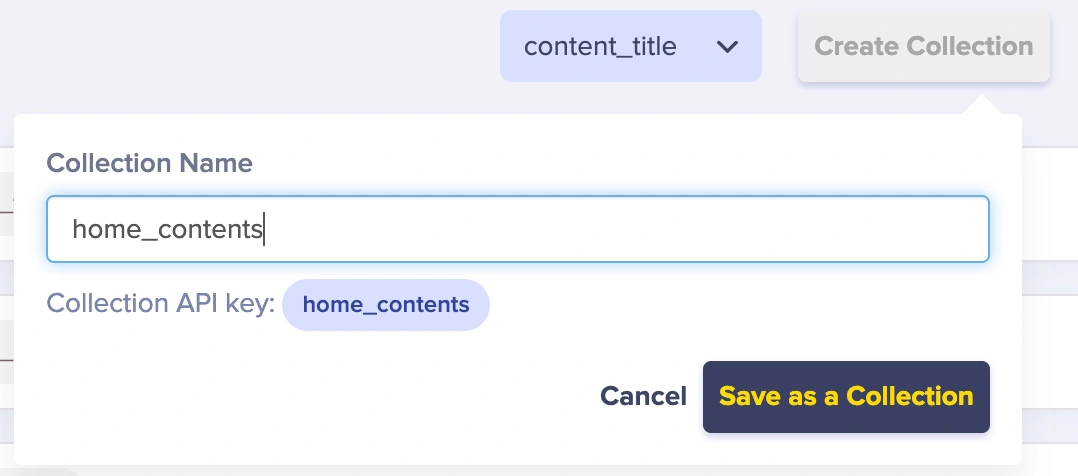
Then, click on the Create Collection button and save the collection.
Save the collection as “home_contents”
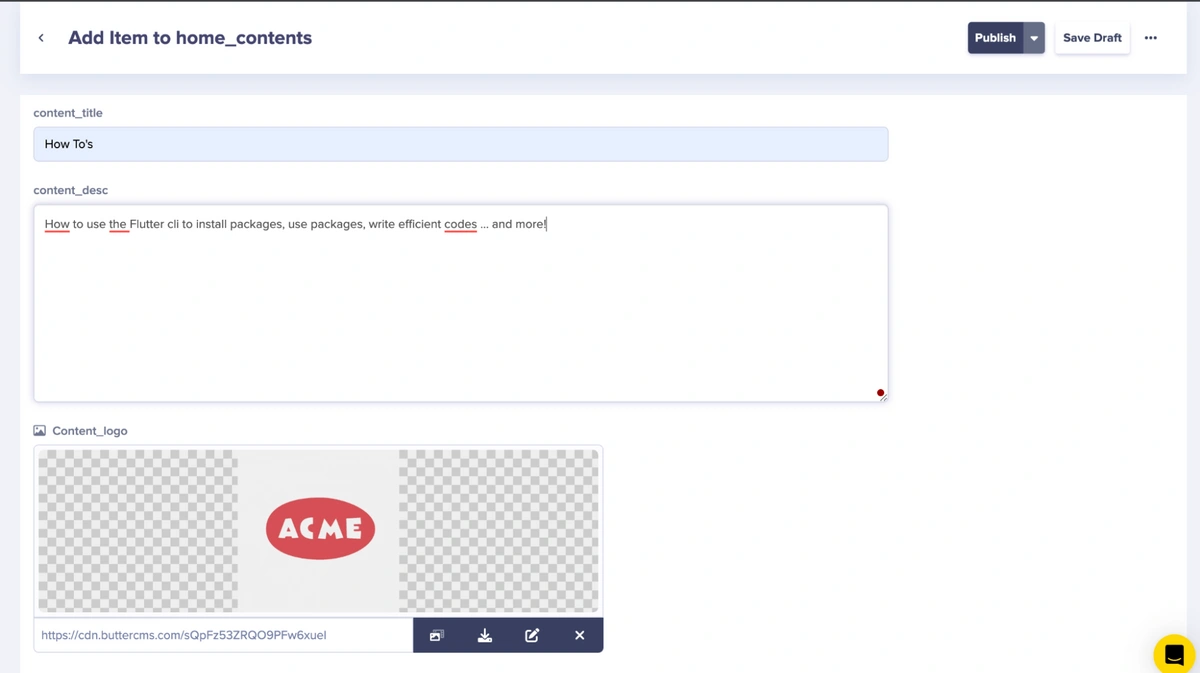
After saving the collection, fill in the fields with your custom data and click on the Publish button when done to save it.
Next, head to Content Types on the sidebar and click the plus (+) button beside Page Types.
Upon clicking the Page Types plus button, you’ll be taken to the New Page Type configuration page.
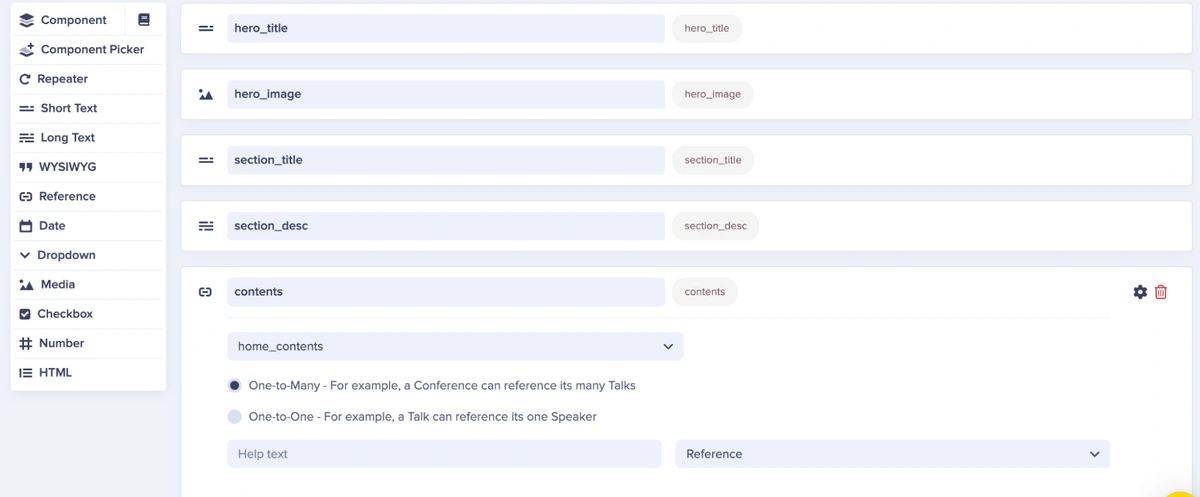
In the editor, add the following fields:
-
Short Text → hero_title
-
Media → hero_image
-
Short Text → section_title
-
Long Text → section_desc
-
Reference → contents (this will reference the home_contents collection created earlier)
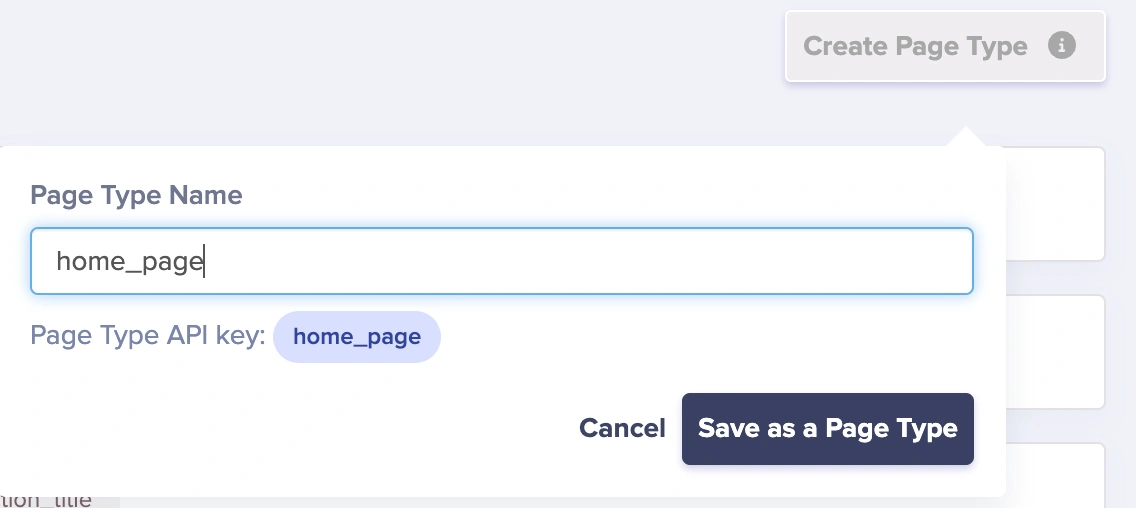
Then, save the page as “home_page”.
Adding content to the home page
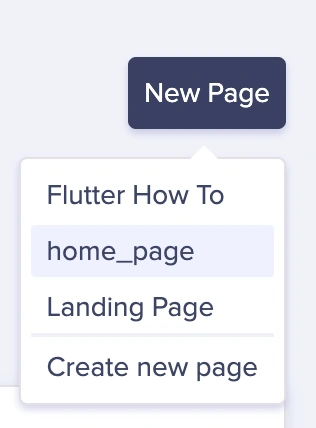
Next, head over to the Pages tab on the sidebar and click the New Page button. In the dropdown, select home_page.
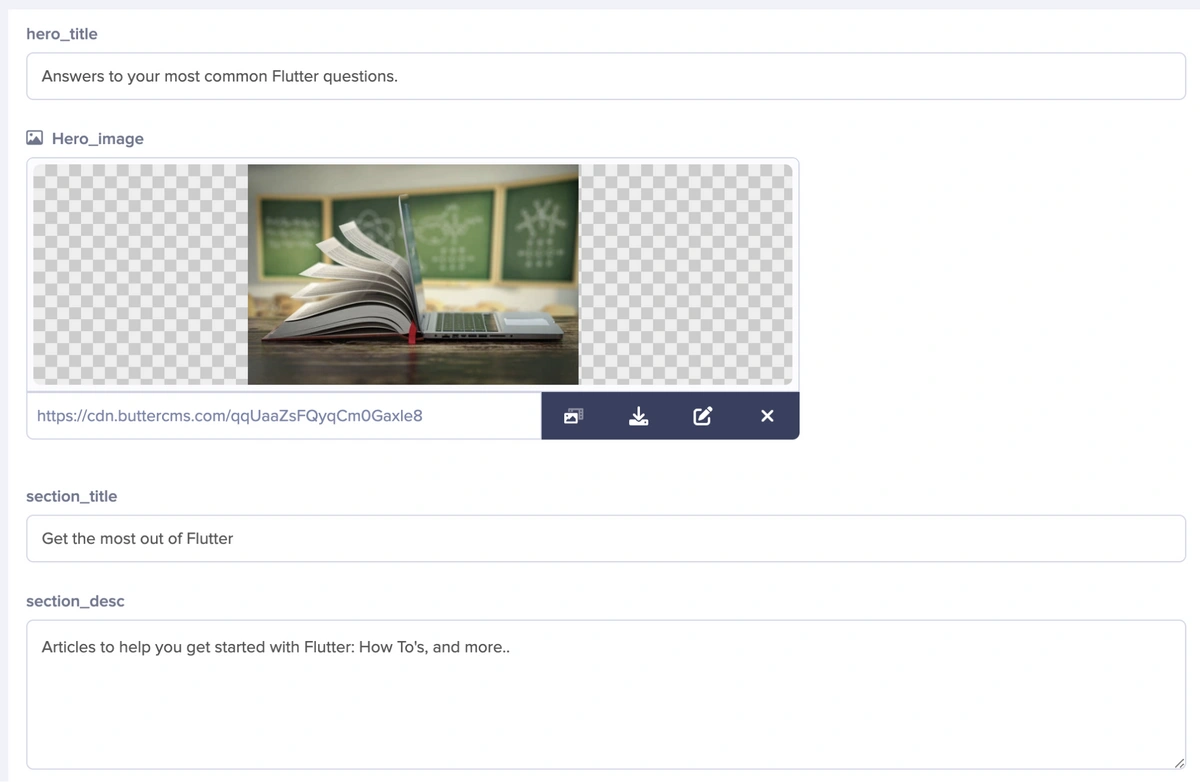
In the Page Editor, provide the page’s metadata. For this tutorial, I’ll save the page title as “Home Page”.

Next, fill data into the fields therein.
Next, click the Add Reference button and select all the How To items created earlier.


Finally, click the Publish Button to save all the updates.
Retrieving the API token
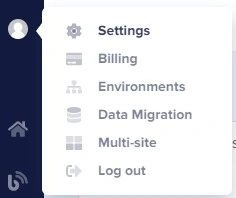
Let’s grab our API token before building our application. Hover over the profile icon and click on Settings.
Copy and store the API token from the API Tokens tab.

Scaffolding our Flutter application
Let’s begin with scaffolding our Flutter application. Run the command below in your terminal to create a Flutter app
flutter create knowledge_based_app
Next, change directories to the project folder.
cd knowledge_based_app
Finally, run the command below to install the http and the flutter_html packages.
flutter pub add http flutter_html
The http package will be responsible for making network calls in our application, while the flutter_html package will be responsible for converting and rendering HTML code.
Configuring our Flutter application
Before building our screens and components, let’s set up some configurations on our application to avoid breaking when building. Head over to the android/app/build.gradle file and update the following variables:
android {
    compileSdkVersion 33 //changed this to 33
    ndkVersion flutter.ndkVersion

    ...

    defaultConfig {
        minSdkVersion 19   // changed this to 19
        targetSdkVersion flutter.targetSdkVersion
        versionCode flutterVersionCode.toInteger()
        versionName flutterVersionName
    }
}
In the code block above, we’re updating compileSdkVersion and minSdkVersion to a custom version suitable for our packages.
Next, head over to the android/app/src/main/AndroidManifest.xml file and paste the code below into the manifest tag:
<uses-permission android:name="android.permission.INTERNET" />
The XML tag above will be responsible for internet permissions for our application.
Building the user interface
Let’s head on to build the interactive part of our application. In this section, we’ll be building all the screens needed to display our ButterCMS content.
Building the HowTo screen
Let’s begin with the HowTo screen. The HowTo screen is responsible for displaying the full details of the content. Create a how_to_screen.dart file in the lib/ folder and paste the code below into it:
import 'package:flutter/material.dart';
import 'package:flutter_html/flutter_html.dart';


class HowToScreen extends StatelessWidget {
 const HowToScreen({super.key, required this.data, required this.date});


 final Map<String, dynamic> data;
 final String date;


 @override
 Widget build(BuildContext context) {
   return Scaffold(
     appBar: AppBar(
       title: const Text('How To'),
       centerTitle: true,
     ),
     body: SingleChildScrollView(
         child: Container(
       padding: const EdgeInsets.symmetric(horizontal: 10, vertical: 10),
       child: Column(
         crossAxisAlignment: CrossAxisAlignment.start,
         children: [
           const SizedBox(height: 10),
           ListTile(
             title: Text(
               data['howto_title'],
               style: const TextStyle(
                   fontSize: 30,
                   color: Colors.black,
                   fontWeight: FontWeight.bold),
             ),
             subtitle: Text(
               'Answered on: $date',
               style: const TextStyle(
                 color: Colors.grey,
                 fontSize: 17,
               ),
             ),
           ),
           Html(
             data: """
               ${data['howto_body']}
               """,
             style: {
               'p': Style(fontSize: FontSize.em(1.4)),
               'li': Style(fontSize: FontSize.em(1.2)),
             },
           ),
           const SizedBox(
             height: 5,
           ),
           const Text(
             'By Team Flutter',
             style: TextStyle(
               color: Colors.grey,
               fontSize: 17,
             ),
           ),
           const SizedBox(
             height: 10,
           ),
         ],
       ),
     )),
   );
 }
}
In the code block above, we’ve created a StatelessWidget called HowToScreen. It displays more information about a selected answer from the knowledge base.
The HowToScreen widget displays the howto_title and the howto_body. The howto_body is displayed using the Html widget from the flutter_html package, which allows you to display HTML content in a Flutter app.
The HowToScreen widget has a parameter called data, which is a map containing the details of the selected article. The build method of the HowToScreen widget uses the data parameter to render the UI.
Building the CustomCard widget
The CustomCard is a reusable widget that we will be using frequently in our application. Create a custom_card.dart file in the lib/ folder and paste the code below into it:
import 'package:flutter/material.dart';
import 'how_to_screen.dart';


class CustomCard extends StatelessWidget {
 const CustomCard({
   Key? key,
   this.date,
   required this.question,
   this.resp,
 }) : super(key: key);


 final String question;
 final DateTime? date;
 final resp;


 @override
 Widget build(BuildContext context) {
   final customDate = date.toString().substring(0, 10);
   return InkWell(
     onTap: () => Navigator.push(
         context,
         MaterialPageRoute(
             builder: (context) => HowToScreen(
                   data: resp,
                   date: customDate,
                 ))),
     child: Card(
       color: Colors.black,
       child: Column(
         crossAxisAlignment: CrossAxisAlignment.start,
         children: [
           ListTile(
             title: Text(
               'On $customDate',
               style: const TextStyle(
                 color: Colors.grey,
                 fontSize: 13,
               ),
             ),
             trailing: const Text(
               'By: Team Flutter',
               style: TextStyle(
                 color: Colors.grey,
                 fontSize: 13,
               ),
             ),
           ),
           Padding(
             padding: const EdgeInsets.symmetric(horizontal: 15.0),
             child: Text(
               question,
               style: const TextStyle(
                 fontSize: 20,
                 color: Color(0xffFCF7F8),
                 fontWeight: FontWeight.bold,
               ),
             ),
           ),
           const SizedBox(
             height: 15,
           ),
         ],
       ),
     ),
   );
 }
}
In the code block above, we’ve created a ListTile with a title, subtitle, and trailing text. The title and trailing text display the article's date and author, respectively. The subtitle displays the article title.
Upon clicking CustomCard, it routes to the HowToScreen with the resp data and the customDate.
The CustomCard class is a StatelessWidget, which means it has no internal state that can change. It's only responsible for rendering the UI based on the given parameters.
Building the Search screen
We’ll be giving our users the ability to search through content in our knowledge base application. To achieve this, create a search.dart file in the lib/ folder and paste the code below into it:
import 'package:flutter/material.dart';
import 'package:knowledge_based_app/custom_card.dart';


class SearchScreen extends SearchDelegate {
 final List data;


 SearchScreen({required this.data});


 @override
 List<Widget>? buildActions(BuildContext context) {
   return [
     IconButton(
       onPressed: () {
         query = '';
       },
       icon: const Icon(Icons.clear),
     ),
   ];
 }


 @override
 Widget? buildLeading(BuildContext context) {
   return IconButton(
     onPressed: () {
       close(context, null);
     },
     icon: const Icon(Icons.arrow_back),
   );
 }


 @override
 Widget buildResults(BuildContext context) {
   List<dynamic> matchQuery = [];


   for (var item in data) {
     var value = item['fields']['howto_title'].toString().toLowerCase();


     if (value.toLowerCase().contains(query.toLowerCase())) {
       matchQuery.add(item);
     }
   }


   return ListView.builder(
     itemCount: matchQuery.length,
     itemBuilder: (context, index) {
       var result = matchQuery[index]['fields'];


       String dateString = data[index]['updated'];


       DateTime date = DateTime.parse(dateString);


       return CustomCard(
         resp: result,
         question: result['howto_title'],
         date: date,
       );
     },
   );
 }


 @override
 Widget buildSuggestions(BuildContext context) {
   List<dynamic> matchQuery = [];


   for (var item in data) {
     var value = item['fields']['howto_title'].toString().toLowerCase();


     if (value.toLowerCase().contains(query.toLowerCase())) {
       matchQuery.add(item);
     }
   }


   return ListView.builder(
     itemCount: matchQuery.length,
     itemBuilder: (context, index) {
       var result = matchQuery[index]['fields'];


       String dateString = data[index]['updated'];
       DateTime date = DateTime.parse(dateString);


       return CustomCard(
         resp: result,
         question: result['howto_title'],
         date: date,
       );
     },
   );
 }
}
In the code block above, we’ve created a SearchDelegate class called SearchScreen. It allows you to customize the search bar and search results in a Flutter app.
The SearchScreen class has a parameter called data, which is a list of data to search through. The buildActions, buildLeading, buildResults, and buildSuggestions methods are called when the user interacts with the search bar.
The buildActions method specifies the actions to be taken when the user submits a search query. In this case, it adds an "X" button to clear the search query.
The buildLeading method specifies the leading widget of the search bar. In this case, it adds a back button to close the search.
The buildResults and buildSuggestions methods are called when the user submits a search query and displays the search results. It searches through the data list and displays a list of CustomCard widgets that match the search query.
Building our Home screen
The Home screen is the main screen of our application. Here, we’ll make our API requests and distribute data to all the other screens and widgets that we created earlier. Create a home.dart file in the lib/ folder and paste the code below into it:
import 'dart:convert';
import 'package:http/http.dart' as http;
import 'package:flutter/material.dart';
import 'package:knowledge_based_app/custom_card.dart';
import 'package:knowledge_based_app/search.dart';


class HomeScreen extends StatefulWidget {
 const HomeScreen({Key? key}) : super(key: key);


 @override
 State<HomeScreen> createState() => _HomeScreenState();
}


class _HomeScreenState extends State<HomeScreen> {
 List data = [];


 bool isLoading = true;


 Future retrieveHowTo() async {
   try {
     final url = Uri.parse(
         "https://api.buttercms.com/v2/pages/flutter_how_to/?auth_token=5b401ef0567ef2085368bf67a20bd1bd96c99098");
     final response = await http.get(url);
     if (response.statusCode == 200) {
       print(response);
       var result = jsonDecode(response.body);
       setState(() {
         data = result['data'] as List;
         isLoading = false;
       });
       return result;
     }
   } catch (e) {
     print(e);
   }
 }


 @override
 void initState() {
   super.initState();
   retrieveHowTo();
 }


 @override
 Widget build(BuildContext context) {
   return Scaffold(
     backgroundColor: const Color(0xffFCF7F8),
     body: isLoading == true
         ? const Center(
             child: CircularProgressIndicator(),
           )
         : SafeArea(
             child: SingleChildScrollView(
               child: data.isEmpty
                   ? const Align(
                       alignment: Alignment.center,
                       child: Text(
                         'No Answers here',
                         style: TextStyle(
                             fontSize: 22,
                             color: Colors.black,
                             fontWeight: FontWeight.bold),
                       ),
                     )
                   : Column(
                       children: [
                         Row(
                           children: [
                             IconButton(
                                 onPressed: () => Navigator.pop(context),
                                 icon: const Icon(
                                     Icons.arrow_back_ios_new_rounded)),
                             const Text(
                               'How To',
                               style: TextStyle(
                                   fontSize: 22,
                                   color: Colors.black,
                                   fontWeight: FontWeight.bold),
                             ),
                           ],
                         ),
                         const SizedBox(
                           height: 20,
                         ),
                         GestureDetector(
                           onTap: () {
                             showSearch(
                                 context: context,
                                 delegate: SearchScreen(data: data));
                           },
                           child: const CircleAvatar(
                             radius: 55,
                             child: Icon(
                               Icons.search,
                               size: 70,
                             ),
                           ),
                         ),
                         const SizedBox(height: 20),
                         const SizedBox(height: 5),
                         const Text(
                           'Frequently asked How To(s) in Flutter',
                           style: TextStyle(
                             color: Color.fromARGB(255, 84, 83, 83),
                             fontSize: 18,
                           ),
                         ),
                         const SizedBox(height: 15),
                         ...List.generate(data.length, (index) {
                           var resp = data[index]['fields'];
                           print(resp);
                           String dateString = data[index]['updated'];
                           DateTime date = DateTime.parse(dateString);
                           print(date);


                           return CustomCard(
                             resp: resp,
                             question: resp['howto_title'],
                             date: date,
                           );
                         })
                       ],
                     ),
             ),
           ),
   );
 }
}
In the code block above, we’ve created a StatefulWidget called HomeScreen. It displays a list of questions and answers from a knowledge base. When the user taps on a question, it navigates to a new screen called HowToScreen and displays more information about the answer.
The HomeScreen has a stateful class called _HomeScreenState that holds the internal state of the HomeScreen widget. The _HomeScreenState has a list of data called data and a Boolean called isLoading.
The initState method is called when the HomeScreen is inserted into the tree. Inside the initState method, the retrieveHowTo method is called to fetch the data from an API and store it in the data list. The isLoading flag is set to true while the data is being fetched.
The build method of the _HomeScreenState is responsible for rendering the UI of the HomeScreen widget. If the isLoading flag is true, it displays a CircularProgressIndicator to show that the data is being fetched. If the data list is empty, it displays a message saying "No answers here". If the data list is not empty, it displays the questions and answers using the CustomCard widget.
In the code block above, we’ve created a StatefulWidget called HomeScreen. The screen also includes a search feature to filter the list of cards.
The HomeScreen is a stateful widget that retrieves data from the API in the retrieveHowTo() method using the http package. The retrieved data is stored in the data list and the state of the widget is updated using the setState() method.
The widget's initState() method calls the retrieveHowTo() method to retrieve the data when the widget is initialized.
The build() method returns a Scaffold widget with a CircularProgressIndicator widget if the data is still being retrieved (isLoading is true), or a SingleChildScrollView widget that displays the list of custom cards if the data has been retrieved.
The custom cards are generated using the CustomCard widget, which was created earlier. The data list is mapped to a list of CustomCard widgets using the List.generate() method, and each card displays data from the corresponding item in the data list.
The search feature is implemented using the showSearch() method, which displays a search bar and filters the list of cards based on the user's input. The search screen is implemented in a separate file (search.dart) using the SearchDelegate class.
Building the Intro screen
Finally, let’s build our Introduction screen that’ll welcome users into our application. To achieve this, create an intro_page.dart file in the lib/ folder and paste the code below into it:
import 'dart:convert';
import 'package:flutter/material.dart';
import 'package:knowledge_based_app/home.dart';
import 'package:http/http.dart' as http;


class IntroPage extends StatefulWidget {
 const IntroPage({Key? key}) : super(key: key);
 @override
 State<IntroPage> createState() => _IntroPageState();
}


class _IntroPageState extends State<IntroPage> {
 List data = [];
 bool isLoading = true;


 Future retrieveIntroPage() async {
   try {
     final url = Uri.parse(
        "https://api.buttercms.com/v2/pages/intro/intro-page?auth_token=YOUR-API-TOKEN");
     final response = await http.get(url);
     if (response.statusCode == 200) {
       var result = jsonDecode(response.body);
       setState(() {
         data = result['data'];
         isLoading = false;
       });
       return result;
     }
   } catch (e) {
     print(e);
   }
 }


 @override
 void initState() {
   super.initState();
   retrieveIntroPage();
 }


 @override
 Widget build(BuildContext context) {
   return Scaffold(
     body: isLoading
         ? const Center(
             child: CircularProgressIndicator())
           : Column(
             children: [
               Container(
                 height: MediaQuery.of(context).size.height * 0.33,
                 width: double.maxFinite,
                 decoration: BoxDecoration(
                     color: Colors.black.withOpacity(0.3),
                     image: DecorationImage(
                       image: NetworkImage(data[0]['fields']['hero_image']),
                       fit: BoxFit.cover,
                       colorFilter: ColorFilter.mode(
                           Colors.black.withOpacity(0.6), BlendMode.darken),
                     )),
                 child: Column(
                   children: [
                     const SizedBox(
                       height: 50,
                     ),
                     const ListTile(
                       leading: FlutterLogo(
                         size: 40,
                       ),
                       title: Text(
                         'Flutter',
                         style: TextStyle(
                             color: Colors.white,
                             fontWeight: FontWeight.bold,
                             fontSize: 30),
                       ),
                     ),
                     const Spacer(),
                     Padding(
                       padding: const EdgeInsets.symmetric(horizontal: 10.0),
                       child: Center(
                         child: Text(
                           data[0]['fields']['hero_title'],
                           textAlign: TextAlign.center,
                           style: const TextStyle(
                               color: Colors.white,
                               fontWeight: FontWeight.bold,
                               fontSize: 30),
                         ),
                       ),
                     ),
                     const SizedBox(
                       height: 40,
                     ),
                   ],
                 ),
               ),
               const SizedBox(
                 height: 30,
               ),
               Text(
                 data[0]['fields']['section_title'],
                 style: const TextStyle(
                     fontWeight: FontWeight.bold, fontSize: 28),
               ),
               const SizedBox(
                 height: 15,
               ),
               Padding(
                 padding: const EdgeInsets.symmetric(horizontal: 20),
                 child: Text(
                   data[0]['fields']['section_desc'],
                   textAlign: TextAlign.center,
                   style: const TextStyle(color: Colors.black87, fontSize: 18),
                 ),
               ),
               const SizedBox(
                 height: 50,
               ),
               ...List.generate(
                 data[0]['fields']['contents'].length,
                 (index) => Padding(
                   padding: const EdgeInsets.symmetric(horizontal: 20.0),
                   child: InkWell(
                     onTap: () => Navigator.push(
                         context,
                         MaterialPageRoute(
                           builder: (context) => const HomeScreen(),
                         )),
                     child: Card(
                       child: Padding(
                         padding: const EdgeInsets.symmetric(
                             horizontal: 20.0, vertical: 20),
                         child: Column(
                           children: [
                             Row(children: [
                               CircleAvatar(
                                 backgroundColor: Colors.black,
                                 backgroundImage: NetworkImage(data[0]
                                         ['fields']['contents'][index]
                                     ['content_logo']),
                                 radius: 48,
                               ),
                               const SizedBox(width: 20),
                               Text(
                                 data[0]['fields']['contents'][index]
                                     ['content_title'],
                                 style: const TextStyle(
                                     color: Colors.black87, fontSize: 30),
                               ),
                             ]),
                             const SizedBox(height: 20),
                             Text(
                               data[0]['fields']['contents'][index]
                                   ['content_desc'],
                               style: const TextStyle(
                                   color: Colors.black87, fontSize: 18),
                             ),
                           ],
                         ),
                       ),
                     ),
                   ),
                 ),
               ),
             ],
           ),
   );
 }
}
In the code block above, we’ve created a StatefulWidget widget called IntroPage.The IntroPage widget retrieves data from a remote API, decodes the response as JSON, and displays the data in various widgets. The state has a List variable that holds the response from the API. There is also a Boolean variable isLoading that is used to determine whether to display a CircularProgressIndicator or the page content.
The retrieveIntroPage() function makes an HTTP GET request to the ButterCMS API to retrieve the Intro page data. If the response status code is 200, the response body is decoded from JSON and added to the data list, and isLoading is set to false.
The build() function returns a Scaffold with a Column widget as its body. If isLoading is true, a CircularProgressIndicator is displayed. Otherwise, the page content is displayed. The page content is composed of a Container widget with a DecorationImage as its background and several other widgets for displaying the title and description of the page, as well as a list of cards that contain additional content.
The additional content is generated using the List.generate() function, which generates a list of Card widgets based on the length of the data[0]['fields']['contents'] list. Each card displays a logo, title, and description for a different section of the app. When a card is tapped, it navigates to the HomeScreen widget.
Updating main.dart
Finally, let’s update our main.dart file to display our Home screen when the application starts.
import 'package:flutter/material.dart';
import 'package:knowledge_based_app/Intro_page.dart';


void main() {
 runApp(const MyApp());
}


class MyApp extends StatelessWidget {
 const MyApp({super.key});


 // This widget is the root of your application.
 @override
 Widget build(BuildContext context) {
   return MaterialApp(
     title: 'Butter Knowledge Based',
     debugShowCheckedModeBanner: false,
     theme: ThemeData(
       useMaterial3: true,
       primarySwatch: Colors.teal,
     ),
     home: const IntroPage(),
   );
 }
}
The main.dart file is the main entry point for all Flutter apps. The main function calls the runApp function and passes it the MyApp widget, which is the root widget of the app. In the code block above, we’re setting the default route of the app to the IntroPage widget.
Our resulting application
With these actions done, let’s run our app on an emulator using the command below:
flutter run
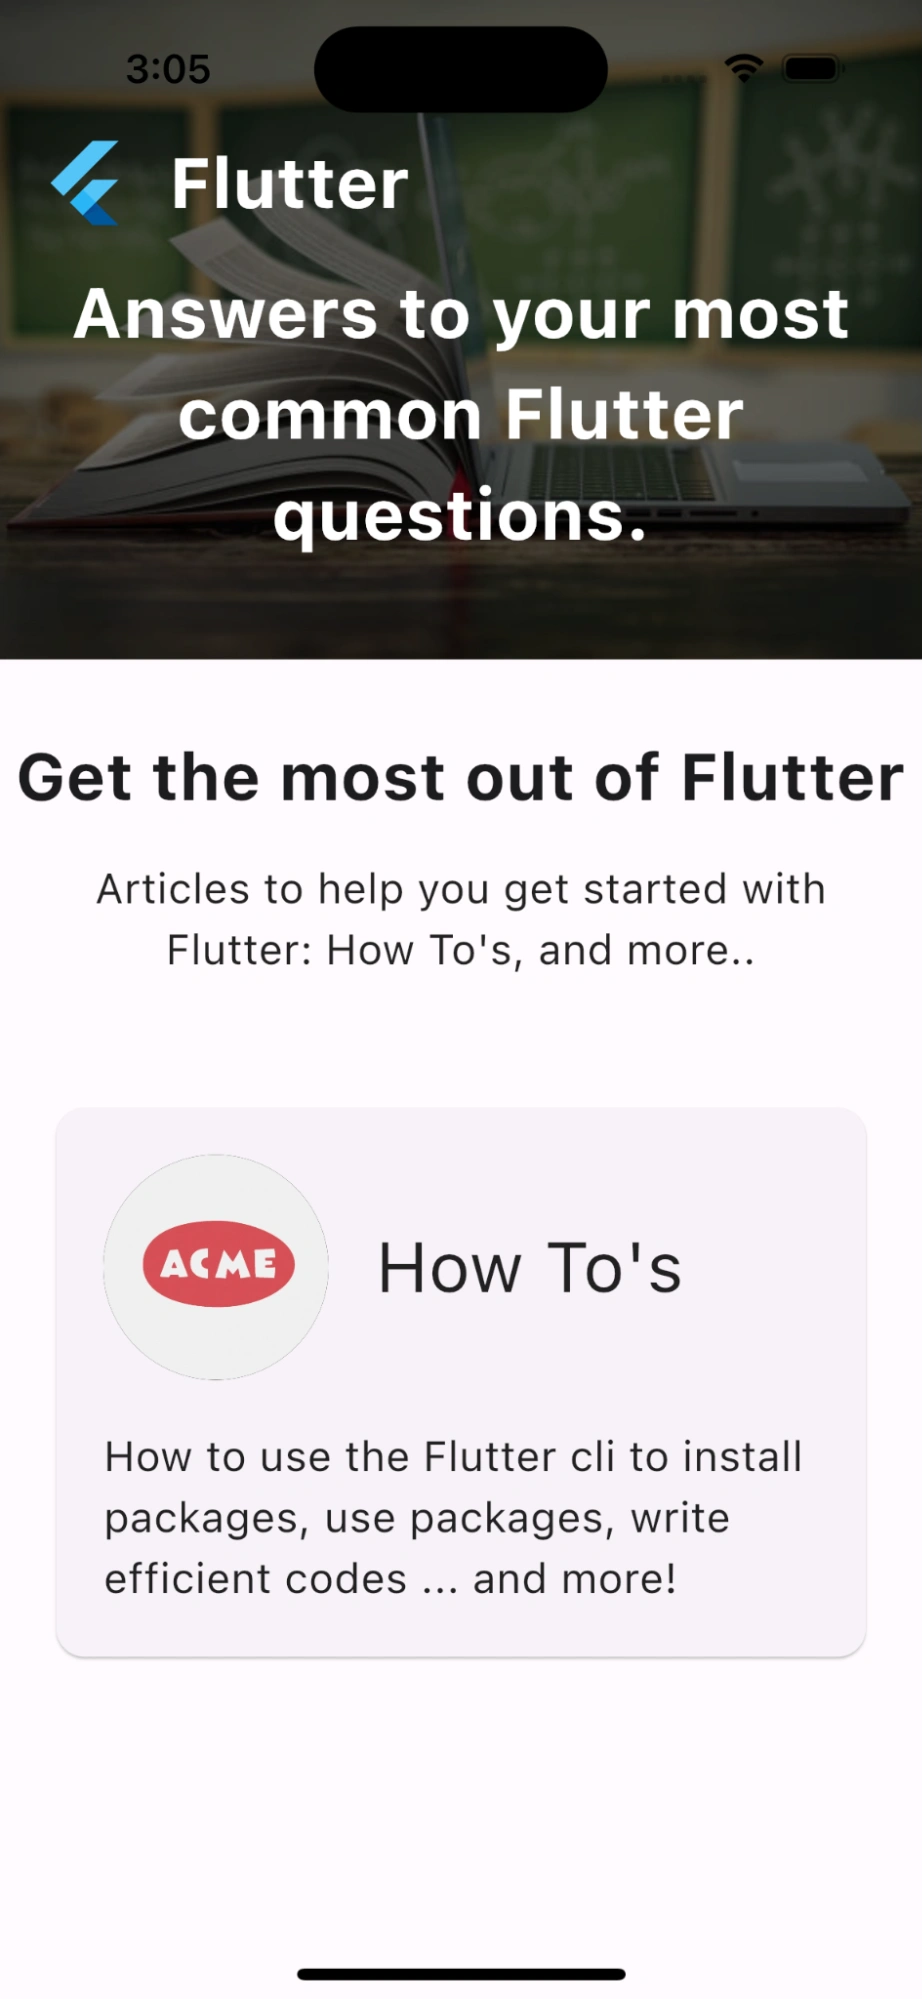
This is the Home page:
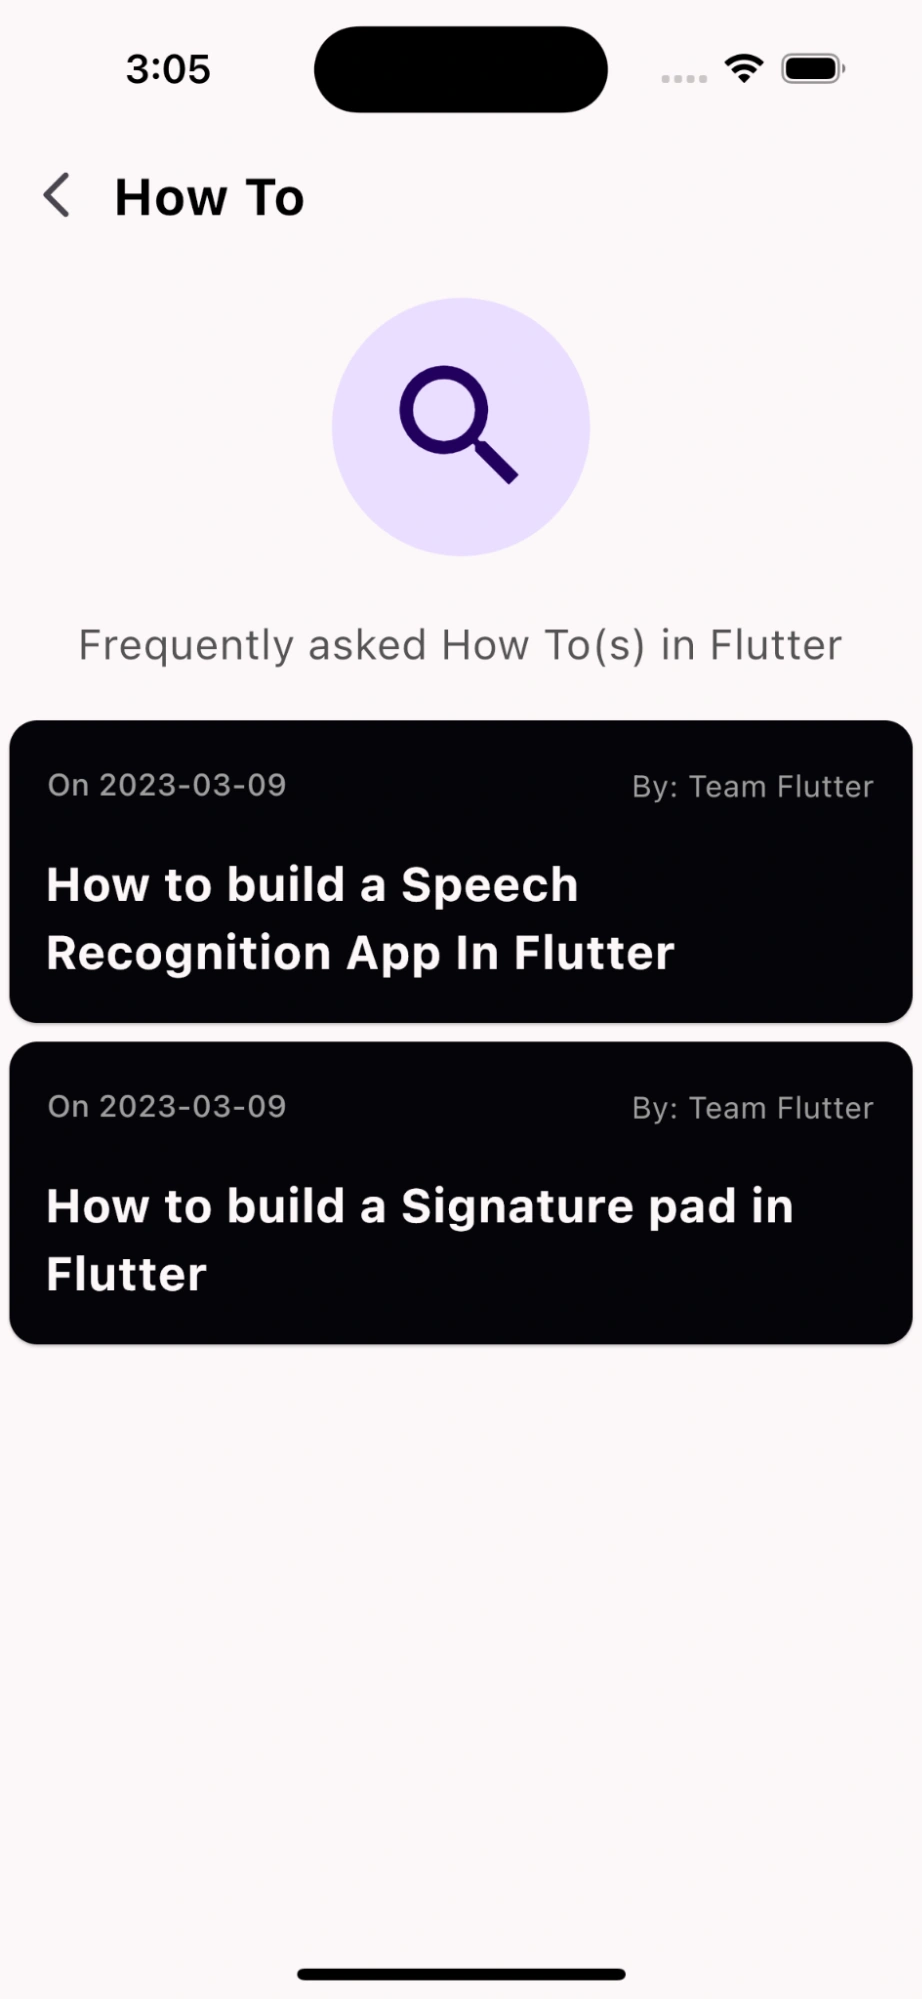
This is the How To screen containing the list of articles retrieved that we’ve created:
The GIF below shows the entire application with our content fetched from our ButterCMS dashboard:
Closing thoughts
When built correctly, a knowledge base can be a valuable resource for businesses and organizations that want to provide employees and customers with quick and easy access to information related to their products and services from a central location.
There are many different tools and platforms available for building and managing a knowledge base, including headless content management systems like ButterCMS.
If you've followed along with this tutorial, you should now have a functional knowledge base built with Flutter and ButterCMS. The possibilities for building applications using this powerful combination are endless and exciting to think about.
To learn more about how Flutter can be used with ButterCMS, check out the tutorials below:

