
- Why use Gatsby?
- Why use ButterCMS?
- Building a blog site with Gatsby and ButterCMS
- Creating our custom blog pages with Content Types
- Installing and setting up Gatsby
- Installing and configuring Chakra UI
- Connecting ButterCMS to the application
- Creating the blog layout
- Rendering the blog’s home page
- Displaying blog details
- Final thoughts
A blog is a tool that helps individuals and companies develop an online community, engage with more audiences, and can help lead customers to a call-to-action (CTA). A blog allows an organization and individuals to share information about a given topic, prove that they are experts in their industry, rank higher in search engines, and attract potential customers.
There are many different ways to develop/create a blog site—either by using a traditional, monolithic content management system (CMS) or a site builder like WordPress or by using a headless CMS like ButterCMS. With the advent of headless CMSs, managing content, data storage, and distribution has become more flexible and allows users to integrate with any powerful web framework (Gatsby, Next.js, etc) to build fast, secure, and powerful blog sites.
In this article, we’ll cover how to build a blog site using a powerful React-based framework—Gatsby. We’ll also be using a headless CMS—ButterCMS—as our back-end to store, manage, and fetch data for our blog site.
Table of contents
Why use Gatsby?
Gatsby is an open-source React-based framework built on top of Node.js. It uses React and GraphQL to streamline the process of developing fast, secure, SEO-friendly, dynamic, and performant websites. It provides for a better online experience for sites including marketing sites, eCommerce stores, and blogs.
Gatsby is a static site generator and leverages front-end technologies such as ReactJS, Webpack, GraphQL, modern JavaScript, and CSS. Sites can be hosted using Gatsby in various ways, including using object storage services or content delivery networks (CDNs). Using plugins, Gatsby allows you to access data from various sources including Markdown documents, MDX, images, and headless CMSs like WordPress and ButterCMS.
Gatsby also provides many features such as reusable components, different rendering techniques, and a large community.

Why use ButterCMS?
ButterCMS is an API-based headless CMS that is designed to be developer-friendly by allowing developers to easily create CMS-powered apps and websites with any tech stack. ButterCMS was also designed with marketers in mind as it provides them with features like built-in SEO, previewing, revision histories, and scheduling. ButterCMS also has a wide variety of content types and fields that you can customize to help you integrate the CMS quickly and seamlessly into any new or existing web project.
Furthermore, ButterCMS has a robust media library that supports all modern file types, allows users to host or configure their own media files, and provides a fast and efficient experience for your content editors and end users. ButterCMS saves time by handling all CMS activities on the backend, thus allowing your content editors and developers to focus on delivering quality content to your end users.
Finally, ButterCMS also offers an exceptional support team, and they are always available for any problems. Other important features provided by ButterCMS can be found here.
Building a blog site with Gatsby and ButterCMS
In this section, we’ll create a blog site from scratch using Gatsby and Chakra UI. Chakra UI is a component-based library made up of basic building blocks that are super simple to use and can help you build the frontend of your web application. It supports React as well as some other libraries and is both adaptable and reusable.
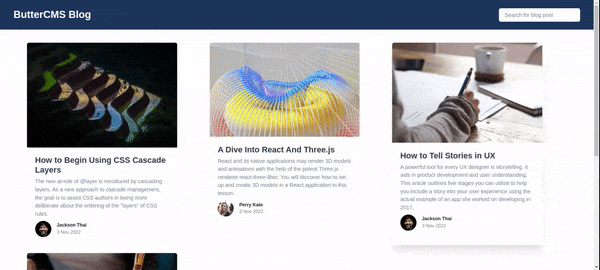
We will set up ButterCMS, create content types, update the content in our ButterCMS admin dashboard, and make data available in our ButterCMS API. We will then look at how to connect and fetch data from ButterCMS to Gatsby using GraphQL. With this, we will then be able to request all the blog pages and display them on our frontend. At the end of the tutorial, here is what our application should look like:
Tutorial prerequisites
To follow along with this tutorial, you need:
- Node.js installed
- npm
- A ButterCMS account
- A basic understanding of React, JavaScript, and GraphQL
Creating our custom blog pages with Content Types
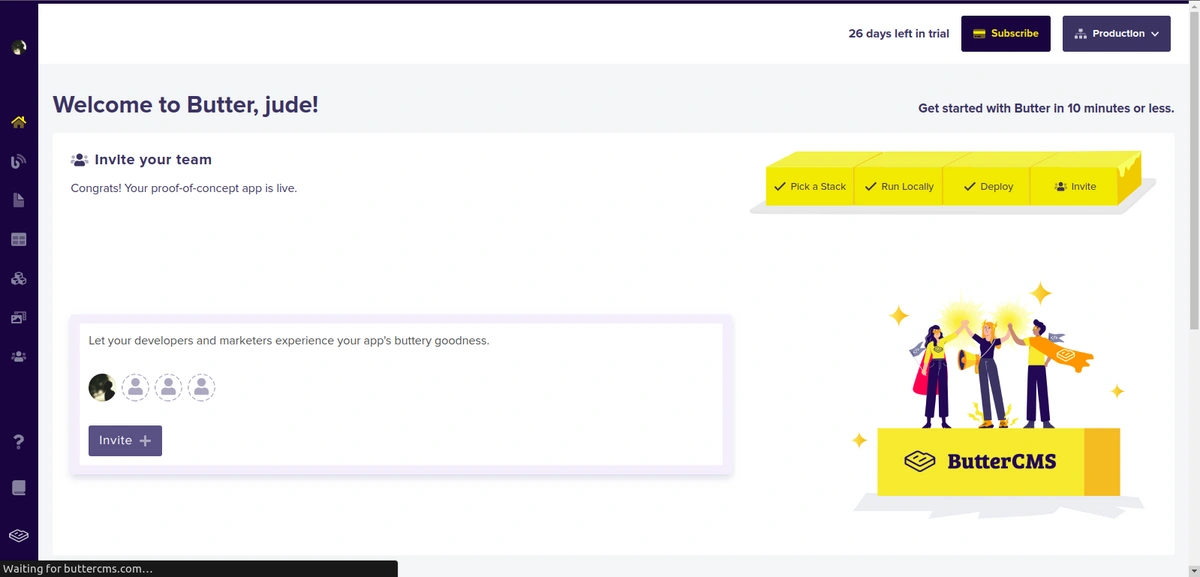
To get started using ButterCMS, first you will need to create an account to gain access to the admin dashboard. After signing up, you will be directed to the dashboard homepage.
As stated earlier, ButterCMS has a built-in blog engine that permits several fields (metadata, SEO, categories, and tags) that cover most of the typical use cases for blogs that makes it easy to integrate it into an existing website and start blogging. However, ButterCMS also allows users to configure custom blog pages using their Page Types feature. In this tutorial, we’ll create a custom blog page using different content types.
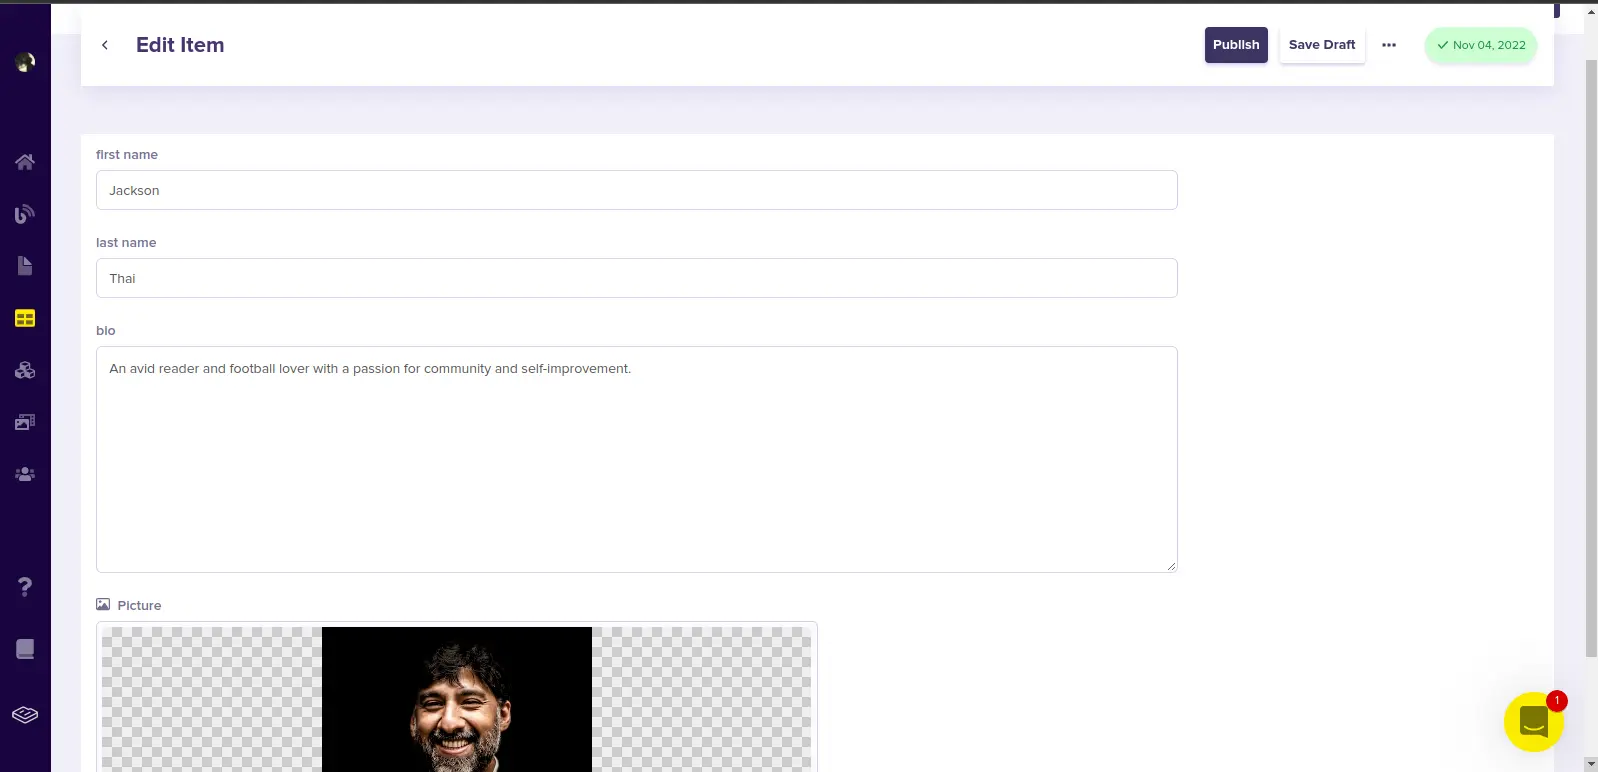
Creating an Author collection
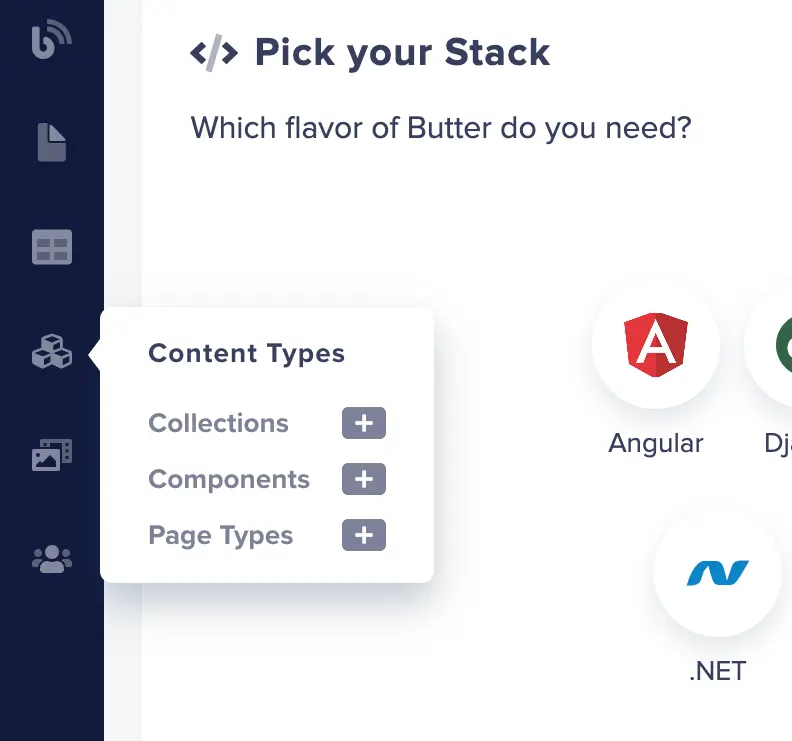
First, delete the default components, collections, and page types created by ButterCMS, and let's start by creating an Author collection content type. On your ButterCMS dashboard, go to Content types > Collections.
Create a collection called Authors to store a list of authors, add the following fields, and click Save:
- A
short textfield with the value First name - Author’s first name - A
short textfield with the value Last name - Author’s last name - A
long textfield with the value Bio - A short description of the author - A
mediafield with value Picture - Author’s image

Creating the page type
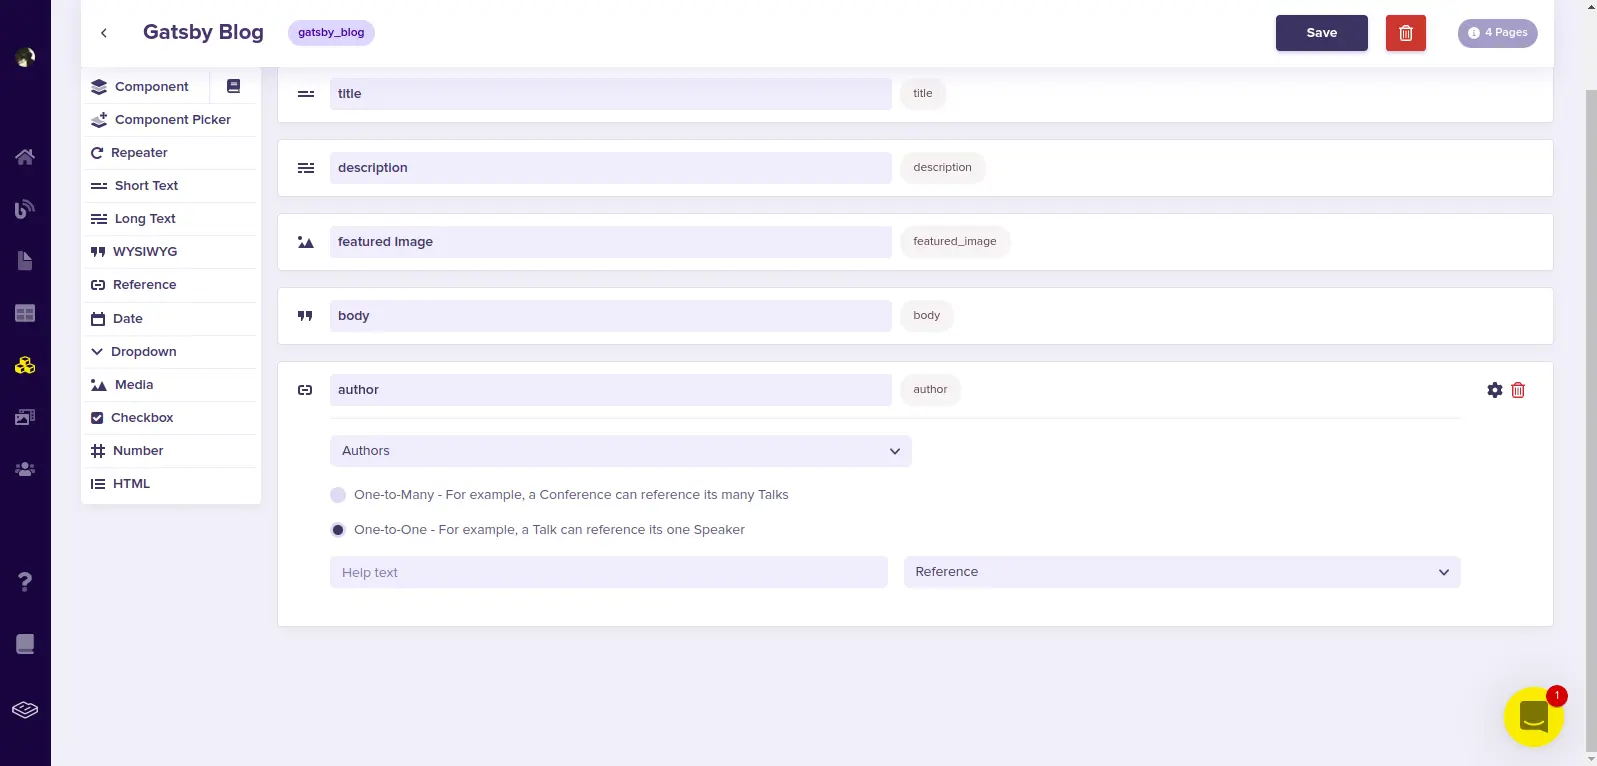
To create our custom blog page type, navigate to Content type > Page types and create a page type called Gatsby Blog. This page type will be used to create our blog posts. Add the following fields and click Save:
- A
short textfield with the value Title - Article title - A
long textfield with value Description - A short description of the article - A
WYSIWYGfield with value Body - Full details of the article - A
mediafield with value Featured Image - Article’s featured Image - A
referencefield to the author collection with the value Author
Adding our author content
To add content to our author content type, navigate to collections, click on new item > authors, fill out the fields, and click Publish.
You can add more content by clicking on New Item.
Adding our blog content
To add content to our newly created custom blog page type, navigate to Pages, click on New page > Gatsby blog, fill out the fields, and click Publish.
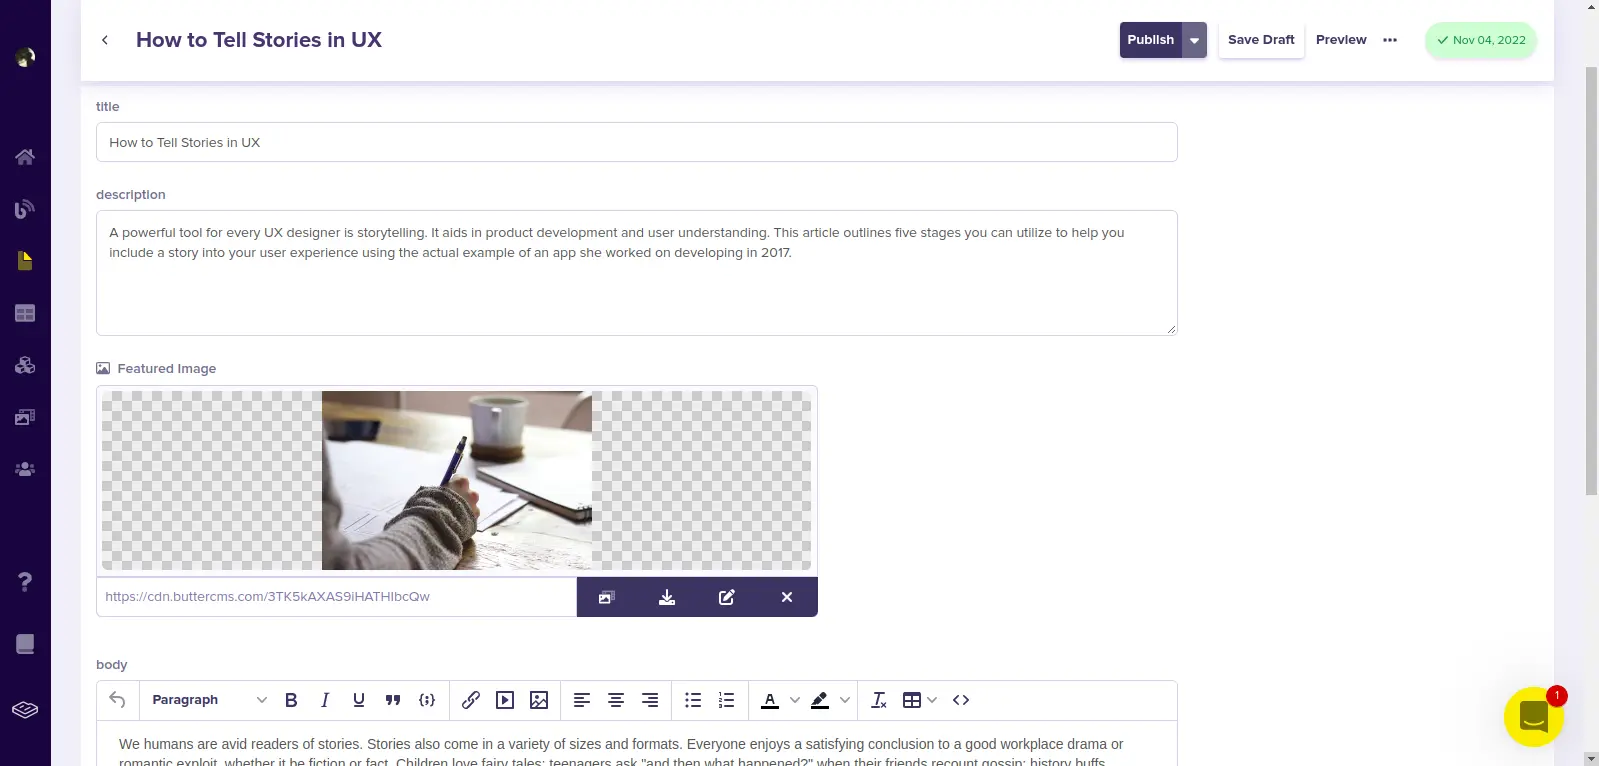
You can add more blog posts by clicking on New page.
Getting our API key
To query our data (content) from ButterCMS inside Gatsby, we first need to obtain our API key. Go to your account and click on our profile image then Settings.
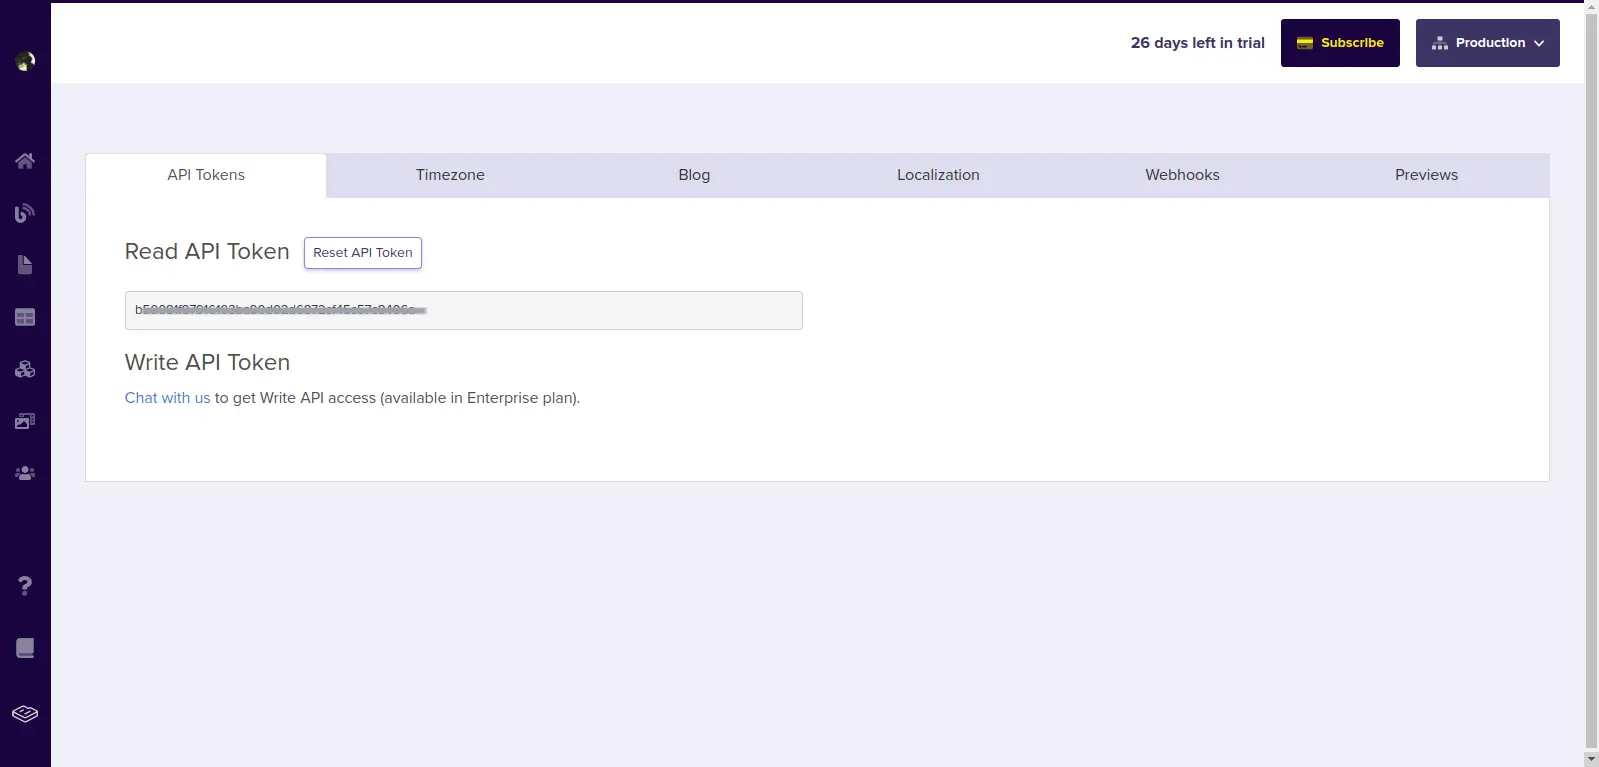
Make a copy of the Read API Token and store it securely. Later on, we'll use it to authenticate and fetch data with Gatsby.
Installing and setting up Gatsby
In this section, we will set up Gatsby and create our blog site user interface. Let’s start by installing Gatsby CLI. Using the Gatsby command-line interface (CLI) you can quickly construct new Gatsby-powered sites and execute instructions for creating Gatsby sites. On your terminal, run the following command:
npm install -g gatsby-cli

// to verify if it is installed
gatsby --version
With the command line interface installed, use the command below to create a new Gatsby project:
gatsby new

Follow the instructions as seen below.

create-gatsby version 2.21.0

                               Welcome to Gatsby!

This command will generate a new Gatsby site for you in /home/andreas with the
setup you select. Let's answer some questions:

What would you like to call your site?
✔ · buttercms-blog
What would you like to name the folder where your site will be created?
✔ andreas/ buttercms-blog
✔ Will you be using JavaScript or TypeScript?
· JavaScript
✔ Will you be using a CMS?
· No (or I'll add it later)
✔ Would you like to install a styling system?
· No (or I'll add it later)
✔ Would you like to install additional features with other plugins?No items were selected

Thanks! Here's what we'll now do:

    🛠  Create a new Gatsby site in the folder buttercms-blog

✔ Created site from template
✔ Installed Gatsby
✔ Installed plugins
✔ Created site in buttercms-blog
🎉  Your new Gatsby site new has been successfully created
After the installation is done, move on to the project and install some plugins.
cd buttercms-blog
Installing and configuring Chakra UI
In this section, we will be installing and configuring our dependencies:
- Chakra UI - Used in building user interfaces
gatsby-source-buttercms- Used to fetch data using the GraphQL endpoint in our ButterCMS instance
We will be using Chakra UI to create our frontend. Run the command below to install Chakra UI into our project:
npm i @chakra-ui/gatsby-plugin @chakra-ui/react @chakra-ui/icons @emotion/react @emotion/styled framer-motion
After installing Chakra UI, we'll need to configure the @chakra-ui/gatsby-plugin. In our gatsby-config.js file, add the code below:
// gatsby-config.js

module.exports = {
  siteMetadata: {
    title: `buttercms-blog`,
    siteUrl: `https://www.yourdomain.tld`,
  },
  plugins: [
    {
      resolve: '@chakra-ui/gatsby-plugin',
      options: {
        resetCSS: true,
        isUsingColorMode: true,
      },
    },
  ],
}
Connecting ButterCMS to the application
Now let’s install gatsby-source-buttercms and configure it. Let’s start by running the command below:
npm install --save gatsby-source-buttercms
Next, in our gatsby-config.js file, add the following code below. But first, we need to import dotenv and specify where we have put our environment variables so we can access them. Then inside the exported object, we’re going to define our new plugin and the configuration we need to fetch data:
// gatsby-config.js

require("dotenv").config({
    path: `.env`,
  })

  module.exports = {
    // other config
    plugins: [
    // chakra ui config
    {
      resolve: 'gatsby-source-buttercms',
      options: {
        authToken: process.env.BUTTERCMS_API_TOKEN,
        pageTypes: [`gatsby_blog`],
      }
    }
  ]
}
As you can see, we configure the gatsby-source-buttercms plugin to be able to fetch data from ButterCMS. We passed our authorization token to the plugin to permit it to fetch our data from ButterCMS.
Create .env in our root folder and paste our ButterCMS API token.
//.env
BUTTERCMS_API_TOKEN= your api token
Now that we have set up our API endpoint, we will be able to query the data from our graphql endpoint in Gatsby. By running the command below and starting our server, you will see how this changes our graphql data:
gatsby developCreating the blog layout
In this section, we’ll start by creating our blog layout. Create components/Layout.js in the src folder and add the code below:
// components/Layout.js

import { Box, Flex, Heading, HStack, Input, Spacer, Text, useColorModeValue } from '@chakra-ui/react';
import { Link } from 'gatsby';
import React from 'react';

const Layout = ({children}) => {
  return (
    <Box>
      <Box bg={useColorModeValue('blue.900', 'blue.900')} py={3} px={10}>
        <Flex h={16} minWidth='max-content' alignItems='center' gap='2'>
          <Link p='2'to='/'>
          <Heading fontSize={'3xl'} color={'white'} fontWeight={'700'}>ButterCMS Blog</Heading>
          </Link>
          <Spacer />
          <Input htmlSize={20} bg={'white'} width='auto' placeholder='Search for blog post' />
        </Flex>
      </Box>
      <Box>
        {children}
      </Box>
    </Box>
  )
}
export default Layout;
This component holds the navigation bar which includes our blog name and input field. We passed the children that allow us to inject child elements from other files.
Creating a blog card component
In our components folder, create a BlogCard.jsx file and add the following code:
// components/BlogCard.jsx

import { Avatar, Box, Heading, Image, LinkBox, LinkOverlay, Stack, Text, useColorModeValue } from '@chakra-ui/react';
import React from 'react';

const BlogCard = ({post}) => {
  return (
    <LinkBox as={'article'} maxW={'445px'} w={'full'} bg={useColorModeValue('white', 'gray.900')} rounded={'md'} _hover={{ boxShadow: 'xl'}} overflow={'hidden'}>
      <Box>
        <Image transform="scale(1.0)" transition="0.3s ease-in-out"
          src={post.node.featured_image}
          alt={post.node.title}
          _hover={{
            transform: 'scale(1.05)',
          }}
        />
      </Box>
      <Stack p={6}>
        <Stack>
        <Heading color={useColorModeValue('gray.700', 'white')} fontSize={'2xl'}
          fontFamily={'body'}>
          <LinkOverlay href={`/${post.node.slug}`}>{post.node.title}</LinkOverlay>
        </Heading>
        <Text color={'gray.500'}>{post.node.description}</Text>
        </Stack>
        <Stack mt={6} direction={'row'} spacing={4} align={'center'}>
          <Avatar
            src={post.node.author.picture}
            alt={'Author'}
          />
          <Stack direction={'column'} spacing={0} fontSize={'sm'}>
            <Text fontWeight={600}>{post.node.author.first_name} {post.node.author.last_name}</Text>
            <Text as={'time'} dateTime={post.node.meta.published} color={'gray.500'}>{new Date(post.node.meta.published).toLocaleDateString(undefined, {
                day:   'numeric',
                month: 'short',
                year:  'numeric',
              })}
            </Text>
          </Stack>
        </Stack>
      </Stack>
    </LinkBox>
  )
}
export default BlogCard;
This component is a list of blogs that will be displayed on the homepage.
Rendering the blog’s home page
In our pages/index.js file, replace it with the following code:
// src/pages/index.js
import { Box, Grid } from '@chakra-ui/react';
import { graphql } from 'gatsby';
import React from 'react';
import BlogCard from '../components/BlogCard';
import Layout from '../components/Layout';
const Index = ({data}) => {
const posts = data.home.edges
return (
<Layout>
<Box px={20} py={15}>
<Grid templateColumns={{ md: 'repeat(3, 1fr)' }} gap={6} pt={6}>
{posts && posts.map((post) => <BlogCard key={post.node.id} post={post} />)}
</Grid>
</Box>
</Layout>
)
}
export default Index;
export const query = graphql`
{
home: allButterPage(filter: {page_type: {eq: "gatsby_blog"}}) {
edges {
node {
id
slug
title
description
featured_image
author {
first_name
last_name
picture
}
meta {
published
}
}
}
}
}
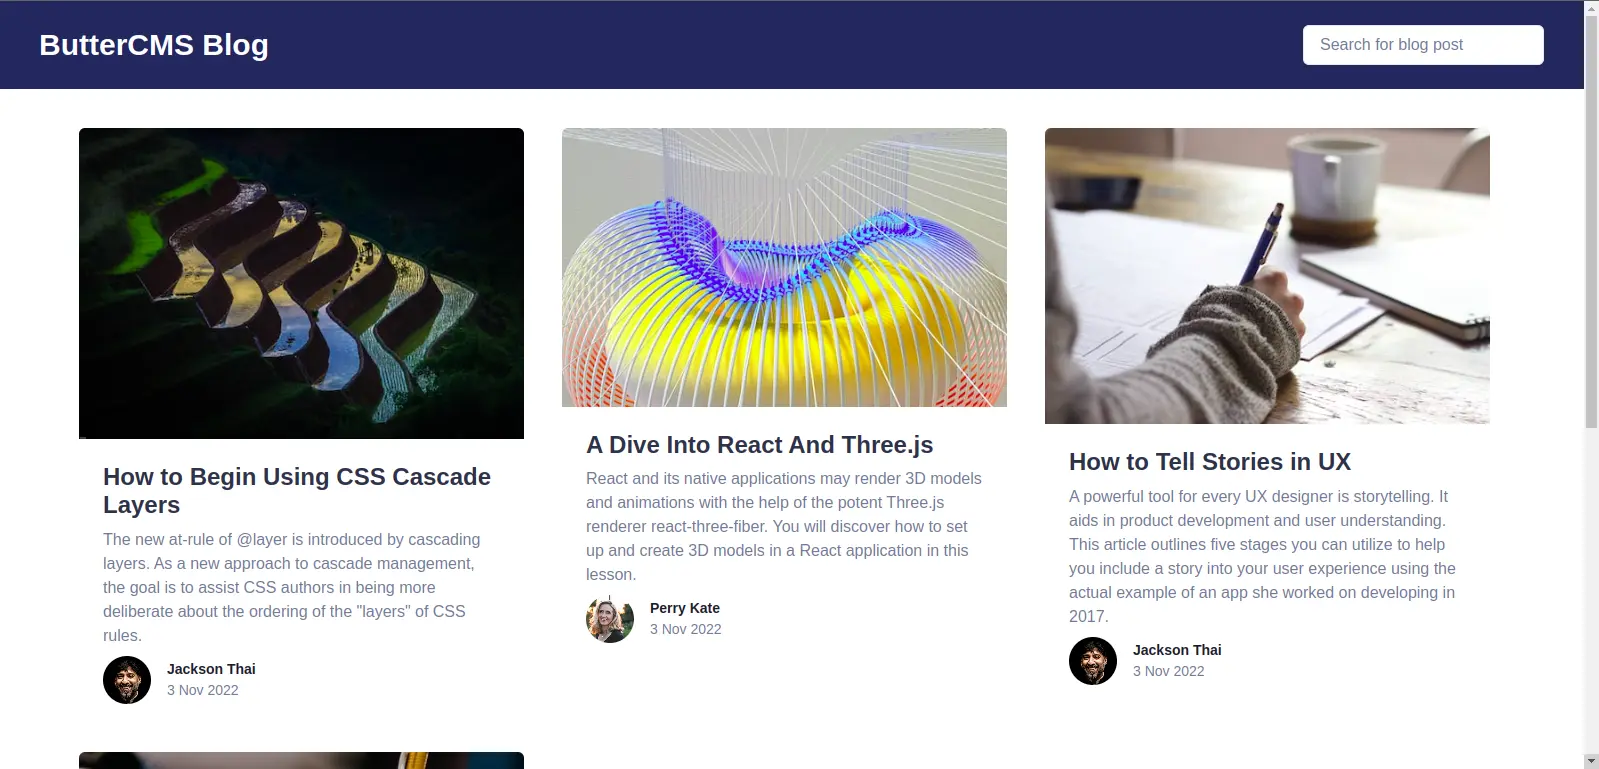
`At the end of the file, we export pageQuery, a GraphQL query that requests the entire blog post list. As you can see, we only require the id, title, description, feature_image, and the author’s first_name, last_name, and picture fields, thanks to the straightforward GraphQL query language.
Then, we pass the { data } destructured object as a parameter of the Index and loop on its query object to display the data. We also used Chakra UI components to build out our frontend. The code above will render the image below in the browser:
Displaying blog details
In our src folder, create the templates/blog-details.js file and add the following code:
// src/templates/blog-details.js

import { Avatar, Box, Container, Heading, HStack, Image, Stack, Text } from '@chakra-ui/react';
import { graphql } from 'gatsby';
import React from 'react'
import Layout from '../components/Layout';

const BlogDetails = ({data}) => {
  const post = data.allButterPage.edges[0].node;
  return (
    <Layout>
      <Container maxW='900px'>
        <Stack py={10}>
          <Heading>{post.title}</Heading>
          <Text color={'gray.500'}>{new Date(post.meta.published).toLocaleDateString(undefined, {
              day:   'numeric',
              month: 'short',
              year:  'numeric',
            })}
          </Text>
          <Image h={'300px'} src={post.featured_image} alt={`${post.title} image`} />
          <Text as={'p'} py={6} dangerouslySetInnerHTML={{__html: post.body}} />
          <HStack w={'800px'} gap={4}>
            <Avatar src={post.author.picture} />
            <Box>
              <Heading fontSize={'lg'} as={'p'}>{post.author.first_name} {post.author.last_name}</Heading>
              <Text>{post.author.bio}</Text>
            </Box>
          </HStack>
        </Stack>
      </Container>
    </Layout>
  )
}
export default BlogDetails;
export const query = graphql`
  query BlogDetail($slug: String) {
    allButterPage(filter: {slug: {eq: $slug}}) {
      edges {
        node {
          id
          slug
          title
          featured_image
          body
          author {
            first_name
            last_name
            bio
            picture
          }
          meta{
            published
          }
        }
      }
    }
  }
`
At this point, Gatsby does not know when this template should be displayed. Each blog post needs a specific URL. We are going to inform Gatsby about the new URLs we need thanks to the createPages function.
In our root folder, create a file gatsby-node.js. We will export the function named createPages in which we get a list of blog posts and create a page for each of them. Here is the result:
// gatsby-node.js

exports.createPages = async function ({ actions, graphql }) {
    const { data } = await graphql(`
        query {
            allButterPage(filter: {page_type: {eq: "gatsby_blog"}}) {
                edges {
                    node {
                        id
                        slug
                    }
                }
            }
        }
    `)
    data.allButterPage.edges.forEach(data => {
      const slug = data.node.slug
      actions.createPage({
        path: slug,
        component: require.resolve(`./src/templates/blog-details.js`),
        context: { slug: slug },
      })
    })
}
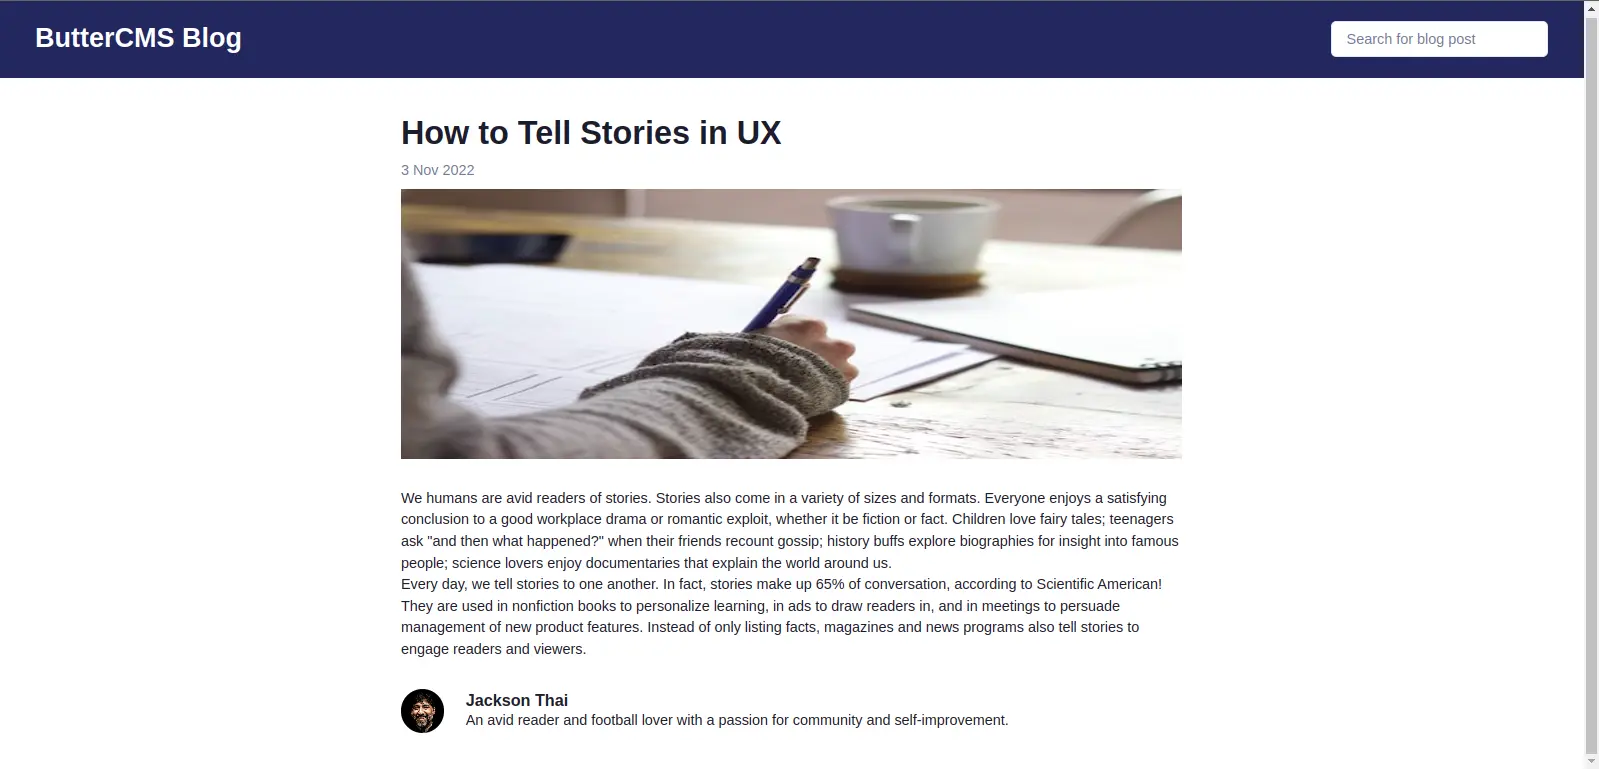
Restart the Gatsby server. You should be able to visit the details page for each blog by clicking on the name displayed on the homepage. Here’s what our app looks like:
Final thoughts
In this tutorial, we covered how to set up, connect and fetch data from our ButterCMS backend to Gatsby using GraphQL. In the process, we created a blog site, looked at how to create different content types, and managed and updated content in ButterCMS. If you’d like to learn more about ButterCMS, check out its outstanding features on its official website.
All code in this tutorial can be found on GitHub.

