- What does parallax mean, anyways?
- Benefits of using parallax
- Parallax caveats
- Why we’re using ButterCMS
- Parallax Scrolling Tutorial: Adding a parallax scrolling effect to a website built with ButterCMS
- Setting up the front-end
- Integrating with ButterCMS
- Creating the page components
- Inputting the content to be fetched
- Integrating ButterCMS with the API key
- Implementing the parallax effect
- The resulting parallax effect in action
- Final thoughts
Parallaxing is a term used to describe websites that incorporate parallax scrolling or other parallax effects in their design. Parallax scrolling is a technique used in modern web design to create an immersive user experience by moving different elements on the page at different speeds while the user scrolls. This creates a sense of depth and perspective, which can be visually appealing and engaging for website visitors.
In this article, we'll explain the concept of parallax scrolling and its use of images and provide a step-by-step guide on how to implement a parallax scrolling effect using ButterCMS and React. Our goal is to help you enhance the visual appeal and user experience of your website by incorporating these dynamic and engaging features.
Table of contents
What does parallax mean, anyways?
Parallax is a visual effect where the background and foreground images move at different speeds to create an illusion of depth and 3D motion. In web development and design, parallax is a technique used to create a more engaging and immersive user experience by giving the website a sense of depth and interactivity. One popular type of parallax is the scroll parallax, which is triggered by the user scrolling down the page, and this is what we aim at achieving in the course of this article.
There are multiple ways to create this parallax effect, such as using CSS, JavaScript, or a library, and it can be applied to various elements on a website, such as headers, sections, and images. CSS can be used alone to create the effect, but with the addition of JavaScript, developers can add more customization. However, libraries have emerged that simplify the process and allow developers to achieve the effect with minimal code.
Benefits of using parallax
The benefits of using parallax in web development and design include:
-
Enhanced user engagement and interactivity: Parallax can help to create a more dynamic and engaging user experience, which can increase user satisfaction and encourage them to spend more time on the website.
-
Improved visual appeal: Parallax can make a website more visually appealing and memorable by adding a sense of depth and movement to the design.
-
Storytelling: Parallax can be used to create a narrative or tell a story through the website design, which can be a powerful way to communicate a message or showcase a product.

Parallax caveats
Some caveats of using parallax in web development and design include:
-
Performance issues: Parallax can increase the load time of a website and may cause performance issues, especially on mobile devices or slower internet connections.
-
Accessibility concerns: Parallax can make it difficult for some users, such as those with visual impairments or motion sensitivities, to navigate and use the website.
-
Usability challenges: Parallax can sometimes be distracting or confusing for users, especially if it is overused or implemented poorly. It is important to use parallax judiciously and with careful consideration of the user experience.
Why we’re using ButterCMS
ButterCMS is a headless content management system that allows developers to easily integrate and manage content for their web applications. In this tutorial, we will be using ButterCMS to manage and, if needed, edit the images and the text of our parallax website.
If you're using ButterCMS to build your website and want to add parallax scrolling and images, you're in luck. ButterCMS provides an intuitive and user-friendly interface for content creation and management, making it an ideal choice for developers who want to focus on building their applications rather than managing content.
Parallax Scrolling Tutorial: Adding a parallax scrolling effect to a website built with ButterCMS
To start our project we will consider three things:
-
The framework to be used.
-
How best to fetch content from ButterCMS.
-
How to implement the parallax effect.
Answering the questions above, we will be using React for the framework, Axios for our fetching, and a React library called react-parallax to implement the parallax effect. To install these dependencies, we will navigate to our command line (terminal) and enter the commands below:
Cd Desktop
npx create-react-app Parallax
npm i axios
npm i react-parallax
Cd react app
Npm start
Setting up the front-end
After executing the commands above, we should have a running React app and after clearing the default styles and elements, we can start our project right away.
In this article, we aim to build a replica of Apple’s landing page, increasing the website's interactivity by adding a parallax effect.
React, as a component-based library, allows us to create faster applications with components. These component trees can serve as different pages for our application.
In our src directory, we will create six parent components with five child components. The reason we will have these child components is to hold our images and make it easy to wrap them with a React-Parallax component. The components tree is as follows:
├── Navbar.js
├── Page1
├── Page2
│   ├── Page2img1.jpg
│   └── Page2img2.jpg
├── Page3
│   ├── Page3img1.jpg
│   └── Page3img2.jpg
└── Page4
    └── Page4img.js
After creating the components above, copy the code below and put them in their appropriate component.
Navbar.js
The code below creates a sticky navbar using React hooks. To make the navbar sticky, we used the window scroll event to set a state variable called sticky based on the user's scrolling behavior. The navbar contains the Apple logo and other links. The class name of the navbar's div element changes dynamically based on the sticky state variable.
import React, { useState, useEffect } from "react";
import "./App.css";


function Navbar() {
  const [sticky, setSticky] = useState();


  useEffect(() => {
    const handleScroll = () => setSticky(window.scrollY > 200);
    console.log(window.scrollY);
    window.addEventListener("scroll", handleScroll);
    return () => window.removeEventListener("scroll", handleScroll);
  });
  return (
    <div className={`${sticky ? "sticky" : ""}`}>
      <nav className="Navbar">
        <span>
          <img
            src="https://1000logos.net/wp-content/uploads/2016/10/Apple-Logo.png"
            alt=""
            className="img"
          />
        </span>


        <a>Mac</a>
        <a>iPad</a>
        <a>Iphone</a>
        <a>Support</a>
        <a>where to Buy</a>
        <a>search</a>
      </nav>
    </div>
  );
}


export default Navbar;
Text.js
The React component named Text receives a prop called data and renders a div with class page1, containing two p elements and an element. The content of the p elements is set to the values of the heading_one and heading_two fields in the data prop, respectively, using optional chaining. The element contains a link to the iPhone 14 Pro page on the Apple website.
import React from 'react'


function Text({data}) {
  return (
    <div className="page1">
    <p className="pro">{data?.fields.heading_one}</p>
      <p className="pro2"> {data?.fields.heading_two}</p>
      <p className="pro3">
        <a href="http://www.apple.com/ng/iphone-14-pro/">Learn More</a>
      </p>
    </div>
  )
}


export default Text
Page1
The code below defines a functional component called Page1 that returns an HTML element with a div tag and an image tag inside it. The image source points to an Apple iPhone 14 Pro image. The component is then exported to the App.js component.
import React from "react";


function Page1() {
  return (

        <div className="page1">
          <img className='img1' src="https://www.apple.com/v/iphone-14-pro/a/images/overview/hero/hero_endframe__cvklg0xk3w6e_large_2x.jpg"/>
         </div>

  );
}


export default Page1;
Page2
The code below defines a functional component called Page2 that takes in an object data as a parameter. The component returns an HTML element with a div tag and several p tags inside it. The p tags contain text and a hyperlink that leads to the Apple iPhone 14 Pro page. The component also contains another div tag with two image components called Page2img1 and Page2img2, which are imported from other files. The component exports to App.js.
import React from "react";
import "./App.css";
import Page2img1 from "./Page2img1";
import Page2img2 from "./Page2img2";


function Page2({data}) {
  return (
    <div className="page2">
      <p className="page2pro">iPhone14 Pro</p>
      <p className="page2pro2"> Big and bigger</p>
      <p className="page2pro3">
        <a href="https://www.apple.com/ng/iphone-14/">Learn More</a>
      </p>
      <div className="page2img">
        <Page2img1 />
        <Page2img2 />
      </div>
    </div>
  );
}


export default Page2;
Page2img1 and Page2img2
The code snippets below define functions page2img1 and Page2img2 that display an image of an iPhone 14. The functions return HTML code with an image tag that has a source URL and a CSS class name. The export default statement exports to the parent component Page2.js.
import React from "react";
function page2img1() {
  return <div>
    <img src="https://www.apple.com/euro/iphone-14/a/screens_alt/images/overview/hero/hero_iphone_14__esmpw7gjv46e_large_2x.jpg" className="page2img"/>
  </div>;
}


export default page2img1;
import React from "react";
function page2img2() {
return <div>
<img src="https://www.apple.com/euro/iphone-14/a/screens_alt/images/overview/hero/hero_iphone_14_plus__fra3gmuj0aum_large_2x.jpg" className="page2img"/>
</div>;
}
export default page2img2;Page3
The code below renders a web page layout with two images. The images are imported from Page3img1 and Page3img2 components. The CSS classes are used to style the page layout and the elements within it. The component is exported to the App.js file.
import React from "react";
import "./App.css";
import Page3img from "./Page3img";
import Page3img2 from "./Page3img2";
function Page3() {
  return (
    <div className="page3">
      <p className="page3pro">Powered by ButterCMS</p>
      <div className="page3img">
        <Page3img />
        <Page3img2 />
      </div>


      <div className="list">


        <div className="list1">
        <ul>
          <li>ButterCMS</li>
          <li>ButterCMS</li>
          <li>ButterCMS</li>
          <li>ButterCMS</li>

        </ul>
        </div>

      <div className="list2">
      <ul>
          <li>ButterCMS</li>
          <li>ButterCMS</li>
          <li>ButterCMS</li>
          <li>ButterCMS</li>

        </ul>
      </div>

      </div>
    </div>
  );
}


export default Page3;
Page3img and Page3img2
The code below defines the two child components of Page3 which are Page3img and Page3img2. This displays an image of the Apple Mac Mini computer on a web page.
import React from 'react'
function Page3img() {
  return  <div>
  <img src="https://www.apple.com/v/mac-mini/s/images/overview/m2_pro__bod7oesbsble_large_2x.png" className="page3img"/>
</div>;
}


export default Page3img
import React from 'react'
function Page3img2() {
return <div>
<img src="https://www.apple.com/v/mac-mini/s/images/overview/m2_pro__bod7oesbsble_large_2x.png" className="page3img"/>
</div>;
}
export default Page3img2Page4
This code below defines a function that returns HTML elements including a container, text, an image, and a link to the ButterCMS website.
import "./App.css";
import Page4img from "./Page4img";
function Page4() {
  return (
    <div className="page4">
      <p className="p4"> Butter Makes it Better.</p>
      <Page4img />
      <p className="pro3">
        <a href="https://buttercms.com/">Learn More about ButterCMS</a>
      </p>
    </div>
  );
}


export default Page4;
Page4img.js
The component below is a child component of Page4.js. As a child component, its duty is just to render an image.
import React from "react";
function page4img() {
  return (
    <div>
      <img
        src="https://www.apple.com/v/iphone-14/c/images/overview/hero/hero_low_light__g8qll6yh8cae_large_2x.jpg"
        className="img4"
      />
    </div>
  );
}


export default page4img;
App.js
In here, we will render every component and then we can add styles to them to make them visually appealing.
import React from "react";
import Navbar from "./Navbar";
import "./App.css";
import Page1 from "./Page1";
import Page2 from "./Page2";
import Page3 from "./Page3";
import Text from "./Text";
import Page4 from "./Page4";
function App() {


  return (
    <div className="page1">
      <Navbar />
      <Text />
      <Page1 />
      <Page2 />
      <Page3 />
      <Page4 />
    </div>
  );
}


export default App;
For the styling, we have:
body {
    overscroll-behavior: none;
  }


.Navbar{
    height: 40px;
    list-style: none;
    display: flex;
    justify-content: center;
    align-items: center;
    background-color: rgba(146, 139, 139, 0.4);
    text-decoration: none;
    font-size: 12px;
    color: rgb(233, 233, 233);
    justify-content: space-evenly;
    position: sticky;
}
.sticky {
    box-shadow: 0px 5px 10px rgba(0, 0, 0, 0.6);
    position: sticky;
    top: 0;
    z-index: 100;
}
.img{
    height: 30px;
    width: 48px;
}
.page1{
   background-color: black;
}
.pro{
    font-size: 50px;
    font-weight: 700;
    margin-bottom: 0;
    display: flex;
    justify-content: center;
    align-items: center;
    color: white;
}
.pro2{
    font-size: 30px;
    font-weight: 500;
    margin: 0;
    display: flex;
    justify-content: center;
    align-items: center;
    color: white;
}
.pro3{
    display: flex;
    justify-content: center;
    align-items: center;
    color: blue;}


.img1{
width: 100%;
height: 100vh;
}
/*page2*/
.page2{
    background-color: white;
    padding-top: 60px;
    background-attachment: fixed;
}
.page2pro{
    font-size: 50px;
    font-weight: 600;
    display: flex;
    justify-content: center;
    align-items: center;
    color: black;
    margin: 0;
}
.page2pro2{
    font-size: 25px;
    font-weight: 350;
    display: flex;
    justify-content: center;
    align-items: center;
    color: black;
    margin: 0;
}
.page2pro3{
    display: flex;
    justify-content: center;
    align-items: center;
    color: rgb(3, 3, 112);
}
.page2img{
    display: flex;
    justify-content: center;
    width: 100%;
    height: 70vh;
}


/*page3*/
.page3pro{
    font-size: 80px;
    font-weight: 600;
    line-height: 1.05;
    font-family: SF Pro Display,SF Pro Icons,Helvetica Neue,Helvetica,Arial,sans-serif;
    letter-spacing: -0.015em;
    display: flex;
    justify-content: center;
    align-items: center;
    color: white;
    margin: 0;
padding-top: 40px;
}


.page3{
    background: rgb(7,1,5);
    background: linear-gradient(90deg, rgba(7,1,5,0.9193802521008403) 0%, rgba(105,9,121,1) 35%, rgba(2,13,65,0.9698004201680672) 100%);

}
.page3img{
    display: flex;
    justify-content: center;
    width: 100%;
    height: 70vh;
}
.page3img{
    display: flex;
}


.list2{
    margin-top: 20px;
    margin-left: 250px;
    margin-right: 250px;
    font-size: 19px;
    line-height: 1.2105263158;
    font-weight: 600;
    letter-spacing: .012em;
    font-family: SF Pro Display,SF Pro Icons,Helvetica Neue,Helvetica,Arial,sans-serif;

}


li{
    list-style: none;
    display: list-item;
    text-align: -webkit-match-parent;
    padding: 3px 0;
    margin-top: 30px;
    color: transparent;

}
.list1{

    margin-top: 20px;
    margin-left: 250px;
    margin-right: 250px;
    font-size: 19px;
    line-height: 1.2105263158;
    font-weight: 600;
    letter-spacing: .012em;
    font-family: SF Pro Display,SF Pro Icons,Helvetica Neue,Helvetica,Arial,sans-serif;

}
.list{
    display: flex;
    justify-content: center;

}


/*page4*/
.page4{
    background-color: white;
    padding-top: 30px;
    background-attachment: fixed;
}


.p4{
    padding-bottom: 30px;
    color: black;
    font-size: 50px;
    font-weight: 700;
    margin-bottom: 0;
    display: flex;
    justify-content: center;
    align-items: center;
}


.img4{
    width: 100%;
height: 100vh;
}
We can open this up in the browser and see what we have:
Integrating with ButterCMS
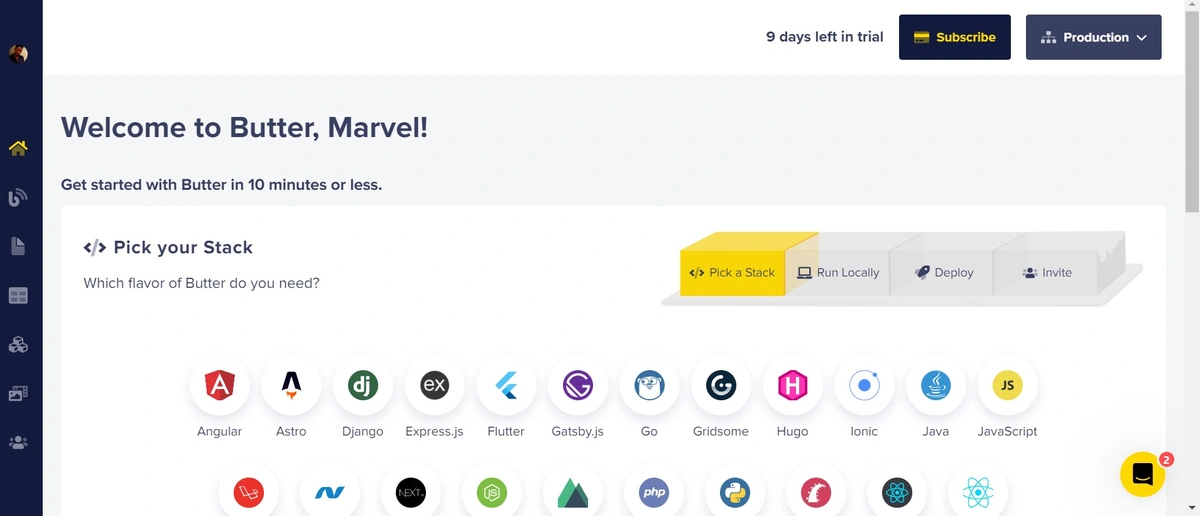
To make use of ButterCMS, a user account on the platform is required. If you do not already have one, navigate in your browser to the ButterCMS login page and create a new user account. Upon signing into your account, you will be redirected to a dashboard similar to the image below:
Creating the page components
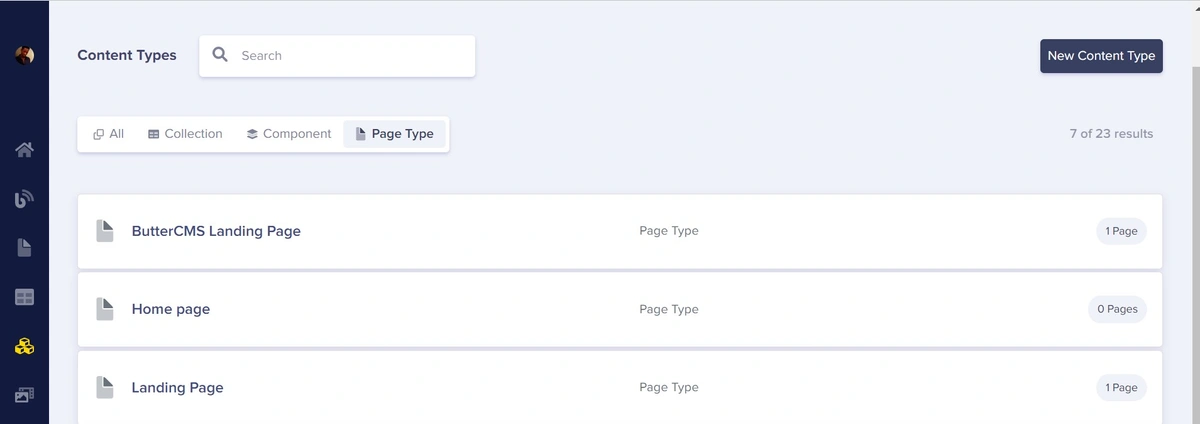
In the side menu, click Content Types. Then, click Page Type to filter only the content in the page type.
At the top right of your screen, you will see a New Content Type button. When you click it, a short drop-down menu pops up:
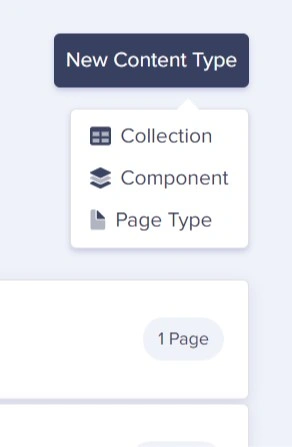
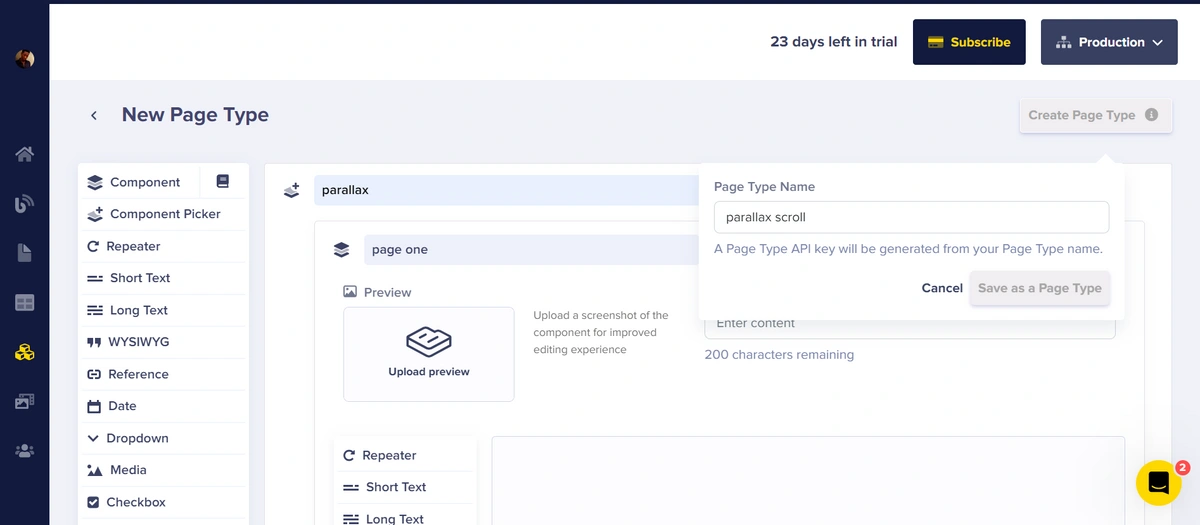
Click Page Type, and the New Page Type page is displayed. On this page, we will configure the schema of a new Page Type.
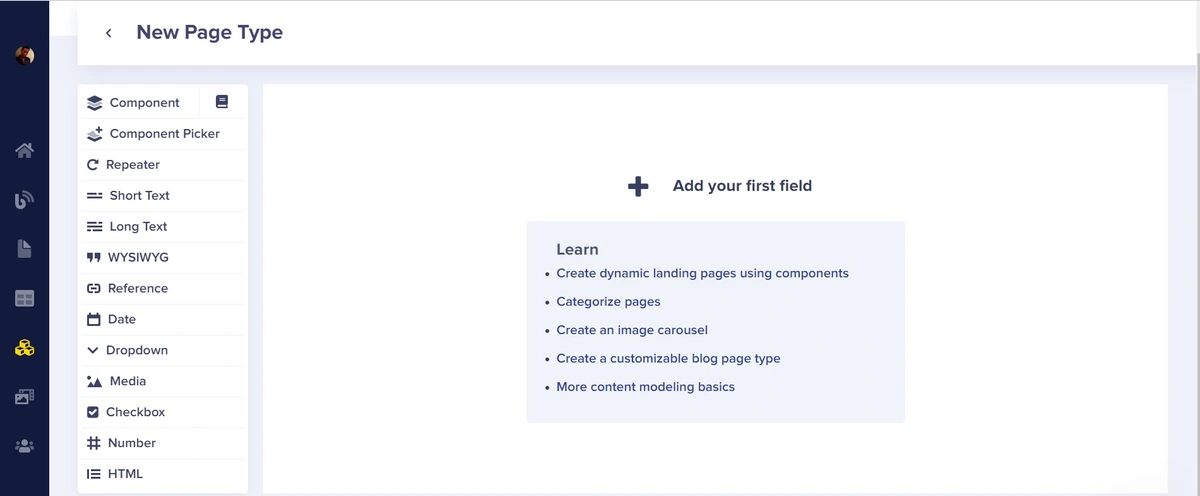
Go ahead and select Component Picker. This will allow you to create different components for your application that you can later select from when building a page.
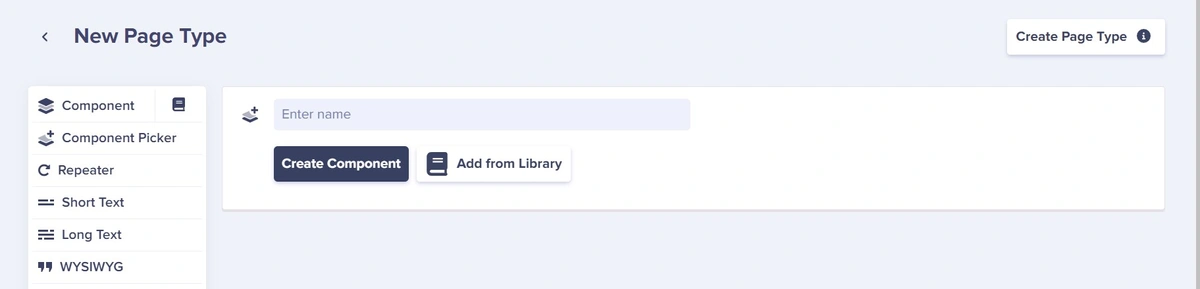
Name your component picker. In our case, it will be named Parallax. After your component picker is named, you then have two options: you either create a component or add from the library. For the sake of this tutorial, you are going to select Create Component.

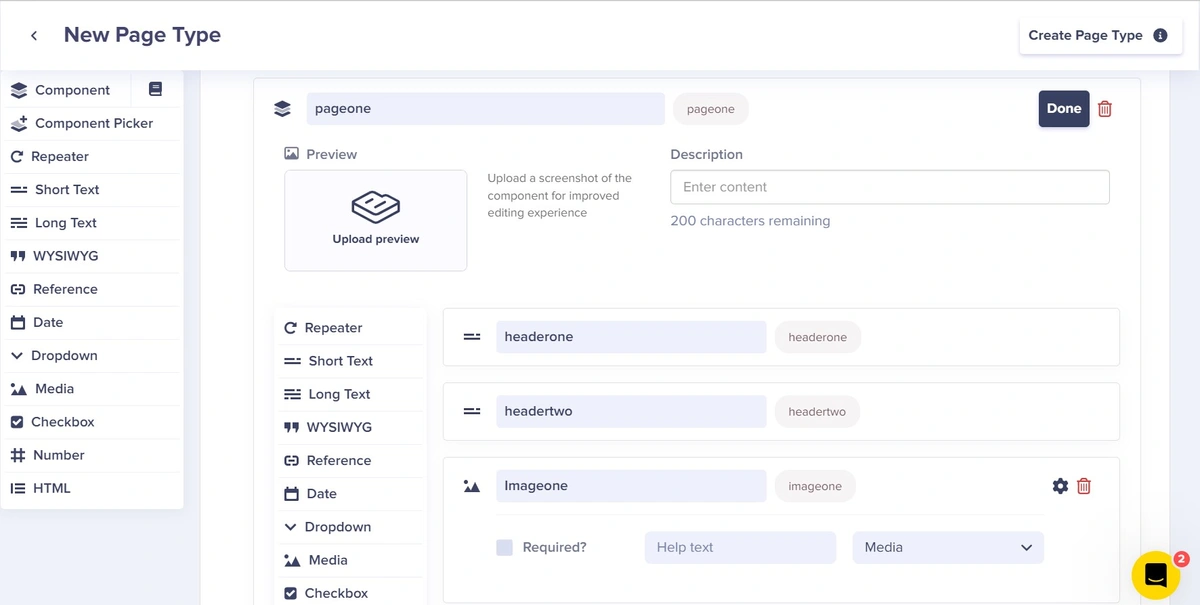
After selecting Create Component, we will configure the components we need. Within this tutorial, we have four pages, but we are going to refer to them as components. Here we will create four different components, naming them Page one, Page two, Page three, and Page four.
For the sake of this tutorial, the fields were named in correspondence to their place in the overall application. For example, in the first field of the first component, we have a short text named headerone, indicating this is the first header in our application. This also applies to headertwo, headerthree, headerfour, headerfive and headersix—indicating these are the second, third, fourth, fifth, and sixth headers in our overall application in descending order.
Below is the list of fields created for each component.
Our Pageone component will have the following fields with their names:
-
Short text named headerone
-
Short text named headertwo
-
Image named imageone
Our Pagetwo component will have the following fields with their names:
-
Short text named headerthree
-
Short text named headerfour
-
Image named imagetwo
-
Image named imagethree
Our Pagethree component will have the following fields with their names:
-
Short text named headerfive
-
Image named imagefour
-
Image named imagefive
Our Pagefour component will have the following fields with their names:
-
Short text named headersix
-
Image named imagesix.
After creating your components and naming the fields, at the top right of the browser, we have a button called Create Page Type as seen above. Click it and the drop-down menu pops up. Next, enter a name for the page type. In our case, we named it parallax scroll, as it will be helpful when fetching these components in our React application.
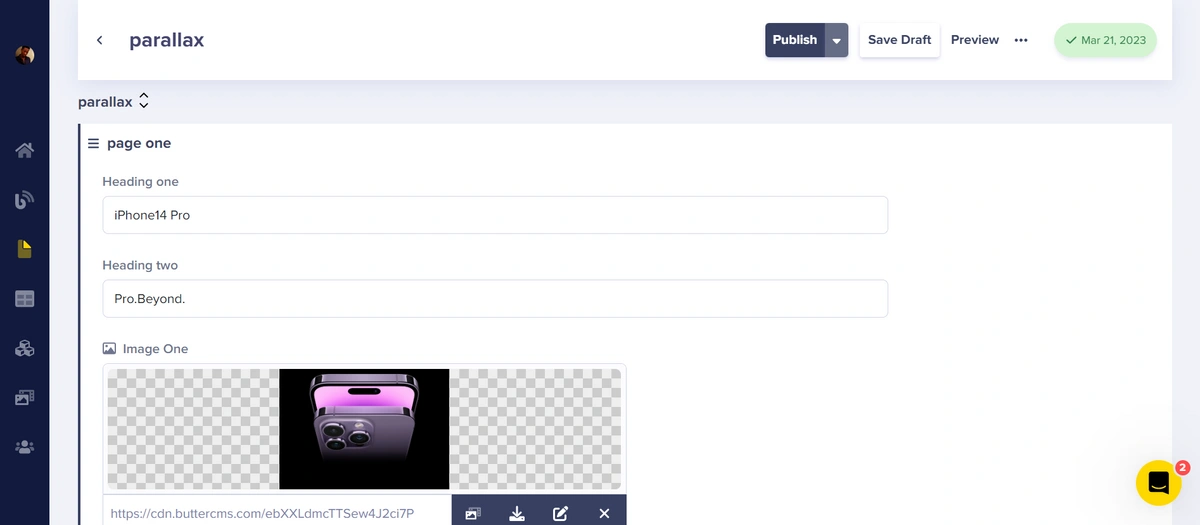
Inputting the content to be fetched
Now, go ahead to the side menu, click the page icon, then click Page Type and select Parallax Scroll to access the page editor where you can then add the content. Once in the page editor for the Parallax Scroll page, we will add fill out our different components (adding them with the component picker) using the content shown in the GIF at the beginning of this tutorial. Once all the content is added, click publish.
Integrating ButterCMS with the API key
At this point, we are done pushing all our contents to ButterCMS. All we need to do is to fetch and display them in our application. To do that, we will need to go to the account settings in our sidebar and copy our API key. With this key, we can successfully integrate ButterCMS into our application.

When that is done, we can close the tab and head to our code editor to integrate our content from ButterCMS. Navigate to our App.js file and paste the code below:
App.js
import React, { useState, useEffect } from "react";
import Navbar from "./Navbar";
import "./App.css";
import Page1 from "./Page1";
import Page2 from "./Page2";
import Page3 from "./Page3";
import Text from "./Text";
import axios from "axios";
import Page4 from "./Page4";
function App() {
  const readtoken = "Your API key";
  const [data, setData] = useState([]);


  useEffect(() => {
    const getData = async () => {
      axios
        .get(
          `https://api.buttercms.com/v2/pages/parallax_scroll/parallax/?auth_token=${readtoken}`
        )
        .then((res) => {
          setData(res.data.data.fields.parallax);
        })
        .catch((err) => {
          console.log(err);
        });
    };
    getData();
  }, []);


  return (
    <div className="page1">
      <Navbar />
      <Text data={data[0]} />
      <Page1 data={data[0]} />
      <Page2 data={data[1]} />
      <Page3 data={data[2]} />
      <Page4 data={data[3]} />
    </div>
  );
}


export default App;
The App.js component defines a constant read token which is a ButterCMS authentication token for reading data from the ButterCMS API. The component also defines a state variable data which is an empty array. The useEffect hook is used to fetch data from the ButterCMS API when the component mounts for the first time. It makes an HTTP GET request to a specific endpoint using the Axios library and retrieves the data related to the parallax fields.
The retrieved data (content from ButterCMS) is stored in the data state variable using the setData function. The component renders several child components, including Navbar, Text, Page1, Page2, Page3, and Page4. These components receive data related to their respective fields in the data array as props.
We can easily dispatch this content to our various pages using props.
Implementing the parallax effect
Implementing the parallax effect can be a simple task using the React-parallax library. This library provides a custom component called <Parallax> that you can use to wrap the content on which you want to apply the parallax effect. The <Parallax> component has its own set of custom styles that allow you to customize the effect according to your preferences. In this section we will not only be adding the parallax effect to our components, we will also be rendering our content fetched from ButterCMS in our application.
To implement this, you can start by importing the React-parallax library into your project. Once imported, you can use the <Parallax> component to wrap the content you want to apply the parallax effect to. Then, you can customize the effect using the custom styles available for the <Parallax> component.
The code blocks below show how we used the parallax component in our application and also specified how to display our fetched content from ButterCMS.
Text.js
In this component, we specified how we want to render our first and second headers from ButterCMS in our React application.
import React from 'react'


function Text({data}) {
  return (
    <div className="page1">
    <p className="pro">{data?.fields.heading_one}</p>
      <p className="pro2"> {data?.fields.heading_two}</p>
      <p className="pro3">
        <a href="http://www.apple.com/ng/iphone-14-pro/">Learn More</a>
      </p>
    </div>
  )
}


export default Text
Page1.js
In this component, we specified how we rendered our first image from ButterCMS in our React application and added our react-parallax component to our page.
import React from "react";
import { Parallax } from "react-parallax";


function Page1({data}) {
  return (

        <Parallax className='img1' blur={0} bgImage={data?.fields.image_one} strength={100} >

         </Parallax>

  );
}


export default Page1;
Page2.js
In this component, we specified how we rendered our header three and header four from ButterCMS in our React application and passed the image as a prop to Page2img1 and Page2img2.
import React from "react";
import "./App.css";
import Page2img1 from "./Page2img1";
import Page2img2 from "./Page2img2";


function Page2({data}) {

  return (
    <div className="page2">
      <p className="page2pro">{data?.fields.heading_three}</p>
      <p className="page2pro2"> {data?.fields.heading_four}</p>
      <p className="page2pro3">
        <a href="https://www.apple.com/ng/iphone-14/">Learn More</a>
      </p>
      <div className="page2img">
        <Page2img1 data={data}/>
        <Page2img2 data={data}/>
      </div>
    </div>
  );
}


export default Page2;
Page2img1.js
Here in Page2img1, we added our parallax effect and rendered the images passed as props.
import React from "react";
import { Parallax } from "react-parallax";
function page2img1({data}) {
  return (
    <Parallax
      blur={0}
      bgImage={data?.fields.image_two}
      className='page2img'
      strength={800}
    ></Parallax>
  );
}


export default page2img1;
Page2img2.js
Similar to Page2img1, we added our parallax effect and rendered the images passed as props.
import React from "react";
import { Parallax } from "react-parallax";
function Page2img2({data}) {
  return (
    <Parallax
      className="page2img"
      blur={0}
      bgImage={data?.fields.image_three}
      strength={400}
    ></Parallax>
  );
}


export default Page2img2;
Page3.js
In this component, we specified how we rendered our fifth header from ButterCMS in our React application and passed the images as props to Page3img and Page3img2.
import React from "react";
import "./App.css";
import Page3img from "./Page3img";
import Page3img2 from "./Page3img2";
function Page3({ data }) {
  return (
    <div className="page3">
      <p className="page3pro">{data?.fields.heading_five}</p>
      <div className="page3img">
        <Page3img data={data} />
        <Page3img2 data={data} />
      </div>


      <div className="list">
        <div className="list1">
          <ul></ul>
        </div>


        <div className="list2">
          <ul></ul>
        </div>
      </div>
    </div>
  );
}


export default Page3;
Page3img.js
Here in Page3img, we rendered the image on the third page passed as props.
import React from 'react'
import { Parallax } from "react-parallax";
function Page3img({data}) {
  return  <div>
  <img src={data?.fields.image_four} className="page3img"/>
</div>;
}


export default Page3img
Page3img2.js
Very similar to the Page3img component, we rendered the image on the third page passed as props.
import React from 'react'
import { Parallax } from "react-parallax";
function Page3img2({data}) {
  return  <div>
     <img src={data?.fields.image_four} className="page3img"/>
   </div>;

}


export default Page3img2
Page4.js
In this component, we specified how we rendered our sixth header from ButterCMS in our React application and passed our images as props to Page4img.
import { Parallax } from "@react-spring/parallax";
import "./App.css";
import Page4img from "./Page4img";
function Page4({ data }) {
  return (
    <div className="page4">
      <p className="p4">{data?.fields.heading_six}</p>
      <Page4img data={data} />
      <p className="pro3">
        <a href="https://buttercms.com/">Learn More about ButterCMS</a>
      </p>
    </div>
  );
}


export default Page4;
Page4img.js
Here in Page4img, we added our parallax effect and rendered the image passed as props.
import React from "react";
import { Parallax } from "react-parallax";
function page4img({ data }) {
  return (
    <Parallax className='img1' blur={0} bgImage={data?.fields.image_five} strength={700} >

         </Parallax>
  );
}


export default page4img;
The resulting parallax effect in action
We can now open our browser and see what we have:
Final thoughts
Adding parallax images and scrolling to your website can greatly enhance the user experience and engagement. By using React and integrating it with ButterCMS, you can easily create stunning and dynamic websites that capture your visitors' attention and leave a lasting impression. With ButterCMS, you have the flexibility to manage your website's content, while React Parallax allows you to bring it to life with beautiful visual effects.
By following the steps outlined in this parallax effect tutorial, you can start creating immersive and engaging websites that truly stand out. So why not give it a try and take your website to the next level? You can start with ButterCMS. I want to take this time to appreciate you for reading this far. Keep coding.
To learn more about how you can use React with ButterCMS, I encourage you to check out the following tutorials: