

- What are CDPs?
- What is a personalization tool?
- Why is personalization important?
- Why you should use a headless CMS
- What is ButterCMS?
- Tutorial: Creating a simple e-commerce site with personalization
- Setting up & Creating Content ButterCMS
- Setting up our Next.js application
- Fetch data from Butter
- Setting up our CDP and personalization tools
- Personalize content based on location
- Personalize content based on user activity
- Adding more personalization features
- Closing thoughts
- Further reading & resources
Personalization is a powerful tool used by many businesses to sustain customer satisfaction and without it, customer experiences would be pretty bland and, possibly, feel very disorganized.
A personalized user experience is one that is built on collected user data and tailored to that user by providing relevant information and services. However, obtaining user data, especially relevant user data, isn't always easy. Users interact with a plethora of products and services online. These interactions, like the products they view, the search keywords they enter, knowledge base articles they consult, or live chats they have with customer support constitute their online activities which build up to very relevant data. However, this might be with one particular business but on different channels. In order to gather this data and make use of it, a customer data platform (CDP) can be used to collect the data from the different channels the user can interact with.
In this article, we'll take a look at the tools and concepts that help us create a personalized experience for users and visitors on our own websites and applications. To best illustrate this, we’ll be building a simple online store application that collects certain user data and is managed by a CDP. We’ll use a personalization tool to provide personalized recommendations based on their activity and we’ll use a headless content management system (CMS), ButterCMS, to provide the content.
Table of contents
What are CDPs?
Customer data platforms are software platforms that act as a single source of truth for customer data on all interactions across multiple channels and tools. They’re often used to build a cohesive customer profile that other systems can easily access to create a more personalized customer experience and power relevant marketing campaigns. This article on the Best Customer Data Platforms for Your Business in 2022 provides more information on what CDPs are all about.

One such CDP we’ll be looking at a bit later in this article is Segment. Segment is the market-leading CDP that helps you collect, clean, and control your customer data. It enables developers to unify customer data from every customer touchpoint and empowers marketing, sales, and customer service leaders with the insights they need to design and build relevant, data-driven customer engagement.
What is a personalization tool?
A personalization tool monitors user characteristics, behavior, and activity and customizes content based on this data. Also, it helps group customers by common traits and characteristics identified in their associated data.
Content can be provided by a CMS based on all these user traits, which leads to a more tailored experience. For example, a personalization tool like Personyze allows you to provide content and product recommendations based on visitors’ demographics, interactions, interests, and much more.
Why is personalization important?
Personalization is very important as it comes with many benefits revolving around customer experience, engagement, and retention.
Customer experience
Client data across multiple channels can be stored centrally in a CDP. Therefore, personalization data can be obtained by the personalization tool to provide very accurate personalized data. This results in a better customer experience as the content shown to the user is more useful.
Customer engagement
Many customer-facing companies and products have heavily invested in crafting personalized experiences for their users which results in an increase in customer engagement as the content that is delivered is tailored to that particular user. This, in turn, potentially increases sales.
Amazon, for example, does a really great job at recommending relevant books based on your preferences and reading history. Other content-based platforms do this as well. Netflix, YouTube, and others have built algorithms based on user activity to create suggestions and feeds based on the user's watch history, likes, and dislikes.
Customer retention
As mentioned previously, personalized experiences are made possible through personalization tools and popular content-based platforms like YouTube and Netflix have been able to retain many of their users on their platforms through personalization. This, in turn, has led to the success of these companies because content recommendations are based on historical data rather than random guessing. So, there's a greater chance the consumer will interact with it.
Why you should use a headless CMS
A headless CMS is simply a CMS that acts as your content backend or content API. The term “headless” refers to the fact that unlike traditional CMS options, the backend, which manages the data, is separated from the frontend, which displays it. This makes it possible for content to be served on multiple application frontends or clients, ranging from laptops to mobile phones to smart watches and even to smart fridges—basically anything that is able to consume an API. Yeah, we’ll even be able to enjoy personalized experiences from our refrigerators.
Now, here are a few reasons for using a headless CMS:
Dynamic content
With a headless CMS, content can be easily structured, added, & modified, all without interfering with the frontend. So all the frontend has to do is fetch this data when required. This is particularly useful when it comes to personalization because as more user traits and “personas” are identified, the content in the CMS can be updated to match the users.
Seamless support and access across multiple devices
Another very important feature of a headless CMS is that content is readily available across multiple devices as it can easily be pulled from one source of truth. This ensures that personalized content can be fetched from any application on multiple devices.
Support for modern infrastructures that are faster and lighter
With a headless CMS, we can take advantage of modern technology and potentially lighter infrastructure. ButterCMS, for example, requires no hosting, deployment, or database integration. This greatly reduces the overall workload ensuring that more focus can be put into the CDP and personalization tool.
Ability to connect to third-party applications
Pulling in data from third-party applications via API, like a CDP’s API, for example, is a very useful feature that a headless CMS provides. It does not limit user data to only first-party data, allowing for a richer and more relevant user experience.
You can find more on how to import third-party data into Butter to integrate an API into your ButterCMS account.

We’ve mentioned ButterCMS a few times already, let’s see what it is.
What is ButterCMS?
ButterCMS is an API-based headless CMS that allows you to easily set up a live CMS backend for your projects in minutes. ButterCMS does not require you to do any deployment or hosting— it’s all managed for you, which is why using it in an application is fast and cost-effective.
ButterCMS also provides a great experience for marketers and non-technical personnel which makes it a great option when developers need to focus on building out a unique customer experience.
Tutorial: Creating a simple e-commerce site with personalization
In the following sections of the article, we’re going to take what we’ve discussed so far and build a very basic e-commerce application with Next.js and ButterCMS. This will be a simple e-commerce or product site that showcases the following content from the CMS backend:
- Products, with categories like “computing”, ”phones and tablets”, etc.
- Personalized pages/sections, based on location, recently viewed content, suggested products, etc.
The content will be pulled from Butter and the frontend will be built into Next.js. This will show how to set up a project and connect it to Butter.
Our app will be able to do the following:
- Display a personalized hero section on the home page that changes based on the user’s geographic location.
- Have a product section showing all the products
- Display a list of personalized product sections based on the products the user has recently viewed
Tutorial Prerequisites
To follow along and complete this tutorial, you’ll need the following:
- A ButterCMS account
- A Segment and Personyze account for the CDP and personalization services we’ll be using
- A text editor, VSCode, for example,
- HTML & JavaScript knowledge
- Basic knowledge of JavaScript, React, and Next.js
- Node.js installed (I’ll be using v16.13.0.)

Note: The code for this tutorial is located in this GitHub Repository.
Setting up & Creating Content ButterCMS
Log in to your ButterCMS dashboard. If you don’t have a ButterCMS account, you can easily create one. If it’s your first time, you will be greeted with a welcome screen where you can pick your application stack and be guided on how to connect Butter to your application.
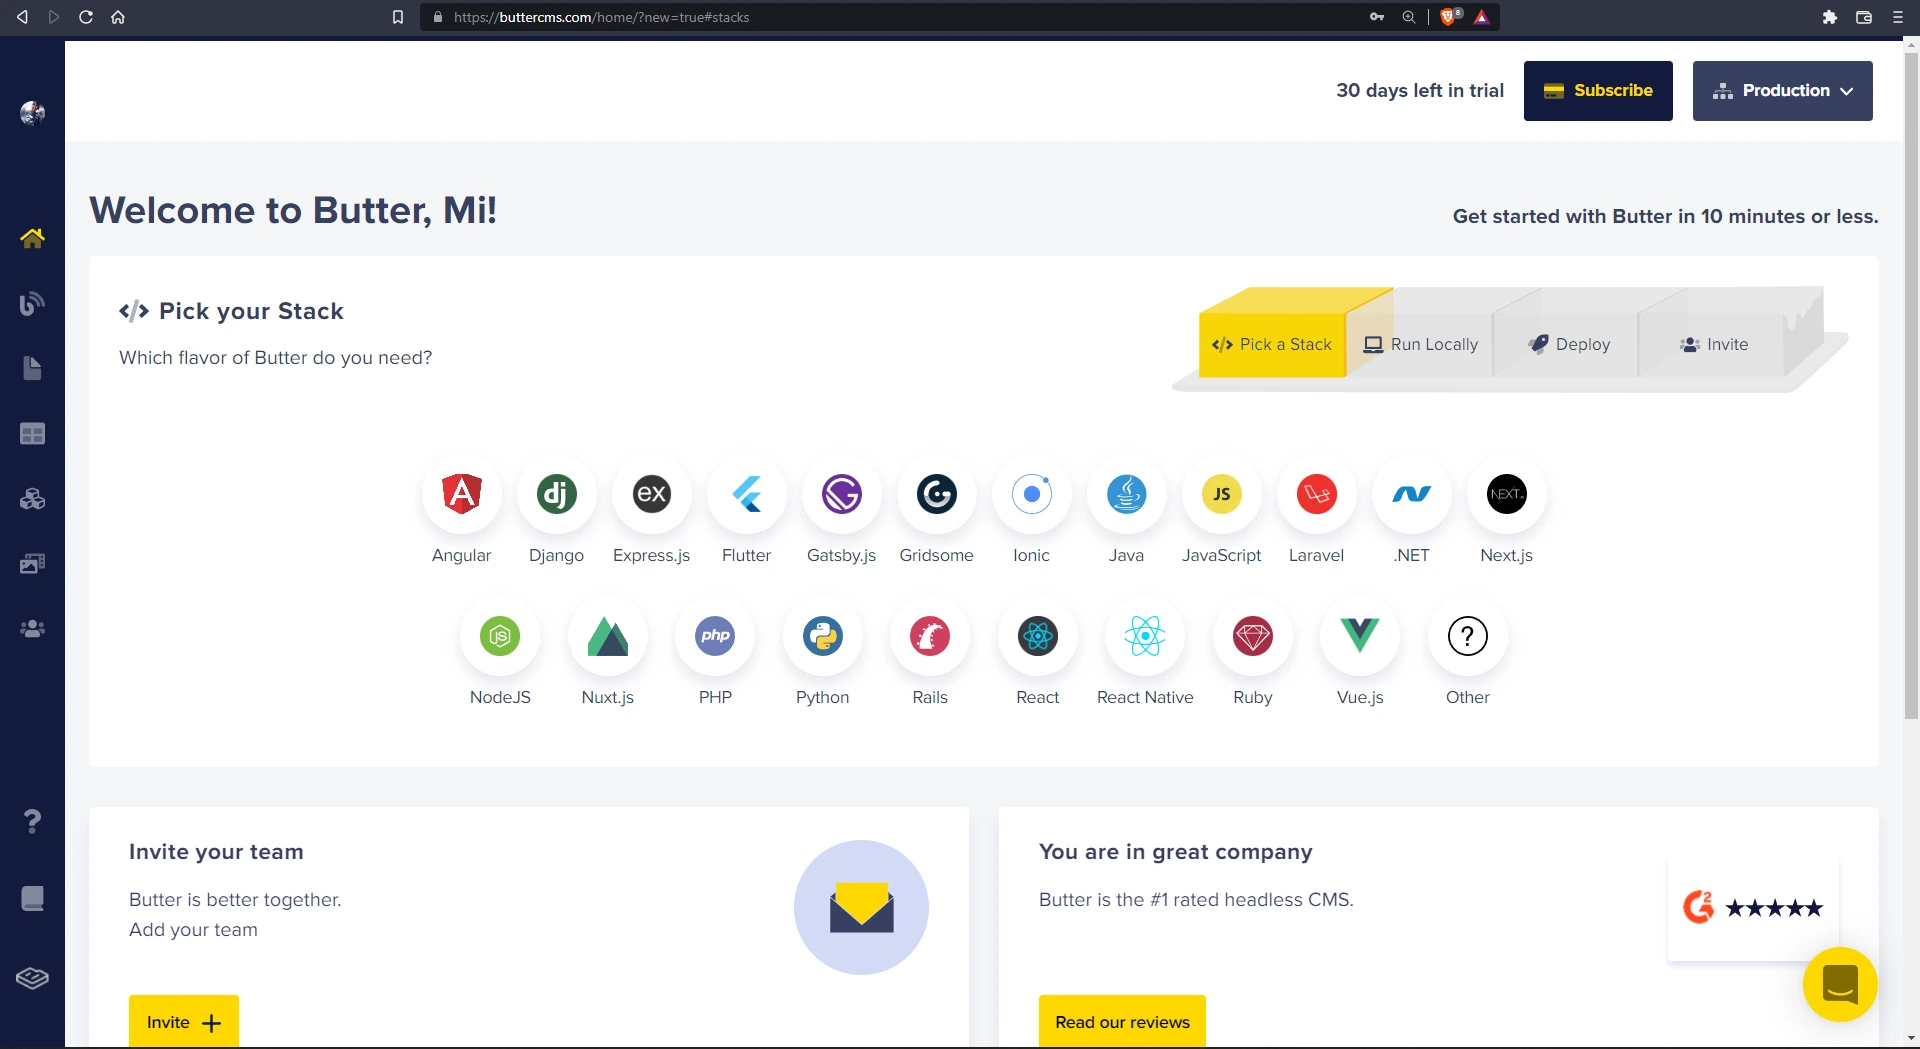
We’ll skip that for now since we don’t have an application up already. We’ll dive right into creating our content.
Content types
To get started, we have to set up and build our product content by creating a new content type. A content type is the specific schema, or structure, of a piece of content/certain kind of content. In Butter, we have different content types based on what we’re trying to build which include: collections, components, blog posts, and page types. We’ll create our product pages using page types.
A product typically has a product page, and that page will need fields for product data like the name and price of the product. To create a product page, we will need to create a new page type in Butter. Once we’ve created this product page type we can use it to create pages for every product.
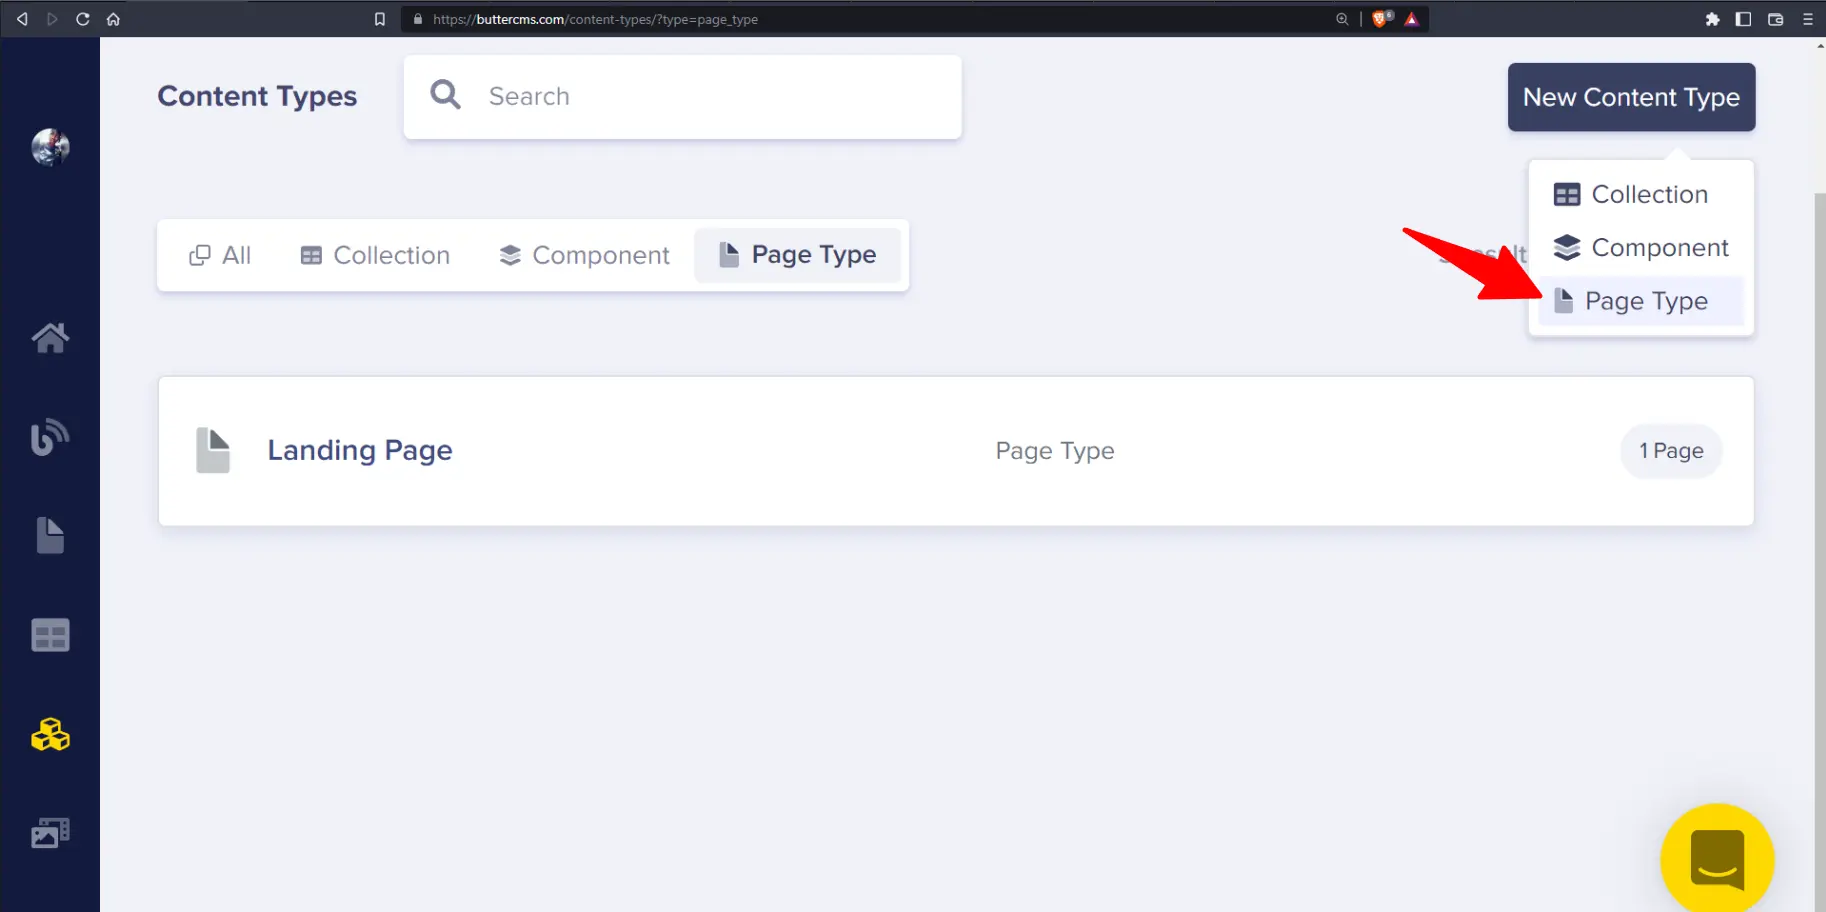
To create a new page type, click on the three building blocks in the sidebar which will take you to the Content Types page. Click on the New Content Type button at the top right. Then, to create a page type, select the Page Type link.
Create product page types
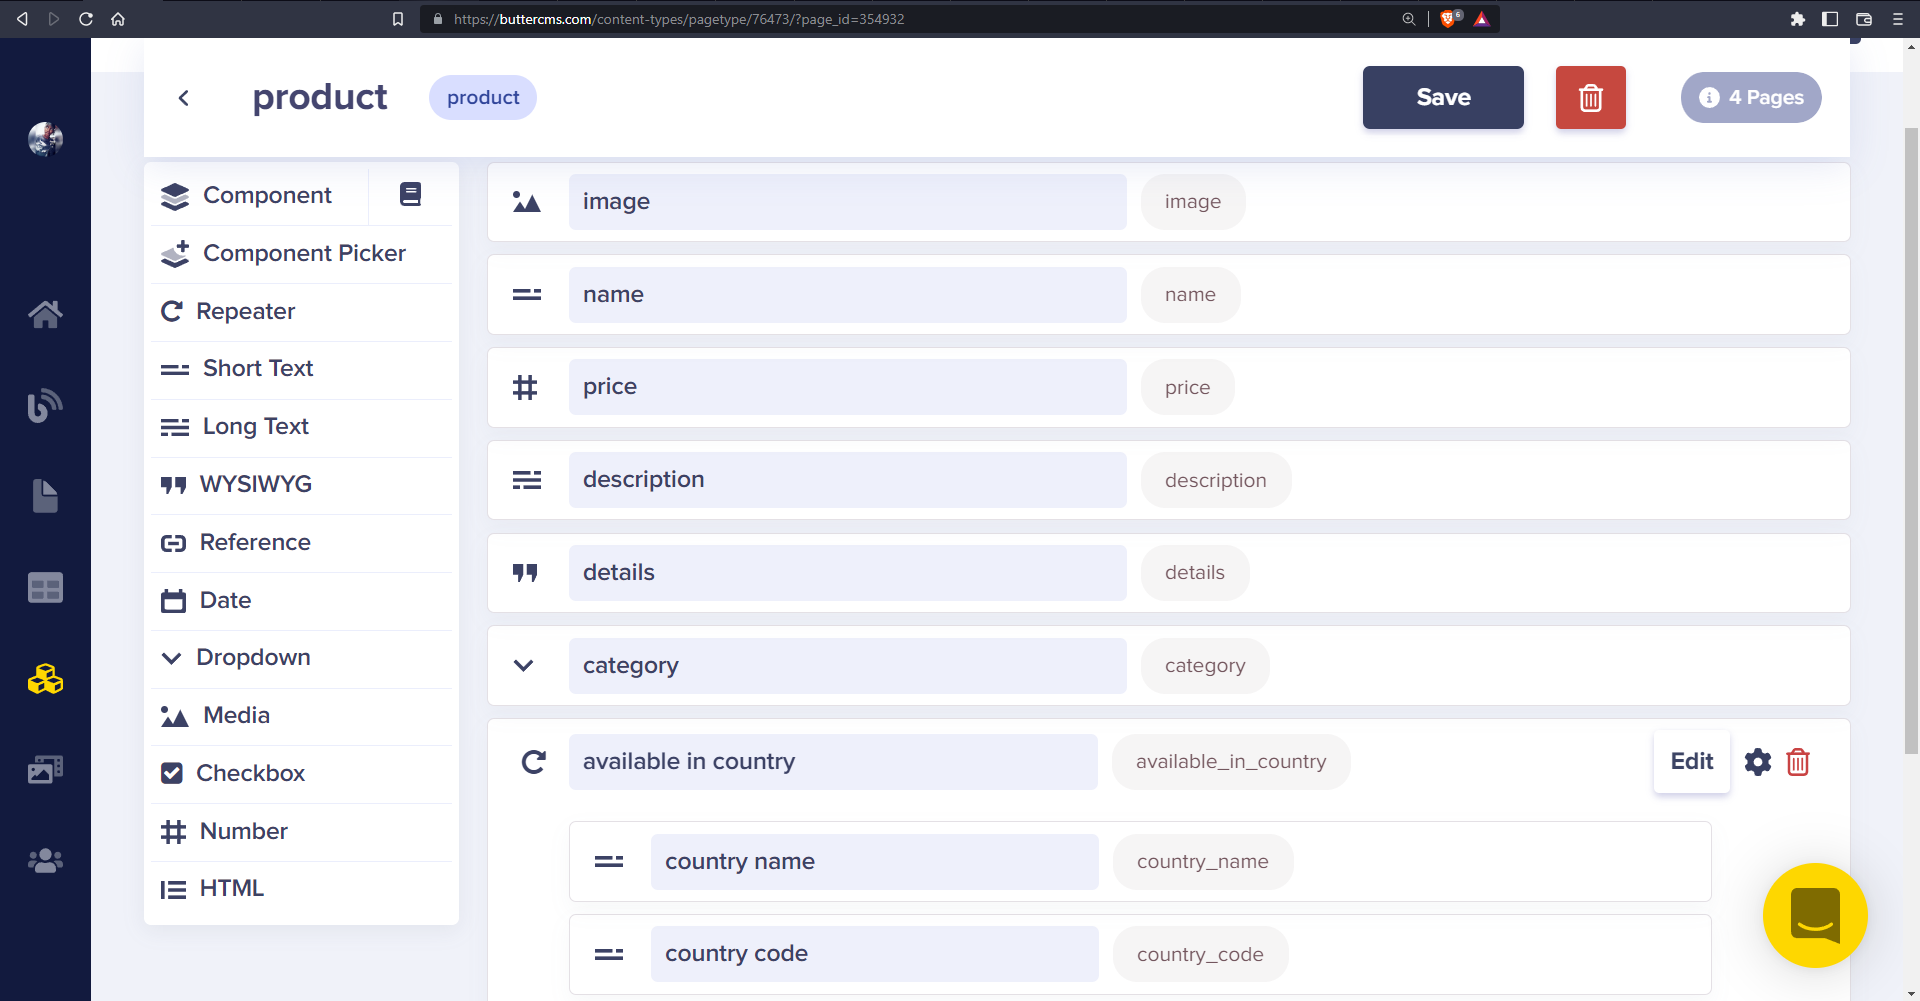
Next, we will configure our product page type to have the following schema:
- “image” - Media:
- ✅ required
Here we add a new Media field and name it “image”. In addition, we set the Required attribute to true to ensure that every product has an image.
- “name” - Short Text
- ✅ required
Here we add a new Short Text field and name it “name”. In addition, we set the Required attribute to true.
- “price” - Number
- ✅ required
Here we add a new Number field and name it “price”. In addition, we set the Required attribute to true.
- “description” - Long Text
- “details” - WYSIWYG
- “category” - Dropdown
Add a dropdown field with the following options:
- phones and tablets
- computing
- electronics
- fashion
The options will be what we’ll pick from when creating a new product.
- “available in country” - Repeater
A Repeater field allows us to provide a list of items that will be returned as an array of items in our API. Our field will contain the following sub-fields: - “country name” - Short Text
- “country code” - Short Text
Now that our structure is defined, let’s save our page type. Click on the Create Page Type button and enter Product as the page type name.
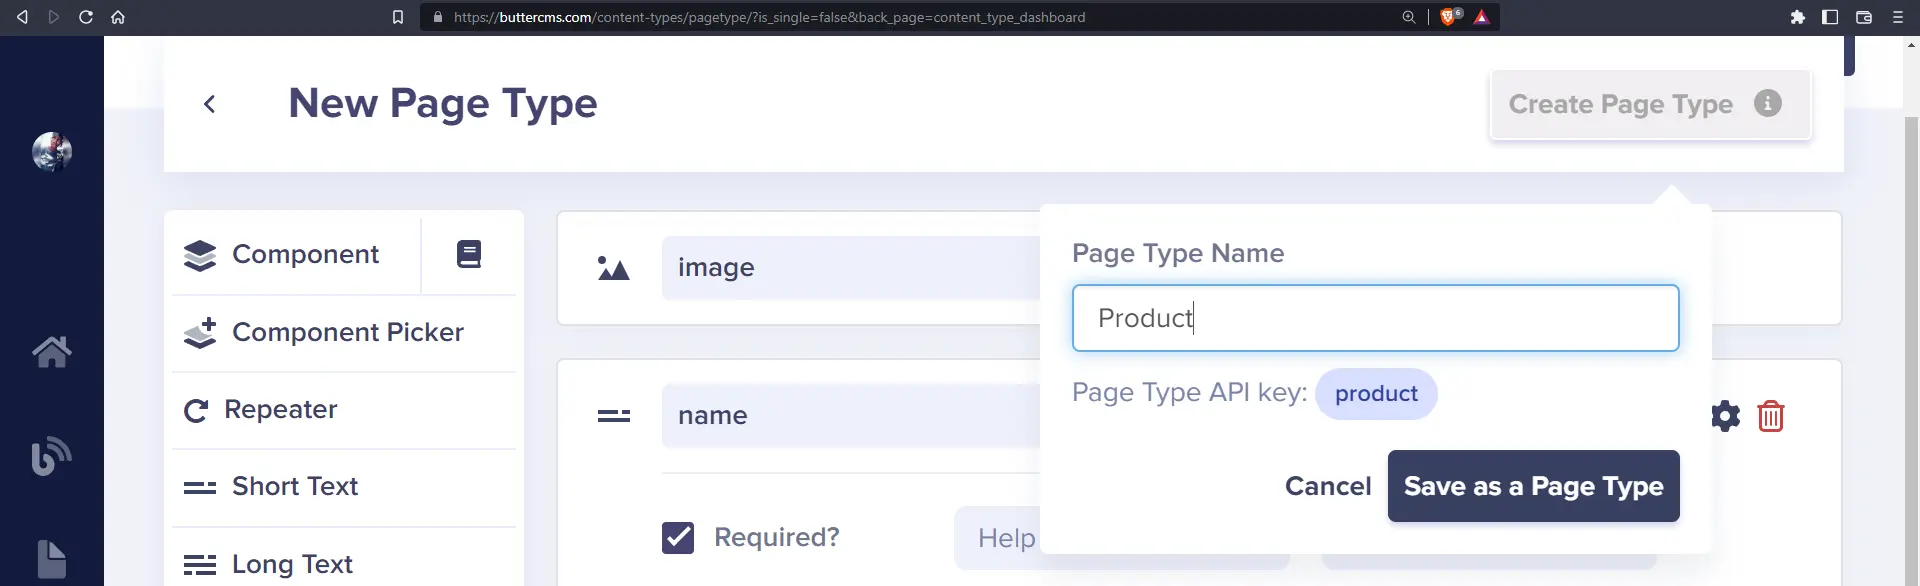
Now that our product page type has been created, let’s create a few products.
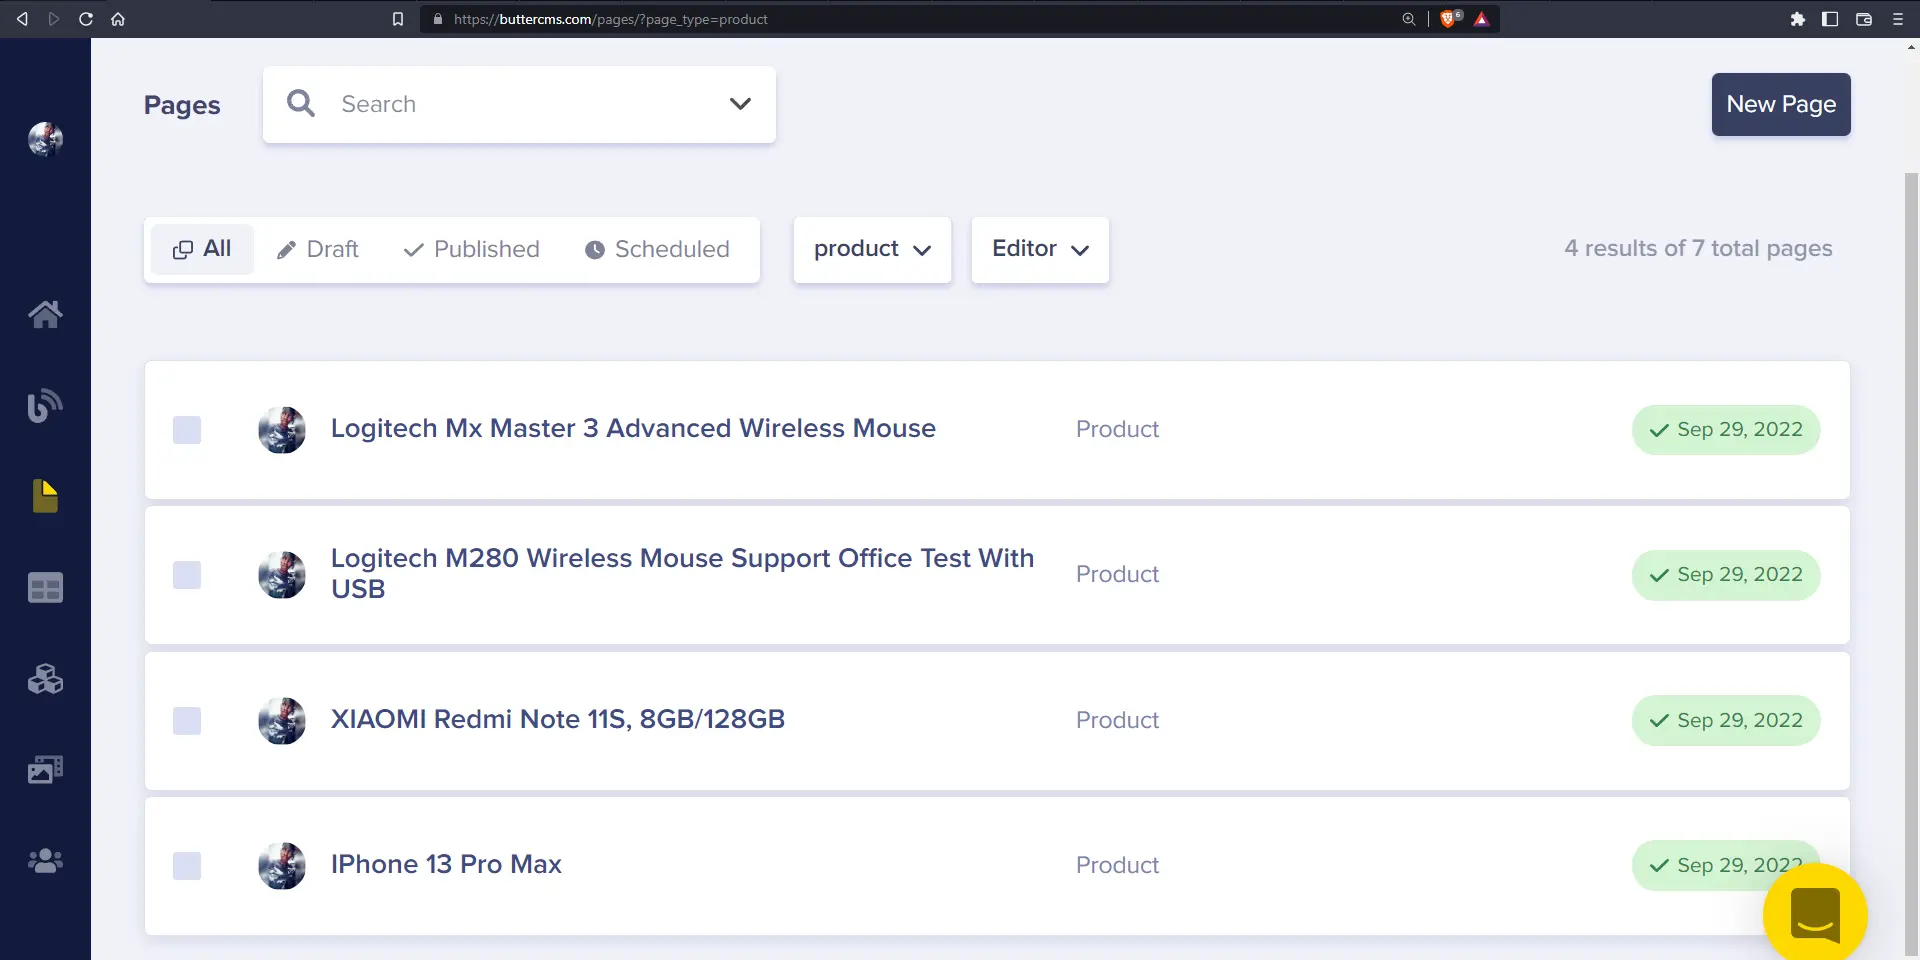
Create products
To do that, navigate to Pages by hovering over the page icon on the right side nav and selecting Product. Next, click on the New Page button at the top right and select Product.
When creating a page, include the Page Title and API Slug, like so:
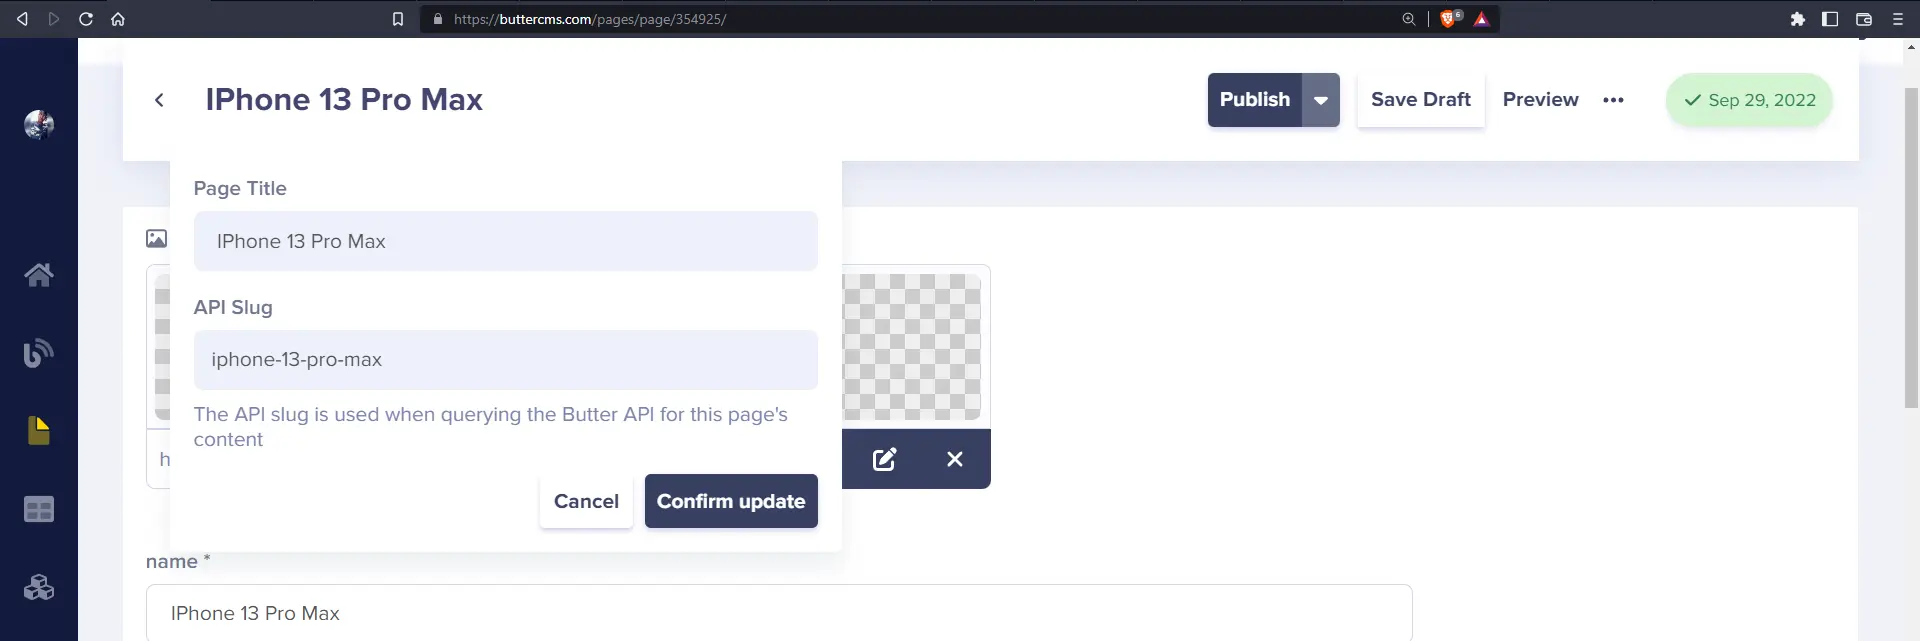
Here, the page title is “iPhone 13 Pro Max” and the slug, which is automatically generated, is “iphone-13-pro-max”.
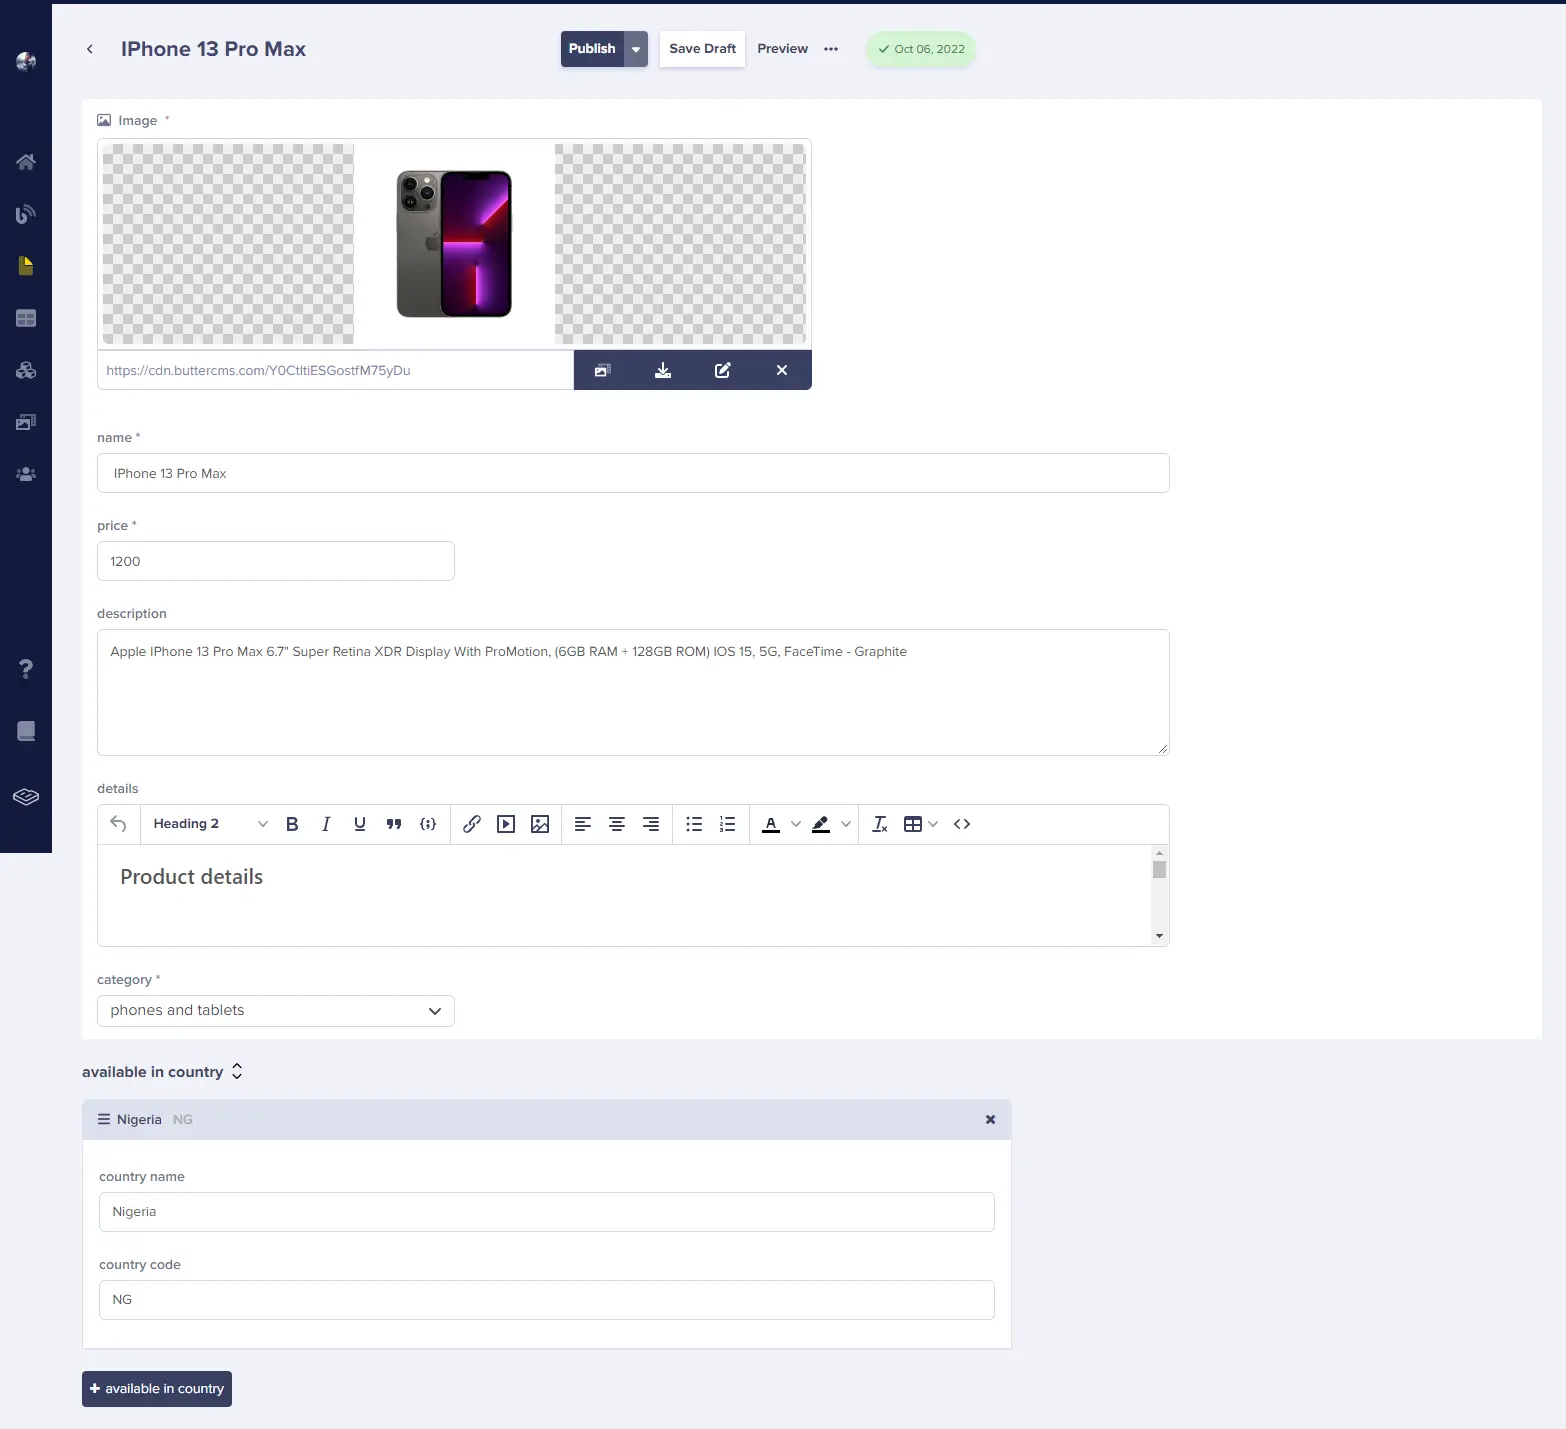
Next, fill in the product fields with the product information:
- Name
- Price
- Description
- Details (This field can contain formatting as it is a WYSIWYG editor.)
- Category (Here, we can simply select an option from the dropdown options we created earlier.)
- Available in Country (Here, we can add a list of countries containing a country name and country code where the product is available.)
Here’s what my product page looks like:
Here’s what the available in country repeater field looks like for a product and what the JSON response looks like through the API Explorer:
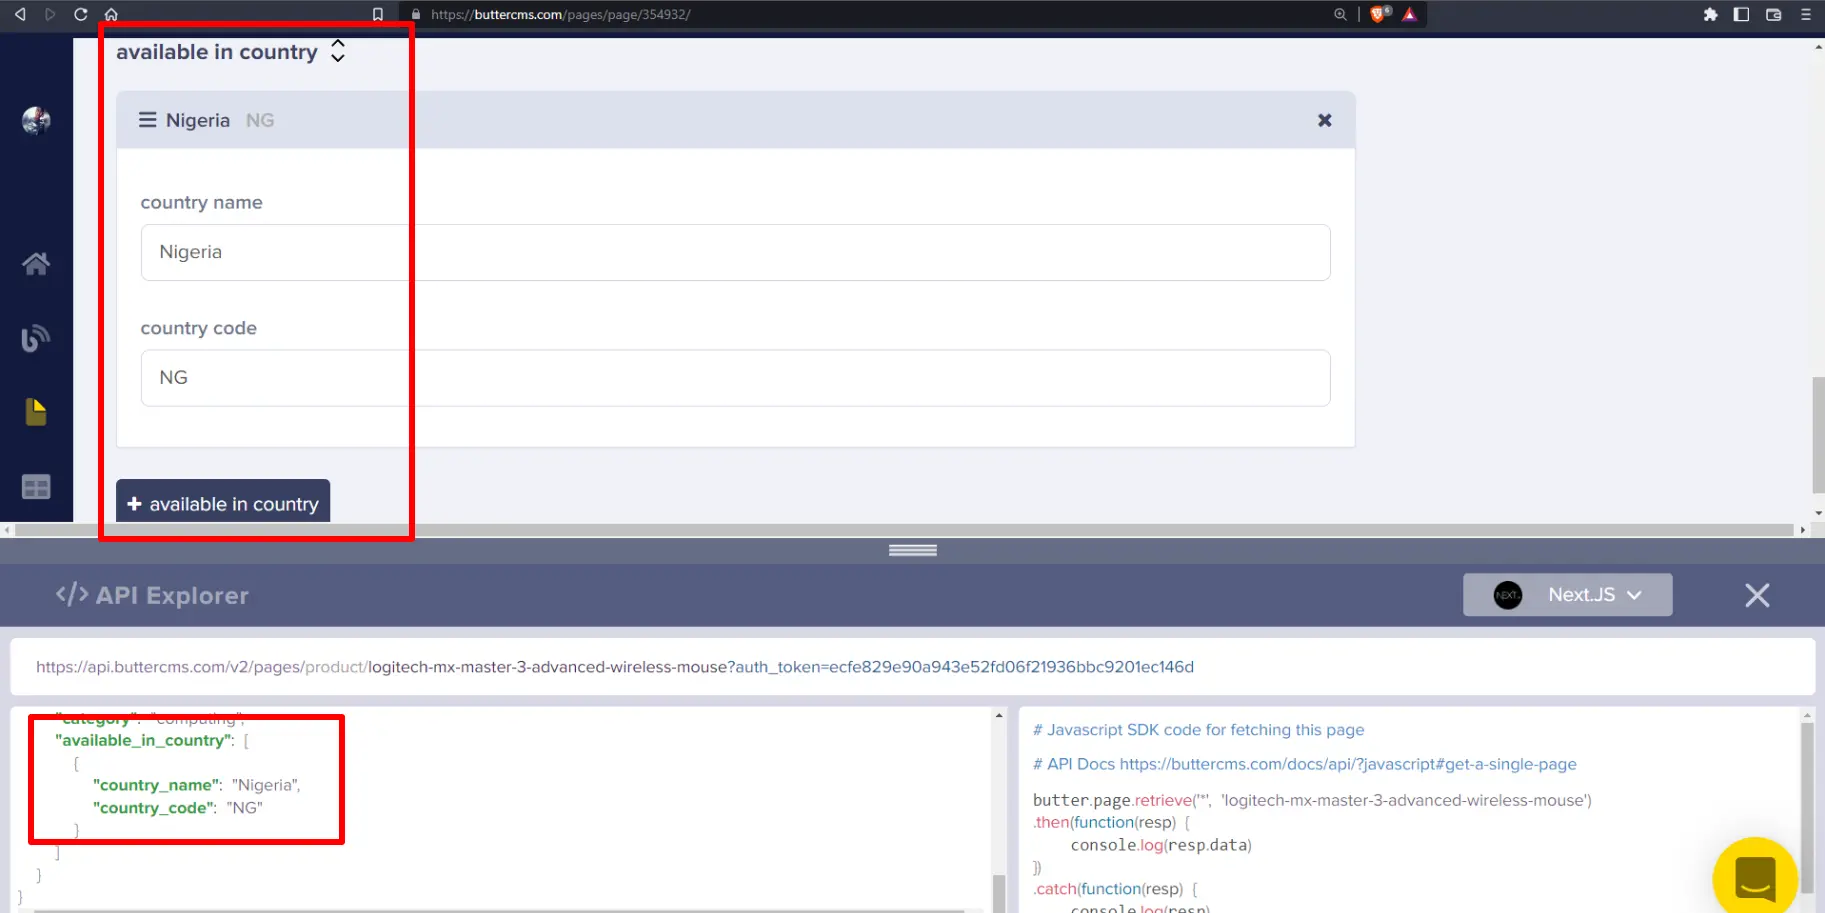
Great!
Now, we can go ahead and create a few more products:
Next, we’ll create a page type for our dynamic landing page.
Create a page type for a dynamic landing page
Our dynamic landing page is going to feature a component picker. The component picker field allows us to choose from multiple components from a component library and will be sent back as an array of objects when the page is requested from the API. The schema of our landing page will be something like this:
- “Page Hero” - Component Picker
- “Hero caption” - Short Text
- “Hero text” - Long Text
- “button label” - Short Text
- “hero image” - Media
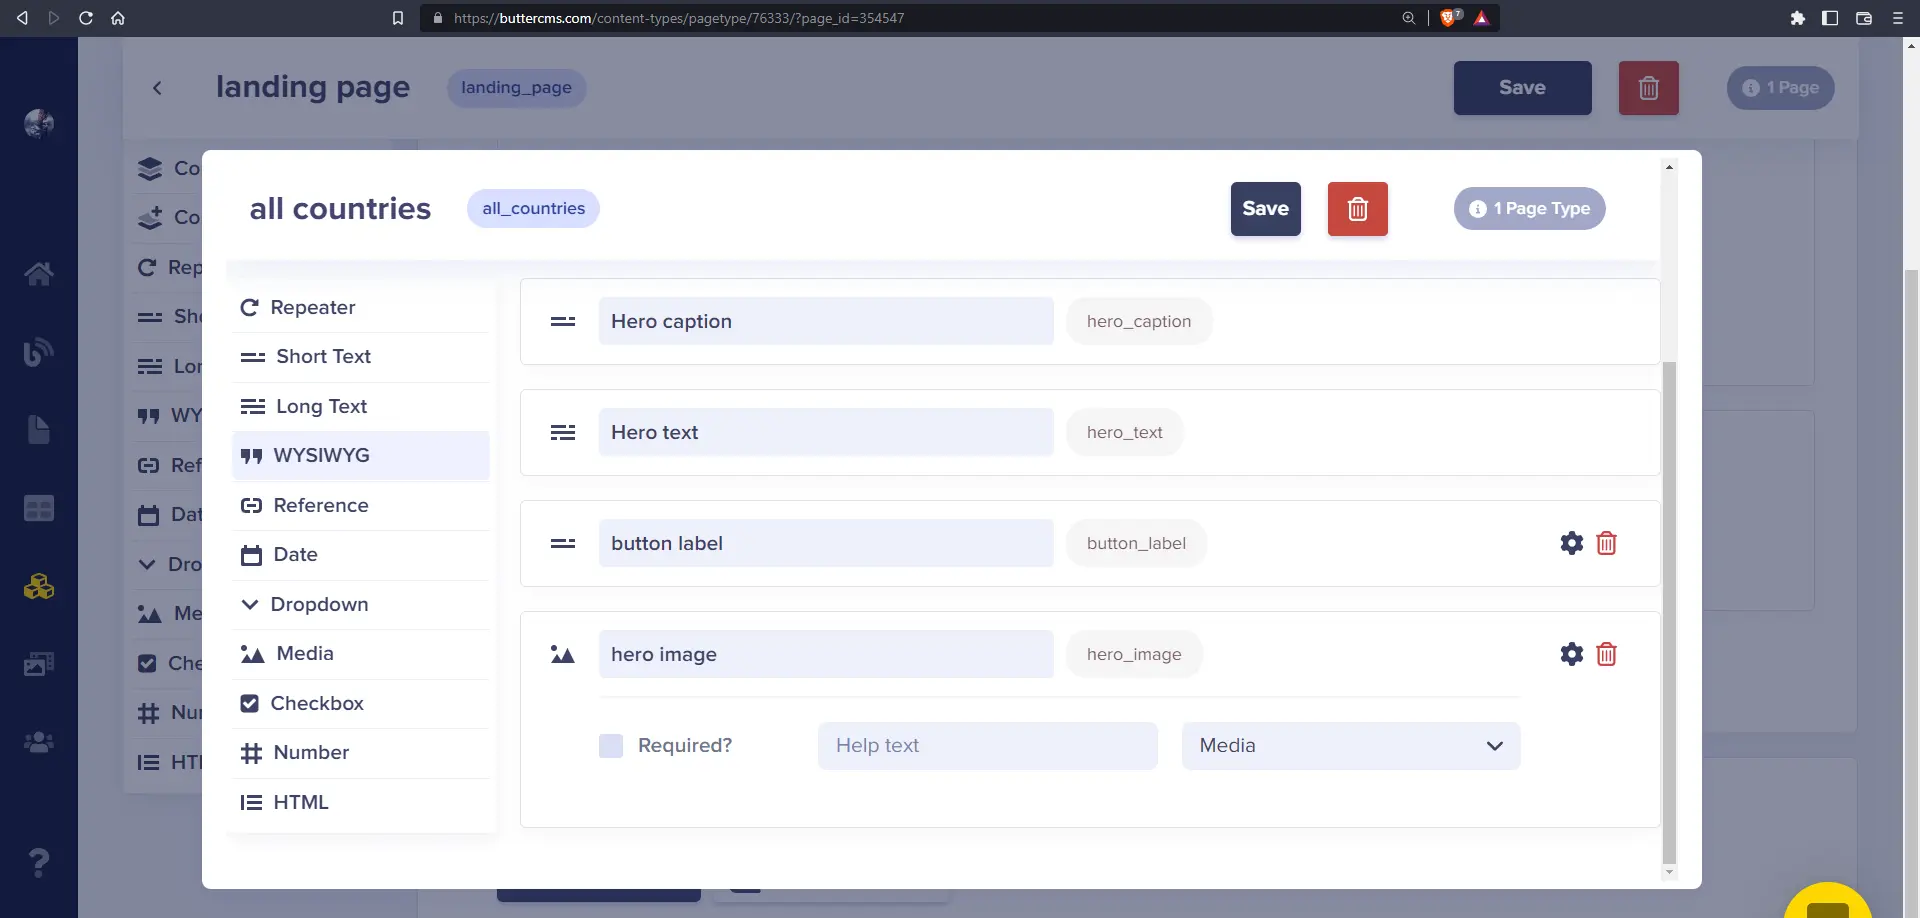
- “all countries” - Component
- “Nigeria” - Component
- “Hero caption” - Short Text
- “Hero text” - Long Text
- “button label” - Short Text
- “hero image” - Media
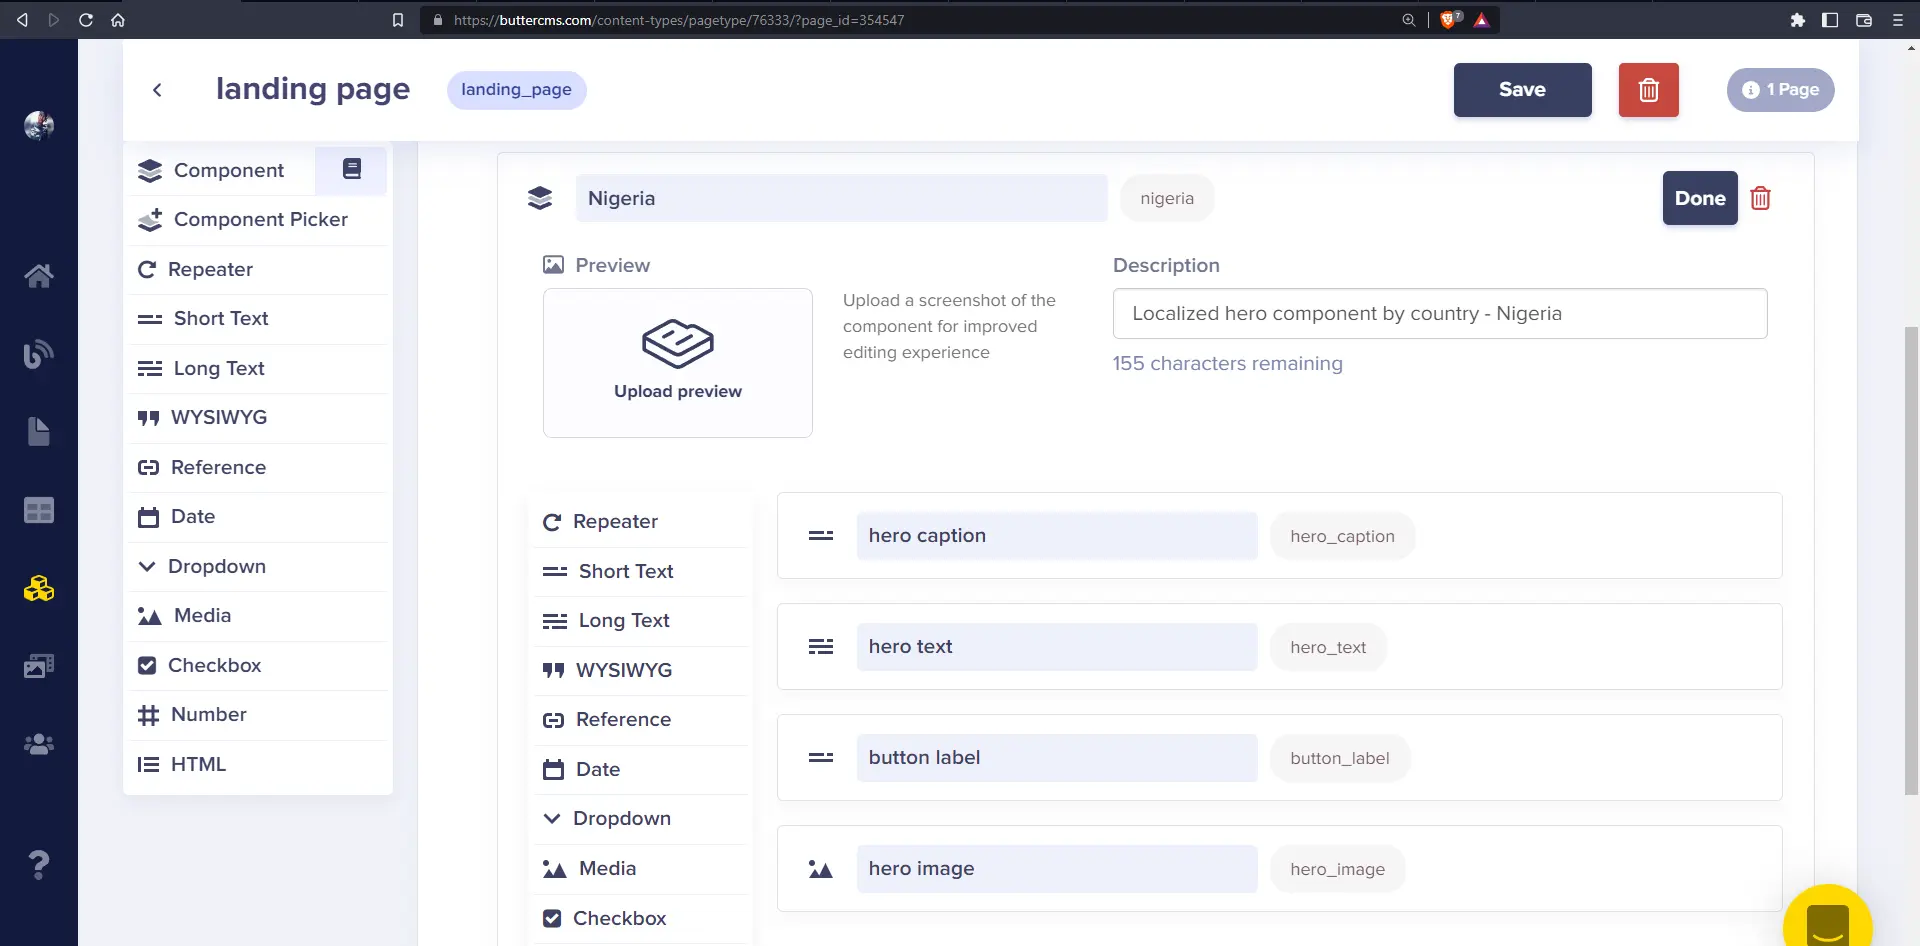
So, we’ve been able to set up the structure of our dynamic landing page which allows us to create multiple versions of our Page Hero component by country.
Currently, we have two versions of the hero component:
- The “all countries” version, for content that will be displayed by default
- The “Nigeria” version, which is meant for users whose current location is in Nigeria
In our application, we can use the user location data from our personalization tool to determine which hero component data to display to the user.
Create a dynamic landing page
Now, let's create our dynamic landing page with our newly created landing page type. Navigate to Pages by hovering over the page icon on the right side nav. On the Pages page, click on the New Page button at the top right and select Landing Page to create a new page.
Enter the page metadata:
- Page Title
- API Slug (automatically matches page title)
Click on the Page Hero component picker, select the components, and enter content for each.

Here’s a preview of what my landing page looks like:
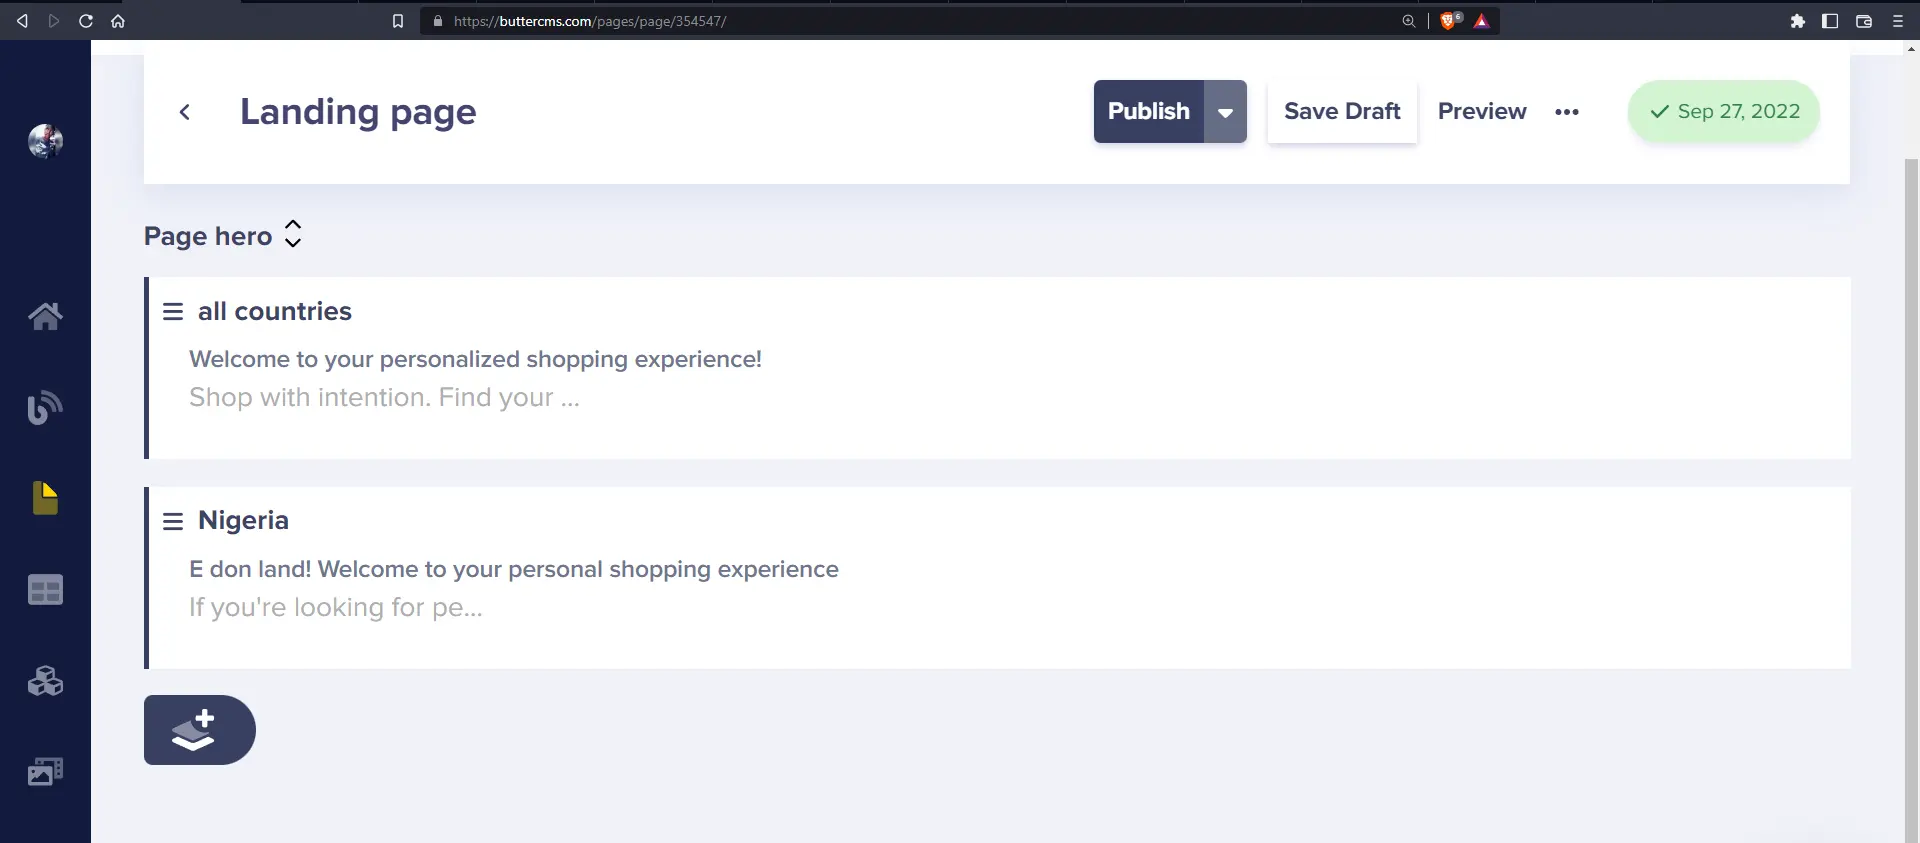
Here, we have the age Hero component picker with two components:
- All countries
- Nigeria
This allows us to implement logic on our frontend to select one of these options that will be displayed for the user depending on their geographic location.
Since the Page Hero is a component, we can add other fields to our Landing Page page type that will constitute other sections of the landing page which will remain the same across all users. This way, we do not have to create new landing pages for different users when the Page Hero component may be the only part of the page that is dynamic.
Now that we’ve created our content in ButterCMS to power our personalized application, it would be nice to see how ButterCMS delivers our content through the API. That’s where the API Explorer comes in.
Viewing JSON data with the API Explorer
One handy feature ButterCMS has is the API Explorer. With this, we can take a look at the actual JSON data Butter will deliver to our application through the API.
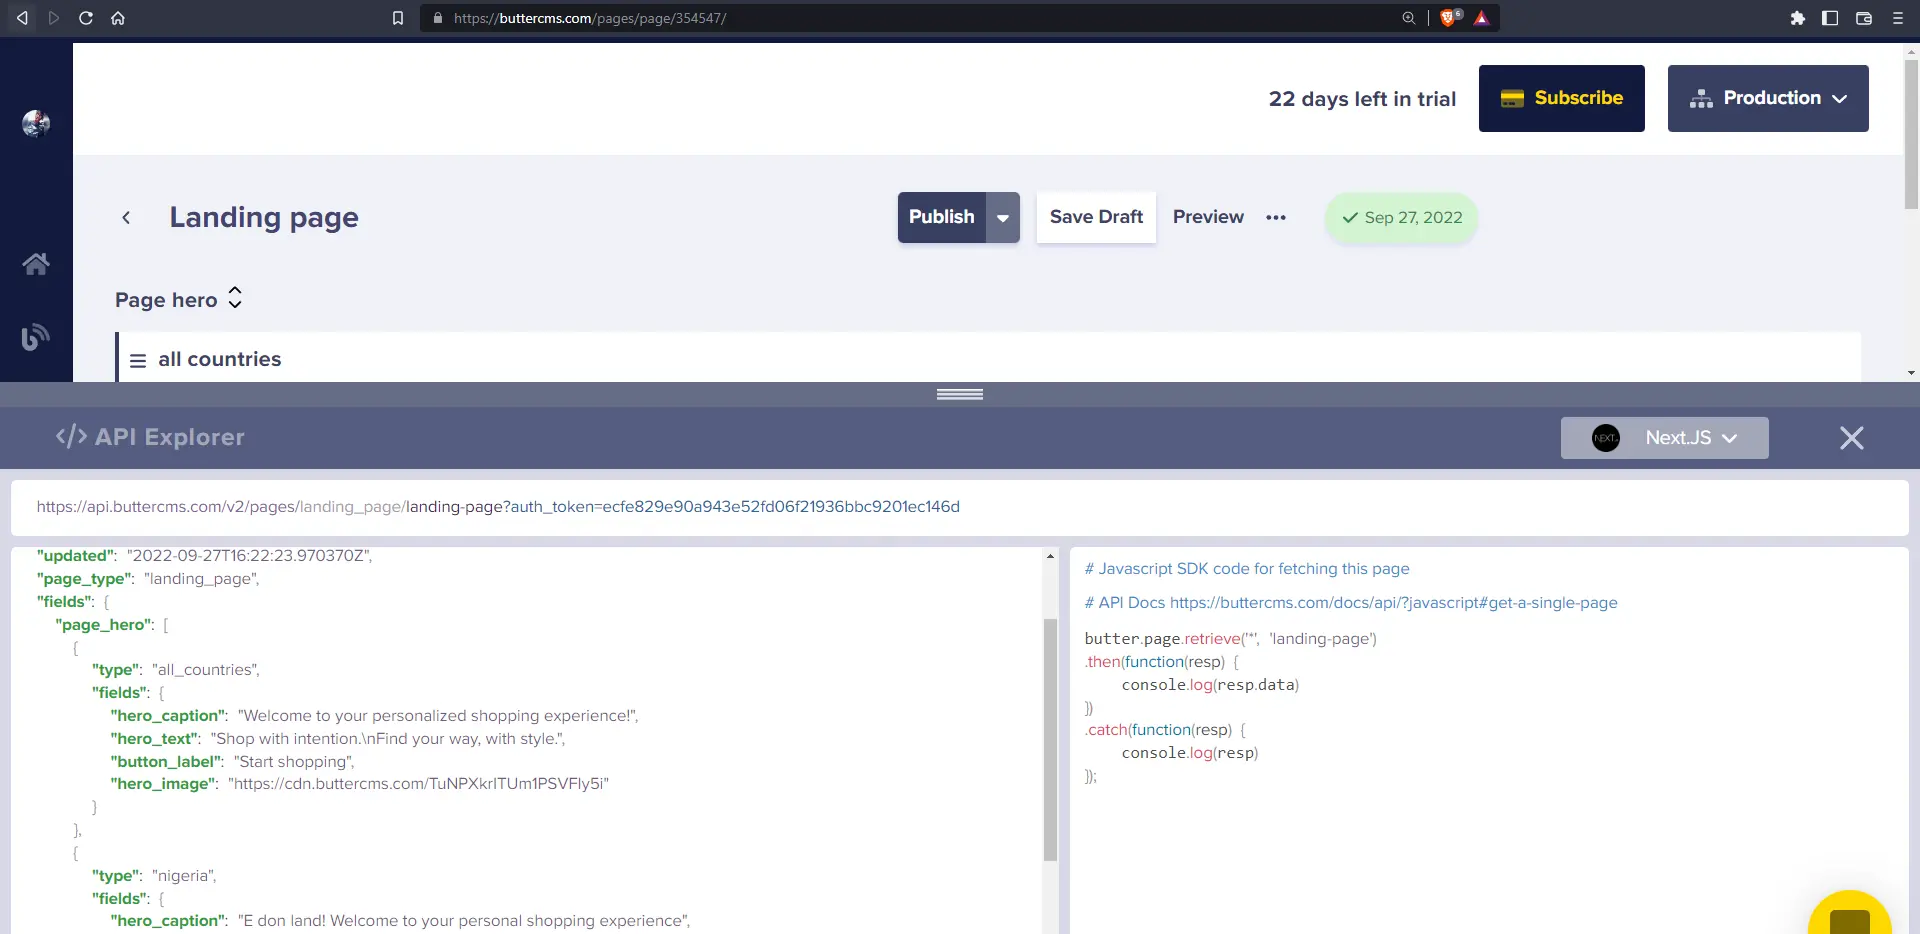
As you can see in the image above, the API Explorer shows us the URL to fetch data for our newly created landing page. In addition, it also shows us the Butter SDK code that can be used in our application.
Now that we’ve set up our CMS, let’s create our Next.js application and connect it to Butter.
Setting up our Next.js application
To create a new Next application, navigate to a folder of your choice and run the following:
npx create-next-app@latest personalized-app
# or
yarn create next-app personalized-app
# or
pnpm create next-app personalized-app
Once the installation is successful, we can navigate to our personalized-app directory and install a few packages:
cd personalized-app
yarn add @segment/snippet buttercms
We’ll also install Tailwind CSS and Tailwind Typography:
yarn add @tailwindcss/typography autoprefixer postcss tailwindcss
npx tailwindcss init -p
Add the paths to all of your template files in your tailwind.config.js file:
// ./tailwind.config.js
/** @type {import('tailwindcss').Config} */
module.exports = {
  content: [
    "./pages/**/*.{js,ts,jsx,tsx}",
    "./components/**/*.{js,ts,jsx,tsx}",
  ],
  theme: {
    extend: {},
  },
  plugins: [
    require("@tailwindcss/typography"),
    require('@tailwindcss/forms'),
  ],
};
Add the @tailwind directives for each of Tailwind’s layers to your ./styles/globals.css file:
// ./styles/globals.css

@tailwind base;
@tailwind components;
@tailwind utilities;

body {
  @apply bg-slate-100;
}
.cta {
  @apply w-fit bg-slate-100 text-black font-medium px-5 py-2.5 rounded-xl;
}
Now that we’ve created our application, let’s see how we can set up Butter and create a few helper functions to fetch data.
Set up a global state with the Context API
Let's set up a global state for our application using the Context API. This will allow for things like user data to be available in all components.
Create a new file called ./modules/AppContext.js with the following:
// ./modules/AppContext.js

import { createContext, useContext, useState } from "react";
const UserStateContext = createContext();
const UserDispatchContext = createContext();
export const AppProvider = ({ children }) => {
  const [userData, setUserData] = useState({});
  return (
    <UserDispatchContext.Provider value={setUserData}>
      <UserStateContext.Provider value={userData}>
        {children}
      </UserStateContext.Provider>
    </UserDispatchContext.Provider>
  );
};
export const useUserState = () => useContext(UserStateContext);
export const useUserDispatch = () => useContext(UserDispatchContext);
Next, in the ./pages/_app.js file:
// ./pages/_app.js

import "../styles/globals.css";
import {
  AppProvider
} from "../modules/AppContext";

import { useEffect, useState } from "react";

function MyApp({ Component, pageProps }) {
  return (
    <AppProvider>
        <Component {...pageProps} />
    </AppProvider>
  );
}
export default MyApp;
Now that we’ve added our AppProvider and wrapped our application within it, we have access to useUserState and useUserDispatch which will be used to get and set user state, respectively.
Next, before we create our product card component, let’s create a few helper functions we’ll use later on to convert and format product prices.
Create helper functions
These are functions that will be used in multiple components, so we’ll create them in ./lib/helpers.js with the following inside:
// ./lib/helpers.js

// USD to NGN rate
const USD_NGN = 700;

// function to return number in currency formarting e.g 3000 => 3,000
const formatPrice = (amount) =>
  parseFloat(amount).toLocaleString("en", { maximumFractionDigits: 5 });

const convertPrice = (amount, { from = "US", to }) => {
  let amountInUSD;
  let result;
  let symbol;
  switch (from) {
    case "NG":
      amountInUSD = amount / USD_NGN;
      break;
    default:
      amountInUSD = amount;
      break;
  }
  switch (to) {
    case "NG":
      symbol = "₦";
      result = amountInUSD * USD_NGN;
      break;
    default:
      symbol = "$";
      result = amount;
      break;
  }
  return { amountInUSD, result: `${symbol}${formatPrice(result)}` };
};
export { convertPrice, formatPrice };
Currently, our convertPrice() function only handles conversions to and from “US” and “NG” currencies, but more switches can be added later on to support more countries.
Connecting to ButterCMS
To start fetching data from Butter, we’ll follow the steps to add Butter to an existing app. You’ll need your API token. This is generated when you create a free trial account with ButterCMS. Once logged in, you can grab it from the Settings page.
Create a new .env file and add the API token:
./.env
BUTTER_READ_API_KEY=<API key here>
Now, we’ll create a few functions that we’ll use to fetch data.
Create a new file in ./lib/api.js with the following in it:
// ./lib/api.js

import Butter from "buttercms";
const APIKEY = process.env.BUTTER_READ_API_KEY;
const butter = Butter(APIKEY);

export const getLandingpage = async (slug) => {
  try {
    const page = await butter.page.retrieve("*", "landing-page");
    return page.data?.data;
  } catch (error) {
    console.log({ error });
    throw error;
  }
};
export const getProducts = async ({
  params = { page: 1, page_size: 10 },
} = {}) => {
  try {
    const products = await butter.page.list(["product"], params);
    console.log({ products: products.data });
    return products.data;
  } catch (error) {
    console.log({ error });
    throw error;
  }
};
export const getProductBySlug = async (slug) => {
  try {
    const product = await butter.page.retrieve(["product"], slug);
    return product.data;
  } catch (error) {
    console.log({ error });
    throw error;
  }
};
Here, we have:
getLandingpage(), a function which retrieves our dynamic landing pagegetProducts(), a function which retrieves all productsgetProductById(), a function which retrieves a product by its slug
In addition to our API functions, Next.js requires us to add authorized domains for images we wish to display using the next/Image component. This means that we’ll have to add Butter’s CDN domain in order to load data from it.
// ./next.config.js
/** @type {import('next').NextConfig} */
const nextConfig = {
  reactStrictMode: true,
  swcMinify: true,
  images: {
    domains: ['cdn.buttercms.com'],
  },
}
module.exports = nextConfig
Before we start fetching data, let's set up a few components.
Create Page Hero component
Let’s create a page hero component which will display content from our ButterCMS dynamic landing page based on the user’s location.
Create a new file called ./components/PageHero.jsx with the following:
// ./components/PageHero.jsx

import { useEffect, useState } from "react";
import { useUserState } from "../modules/AppContext";
const PageHero = ({ country, data }) => {
  const userState = useUserState();
  // set page hero data to state
  const [heroData, setHeroData] = useState(data[0].fields);

  useEffect(() => {
    // set selectedHeroData to hero data whose type matches the user country
    let selectedHeroData = data.find((x) => x.type === country.toLowerCase());
    // set heroData to the default "all_countries" data if no match for the user country is not found
    setHeroData(selectedHeroData?.fields || data[0].fields);
  }, [country, data]);

  return (
    <section>
      <div className="wrapper">
        <header
          className="relative flex items-center p-6 h-screen max-h-[32rem] w-full bg-no-repeat bg-cover before:absolute before:w-full before:h-full before:bg-black before:bg-opacity-70 before:top-0 before:left-0"
          style={{
            backgroundImage: `url(${heroData.hero_image})`,
            backgroundPosition: "top center",
          }}
        >
          <div className="wrapper flex flex-col gap-2 text-white  z-10 w-full max-w-5xl m-auto">
            {userState.country && (
              <span>You are browsing from {userState.country} </span>
            )}
            <h1 className="text-4xl">{heroData.hero_caption}</h1>
            <p className="w-2/3">{heroData.hero_text}</p>
            <button className="cta"> {heroData.button_label} </button>
          </div>
        </header>
      </div>
    </section>
  );
};
export default PageHero;
This component accepts country and data as props that correspond to the user country and page hero data, respectively. Once the component is loaded, we match the page hero data to the corresponding user country and assign it to the heroData state.
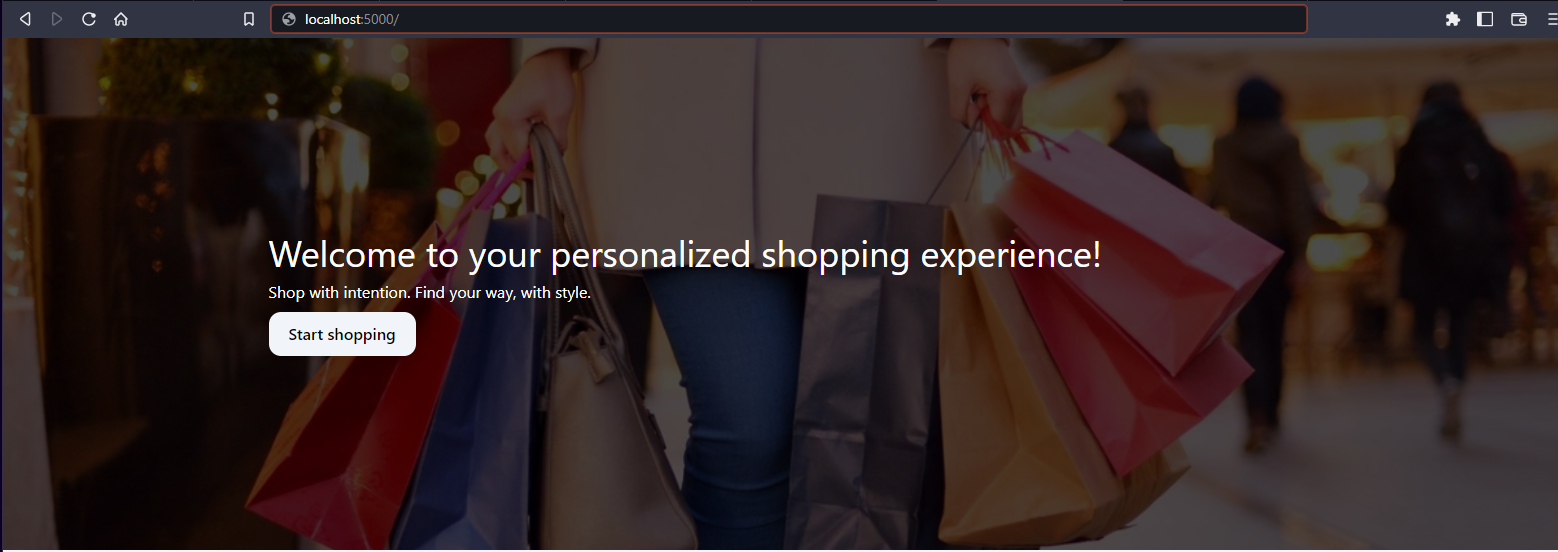
Here’s what our component will look like with some demo data:
Create Product Card component
Let’s create our product card component.
Create a new file ./components/ProductCard.jsx:
// ./components/ProductCard.jsx
import Image from "next/image";
import Link from "next/link";
import { convertPrice } from "../lib/helpers";
import { useUserState } from "../modules/AppContext";

const ProductCard = ({ product }) => {
  const { slug, fields } = product;
  const userState = useUserState();
  // get country currency code from user data
  const currencyCode = userState?.country_code;

  return (
    <>
      <article className="product-card p-4 bg-white rounded-lg">
        <div className="wrapper">
          <header>
            <div className="img-cont">
              <Image
                src={fields.image}
                width={400}
                height={400}
                alt="product"
              />
            </div>
            <h3> {fields.name} </h3>
            <p className="text-2xl">
              {
                // convert from US price to current country currency code e.g `NG`
                convertPrice(fields.price, { from: "US", to: currencyCode })
                  .result
              }
            </p>
            <Link
              href={{
                pathname: "/products/[slug]",
                query: { slug: slug },
              }}
            >
              <a>
                <button className="cta mt-4 !w-full">View product</button>
              </a>
            </Link>
          </header>
        </div>
      </article>
    </>
  );
};
export default ProductCard;
In this component, in addition to showing product information, we import the useUserState() global state which will contain information such as the user’s country code, which we’ll use to convert the product price to the user’s local currency.
Create User Form component
For a real e-commerce application, we would need to implement authentication of some sort in our application. But to keep things simple, we’ll simply save the user information like name and email to local storage.
This information also helps CDPs like Segment identify users.
Create a new file called ./components/UserForm.jsx with the following:
// ./components/UserForm.jsx

import { useEffect, useState } from "react";
import { useUserDispatch, useUserState } from "../modules/AppContext";

const UserForm = () => {
  // global user state
  const userState = useUserState();
  const setUser = useUserDispatch();

  // form state
  const [active, setActive] = useState(false);
  const [name, setName] = useState("");
  const [email, setEmail] = useState("");

  // function to save user info to global state and localStorage
  const saveUserInfo = (e) => {
    e.preventDefault();

    // generate dummy ID
    let id = email.substring(0, 3) + Math.floor(Math.random() * 100000);

    setUser({ ...userState, id, name, email });
    localStorage.localUserInfo = JSON.stringify({ id, name, email });

    // hide form
    setActive(false);
  };

  // get user info from localStorage and show form if no user data exists
  useEffect(() => {
    let localUserInfo = localStorage.localUserInfo;
    if (!localUserInfo) {
      setActive(true);
      return;
    }
    // set global user state if user info exists in localStorage
    setActive(false);
    setUser({ ...userState, ...JSON.parse(localUserInfo) });
  }, []);

  return !active ? null : (
    <>
      <div className="form-cont fixed top-0 left-0 flex items-center justify-center w-screen h-screen bg-slate-800 bg-opacity-40 z-10">
        <form
          onSubmit={saveUserInfo}
          className=" min-w-[34rem] bg-white px-8 py-6 rounded-xl"
        >
          <div className="form-control flex flex-col gap-2 my-4">
            <label htmlFor="name">Your name</label>
            <input
              value={name}
              onChange={(e) => setName(e.target.value)}
              id="name"
              name="name"
              type="text"
              className="form-input rounded-lg"
              required
            />
          </div>
          <div className="form-control flex flex-col gap-2 my-4">
            <label htmlFor="email">Your email address</label>
            <input
              value={email}
              onChange={(e) => setEmail(e.target.value)}
              id="email"
              name="email"
              type="email"
              className="form-input rounded-lg"
              required
            />
          </div>
          <button type="submit" className="cta">
            Continue shopping
          </button>
        </form>
      </div>
    </>
  );
};

export default UserForm;
Our <UserForm/> component simply prompts the user for their name and email address if it doesn't exist in local storage already, and then saves it to local storage.
Create Site Header component
Of course, our app wouldn’t be complete without some navigation, now would it?
Create a new file called ./components/SiteHeader.jsx with the following:
// ./components/SiteHeader.jsx
import Link from "next/link";
const SiteHeader = () => {
  return (
    <header className="sticky top-2 my-2 w-full  z-30">
      <div className="wrapper flex gap-6 justify-between p-4 bg-slate-100 max-w-4xl m-auto rounded-xl">
        <div className="logo">
          <Link href={"/"}>
            <a>
              <span className="font-black text-lg">iShop</span>
            </a>
          </Link>
        </div>
        <nav>
          <ul>
            <li>
              <Link href={"/products"}>
                <a>All products</a>
              </Link>
            </li>
          </ul>
        </nav>
      </div>
    </header>
  );
};
export default SiteHeader;
Now that we’ve created our components, let’s start piecing them together.
First, we’ll create a layout component that will house our global components.
Create default layout
Create a new file called ./layouts/default.js with the following:
// ./layouts/default.jsx
import SiteHeader from "../components/SiteHeader";
import UserForm from "../components/UserForm";
const Layout = ({ children }) => {
  return (
    <>
      <SiteHeader />
      <main> {children} </main>
      <UserForm />
    </>
  );
};
export default Layout;
Next, we’ll add the layout to our ./pages/_app.js file:
// ./pages/_app.js
// ...
import Layout from "../layouts/default";
function MyApp({ Component, pageProps }) {
  return (
    <AppProvider>
      <Layout>
        <Component {...pageProps} />
      </Layout>
    </AppProvider>
  );
}
export default MyApp;
Great. Now we can proceed to fetching data from Butter.
Fetch data from Butter
Now, on the home page, we’ll fetch the landing page and product data.
On this page we’ll implement our three main personalization features:
- Personalize the hero section with content based on the user's country
- Personalize the product section with products available in the user's current country
- Personalize the user product recommendations section with products based on what the user has viewed previously
We’ll use getServerSideProps() to fetch the data and render the page on the server side.
We'll fetch the landing page data and products data using the getLandingPage() and getProducts() functions, respectively, that we created earlier.
This data gets passed as props to the Home() component to be rendered on the client side.
In the ./pages/index.js file, enter the following:
// ./pages/index.js
import { useEffect, useState } from "react";
import PageHero from "../components/PageHero";
import ProductCard from "../components/ProductCard";
import { getLandingpage, getProducts } from "../lib/api";
import { useUserDispatch, useUserState } from "../modules/AppContext";

export const getServerSideProps = async ({ params }) => {
  let data = await getLandingpage();
  let products = await getProducts();
  console.log({ data, products: products.data });
  return {
    props: { data, products: products.data },
  };
};

export default function Home({ data, products }) {
  const userState = useUserState();

  // get page hero data from landing page data
  const {
    fields: { page_hero },
  } = data;

  // set hero data
  const [heroData, setHeroData] = useState(page_hero);

  // country type based on user's location,
  // for the page hero component
  const [heroCountryType, setHeroCountryType] = useState("");
  const [productsByCountry, setProductsByCountry] = useState(products);

  // function to filter products by country
  // by returning an array of products where the `available_in_country` field (an array)
  // contains an object with a `country_name` key with value == country
  const filterProductsByCountry = (country) =>
    products.filter((x) =>
      x.fields.available_in_country.find(
        (x) => x.country_name.toLowerCase() == country.toLowerCase()
      )
    );

  useEffect(() => {
    let country = userState.country;
    // if userState.country exists,
    if (country) {
      // set the heroCountryType to the user's country
      setHeroCountryType(country);
      // filter products by country where they are available
      let filteredProducts = filterProductsByCountry(country);
      // if no product matches the user country, return all products
      filteredProducts.length > 0
        ? setProductsByCountry(filteredProducts)
        : setProductsByCountry(products);
    }
    console.log({ products });
  }, [userState]);

  return (
    <main>
      <PageHero country={heroCountryType} data={heroData} />
      <section className="p-4">
        <div className="wrapper max-w-5xl m-auto">
          <header className="py-4">
            <h2 className="font-bold text-xl">
              Browse products available in your region
            </h2>
          </header>
          <ul className="products grid md:grid-cols-2 lg:grid-cols-3 gap-4">
            {productsByCountry.map((product) => {
              return (
                <li key={product.slug} className="product">
                  <ProductCard product={product} />
                </li>
              );
            })}
          </ul>
        </div>
      </section>
      <section className="p-4">
        <div className="wrapper max-w-5xl m-auto">
          <header className="py-4">
            <h2 className="font-bold text-xl">Browse recommended products</h2>
          </header>
          <span>Nothing here yet</span>
        </div>
      </section>
    </main>
  );
}
On the client side, we passed the landing page data to the <PageHero/> component along with the user’s country data (which we’ll obtain later in the tutorial using Personyze).
In addition to showing page hero content that’s based on the user’s country, we also filter the products by country using the filterProductsByCountry() function.
Create products page
Now, we’re going to create a products page to display all products. Create a new file called ./pages/products/index.js with the following:
// ./pages/products/index.js
import ProductCard from "../../components/ProductCard";
import { getProducts } from "../../lib/api";
export const getServerSideProps = async ({ params }) => {
  let products = await getProducts();
  return {
    props: { products: products.data },
  };
};
const Products = ({ products }) => {
  return (
    <main>
      <div className="wrapper max-w-5xl m-auto">
        <header className="my-6">
          <h1 className="text-2xl">All products</h1>
        </header>
        <ul className="products grid md:grid-cols-2 lg:grid-cols-3 gap-4">
          {products.map((product) => {
            return (
              <li key={product.slug} className="product">
                <ProductCard product={product} />
              </li>
            );
          })}
        </ul>
      </div>
    </main>
  );
};
export default Products;
Here, we used the getProducts() function to get all (first 10) products.
We should have something like this:
Next, we’ll create a dynamic page to display each product.
Create a dynamic Product page
To create a dynamic route in Next.js, create a new file called ./pages/[slug].js as follows:
// ./pages/products/[slug].js

import Image from "next/image";
import { useEffect } from "react";
import { getProductBySlug } from "../../lib/api";
import { convertPrice } from "../../lib/helpers";
import { useUserState } from "../../modules/AppContext";
export const getServerSideProps = async ({ params }) => {
  const { slug } = params;
  const product = await getProductBySlug(slug);
  return {
    props: {
      product,
    },
  };
};
const Product = ({ product }) => {
  const {
    data: { fields },
  } = product;
  const userState = useUserState();
  const currencyCode = userState?.country_code;

  return (
    <main>
      <section className="p-6">
        <div className="wrapper max-w-5xl m-auto">
          <header>
            <div className="wrapper grid lg:grid-cols-7 gap-4">
              <div className="col-span-4 img-cont">
                <Image
                  src={fields.image}
                  width={800}
                  height={800}
                  alt="product"
                />
              </div>
              <div className="details col-span-3 flex flex-col gap-4">
                <h1 className="text-3xl"> {fields.name} </h1>
                <p className="text-xl">{fields.description}</p>
                <p className="text-4xl">
                  {
                    // convert price to user currency
                    convertPrice(fields.price, { to: currencyCode }).result
                  }
                </p>
              </div>
            </div>
          </header>
          <article className="mt-4 bg-white rounded-xl p-6">
            <header className="border-b border-slate-800 py-4 mb-4">
              <h3 className="font-bold  ">Details</h3>
            </header>
            <div
              className="details prose max-w-none"
              dangerouslySetInnerHTML={{ __html: fields.details }}
            ></div>
          </article>
        </div>
      </section>
    </main>
  );
};
export default Product;
In Next.js, we can add brackets to our page file name (e.g., [slug]) to create a dynamic route. This way, we can get the value iphone from a URL like this: http://localhost:3000/products/iphone, using {params} in getServerSideProps(). We get the slug from the params and pass it to our getProductBySlug() function to fetch the product that matches the slug.
In the Product component, we use convertPrice() to convert the price and we insert the WYSIWYG details field into a div.details element using dangerouslySetInnerHTML.
With the help of Tailwind Typography, we can just attach a .prose class and it helps us with styling the generated HTML.
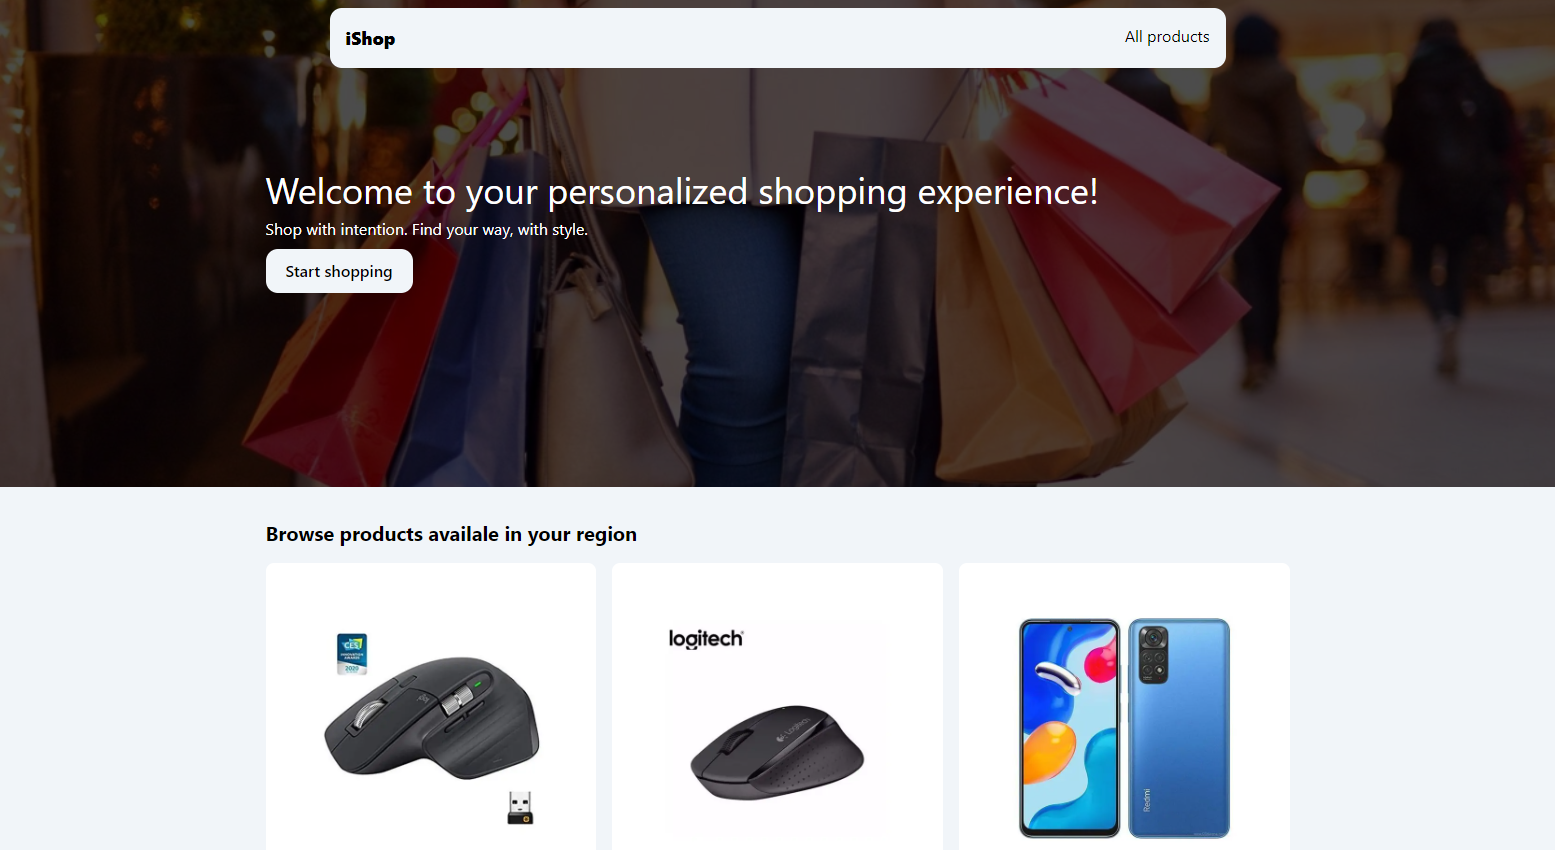
Now, we can finally start up our application:
yarn devWe should have something like this:
In the following sections, we’ll see how we can transform our application into a personalized app with the help of Segment and Personyze.
Setting up our CDP and personalization tools
In this section, we’ll set up Segment as our CDP of choice. We’ll also cover how we can combine Segment and Personyze, a tool for personalization.
We’ll see how we can set up sources and destinations in Segment, with Personyze being one of our destinations.
Set up Segment
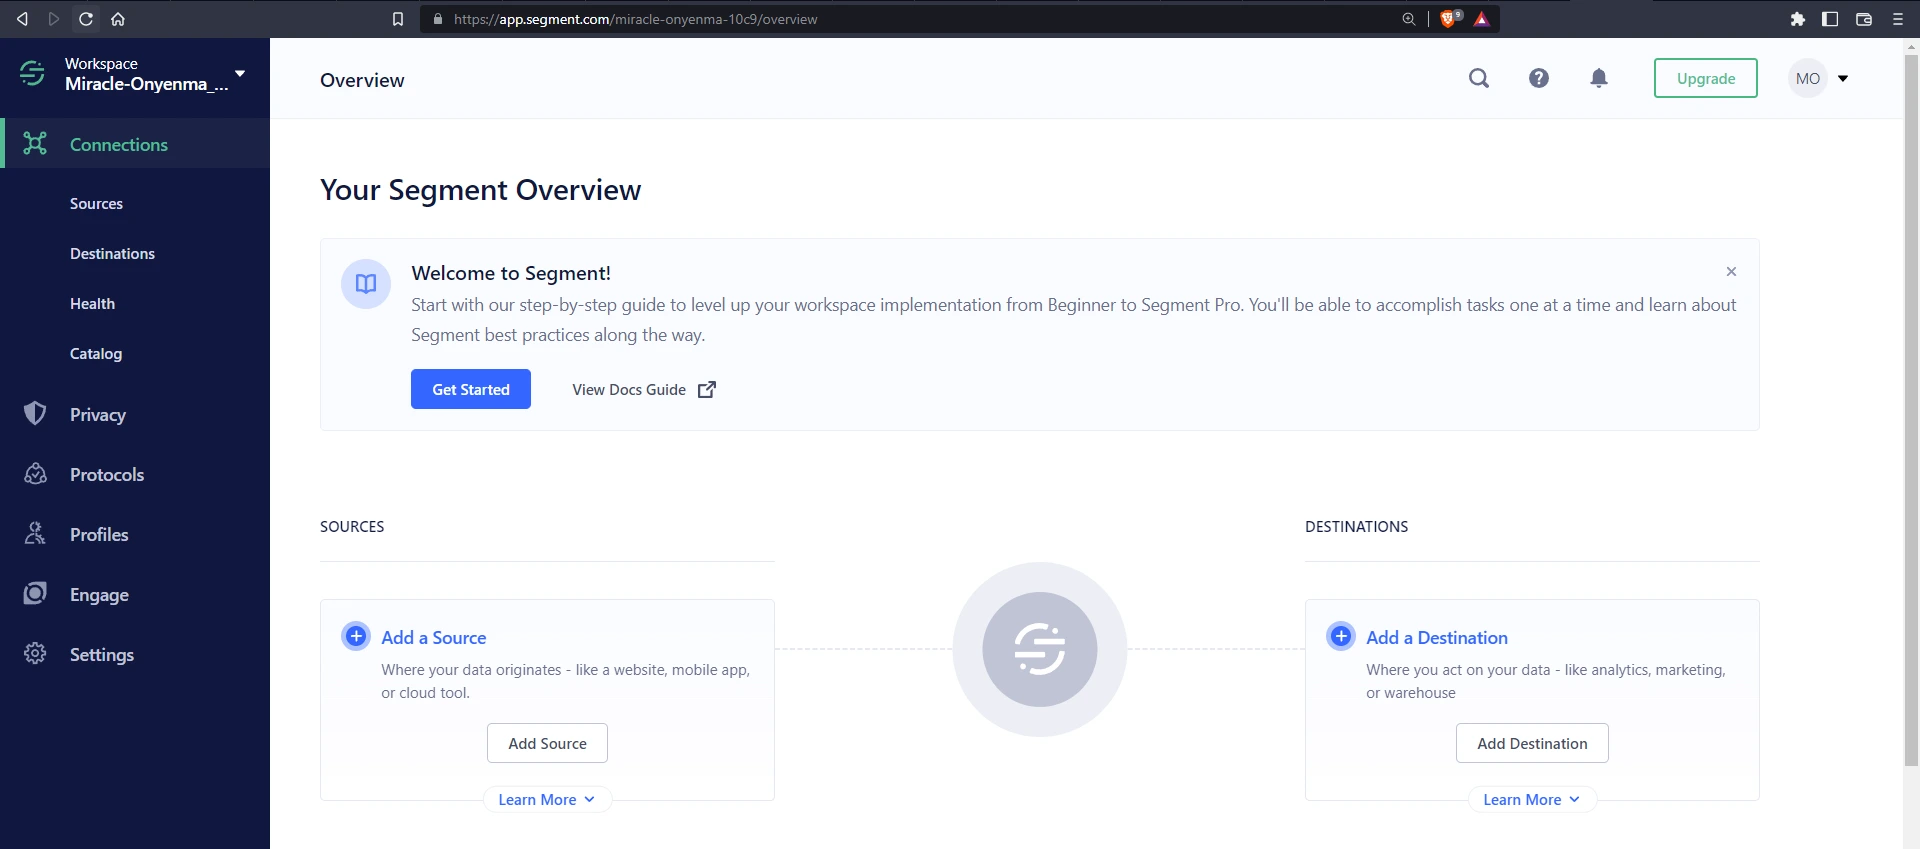
Once you’re logged in to your Segment account, if you haven’t set it up before, you should see something like this:
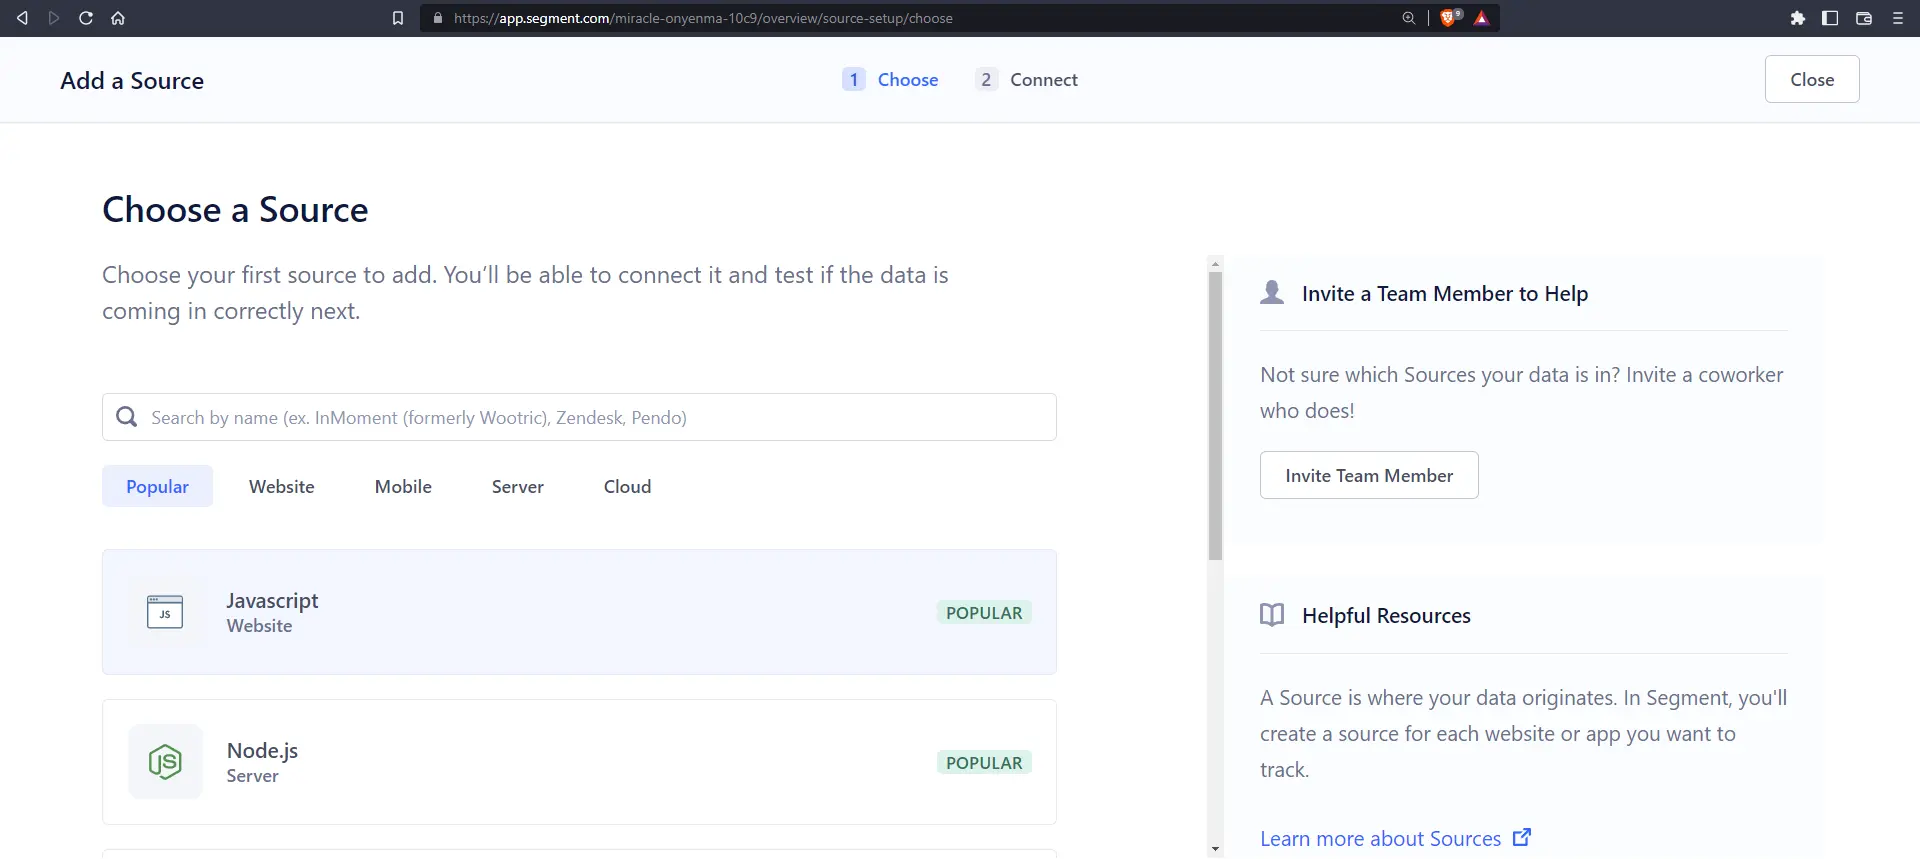
Let’s quickly set up our Next.js application as a source, which means that we’ll be receiving events from it.
Click on the Add a Source button and select JavaScript and click Next.
On the next page, we’ll be asked to give our source a name and a URL. We can use localhost:3000 for our URL for now.

With that, we will see our API key within the snippet. Copy that out. Create add the token to ./.env .
SEGMENT_KEY=<segment key here>
We won’t be able to use this snippet in our Next.js app without some complications, but thanks to the Next.js example with Segment and @segment/snippet package we installed earlier, we can add the following to our ./pages/_app.js to initialize Segment:
// ./pages/_app.js
import "../styles/globals.css";
import { AppProvider } from "../modules/AppContext";
import Layout from "../layouts/default";
import Script from "next/script";
import * as snippet from "@segment/snippet";
import Router from "next/router";

// segment snippet config for Next.js app
const renderSnippet = () => {
  const SEGMENT_KEY = process.env.SEGMENT_KEY;
  const opts = {
    apiKey: SEGMENT_KEY,
    // note: the page option only covers SSR tracking.
    page: true,
  };
  if (process.env.NODE_ENV === "development") return snippet.max(opts);
  return snippet.min(opts);
};

// Track client-side page views with Segment
Router.events.on("routeChangeComplete", (url) => {
  window.analytics.page(url);
});

function MyApp({ Component, pageProps }) {
  return (
    <AppProvider>
      <Script
        id="segment-script"
        dangerouslySetInnerHTML={{ __html: renderSnippet() }}
      />
      <Layout>
        <Component {...pageProps} />
      </Layout>
    </AppProvider>
  );
}
export default MyApp;
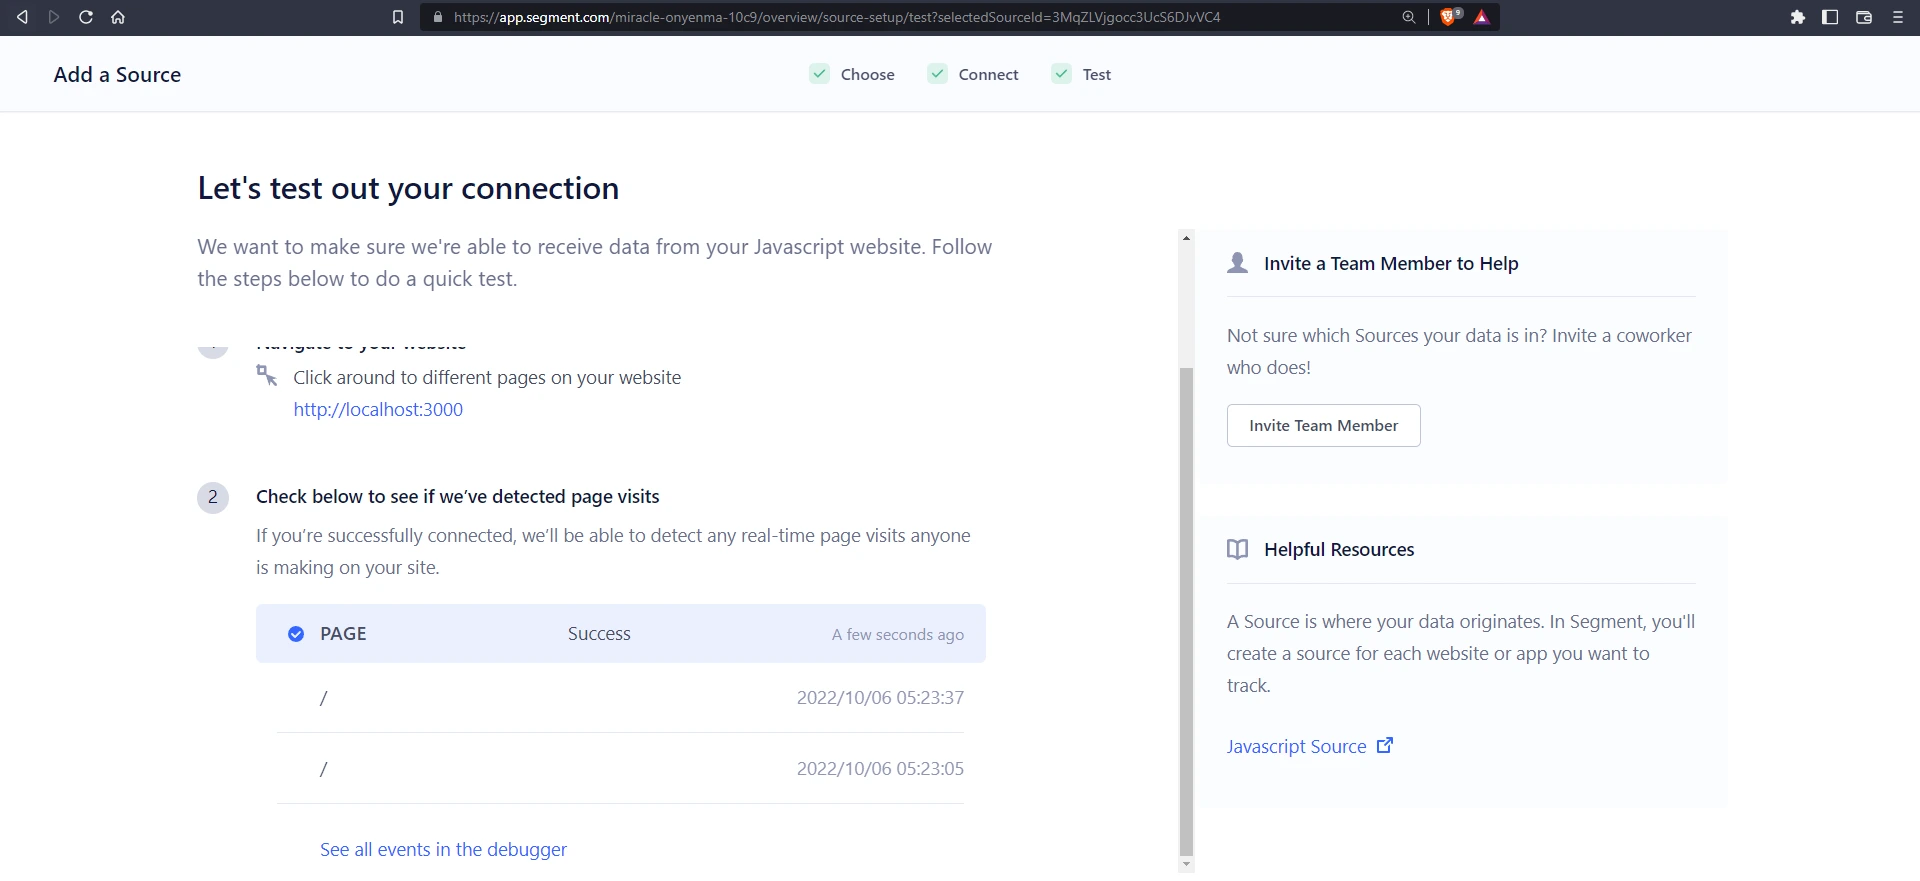
Thanks to the window.analytics.page() that fires each time we navigate within our website, Segment should be able to register some page events from our app.
Let’s take a look at other events we can send with Segment.
Identify events
We’ll send an identity event to Segment. We’ll do this in our ./layouts/default.jsx file since it wraps our app and has access to our global user state.
// ./layouts/default.jsx
import { useEffect } from "react";
import SiteHeader from "../components/SiteHeader";
import UserForm from "../components/UserForm";
import { useUserState } from "../modules/AppContext";
const Layout = ({ children }) => {
  const userState = useUserState();
  useEffect(() => {
    // send identify event with gloal user state data
    window.analytics.identify(userState.id, {
      ...userState,
    });
  }, [userState]);
  return (
    <>
      {/* ... */}
    </>
  );
};
export default Layout;
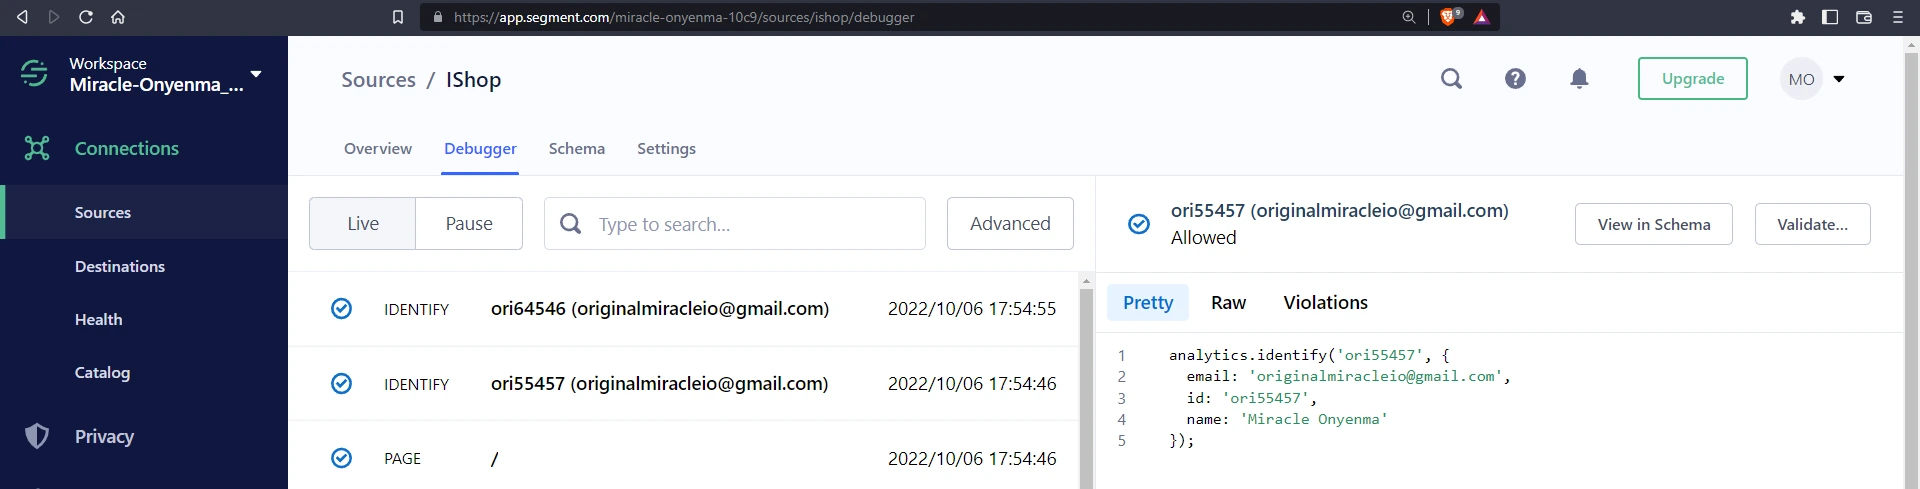
Now, when a user visits the page, it sends the identify event with the user information. We can navigate to our Sources debugger to view all the events.
Track events
Next, we’ll take a look at how we can send track events, a “Product Viewed” event, specifically, whenever a user views a product.
The ./pages/[slug].js file has the following:
// ./pages/products/[slug].js
// ...
import { useUserState } from "../../modules/AppContext";
export const getServerSideProps = async ({ params }) => {
// ...
};
const Product = ({ product }) => {
  const {
    data: { fields },
  } = product;
  const userState = useUserState();
  const currencyCode = userState?.country_code;

  useEffect(() => {
    let viewedProduct = {
      slug: product.data.slug,
      ...fields,
    };
    window.analytics.track("Product Viewed", viewedProduct);
  }, []);
  return (
    <main>
     {/* ... */}
    </main>
  );
};
export default Product;
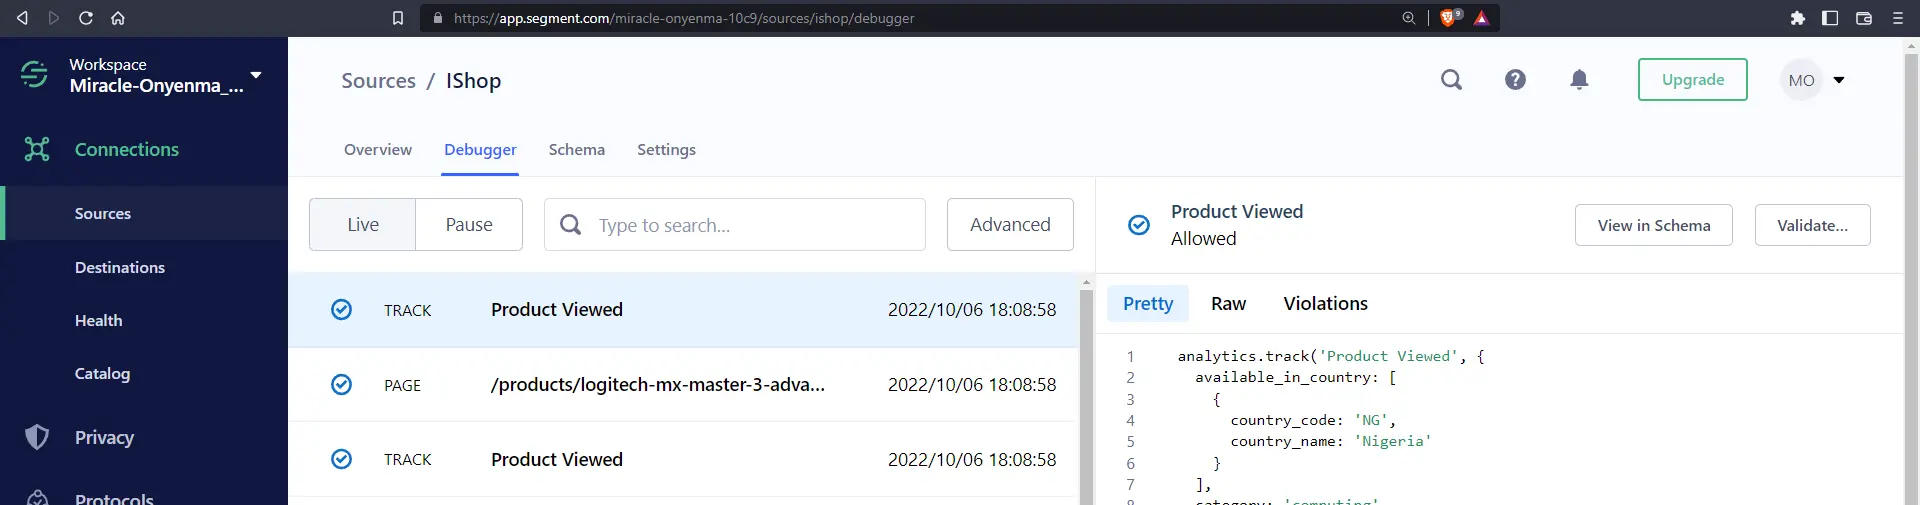
Now, when we view a product, we should see the following event in Segment:
Now that we’ve set up Segment and our sources, let’s set up our destinations. For this, we’ll be using Personyze.
Set up our destinations
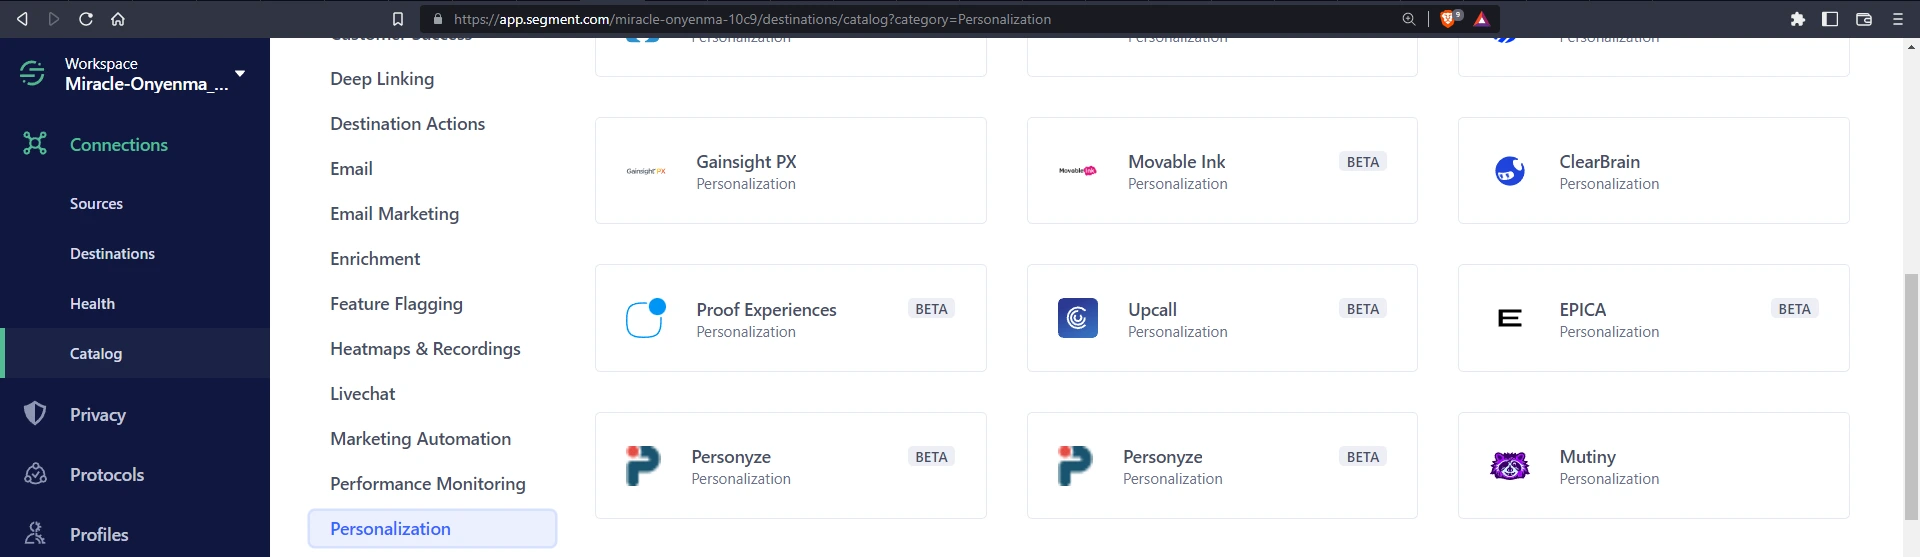
Navigate to the Catalog page by clicking on Catalog on the side navigation. Then select Destinations and under CATEGORIES, select Personalization and click on Personyze.
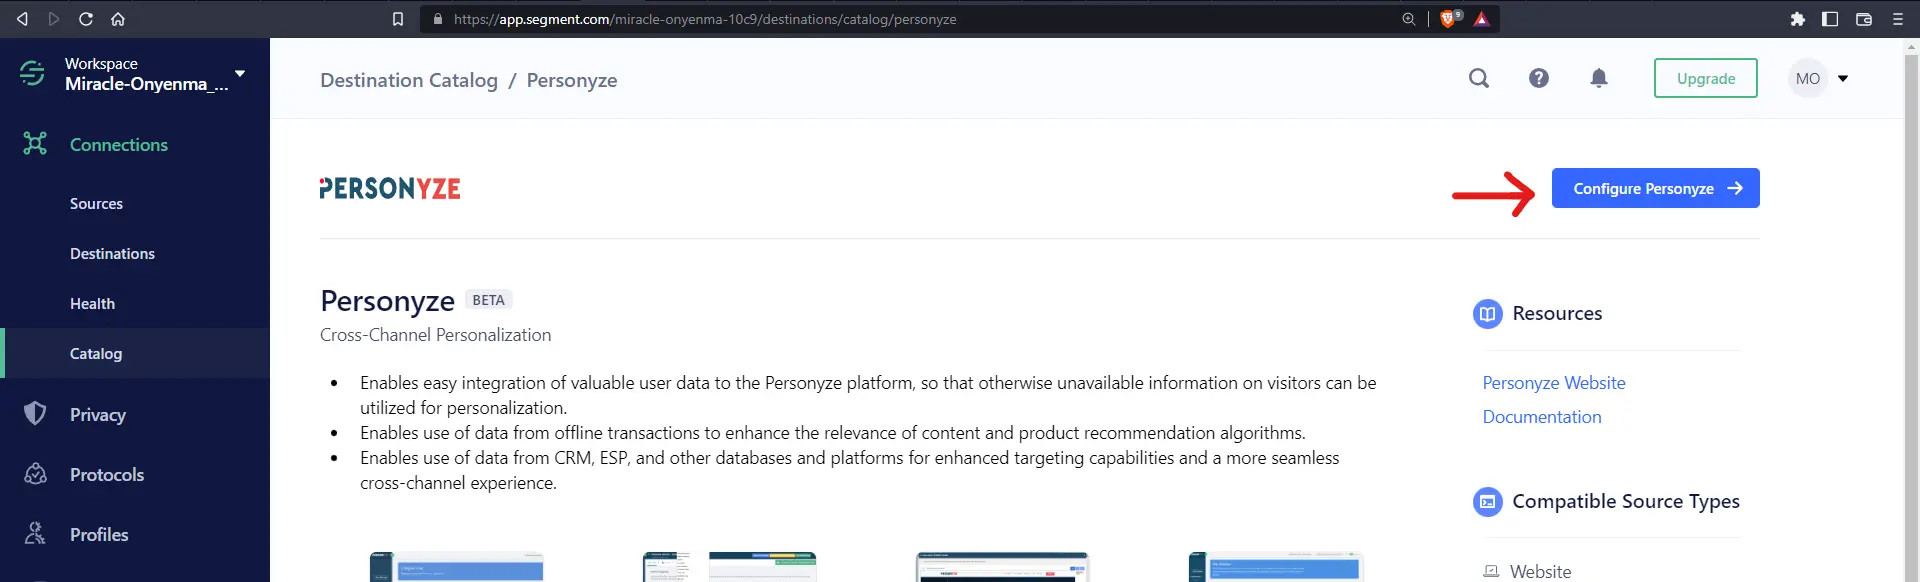
Next, click on the Configure Personyze button.
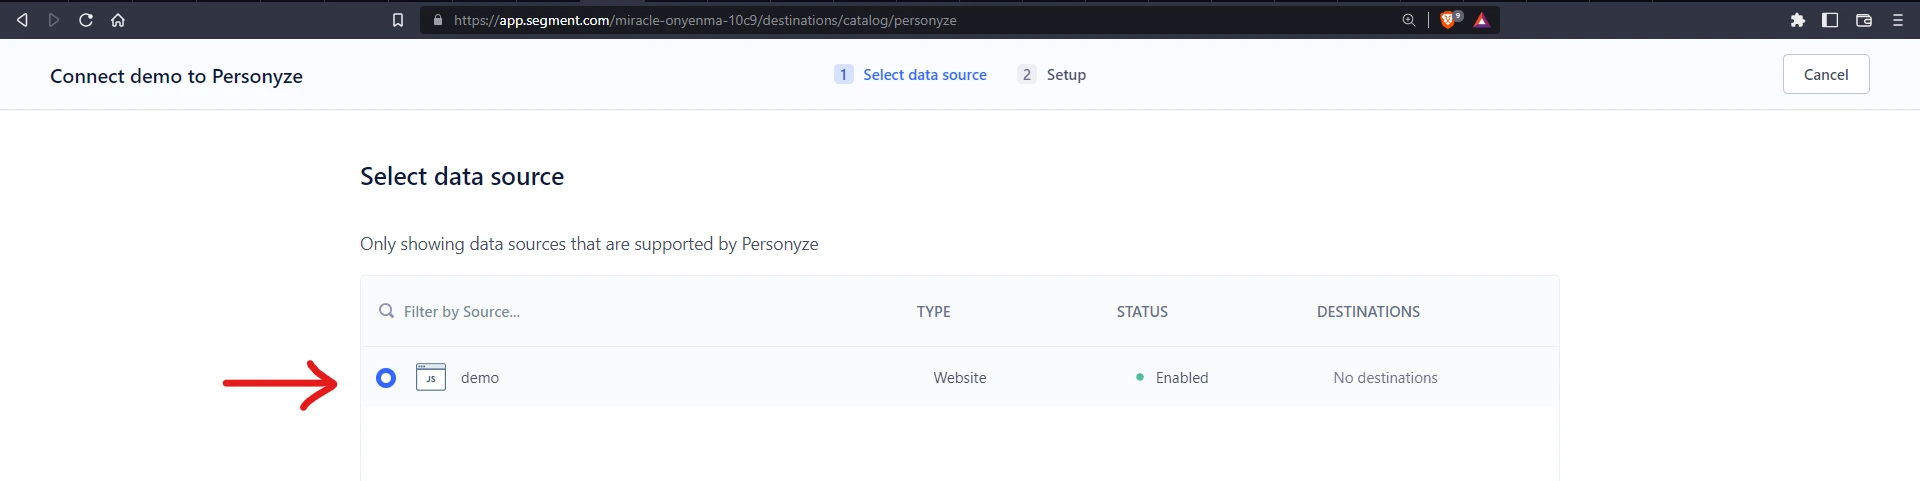
Next, select a data source. We’ll use the recently created “iShop” data source which is our Next.js application. Click on Next.
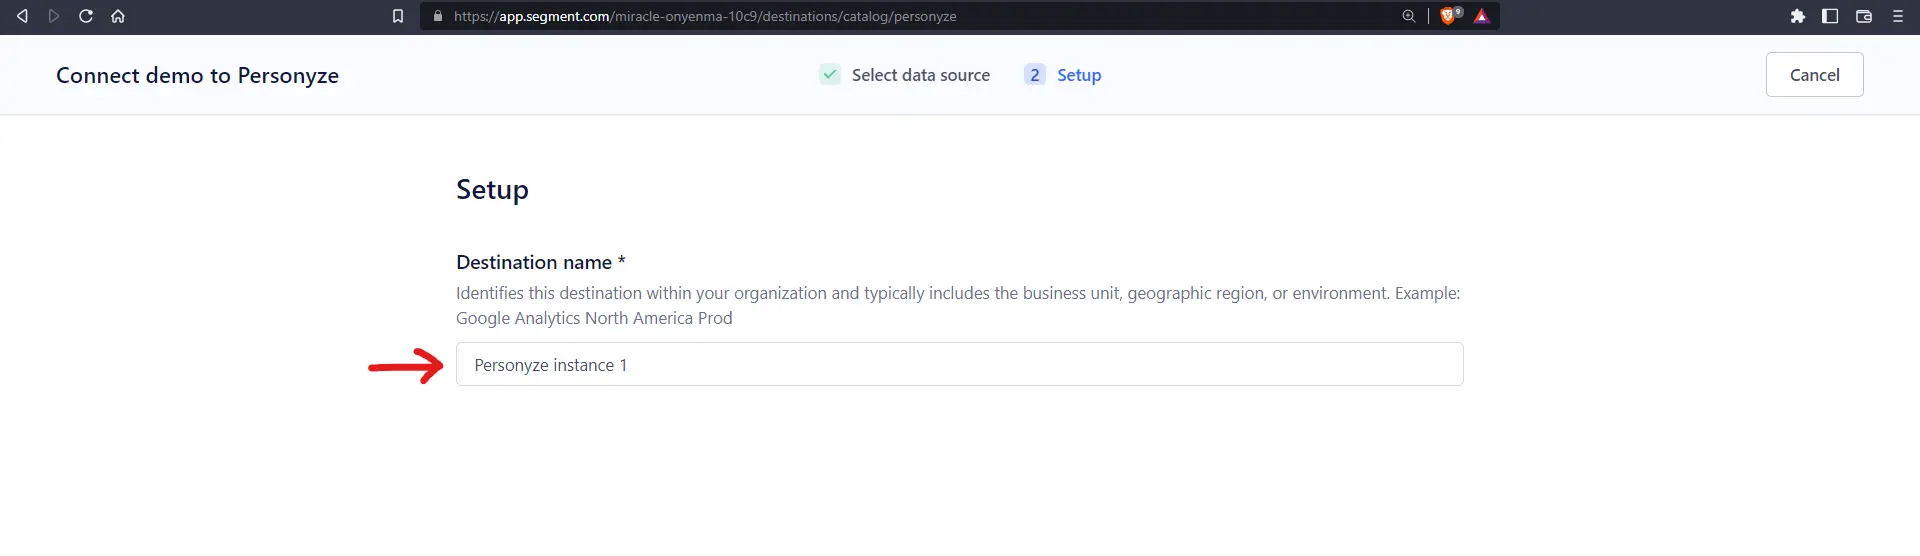
In the next section, we give our Personyze destination a name. It’ll be “Personyze Instance 1” for this example.
Next, we’ll need to configure the connection settings of our Personyze instance. We will require an API token from Personyze.
Set up Personyze
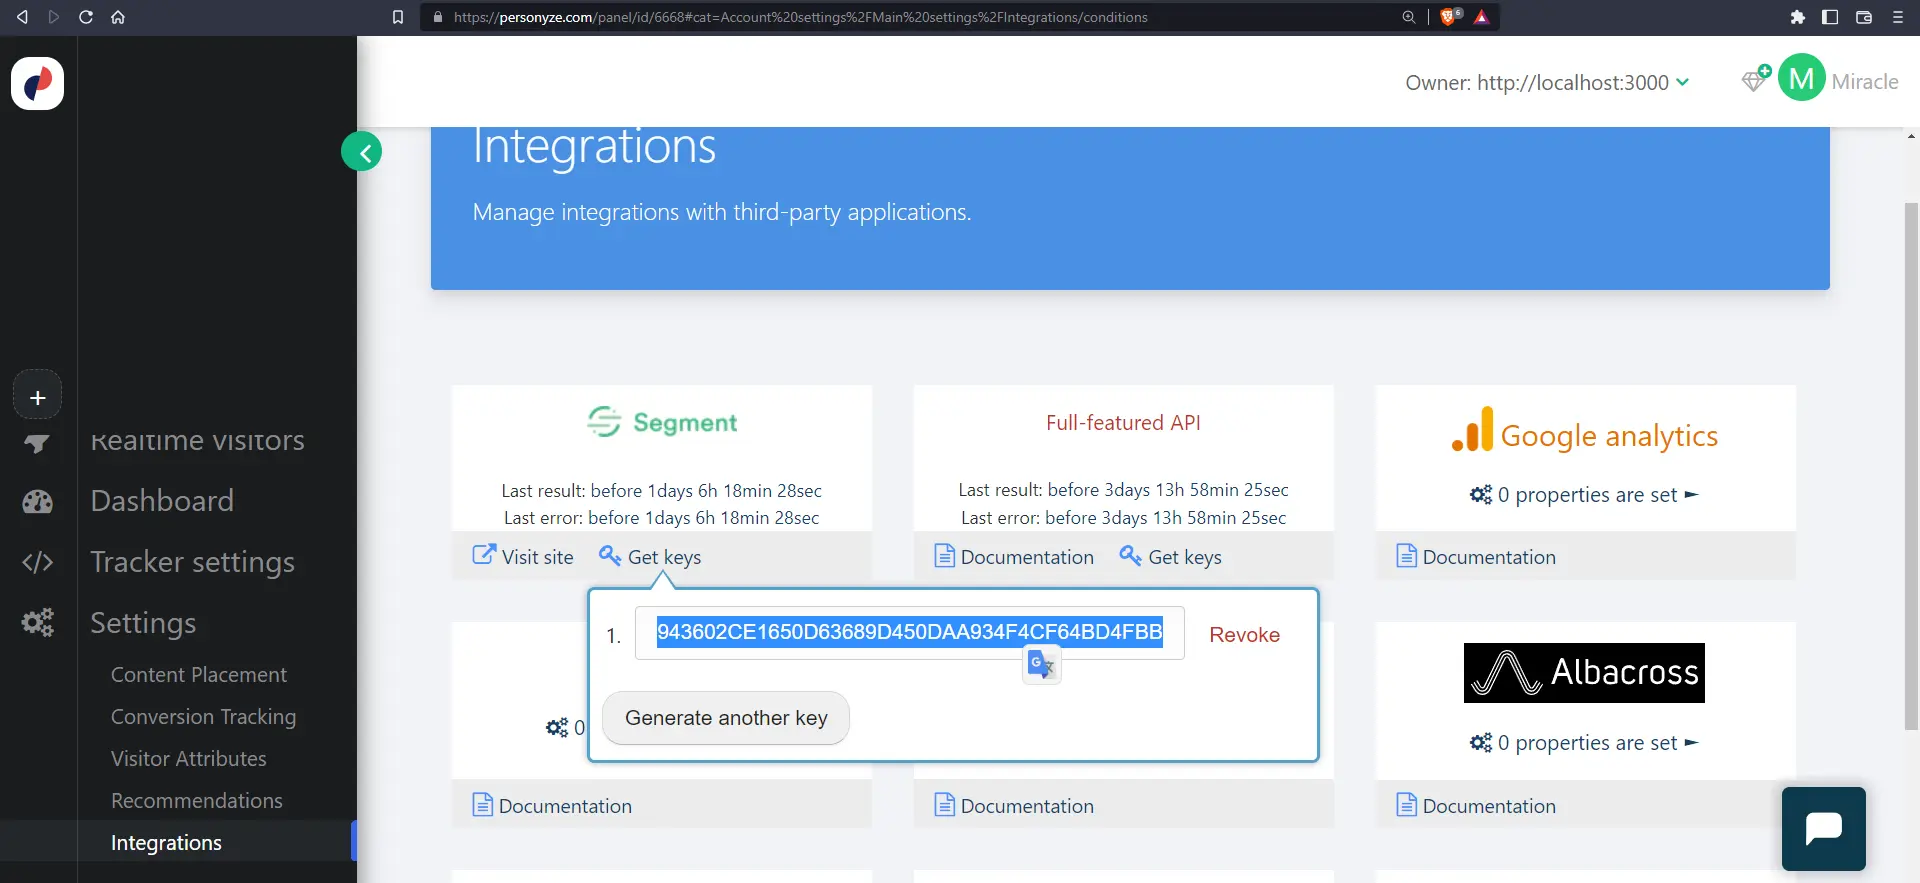
We have to log in to our Personyze dashboard, Click on the Settings link on the side navigation and click on Integrations. On the integrations page, under the Segment option, click on Get Keys and generate a new key, then copy it out.
Back in our Segment dashboard, in our Personyze instance connection settings, click on the API Key under Connection settings.
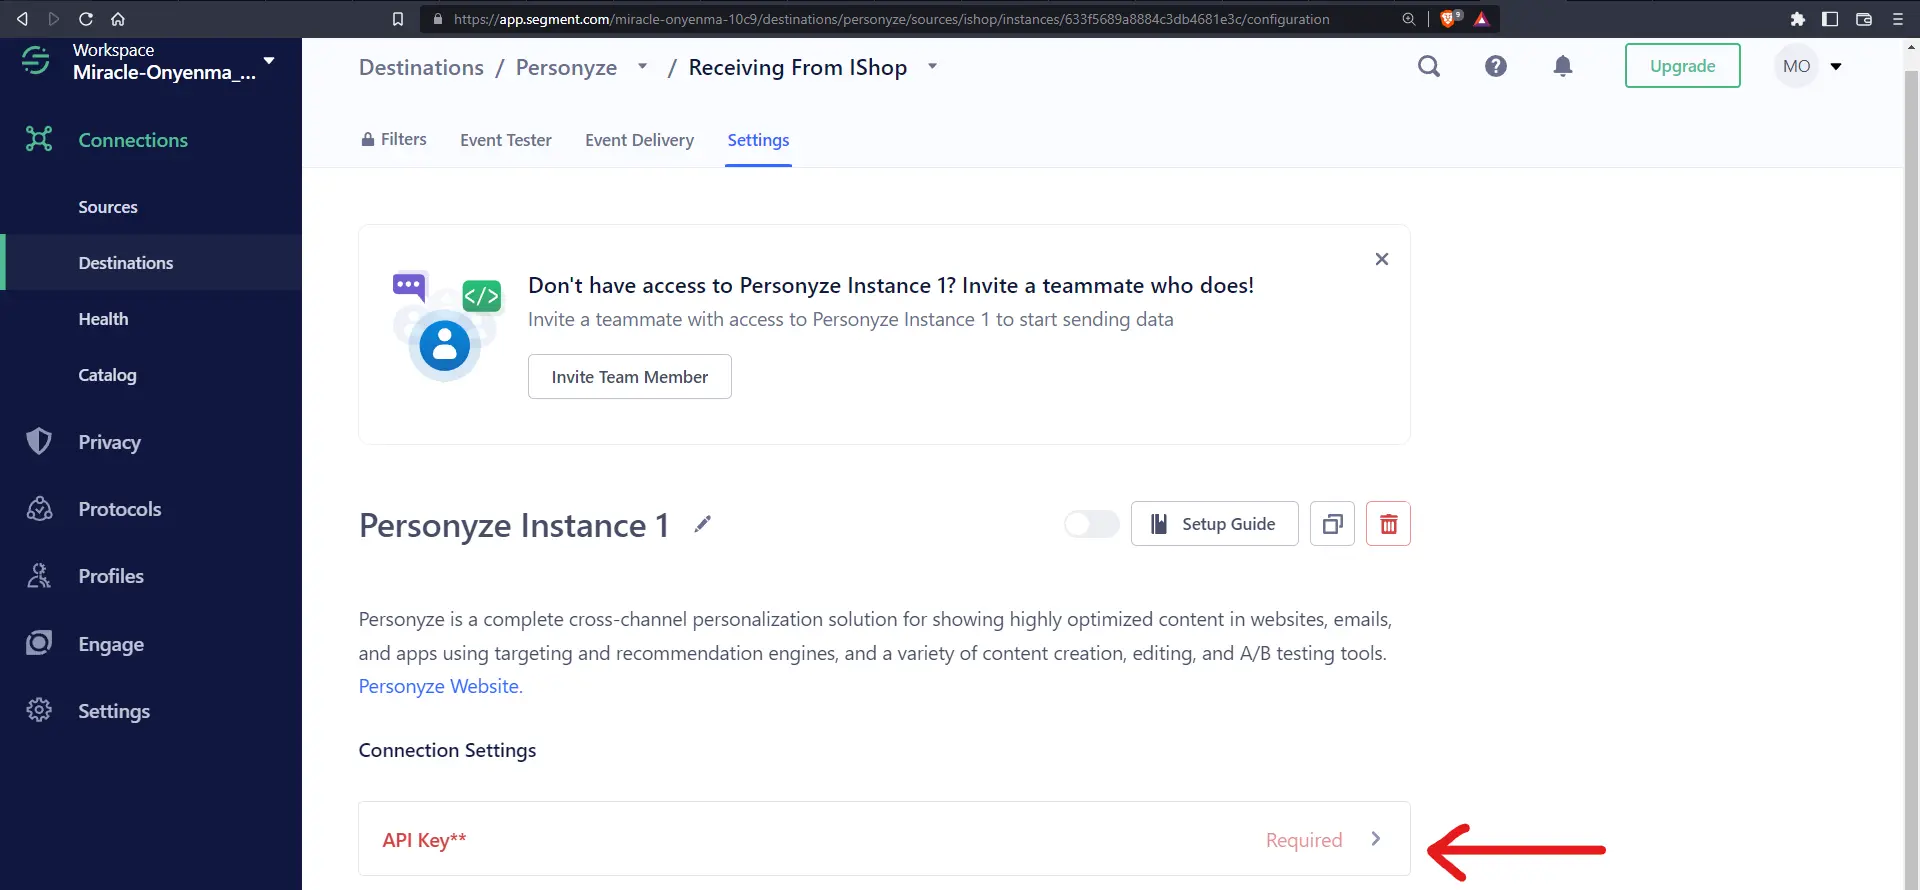
Click on the API Key button and enter the token obtained from Personyze and click Save.
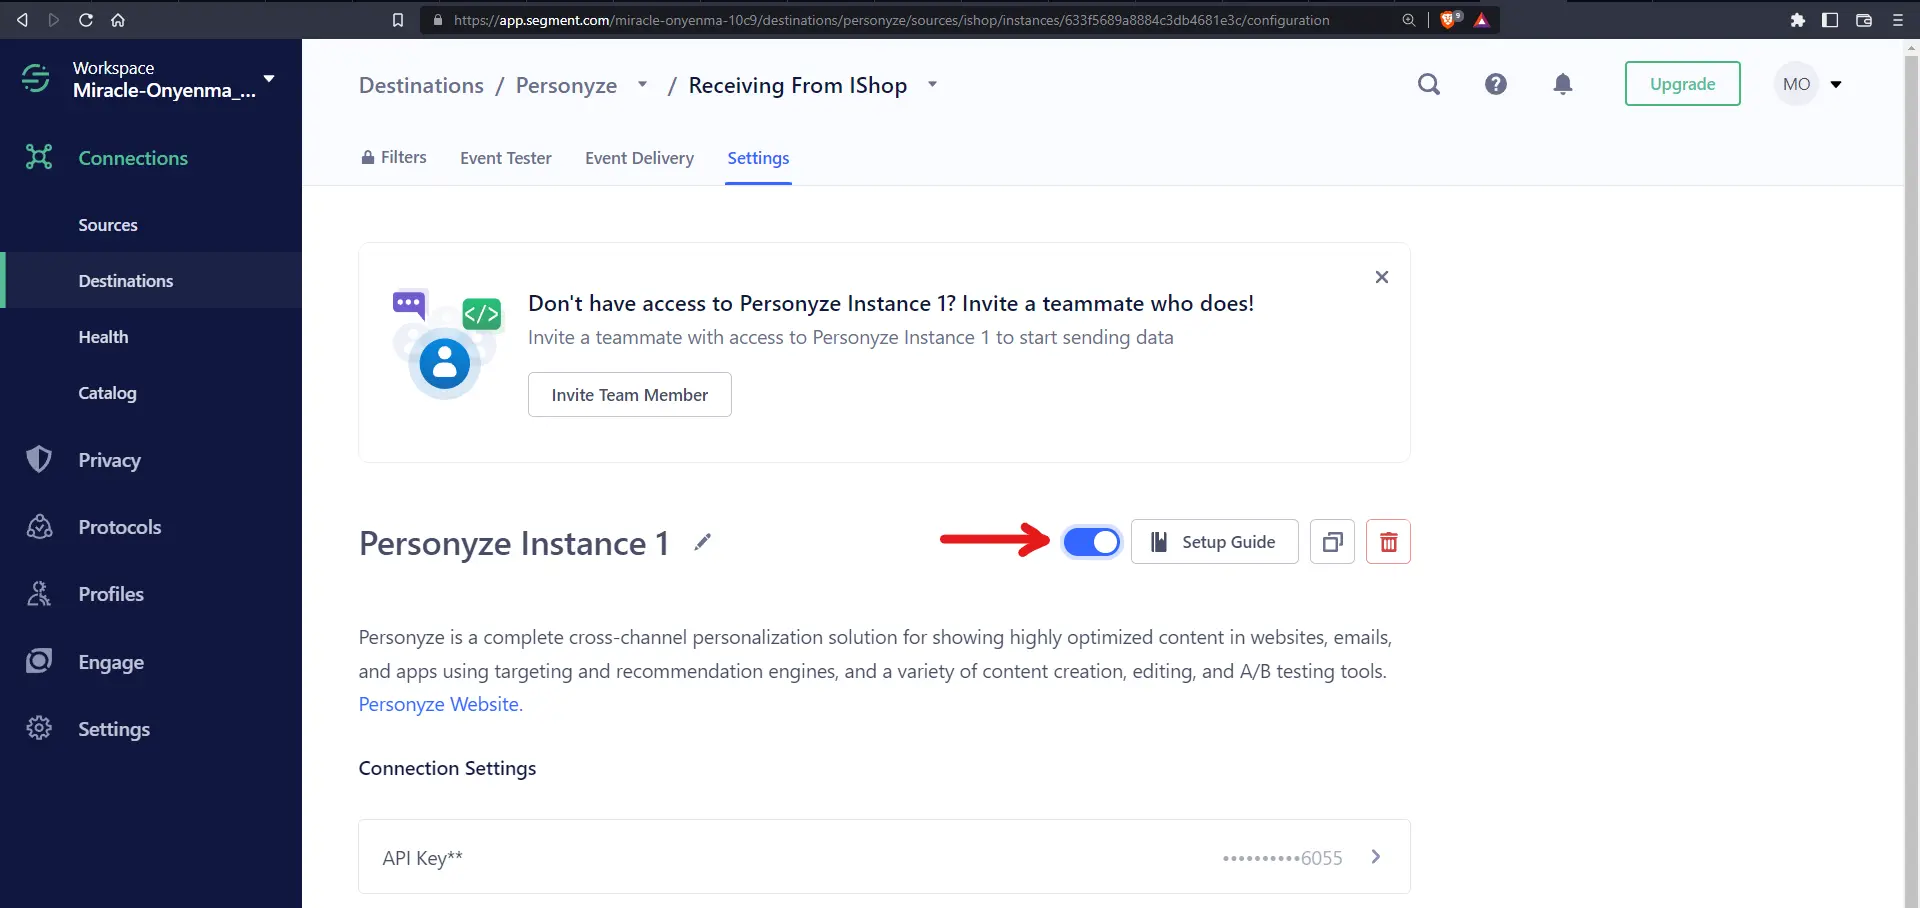
Once saved, activate the instance by clicking on the toggle button.
Awesome!
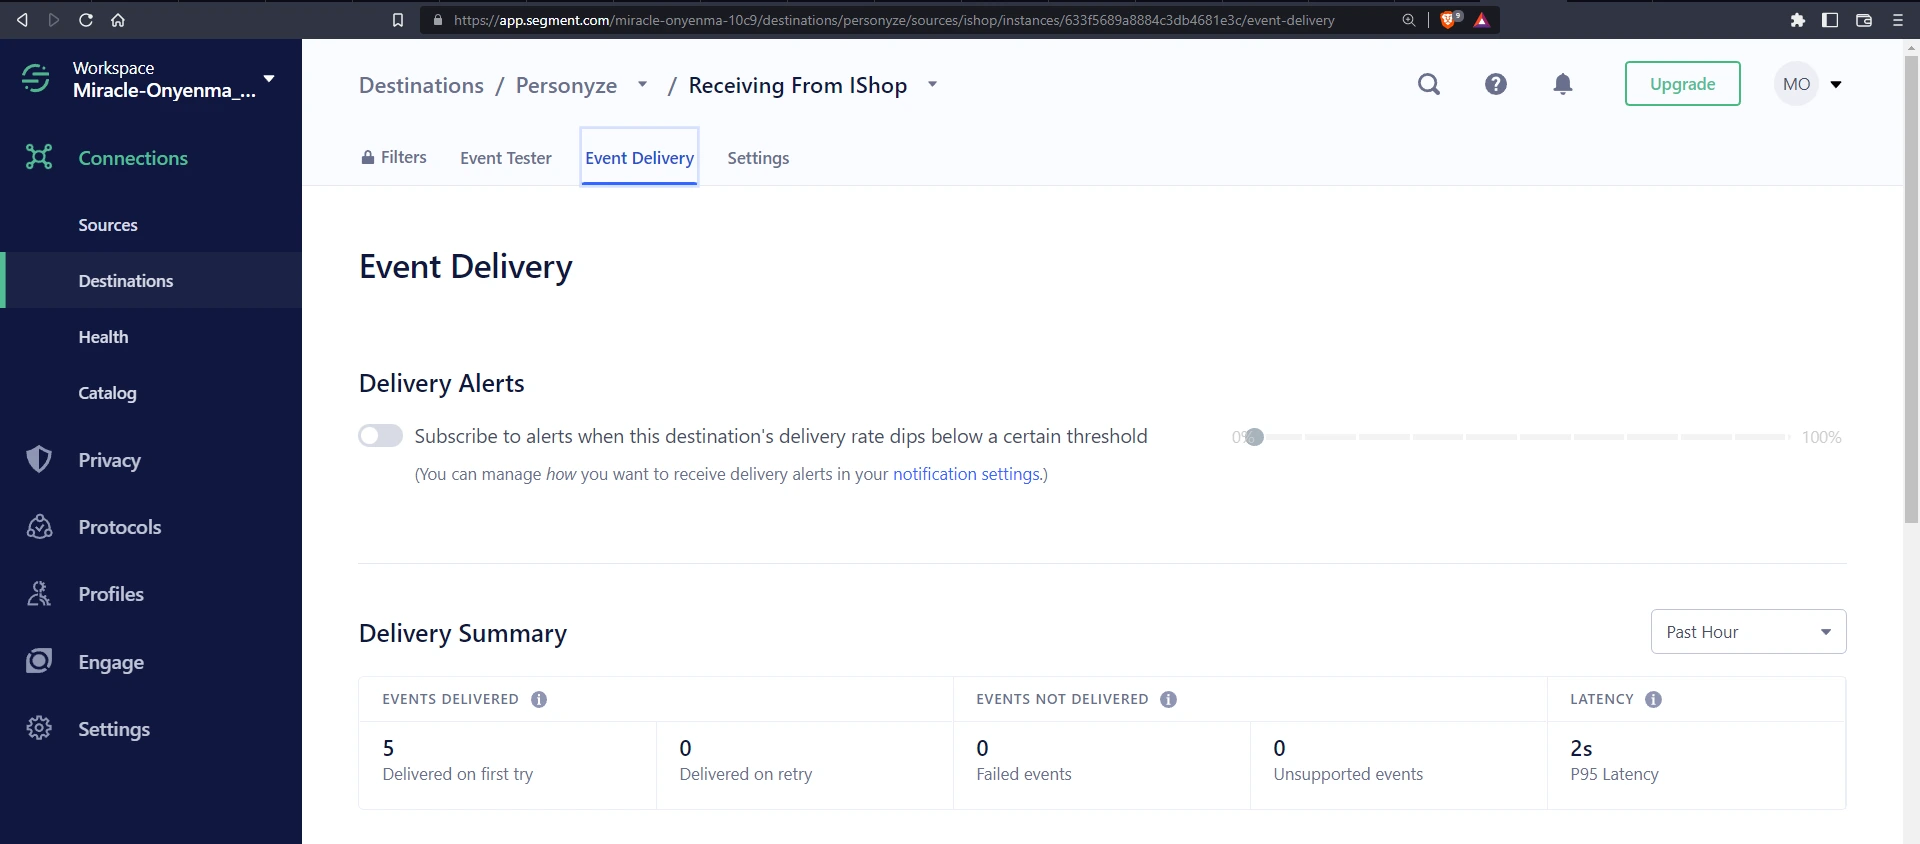
Now, if we navigate between a few pages in our application and come back to our Segment dashboard and take a look at our Event Delivery, we should see that Segment is already sending data to Personyze.
Next, we’ll see how we can install Personyze on our application in order to start getting personalized data such as user locations.
Install Personyze in our application
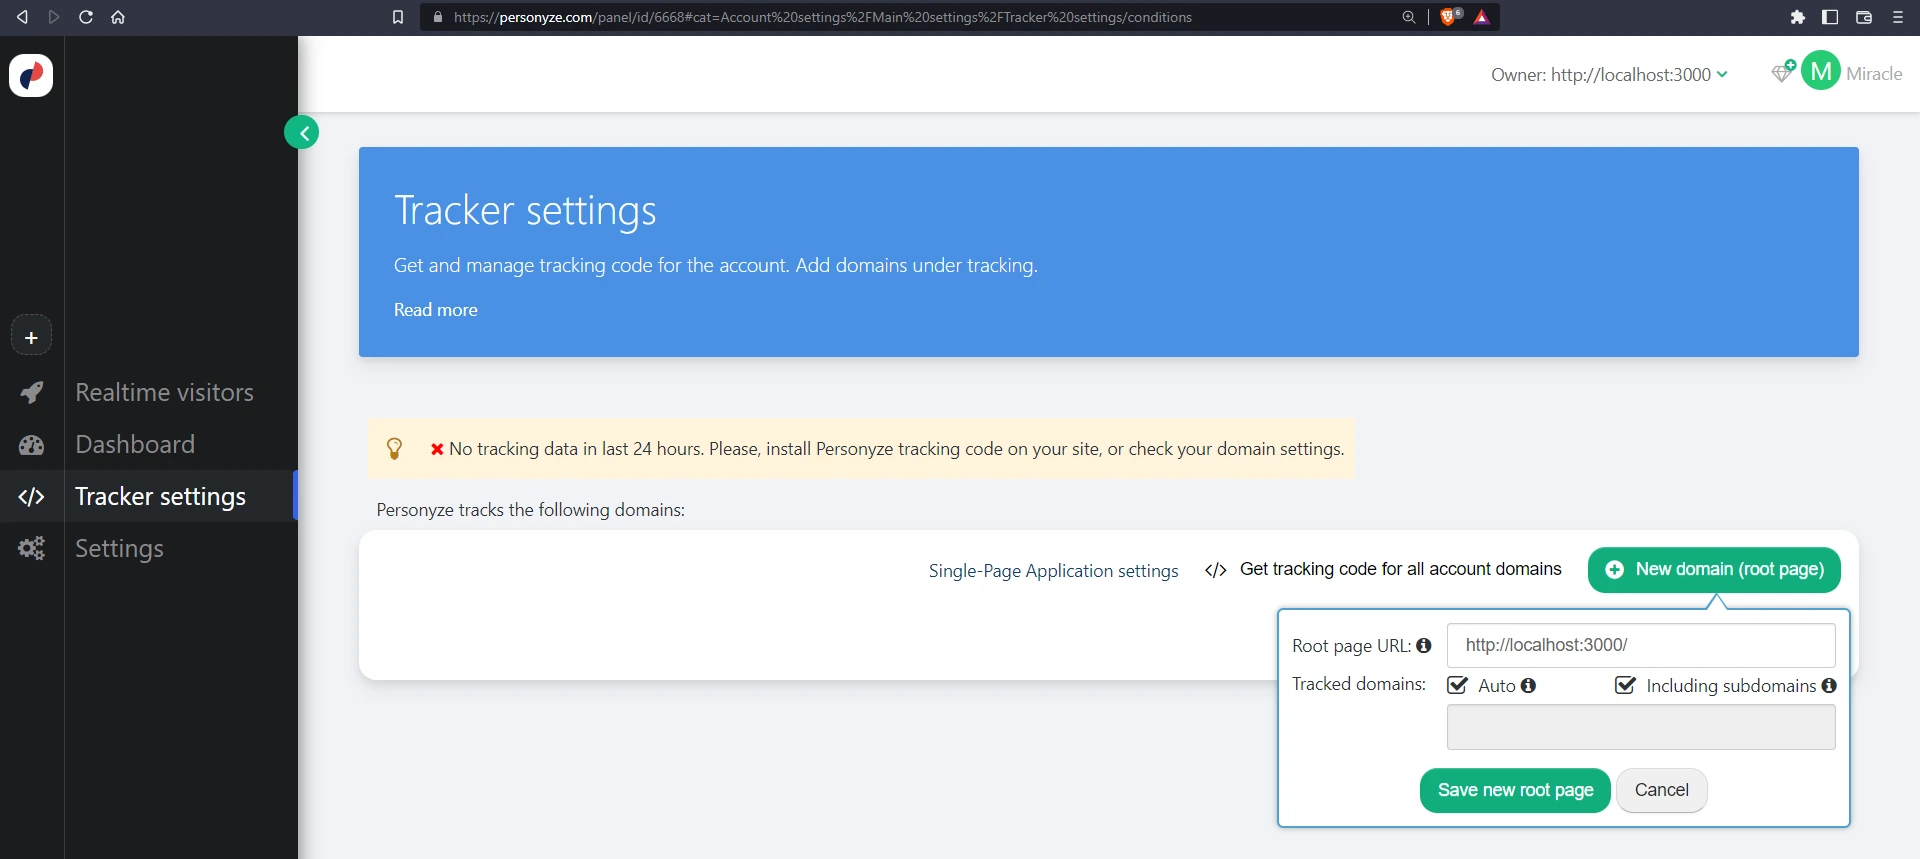
Let’s go back to our Personyze dashboard and navigate to the Tracker Settings page by clicking the link on the side navigation. Click on the New Domain (Root page) button. We’ll add http://localhost:3000, which is where our Next.js app is running.
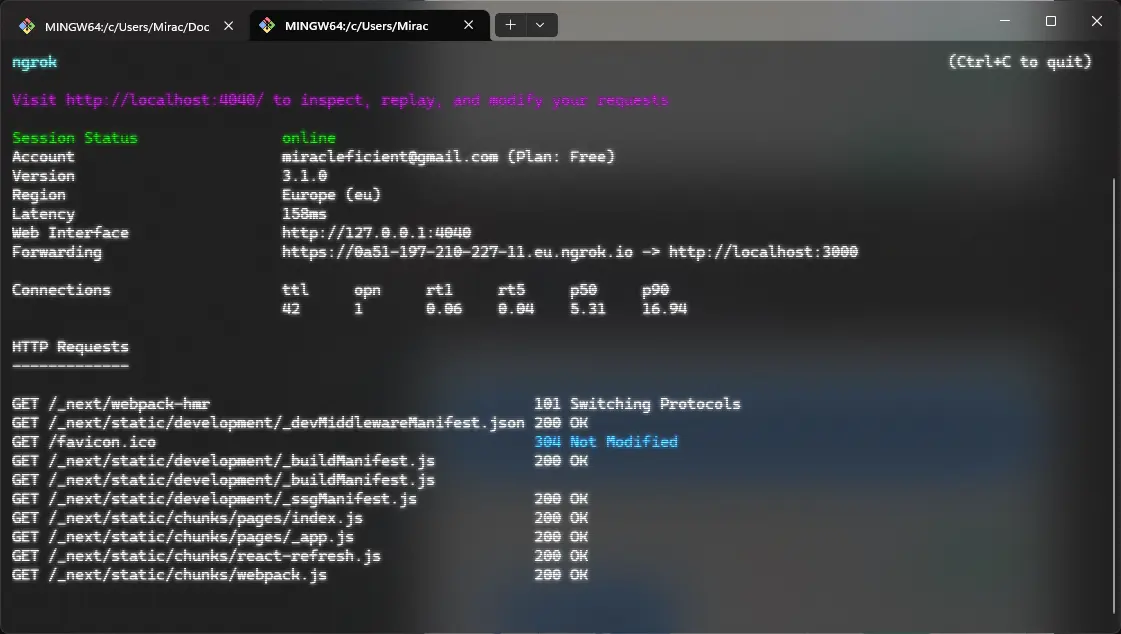
Currently, Personyze is optimized for already hosted/live sites, so working with localhost might not give the desired results. One way around this problem that doesn't require deploying our application is by forwarding our port (:3000) with ngrok.
If you’re on windows, once installed, navigate to the directory where ngrok.exe is present and run:
./ngrox.exe http 3000Here’s what mine looks like:
Now, we can create a new domain with our forwarded URL.

Next, click on Get Tracking code for all account domains and click on Asynchronous tracking code to get our Personyze tracking snippet which we’ll install on our application.
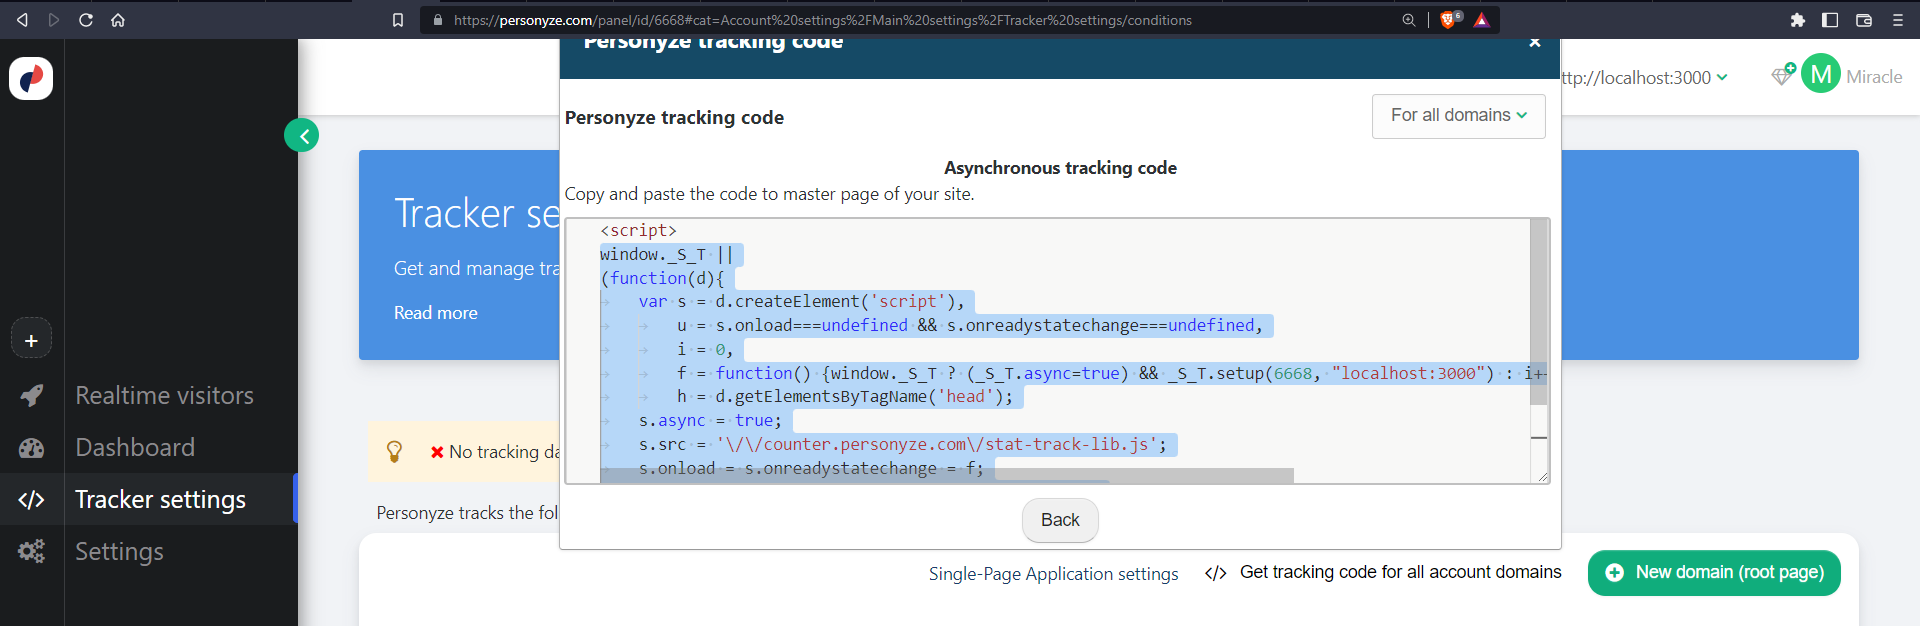
Now, back in our application, ./pages/_app.js has the following:
// ./pages/_app.js
// ...

// personyze tracking code
const personyzeSnippet = () => {
  return `window._S_T ||
  (function(d){
    var s = d.createElement('script'),
      u = s.onload===undefined && s.onreadystatechange===undefined,
      i = 0,
      f = function() {window._S_T ? (_S_T.async=true) && _S_T.setup(624123668, "localhost:3000") : i++<120 && setTimeout(f, 600)},
      h = d.getElementsByTagName('head');
    s.async = true;
    s.src = '\/\/counter.personyze.com\/stat-track-lib.js';
    s.onload = s.onreadystatechange = f;
    (h && h[0] || d.documentElement).appendChild(s);
    if (u) f();
  })(document);`;
};

function MyApp({ Component, pageProps }) {
  return (
    <AppProvider>
      <Script
        id="segment-script"
        dangerouslySetInnerHTML={{ __html: renderSnippet() }}
      />

      {/* add personyze script */}
      <Script
        id="personyze-script"
        dangerouslySetInnerHTML={{ __html: personyzeSnippet() }}
      />
      <Layout>
         {/* ... */}
      </Layout>
    </AppProvider>
  );
}
export default MyApp;
Now, if we go to our application and refresh it, in our console, we should see that Personyze has been installed:
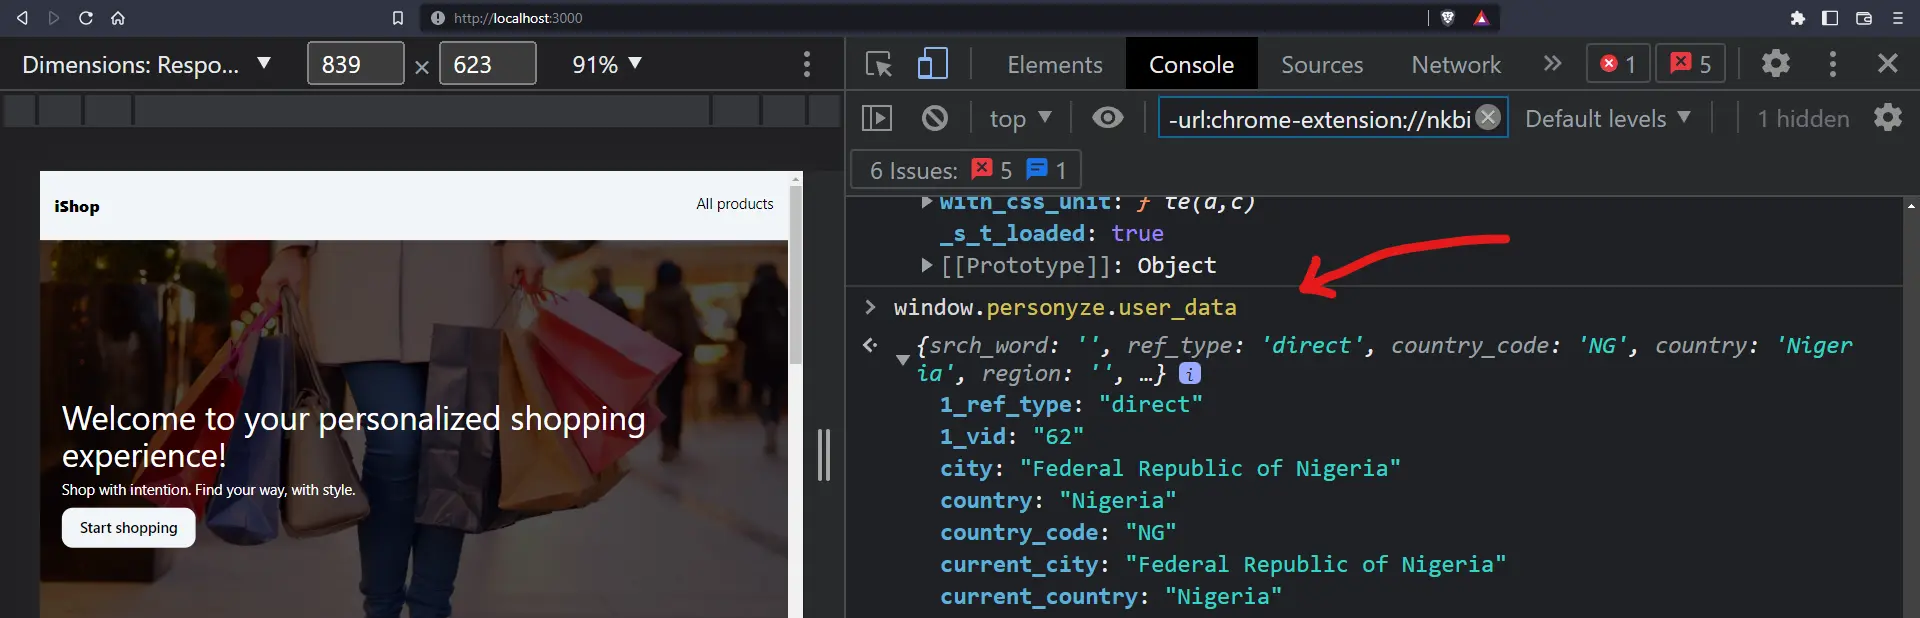
Awesome. With this, we can see our location information. We’ll start from there.
Personalize content based on location
Now, we need to save this information in the global user state. A problem we’ll face is getting the Personyze user data when it’s available since it has to load after the application is rendered. Since we cannot access this data immediately inside a useEffect hook, we’ll set up a getPersonyzeData() function which will run repeatedly until the data has been attached to the window.personyze.user_data object and is available.
Within the getPersonyzeData() function, we’ll set the global userState data.
The ./layouts/default.jsx page has the following:
// ./layouts/default.jsx
import { useEffect } from "react";
import SiteHeader from "../components/SiteHeader";
import UserForm from "../components/UserForm";
import { useUserDispatch, useUserState } from "../modules/AppContext";
const Layout = ({ children }) => {
  const userState = useUserState();
  const setUserState = useUserDispatch();
  useEffect(() => {
    // send identify event with gloal user state data
    window.analytics.identify(userState.id, {
      ...userState,
    });
  }, [userState]);
  useEffect(() => {
    // get local user info
    let localUserInfo = localStorage.localUserInfo || "{}";
    // function to get personyze user_data (containing `country` data)
    let i = 0;
    const getPersonyzeData = () => {
      if (window.personyze && window.personyze.user_data?.country) {
        let user_data = window.personyze.user_data;
        // set global user state
        setUserState({
          ...JSON.parse(localUserInfo),
          ...userState,
          ...user_data,
        });
        console.log({ user_data, userState });
        return;
      }
      // if personyze dat is not available (not loaded)
      // try again up to 20 times
      i++ < 20 && setTimeout(() => getPersonyzeData(), 400);
    };
    getPersonyzeData();
  }, []);
  return (
    <>
      <SiteHeader />
      <main> {children} </main>
      <UserForm />
    </>
  );
};
export default Layout;
Now, if we refresh our app, we should see that the page has been personalized based on country now that the data is available.
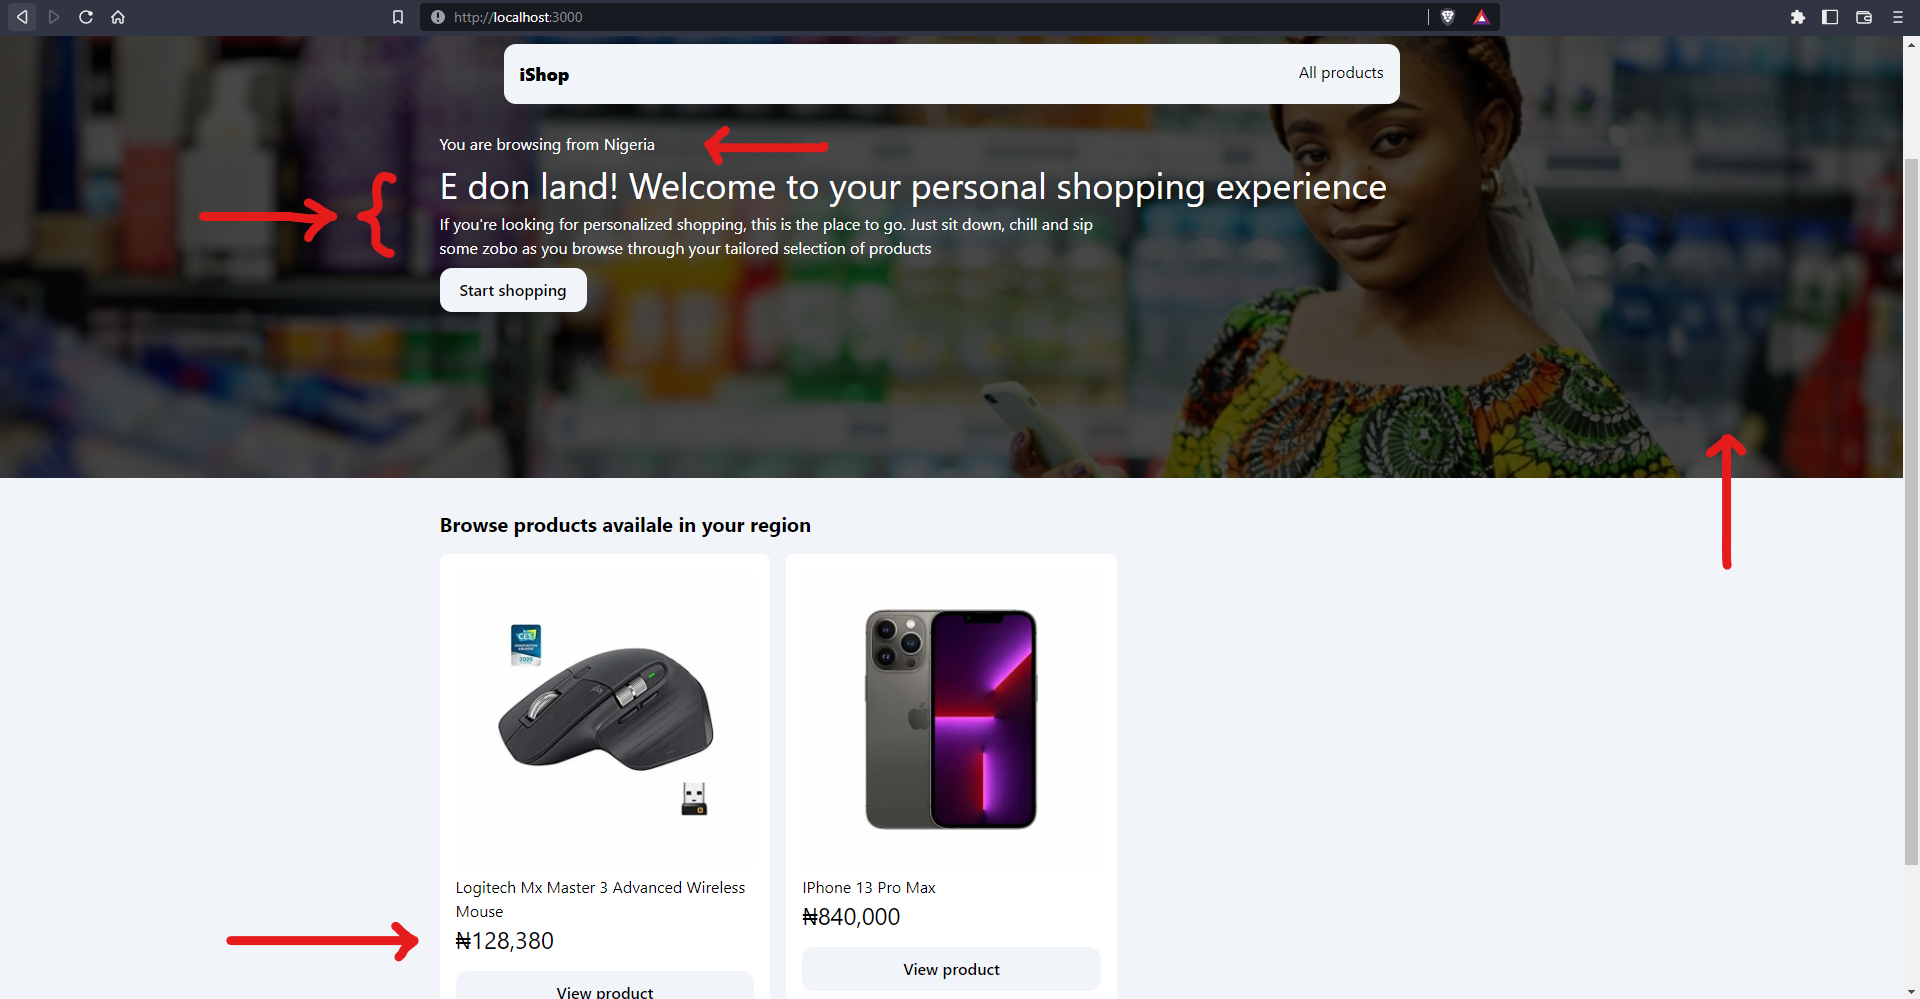
This is what a user visiting from Nigeria will see on the homepage:
- The page hero component displays the data and background image that corresponds to the user’s country
- Only products that are available in the user’s country are shown with converted prices
Personalize content based on user activity
In this section, we’ll take the personalization further by setting up a campaign in Personyze which will help us get recommendations based on the user activity on the site.
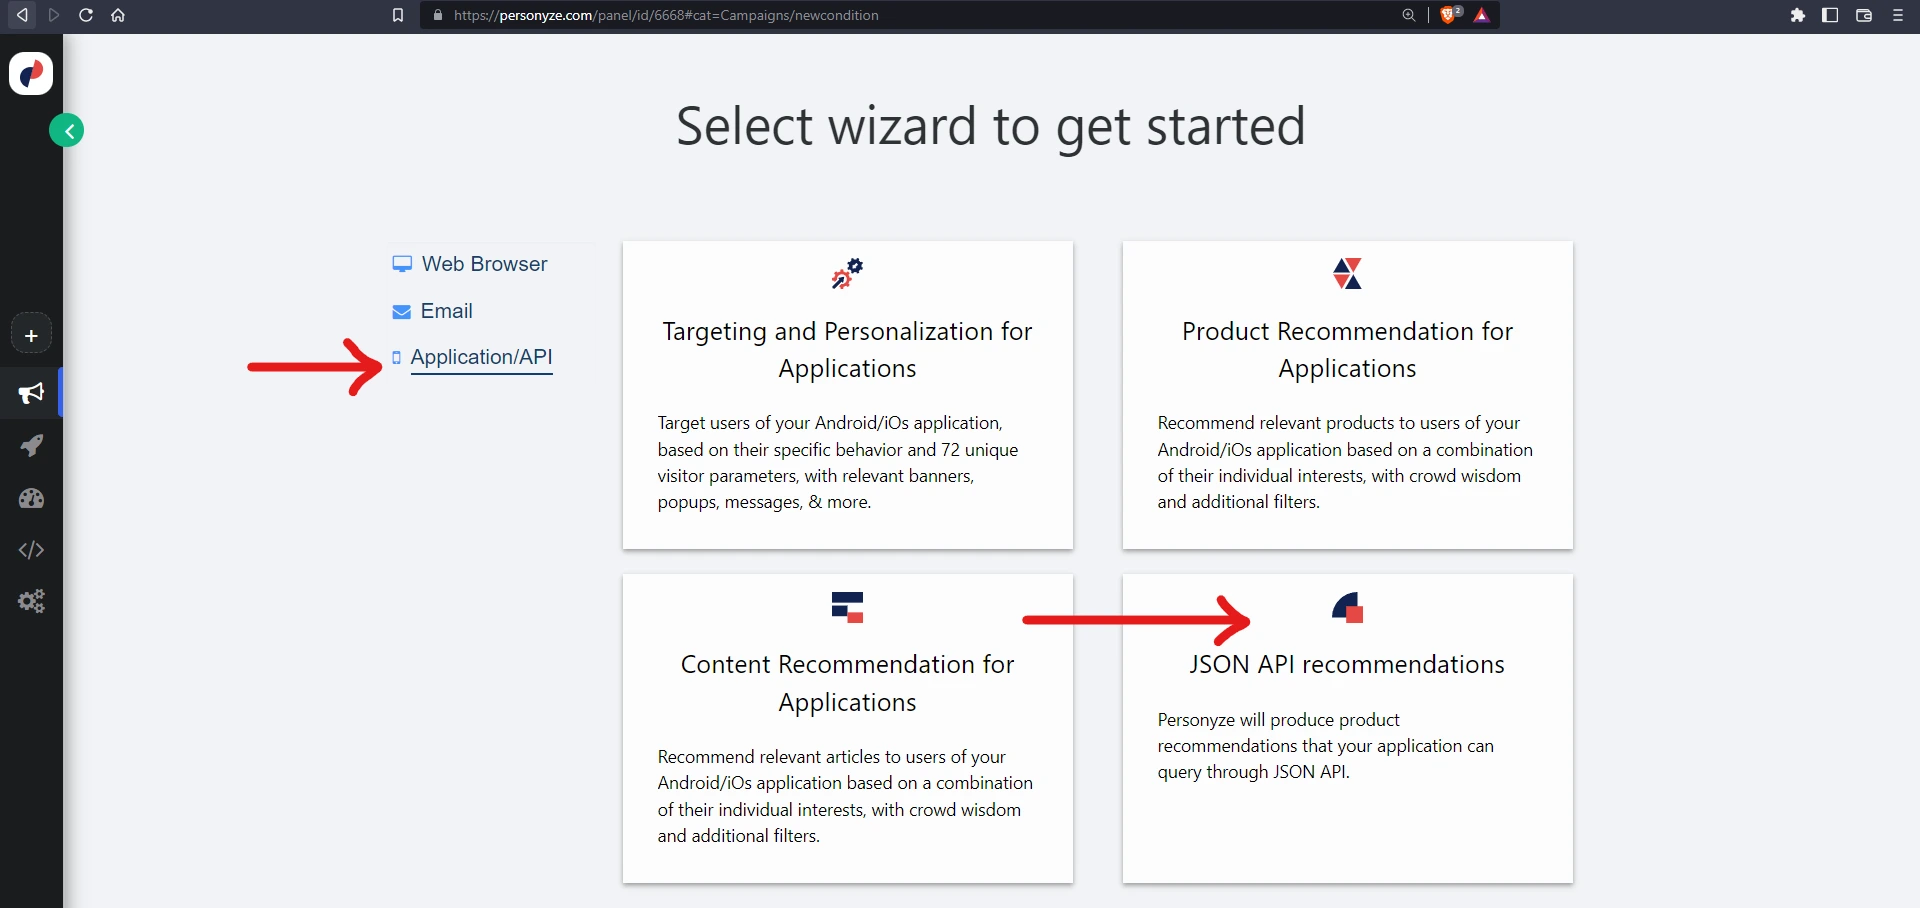
Create a new campaign
Click on the Plus (+) button on the side nav to create a new campaign, select Application/API, then select JSON API recommendations:
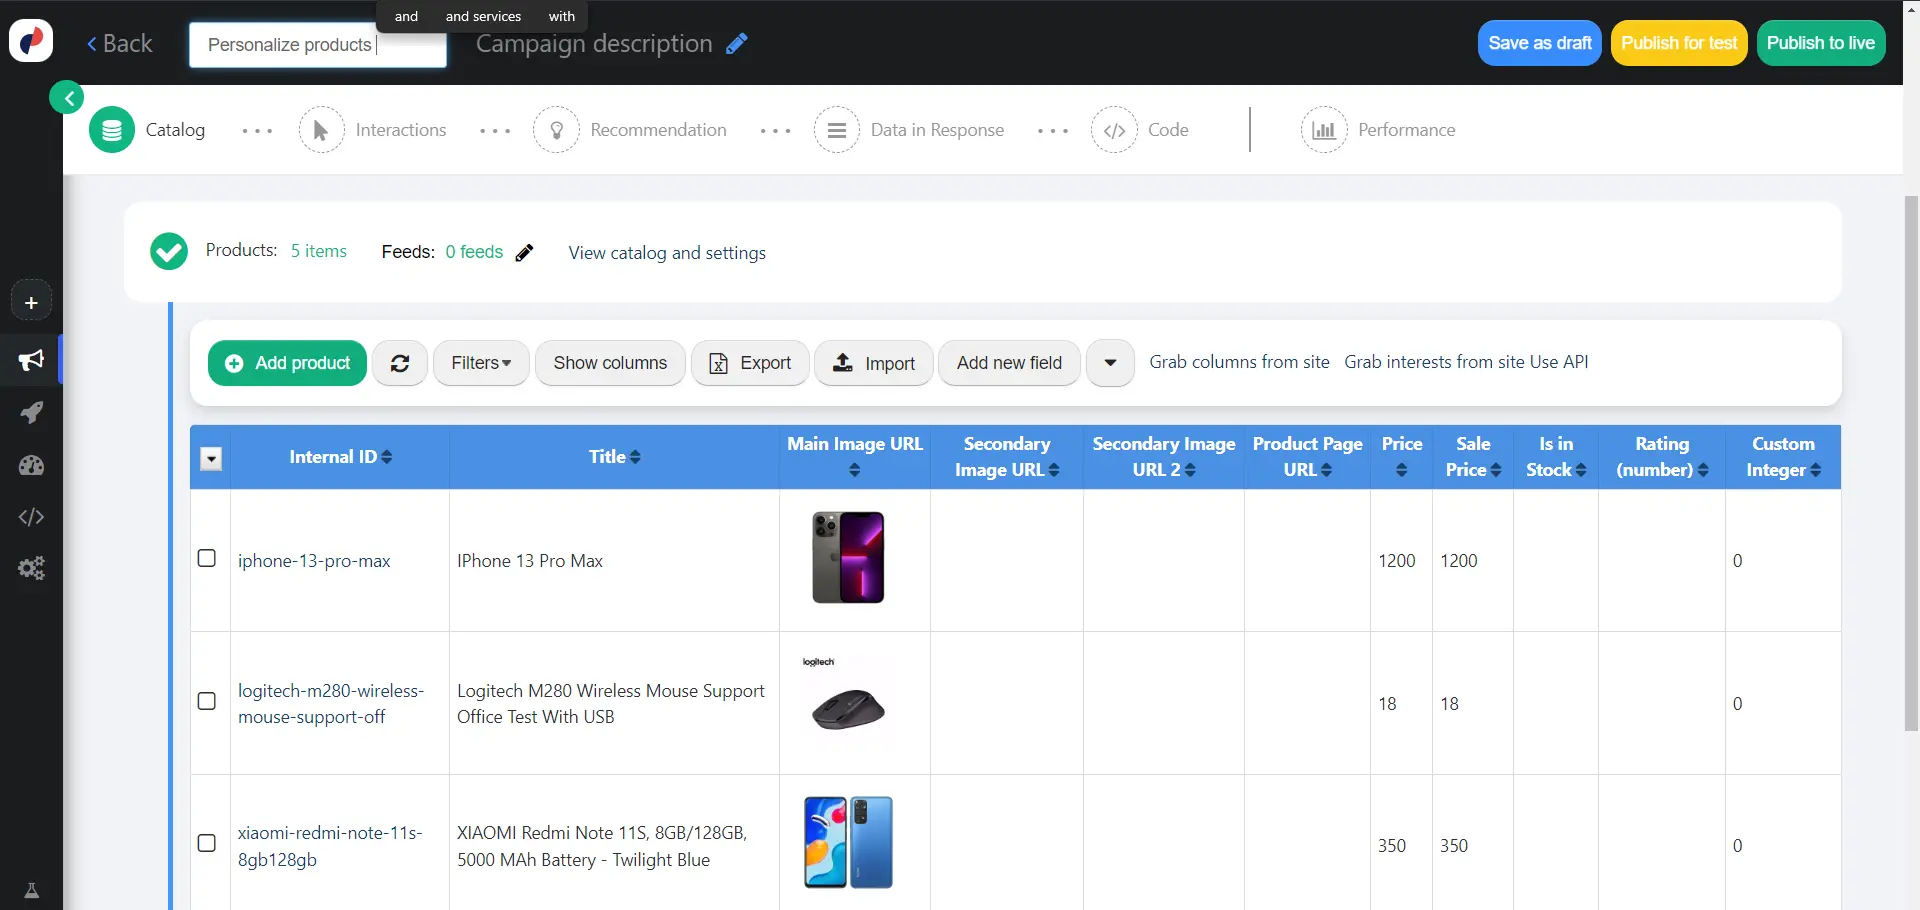
Personyze requires data to base its recommendations on. For our application, that’ll be our products. So, we can add that product data to Personyze’s product catalog. We can also import data from a JSON or .CSV file.
Here’s a sample file on GitHub that you can use or modify for your own products. Once the import is complete, you should have something like this:
In the next section, we’ll see the code we can use to send events to Personyze.
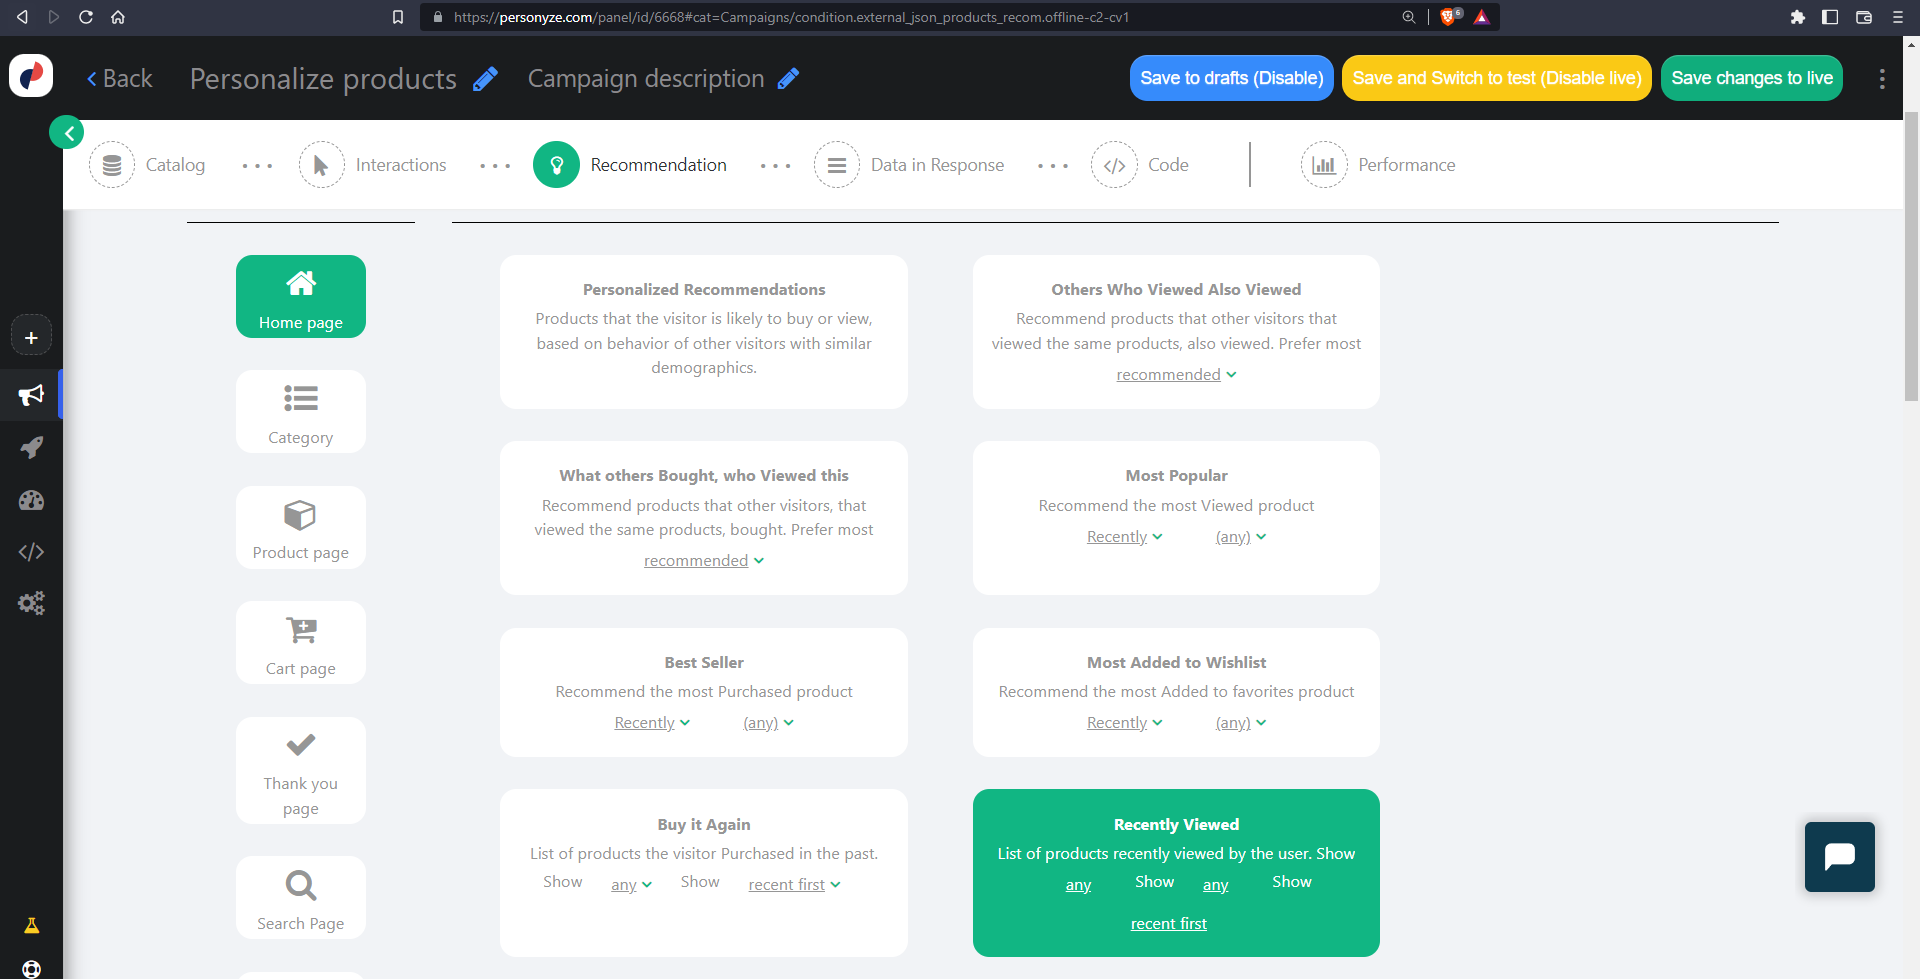
In the recommendation type section, select Start New and select Recently Viewed from the recommendation algorithm types.
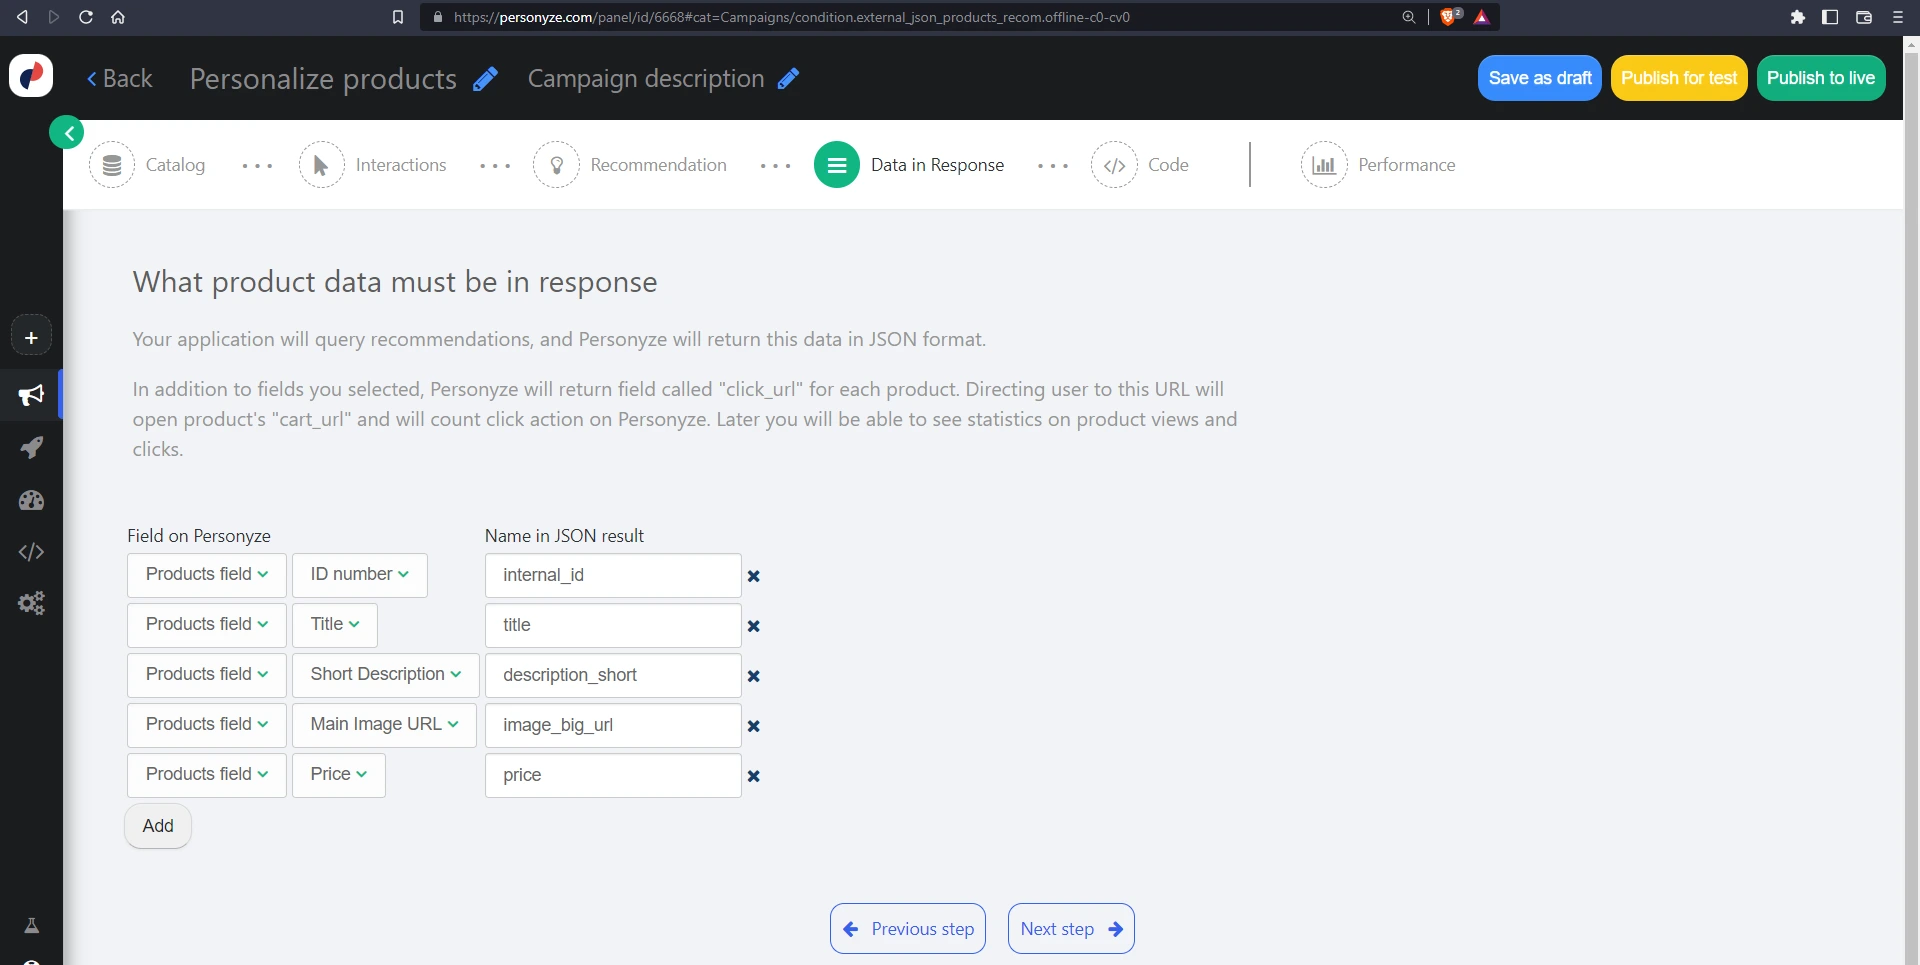
Next, select the product data that will be included in the JSON response. In this example, we’re including:
- ID number
- Title
- Short Description
- Main Image URL
- Price
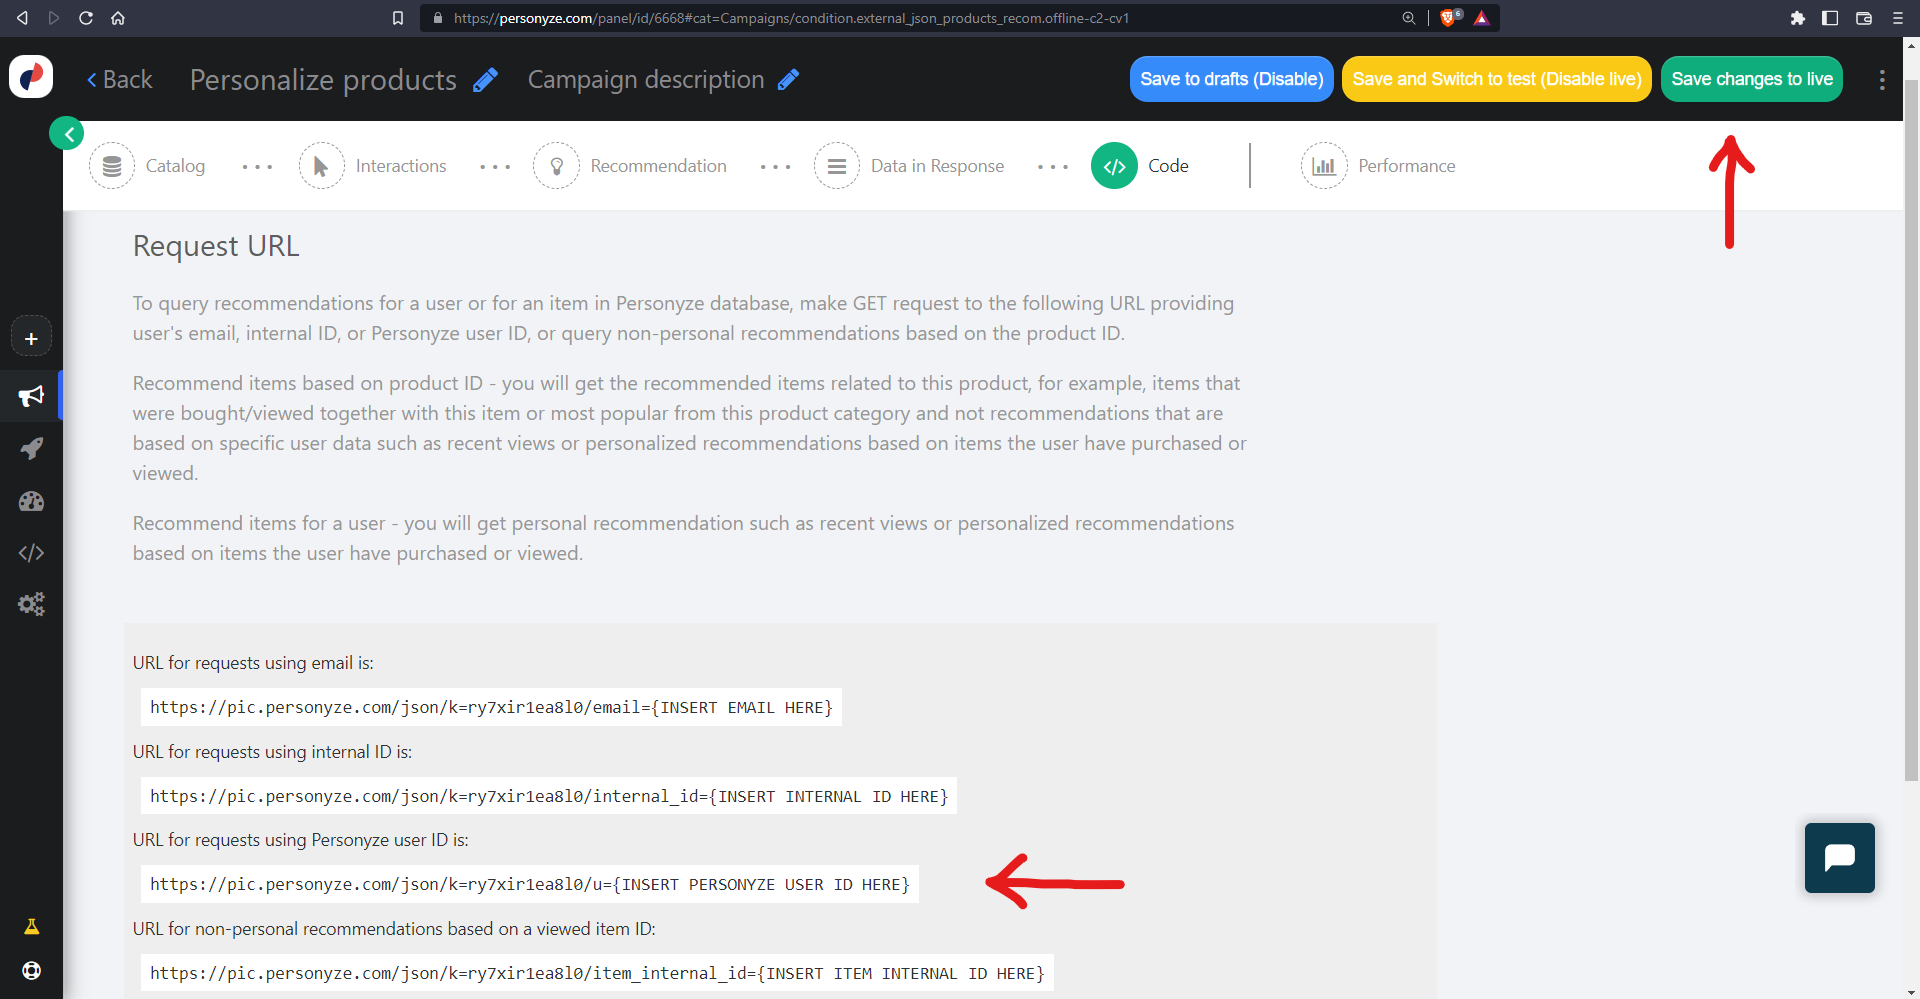
Next, in the Code section, we obtain the code we’ll use to get recommendations data for the user by the user’s Personyze ID.
Now, we can click on the Save button to create the campaign.
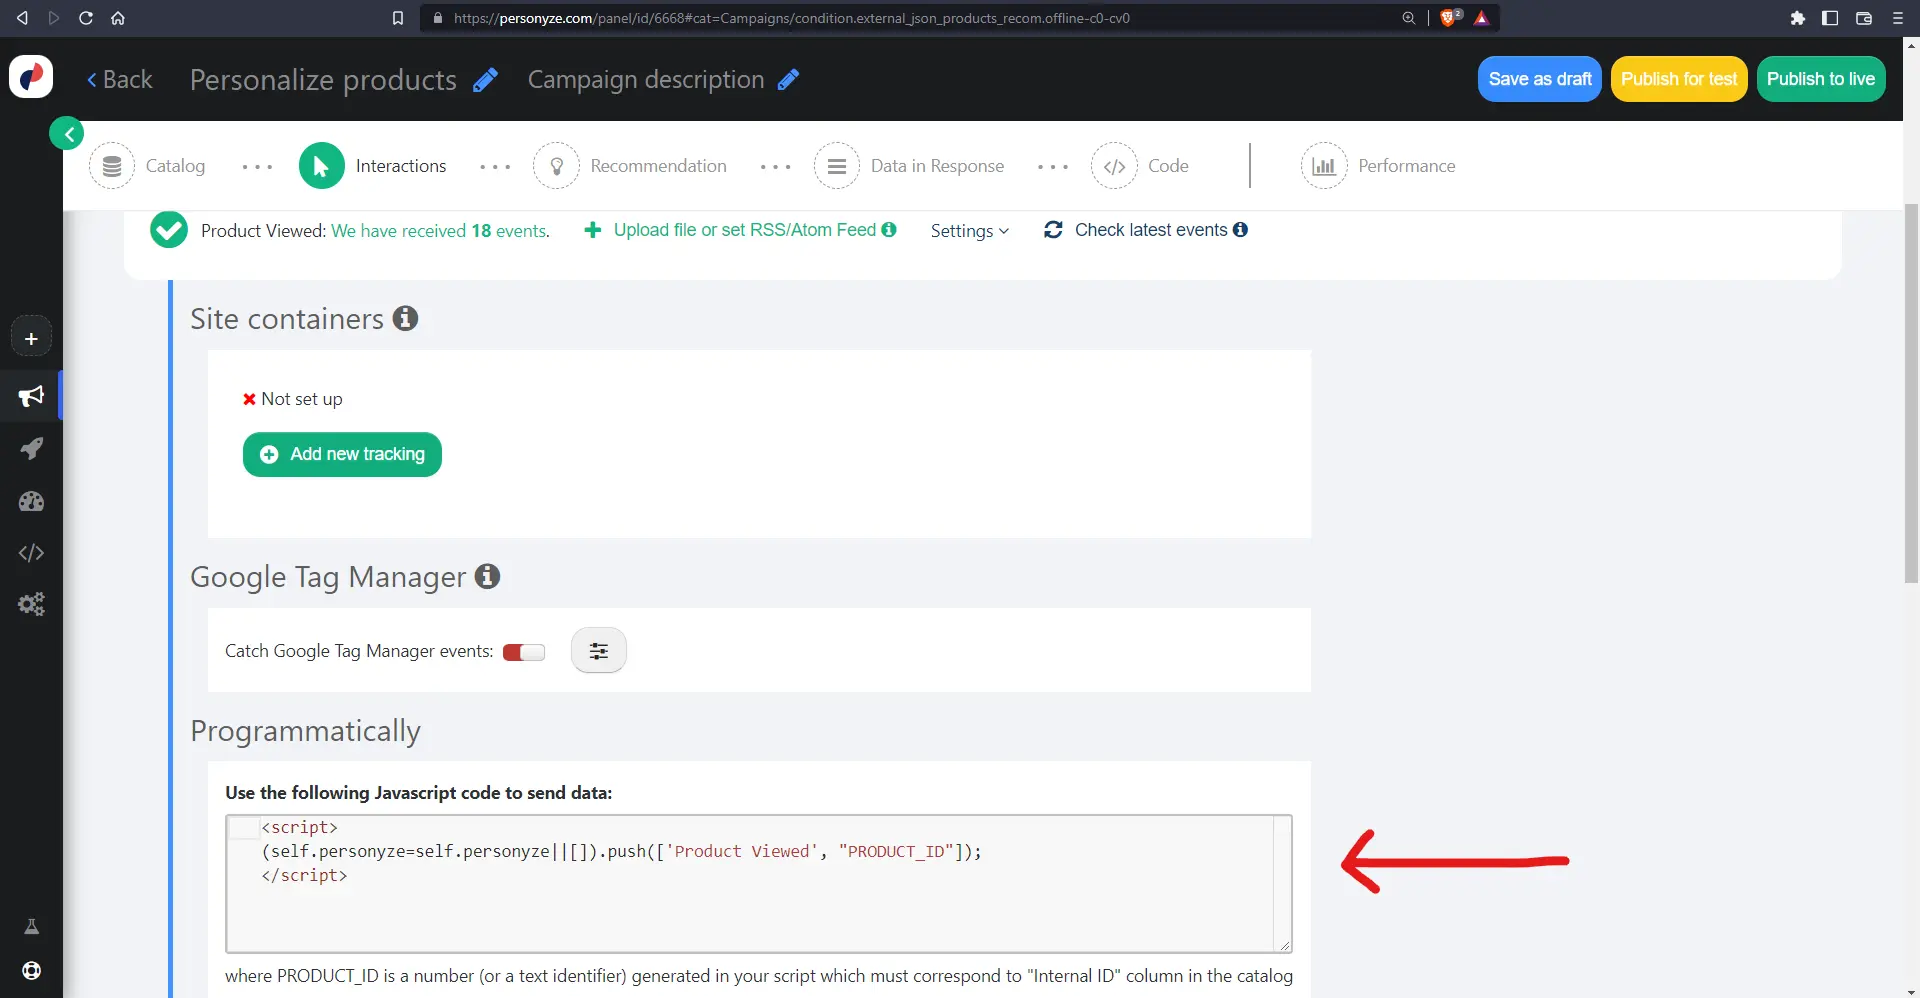
Send Product Viewed event to Personyze
We’ve covered how to send events to Segment, now let’s see how we can send events to Personyze.
In the ./pages/products/[slug].js page, we have the following:
// ./pages/products/[slug].js

// ...

const Product = ({ product }) => {
  // ...

  useEffect(() => {
    let viewedProduct = {
      slug: product.data.slug,
      ...fields,
    };
    console.log({ viewedProduct });
    window.analytics.track("Product Viewed", viewedProduct);

    // send product viewed event with product slug/id
    (self.personyze = self.personyze || []).push([
      "Product Viewed",
      product.data.slug,
    ]);
    // secondary events to personyze
    (self.personyze = self.personyze || []).push([
      "Interests",
      product.data.category,
    ]);
    (self.personyze = self.personyze || []).push([
      "Category",
      product.data.category,
    ]);
  }, []);

  // ...
}
Here, within our useEffect hook, we run:
(self.personyze = self.personyze || []).push([
  "Product Viewed",
  product.data.slug,
]);
That sends the product viewed event with the product slug, which corresponds to the product’s internal ID in our Personyze product catalog.
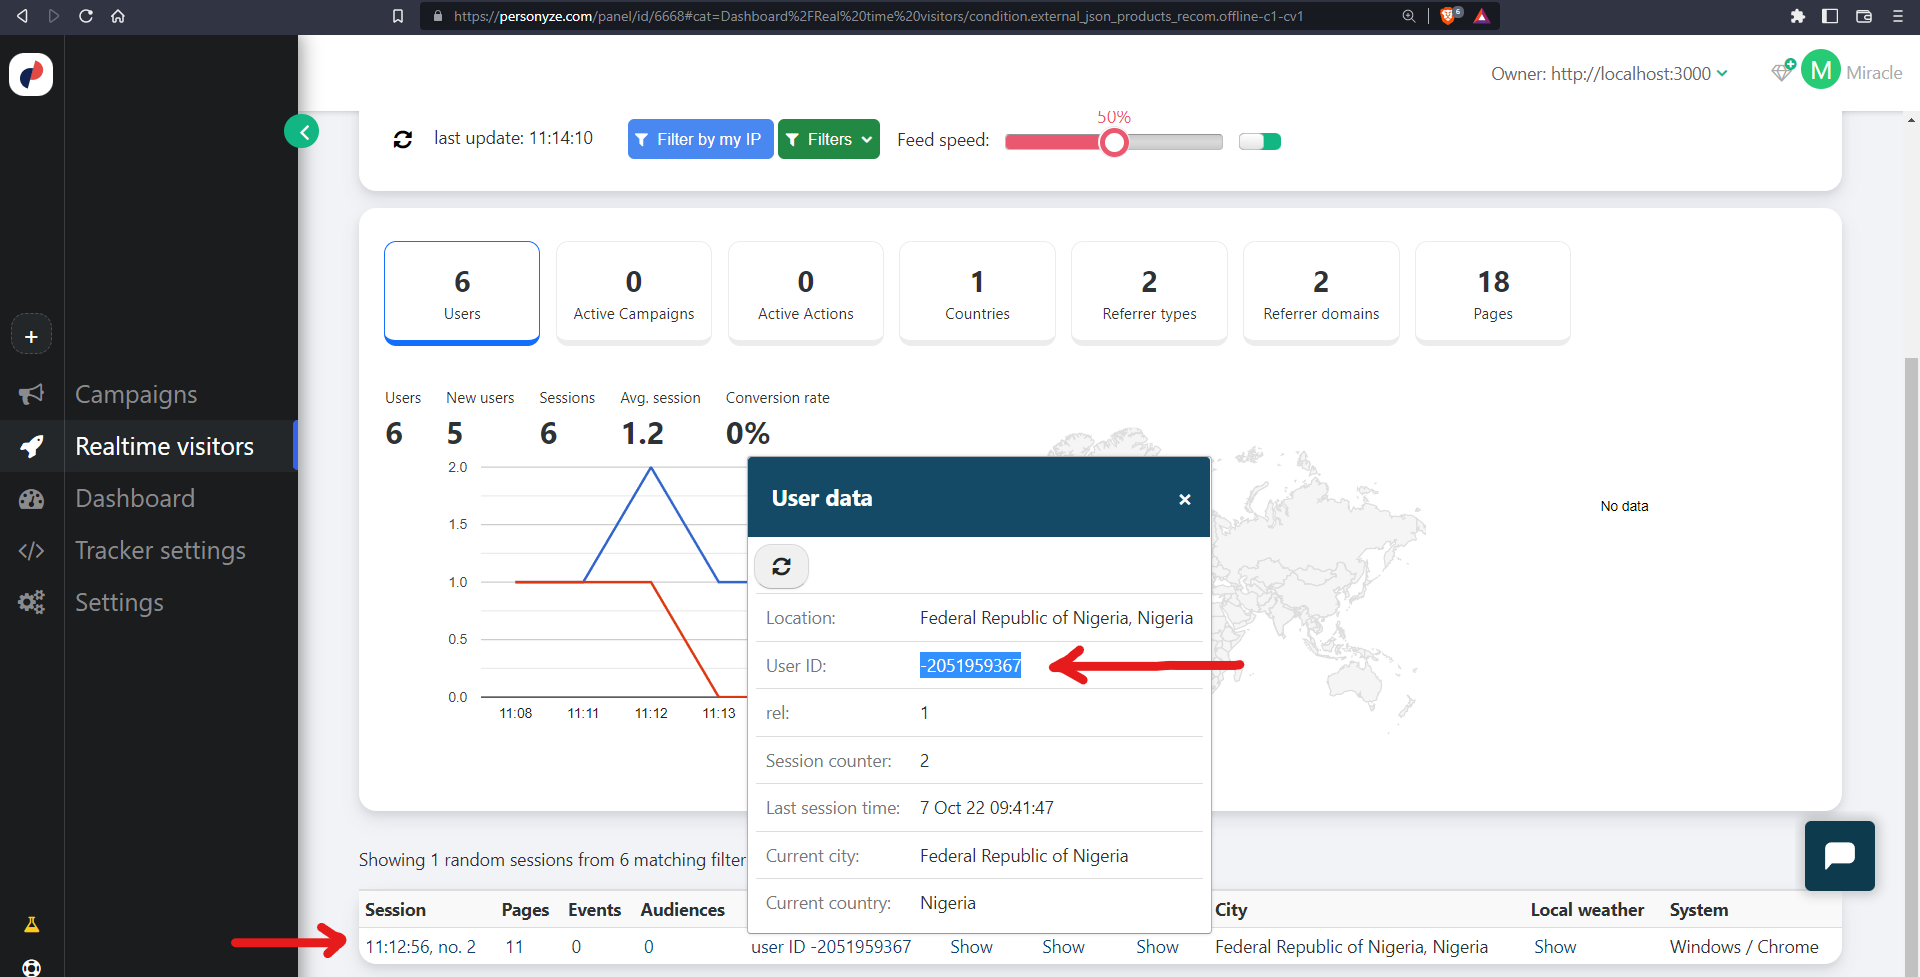
Now, if we go to our forwarded port URL and view a bunch of products, we should see that when we go to Realtime Visitors on our Personyze dashboard and click on Show under Products in a visitor entry, we would see the products we’ve visited:

Awesome. Our tracking works.
The next step is to use the Recommendation code from the campaign we created earlier to fetch recommended products.
To do that, we’ll create an API route in our Next.js application to make the request.
Create getRecommendation API route in Next.js
Create a new file called ./pages/api/getRecommendations.js with the following:
// ./pages/api/getRecommendations.js

// Next.js API route support: https://nextjs.org/docs/api-routes/introduction
let headersList = {
  Accept: "*/*",
};
export default async function handler(req, res) {
  const { id } = req.query;
  console.log({ id });
  try {
    let response = await fetch(
      `https://pic.personyze.com/json/k=0ogbp3tufi7o/u=${id}`,
      {
        method: "GET",
        headers: headersList,
      }
    );
    let data = await response.json();
    console.log(data);
    res.status(200).json(data);
  } catch (error) {
    console.log({ error });
    res.status(400).json(error);
  }
}
Now, get the Personyze User ID from user data in the Realtime Visitors page:
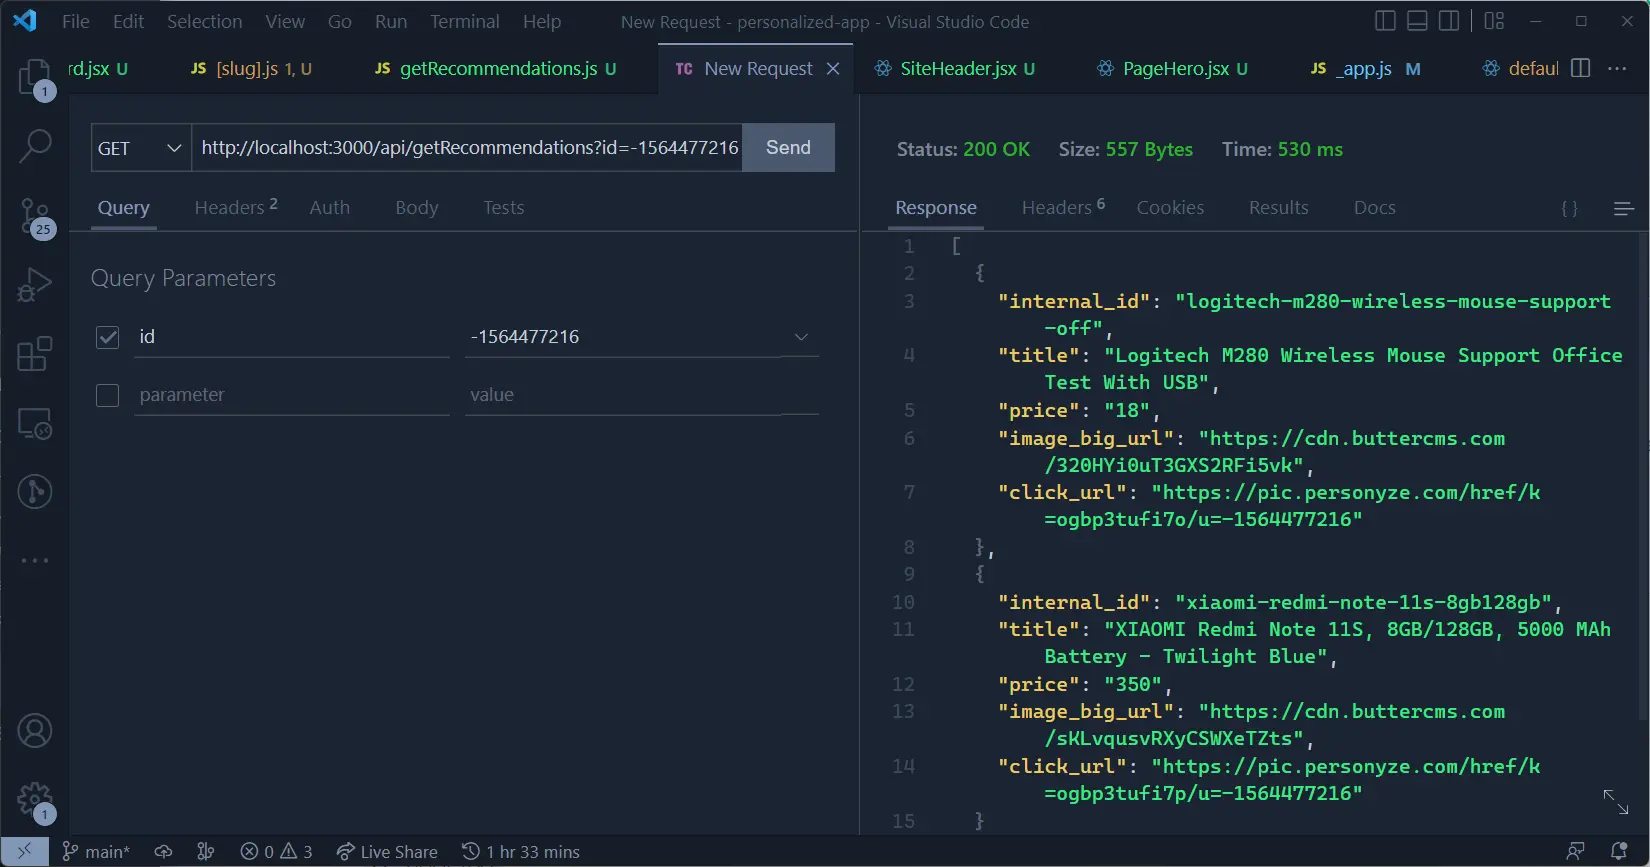
We can use an API tester to make the request and we should see some products returned based on user interaction.
In some cases, you might see a response like {"error": "No recommendations for this user"}, especially when the user has been recently created. Personyze will begin returning recommendations for that user within a few minutes to about 4 hours.
Next, we’ll create a new getRecommendedProducts() function in ./pages/index.js to get data using the user’s Personyze UID:
// ./pages/index.js

// ...

export const getServerSideProps = async ({ params }) => {
  // ...
};
export default function Home({ data, products }) {
  // ...

  const [recommendedProducts, setRecommendedProducts] = useState(null);

  // ...

  // function to get recommended products
  const getRecommendedProducts = async (id) => {
    try {
      const data = await (
        await fetch(`/api/getRecommendations?id=${id || "-1564477216"}`)
      ).json();
      // throw error if data includes an error field
      if (data.error) throw Error(data.error);
      // format data to correspond with ButterCMS product schema
      const productData = data.map((product) => ({
        slug: product.internal_id,
        fields: {
          name: product.title,
          image: product.image_big_url,
          price: product.price,
        },
      }));
      // save to state
      setRecommendedProducts(productData);
      return productData;
    } catch (error) {
      console.log({ error });
      return null;
    }
  };

  useEffect(() => {
    // ...

    // get personyze user ID
    const personyzeUID = window.personyze?.uid;

    // fetch recommendations by personyze user id
    if (personyzeUID) getRecommendedProducts(personyzeUID);
  }, [userState]);

  return (
    <main>
      <PageHero country={heroCountryType} data={heroData} />
      <section className="p-4">
        {/* ... */}
      </section>

      <section className="p-4">
        <div className="wrapper max-w-5xl m-auto">
          {/* ... */}
          {recommendedProducts ? (
            <ul className="products grid md:grid-cols-2 lg:grid-cols-3 gap-4">
              {recommendedProducts.map((product) => (
                <li key={product.slug} className="product">
                  <ProductCard product={product} />
                </li>
              ))}
            </ul>
          ) : (
            <span>Nothing here yet</span>
          )}
        </div>
      </section>
    </main>
  );
}
Here, we got the Personyze UID from window.personyze.uid and passed it to our getRecommendedProducts() function which fetched the products.
Now, when we look at our home page, we should see some recommendations
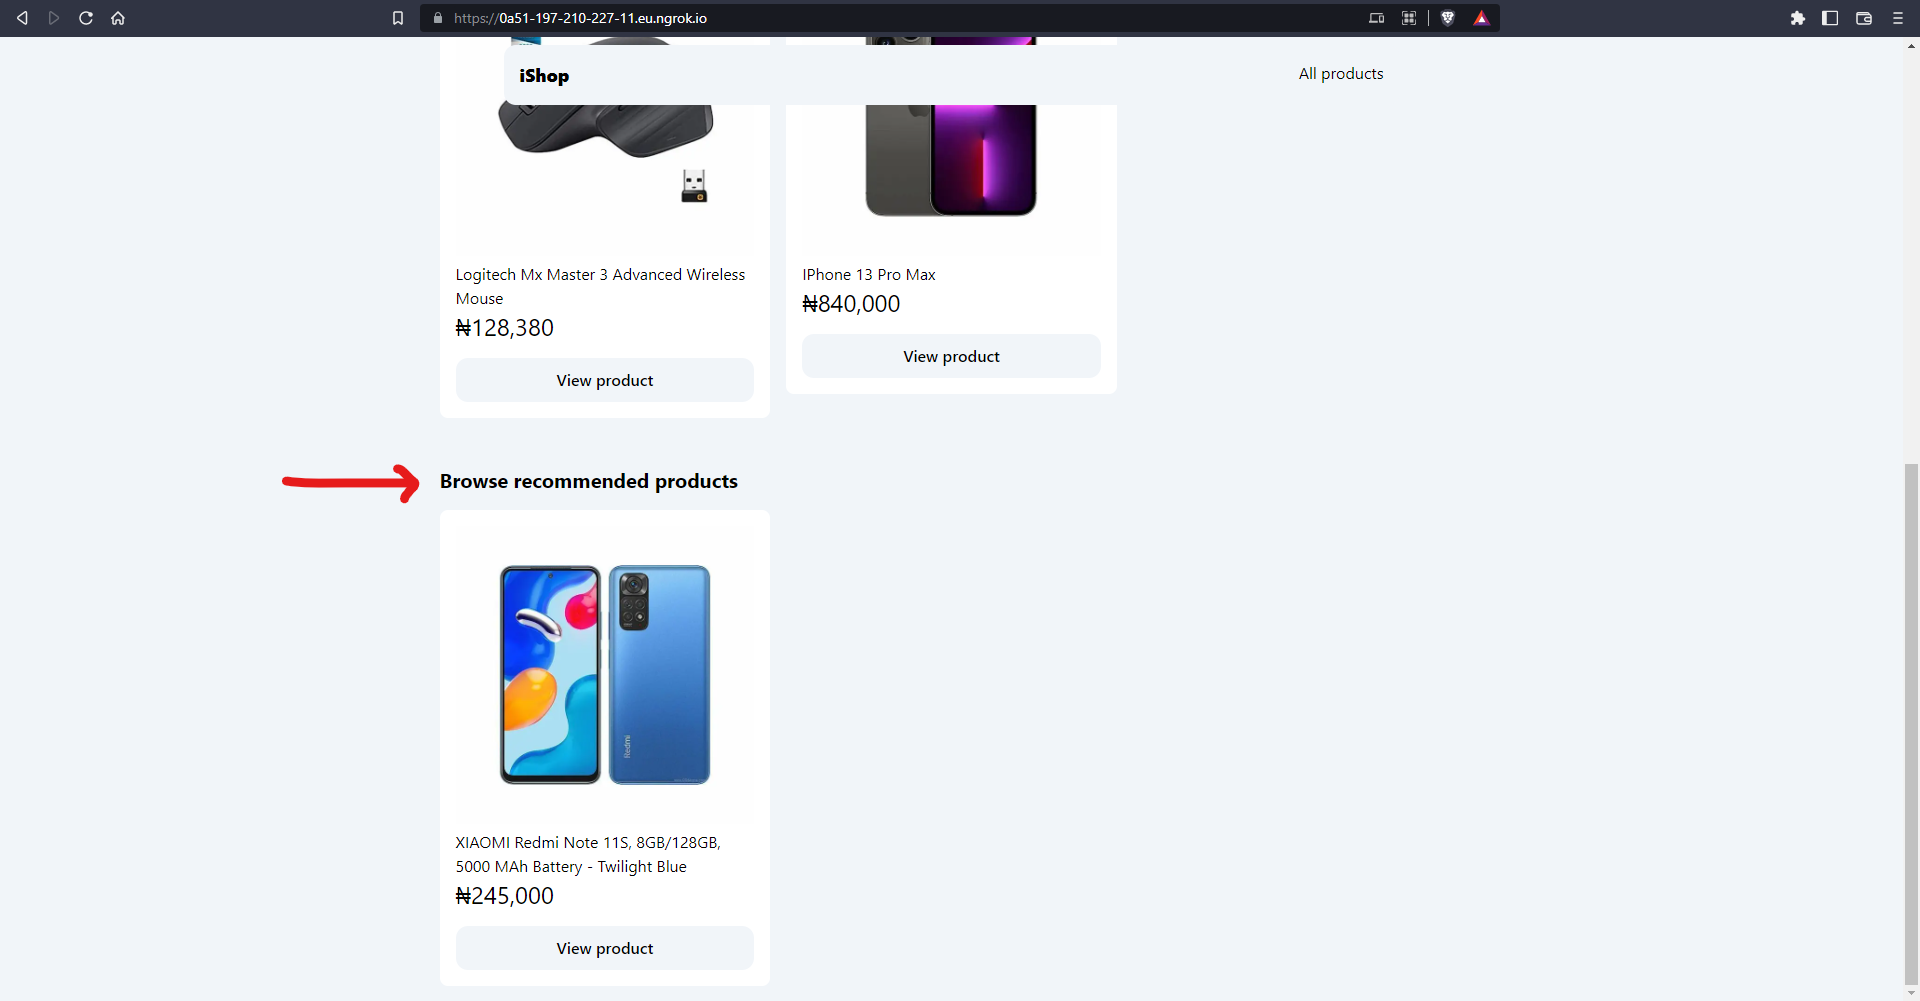
Awesome. You've done it!
You can check out the full application here: Deployed project, hosted on Netlify
Adding more personalization features
We’ve been able to leverage our CDP and personalization tools to build out our personalized e-commerce app, but we’ve only scratched the surface.
We used Segment here because it's quite easy to set up and offers a ton of features. With a paid plan, we can leverage Segment Profiles and Segment Engage instead of Personyze for personalization features. More details can be found in the Segment docs.
With Personyze, we can also add and improve personalization by adjusting the recommendation algorithm in our campaign recommendation settings.
We can also create new campaigns, each with a different recommendation algorithm, this will allow us to get the most out of user interaction as they view products and pages, add products to their cart or wish lists, and so much more.
Closing thoughts
Personalization is always going to be important in an increasingly digital world where information travels at the speed of light. Personalization ensures that users are presented with information, products, and services that are relevant to them.
In this tutorial we’ve covered the concepts of CDPs and personalization tools, how we can use ButterCMS to provide the content, and built out an application with Next.js.
Now that we know the basics of how it all works, and how we can use the different tools covered in this tutorial to build personalized experiences with content provided by ButterCMS, we can take it a step further, create more products in Butter and set up more recommendation algorithms in our personalization tool. We can also use other CDPs or personalization tools of choice to build our application.
Thanks for reading and I hope you learned something from this tutorial.
Further reading & resources
Here are a few useful links:
- Best Customer Data Platforms for Your Business in 2022
- Segment Docs
- Personyze Wiki (Pretty useful in finding our way around Personyze)
Here are the resources for the example project:
Do you want your product or marketing team to test Butter CMS? We can set up a live demo to walk your team through the fast, easy-to-use interface.

