
n today's fiercely competitive online marketplace, having a strong online presence is crucial for businesses to succeed in e-commerce. However, creating an e-commerce website can be challenging, particularly when it comes to designing effective landing pages that convert visitors into customers. Failing to build high-performing landing pages could result in missed sales opportunities and stunted business growth.
Fortunately, there is a way to streamline the process of building landing pages that are both visually appealing and optimized for conversions. By using Golang and ButterCMS, a headless content management system (CMS), brands and business owners can quickly and easily create compelling e-commerce landing pages that drive sales.
With this combination, developers can leverage Golang's efficiency and scalability to build robust e-commerce applications, while ButterCMS provides a simple and flexible platform for managing content and creating landing pages. Ultimately, this approach helps businesses get to market faster and stay ahead of the competition in the fast-paced world of e-commerce.
Table of contents
Why use Golang?
Golang, also known as Go, is a modern programming language created by Google in 2009. It was designed to be fast, efficient, and easy to use, with a focus on concurrent programming and large-scale distributed systems. Golang has gained popularity for its simple syntax, powerful features, and strong performance, making it a popular choice for building web servers and network applications.
Golang is an excellent choice for building e-commerce landing pages because of benefits like:
- Speed: Golang's compiled code executes faster than interpreted languages. This results in faster page load times and a better user experience. Faster compilation time is also useful for developers who need to iterate quickly and deploy changes to their landing pages rapidly.
- Error handling: Golang's error-handling mechanism is unique and efficient. It allows developers to handle errors quickly and efficiently, without interrupting the program's execution flow. This is useful for e-commerce landing pages, where developers need to identify and resolve issues quickly to ensure smooth operation.
- Concurrency: Golang's concurrency features make it easy to handle multiple processes simultaneously. This is crucial for e-commerce landing pages, which often need to retrieve, process, and serve data from multiple users simultaneously. The use of constructs like goroutines and channels in Golang allows developers to write highly efficient and concurrent code, resulting in faster page loading times and better performance.
- Cloud-native: Golang is the language of choice for many cloud-based applications and tools. This is because of its faster compilation time and ability to handle large-scale distributed systems. E-commerce landing pages that are deployed on cloud-based infrastructures can benefit from Golang's cloud-native features like native concurrency support, fast compilation, and startup times, resulting in faster deployment times, better scalability, and improved reliability.
Looking at these features in action
But how do these benefits work together? Let’s use an example by considering an e-commerce landing page that needs to fetch and display product data from a database. With Golang's concurrency features, developers can write highly efficient code that fetches and processes data from multiple users simultaneously, resulting in faster page load times. Additionally, Golang's error-handling mechanism allows developers to quickly identify and resolve issues, ensuring a smooth user experience. Finally, deploying the landing page on a cloud-based infrastructure written in Golang can provide the necessary scalability and reliability needed for an e-commerce site.

Why use ButterCMS?
ButterCMS is a headless CMS that simplifies website creation by providing an easy-to-use dashboard and lightning-fast content API. It offers language SDKs for several languages, including Golang and Python, which make it easier to interact with core ButterCMS features.
For this e-commerce landing page tutorial, we'll be using ButterCMS Pages. This visual page builder tool allows users to create custom page layouts, add and customize various elements such as images, text, videos, and forms, and publish these pages to their website or app.
Other features we’ll be using in this tutorial include:
-
Collections: Utilized as data tables that can be referenced by Pages, thereby expanding the range of possible use cases.
-
Components: Enable us to logically group related content fields together and order flexible page layouts easily.
Tutorial prerequisites & objective
To follow along with this tutorial, you will need:
-
A basic understanding of Golang and HTML is required
-
Golang installed locally on your machine
-
A ButterCMS account
-
A text editor of choice
-
Access to a POSIX-compatible terminal
The image below is the finished landing page we’ll build over the course of this tutorial. For the rest of the tutorial, we’ll focus on creating and curating the content of the UI. In the latter part, we will integrate the ButterCMS API into a Golang application to retrieve the landing page.

Set up the landing page in ButterCMS
Before we write any sample code, let’s set up and create the necessary components of the landing page using ButterCMS Pages. If you don’t have an existing ButterCMS account, click here to create one.
Getting started
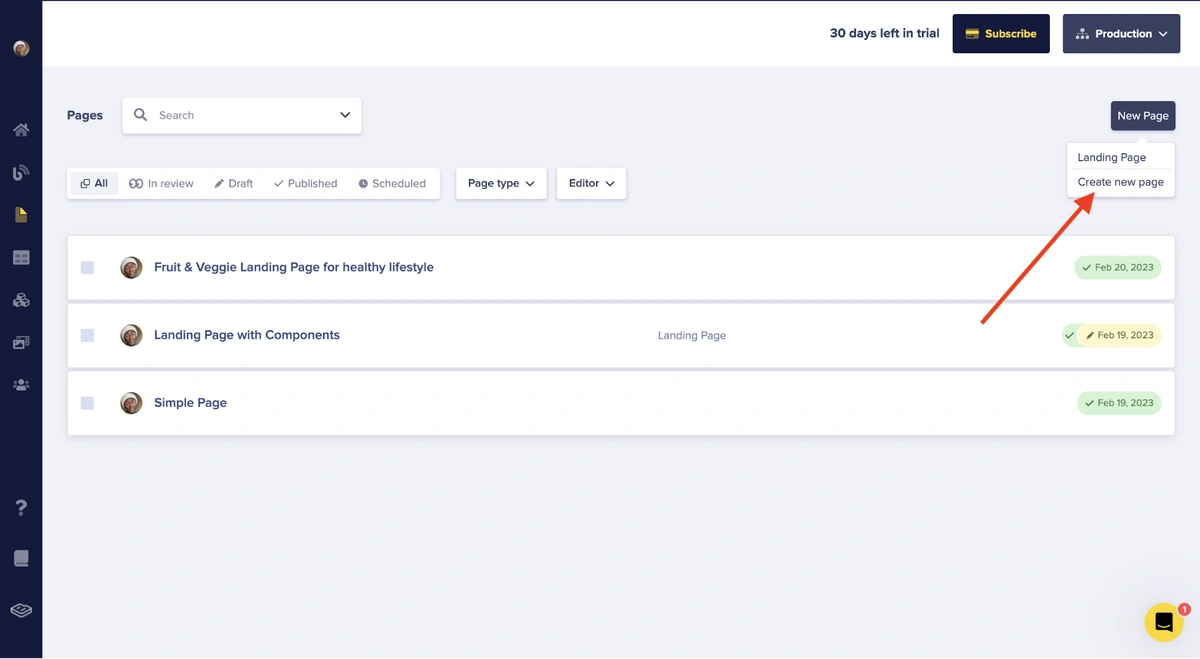
To access the Pages section, first click on Pages in the left-side menu. This will direct you to a page called Pages. Next, click the New Page button at the top-right corner of the page. Then select Create New Page from the drop-down menu to begin defining our page’s schema.
After doing so, you will land in the page schema editor. On the right, you will see various ButterCMS fields that can be used on their own or together to compose various components that will make up the different sections of the e-commerce landing page.
Let’s first add a Short Text field for the page title.
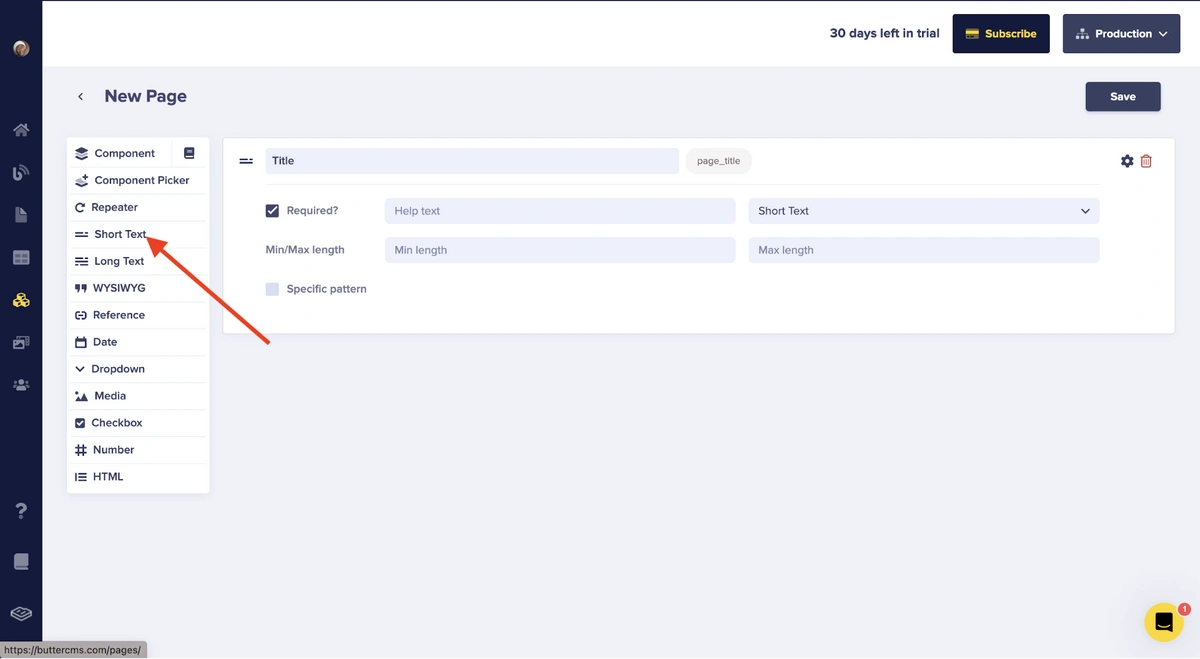
To provide more meaning to the Title data when retrieving it within our project, I updated the JSON field identifier to page_title.
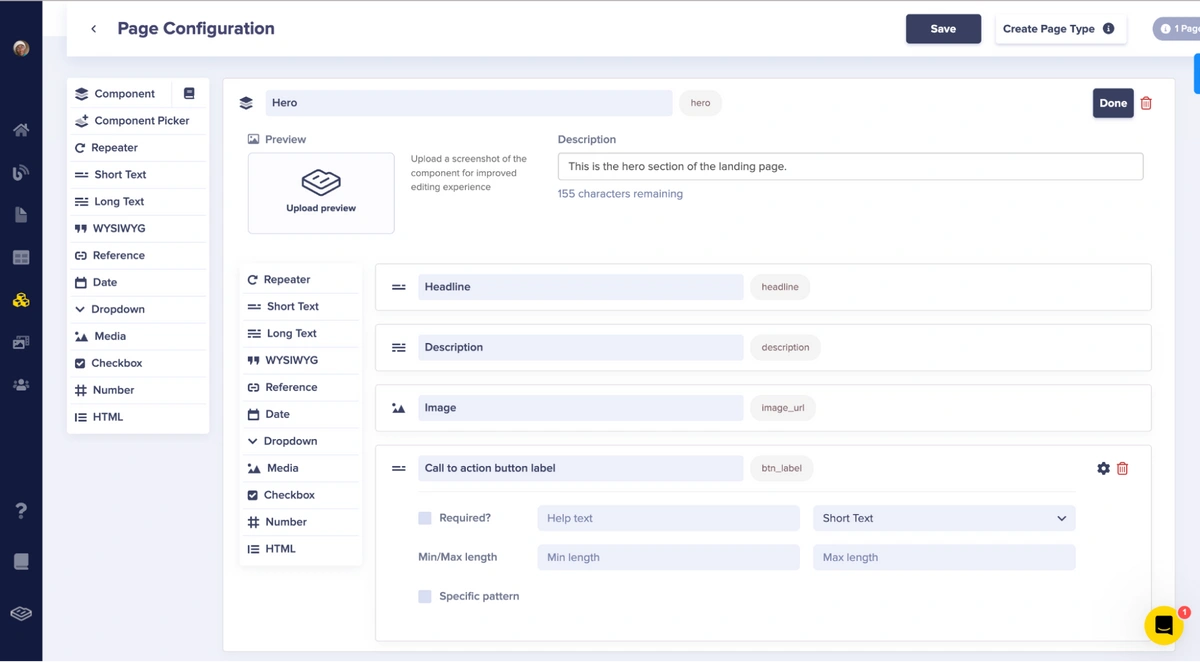
Building the Hero section
Next, we will create the Hero section of the landing page by grouping the necessary fields together using the Component feature. To achieve this, click on Component and then select the Create Component button.
For the Hero section, add the following fields:
-
Short text named “Headline”
-
Long text named “Description”
-
Media named “Image”
-
Short text named “Call to action button label”
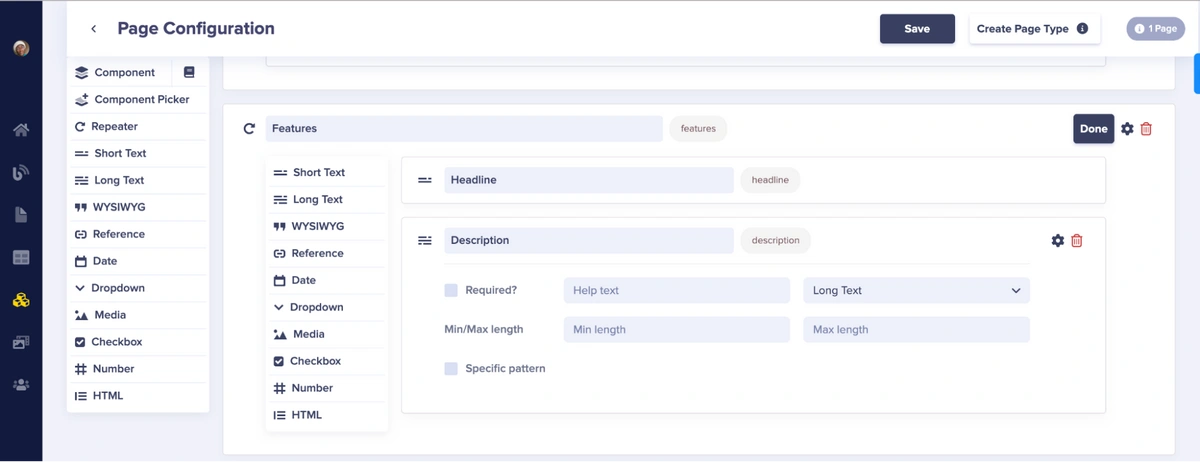
Building the Features section
To create the Features section, we'll use a repeater field. With a repeater, we can create a list containing a set of identical objects within it.
For the Features section, add the following fields to the repeater to hold the different content needed:
-
Short text named “Headline”
-
Long text named “Description”
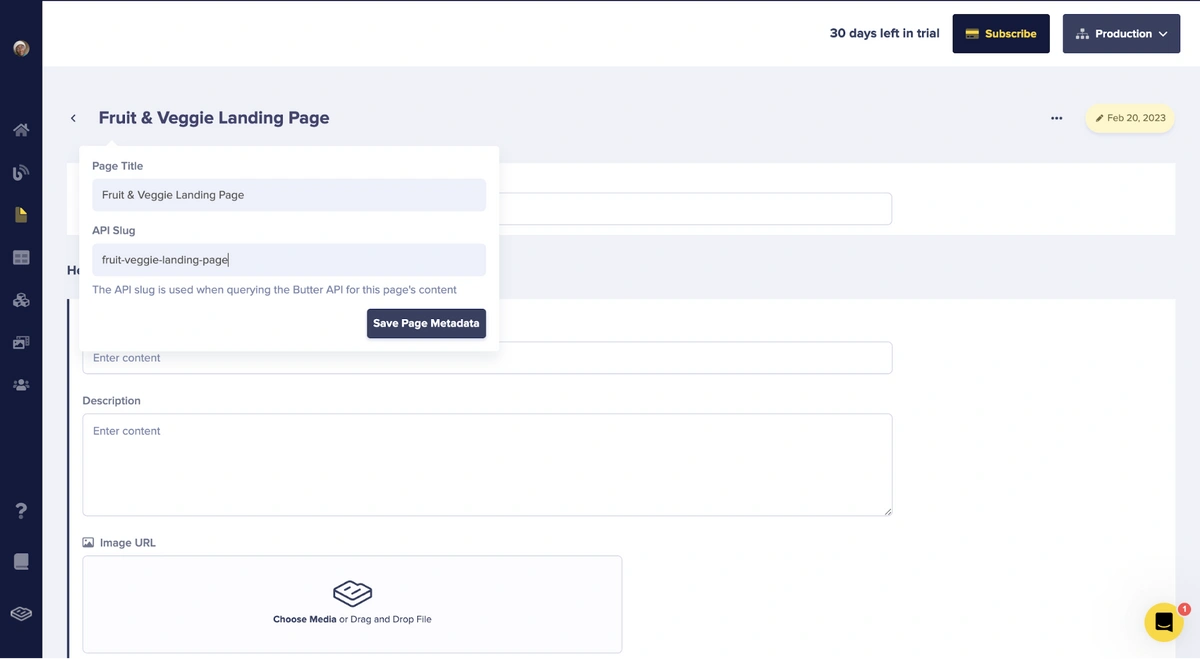
Once you have defined the Features, simply click the Save button and you will be automatically redirected back to the page editor. Here, we will be prompted to enter the Page Title and its unique API slug, which will be used to identify the page when retrieving it within our project. For this tutorial, we’ll use Fruit & Veggie Landing Page and fruit-veggie-landing-page as the values for the Page Title and its unique API slug, respectively.
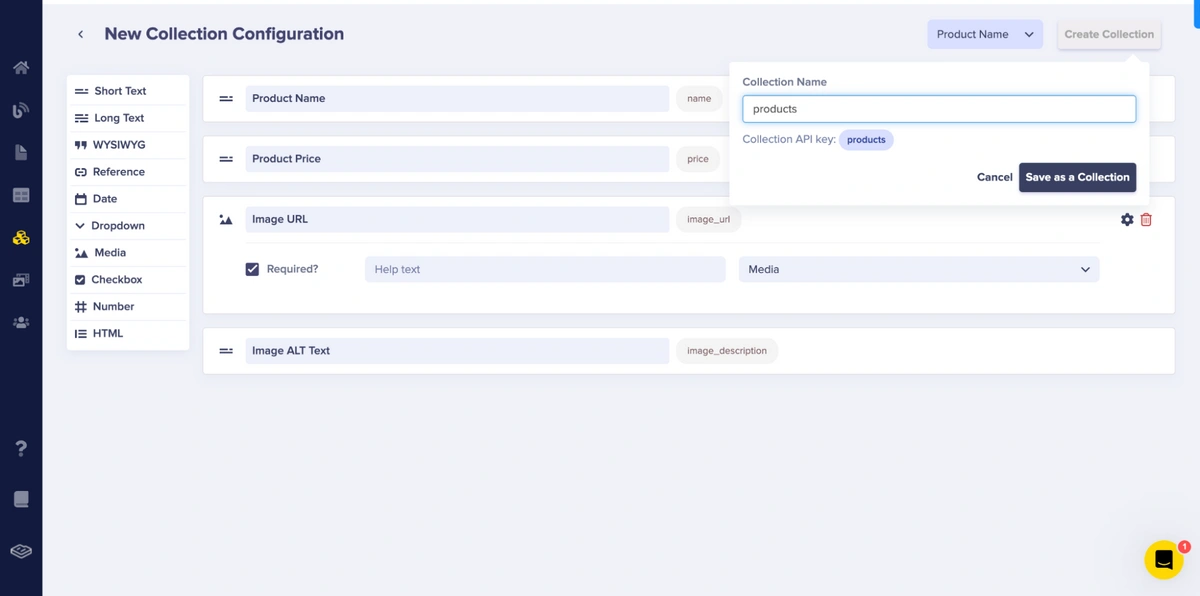
Creating the Products section
To create the Product data for the Featured Products section, we will use the ButterCMS Collections feature. Collections in ButterCMS are tables of data to be referenced by Pages, they allow users to group data together under a common category.
Within the New Collection Configuration page, we’ll add the following fields:
-
Short text named Product Name
-
Short text named Product Price
-
Media named Image URL
-
Short text named Image ALT Text
Save the collection configuration using the unique string, “products”, as the Collection API Key. With this unique string, we can retrieve only items needed for the Products section.
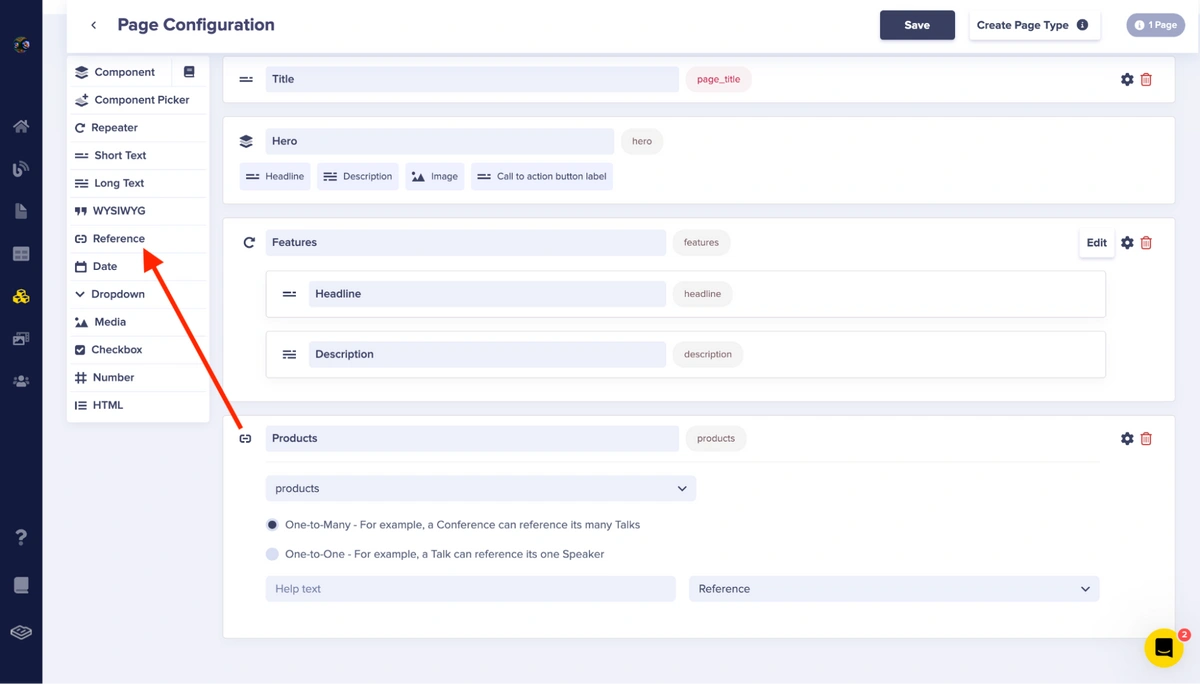
Adding the collections to our landing page
For the next step, let’s return back to the new page we created earlier. Open the page, click on the ellipse at the top right, and select Edit Schema. Here we will add a reference field to add the items within the products collection we just created:
Adding dynamic content to our landing page
Now that we’re done defining the schema of the page, go back to the page editor, click on the Fruit & Veggie Landing Page tile, go through all the components that have been created, and populate them with the required text, images, and descriptions.
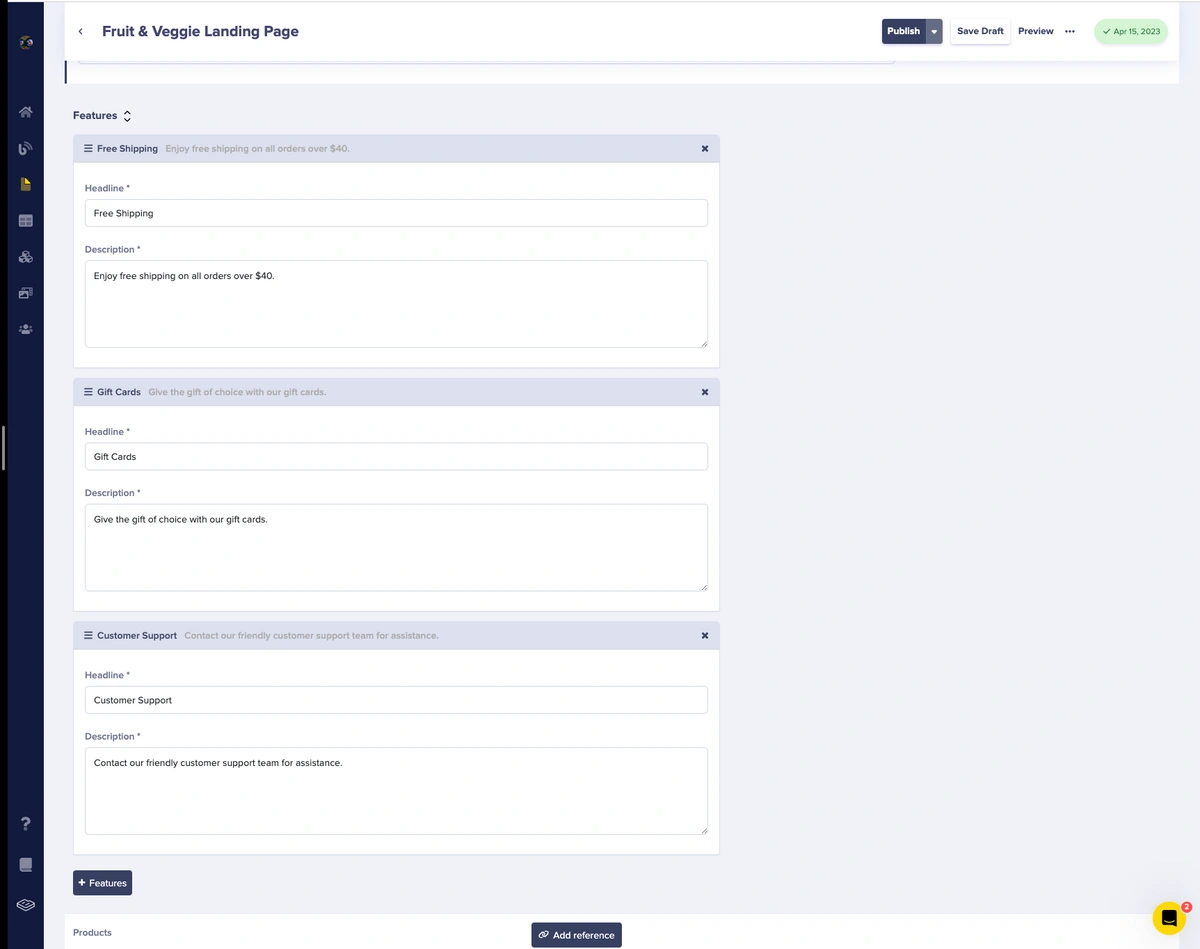
Let’s add dynamic content for the Features section by clicking on the + Feature button, and adding a value for the Headline and Descriptions fields. In the below screenshot, we have three items in the Features section, meaning we clicked on the + Feature button three times to create three distinct items.
In order for us to add items via the Products reference, we will need to create a few items within that collection. So, visit the Collections page, click the New Item button in the top right corner, and then select Products.
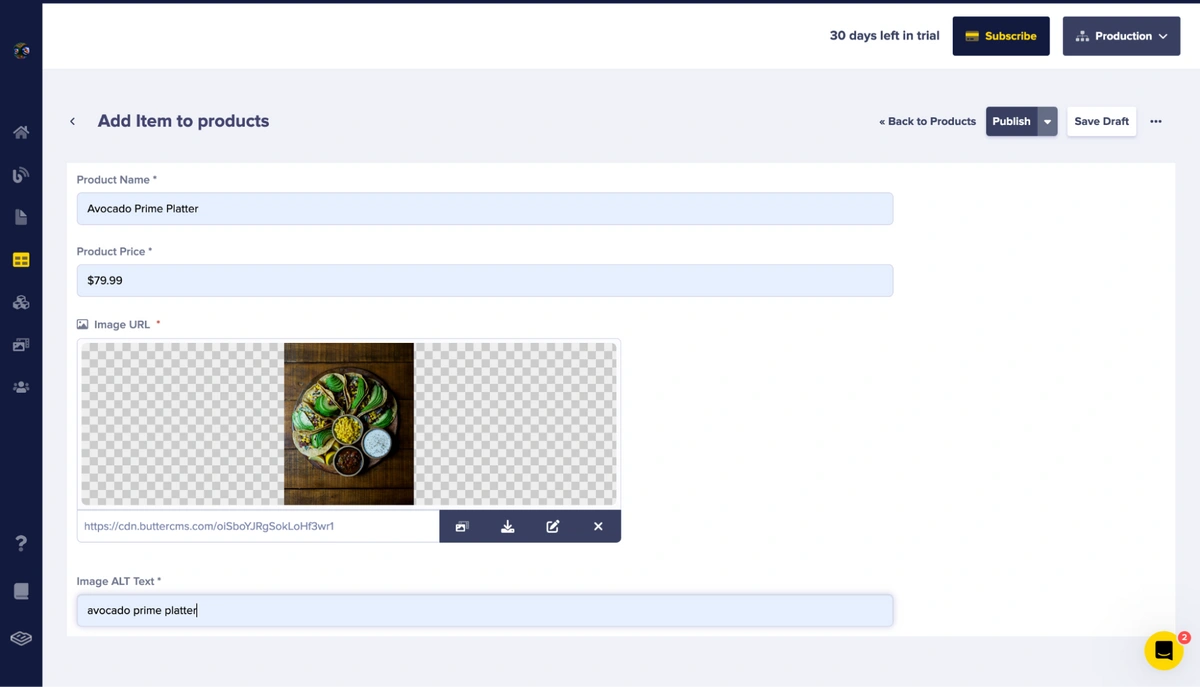
Fill out the fields within the Add items to products page and click Publish. Please do this two more times so you have a total of three items.
After creating the collection items, return back to the landing page, select Add Reference under Products, and then add all the items that show up.
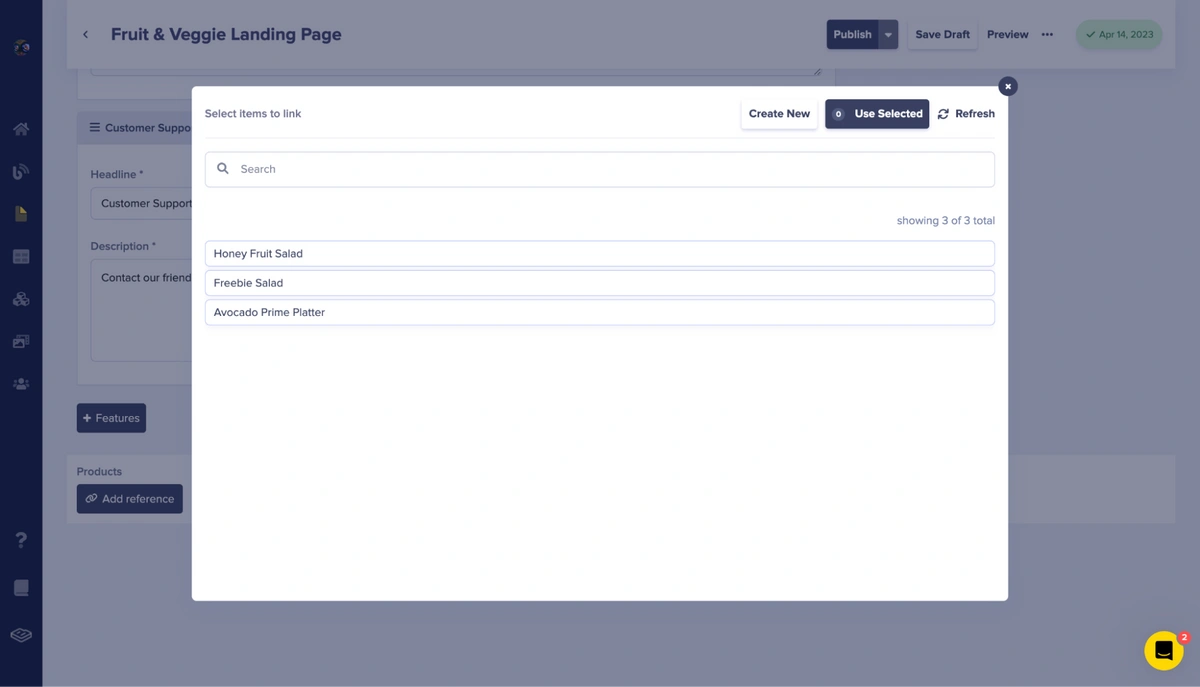
After selecting the items, click on Use Selected to add them to the landing page.
Always remember to publish new changes whenever you add/update data.
Setting up the Go project
To begin, you can clone the completed version of this project, which is available for download. Throughout the article, we will describe various components of the Go project in detail.
# bash
git clone https://github.com/Ikeh-Akinyemi/CMS-Landing-Page.git
We proceed to download the necessary dependencies listed in the go.mod file in the root directory:
# bash
go mod tidy
To download the ButterCMS SDK and pat, a lightweight pattern muxer for Go's net/http library, run the Go command provided above.
Define the data model
After installing the required packages, the next step is to define the data model for the returned data from the API call to ButterCMS.
// File: ./server/internal/model
type Product struct {
  // Name of the product
  Name        string `json:"name"`
  // Price of the product
  Price       string `json:"price"`
  // URL for the product's image
  ImageURL    string `json:"image_url"`
  // Alternative text for the product's image
  ImgAltText  string `json:"image_description"`
}

type Hero struct {
  // Headline for the hero section
  Headline    string `json:"headline"`
  // Description for the hero section
  Description string `json:"description"`
  // URL for the hero section's image
  ImageURL    string `json:"image_url"`
  // Label for the hero section's button
  ButtonLabel string `json:"btn_label"`
}

type Feature struct {
  // Headline for the feature
  Headline    string `json:"headline"`
  // Description for the feature
  Description string `json:"description"`
}

type LandingPage struct {
  // Title of the landing page
  PageTitle string `json:"page_title"`
  // Data for the hero section
  Hero Hero `json:"hero"`
  // List of features for the landing page
  Features []Feature `json:"features"`
  // List of products for the landing page
  Products []Product `json:"products"`
}
Setup the server and its endpoints
To retrieve, parse the returned data, and render the landing page with the returned data, we will set up a server, an endpoint route, and a handler that uses the Go HTML package.
package main

import (
 "log"
 "net/http"

 "github.com/bmizerany/pat"
)

func main() {
  port := ":8080"
  log.Printf("starting server on port %s\n", port)

  mux := pat.New()

  mux.Get("/landing-page", http.HandlerFunc(landingPage))

  // Create a file server which serves files out of the "./ui/static"   directory.
  fileserver := http.FileServer(http.Dir("./ui/static/"))
  mux.Get("/static/", http.StripPrefix("/static", fileserver))

  http.ListenAndServe(port, mux)
}
The above snippet sets up a server with endpoint routes and handlers to serve a landing page and static files.
The pat package is used to create a new router (called mux) that will match incoming requests to their corresponding handler functions. In this case, there is only one route defined, which is for the landing page at /landing-page.
The http.HandlerFunc is used to wrap the landingPage function which will handle the incoming request to the /landing-page endpoint.
The next block of code creates a file server that serves static files from the ./ui/static directory. The http.Dir function is used to get an http.FileSystem object that is used to serve static files. The http.FileServer is used to serve files from the http.FileSystem object. The http.StripPrefix is used to remove the /static prefix from the incoming request URL to correctly match the file path with the file location.
Finally, http.ListenAndServe is used to start the server and listen for incoming requests on port 8080. The mux object is passed as a parameter to handle incoming requests.
Define the endpoint handler
Before we start the server, let’s define the landingPage function. This function will have the function signature of func(w http.ResponseWriter, r *http.Request), as below:
// File: ./server/cmd/landing_page.go
func landingPage(w http.ResponseWriter, r *http.Request) {
  ButterCMS.SetAuthToken(os.Getenv("BUTTERCMS_API_TOKEN"))
  data := map[string]string{}

  result, err := ButterCMS.GetPage("*", "fruit-veggie-landing-page", data)
  if err != nil {
    log.Fatal(err)
  }

  templateData := model.LandingPage{}
  templateData.PageTitle, _ = utils.GetValue[string](result.Page.Fields, "page_title")
  templateData.Features = utils.ProcessFeaturesSection(result.Page.Fields)
  templateData.Products = utils.ProcessProductsSection(result.Page.Fields)
  templateData.Hero = utils.ProcessHeroSection(result.Page.Fields)
  render(w, r, "./ui/html/template.html", &templateData)
}

func render(w http.ResponseWriter, r *http.Request, name string, td *model.LandingPage) {
  t, err := template.ParseFiles(name)
  if err != nil {
    log.Fatal(err)
  }
  buf := new(bytes.Buffer)
  err = t.Execute(buf, td)
  if err != nil {
    log.Fatal(err)
  }
  buf.WriteTo(w)
}
The above snippet defines a handler function for the endpoint /landing-page, which retrieves data from the ButterCMS API and renders the landing page HTML template using the returned data.
The landingPage function first sets the authentication token for ButterCMS using an environment variable. It then initializes an empty map for the data, which will be passed to the ButterCMS API.
Next, it calls the GetPage methods of the ButterCMS client to retrieve all the data for the "fruit-veggie-landing-page" slug. The * in the first parameter of the GetPage method tells the API to return all fields for the page. If there's an error retrieving the data, it logs the error and exits.
The utils package provides the functions that help parse the returned data from the API into the LandingPage struct defined in the data model. The templateData variable is then populated with the processed data.
Finally, it calls the render function, which uses the html/template package to render the HTML template with the data passed in. The resulting HTML is then written to the response writer. See the definition of the template on GitHub.
As mentioned above, we have utility functions to parse data returned from the API call to ButterCMS. Let’s define and explain the internal implementation of these functions next.
// File: ./server/internal/utils/utilities.go
func GetValue[T any](input map[string]interface{}, name string) (T, error) {
  field, ok := input[name].(T)
  if !ok {
    var null T
    return null, fmt.Errorf("unable to get property %s from map", name)
  }
  return field, nil
}
The GetValue function is a generic function that returns a value of any type T from a map of string keys and interface{} values. It takes two arguments: input, which is the input map, and name, which is the key in the map to retrieve the value for. The function attempts to retrieve the value from the input map using the given key, and then converts it to the desired type T. If the conversion is successful, it returns the converted value along with no error. Otherwise, it returns an error.
Next, let’s see the internal implementation of ProcessFeaturesSection below:
// File: ./server/internal/utils/utilities.go
func ProcessFeaturesSection(section map[string]interface{}) []model.Feature {
  unparsedFeatures, _ := GetValue[[]interface{}](section, "features")
  features := []model.Feature{}
  for _, unparsedFeature := range unparsedFeatures {
    typedFeature := unparsedFeature.(map[string]interface{})
    headline, _ := GetValue[string](typedFeature, "headline")
    description, _ := GetValue[string](typedFeature, "description")
    feature := model.Feature{
      Headline: headline,
      Description: description,
    }
    features = append(features, feature)
  }
  return features
}
The ProcessFeaturesSection function is used to extract and process the "features" section of the page data returned from the ButterCMS API.
It takes in a map section which represents the entire page data as a collection of key-value pairs. The function first extracts the features key from this map and stores its value in the unparsedFeatures variable.
Next, it initializes an empty slice of model.Feature structs called features. It then iterates over each item in unparsedFeatures, which is a slice of interface{} types. For each item, it casts it to a map[string]interface{} type, representing the feature data as a collection of key-value pairs.
The function then extracts the headline and description keys from this map using the GetValue utility function and creates a new model.Feature struct with those values. This model.Feature struct is then appended to the features slice, and returned to the calling environment.
Define the utility functions
Next, let’s see the internal implementation of ProcessProductsSection below:
// File: ./server/internal/utils/utilities.go
func ProcessProductsSection(section map[string]interface{}) []model.Product {
  unparsedProducts, _ := GetValue[[]interface{}](section, "products")
  products := []model.Product{}
  for _, unparsedProduct := range unparsedProducts {
    typedProduct := unparsedProduct.(map[string]interface{})
    name, _ := GetValue[string](typedProduct, "name")
    price, _ := GetValue[string](typedProduct, "price")
    imageURL, _ := GetValue[string](typedProduct, "image_url")
    imgAltText, _ := GetValue[string](typedProduct, "image_description")
    product := model.Product{
      Name: name,
      Price: price,
      ImageURL: imageURL,
      ImgAltText: imgAltText,
    }
    products = append(products, product)
  }
  return products
}
The ProcessProductsSection function is used to extract and parse product data from the section map, and it is similar to ProcessFeaturesSection in that it loops through an array of unparsed data, extracts the relevant fields, and creates a slice of model.Product structs.
The unparsedProducts variable is obtained using the GetValue utility function, which extracts the array of product data from the section map using the key "products". The function then loops through the array of unparsedProduct values and casts each value to a map[string]interface{} using a type assertion. From there, the name, price, image_url, and image_description fields are extracted using the GetValue function and assigned to a new model.Product struct. This struct is then appended to the products slice, which is ultimately returned by the function.
Next, let’s see the internal implementation of ProcessHeroSection below:
// File: ./server/internal/utils/utilities.go
func ProcessHeroSection(section map[string]interface{}) model.Hero {
  unparsedHero, _ := GetValue[map[string]interface{}](section, "hero")
  headline, _ := GetValue[string](unparsedHero, "headline")
  description, _ := GetValue[string](unparsedHero, "description")
  imageURL, _ := GetValue[string](unparsedHero, "image_url")
  buttonLabel, _ := GetValue[string](unparsedHero, "btn_label")
  return model.Hero{
    Headline: headline,
    Description: description,
    ImageURL: imageURL,
    ButtonLabel: buttonLabel,
  }
}
The ProcessHeroSection function is a utility function used in the landingPage function to extract and process data for the Hero section of the landing page. It takes a map of the section data as an input and returns a model.Hero object.
The function first extracts the hero section data from the input map using the GetValue function. It then further extracts the individual fields of the hero section, such as headline, description, image_url, and btn_label, using the GetValue function again. Finally, it returns a model.Hero object with the extracted field values.
The ProcessHeroSection function is similar to the ProcessFeaturesSection and ProcessProductsSection functions, but instead of processing a list of items, it processes a single object.
Start the server
Now that we have all the different components of the project explained, let’s start the server by running the command go run followed by the directory path of the main.go file. For example:
# bash
go run server/cmd/*
This command will start the server and make it available on localhost:8080. To access the landing page, navigate to the URL localhost:8080/landing-page on your browser.
Congratulations on your new landing page!
Congratulations! You've successfully created your new landing page with our platform. We are thrilled to have played a part in helping you achieve this important milestone for your business.
Here is the screenshot of the live version:
Final thoughts
By leveraging ButterCMS and Go, we have demonstrated how easy it is to build an e-commerce landing page. With ButterCMS handling content management and Go powering the backend, we have been able to create a dynamic, and responsive landing page in a matter of hours.
This approach provides several benefits for building landing pages quickly and efficiently. By separating the front-end from the back-end, we can easily make changes to the content and design without affecting the functionality of the site. Additionally, using ButterCMS as a headless CMS allows us to use any programming language or platform to consume the content API.
However, an e-commerce site requires more than just a landing page. Additional functionality such as a shopping cart, checkout system, and user account management are crucial for a complete online shopping experience. Fortunately, the modular nature of our approach makes it easy to expand the functionality of our site.
To add a shopping cart, for example, we can create a new endpoint that handles adding, updating, and deleting items from the cart. We can then modify our HTML template to display the cart contents and integrate with a payment gateway to enable checkout. Similarly, we can create an authentication system that allows users to create accounts, save their shipping and billing information, and view their order history.
In conclusion, our landing page is just the beginning of what is possible with ButterCMS and Go. With these powerful tools at our disposal, we can build a fully-functional e-commerce site with all the features required for a seamless shopping experience.
This project serves as a great example and if you want to learn more about using ButterCMS, we can check out their documentation. All the code for this tutorial can be found in this GitHub repo.
To learn more about how you can use headless CMS and/or a headless architecture for e-commerce, check out the following articles:

