
There are many different ways to build a landing page—possibly even too many. The number of choices you can make to come up with the perfect technology stack can leave you in “analysis paralysis”.
Every technology has its pros and cons. But what if you want to have highly customizable landing pages and a robust dashboard that allows you to quickly iterate through changes at the same time?
In this article, we are going to take a look into how you can build your very own custom landing page using ExpressJS and ButterCMS to solve this problem. But before jumping into how to get started with ExpressJS + ButterCMS, the question is: Why should you use them in the first place?
Table of contents
Why should you use Express.js?
According to the latest state of JavaScript survey, which was filled out by more than 15,000 developers, Express still ranks as the number one backend framework when it comes to usage and awareness. There is a striving community behind it, and over the years, the framework has collected more than 50,000 GitHub stars.
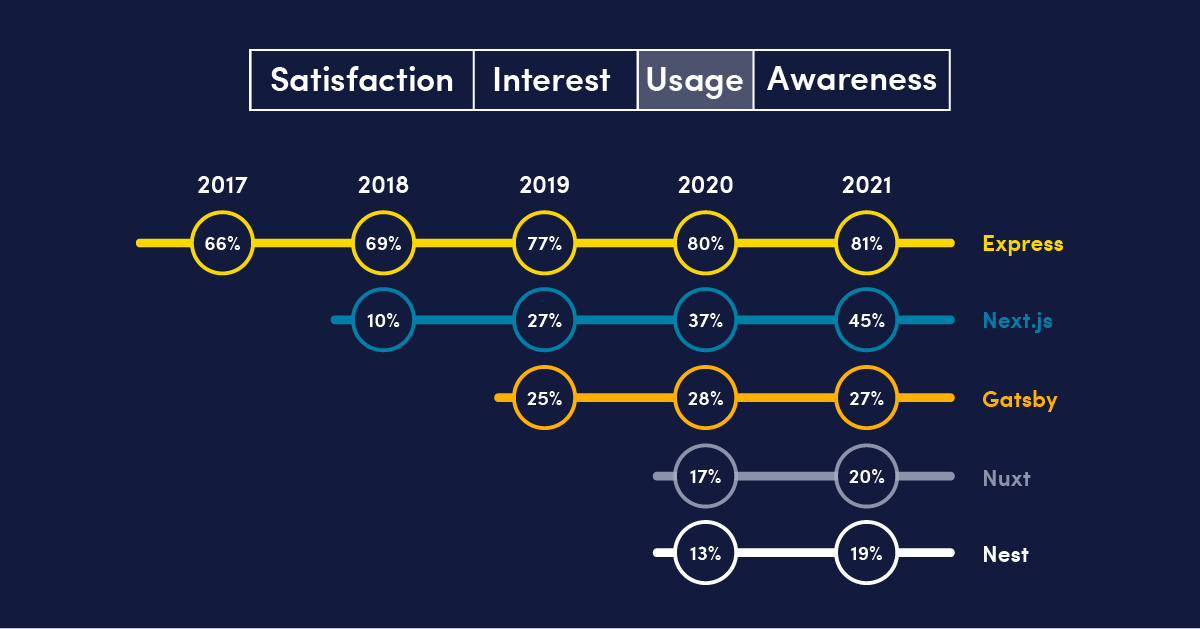
Top 5 backend frameworks by usage on the 2021 State of JS survey
As Express provides only a thin layer of web application features, its performance is unmatched. This thin layer also means you can still get to use your favorite Node features right inside Express. It has a myriad of HTTP utility methods and middleware at your disposal for creating quick and robust Node applications.
Even if the middleware of your choice is not supported by Express out of the box, you will likely find an external package for it created by the community on NPMJS, such as CORS or Helmet.
Since its initial release back in 2010, the framework has had more than a decade to mature, which makes it a perfect choice for building Node applications with JavaScript.
Why should you use ButterCMS?
You may also wonder why you should choose ButterCMS as your content management system (CMS).
ButterCMS is a headless CMS which means there are no implementation constraints—you get to use the technology of your choice for your site. In our case, this is ExpressJS. ButterCMS provides an easy-to-use yet powerful dashboard for building pages, and all your data is returned through API endpoints in JSON format.
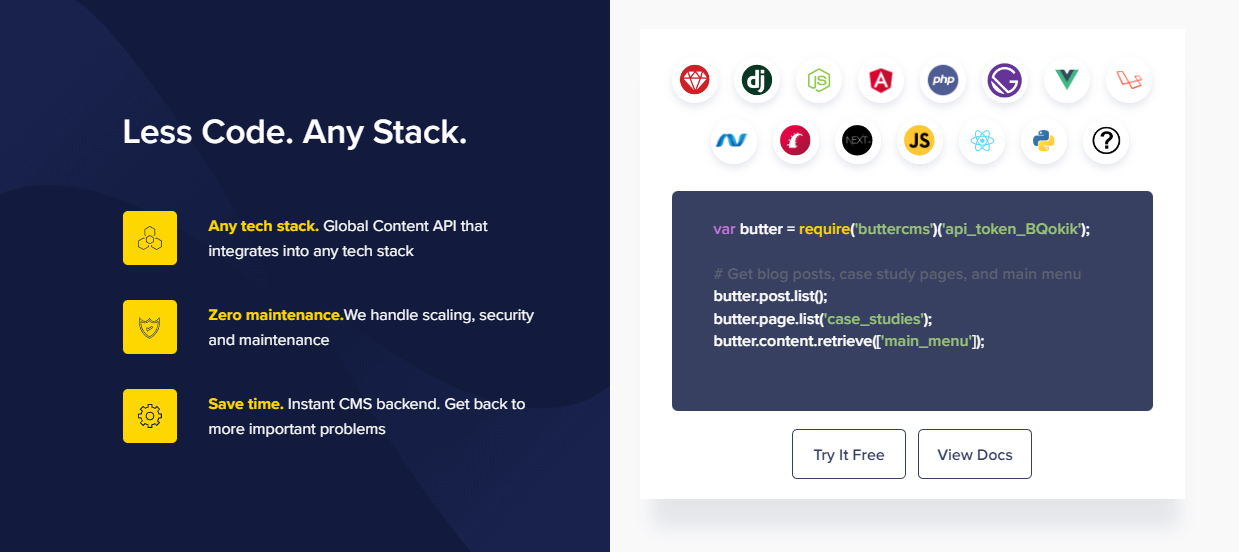
Use any stack with ButterCMS
Being headless makes it very flexible to launch many different landing pages through one centralized dashboard where all your content can be found in one place, but the user-facing side can vastly differ for each landing page, which enables faster experimentation and smaller feedback loops.
What you will need for this tutorial
This tutorial assumes you already have NodeJS installed on your machine and basic knowledge of using the terminal, such as running NPM commands. If you don’t already have Node installed, head over to their homepage and download the right executable for your machine.
You will also need to have a ButterCMS account from which we will add our custom landing page. That is all you will need for this tutorial. Although some prior experience with ExpressJS will help, you will be able to follow along if you have never worked with Express before, as I will be explaining everything along the way.
Without any further ado, let’s jump into setting up ExpressJS for ButterCMS.

How to set up Express for ButterCMS
Luckily for us, ButterCMS provides very clear guidance on how we can set up various stacks for the CMS, including Express. When you first log into your ButterCMS account, you will be greeted with a list of technologies you can use out of the box with ButterCMS. In our case, we will go with ExpressJS.
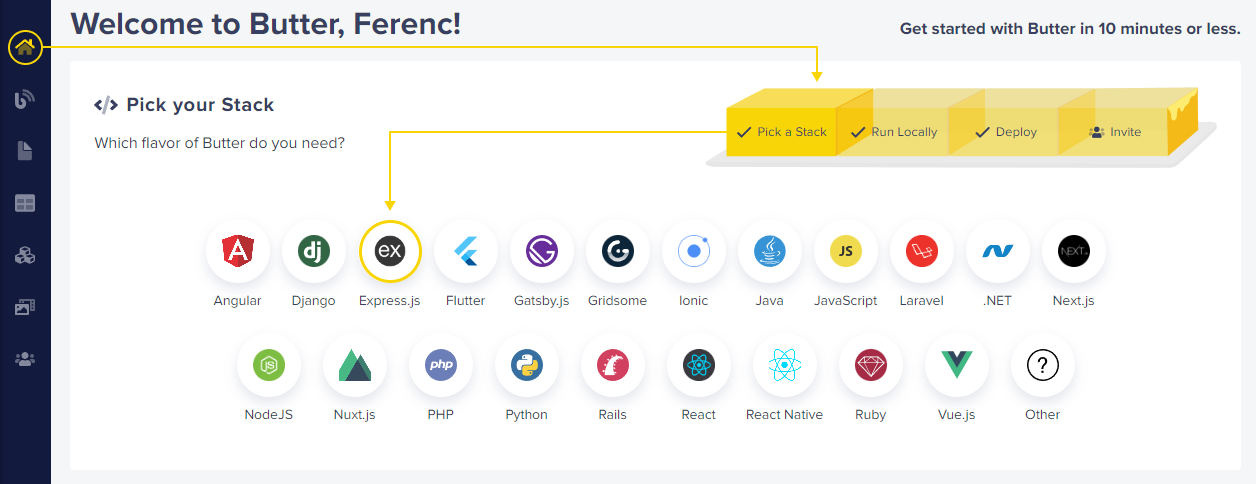
If you don’t see this step on your homepage, make sure you click on “Pick a Stack” first
Here, you will be presented with your Butter API token. Take note of this token as we will need to use it later on in our Express app to be able to make API calls. Then, we will need to clone the expressjs-starter-buttercms repo that will bootstrap the application for us.
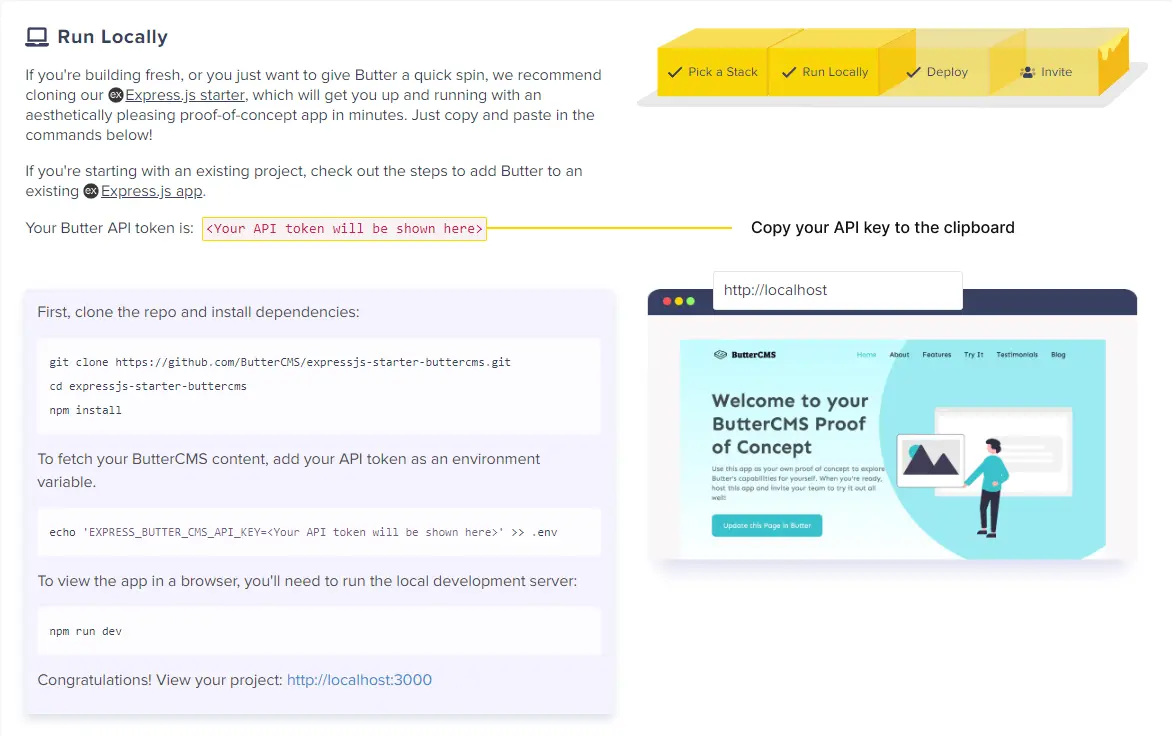
We just need to follow the steps provided by the CMS. Open your IDE and run the following commands consecutively inside your terminal:
git clone https://github.com/ButterCMS/expressjs-starter-buttercms.git
cd expressjs-starter-buttercms
npm install
This will clone the Express-ButterCMS repo to your machine and, after opening the project directory, it will install all of the dependencies.
Now the only thing left to do is to add your API key to your project’s directory. Create a new file at the root of your project called .env and add the following line to the file:
EXPRESS_BUTTER_CMS_API_KEY=<Paste your API token here>Paste your API key to the variable you copied from your ButterCMS dashboard, and now we can start up our express app by running npm run dev in the terminal. Now, you should be able to access your default landing page in ButterCMS through localhost:3000.
How landing pages are rendered in Express
To better understand how landing pages work in Express with ButterCMS, let’s examine first how they are rendered.
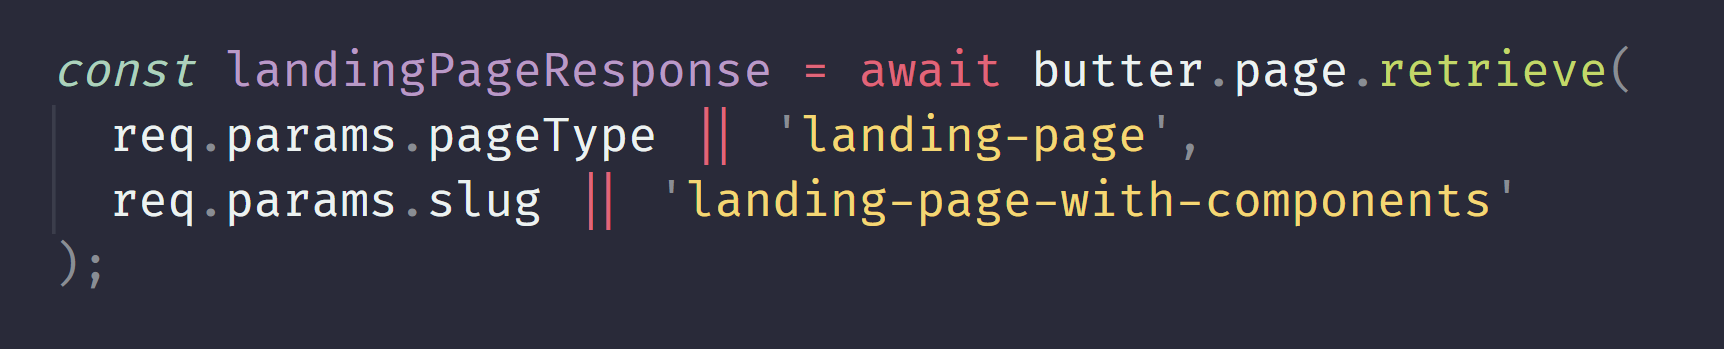
If you open the index.js file at the root of your project and scroll to the bottom of the file, you will notice that just before we call app.listen, we have the following call that is responsible for rendering landing pages from ButterCMS:

You can add new routes to express using the app.get method with a URL
If we head over to the renderLandingPage function to see how ButterCMS handles rendering landing pages, we will see that the response is made up of two parameters—the:pageType and:slug parameters that are passed through the URL. In case these are not set, we have the default landing page hardcoded.
Sure enough, if we head over to localhost:3000/landing-page/landing-page-with-components/, we will be greeted with the same landing page we can see on the home page as well. However, we are not going to use this default landing page. Instead, we are going to create our own to see how you can customize everything from scratch.
How to create landing pages in ButterCMS
To create a new landing page in ButterCMS, head over to the dashboard of your CMS and, on the sidebar, click on the plus sign next to “Landing Page” to create a new page.
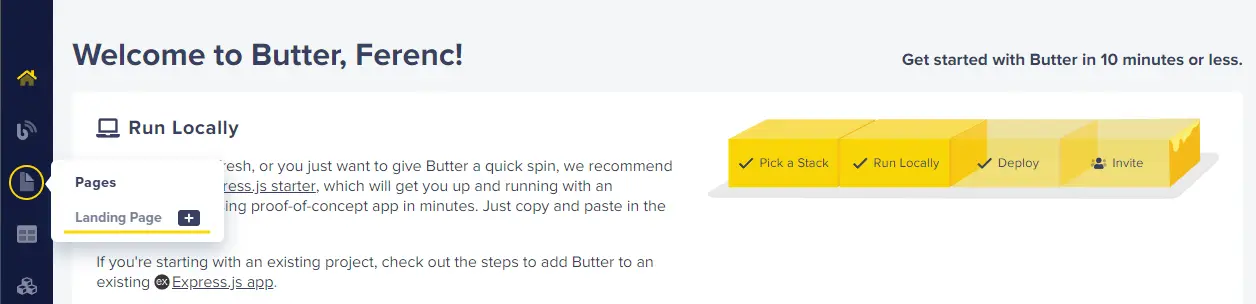
Hover over the “Pages” icon to add a new landing page
This will bring up a new empty page where we first need to enter the page title, as well as the API slug. The API slug will represent the URL where you can access your page. You can change these settings later. For this tutorial, we’ll call it “Custom Landing Page”.

If you now head over to localhost:3000/landing-page/custom-landing-page, you will notice that the page shows the latest blog posts. This is because we haven’t added any fields yet and, by default, Express will render a blog section at the very bottom of your landing page. You can see this if you open views/index.ejs in your Express project.
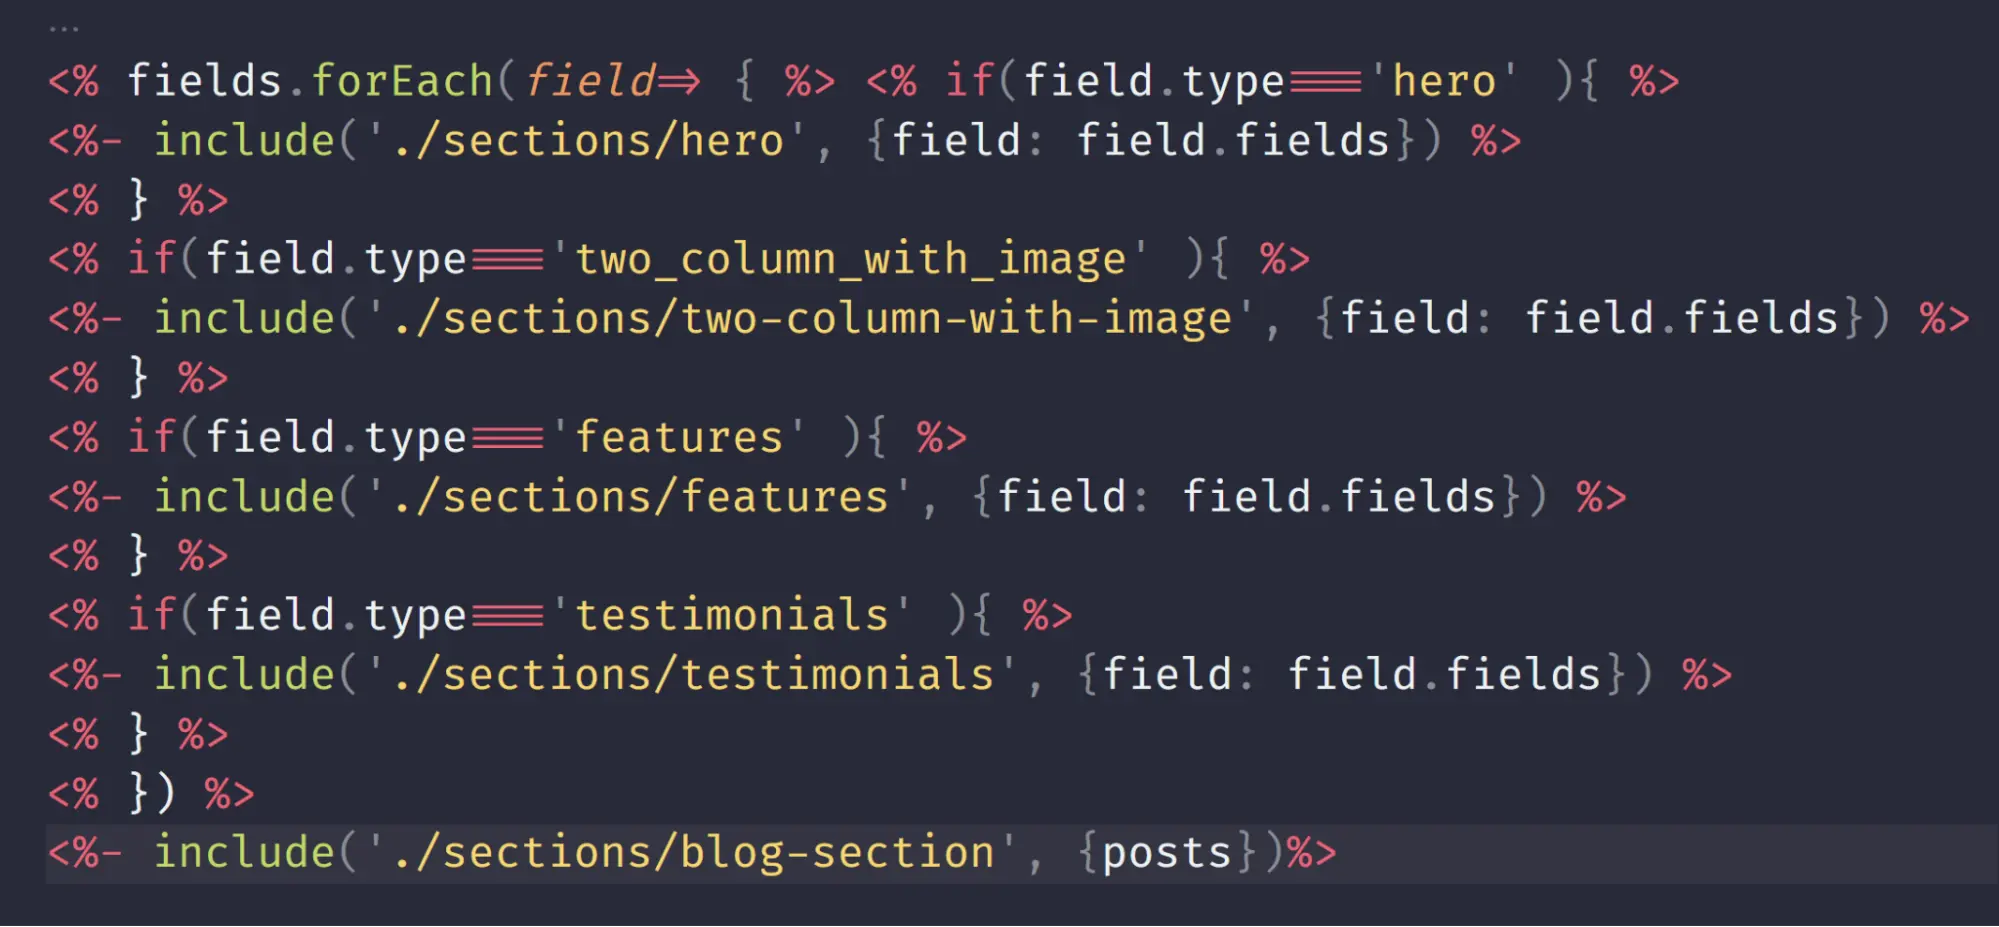
The index.ejs template
As you can see, the Express app is using EJS templates. EJS stands for Embedded JavaScript which is a templating language to generate HTML markup with JavaScript.
Here, we are looping through each field and displaying the appropriate template based on the type of field. At the very end of the template, we are rendering the blog section. So let’s add some components now.
Adding components to your landing page
If you open your landing page inside your ButterCMS dashboard and click on the plus icon under the “Body” tab, a.k.a. the component picker, you will see the available components you can add to this landing page, such as “Features”, “Hero”, or “Testimonials”.
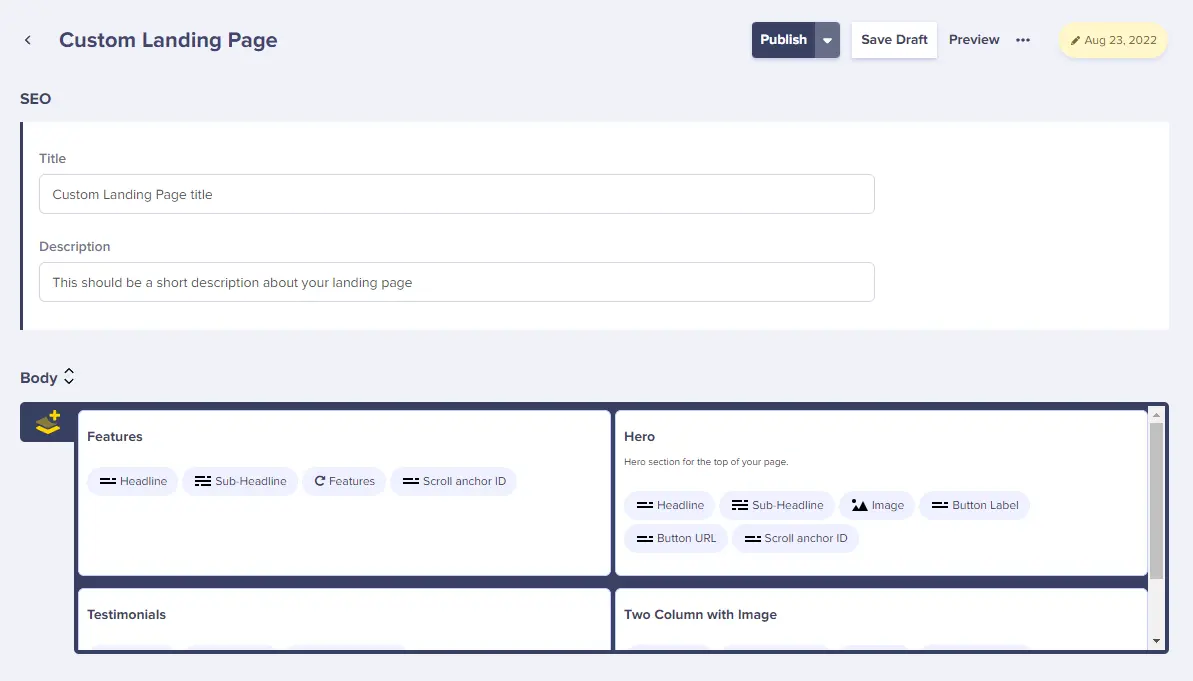
Adding components to our landing page using the component picker
If you add one of the components, you will be able to fill out the details to customize what is returned from the API. Add a new Hero component and fill out the details to see how it will be rendered on the frontend. Once you are ready, don’t forget to save the landing page and your localhost.
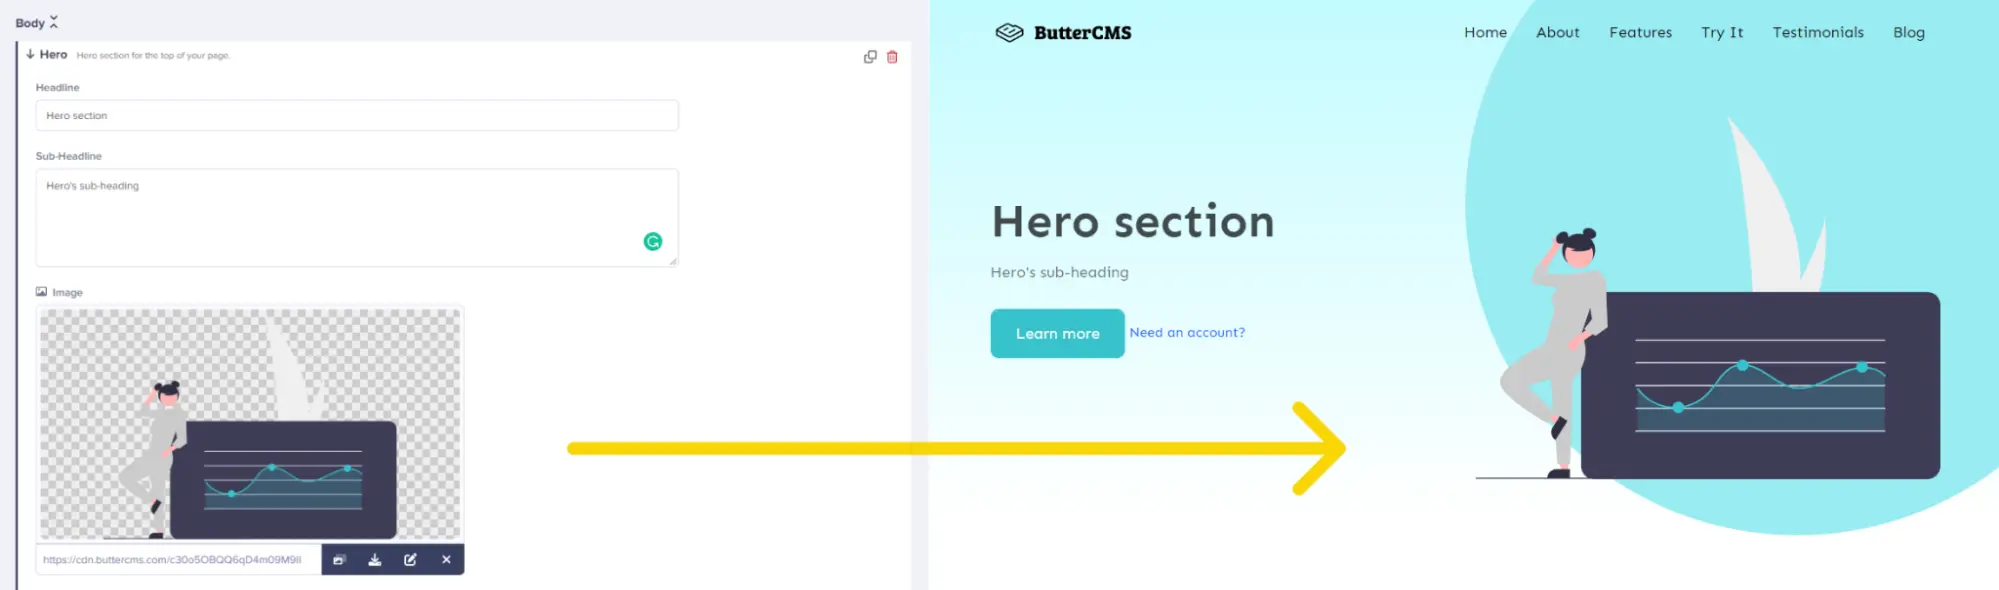
Adding new components will be reflected in Express
Note that the Express app comes with a default design. Since ButterCMS is a headless CMS, you can change this design as well as the layout at any time, and display the returned data to your own taste.
Of course, we are quite limited at the moment because we can only add four different components to our landing page. Luckily for us, we can create our own components to add more flexibility.
Creating custom components in ButterCMS
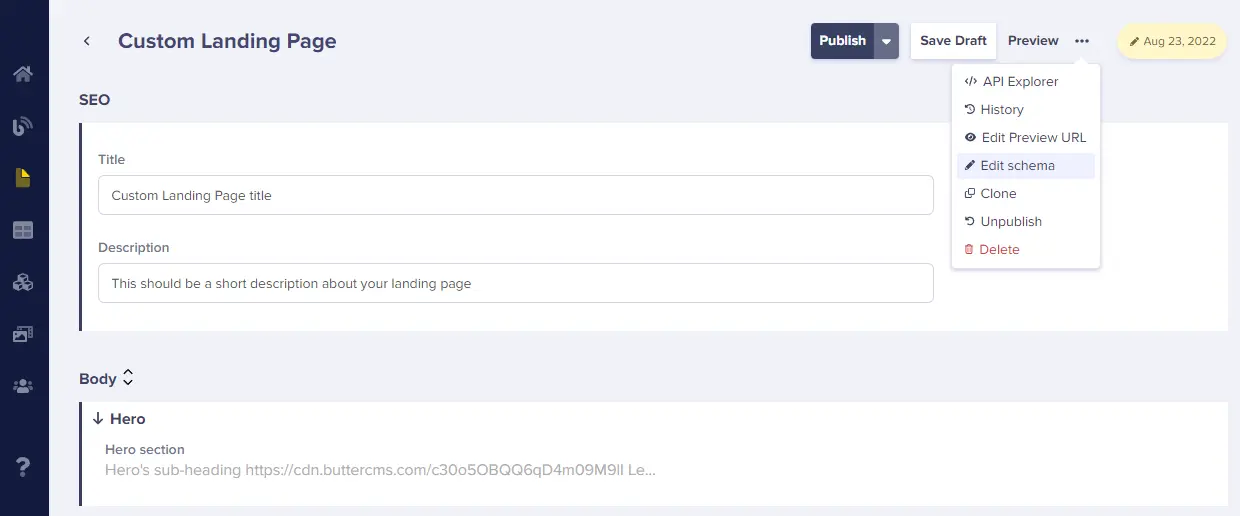
In order to create brand new components (i.e. custom components) that we can later reuse, click on the three dots next to the “Preview” button inside your landing page, and click on “Edit schema”.
Here we will see all of the available components we can use for our landing pages. To create a new component, simply click on the “Create Component” button and add the fields you need. To demonstrate this, let’s create a list component for showcasing a list of features.
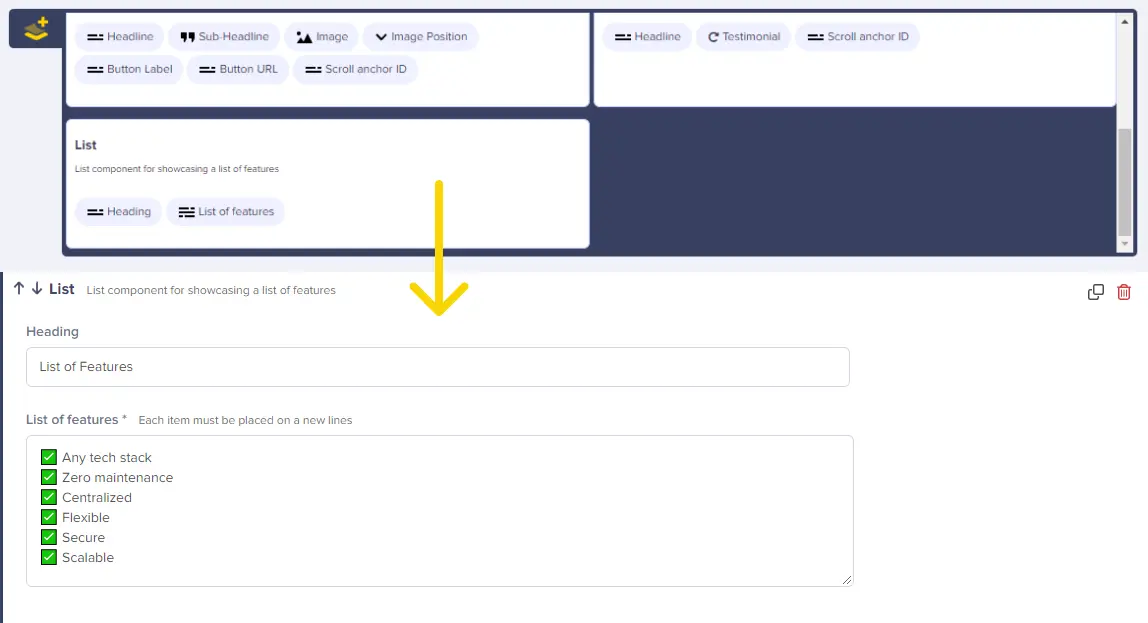
Inside the component, we are able to add all sorts of fields. The ones we are interested in are “Short Text” for a heading and “Long Text” for the list of features. We can also add descriptions both to the component as well as the field to describe what they are used for. Next to the name of the field, you will also see a pill with the name transformed to lowercase. This is how we will be able to access the field inside Express.
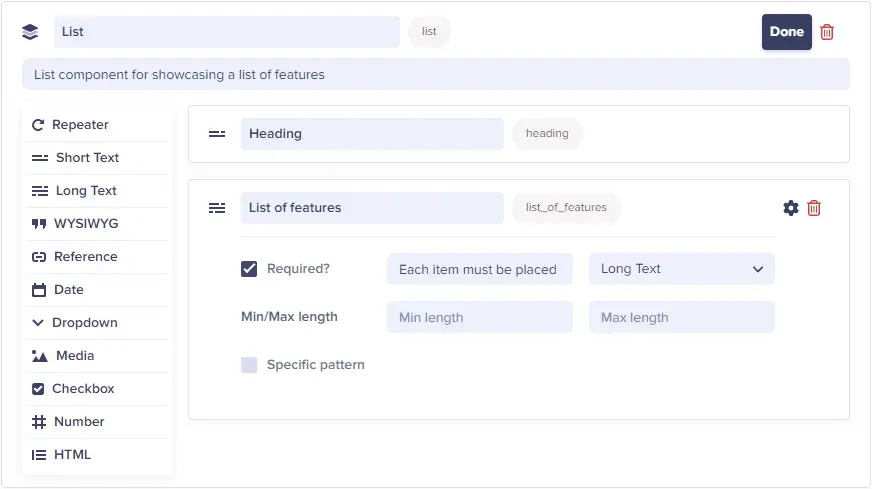
Add a “Short Text” for the heading and a “Long Text” for the list
I have also added a helpful description to the list of features—“Each item must be placed on a new line”—to help content creators understand how they can add new elements. We are going to use this to break up the string based on new line characters.
After you are done with creating the component, click on the “Done” button, and don’t forget to also click on “Save” at the top of the page to save your components. You can then use the back arrow to head back to your landing page and add the newly created component.
Notice that the description we have added for the fields shows up to help the editor
How to handle components in Express
The last thing we need to do is to finally add this component to our Express app. Since this is a brand new component, our app currently doesn’t know how to handle and display it.
In order to display it, we need to tell Express what to do when it receives this new field. But how do we know exactly what Express will receive? Luckily for us, ButterCMS also provides a really handy API explorer that we can use to see what data will be returned in JSON format. To explore the response, click on the three dots again, and click on “API Explorer” to bring up the response of the landing page.
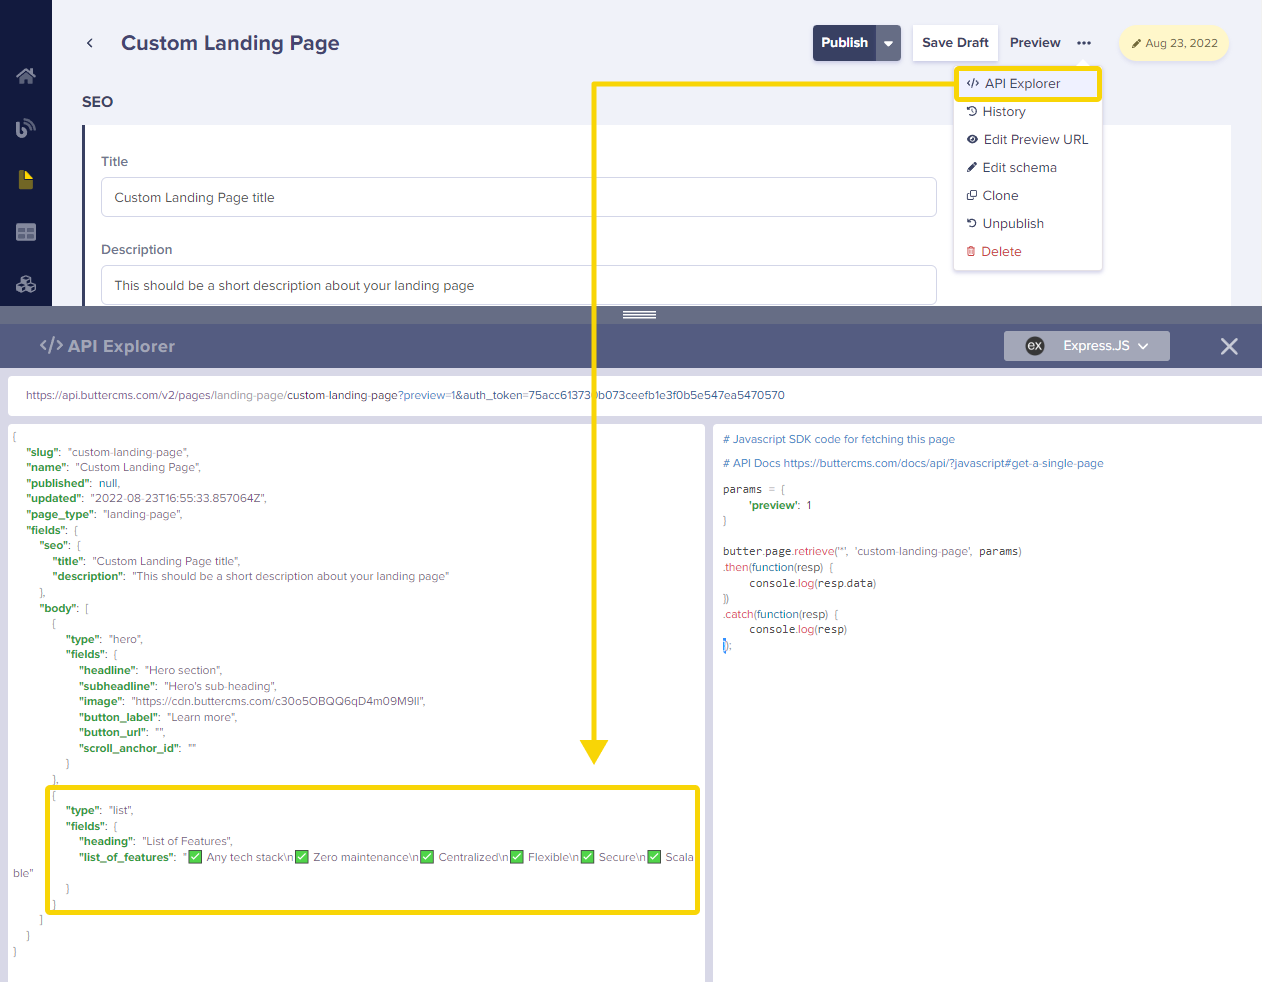
We can see that the new field is returned as a list type field (because we named it “List”), along with the heading and the list of features. Now we know how to reference the data inside Express. Alternatively, we could also log out the data inside the index.js file in Express.
First things first, let’s add another if statement to our views/index.ejs template to handle this new list type field:
<% if(field.type === 'list' ){ %>
  <%- include('./sections/list', { field: field.fields }) %>
<% } %>
These three lines will be responsible for rendering the new list component. Just like with the other fields, we first check if the type is a list type. If so, we can include a new template along with the passed fields. For the next step, let’s create this new template. Create a new file called list.ejs inside your views/sections directory and add the following code:
<section class="list-section">
  <div class="container">
    <% if (field.heading) { %>
      <h2 class="mb-20"><%= field.heading %></h2>
    <% } %>
    <ul>
      <% field.list_of_features.split('\n').forEach(feature => {%>
        <li class="mb-2"><%= feature %></li>
      <% }) %>
    </ul>
  </div>
</section>
As the ButterCMS Express app comes with Bootstrap by default, we can use some predefined classes to style the component accordingly. The important parts are how the heading and the list of features are added.
For the heading, make sure you wrap it into an if statement, as this field can be optional inside the CMS, which means we only want to render an h2, if the data is filled.
For the list, we want to create a ul and loop through the items to create an li for each new line. However, since the list is returned as a single string, we first need to use split to break it up by new line characters (\n). After this, we can use a forEach to loop through them and display an li for each item. With all of this in place, now you should be able to see your brand new component being displayed on your landing page.
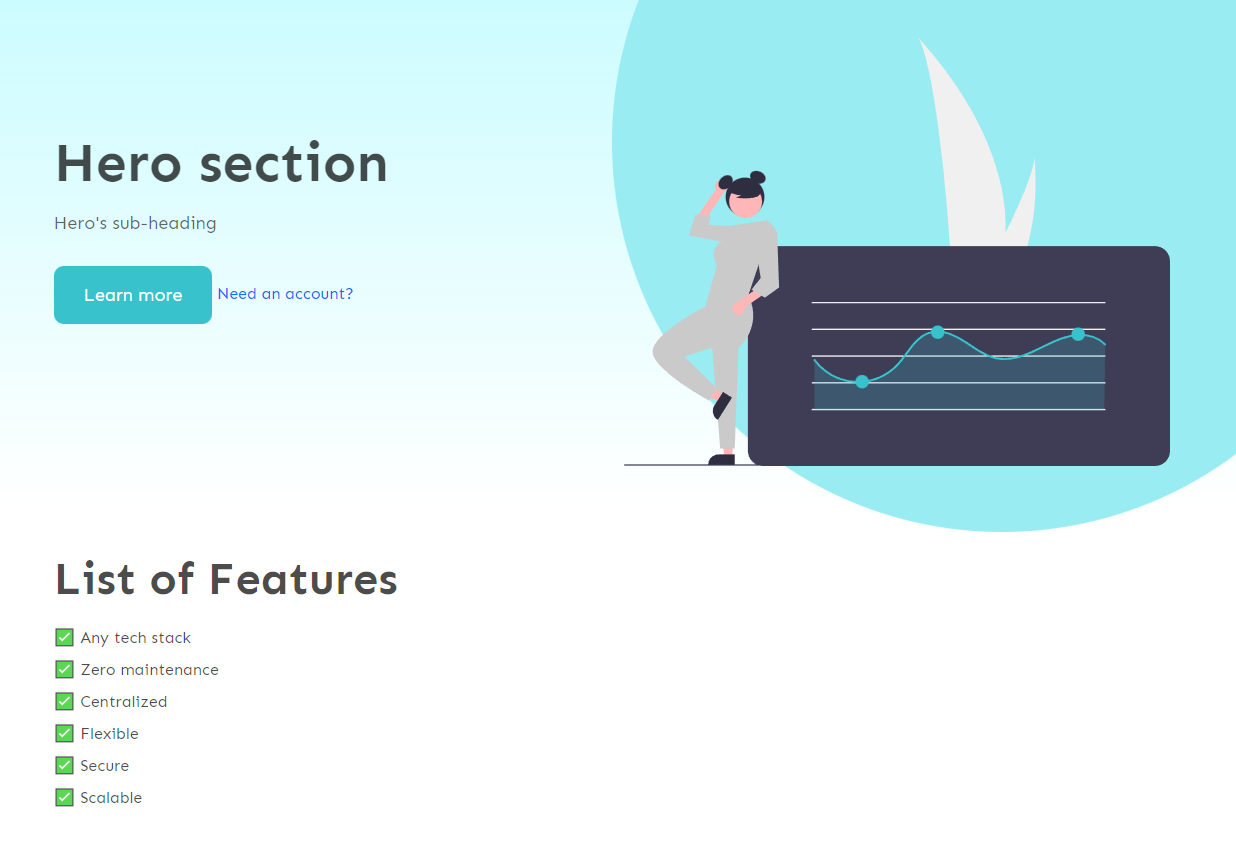
The new list component being displayed under our hero component
Closing thoughts
In conclusion, adding landing pages to your Express app with ButterCMS is a breeze. Most can be configured right through the dashboard of ButterCMS, which makes customizing landing pages easy for less experienced developers.
In case you want to go fully customized, ButterCMS also offers a powerful API explorer that we saw above, where you can see all your data returned in JSON format.
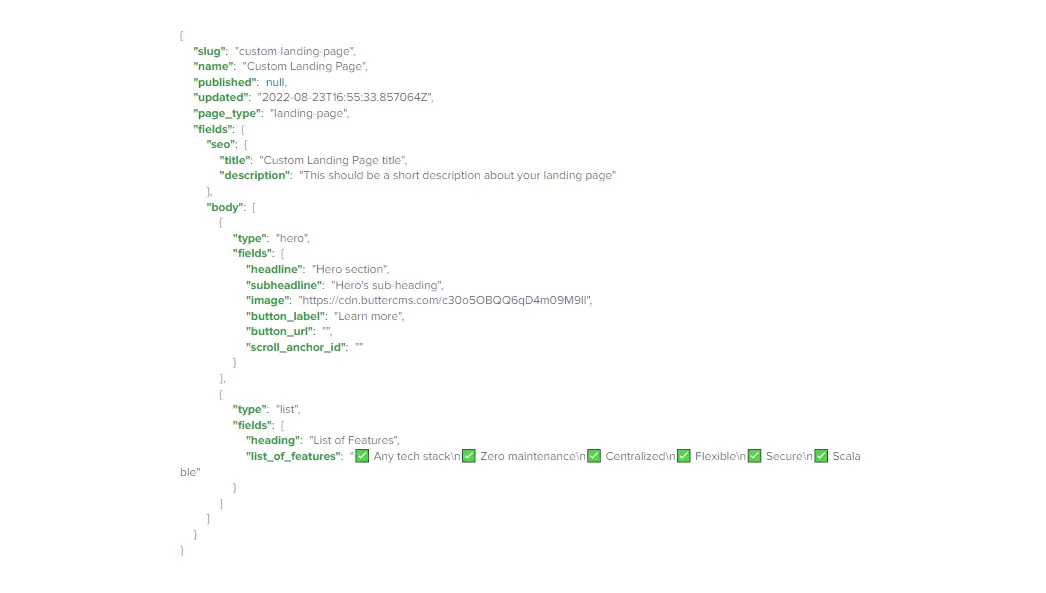
You can then use this data to build up your custom templates with EJS right inside Express. In fact, fields.body is already passed into the views/index.ejs template which is returned for landing pages in Express.
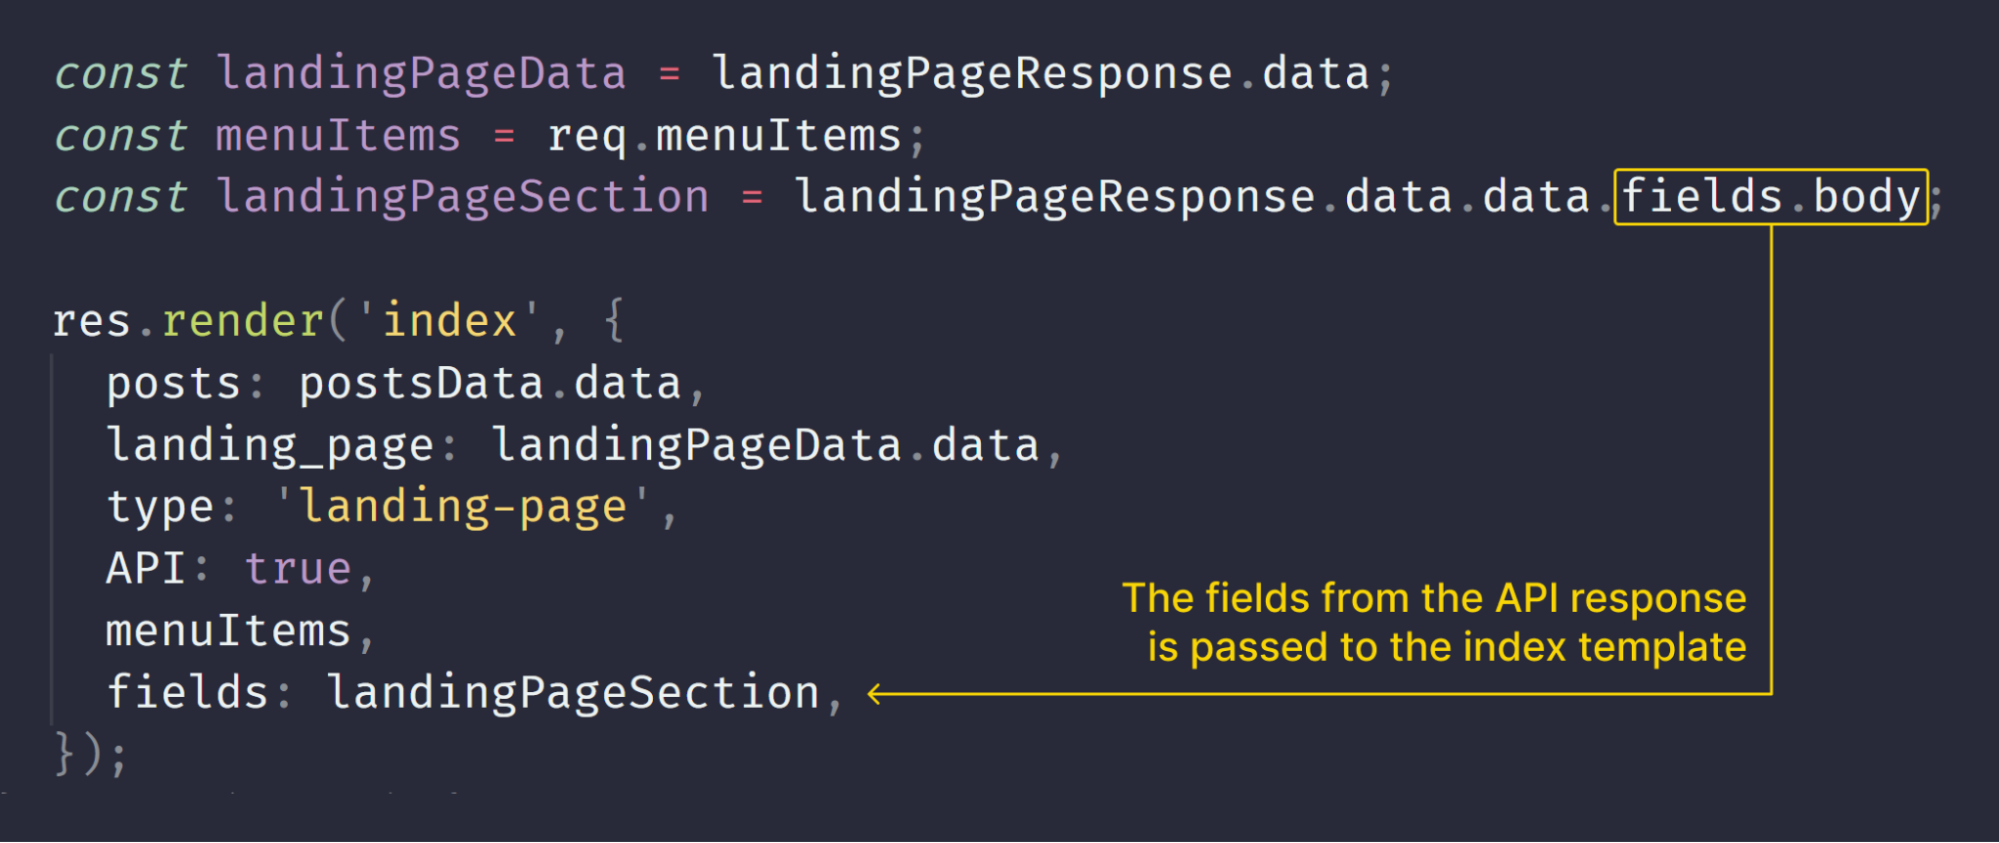
The returned template from the renderLandingPage function
Now the only thing that can stop you from building landing pages in ButterCMS with Express is your imagination. Thank you for reading through. Happy coding!

