
- Understanding JavaScript
- Why should you power your knowledge base with ButterCMS?
- JavaScript app tutorial: Building a knowledge base with JavaScript and ButterCMS
- Getting started with ButterCMS
- Creating the knowledge base article page type
- Creating the knowledge base section page type
- Building the Homepage type
- Creating the knowledge base pages
- Setting up the JavaScript application
- Integrating ButterCMS into the JavaScript application
- Implementing search functionality
- Final results
- Closing thoughts
In today's information-driven world, knowledge bases have become vital assets for businesses across industries. They have the ability to empower teams, enhance customer experiences, and streamline operations. In this JavaScript app tutorial, you'll discover the secrets of building a standout knowledge base with JavaScript and ButterCMS.
Table of contents
Understanding JavaScript
JavaScript has become a ubiquitous programming language that powers dynamic web applications. Its versatility and extensive range of features make it an excellent choice for building robust and interactive knowledge bases. With JavaScript as the foundation, knowledge base platforms can provide intuitive search capabilities, real-time updates, and efficient content organization–ultimately empowering users to find, explore, and leverage information effectively.
Below are the key features of JavaScript that make it ideal for building knowledge base platforms:
-
Dynamic interactivity: JavaScript's capacity to handle user interactions and dynamically modify HTML and CSS elements enables the creation of engaging and interactive knowledge base interfaces. Users can seamlessly search, sort, and filter content, resulting in a smooth browsing experience.
-
Efficient client-side processing: JavaScript executes directly in the browser, allowing knowledge bases to offload processing tasks to the client side. This reduces server load and improves performance, enabling swift navigation and retrieval of information, even in large knowledge bases.
-
Asynchronous programming: JavaScript's support for asynchronous programming permits knowledge base platforms to fetch data from servers without blocking the user interface. Real-time updates, collaborative editing, and seamless integration with external APIs become possible.
-
Integration of rich media: JavaScript facilitates the integration of diverse media elements, such as images, videos, and interactive visualizations, within knowledge base articles. This capability enhances the presentation of information, making it more engaging and visually appealing.
- Extensive libraries and frameworks: JavaScript benefits from a vast ecosystem of libraries and frameworks such as Angular, React, and Vue.js. These tools simplify the development of complex knowledge base interfaces by offering reusable components, efficient state management, and seamless integration with backend systems.
Why should you power your knowledge base with ButterCMS?
ButterCMS is a headless content management system (CMS) that allows users to create, manage, and publish digital content on their websites. It offers a user-friendly interface and a suite of tools that streamline the process of creating and editing content. Users can efficiently organize various types of content, such as articles, blogs, and images, into personalized categories and sections and this facilitates a seamless content creation experience. Some core features of ButterCMS include the following:
-
User-friendly interface: ButterCMS provides an intuitive and user-friendly interface, making it easy for content creators and administrators to manage and update knowledge base content without extensive technical expertise.
-
Structured content: With page types, components, and collections you can define different content structures for various types of knowledge base pages. For example, you can create separate page types for articles, FAQs, tutorials, or troubleshooting guides. This ensures a consistent layout and structure across your knowledge base, making it easy for users to navigate and access relevant information.
-
Customizable templates: ButterCMS allows for the creation of custom templates, ensuring that your knowledge base aligns with your brand identity and provides a seamless user experience. The flexibility of templates enables you to present information in a visually appealing and organized manner.

-
Content versioning and collaboration: ButterCMS offers version control and collaboration features, allowing multiple team members to work on knowledge base content simultaneously. This streamlines content creation and facilitates efficient collaboration between writers, editors, and subject matter experts.
JavaScript app tutorial: Building a knowledge base with JavaScript and ButterCMS
Throughout this article, we will discuss the key steps involved in building a knowledge base with JavaScript and ButterCMS. From setting up the development environment to designing the user interface and integrating ButterCMS for content management, we will cover the essential aspects needed to create a functional and user-friendly knowledge base. All the code for this tutorial can be found in the following GitHub repo.
We will be creating the following pages for the knowledge base:
-
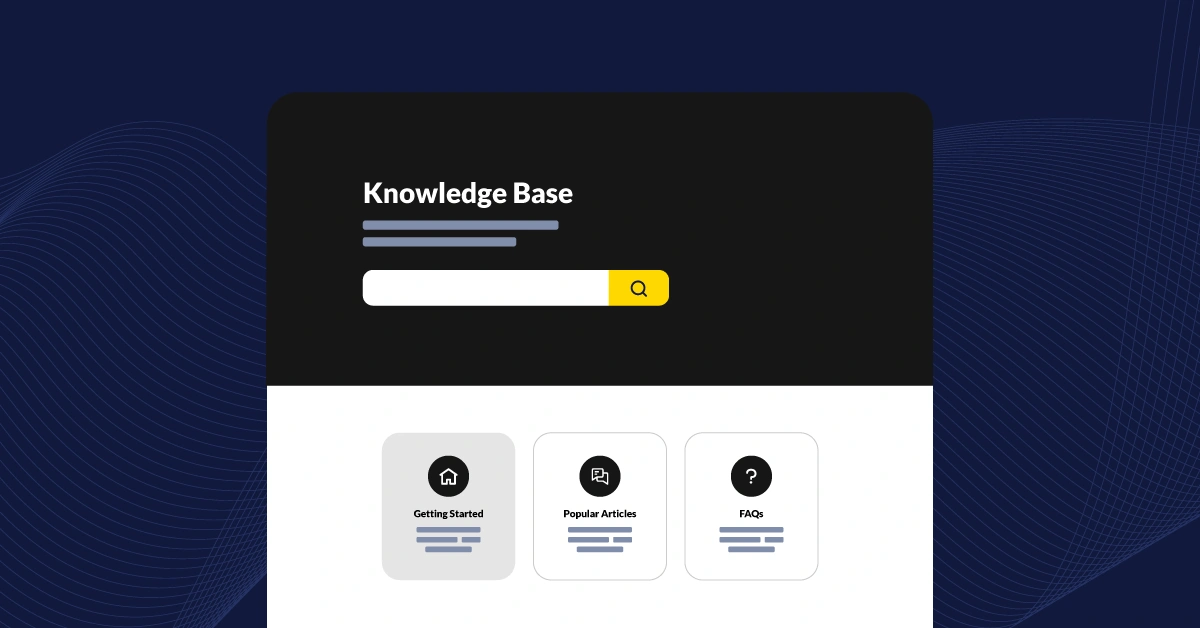
Homepage: The homepage is the starting point of the knowledge base. It provides an overview of the available information, guiding users to explore the content they are looking for.
-
Knowledge base section page: The section page focuses on a specific subject or area within the knowledge base. It acts as a gateway to related topics and articles, allowing users to dive deeper into specific content.
-
Knowledge base article page: The article page contains detailed information on a specific topic. It presents the content in a structured manner to provide users with comprehensive information and solutions.
With the visual reference in mind, let's dive into the step-by-step process of building a knowledge base using JavaScript and integrating ButterCMS for efficient content management.
Getting started with ButterCMS
Visit the ButterCMS website and look for the Get started button on the homepage and click on it and sign up for a free account. Once you've successfully signed up, you'll be redirected to your ButterCMS dashboard.
Creating the knowledge base article page type
To create the article pages, we will be using page types. To do this, click on Content Types and locate the option Page Types. Click on the plus (+) icon and you will be redirected to another page.
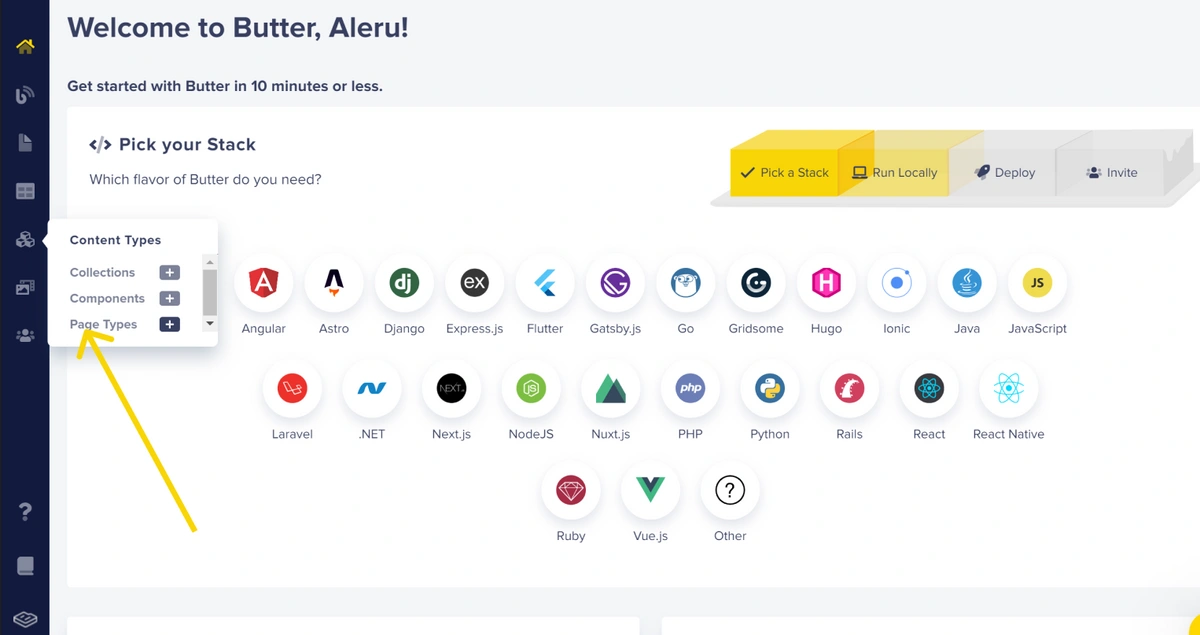
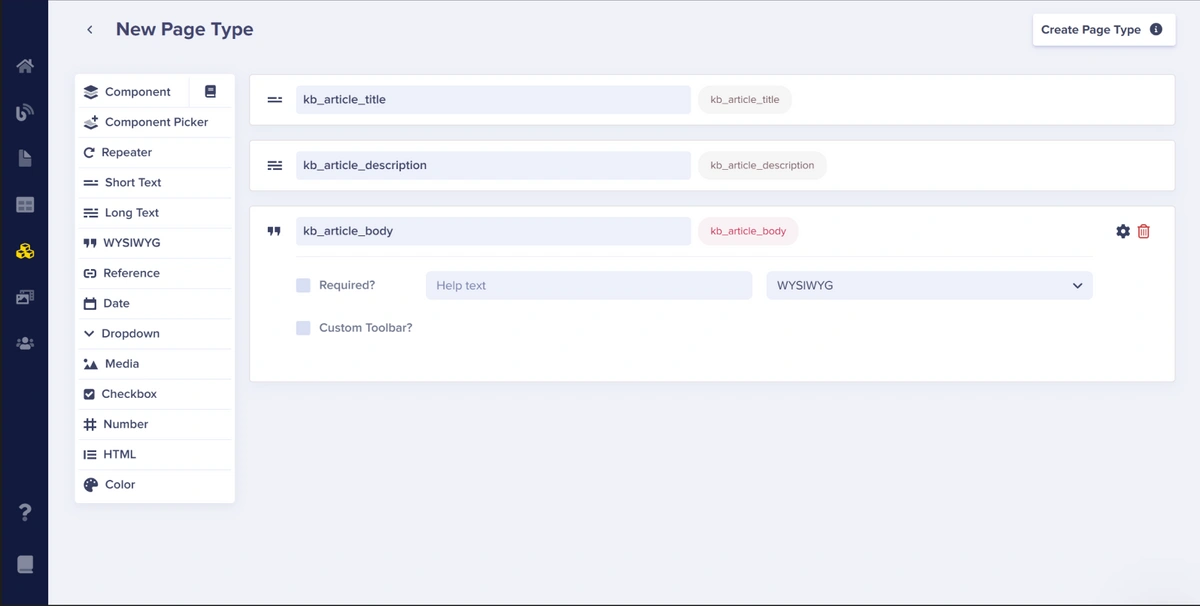
Now you can add the necessary fields to create the structure you want for your new page. In the case of the knowledge base shown above, we will need to add two fields.
-
A short text named “kb_article_title” - This field bears the article name.
-
A long text named “kb_article_description” - This field bears the article description.
-
A WYSIWYG field named “kb_article_body” - This field bears the article’s content itself.
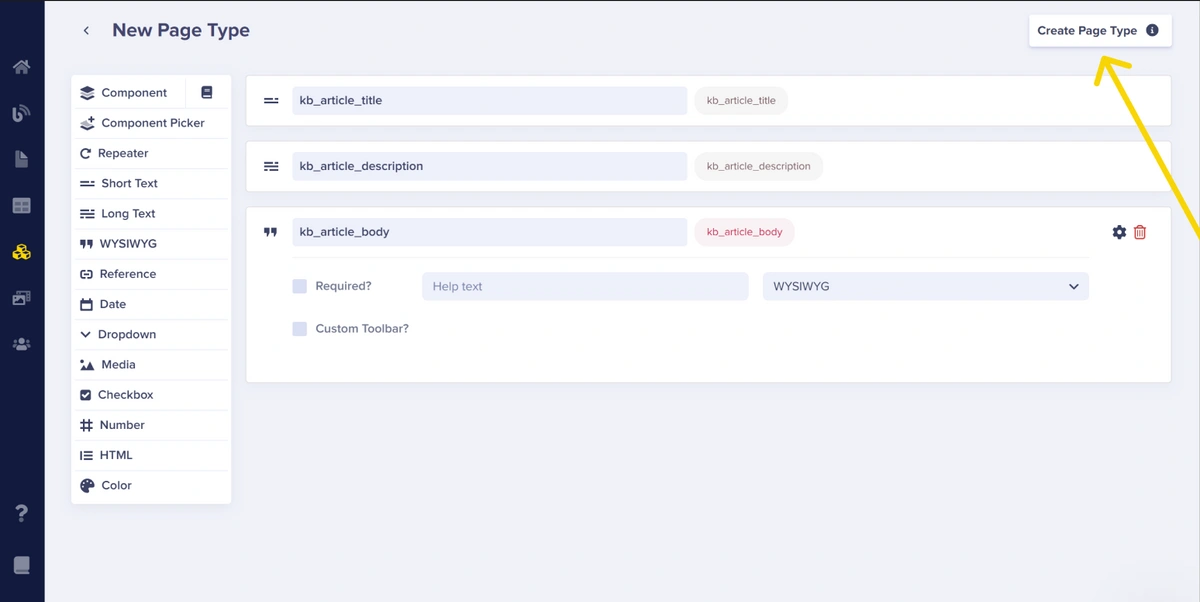
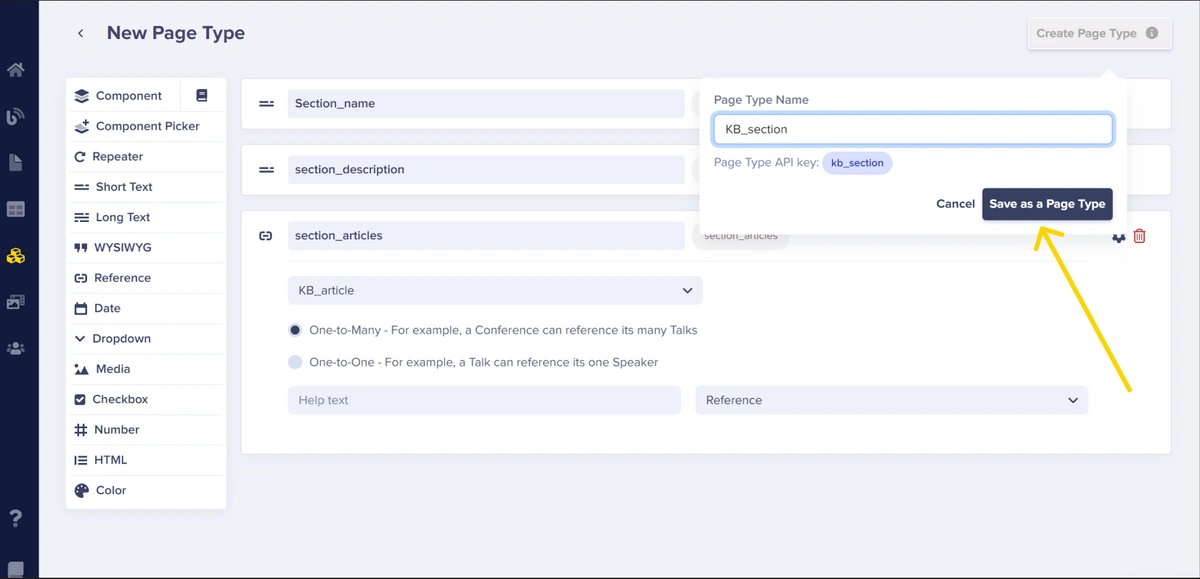
After adding the fields for this page, click on the Create Page Type button in the top right corner to create and save the page.
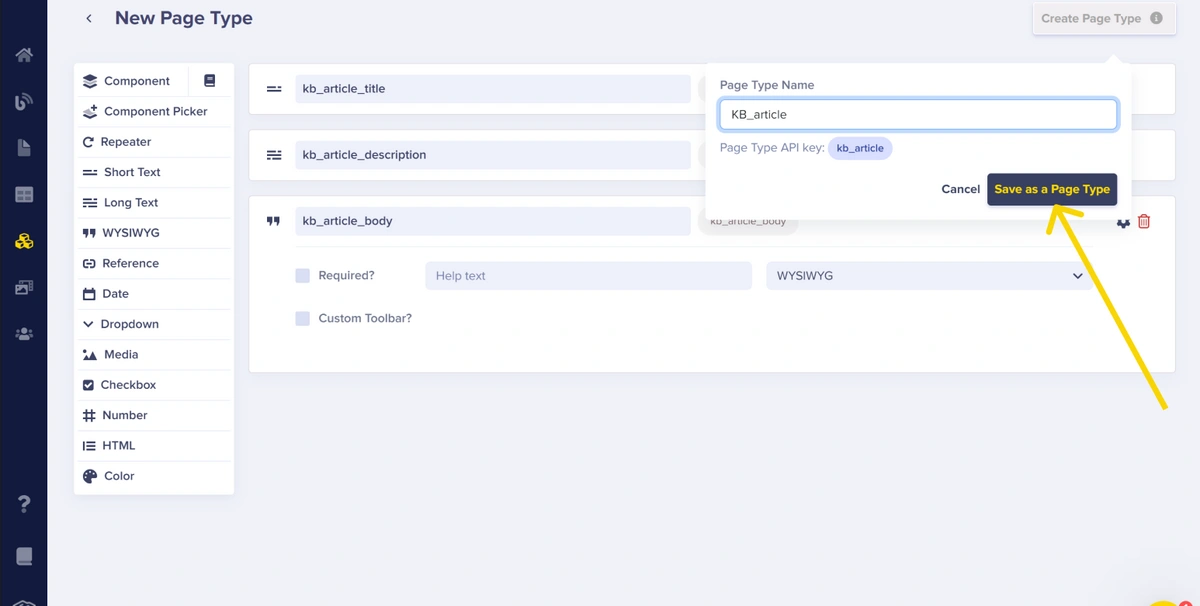
A modal will pop up after you click on the Create Page Type button and you will be required to provide a Page Type Name before you can save. Enter "KB_article" as the name and click on the Save as a Page Type button.
Creating the knowledge base section page type
To create the knowledge base’s section page, we will still make use of page types, just like we did with the article page. Click on Content Types and locate the option Page Types. Click on the plus (+) icon and you will be redirected to another page.
Now we add the necessary fields to create the structure. In this case, we will need to add the following fields:
-
A short text named “Section_name” - This field bears the section name.
-
A short text named “section_description” - This field bears the section description.
-
A reference field named “section_articles” - The reference field provides the ability to link items from other pages.
Next, select the page you would like to reference by clicking on the What will this reference? field and set it to One-to-Many so it can reference as many items as you want.
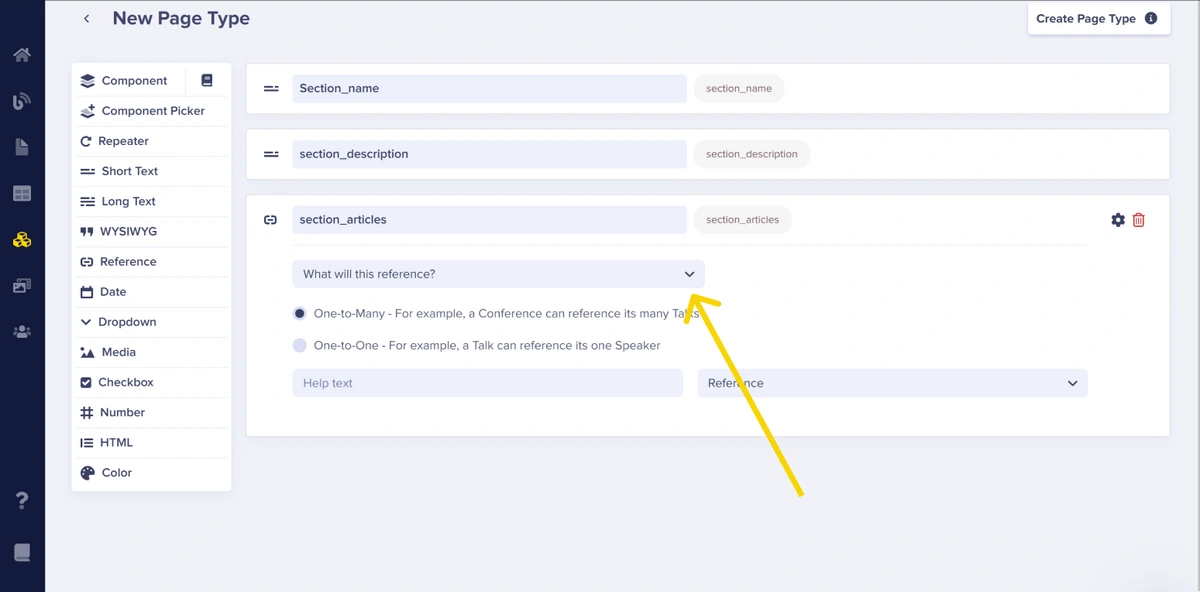
For the reference, add the KB_article page so that you can reference the various articles present on the KB_article page.

Next, we save this page as the “KB_section” page type.
By following these steps, you have created the necessary structure for the section page type in your knowledge base.
Building the homepage page type
The knowledge base homepage we will build is further divided into 2 sections which are:
-
The Hero section
-
The Featured contents section
Creating the Hero section of the homepage
Again, navigate to Content Types and locate the option Page Types. Click on the plus (+) icon. You should land on the Page Type configuration page.
Next, hover and click on Component and further click on the Create Component button.

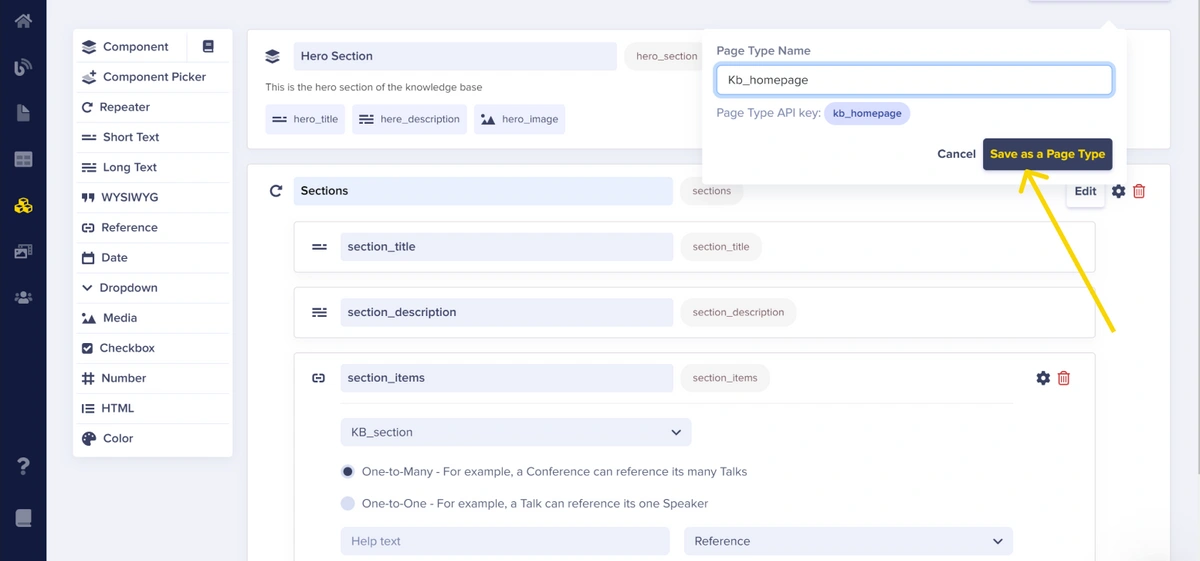
Now we name the component “Hero Section”, add a description, and add the necessary fields to create the structure. In this case, we will need to add the following fields:
-
A short text named “hero_title” - This field bears the title of the hero section.
-
A long text named “hero_description” - This field bears the message in the hero section.
-
A media field named “hero_image” - This field bears the hero image.
Click on the Done button to create the component “Hero Section”.

Creating the Featured Contents section of the homepage
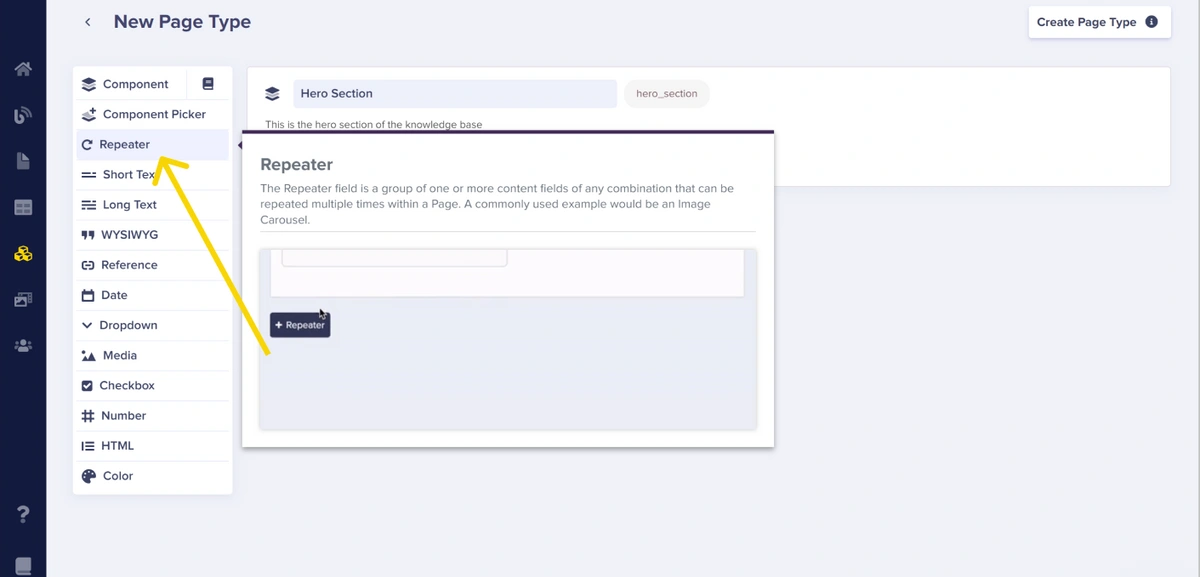
To create this section, we will use the Repeater field. Repeaters allow for the repetition of certain content sections. They are used to duplicate and display multiple instances of similar content blocks or sections within the information area. For example, if there are multiple products or services that need to be showcased, repeaters can be used to display each one in a consistent format. In this case, we have the content below the hero section on the homepage.
First, hover and click on the Repeater field
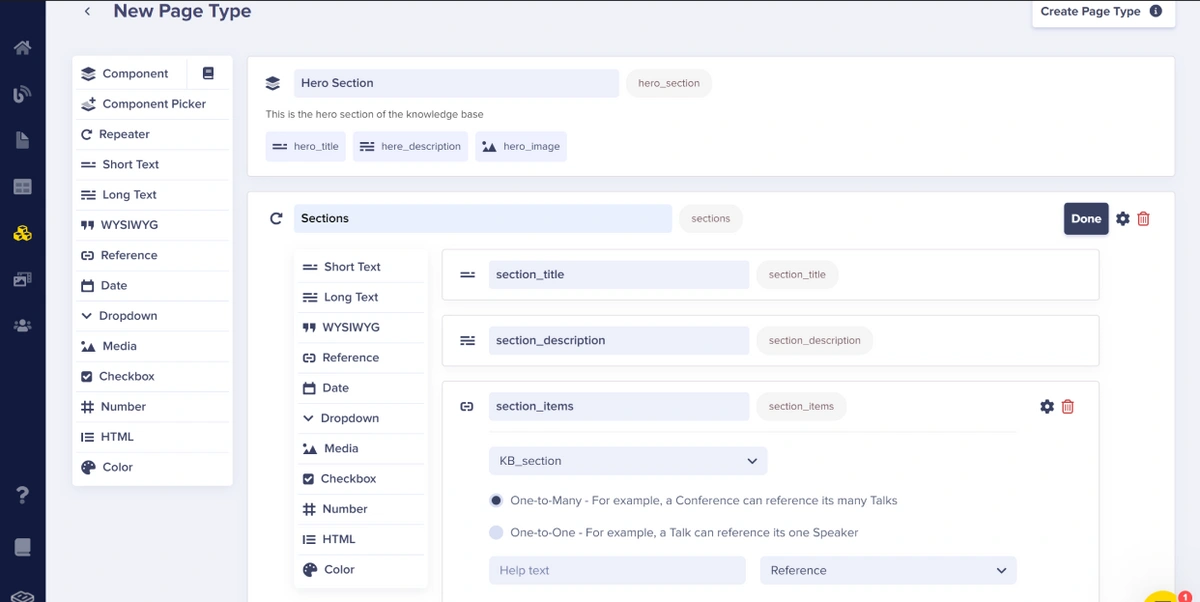
Now we name the repeater “Section”and add the required fields to create the structure. In this case, we will need to add the following fields:
-
A short text named “Section_title” - This field bears the section name.
-
A long text named “section_description” - This field bears the section description.
-
A reference field named “section_items” - This field provides the ability to link items from other pages.
For the reference, add KB_section so that you can appropriately reference the sections to be added to the KB homepage, and set it to One-to-Many.
Next, we save this page as a Kb_homepage page type.
With the Hero section and the other sections (Featured Contents section) in place, you have now constructed the basic structure of the homepage.
Creating the knowledge base pages
Using the page types we created in the section above as our templates, we will now create individual pages of the knowledge base, which are:
-
The article pages
-
The section pages
-
The homepage
Creating the Article pages
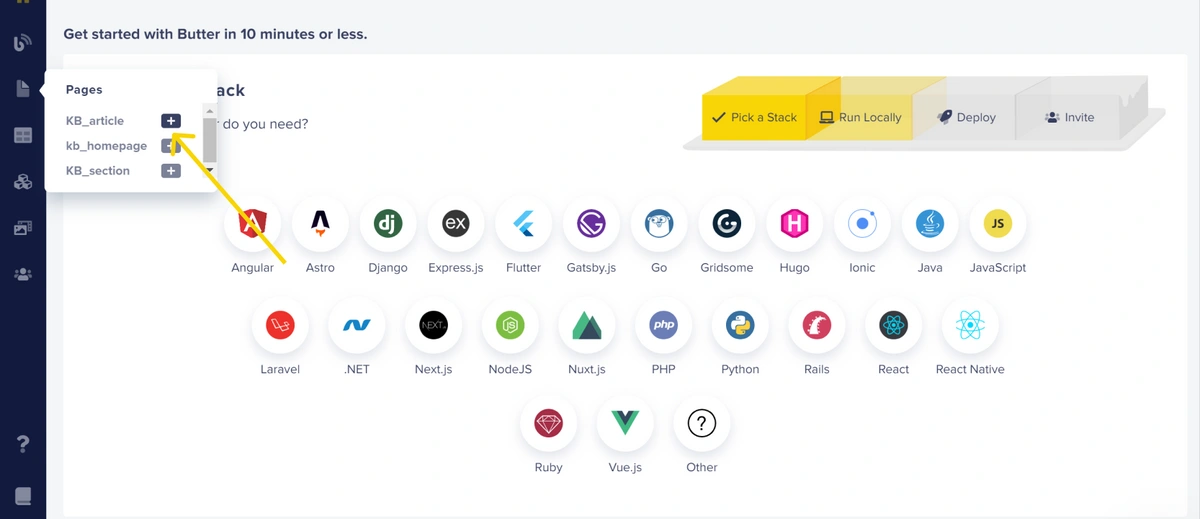
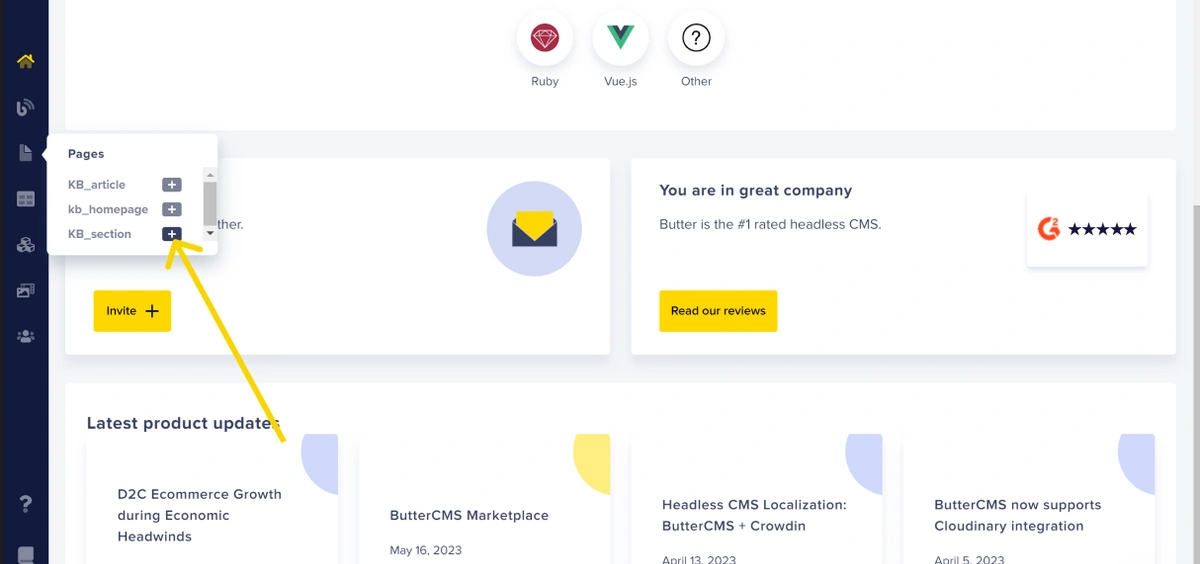
To create an article page, navigate to the Pages section on the menu and click on the (+) icon on KB_article and it takes you to a page where you add metadata.
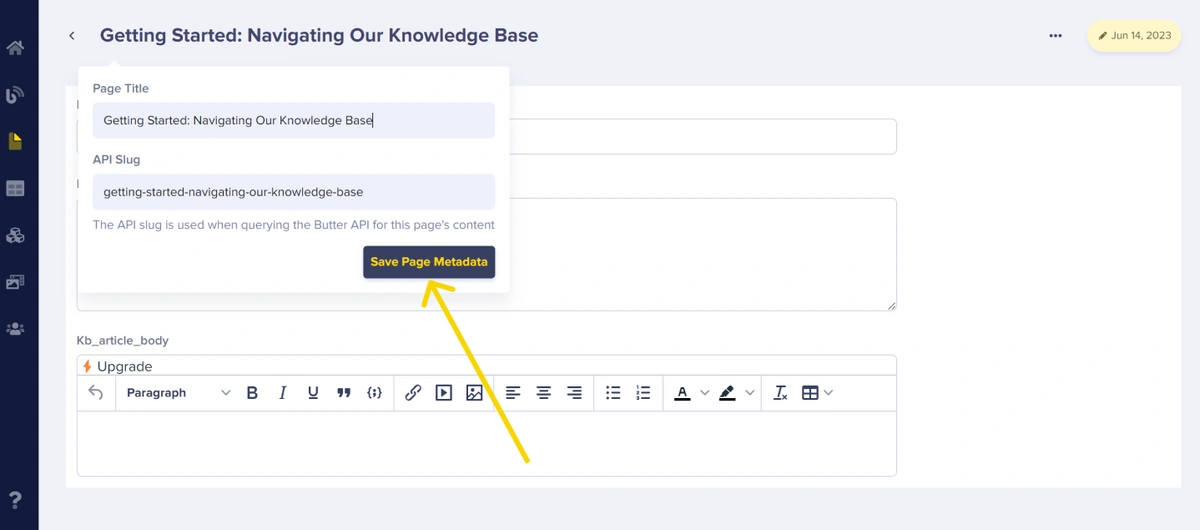
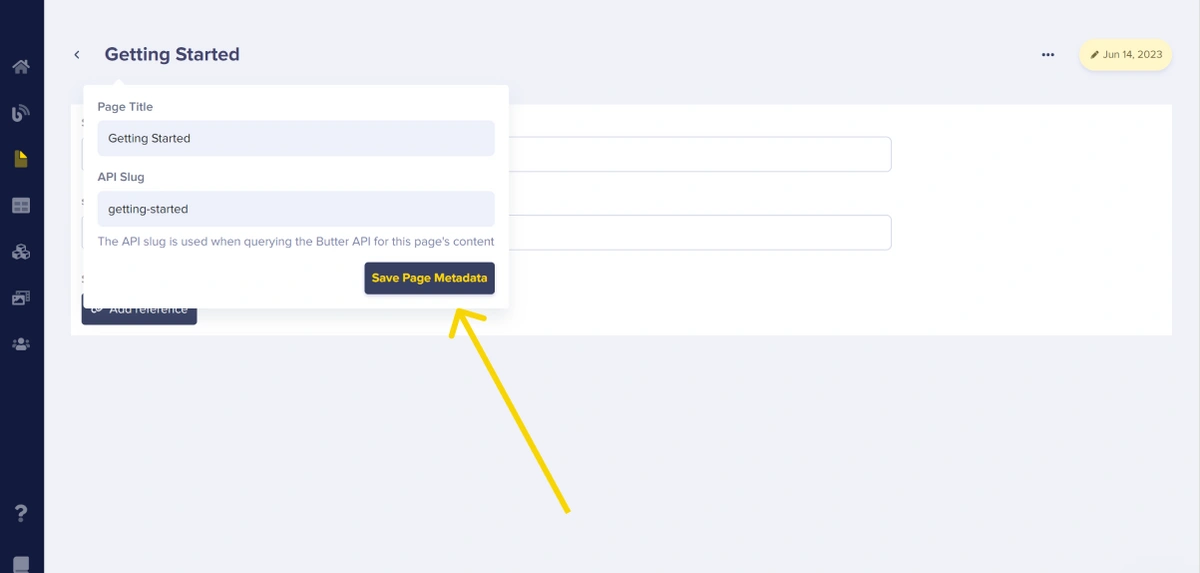
Next, we add the page title Getting Started: Navigating our Knowledge Base and the API slug (created automatically), then click Save Page Metadata for the new article we are creating.
The Page Metadata, also known as meta tags or meta elements, is information embedded within the HTML code of a web page. It provides additional context and instructions for search engines and web browsers about the content of the page. Metadata doesn't appear directly on the visible part of the webpage but is used by search engines and other systems to understand and index the page correctly.
Next, we fill in the content of the article to be published and click on Publish to save and publish the article.
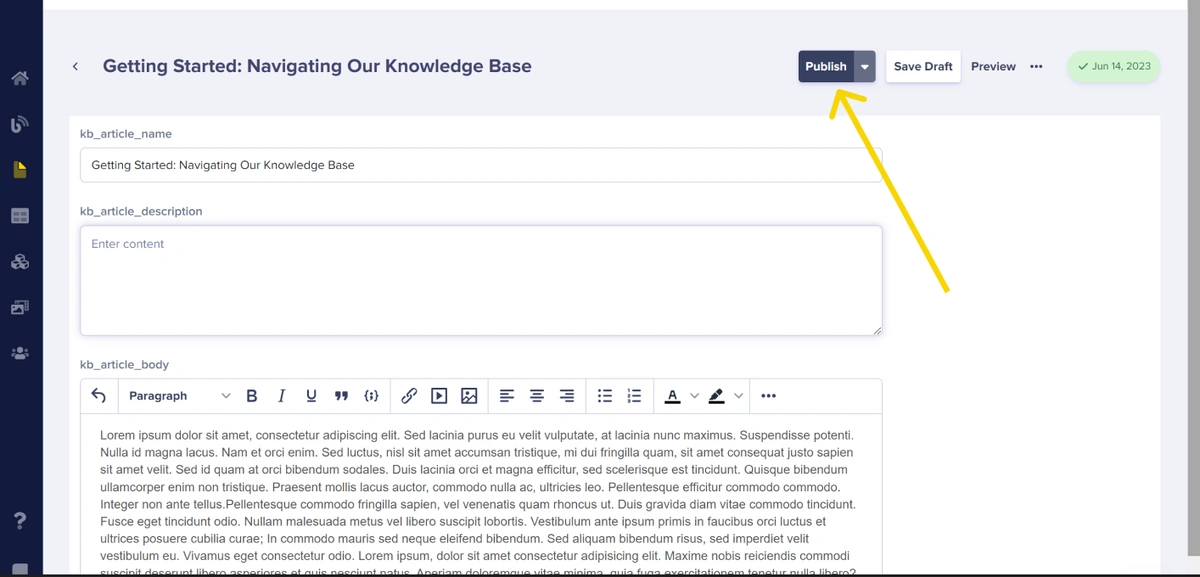
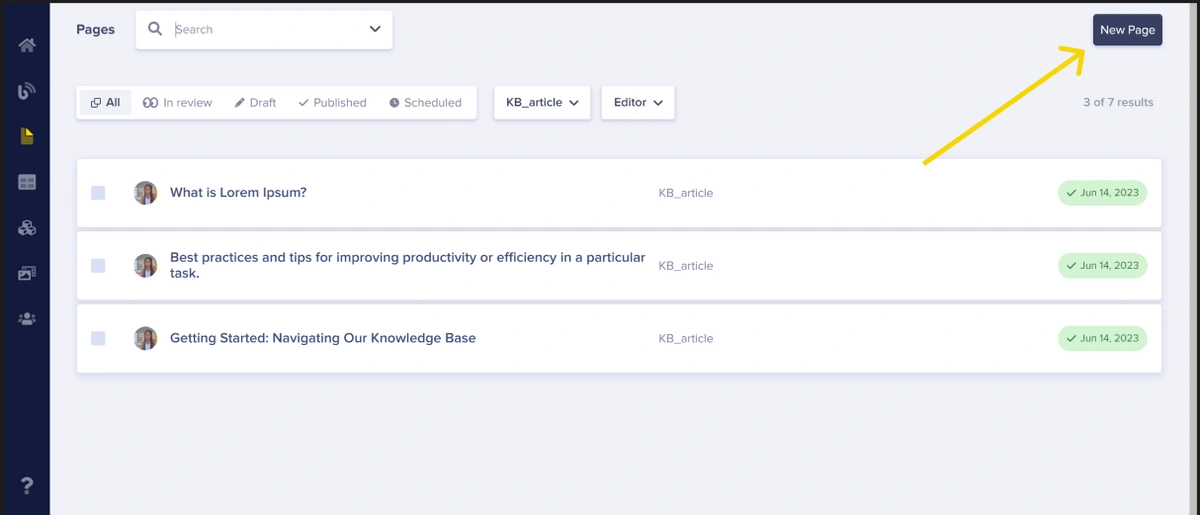
To create more article pages, simply click on the New Page button, as seen in the image below, and follow the steps above.
Creating the Section pages
Hover on the Pages menu, click on the (+) icon in KB_section, and you will be directed to a page where you add metadata.
Next, we add the page title “Getting Started” and the API slug gets created automatically. Click Save Page Metadata for the new section we are creating.
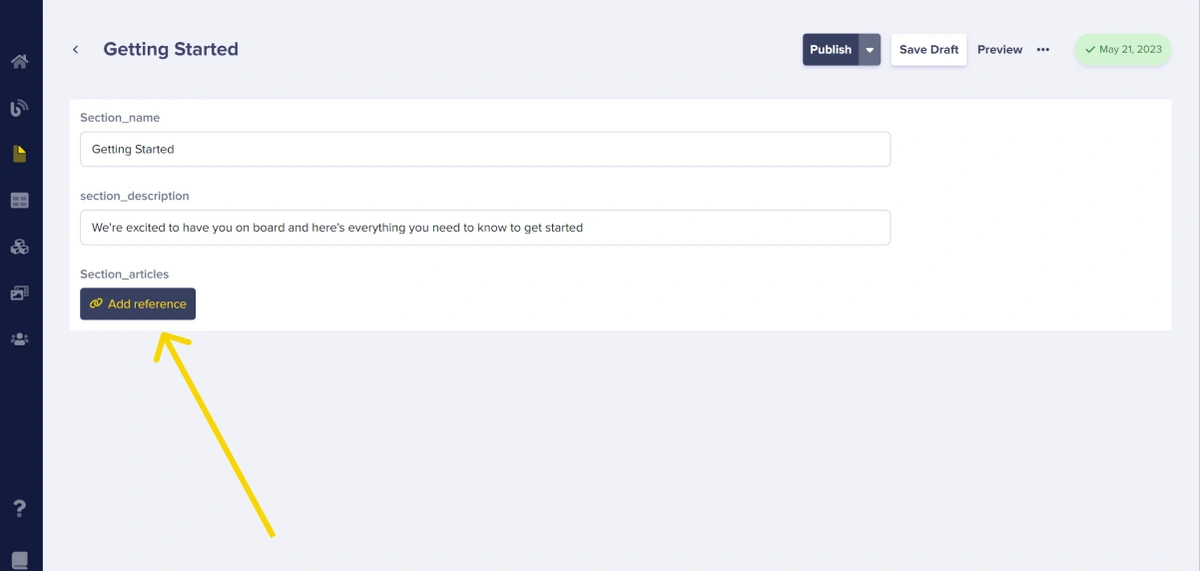
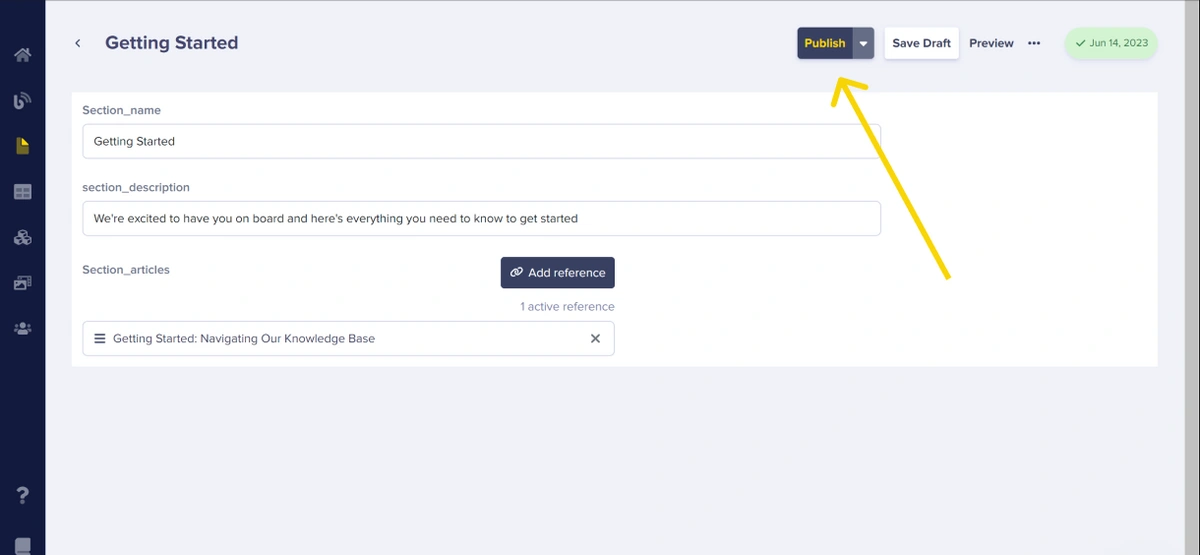
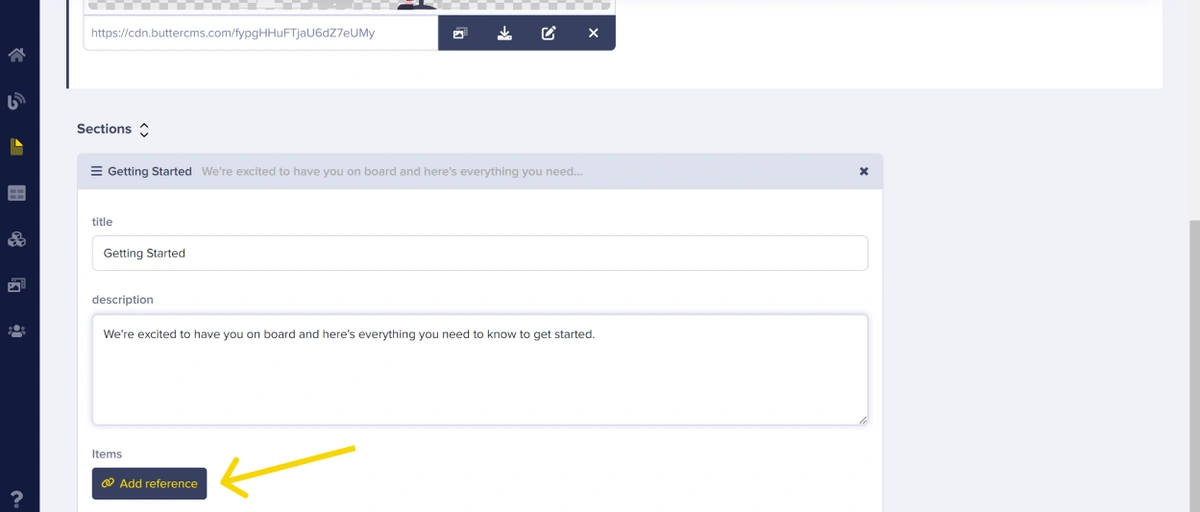
Next, we fill in the section_name and section_description. Click on the Add Reference button to bring up a modal for you to select the articles to reference in this section.
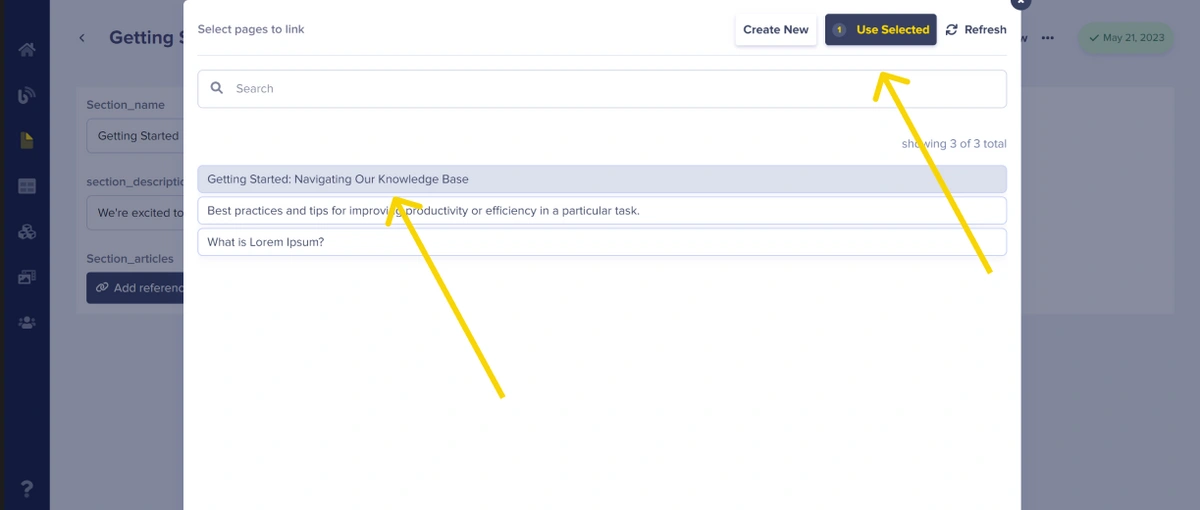
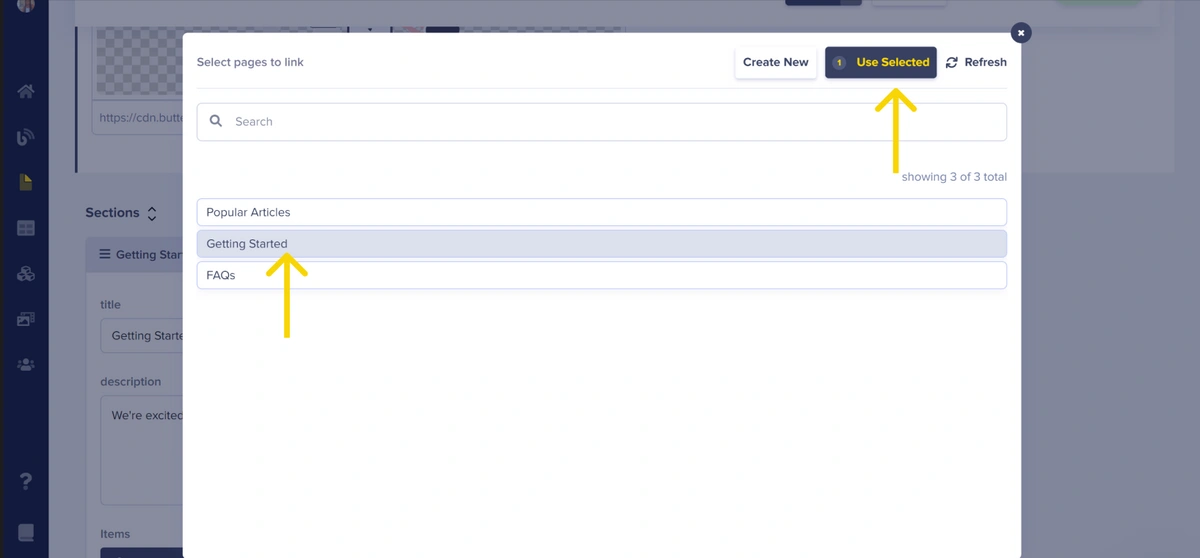
In the modal, click on the article you want to reference. In this case, we will reference the article “Getting Started: Navigating our Knowledge Base” to this section.
Click on the Use Selected button to validate and exit the modal.
Click the Publish button to save and publish.
To create more sections for the knowledge base, navigate to the Pages dashboard and click on the New Page button and repeat the steps above.
Creating the Homepage
Hover on the Pages menu, click on the (+) icon on Kb_homepage and you will be directed to a page where you add metadata.

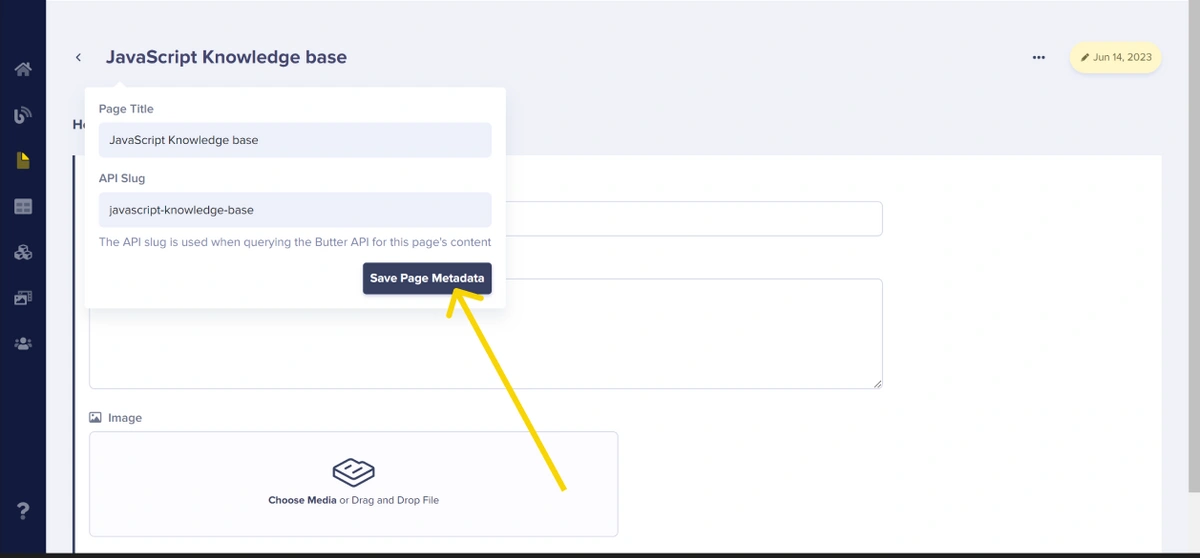
Next, we add the page title “JavaScript knowledge base” and the API slug. Click on Save Page Metadata.
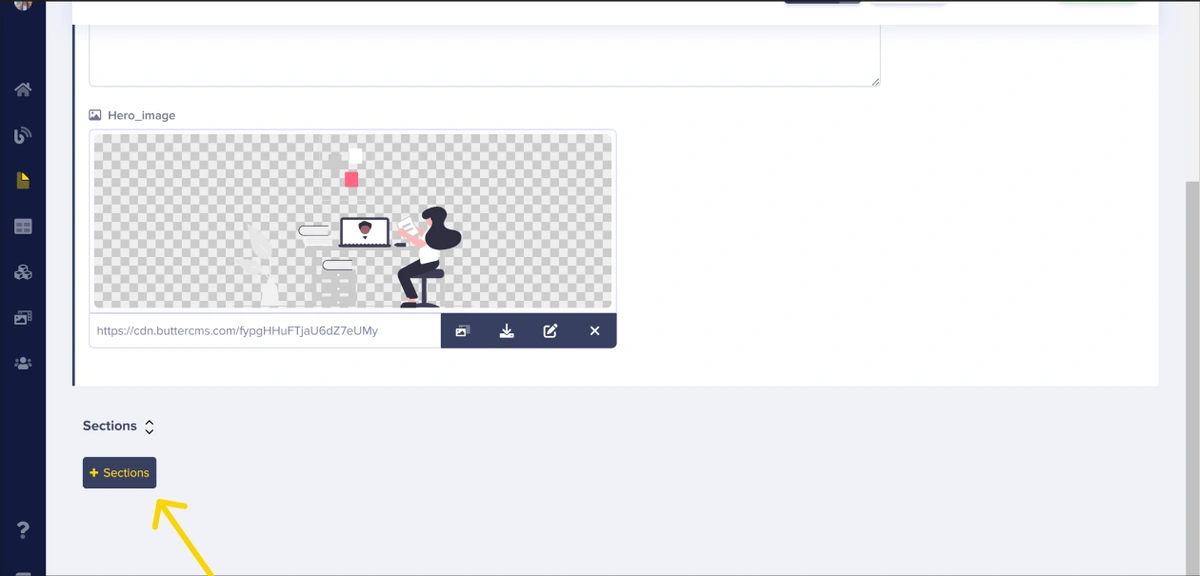
Next, we create the Hero section by adding the content in the Hero Section (hero_title, hero_description, and hero_image)

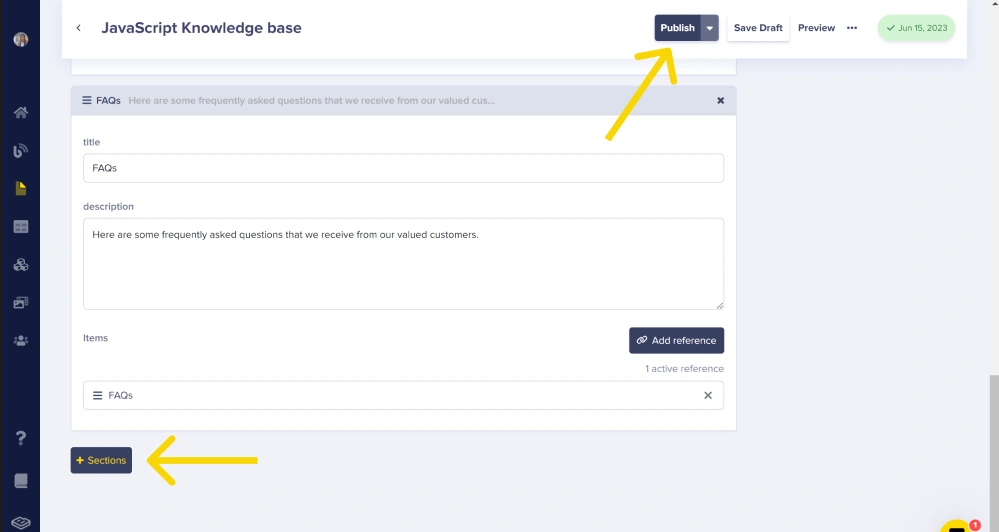
Next, we create the Featured Contents section. By clicking on the + Sections button, we can add as many identical sections as we want. This is because we used the Repeaters field.
Upon clicking the + Sections button, you will be directed to a page where you will need to add the section title and description.
Click on Add reference to reference your preferred section.
In the modal, click on the section you wish to reference. In this case, we are creating the Getting Started section, so we add “Getting Started” and click on the Use Selected button.
To add more sections to your knowledge base’s Featured Contents section on the homepage, click on the + Sections button and fill out the fields again following the steps again. Click on the Publish button to validate and publish.
Setting up the JavaScript application
Now, let’s build the JavaScript project, and consume the data that we have created on the ButterCMS platform. As a preliminary step, create a directory structure using the directory tree below:
│   index.html
│
└───dist
    ├───css
    │       index.css
    │
    └───js
            app.js
            variables.js
Create an index.html file for your knowledge base front-end. Below is the HTML file I will be using for this project. Also, make sure to create a CSS file and link to it in the HTML file. You can see how to link a CSS file to an HTML file here.
<!DOCTYPE html>
<html lang="en">

<head>
  <meta charset="UTF-8">
  <meta http-equiv="X-UA-Compatible" content="IE=edge">
  <meta name="viewport" content="width=device-width, initial-scale=1.0">
  <title>JavaScript Knowledge Base</title>
  <link rel="stylesheet" type="text/css" href="./dist/css/index.css">
</head>

<body>
  <div class="kb-whole">
    <div class="kb-upper">
      <h1 class="kb-title" id="hero-title"></h1>
      <img class="image" id="hero-image" src="https://cdn.buttercms.com/fypgHHuFTjaU6dZ7eUMy">

      <p class="kb-description" id="hero-description"></p>

      <form action="" class="search-bar">
        <input type="search" name="search" required>
        <button class="search-btn" type="submit">
          <span>Search</span>
        </button>
      </form>
    </div>

    <section>
      <div class="kb-sections" id="kb-sections"></div>
    </section>
  </div>

  <script type="module" src="./dist/js/app.js"></script>
  <script type="module" src="./dist/js/variables.js"></script>
  <script src="https://cdnjs.buttercms.com/buttercms-1.2.12.min.js"></script>
</body>

</html>
Next, we must include the ButterCMS JavaScript SDK using the CDN link. In the HTML code, there is already a <script> tag with a CDN link provided, but here it is:
<script src="https://cdnjs.buttercms.com/buttercms-1.2.12.min.js"></script>
Integrating ButterCMS into the JavaScript application
After including the ButterCMS JavaScript SDK in your project, you need to authenticate your application with ButterCMS using your API keys. These API keys are necessary for your application to communicate with ButterCMS and access the relevant data.
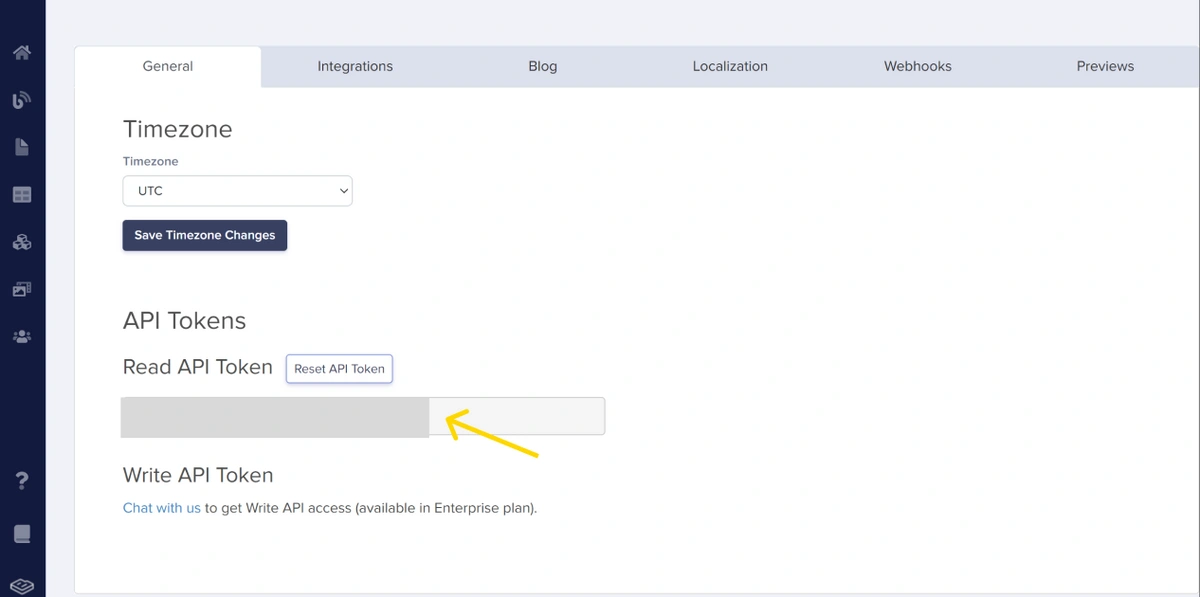
To obtain your API keys, log in to your ButterCMS account, navigate to the Avatar icon and click on Settings.
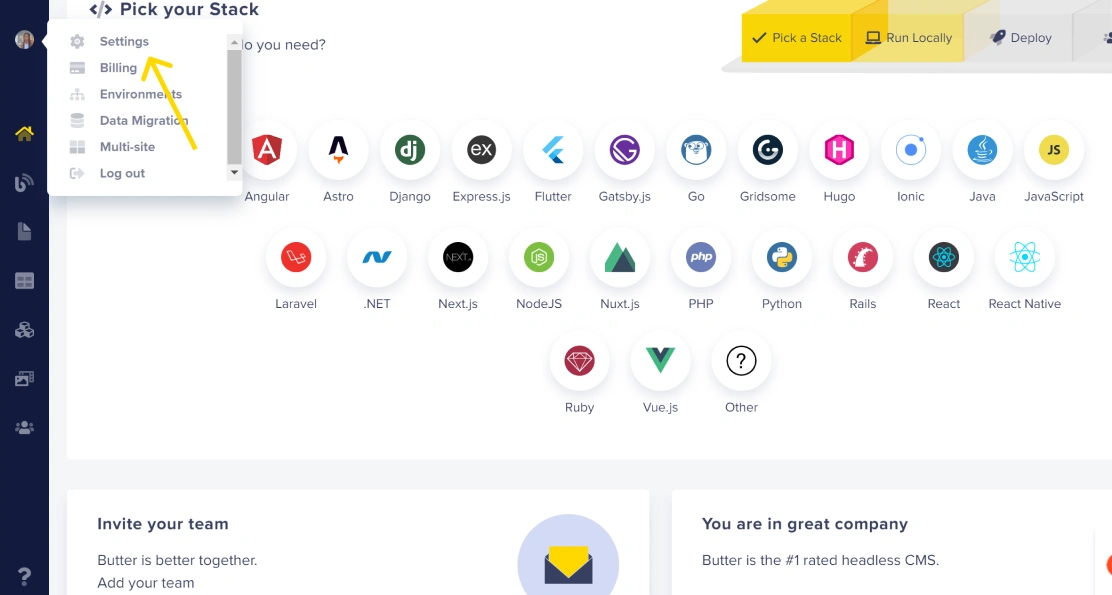
Here, you'll find your API tokens (Read and Write API tokens). Copy the Read API token as we will be using it to fetch content from ButterCMS.
In your JavaScript code, initialize the ButterCMS client with your ButterCMS API token using the method below. This step establishes the connection between your JavaScript application and ButterCMS.
const ButterCMS = Butter('YOUR_READ_API_KEY');
Once the ButterCMS client is initialized, you can use its methods to interact with the ButterCMS API. For example, you can retrieve pages, collections, posts, and other content from ButterCMS.
For example:
// Hero elements
const heroTitle = document.getElementById("hero-title");
const heroDesc = document.getElementById("hero-description");
const heroImg = document.getElementById("hero-image");

// Section element
const bodySecs = document.getElementById("kb-sections");

document.addEventListener('DOMContentLoaded', function (event) {
  const params = {
    'preview': 1
  }
  ButterCMS.page.retrieve('kb_homepage', 'javascript-knowledge-base', params)
    .then(function (resp) {
      const { data } = resp.data;
      heroTitle.innerText = data.fields["hero_section"].title;
      heroDesc.innerText = data.fields["hero_section"].description;
      heroImg.src = data.fields["hero_section"]["img_url"];
      data.fields.sections.forEach((val) => {
        let className = val.title.toLowerCase().replace(/\s+/g, '-')
        let section =
          `<div class="${className}">
            <div class="icons-div"> ${className == "faqs" ? SVGs[2] : className == "popular-articles" ? SVGs[1] : SVGs[0]}
            </div>
            <p class="section-heading">${val.title}</p>
            <p class="section-description">${val.description}</p>
           </div>`;
        generatedSections += section;
      });
      bodySecs.innerHTML = generatedSections;
      // Collection section items.
      data.fields.sections.forEach((val) => {
        sectionItems[val.title] = [...val.items]
      });
      // spinner.style.display = "none";
      main.style.display= "block"
    })
    .catch(function (resp) {
      console.log(resp)
    });
});
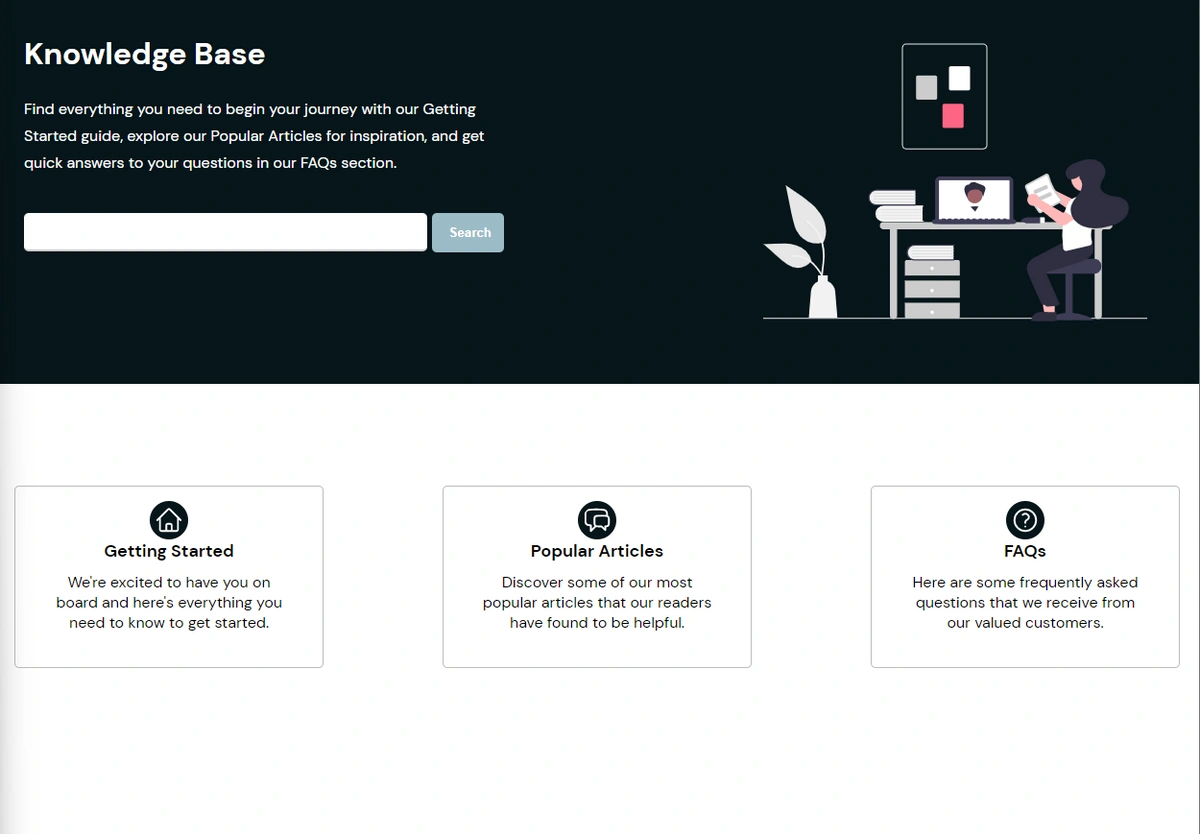
This code retrieves data from a specific page with the page type name kb_homepage and the slug javascript-knowledge-base from the ButterCMS API. It updates the content of the homepage’s HTML elements with the retrieved data, including the hero section's title, description, and image.
Additionally, it dynamically generates sections based on the retrieved data, using the HTML template stored in the section variable with their corresponding title, and description. The generated sections are stored in the generatedSections variable for later use. This effectively integrates ButterCMS data into the webpage, enabling the display of dynamic content.
With these actions, we will have the knowledge base homepage looking like this:
Now that we have retrieved the data, and generated our homepage using a defined template, next we need to generate a new webpage to list out the different items for each section on the homepage.
bodySecs.addEventListener("click", function (e) {
// Traverse up the parent tree
let currentElement = e.target;
while (currentElement.parentNode !== null) {
if (currentElement.className == "kb-sections") {
return
}
if (currentElement.className == "getting-started") {
bodyElement.innerHTML = "";
bodyElement.innerHTML = fillSection(currentElement.className);
return
}
if (currentElement.className == "popular-articles") {
bodyElement.innerHTML = "";
bodyElement.innerHTML = fillSection(currentElement.className);
return
}
if (currentElement.className == "faqs") {
bodyElement.innerHTML = "";
bodyElement.innerHTML = fillSection(currentElement.className);
return
}
currentElement = currentElement.parentNode;
}
});
function fillSection(sectionName) {
let items = innerLisr(sectionName);
let contentItems = "";
items.forEach((val) => {
let className = val.title.toLowerCase().replace(/\s+/g, '-')
let items = `
<li class="${className} ${sectionName + "_"}">
<h3>${val.title}</h3>
</li>
`;
contentItems += items;
})
let section = `
<section class="faq-section">
<h2>${sectionPages[sectionName].h2}</h2>
<p class="section-des">${sectionPages[sectionName].desc}</p>
<div class="faq-list">
<ul>
` + contentItems + `</ul>
</div>
</section>`;
return section;
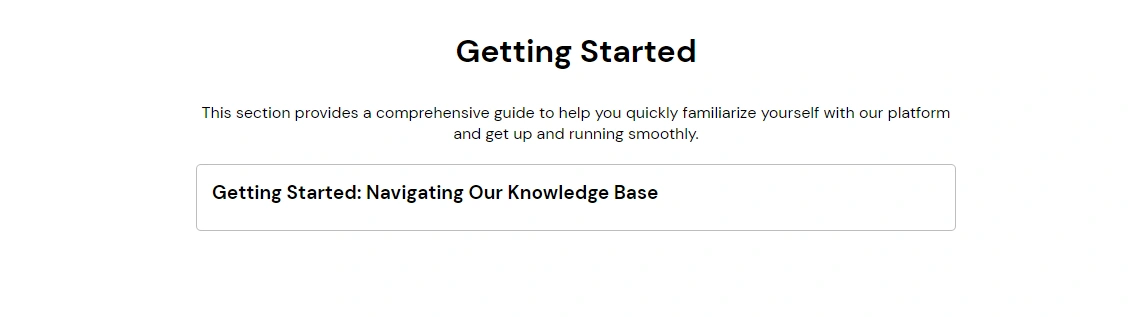
}In summary, this code manages the click event on the sections of the knowledge base. When a section is clicked, it retrieves the corresponding items and dynamically generates HTML content for that section. The generated content includes a list of items with their titles. The code then inserts the generated content into the designated element on the page. The purpose is to display the details of the clicked section in the knowledge base interface.
With these actions, we will have the knowledge base UI looking like this:
Next, we need to generate a new webpage which will contain the individual content of the items listed in the UI above.
bodyElement.addEventListener("click", function (e) {
// Traverse up the parent tree
let currentElement = e.target;
while (currentElement.parentNode !== null) {
if (currentElement.className == "faq-list") {
return
}
let classList = Array.from(currentElement.classList);
if (classList.includes("getting-started_")) {
bodyElement.innerHTML = "";
bodyElement.innerHTML = fillItemDetails(classList[0], "getting-started") + itemDetailsAddon;
return;
}
if (classList.includes("popular-articles_")) {
bodyElement.innerHTML = "";
bodyElement.innerHTML = fillItemDetails(classList[0], "popular-articles") + itemDetailsAddon;
return;
}
if (classList.includes("faqs_")) {
bodyElement.innerHTML = "";
bodyElement.innerHTML = fillItemDetails(classList[0], "faqs") + itemDetailsAddon;
return
}
currentElement = currentElement.parentNode;
}
});
function fillItemDetails(actualClassName, sectionName) {
let items = innerList(sectionName);
let template;
items.forEach((val) => {
let expectedClassName = val.title.toLowerCase().replace(/\s+/g, '-')
if (expectedClassName == actualClassName) {
template = `
<div class="faq">
<h2>${val.title}</h2>
<p class="section-detail">${val.description}</p>
</div>
`;
}
})
return template;
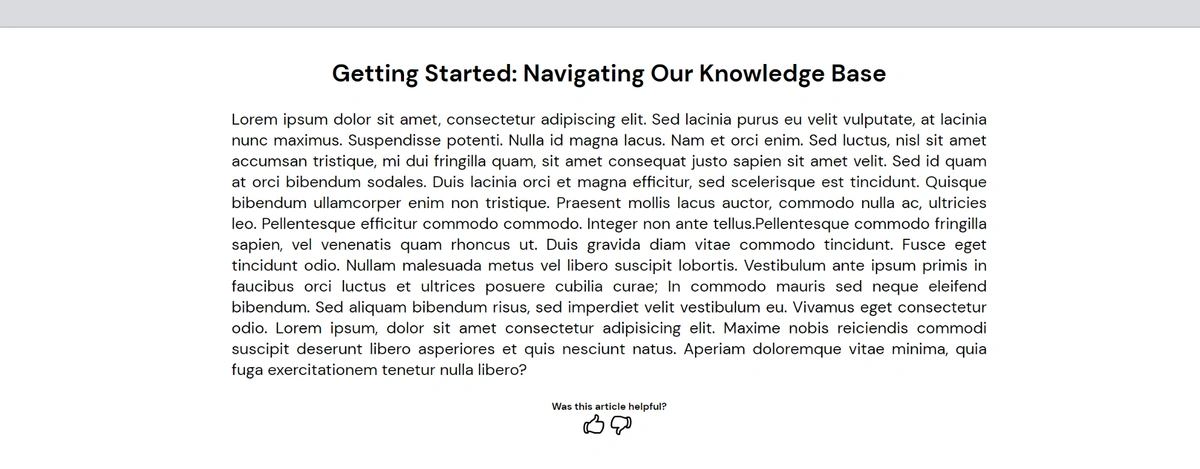
}
The result:
Implementing search functionality
A search feature enhances the user experience, saves time, improves accessibility, accommodates scalability, and provides flexibility and precision in finding desired information.
To enhance our application, let's implement search functionality that allows users to filter and view specific questions and their corresponding answers.
// Add event listener to search form submit
searchForm.addEventListener('submit', function (event) {
  event.preventDefault();
  const searchQuery = searchInput.value.trim().toLowerCase();
  let result = "";
  let sections = ["popular-articles", "getting-started", "faqs",];
  sections.forEach((item) => {
    result += search(searchQuery, item);
  });
  let searchResult = `
  <section class="faq-section">
    <div class="faq-list">
      <ul>
  ` + result + `</ul>
  </div>
</section>`;
bodySecs.innerHTML = searchResult;
});

// Performs a search within the specified section items.
function search(query, sectionName) {
  let items = innerList(sectionName);
  let template = "";
  console.log(items);
  items.forEach((val) => {
    let title = val.title.toLowerCase();
    if (title.toLowerCase().includes(query)) {
      let tmp = `
        <li class="${title.replace(/\s+/g, '-')} ${sectionName + "_"}">
          <h3>${val.title}</h3>
          <sub>${sectionName.split('-')
          .map(word => word.charAt(0).toUpperCase() + word.slice(1))
          .join(' ')}</sub>
        </li>
    `;
    template += tmp;
    }
  });
  return template;
}
And we have this:
Final results
Congratulations on your progress in this tutorial. If you successfully followed the steps in this tutorial, your knowledge base should look like the one in the GIF below.
Closing thoughts
Throughout this JavaScript knowledge base app tutorial, we covered the essential steps involved in setting up a knowledge base using JavaScript and ButterCMS. From creating page types to designing the user interface with components and repeaters, we provided a comprehensive guide to help you build a functional and visually appealing knowledge base.
With JavaScript and ButterCMS, you have the tools to deliver a seamless user experience and empower users to find, explore, and leverage information effectively. Remember to customize this tutorial to fit your specific requirements and explore different knowledge base examples online to inspire and enhance your implementation.
Happy building!
If you'd like to learn more bout what you can build with JavaScript and ButterCMS we recommend that you check out the following tutorials:

