
- Why use Vue?
- Using ButterCMS for your knowledge base
- Tutorial prerequisites
- Building a knowledge base with Vue.js and ButterCMS
- Creating a new Vue application
- Setting up ButterCMS
- Building the knowledge base Page Types
- Building the FAQs frontend
- Showing the individual pages
- Implementing search functionality
- Final thoughts
In today's fast-paced business world, customer support has become a critical component of success. Organizations that prioritize outstanding customer support often see a boost in customer satisfaction and loyalty. However, managing repetitive customer queries can be overwhelming for your team, leading to delays in response time and customer frustration.
This is where a knowledge base can be a game-changer in your business. By providing pre-written answers to common customer queries, you can provide instant and helpful service to your customers through a repository of helpful content. In this article, we'll explore how to build a customized knowledge base that meets the needs of your organization using Vue and ButterCMS. Whether you're looking to support your customers, employees, or community, building a knowledge base is an excellent investment in your organization's success.
Table of contents
Why use Vue?
Vue.js is a progressive and popular JavaScript framework used for building user interfaces and single-page applications. Let's see why it is a good idea to choose Vue to build your knowledge base:
-
Simple and intuitive: Vue provides a simple and intuitive API for building user interfaces, making it easy for developers to get started and build applications quickly.
-
Reusable components: Vue’s component-based architecture allows for the creation of reusable components, which can help simplify the development of a knowledge base and ensure consistent design throughout the application.
-
Performance: Vue is known for its high performance and ability to handle large amounts of data efficiently, making it well suited for building complex applications like a knowledge base.
-
Two-way data binding: Vue’s two-way data binding feature allows for real-time updates to the state of the application, which can be useful in a knowledge base when you need to update the information or add new articles regularly.
Using ButterCMS for your knowledge base
ButterCMS is a headless content management system (CMS) that enables users to manage and store their website's content in a centralized location and deliver it to their website or app using APIs.
One great feature of ButterCMS in building knowledge bases is the Page Types feature. Page types are pages that you create as blueprints that specify the structure of a certain type of webpage you want to create. We used page types when creating our knowledge base because we only had to create and configure the structure of our page once and then we could reuse that configuration whenever we needed it. Another reason is that a slug is automatically generated for every page created using the page types feature. This makes routing very easy when working on the front-end of your application and also provides good developer UX.

Tutorial prerequisites
The following prerequisites are needed to follow along with this tutorial:
-
Knowledge of JavaScript and Vue
The code for this tutorial can be found in this GitHub repo.
Building a knowledge base with Vue.js and ButterCMS
There are several types of knowledge bases you can build, in this article, we will be creating an FAQ-style knowledge base.
Let’s get started!!
Creating a new Vue application
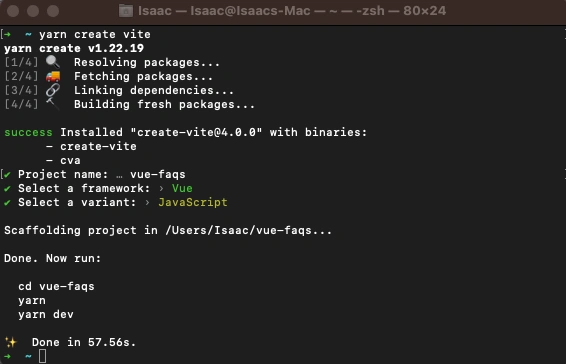
The first step is to create a new Vue application. We will use Vite to bootstrap our application as it is very fast and creates a very minimal build bundle.
Run the command below to create a new Vite application:
yarn create viteAnswer the question prompts and this will create a new Vue application for you.
Next, navigate to the folder and install the application dependencies using the commands below:
cd <The Name of Your Application>
yarn //this is to install dependencies
The next step is to install Vue-router for routing, the ButterCMS dependency for retrieving pages from ButterCMS, and the Sass plugin for interpreting our SASS styles in CSS.
yarn add vue-router@4 buttercms sass-loader sass
With that done, we have set up our application’s frontend. Let's look at setting up ButterCMS.
Setting up ButterCMS
Navigate to the ButterCMS site and create an account. After creating an account, you will be directed to a dashboard that looks like the image below:

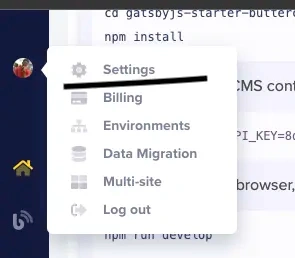
Create an API key which will be crucial for making requests to and fetching data from ButterCMS. Navigate to the Account tab and click on Settings:
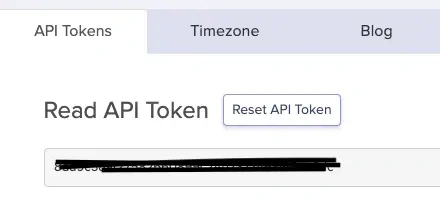
Get your API key from the API Tokens tab and store it securely.
Building the knowledge base Page Types
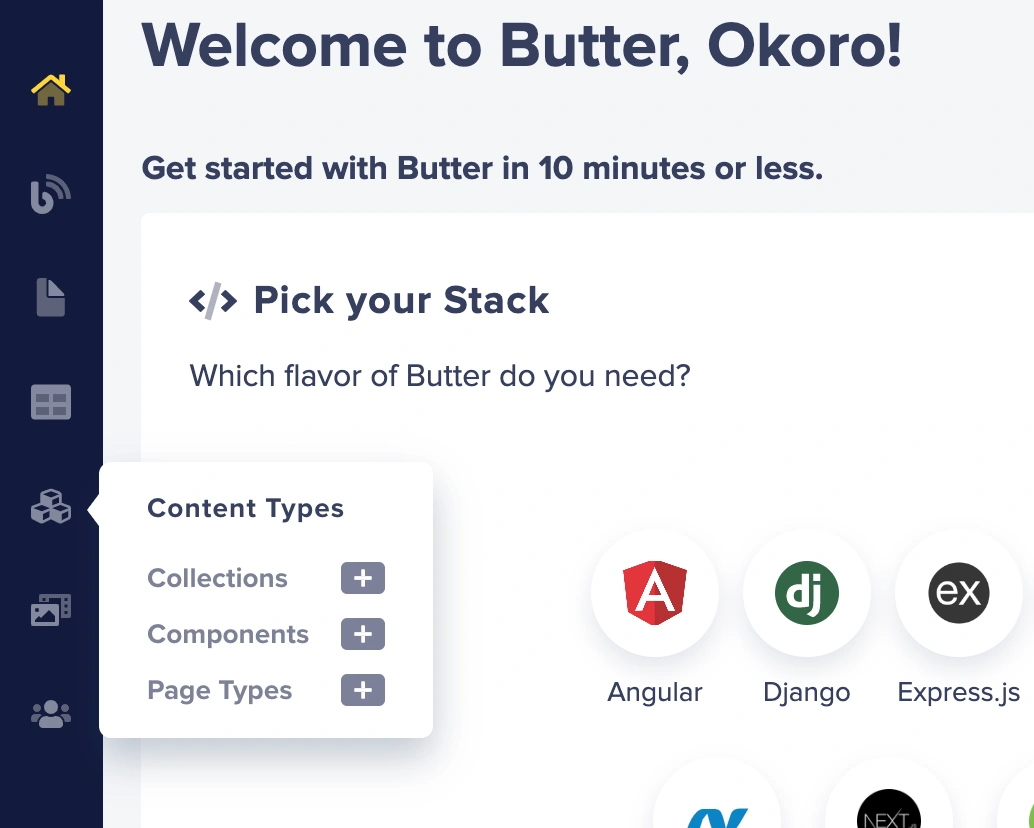
Navigate to your ButterCMS dashboard, click on the Content Types tab, and then go to Page Types, as shown in the image below:
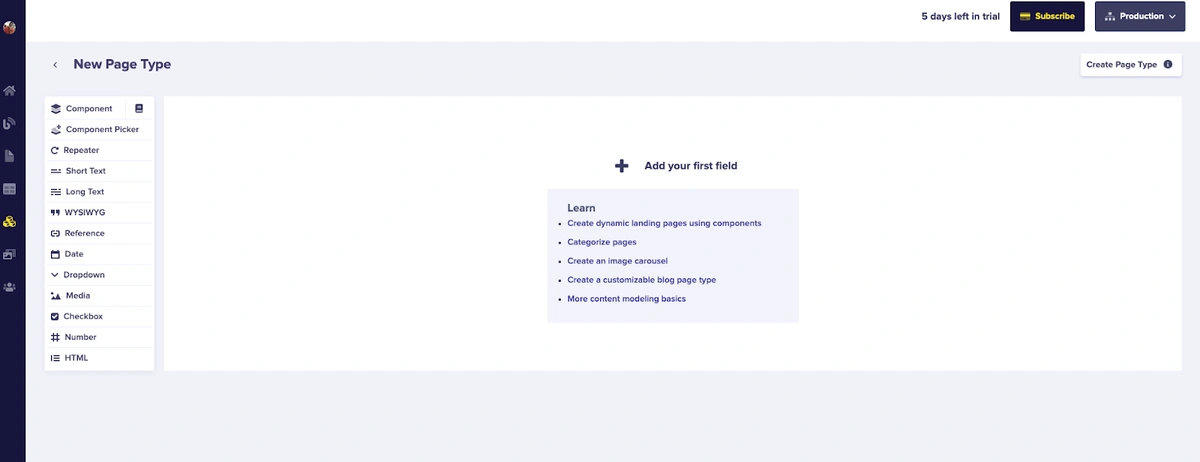
You will be directed to a page that looks like the image below, which is where we will be configuring our page type:
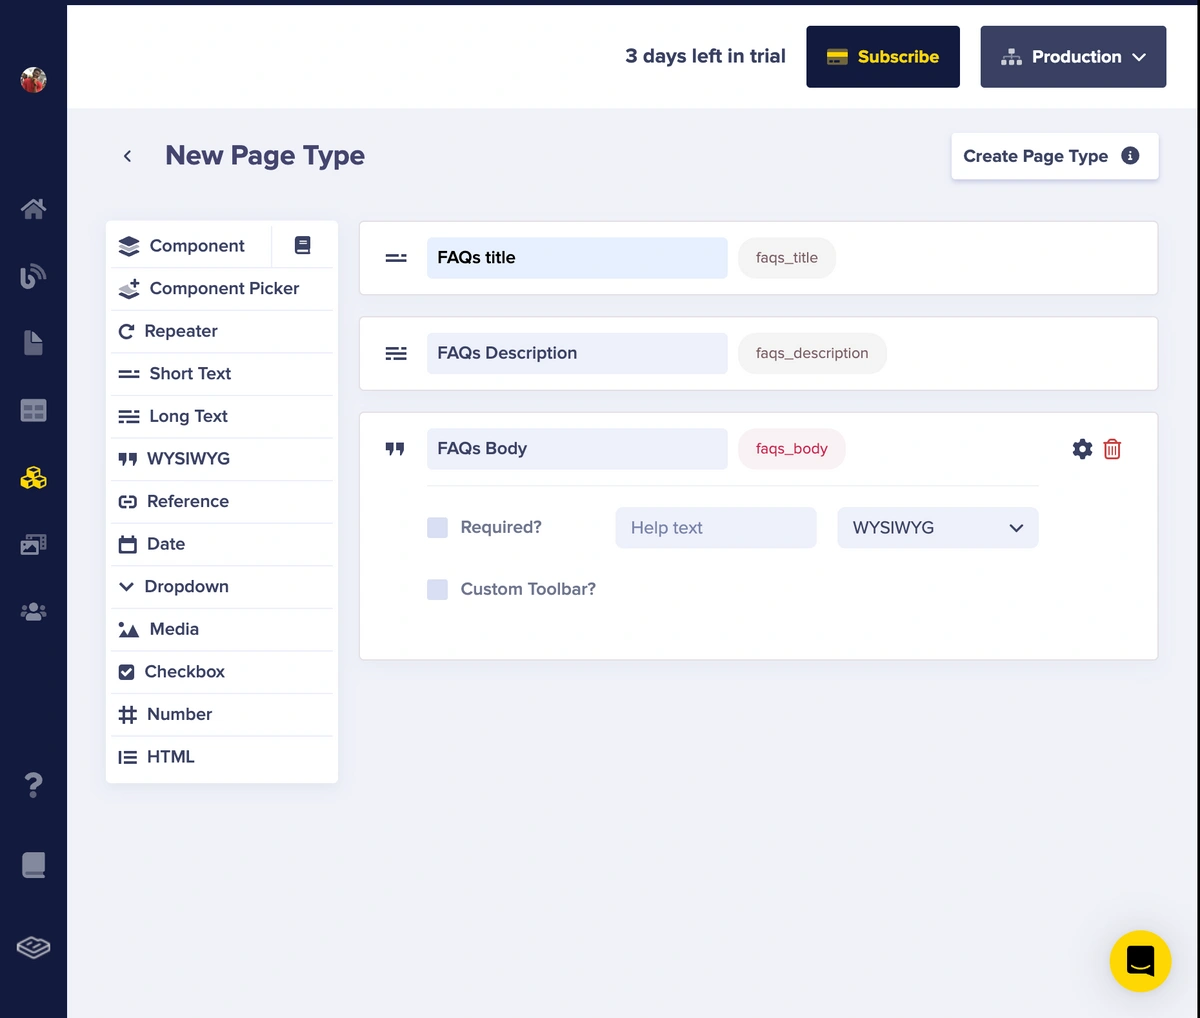
Choose the following fields for the new page type:
-
A short text for the knowledge base article name, naming it “FAQs title”
-
A long text for the knowledge base article description, naming it “FAQs description”
-
A WYSIWYG (What You See Is What You Get) editor for the article body, naming it “FAQs body”
Save the created page type with a name of your choice as shown in the image below. I saved mine as “Vue knowledge base”:

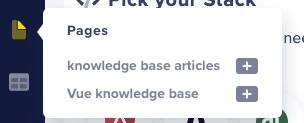
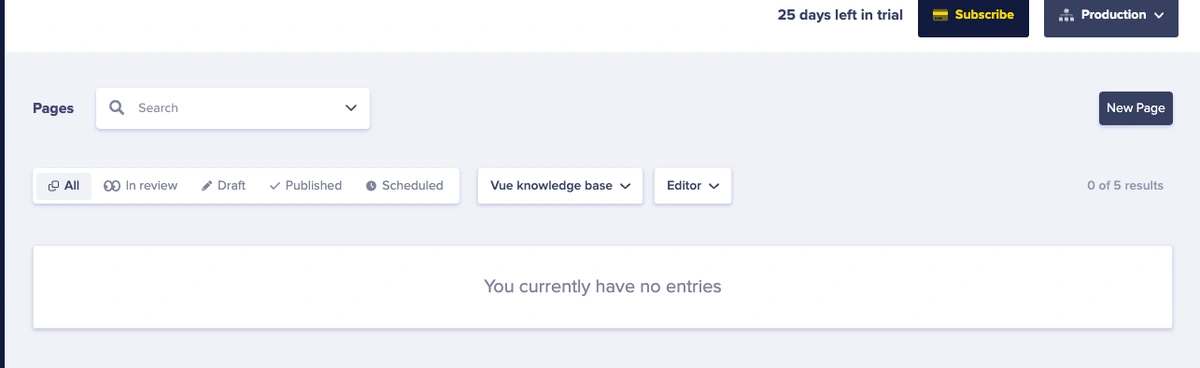
In the Pages tab, navigate to the created page, which in our case is the Vue knowledge base pages, as shown in the image below:
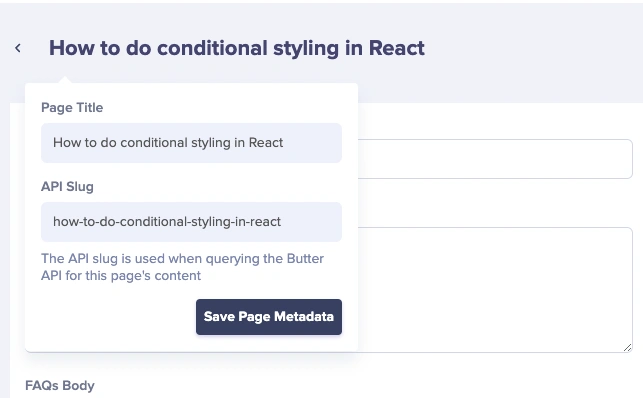
The next step is to click on the New Page button shown in the image below. Then, we get directed to a page where we can create a new page using the page type which we created earlier.
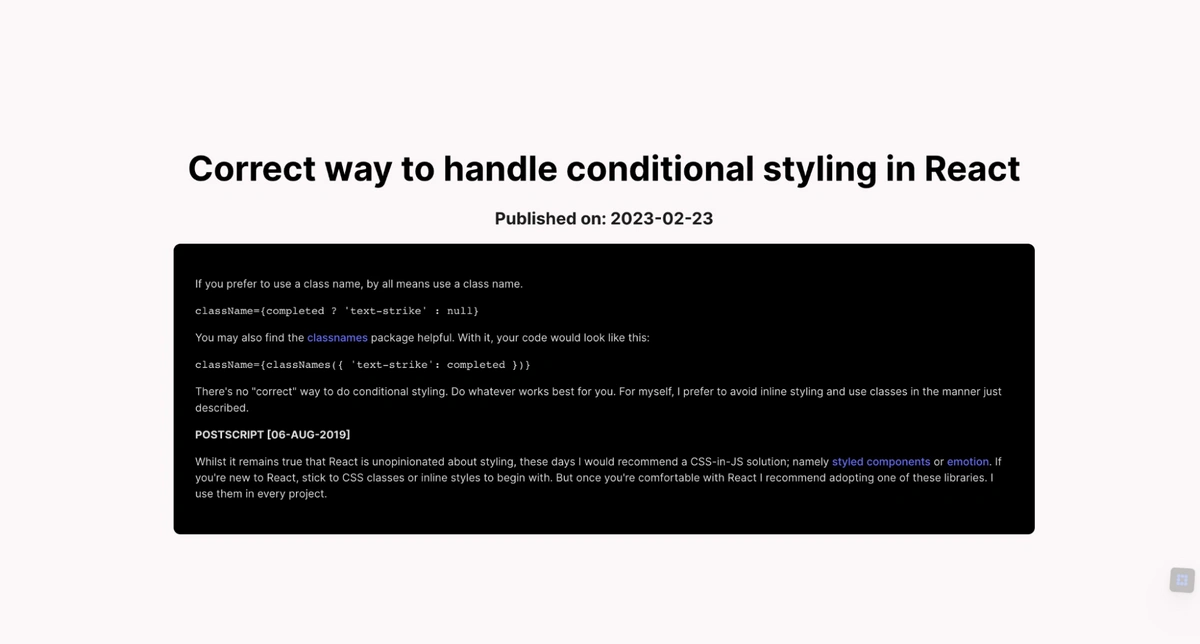
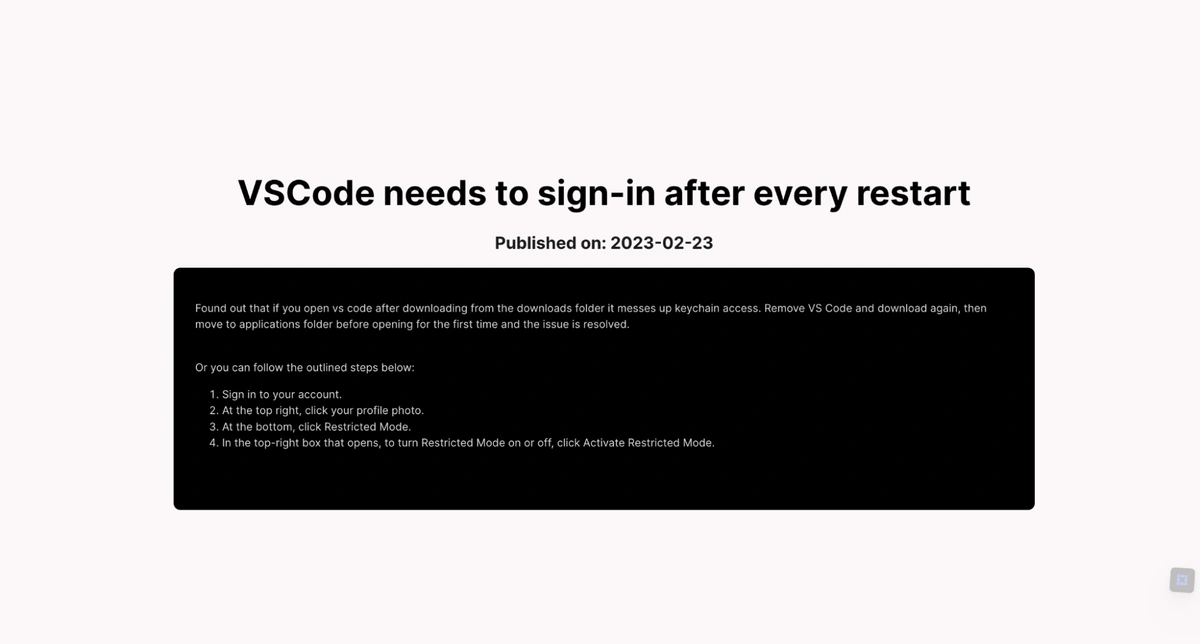
Save your page with a name of your choice when prompted as shown in the image below. I’ll be saving mine as “How to do conditional styling in React” and the API slug automatically created by NutterCMS for us will be useful in routing to this page in the frontend of our application
After saving the page metadata, we can then go ahead and populate the various sections with your data. For this tutorial, I’ll be using my favorite questions on Stack Overflow to populate the fields as shown below:
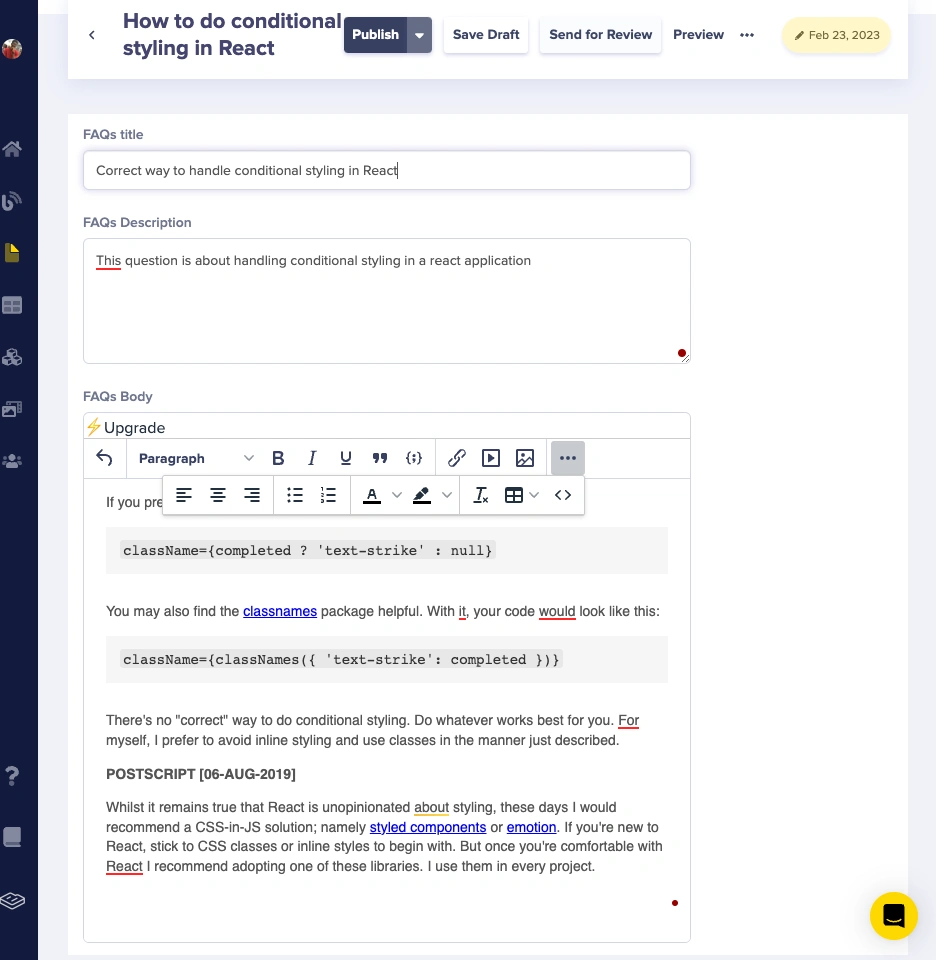
Do this for any number of questions that you want to answer and then click on the Publish button. With that, we are done setting up ButterCMS.
Building the FAQs frontend
This section will cover how to pull our data from ButterCMS and render it on our application’s frontend. Let's get started by importing the vue-router into the root of our application so that we can use it. We can do this in the src/main.js file:
//src/main.js

import { createApp } from 'vue';
import './style.css';
import App from './App.vue';
import router from './router';

createApp(App).use(router).mount('#app');
The next step is to create routes for our application. Create a router folder inside the src folder. Create an index.js file in the router folder and paste the code below into it:
//src/router/index.js
import { createRouter, createWebHistory } from 'vue-router';
import Home from '../components/HomeHome.vue';
import Details from '../components/Details.vue';
const routes = [
  {
    path: '/',
    name: 'Home',
    component: Home,
  },
  {
    path: '/details',
    name: 'Details',
    component: Details,
    props: true,
  },
];
const router = createRouter({
  history: createWebHistory(),
  routes,
  mode: 'abstract',
});

export default router;
In the code block above, we are importing the components that we want to route to, creating the routes, and then exporting the routes. The next step is to create the components which we are importing.
Create two files in the components folder: Home.vue and Details.vue.
In Home.vue, paste the code below into it:
<script>
import Butter from 'buttercms';

export default {
 data() {
   return {
     search: '',
     body: [],
   };
 },
 methods: {
   shareData(post) {
     this.$router.push({
       name: 'Details',
       query: { post: JSON.stringify(post) },
     });
   },
 },
 mounted() {
   const butter = Butter('YOUR API KEY');
   butter.page
     .list('vue_knowledge_base')
     .then((response) => {
       this.body = response.data.data;
       console.log(this.body);
     })
     .catch((resp) => {
       console.log(resp);
     });
 },
 computed: {
   filteredList() {
     return this.body.filter((post) => {
       return post.fields.faqs_title
         .toLowerCase()
         .includes(this.search.toLowerCase());
     });
   },
 },
};
</script>


<template>
 <div id="app">
   <h1 class="title">FAQs with ButterCMS</h1>

   <div class="search-wrapper">
     <input type="text" v-model="search" placeholder="Search here.." />
     <label>Search Question</label>
   </div>

   <h3 class="red" v-if="filteredList.length < 1">No Articles found for this search!!!!!</h3>

   <div class="card" v-for="post in filteredList">
     <div class="wrapper" @click="shareData(post.slug)">
       <div class="timeDiv">
         <span class="green">{{ post.updated.slice(0, 10) }}</span>
       </div>
       <h2>{{ post.fields.faqs_title }}</h2>
       <h4 class="desc">{{ post.fields.faqs_description }}</h4>

     </div>
   </div>
 </div>
</template>

<style lang="scss" scoped>
html,
body {
 display: flex;
 align-items: center;
 justify-content: center;
 flex-direction: column;
 margin-top: 16px;
 margin-bottom: 16px;
 overflow-x: hidden;
}

.desc {
 color: rgb(182, 182, 182);
}

.red {
 color: rgb(145, 29, 29);
 font-size: 2em;
}

div#app {
 display: flex;
 align-items: center;
 justify-content: center;
 flex-direction: column;

 .search-wrapper {
   position: relative;

   label {
     position: absolute;
     font-size: 18px;
     color: rgba(0, 0, 0, 0.5);
     top: 8px;
     left: 2px;
     z-index: -1;
     transition: 0.15s all ease-in-out;
   }


   input {
     padding: 20px 12px;
     margin-bottom: 30px;
     width: 600px;
     color: rgba(0, 0, 0, 0.7);
     border: 1px solid rgba(0, 0, 0, 0.12);
     border-radius: 20px;
     transition: 0.15s all ease-in-out;
     background: white;
     font-size: 18px;

     &:focus {
       outline: none;
       transform: scale(1.5);

       &+label {
         font-size: 18px;
         font-weight: bold;
         transform: translateY(-55px) translateX(-122px);
       }
     }

     &::-webkit-input-placeholder {
       font-size: 18px;
       color: rgba(0, 0, 0, 0.5);
       font-weight: 100;
     }
   }
 }

 .title {
   color: black;
   padding-bottom: 30px;
 }

 .wrapper {
   display: flex;
   flex-direction: column;
   flex-wrap: wrap;
   padding-top: 12px;
   text-align: start;
 }

 .card {
   background-color: black;
   border-radius: 10px;
   padding: 60px;
   box-shadow: rgba(0, 0, 0, 0.117647) 0px 4px 10px,
     rgba(0, 0, 0, 0.117647) 0px 1px 4px;
   width: 800px;
   margin: 20px;
   transition: 0.15s all ease-in-out;

   &:hover {
     transform: scale(1.1);
   }

   a {
     text-decoration: none;
     padding: 12px;
     color: #03a9f4;
     font-size: 24px;
     display: flex;
     flex-direction: column;
     align-items: center;

     img {
       height: 100px;
     }

     small {
       font-size: 10px;
       padding: 4px;
     }
   }
 }

 .timeDiv {
   display: flex;

   align-self: end;
 }

 .hotpink {
   background: hotpink;
 }

 .green {
   padding: 0 7px;
   text-align: center;
   border-radius: 10px;
   background: green;
   font-weight: bold;
 }

 .box {
   width: 100px;
   height: 100px;
   border: 1px solid rgba(0, 0, 0, 0.12);
 }
}
</style>
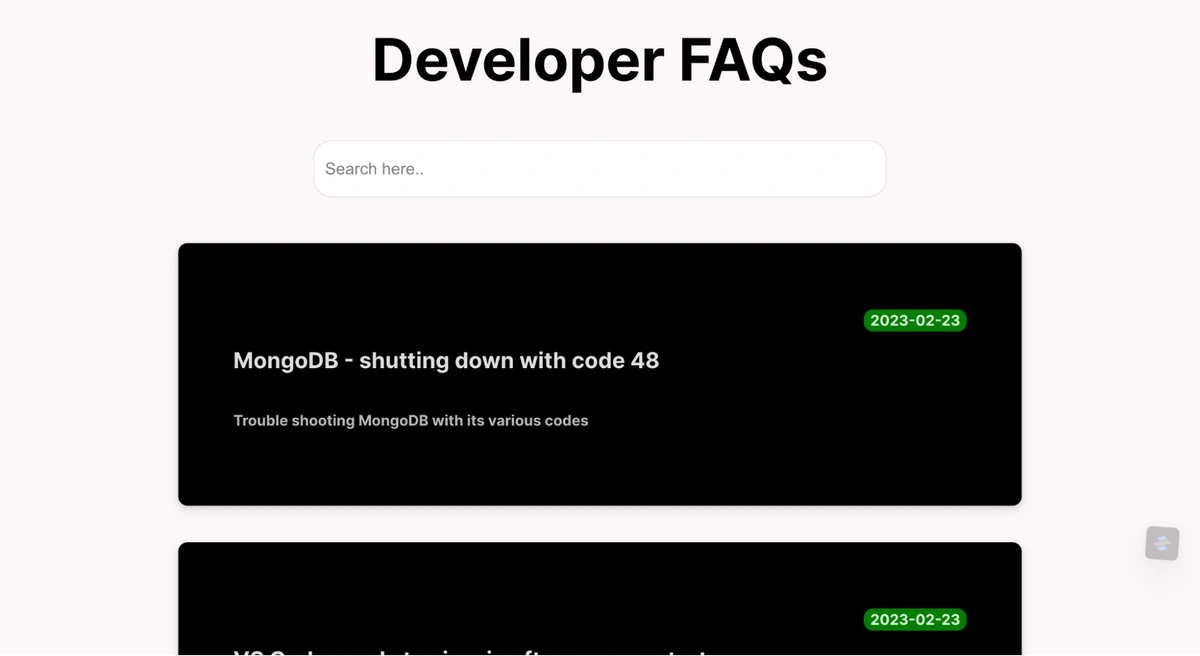
In the code above, we created our application’s state and then the methods which we will call for routing and when our application mounts. When the application mounts, we update our application’s state with the results of the query to ButterCMS. The next step is to now pass the results into the application. When we save and navigate to the browser, we should see what looks like the image below:
Showing the individual pages
Navigate to the Details.vue page and paste the code below into it:
<template>
 <h1 class="title">{{ value.fields.faqs_title
 }}</h1>
 <h3 class="date">Uploaded on: {{ value.updated.slice(0, 10) }}</h3>
 <div class="card">
   <div class="wrapper">
     <p v-html="value.fields.faqs_body

     "></p>
   </div>
 </div>
</template>

<script>
import Butter from 'buttercms';
export default {
 data() {
   return {
     value: null,
   };
 },

 created() {
   const resp = this.$route.query.post;
   const butter = Butter('YOUR API KEY');
   butter.page
     .retrieve('*', JSON.parse(resp))
     .then((response) => {
       this.value = response.data.data;
       console.log(this.value);
     })
     .catch((resp) => {
       console.log(resp);
     });
 },
};
</script>

<style scoped>
.card {
 background-color: black;
 border-radius: 10px;
}

.title {
 color: #000;
}

.date {
 color: rgb(30, 29, 29);
 font-size: 25px;}
</style>
In the code block above, we are getting our details from the home page and then rendering it. We created our state which is null and then we update it and then pass it to the components. With that done, we should get the images below when we click on each of the posts:
Implementing search functionality
Let’s enable search functionality in our application to enable users to filter which question they would like to see the answer to.
In the Home.vue file, paste the code below into the scripts tags:
<script>
import Butter from 'buttercms';
export default {
  //Creating application's state
  data() {
    return {
      search: '',
      content: [],
      title: '',
    };
  },
  //Creating application's method for routing
  //Creating application's lifecycle hook for when the app mounts

  //Search functionality
  computed: {
    filteredList() {
      return this.content.filter((post) => {
        return post.question_asked
          .toLowerCase()
          .includes(this.search.toLowerCase());
      });
    },
  },
};
</script>
We created a method for searching through our content from ButterCMS in the code block above. We will pass that method into the search box as shown below:
 <div class="search-wrapper">
      <input type="text" v-model="search" placeholder="Search here.." />
      <label>Search Question</label>
  </div>
Now, we see that the search box works in our application, as shown when we search for mongo:
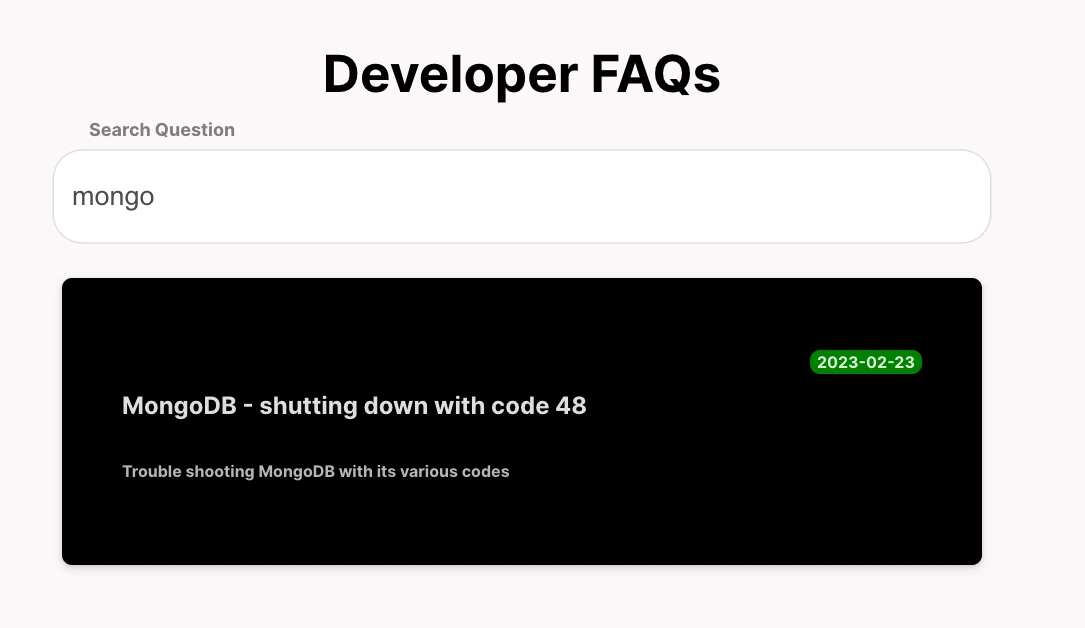
The image above shows the search functionality in our application to be working and it should be the same in your application if you followed the steps laid out in this tutorial.
With that done, you should have a fully functional knowledge base with a home page that shows the articles that have been inputted into your ButterCMS account. Your resulting Vue knowledge base application should look like the images below.
The homepage:
The individual article pages should look like the image below when they are clicked:

Final thoughts
Congratulations on getting to this point in the article and creating a FAQs knowledge base powered with ButterCMS! Building a knowledge base with ButterCMS and Vue is an excellent choice for any organization seeking a user-friendly and customizable knowledge base.
ButterCMS provides an intuitive and flexible content management system that allows you to create and manage your knowledge base content effortlessly. At the same time, Vue offers a powerful and versatile JavaScript framework for building robust user interfaces. Combining these two will tools enables you to create a knowledge base that looks great and provides a seamless and enjoyable user experience.
You can also learn more about how you can use ButterCMS with Vue in the following tutorials:

