

In the first days of the web, all pages were static. This meant that a typical communication between a client and a server happened just once when the user first loaded the page. At that time, all resources were fetched and the content was rendered to the screen. If later the user came back to the same page, as long as the content hadn’t changed, they would get the same result.
As time went on, the need for dynamic content became more apparent. For example, if I were at a news website, I would want to get fresh content. Or maybe if I were following stock market prices, I would want real-time data. Social network feeds could also be a clear use case for dynamic, always-changing content. As you can see, the static approach was doomed.
With dynamic architecture, though, data is pulled routinely. That way, your newsfeed can be regularly updated without the need for requesting new information. Plus, if only part of the content changes, all you need to do is fetch that part, preventing you from having to download all the data again. It’s a huge win.
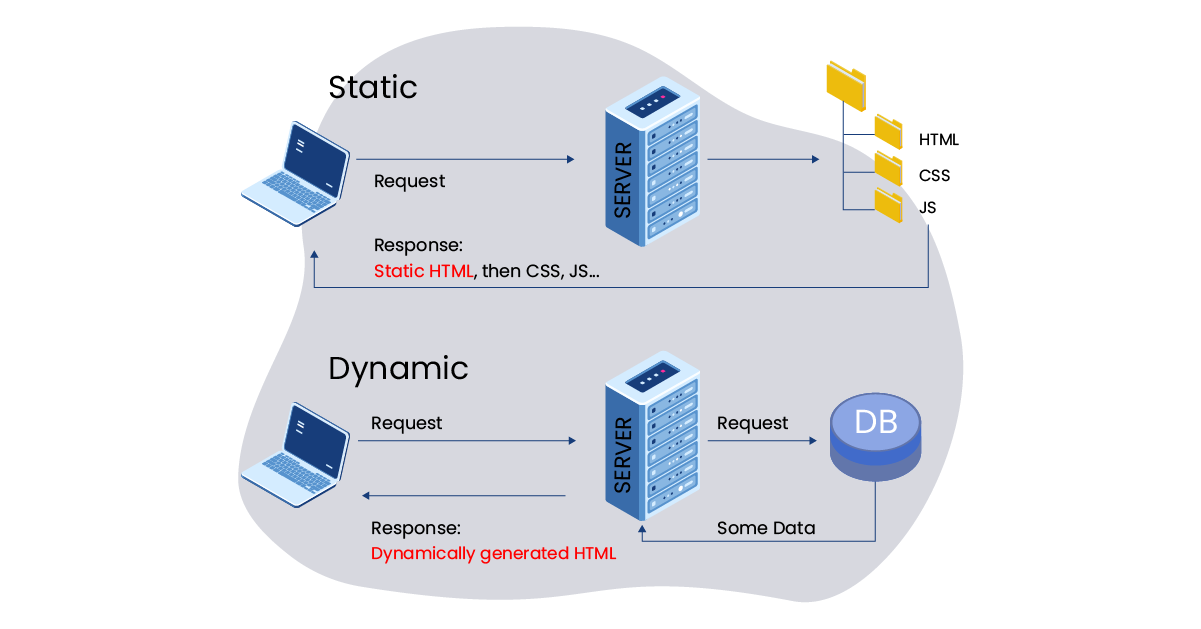
That model enabled the boom of web applications, given that web pages started to get more dynamic, more interactive, more powerful, and faster. Data is being constantly updated based on user actions, and because we are smart enough to pull only the freshest information, performance for complex applications has increased as well.
As good as it sounds, the dynamic model still has its flaws. First, because data is being constantly fetched, the application should be “mounted” on the fly, being loaded in chunks and either rendered asynchronously or after an unnecessarily long wait. Additionally, this wait is bad for SEO since the web crawler has to wait until the data is fetched and the page is mounted to be able to start properly indexing the application (and Google had limitations with that for years).
The static model overcomes these flaws. Because the content is already rendered and stored in the server, you download it only once (when you land on the page) and everything is ready to use. Crawlers are happy too — they can start indexing your page right away, saving your crawl budget. Faster loading times plus no waste of crawl budget equals a higher-ranked SEO page, which in turn means more organic users, less money spent on advertising, more revenue, and so on. In short: static sites are less flexible but more SEO-friendly. The big question then becomes: is it possible to make them more malleable and still retain the SEO benefits?
Table of contents
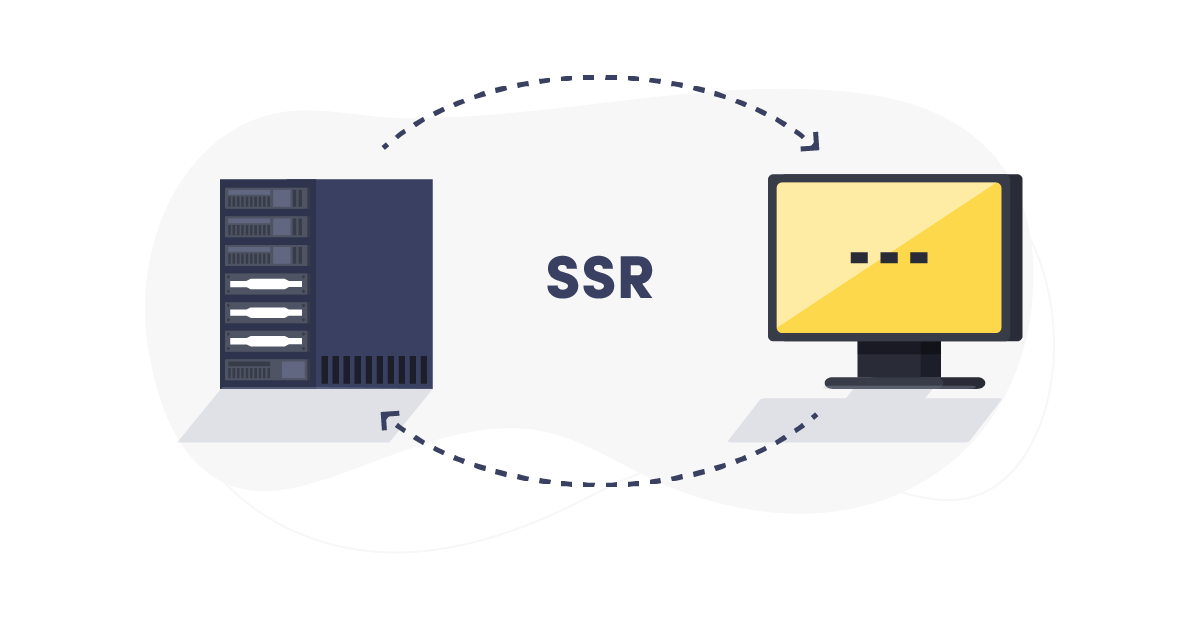
Enter server-side rendered apps
Server-Side Rendering (SSR) applications are, as the name suggests, rendered in the server. How is that different from the traditional static model?
In SSR architecture, the application is regularly built during the build phase. In each build, the freshest data available is gathered, which means that every build has dynamic content. This solves the problem for applications that aren’t time-sensitive. If your app can afford to update data, say, every 30 minutes, then an SSR approach might make sense for you. Every 30 minutes, you download the freshest data available, build (render) your page, and upload (deploy) the content to the server. Your users will then fetch the page as a static resource (like the old days), and the content will be at most 30 minutes delayed.
Or maybe you have a website with content that doesn’t change very often, like a blog, but that you want to rebuild every time it changes (maybe a new edition is made or a new post is added.) In that scenario, you could set a deploy hook that would rebuild and deploy your application as needed.
Now, imagine this blog is really big. For example, it has thousands of entries. If you change page A, you really don’t want to rebuild all the other entries. That can get really problematic at scale. In other words, the desired effect is to rebuild only the content that changed, nothing else. Now how are we able to do that?

Incremental builds
The answer to this question lies in incremental builds. As the name suggests, and our intuition indicates, incremental builds will build only what is necessary (i.e. what has been added or updated.) A full build, on the other hand, rebuilds the whole application at once, notwithstanding the number of pages and the time needed to accomplish this.

In the big blog example, it means that when page A is modified or added, the others won’t be rebuilt. In terms of build time, this is a huge win—the faster your website is rebuilt, the sooner your users will have access to fresh data.
The benefits are not limited to only blog posts but product catalogs, social network profiles, stock market indicators, and basically everything that is bound to be read from a CMS can potentially make the most of incremental builds. In general, if your app relies on data from another source—for example, a CMS editor such as ButterCMS—incremental builds are a really smart choice.
When not to use Incremental Builds
Sometimes it'll be in your best interest to do a full build. For example, if you add a new feature to your application that is visible throughout the app (say, a sidebar), you will want it to be present on every page.
Also, as mentioned before, if your application is sensitive to real-time data then an SSR approach (and, therefore, incremental builds) won’t be adequate.
Gatsby’s approach to incremental builds
When Gatsby launched their cloud service, one of the main benefits was — you guessed it — incremental builds, a long-awaited feature of the community.
As expected, this approach became very popular—to the point that since the launching of Gatsby v3 in March of 2021, incremental builds became available to everyone by default. Now, content creators who are integrating their CMS with Gatsby have this functionality right off the bat, allowing faster build times and better scalability.
Later, we will see how Gatsby’s incremental builds work in practice.
Leveraging incremental builds with ButterCMS
I mentioned before that incremental builds are particularly interesting for content creators. It gets even better for users who use a headless CMS.
A headless CMS is a data source that abstracts away the need to change code when all you want to change is content. Suppose you want to deploy a landing page for a brand new product of yours. Well, you may be working closely with the marketing team, tweaking texts, adding images, changing colors, and so on in a never-ending search for perfection. Now, if you have a team of engineers, it’s arguably not the best use of their time and expertise to tweak pixels on the screen.
A headless CMS is a solution for the aforementioned problem that delegates the creation of the landing page to a dedicated team and, later on, integrates the end result into your app.
ButterCMS is an excellent example of a headless CMS. Butter users can create and edit landing pages in addition to maintaining posts and other content while integrating it easily with several programming languages. One of the most popular is Gatsby, which has a simple plugin to source data directly from ButterCMS in each build.
Now, if you have been following me since the beginning, you know what I’m getting at: Gatsby enables incremental builds when content changes by default (since v3), and also integrates seamlessly with ButterCMS. ButterCMS, in turn, is a headless CMS that empowers content creators. Can we connect them all and testify to the miracle of incremental builds with Gatsby and ButterCMS? Heck, yeah.
In the next section, we will learn how to create a simple Gatsby website which sources data from ButterCMS. We will also deploy this application to Netlify to understand how incremental builds work in practice.
Tutorial: Creating a simple blog using ButterCMS and Gatsby’s incremental builds
Before you begin
There are a couple of things you are going to need in order to follow through with this tutorial. One of them is a ButterCMS account. Go to https://buttercms.com/join and sign up, if you still haven’t. Once you are logged in, click on your account and hit “Settings.” Select the “API Keys” tab and copy what is under “Read API Token,” which we will need to fetch information from Butter. Make sure to store it safely.
Next, make sure you have NodeJS installed. Gatsby’s Docs have a section explaining how to do it for every OS. Also, it’s a good idea to follow through with their tutorial if you are a complete newbie to Gatsby.
Finally, create an account on Netlify. We will host our application there (don’t worry, it’s free!) so we can see in practice how incremental builds work in a production environment. We’ll get to that part later.
What we're building
To showcase how incremental builds work, we are going to build an application that pulls posts from ButterCMS. We will render this content to our site and watch how builds react as content changes.
Step 1: Creating a Gatsby app
The first thing to do is to create the Gatsby application. Follow their quick start to create an initial boilerplate. Don’t worry about all the customizations; we are not going to need them now. After completing the quick start, make sure you can visit localhost:8000 and see your brand new Gatsby app.
Step 2: Sourcing data from ButterCMS
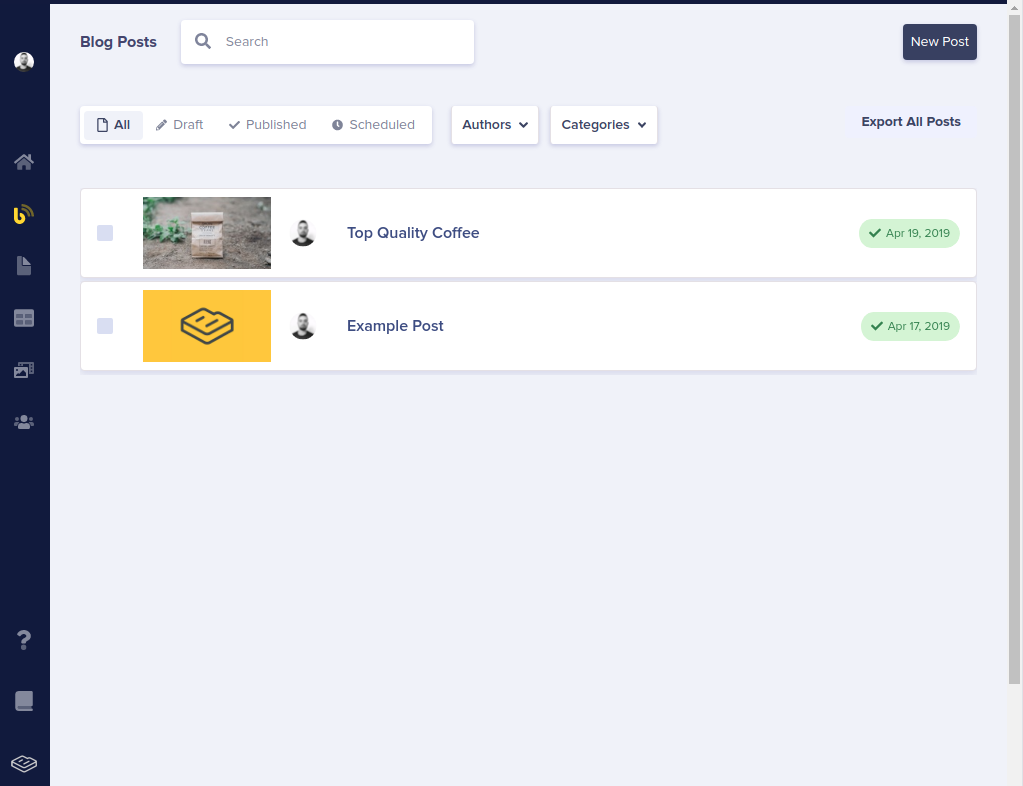
Our app is so far pretty simple. We are going to color it a bit by integrating data with ButterCMS. The first thing you want to do, if you haven’t already, is to add some content in Butter!
In Butter’s admin panel, click on “Blog posts” in the side menu and add a couple of entries. In the end, it should look something like this:
Now that we have actual content in our CMS, we are ready to source it in Gatsby. As mentioned before, Gatsby and Butter have a handy integration plugin called gatsby-source-buttercms. You can follow the official docs from Gatsby for more context.
In your project’s directory, add the plugin:
$ npm install gatsby-source-buttercms
Once the installation is done, open gatsby-config.js and add the following to the plugins array:
...
{
      resolve: `gatsby-source-buttercms`,
      options: {
        authToken: YOUR_TOKEN
      },
    },
}
…
Replacing YOUR_TOKEN with the token you grabbed from Butter’s panel before. If everything is correct, start the Gatsby server again and go to http://localhost:8000/___graphql where you should be able to see this:
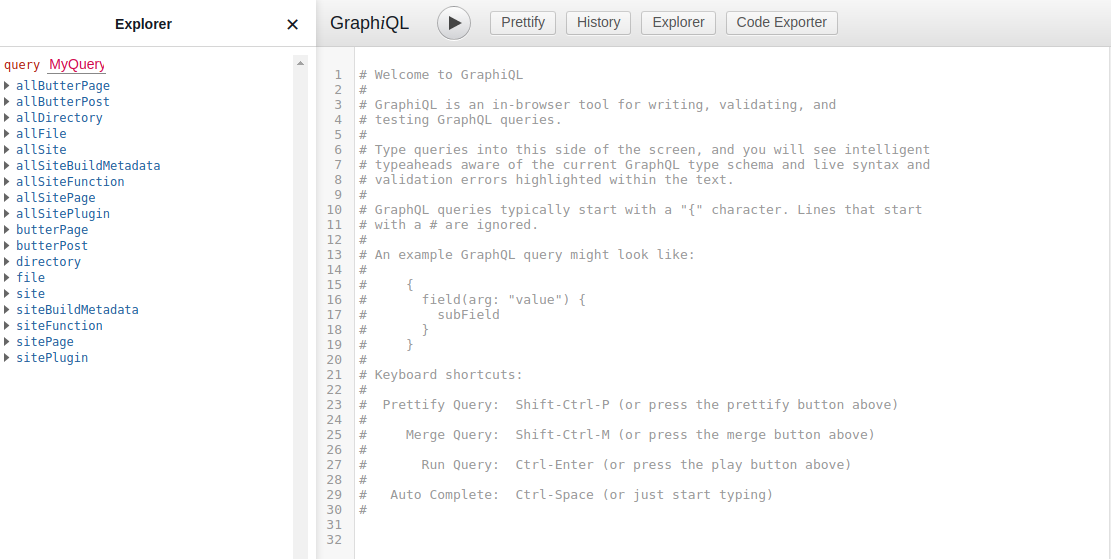
Note how there are Butter nodes in the Explorer! You can easily test that the data is available by writing the following query to the interface:
query MyQuery {
  allButterPost {
    nodes {
      title
      author {
        first_name
        last_name
      }
    }
  }
}
Now you should see the title of your posts and the author’s name in the right-side panel. Nice job! Gatsby and ButterCMS are now hooked up!
Step 3: Rendering data in Gatsby
Now, our app is sourcing data from Butter, but we are still not seeing it. Thankfully, this is the easy part!
For our proof-of-concept, we are going to create three pages:
- A home page, which will have no information from Butter;
- A blog index, which will render the title of all posts and link to them;
- A post template, which will be used to dynamically render every post added in Butter.
Our goal, when debugging incremental builds, will be to assert the following:
- A code change triggers a rebuild for all pages;
- A content change triggers a rebuild only for the pages that contain that content (the blog index and the corresponding post):
- As a corollary, if I change post A, then the home page and post B shouldn’t be rebuilt.
Create the blog index component:
import React from "react";
import Layout from "../components/layout";
import { useStaticQuery, graphql, Link } from "gatsby";
import { content } from "./blog.module.css";

const Blog = () => {
  const {
    allButterPost: { nodes: posts },
  } = useStaticQuery(graphql`
    query MyQuery {
      allButterPost {
        nodes {
          title
          slug
        }
      }
    }
  `);

  return (
    <Layout>
      <div>
        <h1>My Blog</h1>
        <ul className={content}>
          {posts.map((post) => (
            <li key={post.slug}>
              <Link to={`/blog/${post.slug}`}>{post.title}</Link>
            </li>
          ))}
        </ul>
      </div>
    </Layout>
  );
};

export default Blog;
And the post template:
import React from "react";
import { Link, graphql } from "gatsby";
import Layout from "./layout";
import { container, back, body } from "./post.module.css";

const PostTemplate = ({ data }) => {
  return (
    <Layout>
      <div className={container}>
        <Link className={back} to="/blog">
          ⇦ Go back
        </Link>
        <h1>{data.butterPost.title}</h1>
        <div
          className={body}
          dangerouslySetInnerHTML={{ __html: data.butterPost.body }}
        />
      </div>
    </Layout>
  );
};

export const query = graphql`
  query ($slug: String!) {
    butterPost(slug: { eq: $slug }) {
      title
      body
    }
  }
`;

export default PostTemplate;
For the sake of simplicity, I’m not going into Gatsby’s details in this tutorial, but you have access to the full code at https://github.com/ButterCMS/gatsby-incremental-builds. A live example can be found at https://incremental-builds.netlify.app/.
If you follow through the repository (or clone it and switch the authToken with your own), you will see something like this:
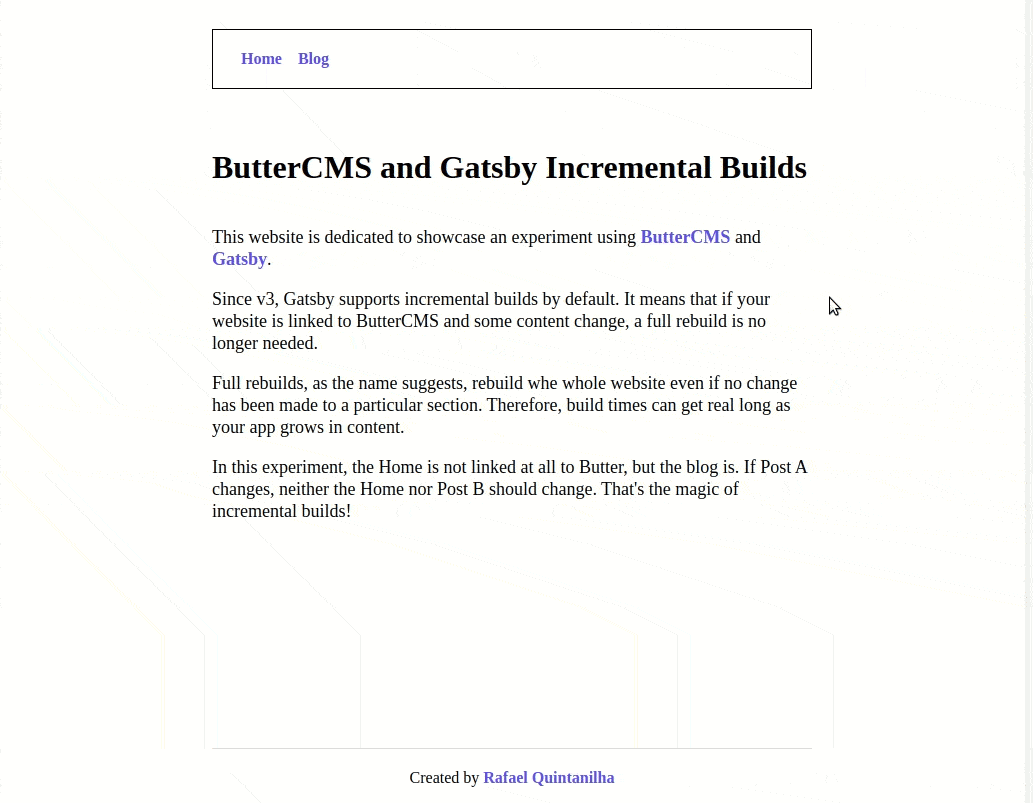
See how the content of the post you added in ButterCMS is correctly rendered in your app? Congratulations, you have successfully combined Butter and Gatsby!
Step 4: Deploying to Netlify
Now that our app is complete, it’s time to make it available to the world. Log in to Netlify and click on “New site from git.”
Note: It’s a good time to create a repository for your own app. I recommend GitHub. Follow the instructions on their website to store your code in the cloud and get Git benefits.
Warning: do not commit your ButterCMS token to any Git provider. When using Netlify, Netlify environment variables are preferred instead.
When creating your new site, make sure to replace the Build command with:
gatsby build --verbose --log-pages
This will be necessary to gather more information about built pages. Gatsby Docs have a dedicated page on how to debug incremental builds.
If all is good, you should be able to start a deploy for your app and see something like this in the logs:
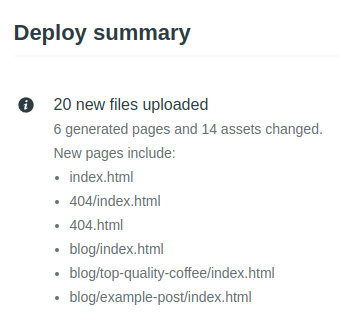
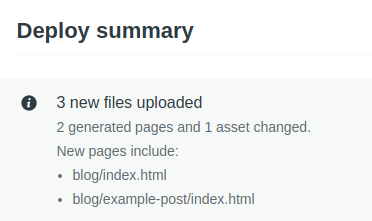
Note how Netlify discerns all pages and assets built during that phase. If you scroll down the logs, you will be able to see more detailed information on the number of pages updated and how long it took for Gatsby to build them.
Step 5: Hooking Netlify deploys to content changes
The penultimate step remaining in your build puzzle is to “hook” every change in Butter’s content to a new deploy in Netlify. This way, every time a post is either published or updated in the Butter interface, we trigger a new build in Netlify. This build will generate new static assets (only if the content has changed) and then deploy them to the server. New visitors will be served with the updated content as soon as the deploy is complete.
In Netlify, go to “Site settings” and then “Build & deploy.” Scroll down to “Build hooks” and click on “Add build hook”. Give it a descriptive name and, in the end, you should see something like this:
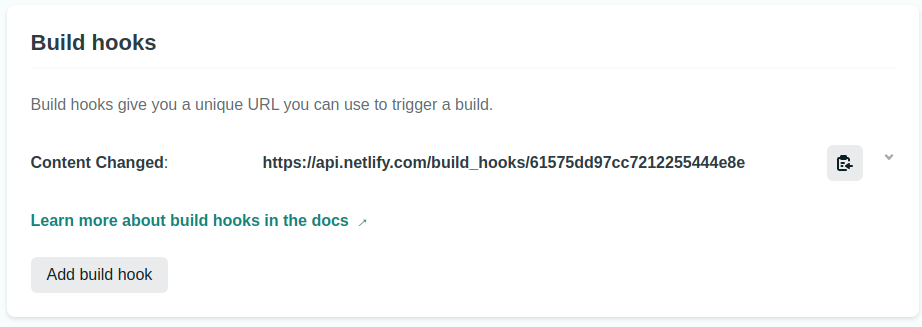
Copy the URL (the “hook”) and head to Butter’s panel. Go back to “Settings” again and, in the “Webhooks” tab, add the copied URL as the Target URL. Leave “Header” blank and select post.published - blog post is published in the Event field. Hit “Save” and we are done! Now, every time any post is published, a new build will be triggered.
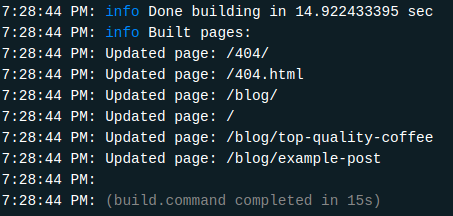
In order to test that, go to your Blog posts and change something in one of the posts. Note that Netlify will automatically start a new build and that by the end of it only the affected pages (the post itself and the index with all posts) will be rebuilt!
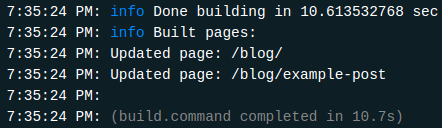
Note how this build was faster (10s now vs 15s before). Now, imagine the difference if you had hundreds or thousands of pages of static content!
Note: Due to cache reasons it might be that the incremental builds kick in only after you have rebuilt your site at least once.
As a final test, change something in your Gatsby code and push it to your Git provider. As expected, all pages will be rebuilt, as mentioned in Gatsby’s Docs as expected behavior. In short: incremental builds will be applied whenever content changes, but full builds are expected when your code changes.
Step 6: Previewing draft content before publishing
There is one last enhancement that can be done in order to streamline our process even more. In the previous step, we set up a webhook that rebuilds the website when a new post is published or updated. That’s really great, but in a working environment, the experience would be subpar. Oftentimes, content creators will want to double-check and preview their work before publishing it to a production environment.
Luckily, there’s a way to circumvent this limitation with ButterCMS! All we need to do is to set up a proper staging environment. I will walk you through how to do it in Netlify in a moment, but before that, create a staging branch in your repo:
$ git checkout -b staging
Now that you are in a different branch, the only code change needed is to tell gatsby-source-buttercms that you also want to source data in a draft state. Go to gatsby-config.js again and add the following line:
...
{
      resolve: `gatsby-source-buttercms`,
      options: {
        authToken: YOUR_TOKEN,
        preview: 1
      },
    },
}
…
Surprisingly, that’s all you need code-wise! As a side note, you could try to use environment variables to spawn multiple environments based on the same code.
Let us now set up the staging environment. Hop back to Netlify and create a new site. Again, we are taking the simpler step here. If you have a custom domain registered with Netlify, you can leverage branch subdomains instead of setting up a new site.
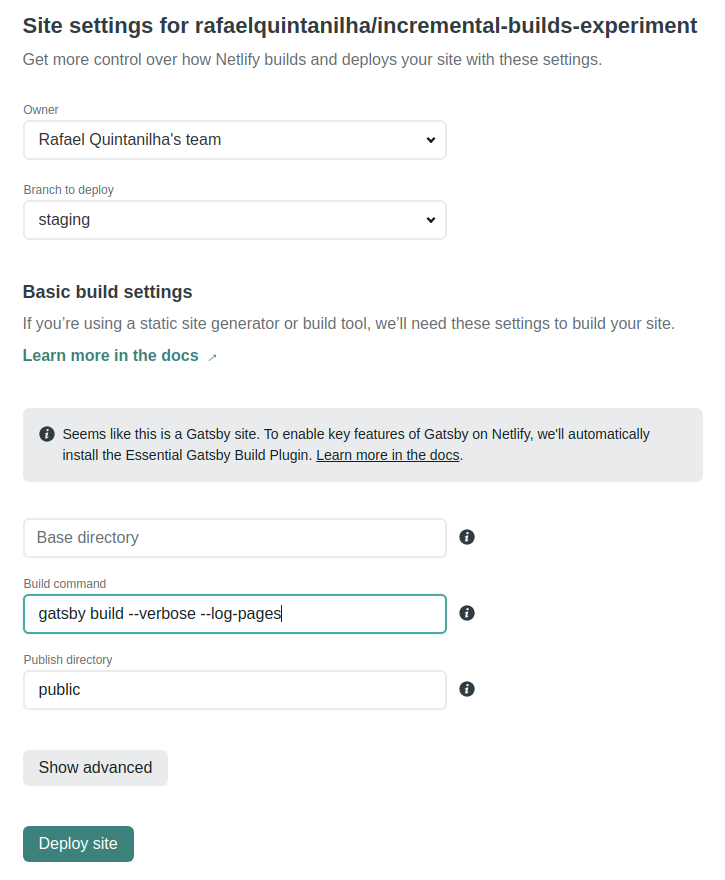
Repeat the procedure done in Step 4, only this time selecting staging as the “Branch to deploy.” Your configuration should look similar to this:
Proceed to deploy and don’t forget to add your ButterCMS API key as an environment variable to the site recently created.
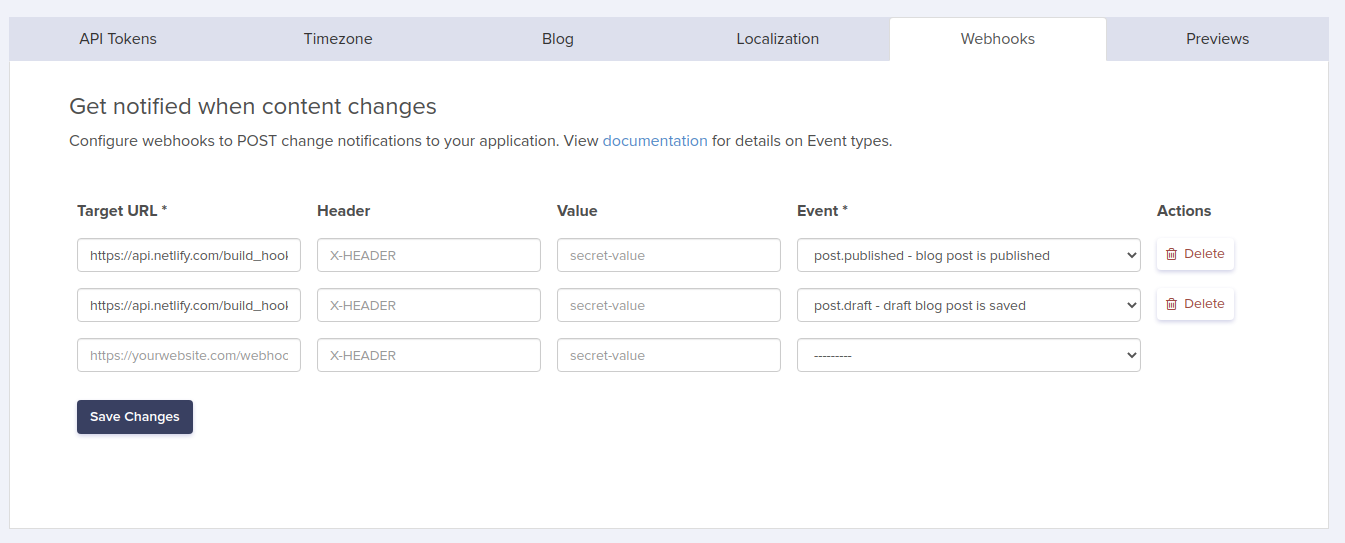
Next, repeat Step 5 and create a new webhook both in Netlify and ButterCMS. Make sure to add the URL generated by Netlify as the Target URL in Butter’s Webhooks tab and, this time, select post.draft - draft post is saved in the Event field. Your Butter’s webhooks should look like this:
As is, our app already has a working preview environment: every time a new draft post is created or saved, a webhook will be triggered to rebuild our staging site in Netlify. This way, content creators can iterate and observe how it looks on the real page before actually publishing to the production site.
The only caveat is that previewing happens outside Butter — well, not anymore! The last step in this tutorial is to set up Previews in Butter’s settings, which means that ButterCMS will become the one-stop shop for your content creators.
Click on the “Previews” tab and add the template URL to the Blog Posts field. In our case, it will look like: https://your-staging-site-url.netlify.app/blog/<slug>. The green part is what we defined in gatsby-node.js, only now using <slug> as the slug placeholder.
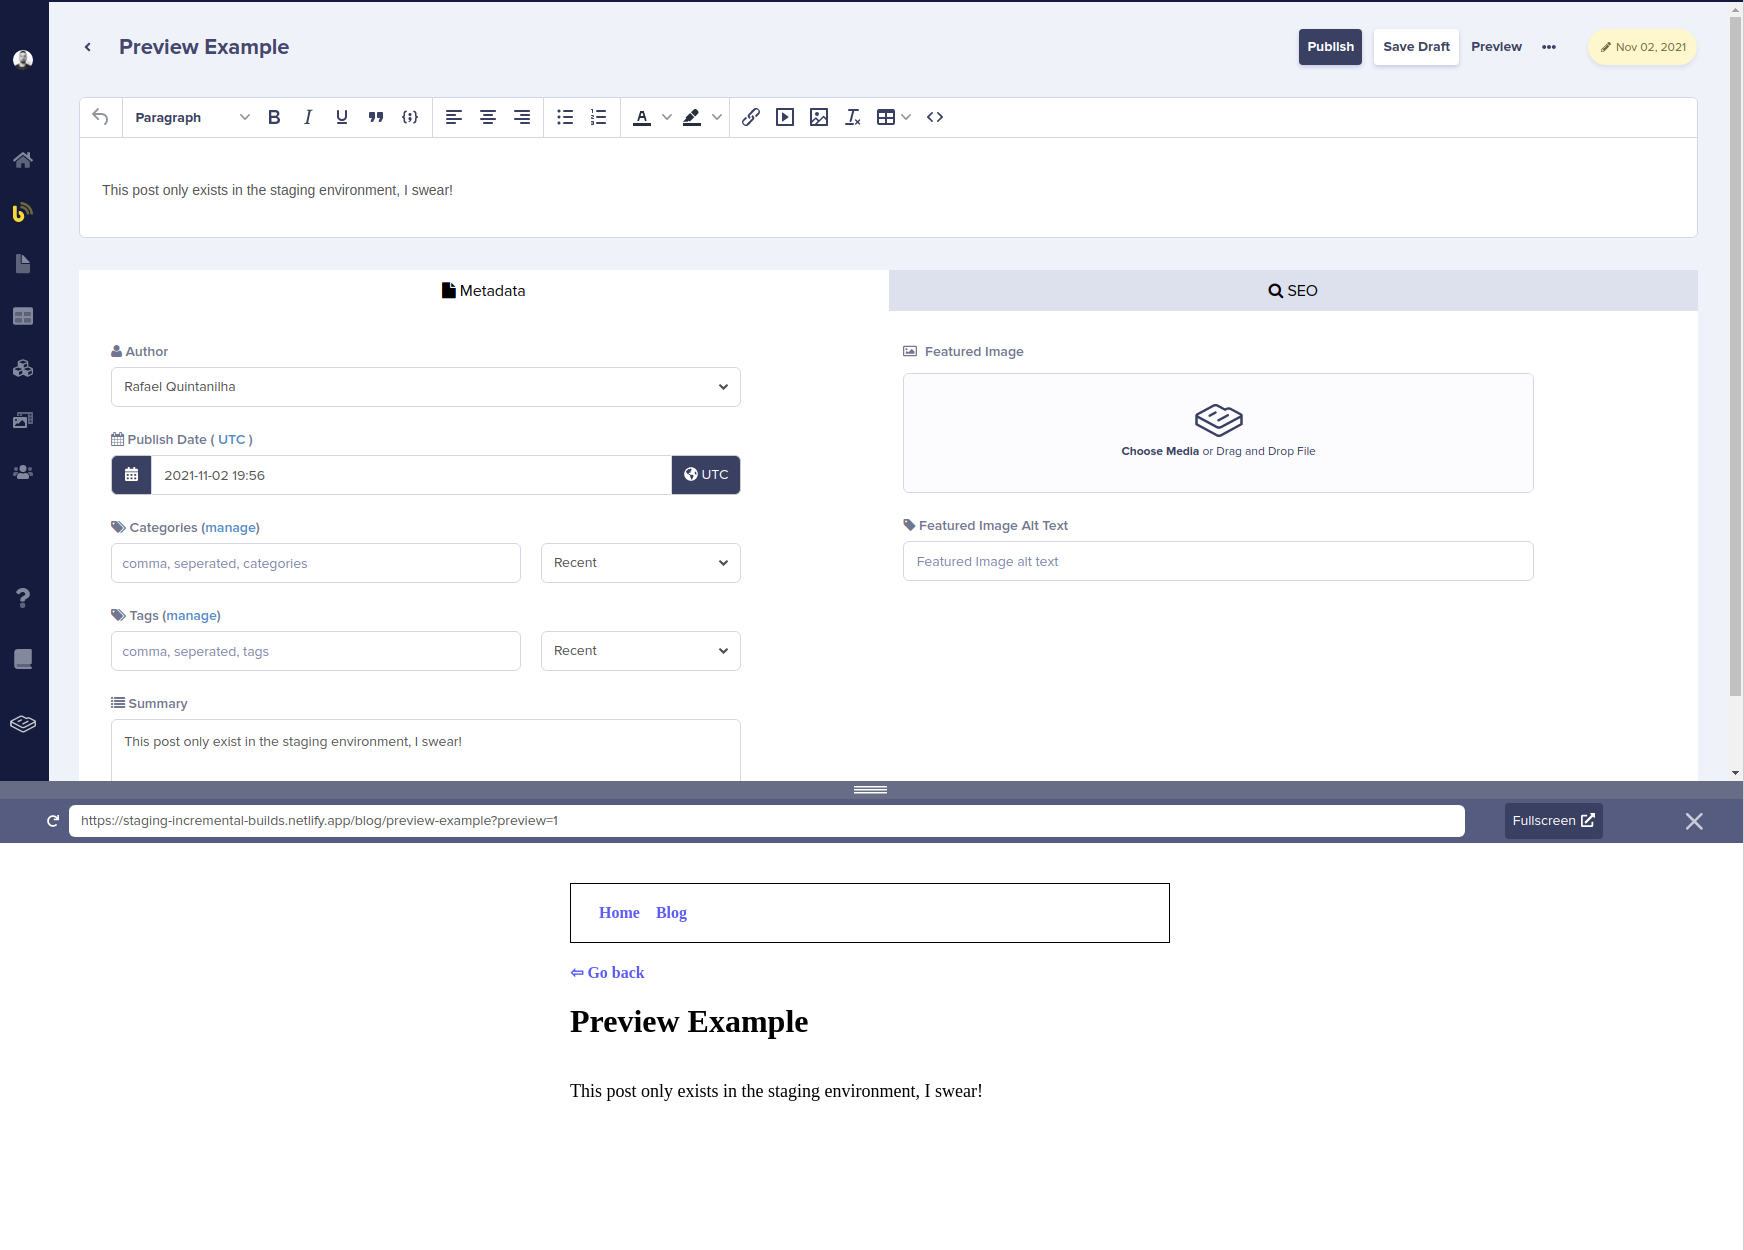
And that’s it! All technical details are done. Try your setup by creating a new post, but instead of clicking on “Publish,” select “Save draft.” Check that only your staging site was rebuilt, while the production site remained unchanged. Compare how the blog index is different in the staging and live production environments.
Note that you can keep editing your content in Butter and, whenever “Save draft” is clicked, a new rebuild will be triggered. Click on the “Preview” button while editing to see your changes right inside Butter’s panel! Hopefully, once we are leveraging incremental builds, the rebuild will be really fast and the new content will be readily available.
Conclusion
Today, we learned the motivation behind incremental builds and the problems they are trying to solve. We gathered all information in a tutorial hooking up ButterCMS and Gatsby, which has incremental builds enabled for free by default since its v3.
Incremental builds are and will no doubt continue to be beneficial for content creators, especially the ones leveraging a Gatsby-compatible headless CMS such as ButterCMS. By significantly decreasing build times, your website will be able to scale properly as new content is added for the enjoyment of your audience.

